Sensors TOYOTA RAV4 HYBRID 2020 Owners Manual (in English)
[x] Cancel search | Manufacturer: TOYOTA, Model Year: 2020, Model line: RAV4 HYBRID, Model: TOYOTA RAV4 HYBRID 2020Pages: 748, PDF Size: 30.6 MB
Page 36 of 748
361-1. For safe use
SRS curtain shield airbags
• Can help protect primarily the head of occupants in the outer seats
• Can help prevent the occupants from being thrown from the vehi cle in the
event of vehicle rollover
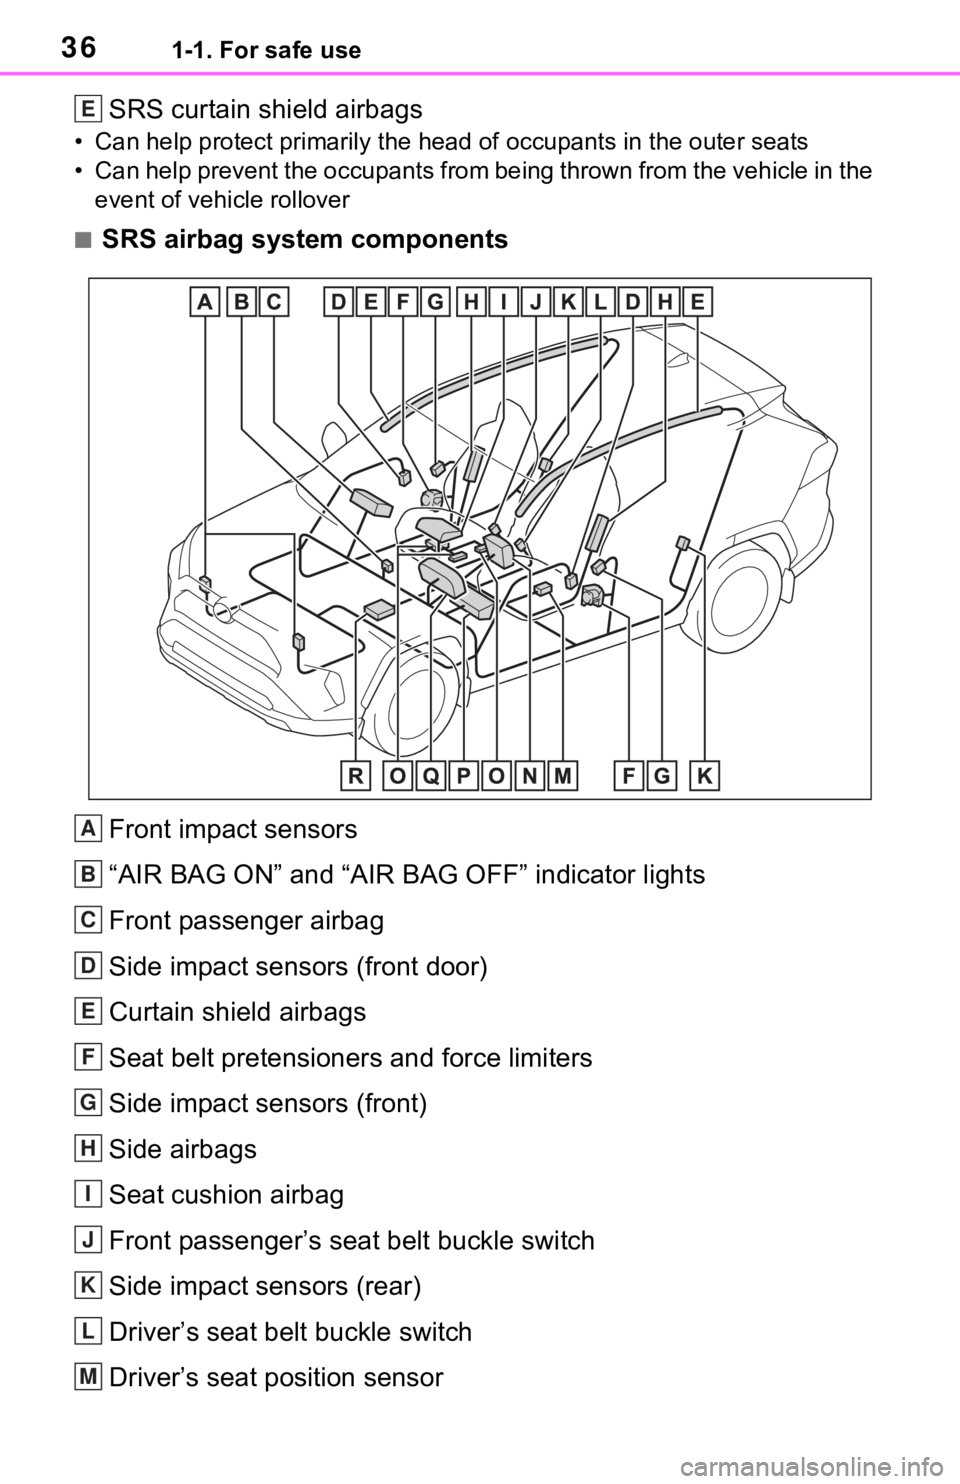
■SRS airbag system components
Front impact sensors
“AIR BAG ON” and “AIR BAG OFF” indicator lights
Front passenger airbag
Side impact sensors (front door)
Curtain shield airbags
Seat belt pretensioners and force limiters
Side impact sensors (front)
Side airbags
Seat cushion airbag
Front passenger’s seat belt buckle switch
Side impact sensors (rear)
Driver’s seat bel t buckle switch
Driver’s seat position sensor
E
A
B
C
D
E
F
G
H
I
J
K
L
M
Page 37 of 748
371-1. For safe use
1
For safety and security
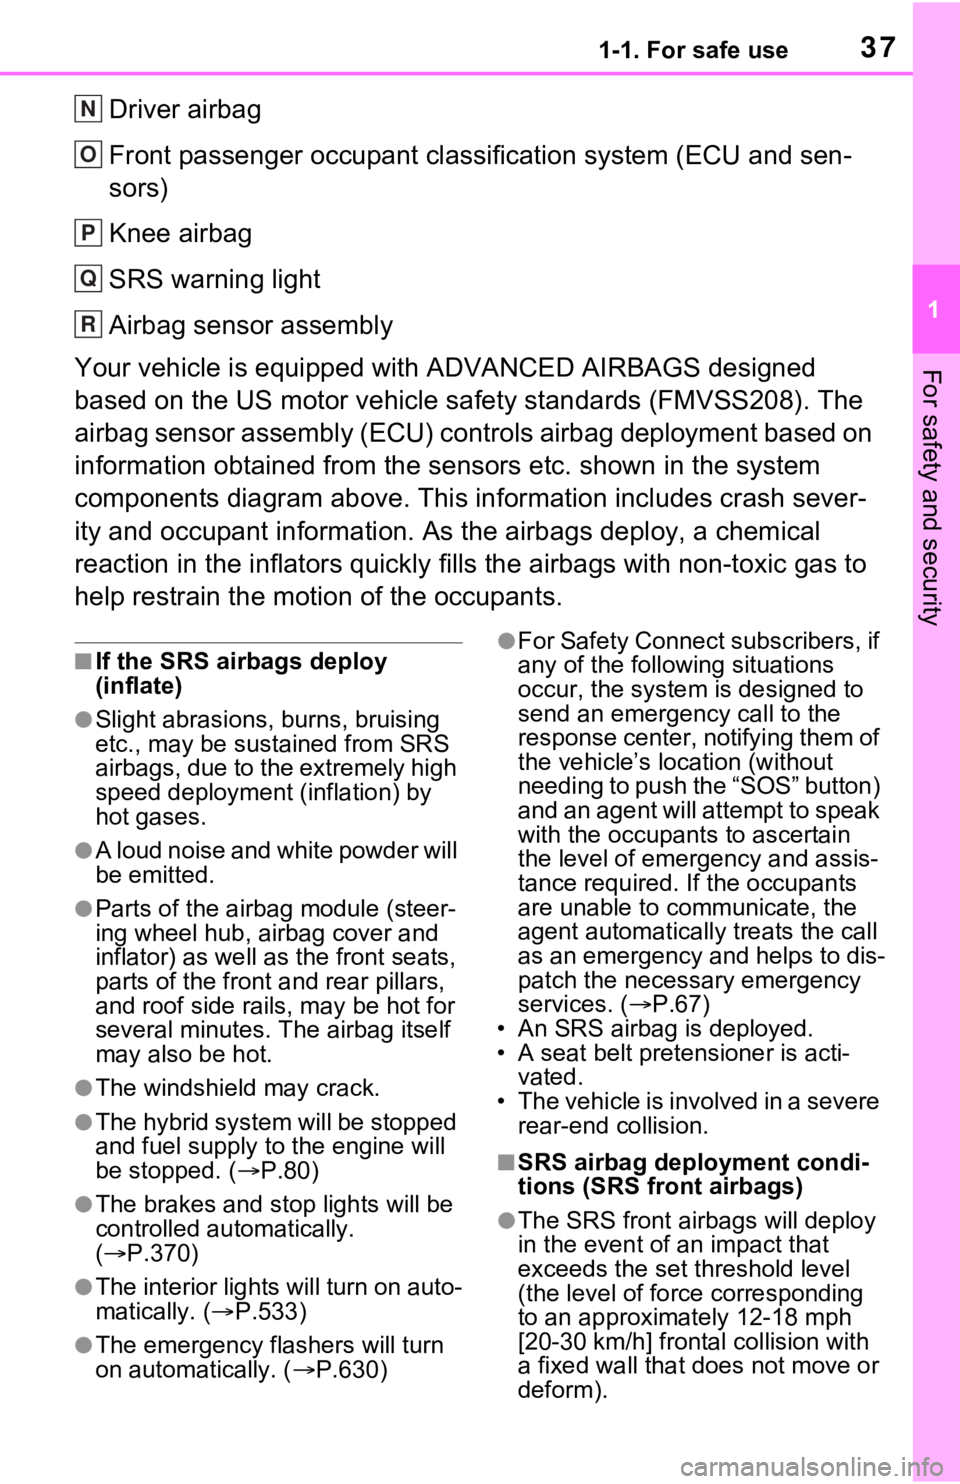
Driver airbag
Front passenger occupant classification system (ECU and sen-
sors)
Knee airbag
SRS warning light
Airbag sensor assembly
Your vehicle is equipped with ADVANCED AIRBAGS designed
based on the US motor vehicle safety standards (FMVSS208). The
airbag sensor assembly (ECU) cont rols airbag deployment based on
information obtained from the sensors etc. shown in the system
components diagram above. This in formation includes crash sever-
ity and occupant information. As the airbags deploy, a chemical
reaction in the inflators quickly fills the airbags with non-toxic gas to
help restrain the motion of the occupants.
■If the SRS airbags deploy
(inflate)
●Slight abrasions, burns, bruising
etc., may be sustained from SRS
airbags, due to the extremely high
speed deployment (inflation) by
hot gases.
●A loud noise and white powder will
be emitted.
●Parts of the airbag module (steer-
ing wheel hub, airbag cover and
inflator) as well as the front seats,
parts of the front and rear pillars,
and roof side rails, may be hot for
several minutes. T he airbag itself
may also be hot.
●The windshield may crack.
●The hybrid system will be stopped
and fuel supply to the engine will
be stopped. ( P.80)
●The brakes and st op lights will be
controlled automatically.
( P.370)
●The interior lights will turn on auto-
matically. ( P.533)
●The emergency flashers will turn
on automatically. ( P.630)
●For Safety Connect subscribers, if
any of the following situations
occur, the system is designed to
send an emergency call to the
response center, notifying them of
the vehicle’s location (without
needing to push the “SOS” button)
and an agent will attempt to speak
with the occupants to ascertain
the level of emergency and assis-
tance required. If the occupants
are unable to communicate, the
agent automatically treats the call
as an emergency and helps to dis-
patch the necessary emergency
services. ( P.67)
• An SRS airbag is deployed.
• A seat belt pretensioner is acti- vated.
• The vehicle is involved in a severe rear-end collision.
■SRS airbag deployment condi-
tions (SRS front airbags)
●The SRS front airbags will deploy
in the event of an impact that
exceeds the set threshold level
(the level of forc e corresponding
to an approximately 12-18 mph
[20-30 km/h] frontal collision with
a fixed wall that does not move or
deform).
N
O
P
Q
R
Page 141 of 748
1413-2. Opening, closing and locking the doors
3
Before driving
1On
2 Off
■Back door closer
In the event that the back door is left
slightly open, the back door closer
will automatically close it to the fully
closed position.
Whatever the state of the power
switch, the back door closer oper-
ates.
■Power back door operating con-
ditions
The power back door can automati-
cally open and close under the fol-
lowing conditions:
●When the power back door sys-
tem is enabled. ( P.108)
●When the power switch is in ON,
in addition to the above for the
opening operations, the back door
operates for any of the following
conditions:
• Parking brake is engaged
• The brake pedal is depressed
• The shift lever is in P.
■Operation of the power back
door
●A buzzer sounds and the emer-
gency flashers flash twice to indi-
cate that the back door is
opening/closing.
●When the power back door sys-
tem is disabled, the power back
door does not ope rate but it can
be opened and closed by hand.
●When the power back door auto-
matically opens, if an abnormality
due to people or objects is
detected, oper ation will stop.
■Jam protection function
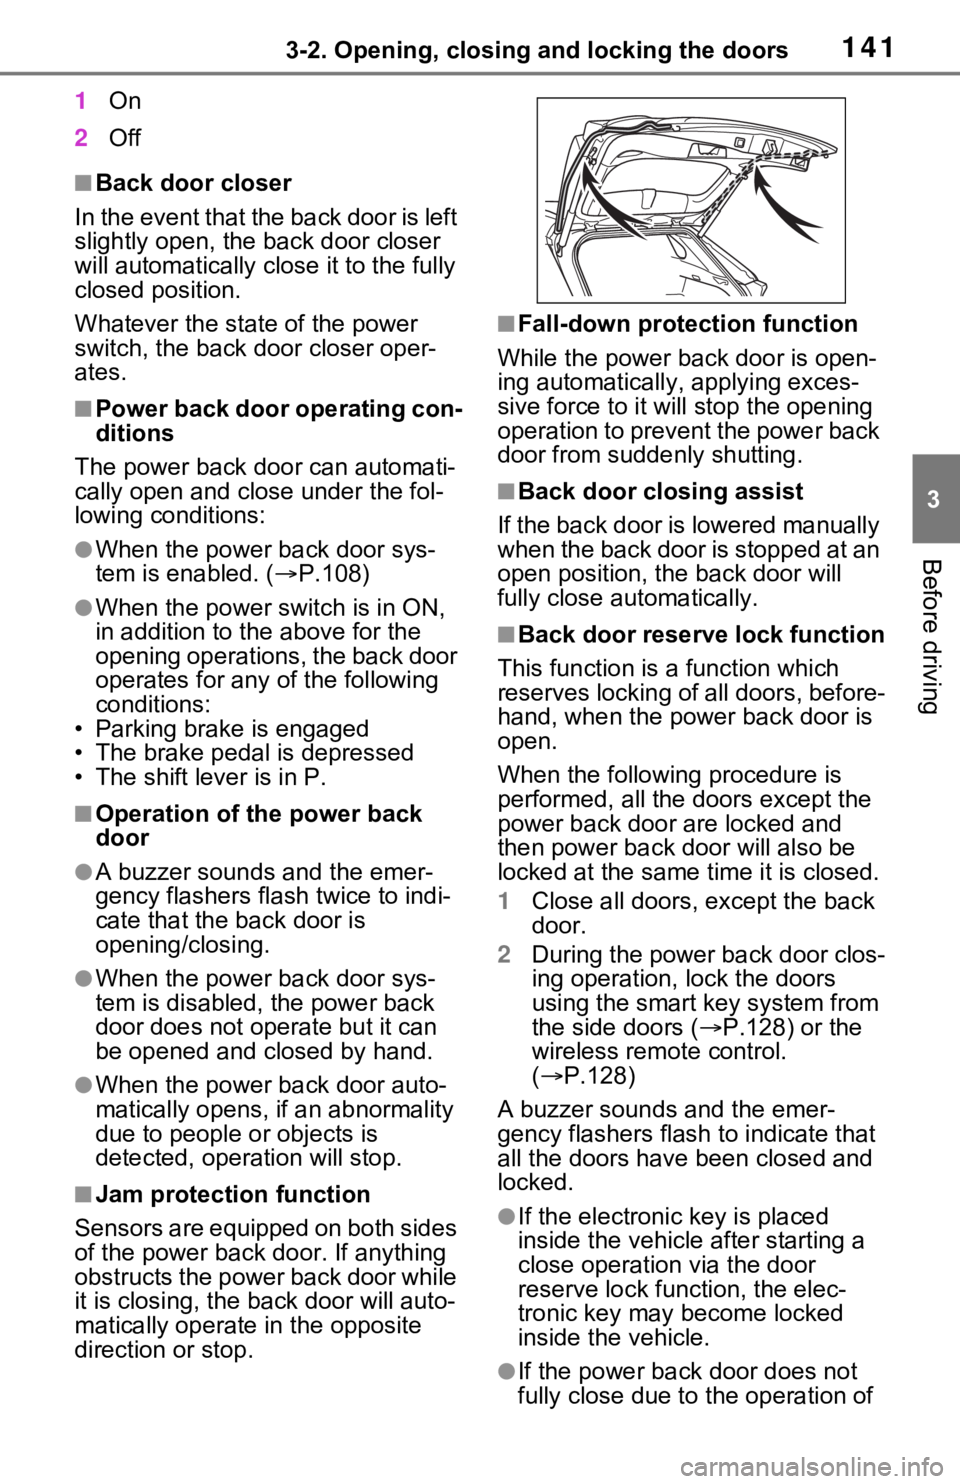
Sensors are equipped on both sides
of the power back door. If anything
obstructs the power back door while
it is closing, the b ack door will auto-
matically operate in the opposite
direction or stop.
■Fall-down protection function
While the power back door is open-
ing automatically, applying exces-
sive force to it will stop the opening
operation to prevent the power back
door from suddenly shutting.
■Back door closing assist
If the back door is lowered manually
when the back door is stopped at an
open position, the back door will
fully close automatically.
■Back door reserve lock function
This function is a function which
reserves locking of all doors, before-
hand, when the power back door is
open.
When the following procedure is
performed, all the doors except the
power back door are locked and
then power back door will also be
locked at the same time it is closed.
1 Close all doors, except the back
door.
2 During the power back door clos-
ing operation, lock the doors
using the smart key system from
the side doors ( P.128) or the
wireless remote control.
( P.128)
A buzzer sounds and the emer-
gency flashers flash to indicate that
all the doors have been closed and
locked.
●If the electronic key is placed
inside the vehicle after starting a
close operation via the door
reserve lock function, the elec-
tronic key may become locked
inside the vehicle.
●If the power back door does not
fully close due to the operation of
Page 146 of 748
1463-2. Opening, closing and locking the doors
NOTICE
■To prevent damage to the
power back door
●Make sure that there is no ice
between the back door and
frame that would prevent move-
ment of the back door. Operat-
ing the power back door when
excessive load is present on the
back door may cause a mal-
function.
●Do not apply excessive force to
the back door while the power
back door is operating.
●Take care not to damage the
sensors (installed on the right
and left edges of the power
back door) with a knife or other
sharp object. If the sensor is
disconnected, the power back
door will not close automati-
cally.
■Hands Free Power Back Door
precautions (if equipped)
The kick sensor is located behind
lower center part of the rear
bumper. Observe the following to
ensure that the Hands Free
Power Back Door function oper-
ates properly:
●Keep the lower center part of
the rear bumper clean at all
times.
If the lower cen ter part of the
rear bumper is dirty or covered
with snow, the kick sensor may
not operate. In this situation,
clean off the dirt or snow, move
the vehicle from the current
position and then check if the
kick sensor operates.
If it does not operate, have the
vehicle inspected by your
Toyota dealer.
●Do not apply coatings that have
a rain clearin g (hydrophilic)
effect, or other coatings, to the
lower center part of the rear
bumper.
●Do not park the vehicle near
objects that may move and con-
tact the lower center part of the
rear bumper, such as grass or
trees.
If the vehicle has been parked
for a while near objects that
may move and contact the
lower center part of the rear
bumper, such as grass or trees,
the kick sensor may not oper-
ate. In this situation, move the
vehicle from the current position
and then check if the kick sen-
sor operates. If it does not oper-
ate, have the vehicle inspected
by your Toyo ta dealer.
●Do not subject the kick sensor
or its surroundi ng area to a
strong impact.
If the kick sensor or its sur-
rounding area has been sub-
jected to a strong impact, the
kick sensor may not operate
properly. If the kick sensor does
not operate in the following situ-
ations, have the vehicle
inspected by your Toyota
dealer.
• The kick sensor or its surround- ing area has been subjected to
a strong impact.
• The lower center part of the rear bumper is scratched or dam-
aged.
●Do not disassemble the rear
bumper.
●Do not attach stickers to the
rear bumper.
●Do not paint the rear bumper.
Page 164 of 748
1643-4. Adjusting the steering wheel and mirrors
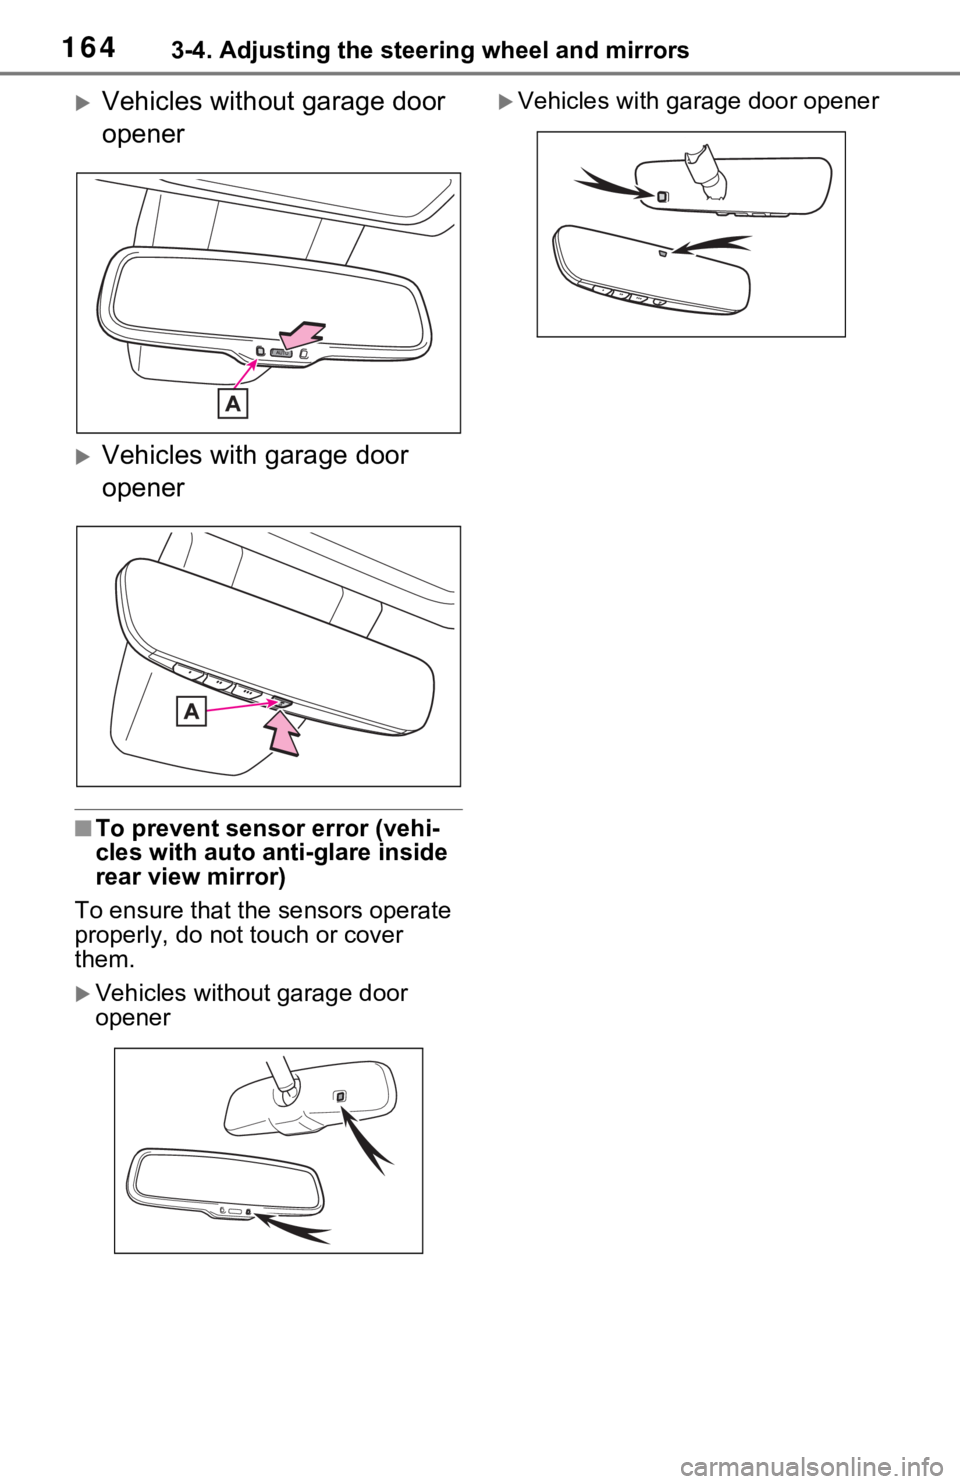
Vehicles without garage door
opener
Vehicles with garage door
opener
■To prevent sensor error (vehi-
cles with auto anti-glare inside
rear view mirror)
To ensure that the sensors operate
properly, do not touch or cover
them.
Vehicles without garage door
opener
Vehicles with garage door opener
Page 168 of 748
1683-4. Adjusting the steering wheel and mirrors
*: This is a function for the optical
mirror mode, however, the setting
can also be changed while using
the digital mirror mode.
■Enabling/disabling the
automatic anti-glare func-
tion (optical mirror mode)
The automatic anti-glare func-
tion in the optical mirror mode
can be enabled/disabled. The
setting can be changed in both
the digital mirror mode and the
optical mirror mode.
When using the digital mirror
mode
P.167
When using the optical mirror
mode
1 Press the menu button.
The icons will be displayed.
2Press the menu button
repeatedly and select .
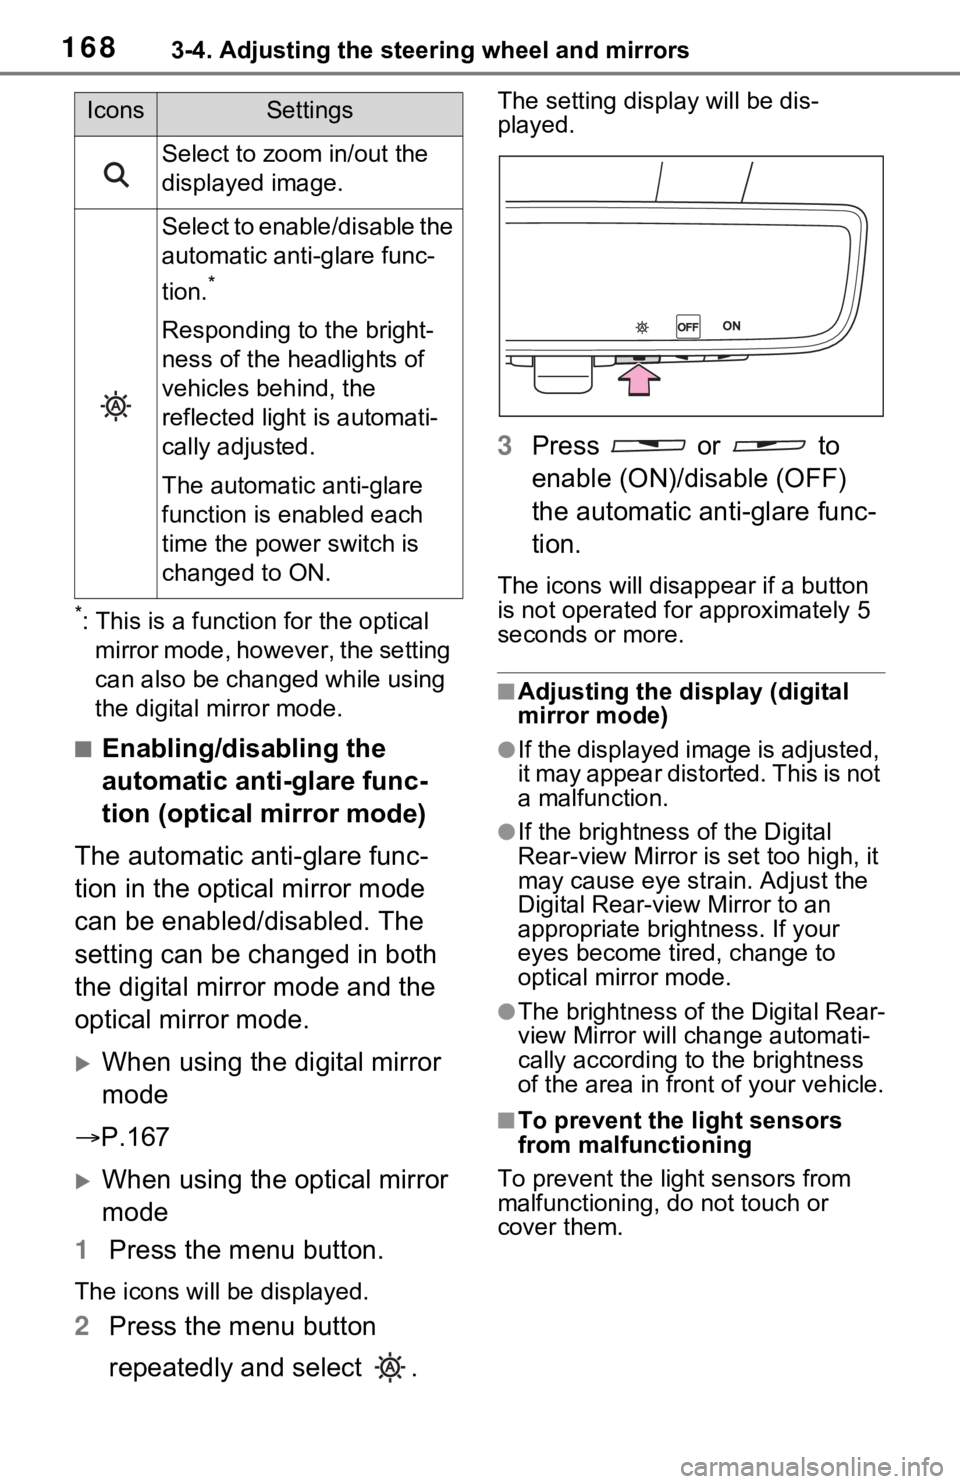
The setting display will be dis-
played.
3Press or to
enable (ON)/disable (OFF)
the automatic anti-glare func-
tion.
The icons will disappear if a button
is not operated fo r approximately 5
seconds or more.
■Adjusting the display (digital
mirror mode)
●If the displayed image is adjusted,
it may appear distorted. This is not
a malfunction.
●If the brightness of the Digital
Rear-view Mirror is set too high, it
may cause eye strain. Adjust the
Digital Rear-view Mirror to an
appropriate brightness. If your
eyes become tired, change to
optical mirror mode.
●The brightness of the Digital Rear-
view Mirror will change automati-
cally according to the brightness
of the area in front of your vehicle.
■To prevent the light sensors
from malfunctioning
To prevent the light sensors from
malfunctioning, do not touch or
cover them.
Select to zoom in/out the
displayed image.
Select to enable/disable the
automatic anti-glare func-
tion.
*
Responding to the bright-
ness of the headlights of
vehicles behind, the
reflected light is automati-
cally adjusted.
The automatic anti-glare
function is enabled each
time the power switch is
changed to ON.
IconsSettings
Page 244 of 748

2444-5. Using the driving support systems
4-5.Using the driving support systems
■PCS (Pre-Collision System)
P.250
■LTA (Lane Tracing Assist)
P.258
■AHB (Automatic High
Beam)
P.232
■RSA (Road Sign Assist) (if
equipped)
P.268
■Dynamic radar cruise con-
trol with full-speed range
P.271 Two types of sensors, located
behind the front grille and wind-
shield, detect information neces-
sary to operate the drive assist
systems.
Radar sensor
Front camera
Toyota Safety Sense
2.0
The Toyota Safety Sense
2.0 consists of the following
drive assist systems and
contributes to a safe and
comfortable driving experi-
ence:
Driving assist system
WARNING
■Toyota Safety Sense 2.0
The Toyota Safety Sense 2.0 is
designed to operate under the
assumption that the driver will
drive safely, and is designed to
help reduce the impact to the
occupants and the vehicle in the
case of a collision or assist the
driver in normal driving condi-
tions.
As there is a limit to the degree of
recognition accuracy and control
performance that this system can
provide, do not overly rely on this
system. The driver is always
responsible for paying attention to
the vehicle’s su rroundings and
driving safely.
Sensors
A
B
Page 273 of 748
2734-5. Using the driving support systems
4
Driving
WARNING
●Assisting the driver to operate
the vehicle
The dynamic radar cruise control
with full-speed range does not
include function s which will pre-
vent or avoid collisions with vehi-
cles ahead of your vehicle.
Therefore, if there is ever any
possibility of da nger, the driver
must take immediate and direct
control of the vehicle and act
appropriately in order to ensure
the safety of all involved.
■Situations unsuitable for
dynamic radar cruise control
with full-speed range
Do not use dynamic radar cruise
control with full-speed range in
any of the following situations.
Doing so may result in inappropri-
ate speed control and could
cause an accident resulting in
death or serious injury.
●Roads where there are pedes-
trians, cyclists, etc.
●In heavy traffic
●On roads with sharp bends
●On winding roads
●On slippery roads, such as
those covered with rain, ice or
snow
●On steep downhills, or where
there are sudden changes
between sharp up and down
gradients
Vehicle speed may exceed the
set speed when driving down a
steep hill.
●At entrances to freeways and
highways
●When weather conditions are
bad enough that they may pre-
vent the sensors from detecting
correctly (fog, snow, sandstorm,
heavy rain, etc.)
●When there is rain, snow, etc.
on the front surface of the radar
or front camera
●In traffic conditi ons that require
frequent repeated acceleration
and deceleration
●When your vehicle is towing a
trailer or during emergency tow-
ing
●When an approach warning
buzzer is heard often
Page 282 of 748
2824-5. Using the driving support systems
*: If equipped
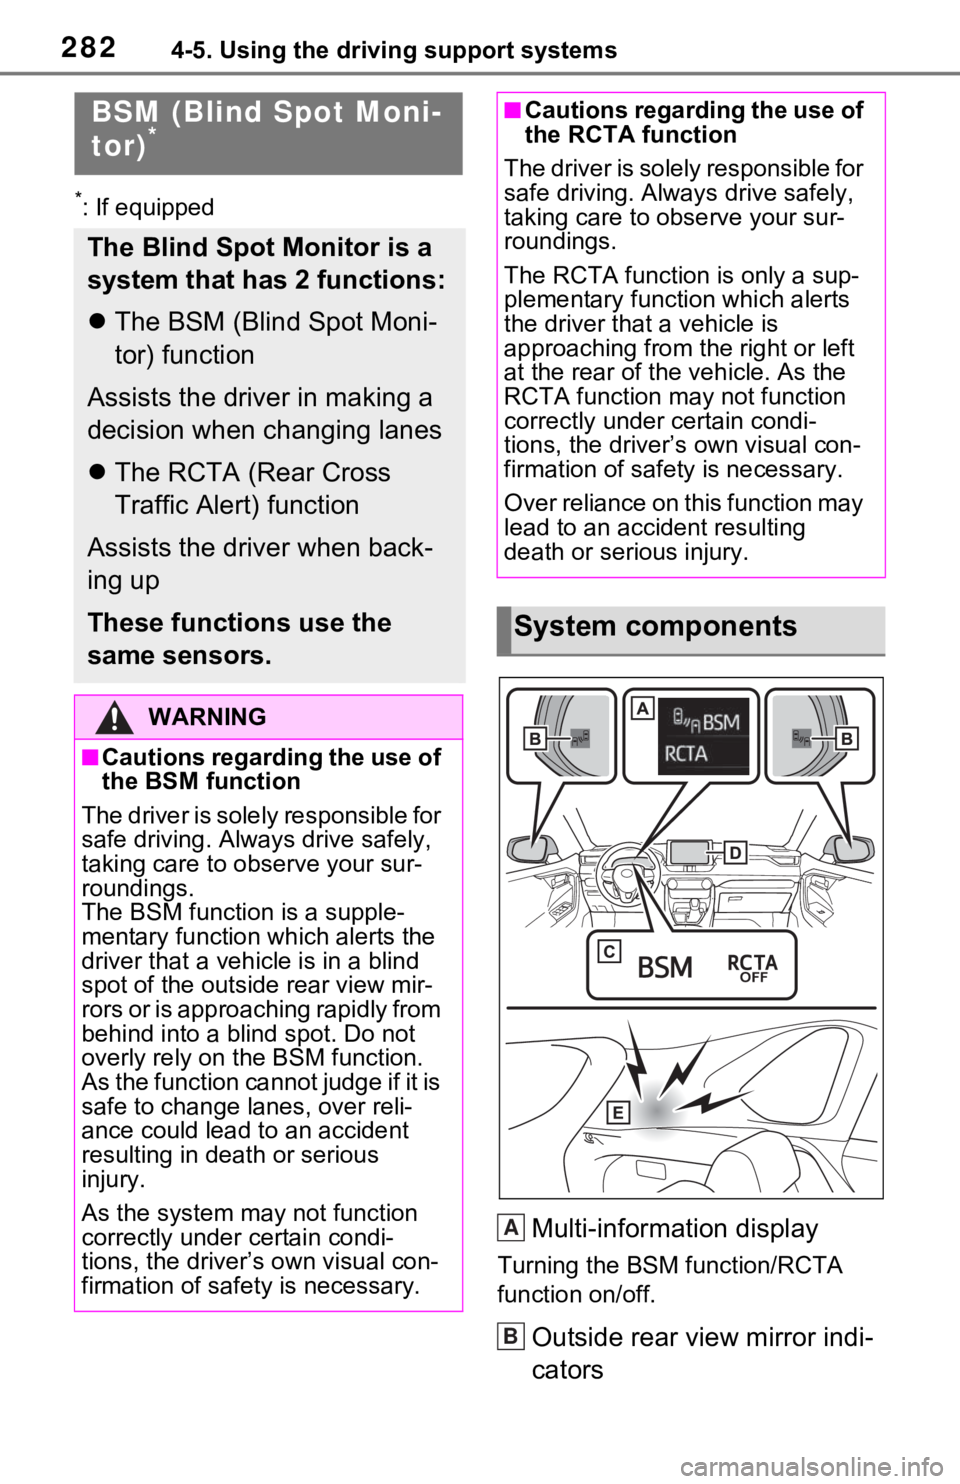
Multi-information display
Turning the BSM function/RCTA
function on/off.
Outside rear view mirror indi-
cators
BSM (Blind Spot Moni-
tor)*
The Blind Spot Monitor is a
system that has 2 functions:
The BSM (Blind Spot Moni-
tor) function
Assists the driver in making a
decision when changing lanes
The RCTA (Rear Cross
Traffic Alert) function
Assists the driver when back-
ing up
These functions use the
same sensors.
WARNING
■Cautions regarding the use of
the BSM function
The driver is solely responsible for
safe driving. Always drive safely,
taking care to o bserve your sur-
roundings.
The BSM function is a supple-
mentary function which alerts the
driver that a vehicle is in a blind
spot of the outside rear view mir-
rors or is approaching rapidly from
behind into a blind spot. Do not
overly rely on the BSM function.
As the function cannot judge if it is
safe to change lanes, over reli-
ance could lead to an accident
resulting in dea th or serious
injury.
As the system may not function
correctly under certain condi-
tions, the driver’s own visual con-
firmation of safety is necessary.
■Cautions regarding the use of
the RCTA function
The driver is solely responsible for
safe driving. Always drive safely,
taking care to observe your sur-
roundings.
The RCTA function is only a sup-
plementary function which alerts
the driver that a vehicle is
approaching from the right or left
at the rear of the vehicle. As the
RCTA function may not function
correctly under certain condi-
tions, the driver’s own visual con-
firmation of safety is necessary.
Over reliance on this function may
lead to an accident resulting
death or serious injury.
System components
A
B
Page 285 of 748
2854-5. Using the driving support systems
4
Driving
WARNING
■Handling the radar sensor
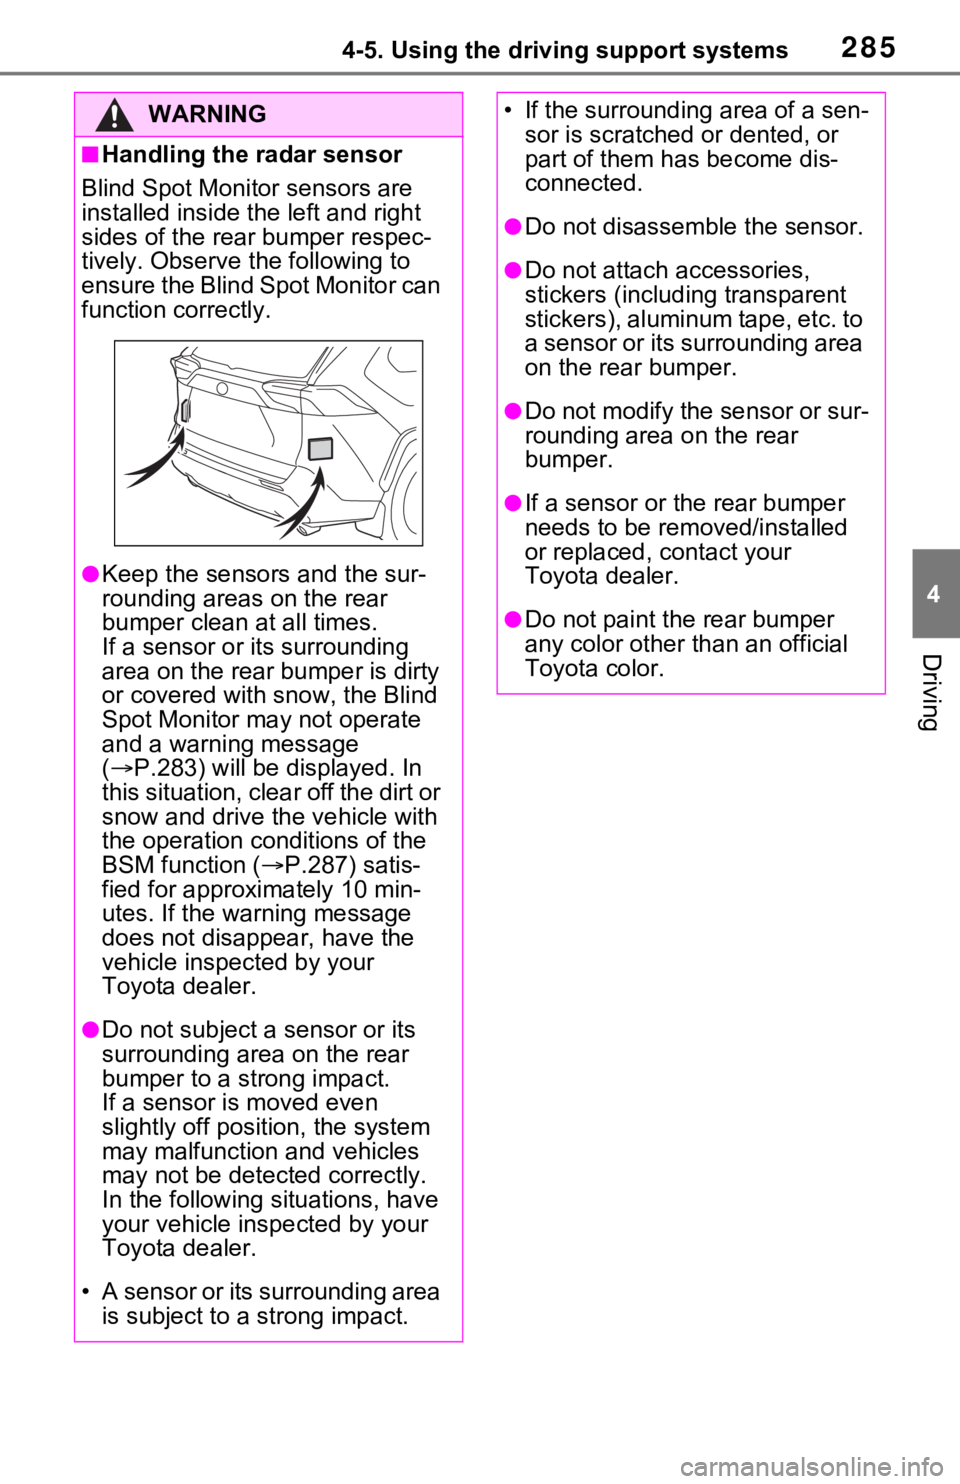
Blind Spot Monitor sensors are
installed inside t he left and right
sides of the rear bumper respec-
tively. Observe the following to
ensure the Blind Spot Monitor can
function correctly.
●Keep the sensors and the sur-
rounding areas on the rear
bumper clean at all times.
If a sensor or its surrounding
area on the rear bumper is dirty
or covered with snow, the Blind
Spot Monitor may not operate
and a warning message
( P.283) will be displayed. In
this situation, clear off the dirt or
snow and drive the vehicle with
the operation conditions of the
BSM function ( P.287) satis-
fied for approxi mately 10 min-
utes. If the warning message
does not disappear, have the
vehicle inspected by your
Toyota dealer.
●Do not subject a sensor or its
surrounding area on the rear
bumper to a strong impact.
If a sensor is moved even
slightly off position, the system
may malfunction and vehicles
may not be detected correctly.
In the following si tuations, have
your vehicle inspected by your
Toyota dealer.
• A sensor or its surrounding area is subject to a strong impact.
• If the surrounding area of a sen-
sor is scratched or dented, or
part of them h as become dis-
connected.
●Do not disassemble the sensor.
●Do not attach a ccessories,
stickers (including transparent
stickers), aluminum tape, etc. to
a sensor or its surrounding area
on the rear bumper.
●Do not modify the sensor or sur-
rounding area on the rear
bumper.
●If a sensor or the rear bumper
needs to be removed/installed
or replaced, contact your
Toyota dealer.
●Do not paint the rear bumper
any color other than an official
Toyota color.