height TOYOTA RAV4 HYBRID 2020 Owners Manual (in English)
[x] Cancel search | Manufacturer: TOYOTA, Model Year: 2020, Model line: RAV4 HYBRID, Model: TOYOTA RAV4 HYBRID 2020Pages: 744, PDF Size: 31.43 MB
Page 33 of 744
331-1. For safe use
1
For safety and security
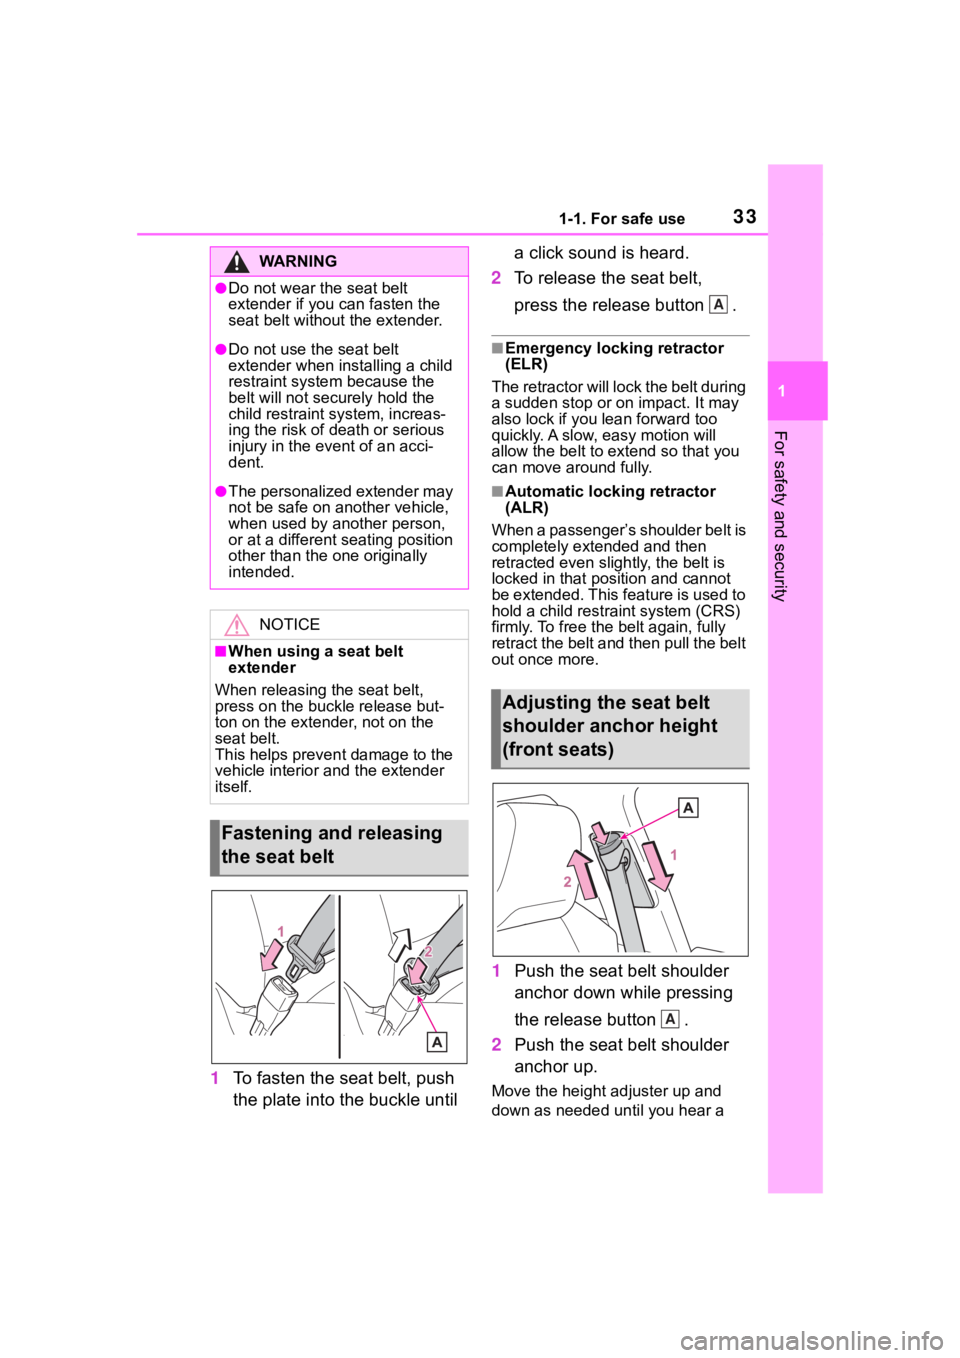
1To fasten the seat belt, push
the plate into the buckle until a click sound is heard.
2 To release the seat belt,
press the release button .
■Emergency locking retractor
(ELR)
The retractor will lock the belt during
a sudden stop or on impact. It may
also lock if you lean forward too
quickly. A slow, easy motion will
allow the belt to extend so that you
can move around fully.
■Automatic locking retractor
(ALR)
When a passenger’s shoulder belt is
completely extended and then
retracted even slightly, the belt is
locked in that position and cannot
be extended. This feature is used to
hold a child restraint system (CRS)
firmly. To free the belt again, fully
retract the belt and then pull the belt
out once more.
1 Push the seat belt shoulder
anchor down while pressing
the release button .
2 Push the seat belt shoulder
anchor up.
Move the height adjuster up and
down as needed until you hear a
WA R N I N G
●Do not wear the seat belt
extender if you can fasten the
seat belt without the extender.
●Do not use the seat belt
extender when installing a child
restraint system because the
belt will not securely hold the
child restraint system, increas-
ing the risk of death or serious
injury in the event of an acci-
dent.
●The personalized extender may
not be safe on another vehicle,
when used by another person,
or at a different seating position
other than the one originally
intended.
NOTICE
■When using a seat belt
extender
When releasing the seat belt,
press on the buckle release but-
ton on the extender, not on the
seat belt.
This helps prevent damage to the
vehicle interior and the extender
itself.
Fastening and releasing
the seat belt
Adjusting the seat belt
shoulder anchor height
(front seats)
A
A
Page 154 of 744
1543-3. Adjusting the seats
3-3.Adjusting the seats
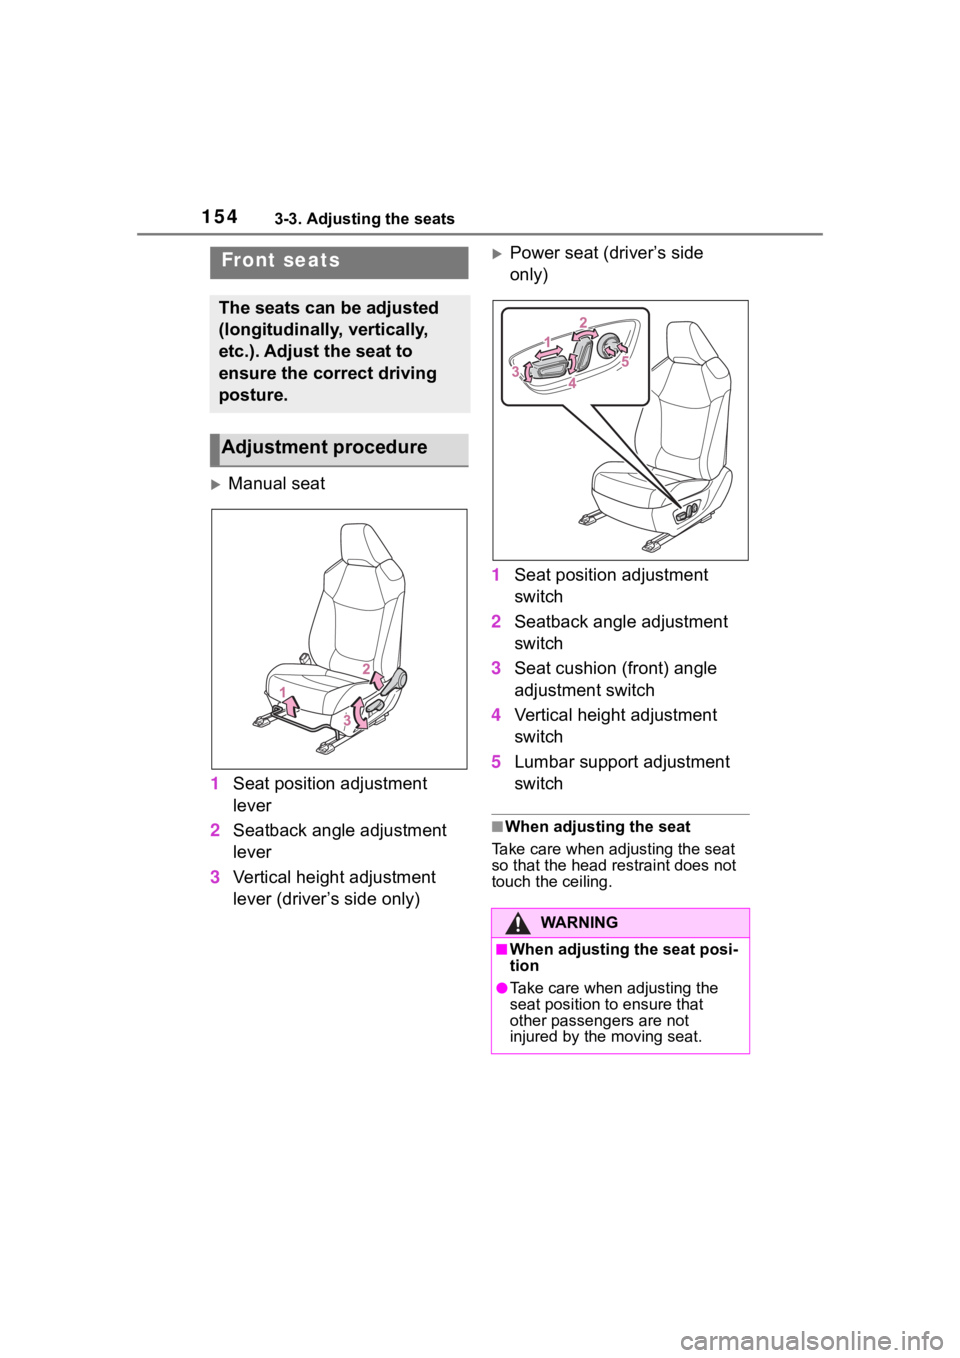
Manual seat
1 Seat position adjustment
lever
2 Seatback angle adjustment
lever
3 Vertical height adjustment
lever (driver’s side only)
Power seat (driver’s side
only)
1 Seat position adjustment
switch
2 Seatback angle adjustment
switch
3 Seat cushion (front) angle
adjustment switch
4 Vertical height adjustment
switch
5 Lumbar support adjustment
switch
■When adjusting the seat
Take care when adjusting the seat
so that the head restraint does not
touch the ceiling.
Front seats
The seats can be adjusted
(longitudinally, vertically,
etc.). Adjust the seat to
ensure the correct driving
posture.
Adjustment procedure
WA R N I N G
■When adjusting the seat posi-
tion
●Take care when adjusting the
seat position to ensure that
other passengers are not
injured by the moving seat.
Page 160 of 744
1603-3. Adjusting the seats
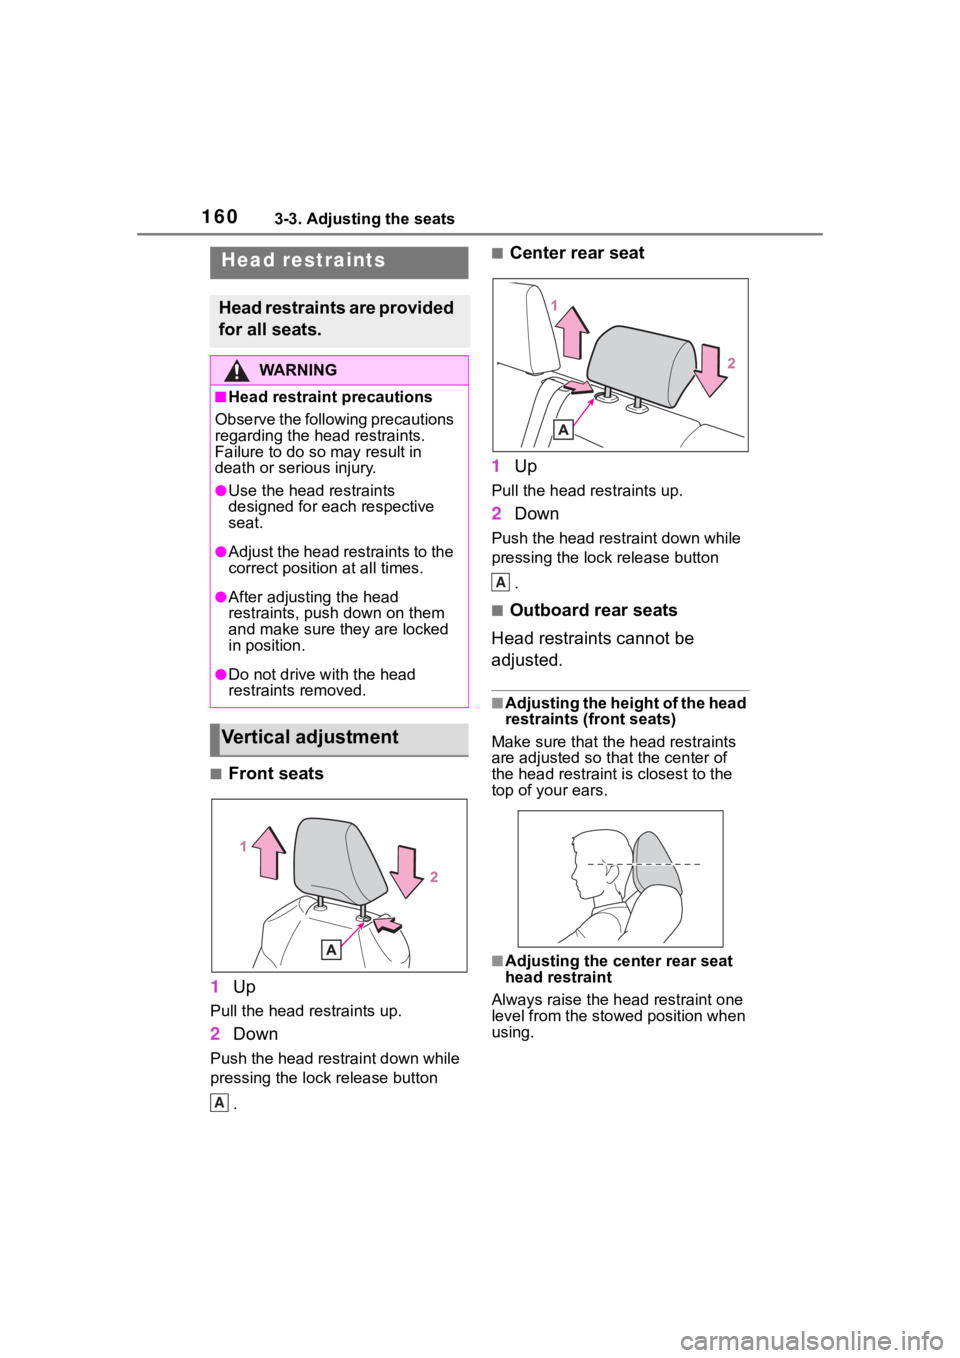
■Front seats
1 Up
Pull the head restraints up.
2Down
Push the head restraint down while
pressing the lock release button
.
■Center rear seat
1 Up
Pull the head restraints up.
2Down
Push the head restraint down while
pressing the lock release button
.
■Outboard rear seats
Head restraints cannot be
adjusted.
■Adjusting the height of the head
restraints (front seats)
Make sure that the head restraints
are adjusted so that the center of
the head restraint i s closest to the
top of your ears.
■Adjusting the center rear seat
head restraint
Always raise the head restraint one
level from the stowed position when
using.
Head restraints
Head restraints are provided
for all seats.
WA R N I N G
■Head restraint precautions
Observe the following precautions
regarding the head restraints.
Failure to do so m ay result in
death or serious injury.
●Use the head restraints
designed for each respective
seat.
●Adjust the head restraints to the
correct position at all times.
●After adjusting the head
restraints, push down on them
and make sure they are locked
in position.
●Do not drive with the head
restraints removed.
Vertical adjustment
A
A
Page 161 of 744
1613-3. Adjusting the seats
3
Before driving
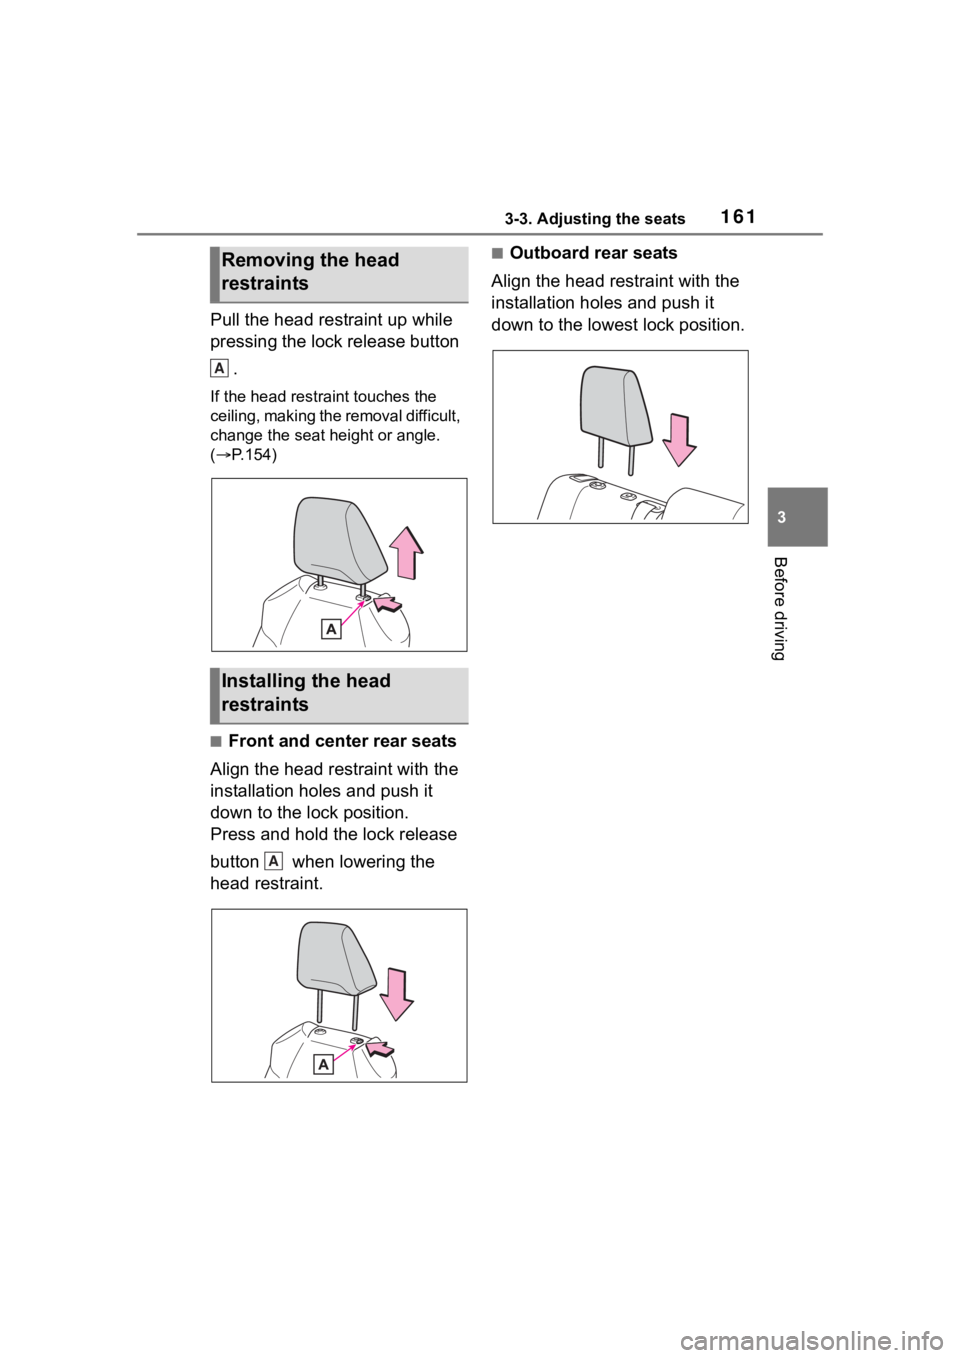
Pull the head restraint up while
pressing the lock release button .
If the head restraint touches the
ceiling, making the removal difficult,
change the seat height or angle.
( P.154)
■Front and center rear seats
Align the head restraint with the
installation holes and push it
down to the lock position.
Press and hold the lock release
button when lowering the
head restraint.
■Outboard rear seats
Align the head restraint with the
installation holes and push it
down to the lowest lock position.Removing the head
restraints
Installing the head
restraints
A
A
Page 163 of 744
1633-4. Adjusting the steering wheel and mirrors
3
Before driving
*: If equipped
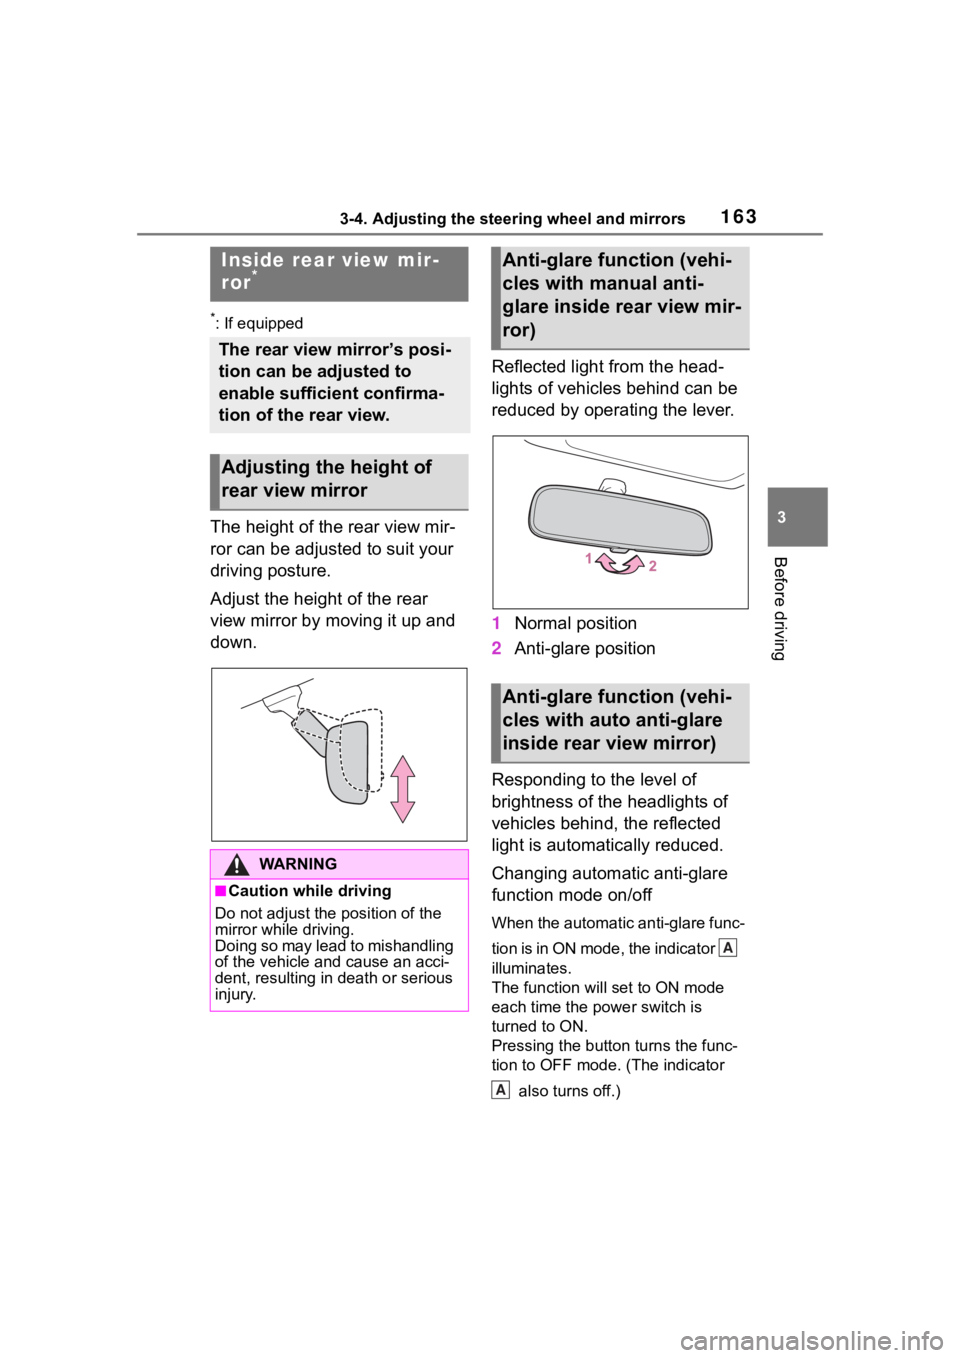
The height of the rear view mir-
ror can be adjusted to suit your
driving posture.
Adjust the height of the rear
view mirror by moving it up and
down.Reflected light from the head-
lights of vehicles behind can be
reduced by operating the lever.
1
Normal position
2 Anti-glare position
Responding to the level of
brightness of the headlights of
vehicles behind, the reflected
light is automatically reduced.
Changing automatic anti-glare
function mode on/off
When the automatic anti-glare func-
tion is in ON mode, the indicator
illuminates.
The function will set to ON mode
each time the power switch is
turned to ON.
Pressing the button turns the func-
tion to OFF mode. (The indicator also turns off.)
Inside rear view mir-
ror*
The rear view mirror’s posi-
tion can be adjusted to
enable sufficient confirma-
tion of the rear view.
Adjusting the height of
rear view mirror
WA R N I N G
■Caution while driving
Do not adjust the position of the
mirror while driving.
Doing so may lead to mishandling
of the vehicle and cause an acci-
dent, resulting in death or serious
injury.
Anti-glare function (vehi-
cles with manual anti-
glare inside rear view mir-
ror)
Anti-glare function (vehi-
cles with auto anti-glare
inside rear view mirror)
A
A
Page 166 of 744
1663-4. Adjusting the steering wheel and mirrors
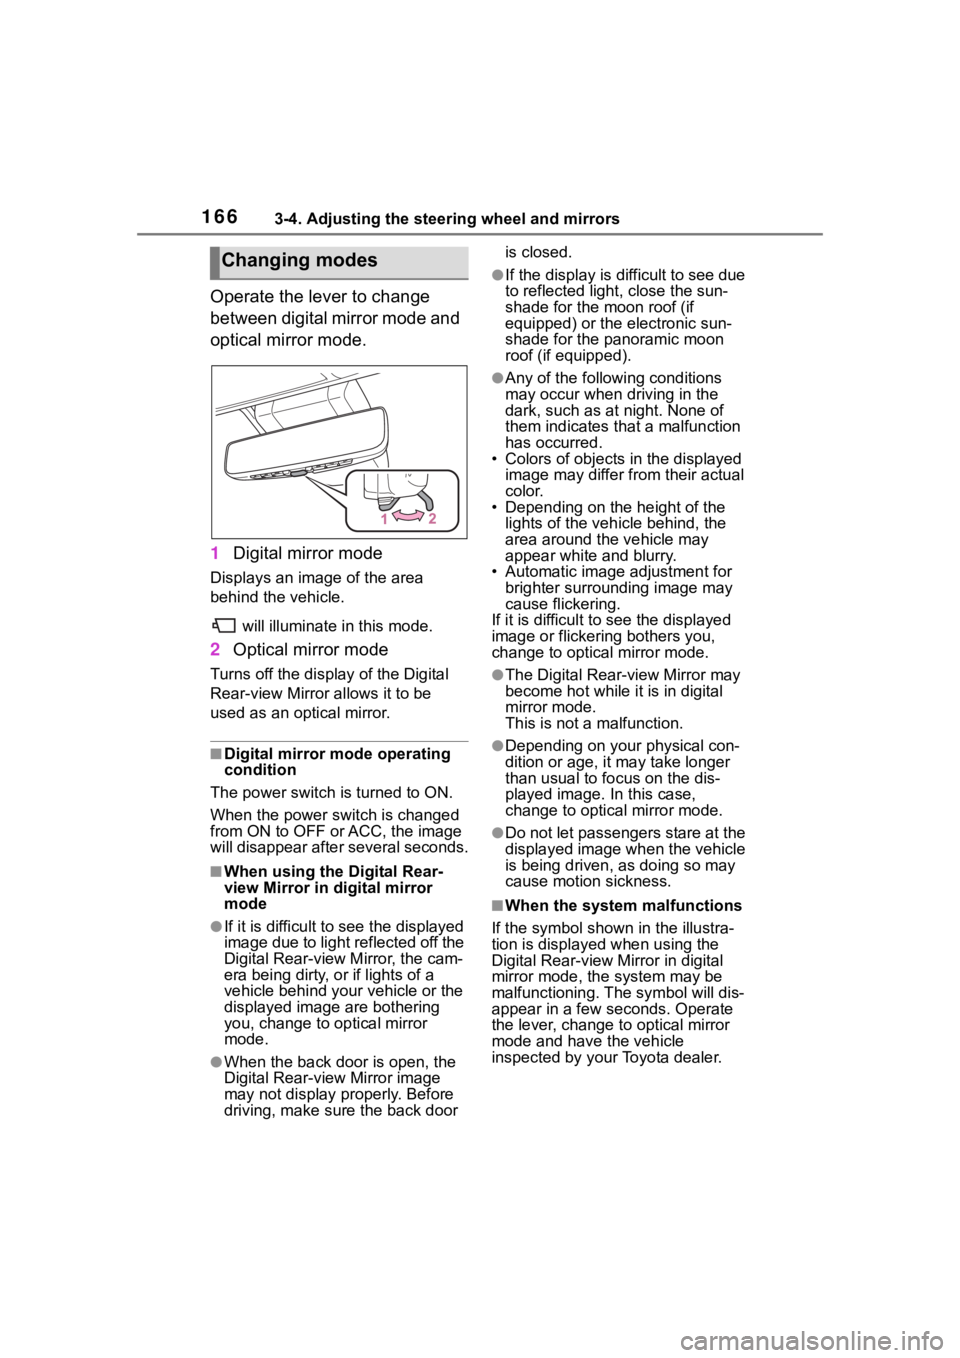
Operate the lever to change
between digital mirror mode and
optical mirror mode.
1Digital mirror mode
Displays an image of the area
behind the vehicle.
will illuminate in this mode.
2Optical mirror mode
Turns off the display of the Digital
Rear-view Mirror allows it to be
used as an optical mirror.
■Digital mirror mode operating
condition
The power switch is turned to ON.
When the power switch is changed
from ON to OFF or ACC, the image
will disappear afte r several seconds.
■When using the Digital Rear-
view Mirror in digital mirror
mode
●If it is difficult to see the displayed
image due to light reflected off the
Digital Rear-view M irror, the cam-
era being dirty, or if lights of a
vehicle behind your vehicle or the
displayed image are bothering
you, change to optical mirror
mode.
●When the back door is open, the
Digital Rear-view Mirror image
may not display properly. Before
driving, make sure the back door is closed.
●If the display is difficult to see due
to reflected light
, close the sun-
shade for the moon roof (if
equipped) or the electronic sun-
shade for the panoramic moon
roof (if equipped).
●Any of the following conditions
may occur when driving in the
dark, such as at night. None of
them indicates that a malfunction
has occurred.
• Colors of objects in the displayed
image may differ from their actual
color.
• Depending on the height of the
lights of the vehicle behind, the
area around the vehicle may
appear white and blurry.
• Automatic image adjustment for brighter surrounding image may
cause flickering.
If it is difficult to see the displayed
image or flickering bothers you,
change to optical mirror mode.
●The Digital Rear-view Mirror may
become hot while it is in digital
mirror mode.
This is not a malfunction.
●Depending on your physical con-
dition or age, it may take longer
than usual to fo cus on the dis-
played image. In this case,
change to optical mirror mode.
●Do not let passengers stare at the
displayed image when the vehicle
is being driven, as doing so may
cause motion sickness.
■When the system malfunctions
If the symbol shown in the illustra-
tion is displayed when using the
Digital Rear-view Mirror in digital
mirror mode, the system may be
malfunctioning. The symbol will dis-
appear in a few seconds. Operate
the lever, change to optical mirror
mode and have the vehicle
inspected by your Toyota dealer.
Changing modes
Page 167 of 744
1673-4. Adjusting the steering wheel and mirrors
3
Before driving
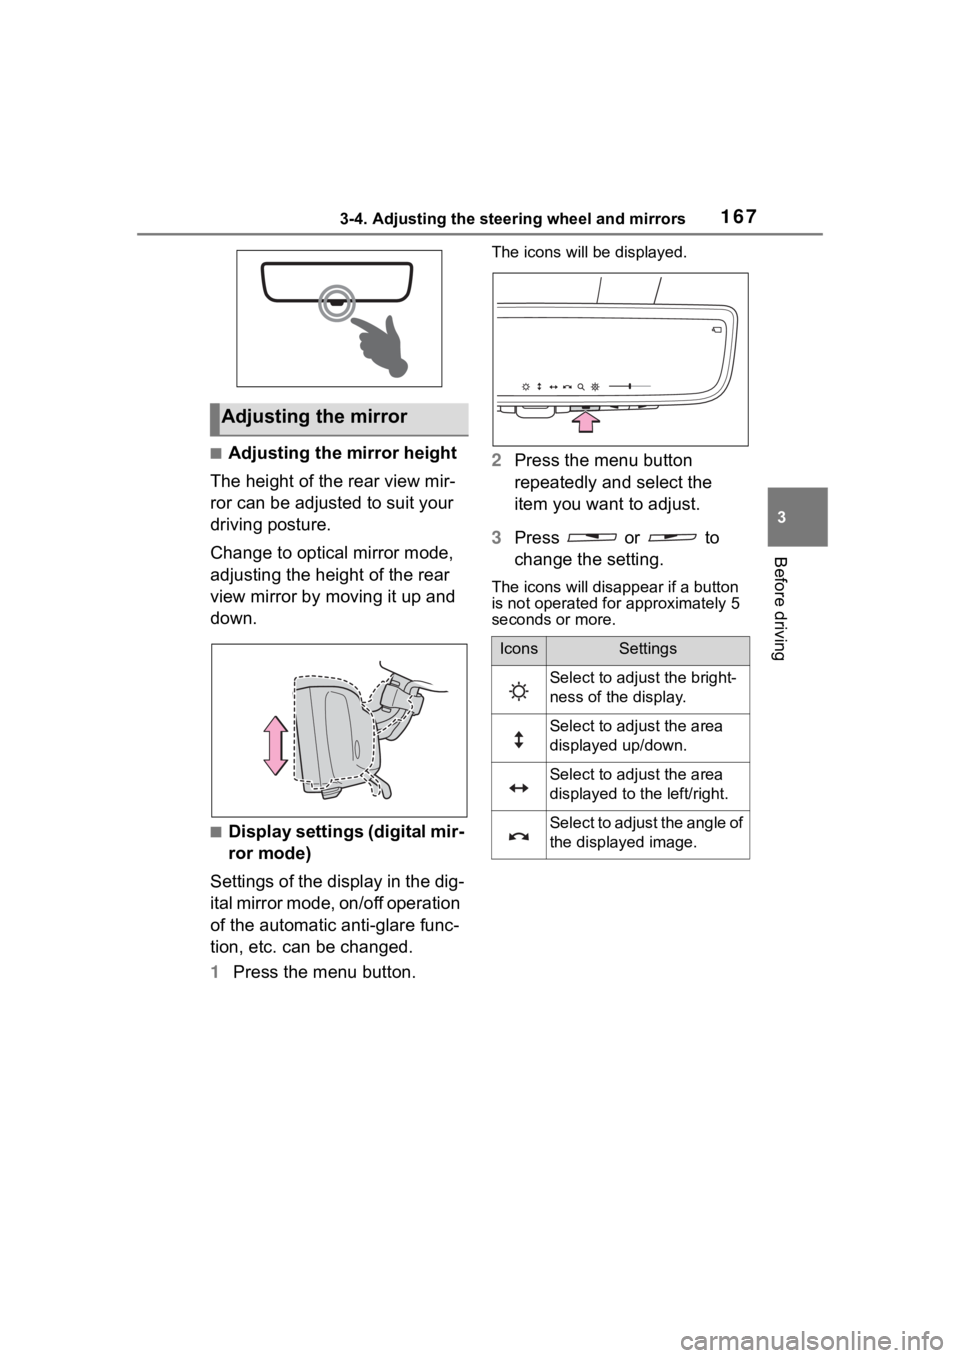
■Adjusting the mirror height
The height of the rear view mir-
ror can be adjusted to suit your
driving posture.
Change to optical mirror mode,
adjusting the height of the rear
view mirror by moving it up and
down.
■Display settings (digital mir-
ror mode)
Settings of the display in the dig-
ital mirror mode, on/off operation
of the automatic anti-glare func-
tion, etc. can be changed.
1 Press the menu button.
The icons will be displayed.
2Press the menu button
repeatedly and select the
item you want to adjust.
3 Press or to
change the setting.
The icons will disappear if a button
is not operated fo r approximately 5
seconds or more.
Adjusting the mirror
IconsSettings
Select to adjust the bright-
ness of the display.
Select to adjust the area
displayed up/down.
Select to adjust the area
displayed to the left/right.
Select to adjust the angle of
the displayed image.
Page 200 of 744
2004-1. Before driving
■Before towing
Check that the fo llowing conditions
are met:
●Ensure that your vehicle’s tires
are properly inflated. ( P.681)
●Trailer tires are inflated according
to the trailer manufacturer’s rec-
ommendation.
●All trailer lights work as required
by law.
●All lights work each time you con-
nect them.
●The trailer ball is set at the proper
height for the coupler on the
trailer.
●The trailer is level when it is
hitched.
Do not drive if th e trailer is not
level, and check for improper
tongue weight, overloading, worn
suspension, or other possible
causes.
●The trailer cargo is securely
loaded.
●The rear view mirr ors conform to
all applicable fede ral, state/provin-
cial or local regulations. If they do
not, install rear view mirrors
appropriate for towing purposes.
Trailer towing
Your vehicle is designed pri-
marily as a passenger-and-
load-carrying vehicle. Tow-
ing a trailer can have an
adverse impact on handling,
performance, braking, dura-
bility, and fuel consumption.
For your safety and the
safety of others, you must
not overload your vehicle or
trailer. You must also
ensure that you are using
appropriate towing equip-
ment, that the towing equip-
ment has been installed
correctly and used prop-
erly, and that you employ
the requisite driving habits.
Vehicle-trailer stability and
braking performance are
affected by trailer stability,
brake performance and set-
ting, trailer brakes, the hitch
and hitch systems (if
equipped).
To tow a trailer safely, use
extreme care and drive the
vehicle in accordance with
your trailer’s characteris-
tics and operating condi-
tions.
Toyota warranties do not
apply to damage or mal-
function caused by towing a
trailer for commercial pur-
poses.
Contact your Toyota dealer for
further information about addi-
tional requirements such as a
towing kit, etc.
Page 205 of 744
2054-1. Before driving
4
Driving
by the hitch manufacturer.
Lubricate the hitch ball with a
light coating of grease.
Remove the hitch ball when-
ever you are not towing a
trailer. Remove the trailer
hitch if you do not need it.
After removing the hitch, seal
any mounting holes in the
vehicle body to prevent entry
of any substances into the
vehicle.
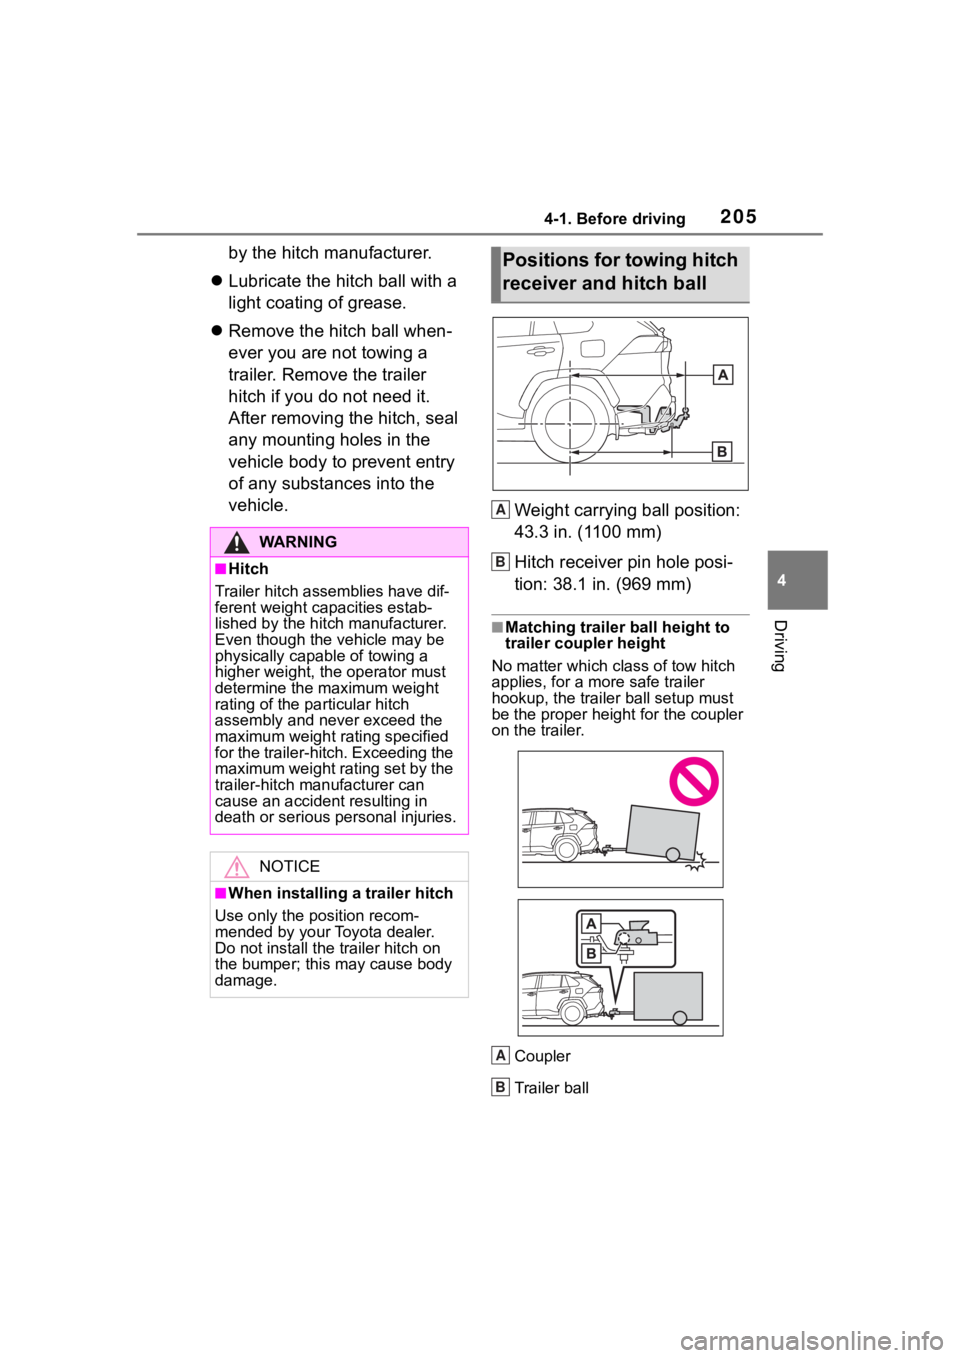
Weight carrying ball position:
43.3 in. (1100 mm)
Hitch receiver pin hole posi-
tion: 38.1 in. (969 mm)
■Matching trailer ball height to
trailer coupler height
No matter wh ich class of tow hitch
applies, for a m ore safe trailer
hookup, the trailer ball setup must
be the proper height for the coupler
on the trailer.
Coupler
Trailer ball
WA R N I N G
■Hitch
Trailer hitch assemblies have dif-
ferent weight capacities estab-
lished by the hitch manufacturer.
Even though the vehicle may be
physically capable of towing a
higher weight, the operator must
determine the maximum weight
rating of the pa rticular hitch
assembly and never exceed the
maximum weight rating specified
for the trailer-hitch. Exceeding the
maximum weight rating set by the
trailer-hitch manufacturer can
cause an accident resulting in
death or serious personal injuries.
NOTICE
■When installing a trailer hitch
Use only the position recom-
mended by your Toyota dealer.
Do not install the trailer hitch on
the bumper; this may cause body
damage.
Positions for towing hitch
receiver and hitch ball
A
B
A
B
Page 255 of 744
2554-5. Using the driving support systems
4
Driving
• If a detectable object makes an abrupt maneuver (such as sudden
swerving, accelera tion or deceler-
ation)
• When your vehicle approaches a detectable object rapidly
• When a detectable object is not directly in front of your vehicle
• When a detectable object is near a wall, fence, guardrail, manhole
cover, vehicle, steel plate on the
road, etc.
• When a detectable object is under a structure
• When part of a detectable object is hidden by an object, such as
large baggage, an umbrella, or
guardrail
• When multiple detectable objects are close together
• If the sun or other light is shining directly on a detectable object
• When a detectable object is a
shade of white and looks
extremely bright
• When a detectable object appears
to be nearly the same color or
brightness as its surroundings
• If a detectable object cuts or sud-
denly emerges in front of your
vehicle
• When the front of your vehicle is
hit by water, snow, dust, etc.
• When a very bright light ahead, such as the sun or the headlights
of oncoming traffic, shines directly
into the front camera
• When approaching the side or front of a vehicle ahead
• If a vehicle ahead is a motorcycle
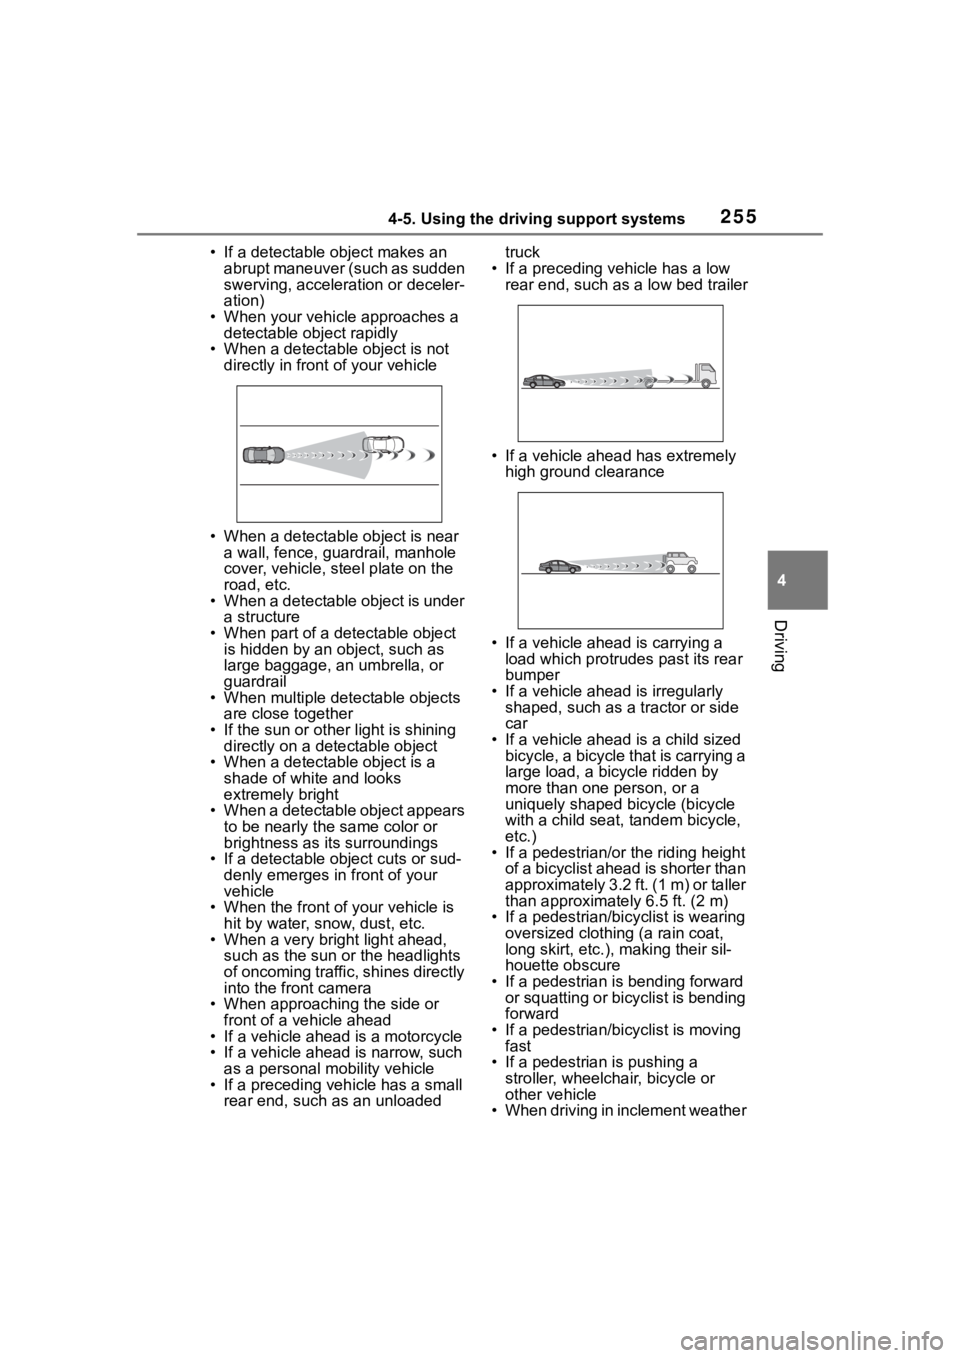
• If a vehicle ahead is narrow, such as a personal mobility vehicle
• If a preceding vehicle has a small rear end, such as an unloaded truck
• If a preceding vehicle has a low rear end, such as a low bed trailer
• If a vehicle ahead has extremely high ground clearance
• If a vehicle ahead is carrying a load which protrudes past its rear
bumper
• If a vehicle ahead is irregularly shaped, such as a tractor or side
car
• If a vehicle ahead is a child sized bicycle, a bicycle that is carrying a
large load, a bicycle ridden by
more than one person, or a
uniquely shaped bicycle (bicycle
with a child seat, tandem bicycle,
etc.)
• If a pedestrian/or the riding height
of a bicyclist ahead is shorter than
approximately 3.2 ft. (1 m) or taller
than approximate ly 6.5 ft. (2 m)
• If a pedestrian/bic yclist is wearing
oversized clothing (a rain coat,
long skirt, etc.), making their sil-
houette obscure
• If a pedestrian is bending forward or squatting or bicyclist is bending
forward
• If a pedestrian/bicyclist is moving fast
• If a pedestrian is pushing a
stroller, wheelchair, bicycle or
other vehicle
• When driving in inclement weather