steering wheel TOYOTA RAV4 HYBRID 2020 Owners Manual (in English)
[x] Cancel search | Manufacturer: TOYOTA, Model Year: 2020, Model line: RAV4 HYBRID, Model: TOYOTA RAV4 HYBRID 2020Pages: 744, PDF Size: 31.43 MB
Page 2 of 744

2TABLE OF CONTENTS
For your information...................8
Reading this manual ................ 13
How to search .......................... 14
Pictorial index .......................... 16
1-1. For safe use Before driving ................... 28
For safe driving ................ 29
Seat belts ......................... 31
SRS airbags ..................... 35
Front passenger occupant classification system ...... 45
Exhaust gas precautions.. 50
1-2. Child safety Riding with children .......... 51
Child restraint systems..... 52
1-3. Emergency assistance Safety Connect ................ 67
1-4. Hybrid system Hybrid system features .... 72
Hybrid system precautions ....................................... 77
1-5. Theft deterrent system Immobilizer system .......... 82
Alarm................................ 85
2-1. Instrument cluster Warning lights and indicators....................................... 88
Gauges and meters (with 4.2- inch display) ................... 94Gauges and meters (with 7-
inch display) ................... 98
Multi-information display 103
Energy monitor/ consumption
screen.......................... 113
3-1. Key information Keys .............................. 122
3-2. Opening, closing and lock- ing the doors
Side doors ..................... 128
Back door ...................... 134
Smart key system .......... 148
3-3. Adjusting the seats Front seats .................... 154
Rear seats ..................... 155
Driving position memory 157
Head restraints .............. 160
3-4. Adjusting the steering wheel and mirrors
Steering wheel............... 162
Inside rear view mirror ... 163
Digital Rear-view Mirror . 165
Outside rear view mirrors .................................... 174
3-5. Opening, closing the win- dows and moon roof
Power windows ............. 176
Moon roof ...................... 179
Panoramic moon roof .... 182
1For safety and security
2
Vehicle status
information and
indicators
3Before driving
Page 5 of 744
5TABLE OF CONTENTS
1
2
3
4
5
6
7
8
9
10
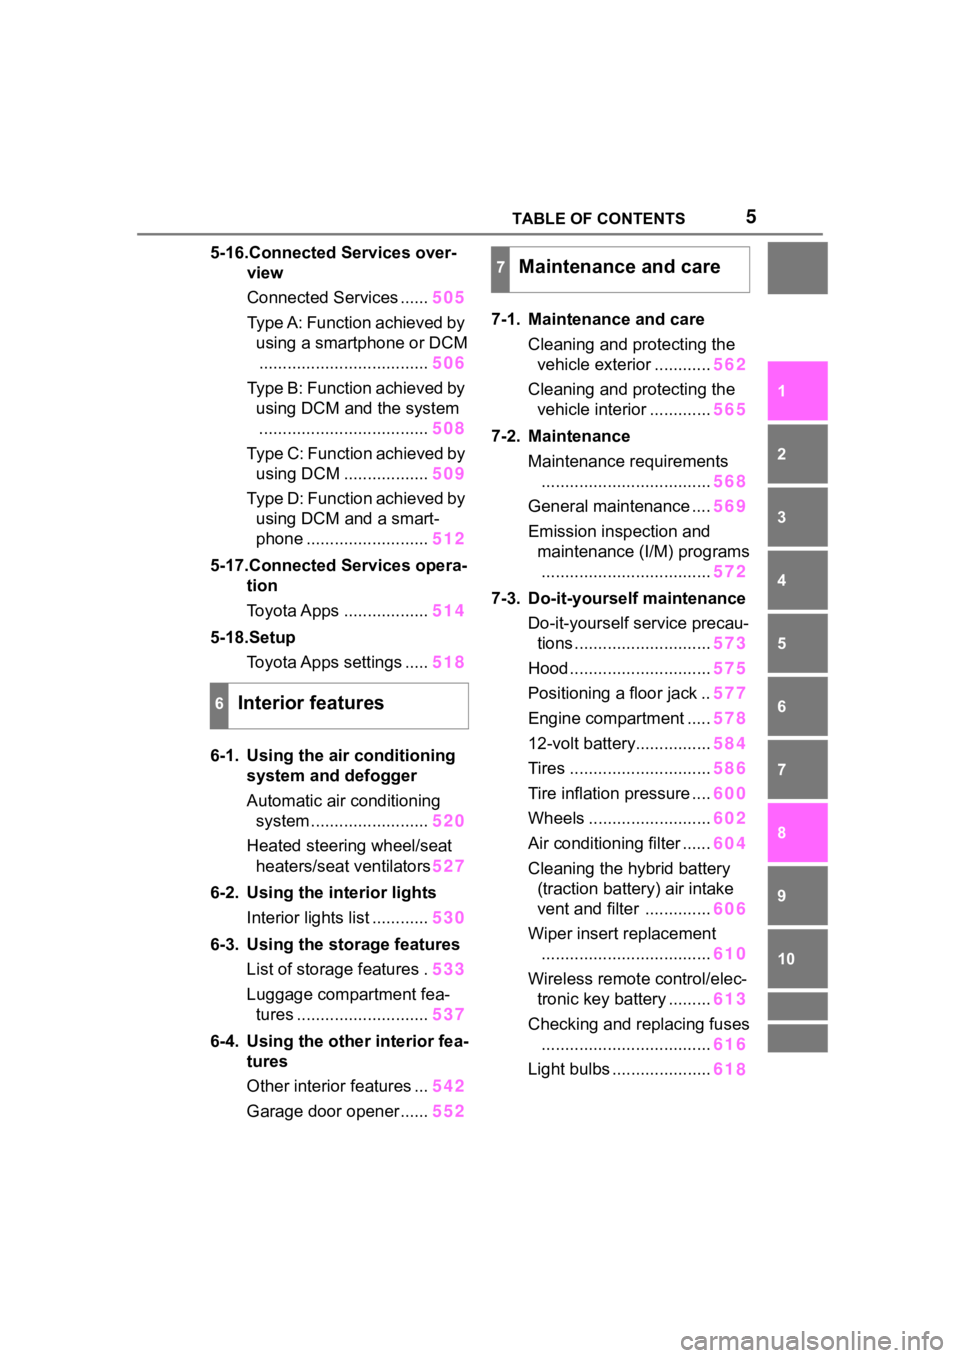
5-16.Connected Services over-view
Connected Services ...... 505
Type A: Function achieved by using a smartphone or DCM.................................... 506
Type B: Function achieved by using DCM and the system
.................................... 508
Type C: Function achieved by using DCM .................. 509
Type D: Function achieved by using DCM and a smart-
phone .......................... 512
5-17.Connected Services opera- tion
Toyota Apps .................. 514
5-18.Setup Toyota Apps settings ..... 518
6-1. Using the air conditioning
system and defogger
Automatic air conditioning system ......................... 520
Heated steering wheel/seat heaters/seat ventilators 527
6-2. Using the interior lights Interior lights list ............ 530
6-3. Using the storage features List of storage features . 533
Luggage compartment fea- tures ............................ 537
6-4. Using the other interior fea- tures
Other interior features ... 542
Garage door opener...... 5527-1. Maintenance and care
Cleaning and protecting the vehicle exterior ............ 562
Cleaning and protecting the vehicle interior ............. 565
7-2. Maintenance Maintenance requirements.................................... 568
General maintenance .... 569
Emission inspection and maintenance (I/M) programs.................................... 572
7-3. Do-it-yourself maintenance Do-it-yourself service precau-tions ............................. 573
Hood .............................. 575
Positioning a floor jack .. 577
Engine compartment ..... 578
12-volt battery................ 584
Tires .............................. 586
Tire inflation pressure .... 600
Wheels .......................... 602
Air conditioning filter ...... 604
Cleaning the hybrid battery (traction battery) air intake
vent and filter .............. 606
Wiper insert replacement .................................... 610
Wireless remote control/elec- tronic key battery ......... 613
Checking and replacing fuses .................................... 616
Light bulbs ..................... 61
8
6Interior features
7Maintenance and care
Page 21 of 744
21Pictorial index
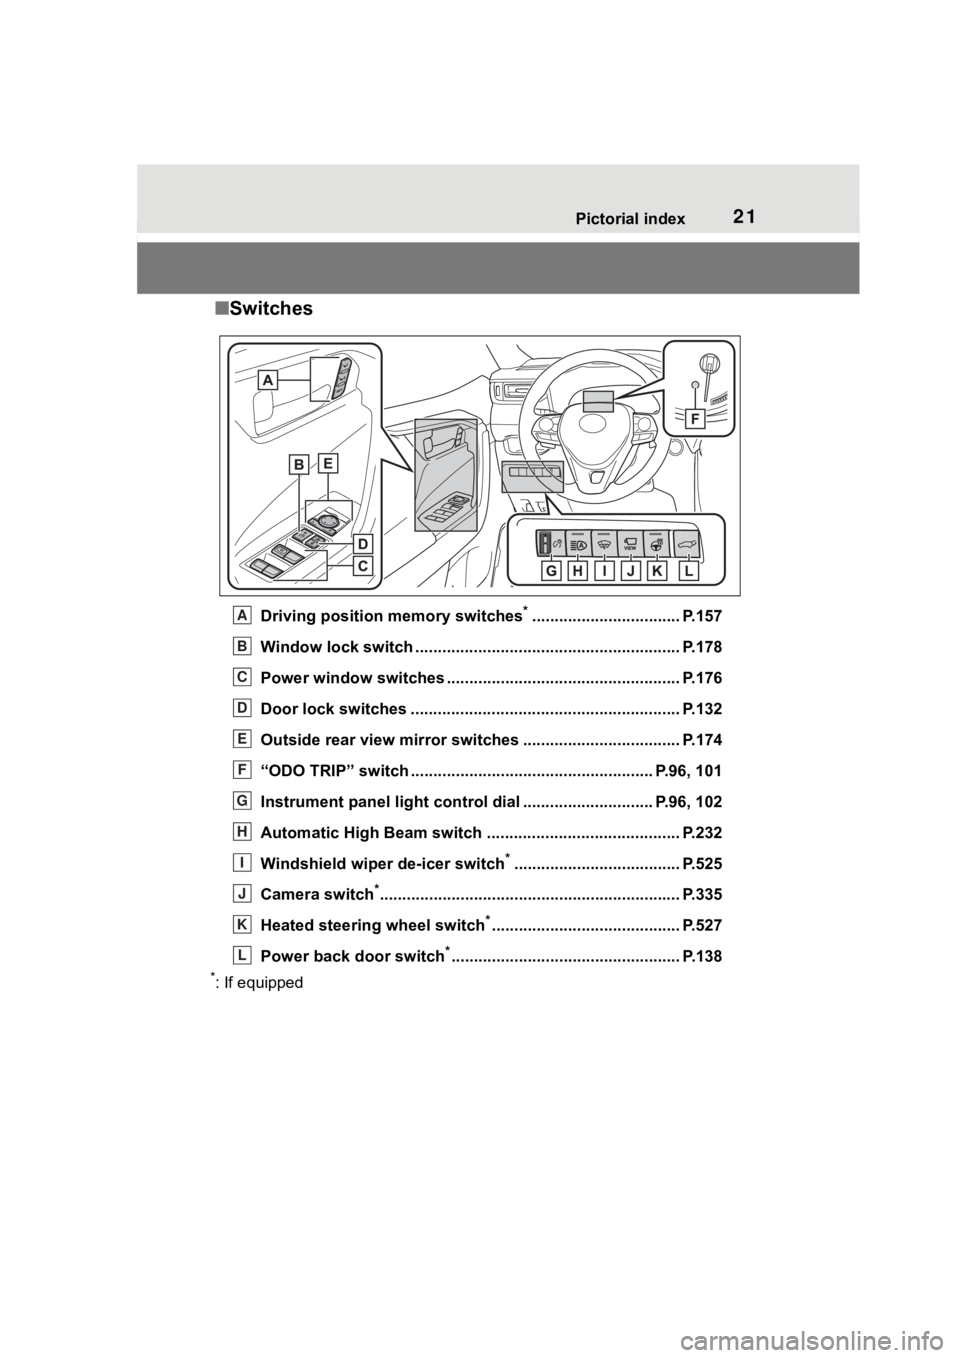
■Switches
Driving position memory switches*................................. P.157
Window lock switch ............................................. .............. P.178
Power window switches ....... ............................................. P.176
Door lock switches ............................................................ P.132
Outside rear view mirror swi tches ................................... P.174
“ODO TRIP” switch .............................................. ........ P.96, 101
Instrument panel light cont rol dial ............................. P.96, 102
Automatic High Beam switch ..................................... ...... P.232
Windshield wiper de-icer switch
*..................................... P.525
Camera switch
*............................................................... .... P.335
Heated steering wheel switch
*.......................................... P.527
Power back door switch
*................................................... P.138
*: If equipped
A
B
C
D
E
F
G
H
I
J
K
L
Page 29 of 744
291-1. For safe use
1
For safety and security
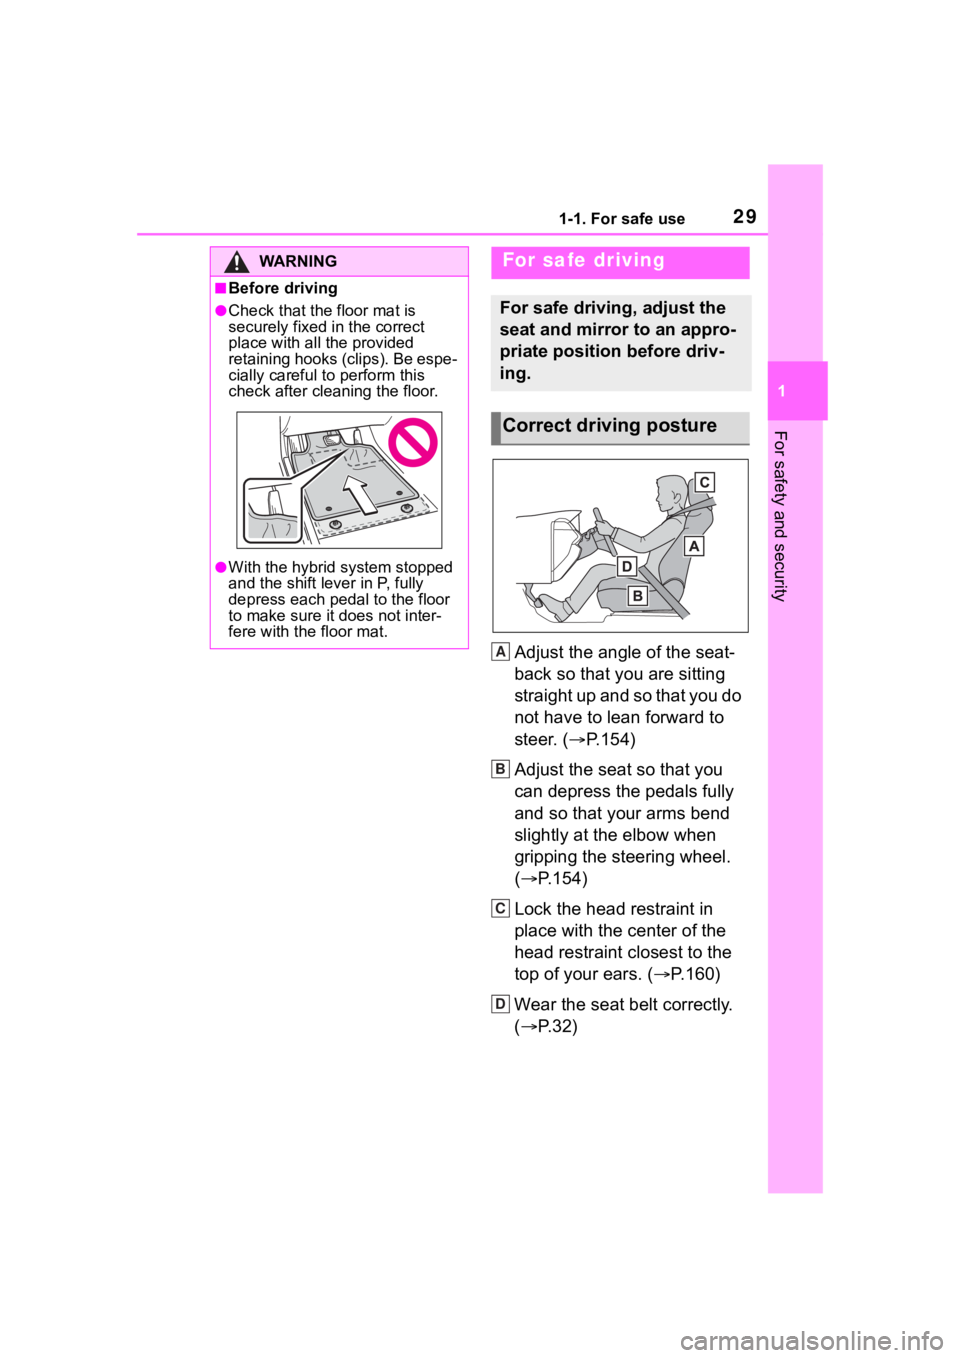
Adjust the angle of the seat-
back so that you are sitting
straight up and so that you do
not have to lean forward to
steer. (P.154)
Adjust the seat so that you
can depress the pedals fully
and so that your arms bend
slightly at the elbow when
gripping the steering wheel.
( P.154)
Lock the head restraint in
place with the center of the
head restraint closest to the
top of your ears. ( P.160)
Wear the seat belt correctly.
( P.32)
WA R N I N G
■Before driving
●Check that the floor mat is
securely fixed in the correct
place with all the provided
retaining hooks (clips). Be espe-
cially careful to perform this
check after cleaning the floor.
●With the hybrid system stopped
and the shift lever in P, fully
depress each pedal to the floor
to make sure it does not inter-
fere with the floor mat.
For safe driving
For safe driving, adjust the
seat and mirror to an appro-
priate position before driv-
ing.
Correct driving posture
A
B
C
D
Page 40 of 744
401-1. For safe use
vehicle was involved in an acci-
dent that was not severe enough
to cause the SRS side and curtain
shield airbags to inflate.
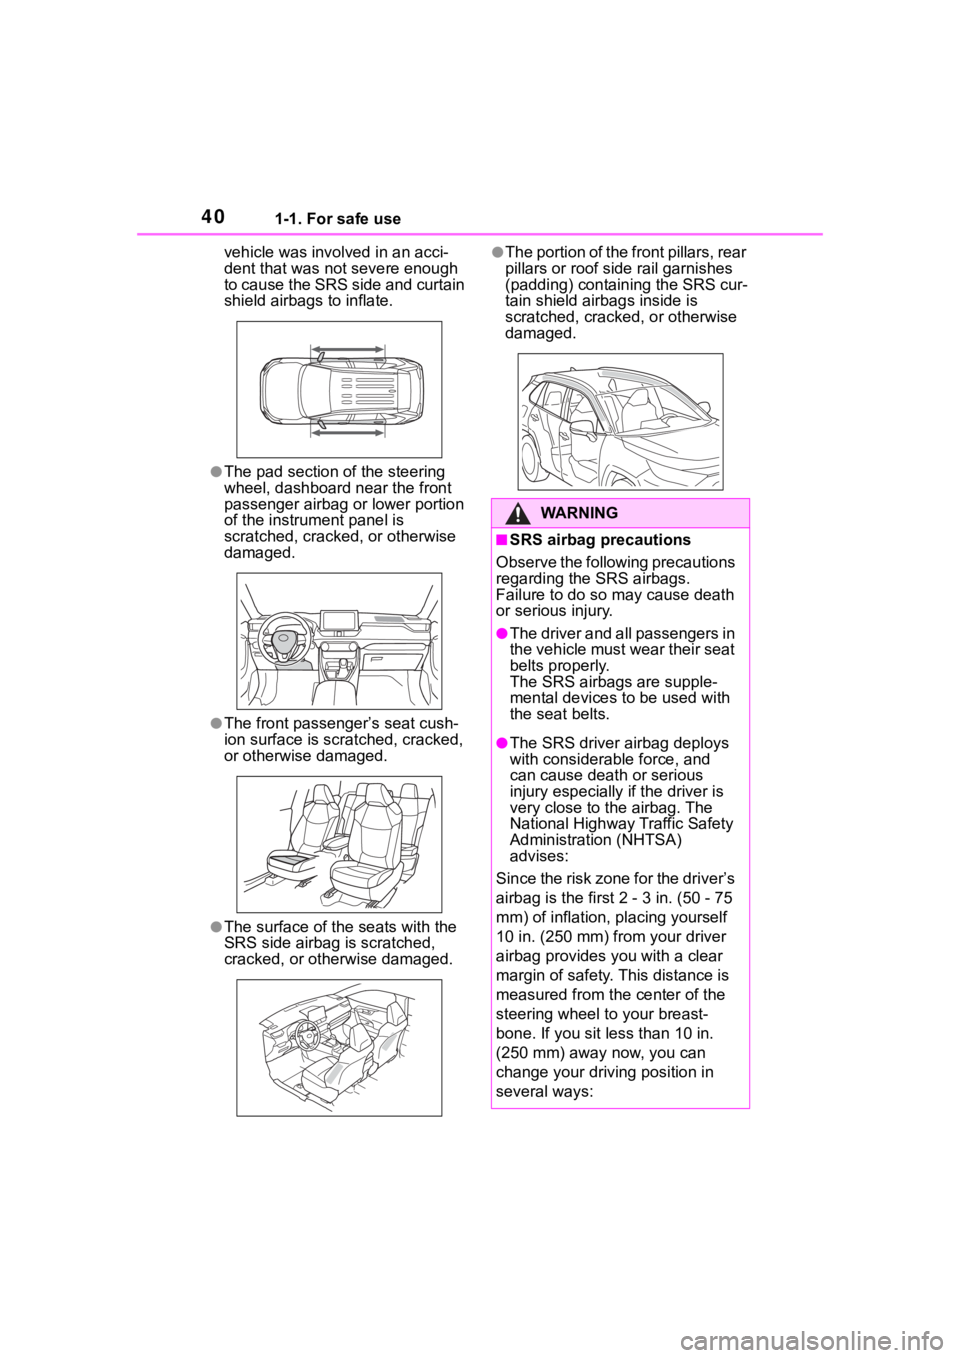
●The pad section of the steering
wheel, dashboard near the front
passenger airbag or lower portion
of the instrument panel is
scratched, cracked, or otherwise
damaged.
●The front passenger’s seat cush-
ion surface is scratched, cracked,
or otherwise damaged.
●The surface of the seats with the
SRS side airbag is scratched,
cracked, or otherwise damaged.
●The portion of the front pillars, rear
pillars or roof sid e rail garnishes
(padding) containing the SRS cur-
tain shield airbags inside is
scratched, cracked, or otherwise
damaged.
WA R N I N G
■SRS airbag precautions
Observe the following precautions
regarding the SRS airbags.
Failure to do so may cause death
or serious injury.
●The driver and all passengers in
the vehicle must wear their seat
belts properly.
The SRS airbags are supple-
mental devices to be used with
the seat belts.
●The SRS driver airbag deploys
with considerable force, and
can cause death or serious
injury especially if the driver is
very close to the airbag. The
National Highway Traffic Safety
Administration (NHTSA)
advises:
Since the risk zone for the driver’s
airbag is the first 2 - 3 in. (50 - 75
mm) of inflation, placing yourself
10 in. (250 mm) from your driver
airbag provides you with a clear
margin of safety. This distance is
measured from the center of the
steering wheel to your breast-
bone. If you sit l ess than 10 in.
(250 mm) away now, you can
change your driving position in
several ways:
Page 42 of 744
421-1. For safe use
WA R N I N G
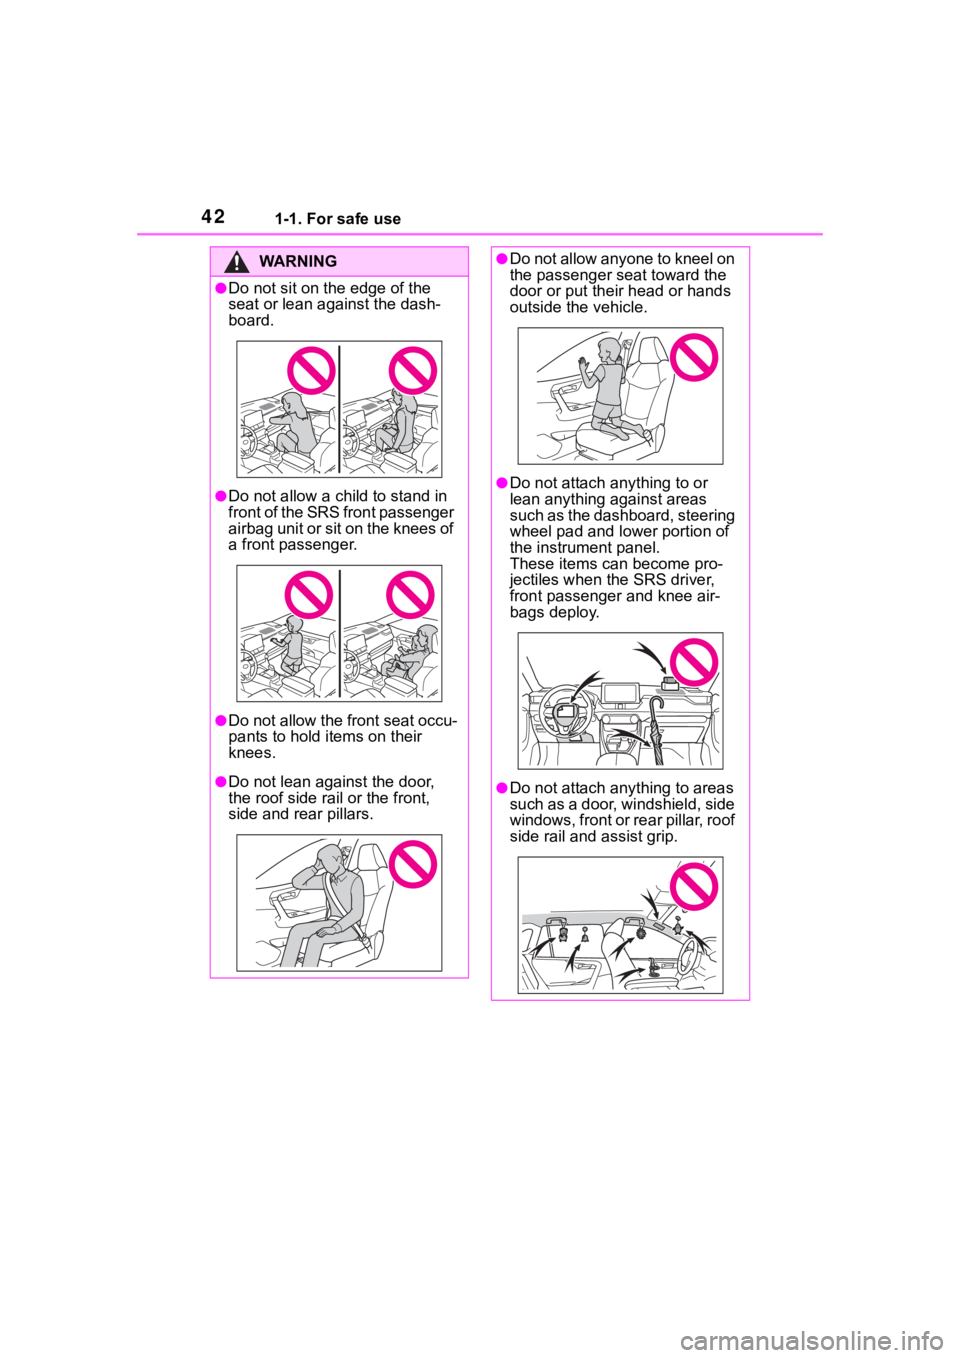
●Do not sit on the edge of the
seat or lean against the dash-
board.
●Do not allow a child to stand in
f r o n t o f t h e S R S f r o n t p a s s e n g e r
airbag unit or sit on the knees of
a front passenger.
●Do not allow the front seat occu-
pants to hold items on their
knees.
●Do not lean against the door,
the roof side rail or the front,
side and rear pillars.
●Do not allow anyone to kneel on
the passenger seat toward the
door or put their head or hands
outside the vehicle.
●Do not attach a nything to or
lean anything against areas
such as the dashboard, steering
wheel pad and lower portion of
the instrument panel.
These items can become pro-
jectiles when th e SRS driver,
front passenger and knee air-
bags deploy.
●Do not attach anything to areas
such as a door, windshield, side
windows, front or rear pillar, roof
side rail and assist grip.
Page 43 of 744
431-1. For safe use
1
For safety and security
WA R N I N G
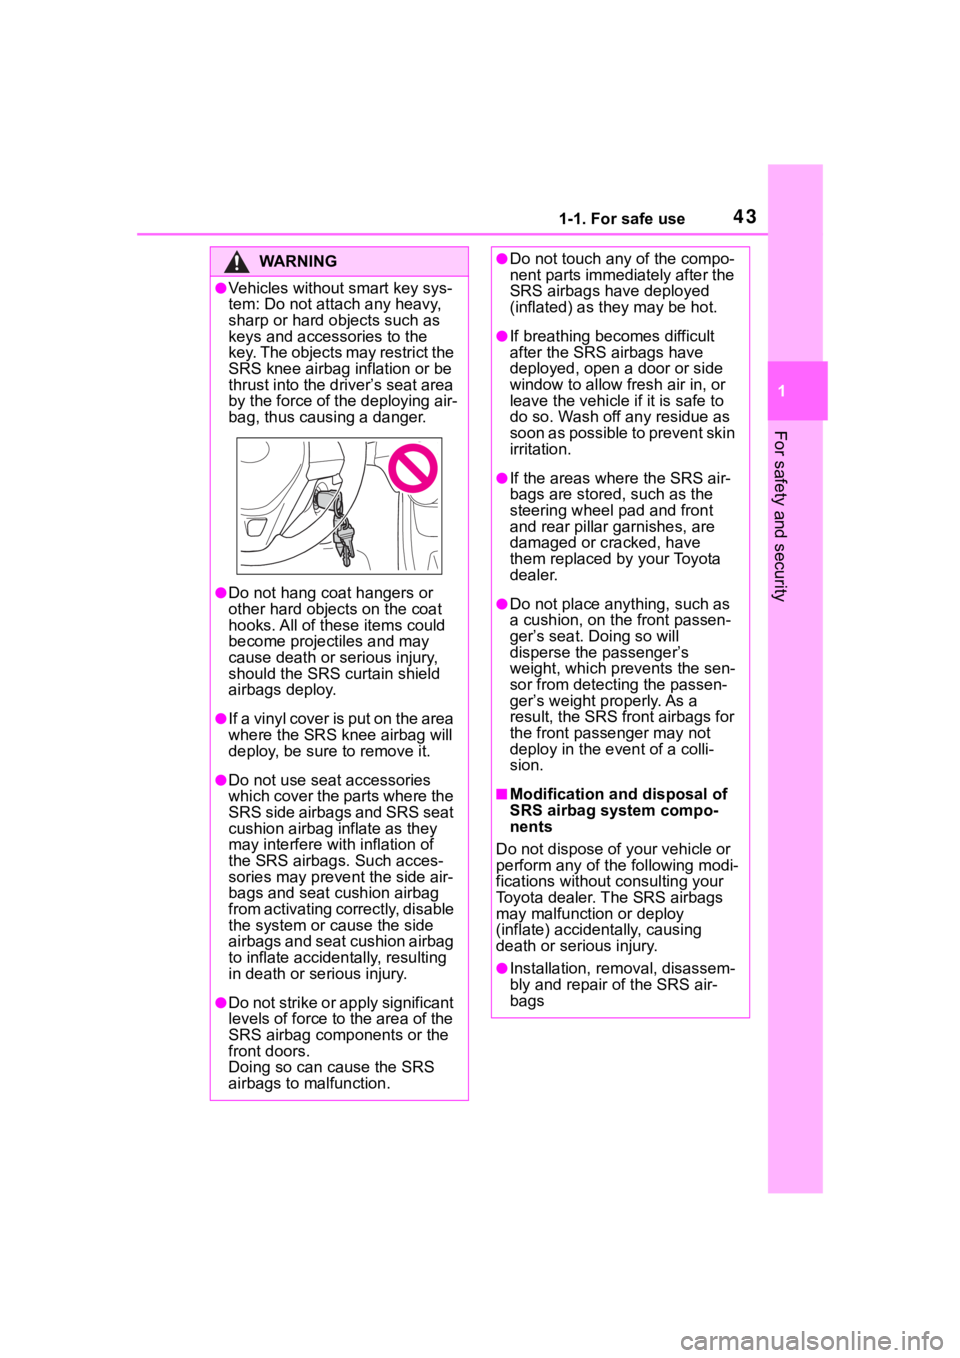
●Vehicles without smart key sys-
tem: Do not attach any heavy,
sharp or hard objects such as
keys and accessories to the
key. The objects may restrict the
SRS knee airbag inflation or be
thrust into the driver’s seat area
by the force of the deploying air-
bag, thus causing a danger.
●Do not hang coat hangers or
other hard objects on the coat
hooks. All of these items could
become projectiles and may
cause death or serious injury,
should the SRS curtain shield
airbags deploy.
●I f a vin yl co ver is p u t on t he ar ea
where the SRS knee airbag will
deploy, be sure to remove it.
●Do not use seat accessories
which cover the parts where the
SRS side airbags and SRS seat
cushion airbag inflate as they
may interfere with inflation of
the SRS airbags. Such acces-
sories may prevent the side air-
bags and seat cushion airbag
from activating correctly, disable
the system or cause the side
airbags and seat cushion airbag
to inflate accidentally, resulting
in death or serious injury.
●Do not strike or apply significant
levels of force to the area of the
SRS airbag components or the
front doors.
Doing so can cause the SRS
airbags to malfunction.
●Do not touch any of the compo-
nent parts immediately after the
SRS airbags have deployed
(inflated) as they may be hot.
●If breathing becomes difficult
after the SRS airbags have
deployed, open a door or side
window to allow fresh air in, or
leave the vehicle if it is safe to
do so. Wash off any residue as
soon as possible to prevent skin
irritation.
●If the areas where the SRS air-
bags are stored, such as the
steering wheel pad and front
and rear pillar garnishes, are
damaged or cracked, have
them replaced by your Toyota
dealer.
●Do not place anything, such as
a cushion, on the front passen-
ger’s seat. Doing so will
disperse the passenger’s
weight, which prevents the sen-
sor from detecting the passen-
ger’s weight properly. As a
result, the SRS front airbags for
the front passenger may not
deploy in the event of a colli-
sion.
■Modification and disposal of
SRS airbag system compo-
nents
Do not dispose of your vehicle or
perform any of the following modi-
fications without consulting your
Toyota dealer. The SRS airbags
may malfunction or deploy
(inflate) accidentally, causing
death or serious injury.
●Installation, re moval, disassem-
bly and repair of the SRS air-
bags
Page 44 of 744
441-1. For safe use
WA R N I N G
●Repairs, modifications, removal
or replacement of the steering
wheel, instrument panel, dash-
board, seats or seat upholstery,
front, side and rear pillars, roof
side rails, front door panels,
front door trims or front door
speakers
●Modifications to the front door
panel (such as making a hole in
it)
●Repairs or modifications of the
front fender, front bumper, or
side of the occ upant compart-
ment
●Installation of a grille guard (bull
bars, kangaroo bar, etc.), snow
plows, winches or roof luggage
carrier
●Modifications to the vehicle’s
suspension system
●Installation of electronic devices
such as mobile two-way radios
and CD players
●Modifications to your vehicle for
a person with a physical disabil-
ity
Page 104 of 744
1042-1. Instrument cluster
■The multi-information display is
displayed when
The power swit ch is in ON.
■When changing driving mode
Background color of the multi-infor-
mation display is changed following
the selected drivi ng mode or when
Trail Mode is turned on. ( P.365,
366)
■Liquid crystal display
Small spots or light spots may
appear on the display. This phenom-
enon is characteristi c of liquid crys-
tal displays, and there is no problem
continuing to use the display.
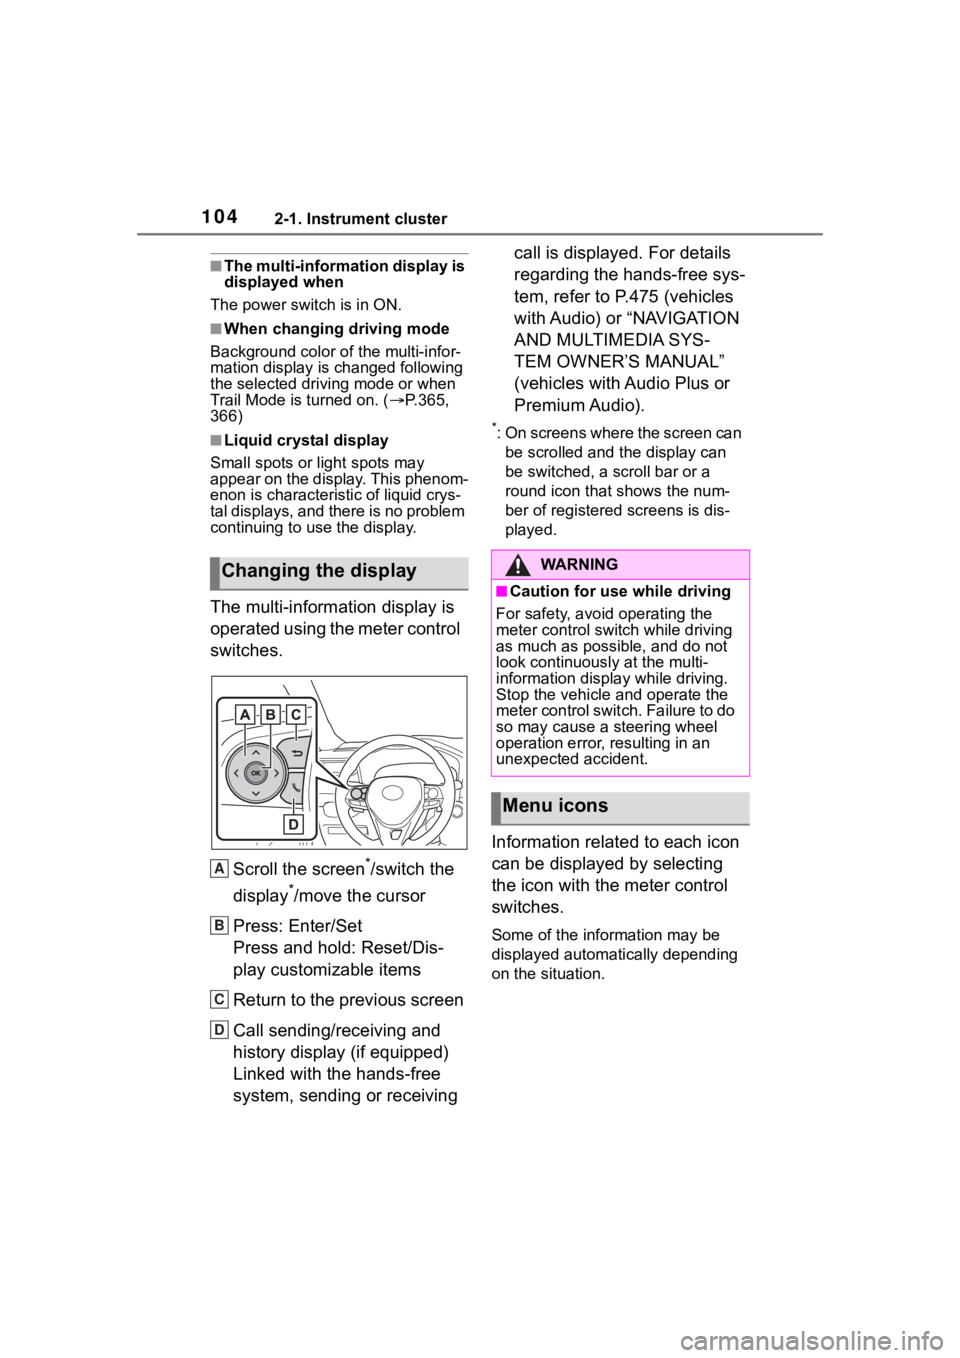
The multi-information display is
operated using the meter control
switches.
Scroll the screen
*/switch the
display
*/move the cursor
Press: Enter/Set
Press and hold: Reset/Dis-
play customizable items
Return to the previous screen
Call sending/receiving and
history display (if equipped)
Linked with the hands-free
system, sending or receiving call is displayed. For details
regarding the hands-free sys-
tem, refer to P.475 (vehicles
with Audio) or “NAVIGATION
AND MULTIMEDIA SYS-
TEM OWNER’S MANUAL”
(vehicles with Audio Plus or
Premium Audio).
*: On screens where the screen can
be scrolled and the display can
be switched, a scroll bar or a
round icon that shows the num-
ber of registered screens is dis-
played.
Information related to each icon
can be displayed by selecting
the icon with the meter control
switches.
Some of the information may be
displayed automatically depending
on the situation.
Changing the display
A
B
C
D
�:�$ �5 �1 �, �1 �*
■Caution for use while driving
For safety, avoid operating the
meter control switch while driving
as much as possible, and do not
look continuously at the multi-
information displa y while driving.
Stop the vehicle and operate the
meter control swit ch. Failure to do
so may cause a steering wheel
operation error, resulting in an
unexpected accident.
Menu icons
Page 109 of 744
1092-1. Instrument cluster
2
Vehicle status information and indicators
changed by using the meter
control switches.
■Setting procedure
1 Operate or of the
meter control switches and
select .
2 Operate or of the
meter control switches and
select the desired item.
• If the function is turned on and off or the volume, etc. is
changed on the setting
screen, the setting is changed
each time is pressed.
• For functions that allow oper- ation contents, display con-
tents, etc., of function to be
selected, the setting screen is
displayed by pressing and
holding . When the setting
screen is displayed, select the
setting or desired value (time,
etc.) with .
3 After changing the settings,
press of the meter control
switches.
■ LTA (Lane Tracing
Assist) ( P.257)
Select to set up the following
items.
“Lane Center”
Select to enable/disable the lane
centering function.
“Steering Assist”
Select to enable/d isable steering
wheel assistance.
“Sensitivity”
Select to set the lane departure
alert sensitivity.
“Sway Warning”
Select to enable/disable the vehicle
sway warning.
“Sway Sensitivity”
Select to set the vehicle sway warn-
ing sensitivity.
■ PCS (Pre-Collision Sys-
tem) ( P.249)
Select to set up the following
items.
PCS on/off
Select to enable/disable the pre-
collision system.
“Sensitivity”
Select to change the pre-collision
warning timing.
■ BSM (Blind Spot Moni-
tor) (if equipped) ( P.280)
Select to set up the following
items.
BSM (Blind Spot Monitor)
on/off
Select to enable/disable the BSM
system.
“Brightness”
Select to switch the brightness of
the outside rear view mirror indica-
tors. ( P.281)
“Sensitivity”
Select to change the alert timing for
an approaching vehicle.