clock TOYOTA RAV4 PHEV 2021 User Guide
[x] Cancel search | Manufacturer: TOYOTA, Model Year: 2021, Model line: RAV4 PHEV, Model: TOYOTA RAV4 PHEV 2021Pages: 666, PDF Size: 161.28 MB
Page 551 of 666
549
7
7-3. Do-it-yours elf maintenance
Maintenance and care
●Back-up lights
●Outer foot lights (if equipped)
■Condensation build-up on the
inside of the lens
Temporary condensation build-up on the inside of the lig ht lens does not indi-
cate a malfunction. Contact any autho -
rized Toyota ret ailer or Toyota authorized repairer, or any reliable
repairer for more inf ormation in the fol-
lowing situations:
●Large drops of wat er have built up on
the inside of the lens.
●Water has built up inside the light.
■When replacing an electronic com -
ponent, such as a lights, etc.
→ P.547
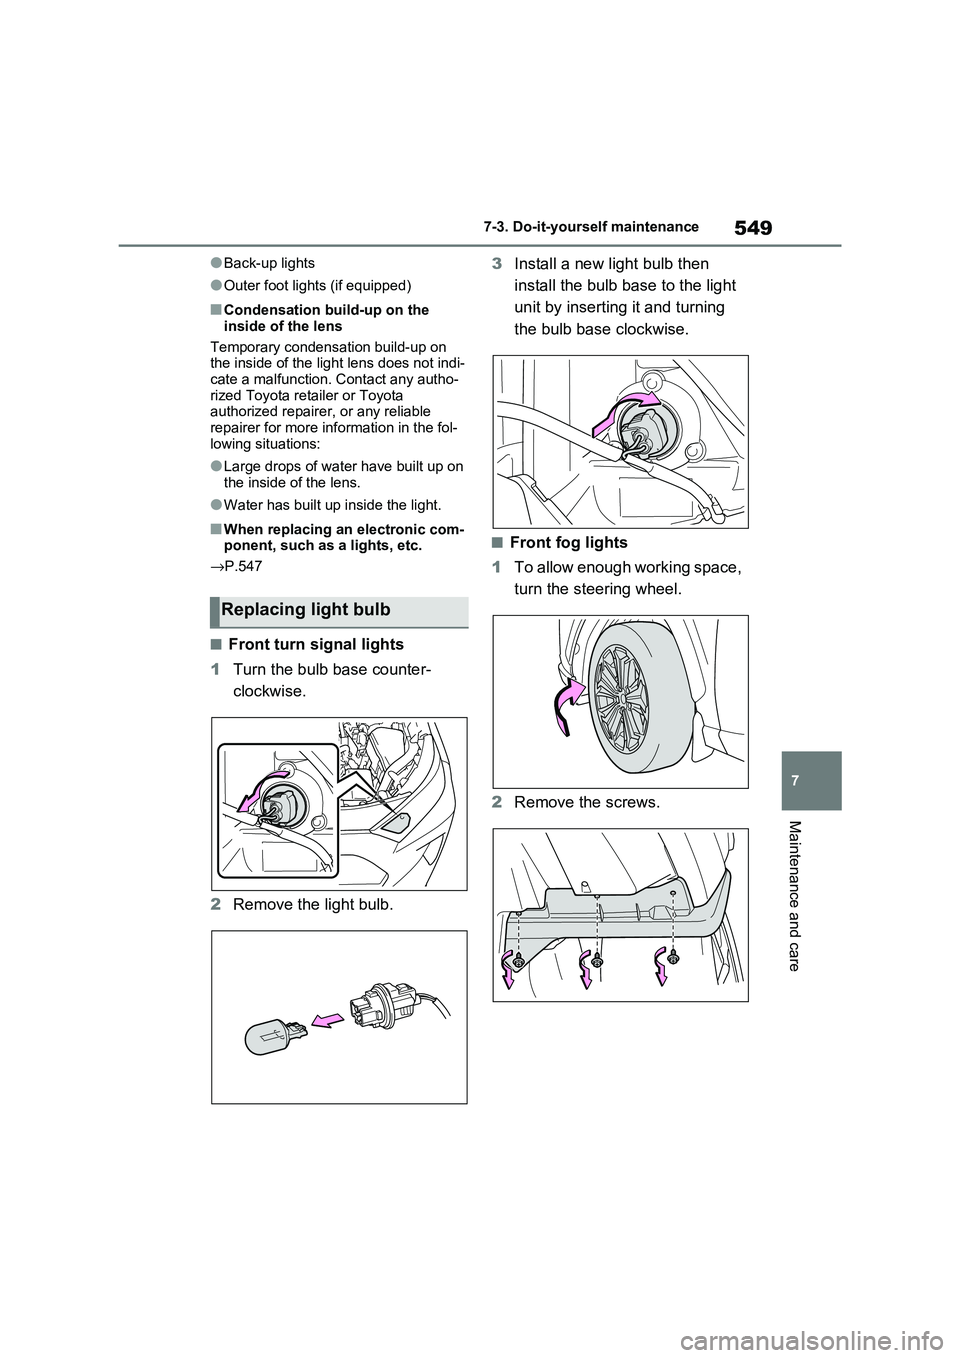
■Front turn signal lights
1 Turn the bulb base counter-
clockwise.
2 Remove the light bulb.
3 Install a new light bulb then
install the bulb base to the light
unit by inserting it and turning
the bulb base clockwise.
■Front fog lights
1 To allow enough working space,
turn the steering wheel.
2 Remove the screws.
Replacing light bulb
Page 552 of 666
5507-3. Do-it-yourself maintenance
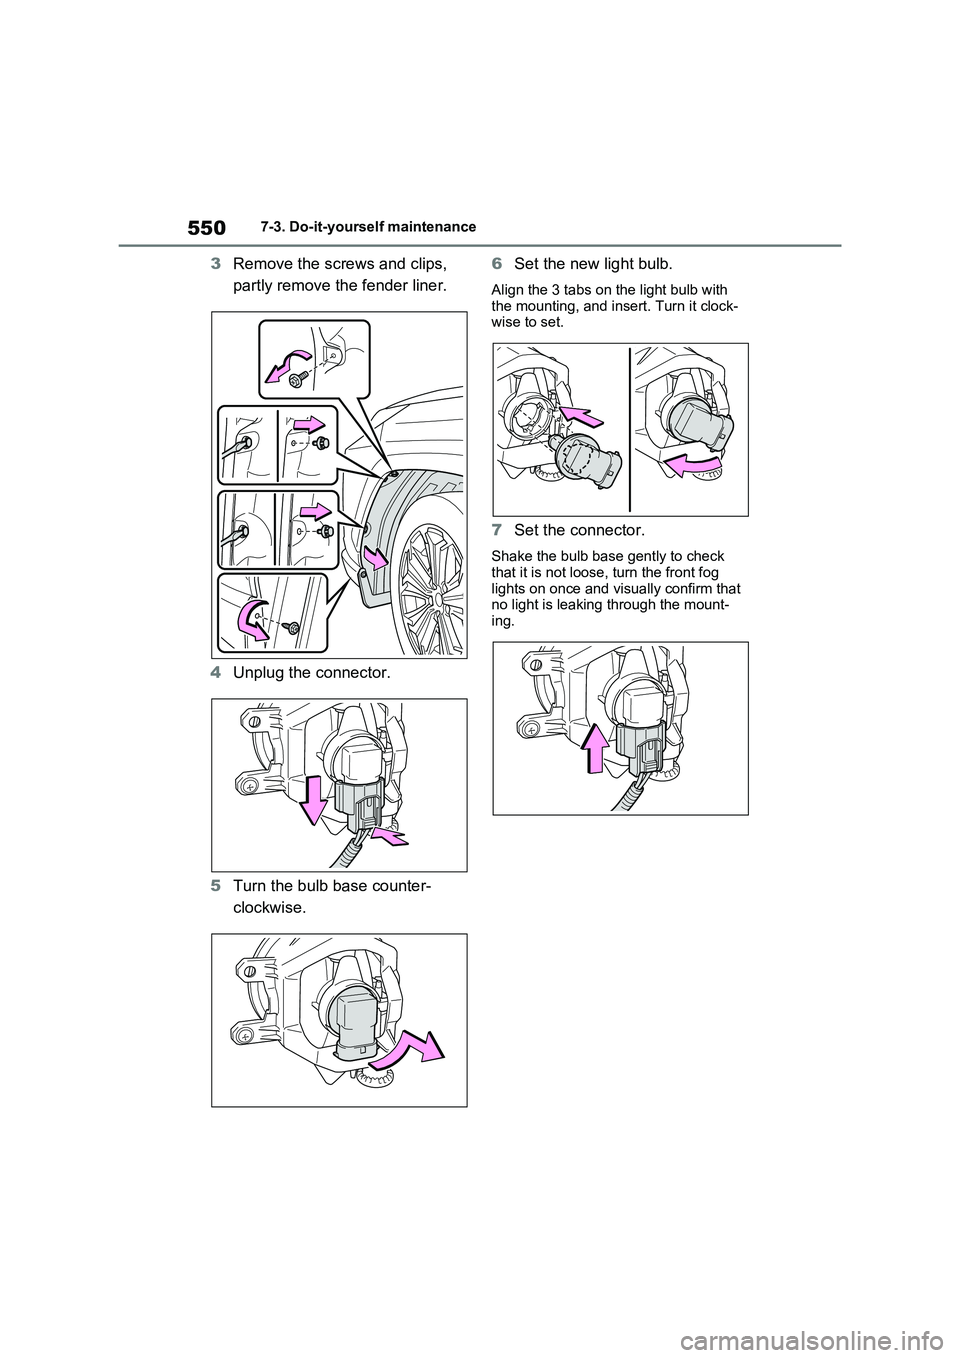
3Remove the screws and clips,
partly remove the fender liner.
4 Unplug the connector.
5 Turn the bulb base counter-
clockwise.
6 Set the new light bulb.
Align the 3 tabs on the light bulb with
the mounting, and in sert. Turn it clock- wise to set.
7 Set the connector.
Shake the bulb base gently to check that it is not loose , turn the front fog
lights on once and visually confirm that
no light is leaking through the mount - ing.
Page 553 of 666
551
7
7-3. Do-it-yours elf maintenance
Maintenance and care
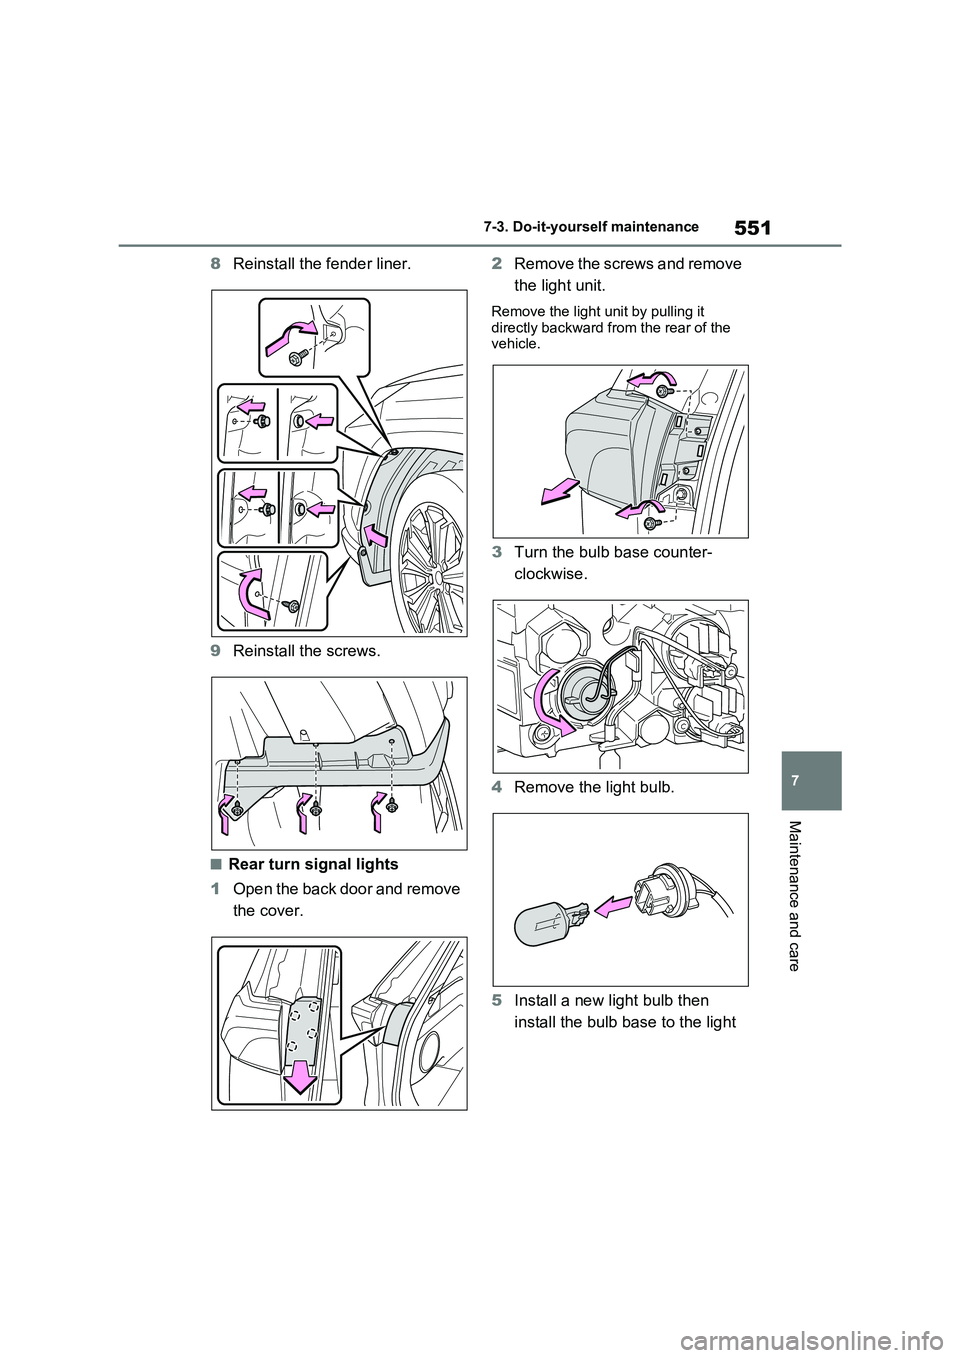
8Reinstall the fender liner.
9 Reinstall the screws.
■Rear turn signal lights
1 Open the back door and remove
the cover.
2 Remove the screws and remove
the light unit.
Remove the light unit by pulling it
directly backward from the rear of the vehicle.
3 Turn the bulb base counter-
clockwise.
4 Remove the light bulb.
5 Install a new light bulb then
install the bulb base to the light
Page 554 of 666
5527-3. Do-it-yourself maintenance
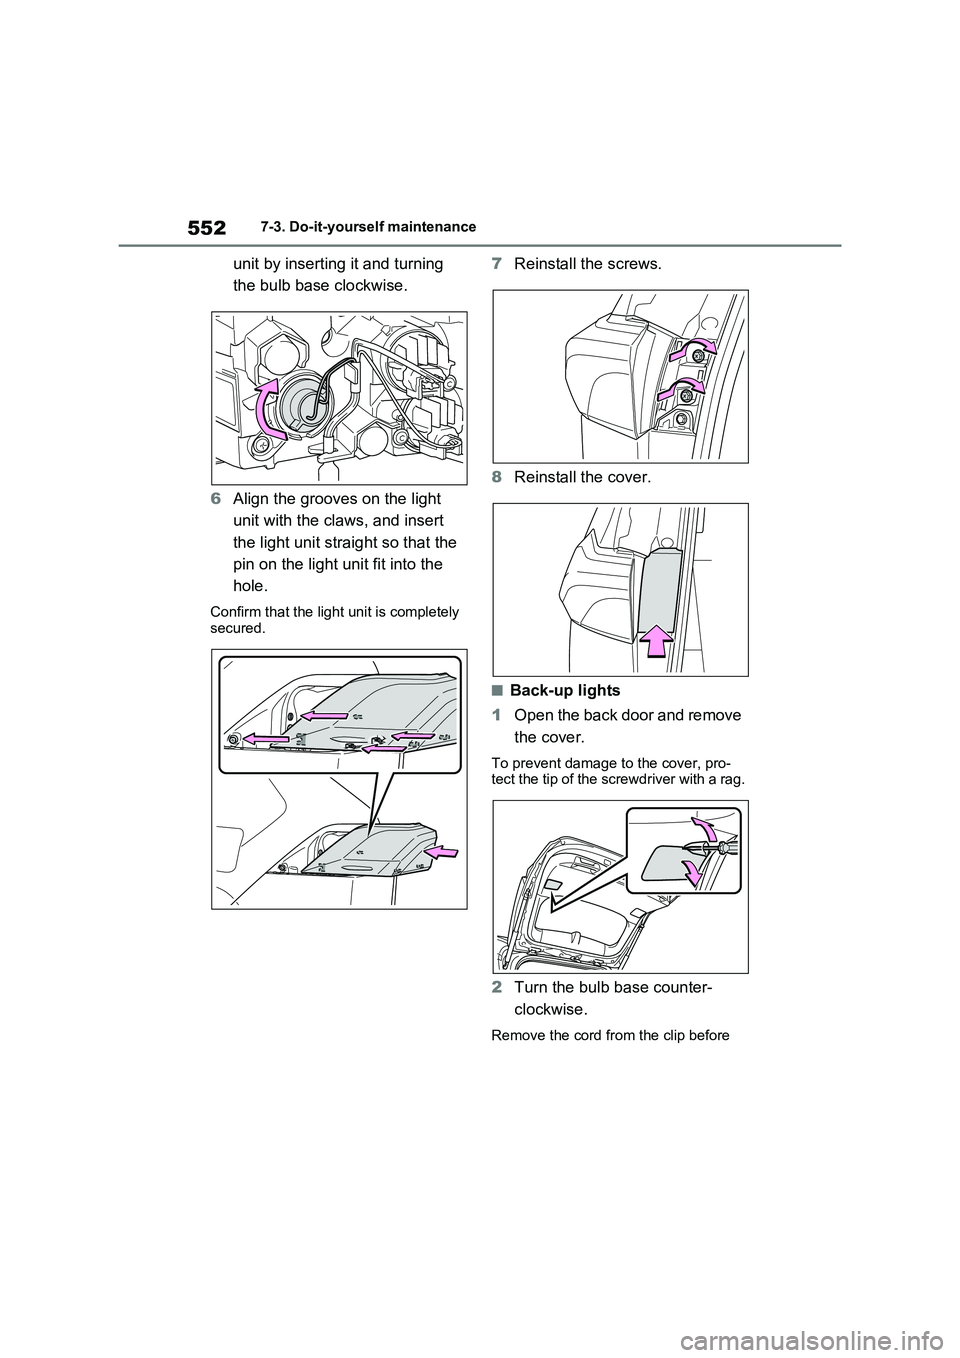
unit by inserting it and turning
the bulb base clockwise.
6 Align the grooves on the light
unit with the claws, and insert
the light unit straight so that the
pin on the light unit fit into the
hole.
Confirm that the light unit is completely secured.
7 Reinstall the screws.
8 Reinstall the cover.
■Back-up lights
1 Open the back door and remove
the cover.
To prevent damage to the cover, pro - tect the tip of the screwdriver with a rag.
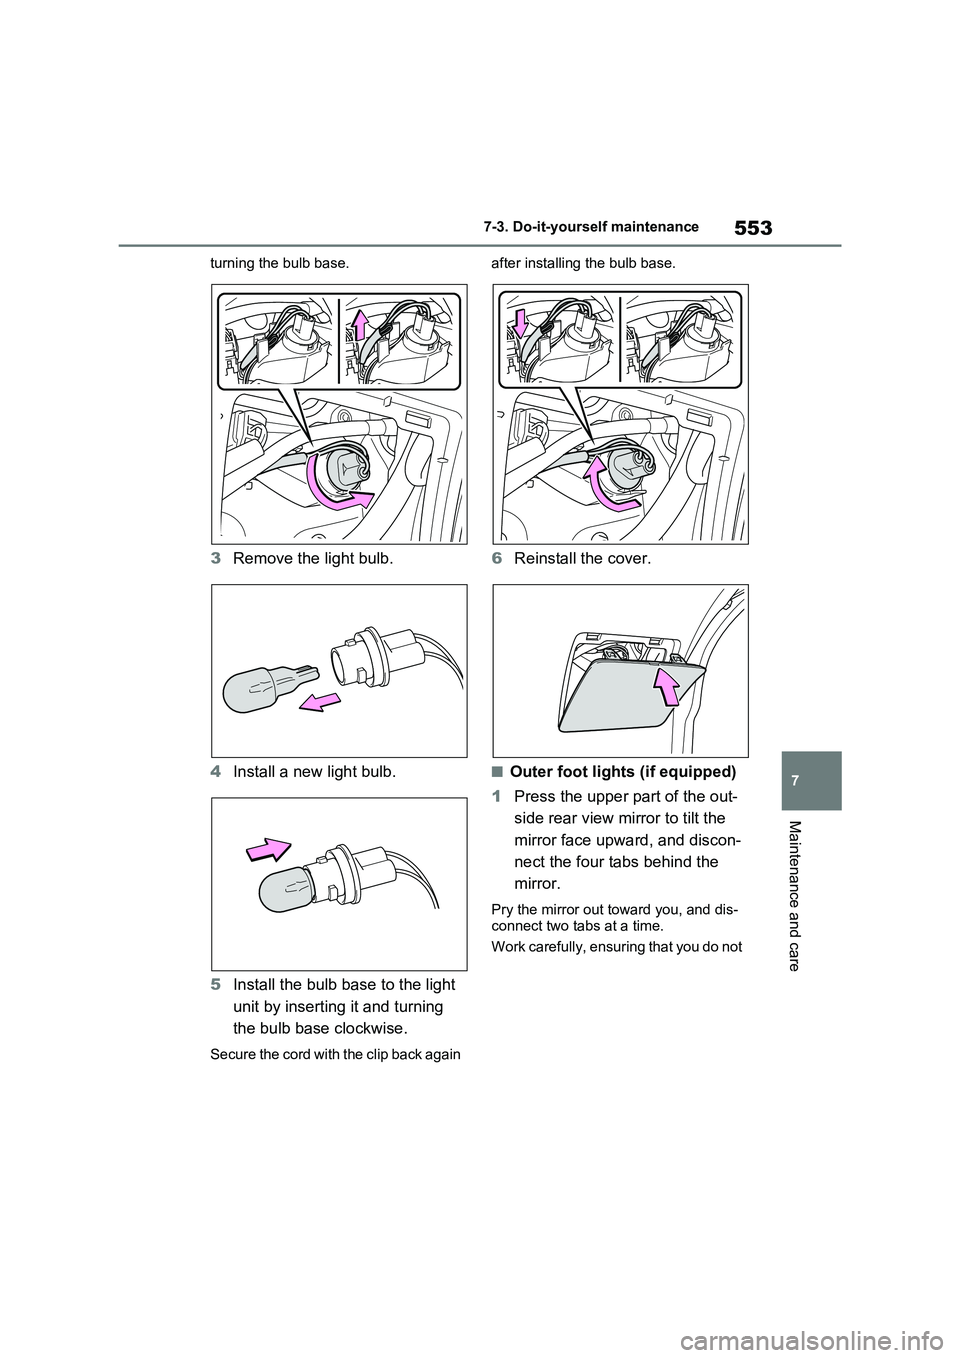
2 Turn the bulb base counter-
clockwise.
Remove the cord fr om the clip before
Page 555 of 666
553
7
7-3. Do-it-yours elf maintenance
Maintenance and care
turning the bulb base.
3Remove the light bulb.
4 Install a new light bulb.
5 Install the bulb base to the light
unit by inserting it and turning
the bulb base clockwise.
Secure the cord with the clip back again
after installing the bulb base.
6Reinstall the cover.
■Outer foot lights (if equipped)
1 Press the upper part of the out-
side rear view mirror to tilt the
mirror face upward, and discon -
nect the four tabs behind the
mirror.
Pry the mirror out toward you, and dis -
connect two tabs at a time.
Work carefully, ensuring that you do not
Page 557 of 666
555
7
7-3. Do-it-yours elf maintenance
Maintenance and care
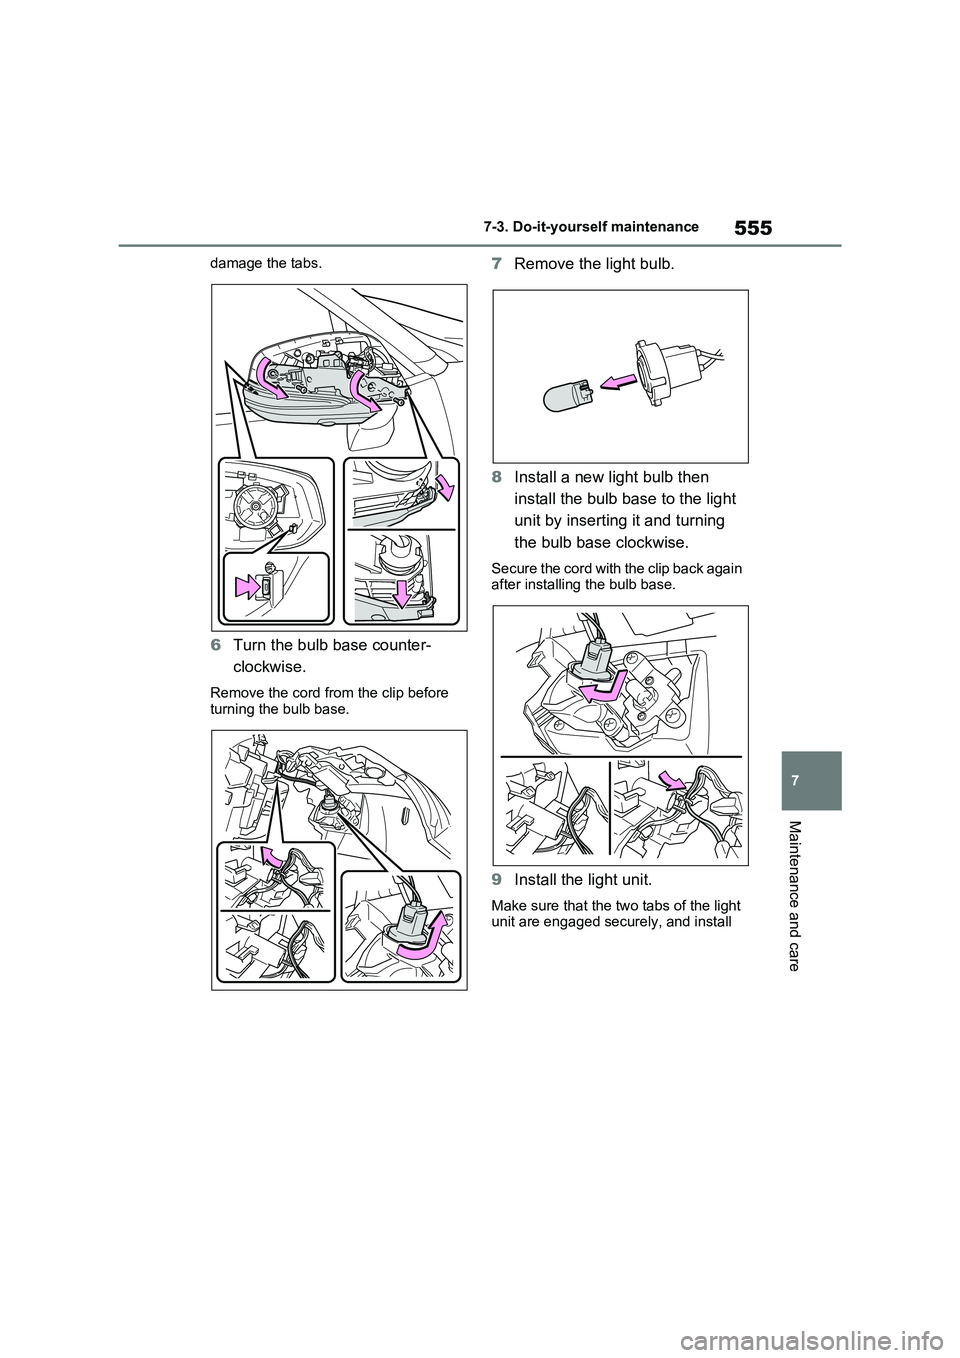
damage the tabs.
6Turn the bulb base counter-
clockwise.
Remove the cord from the clip before turning the bulb base.
7 Remove the light bulb.
8 Install a new light bulb then
install the bulb base to the light
unit by inserting it and turning
the bulb base clockwise.
Secure the cord with the clip back again after installing the bulb base.
9Install the light unit.
Make sure that the two tabs of the light
unit are engaged securely, and install
Page 589 of 666
587
8
8-2. Steps to take in an emergency
When trouble arises
Therefore keep it in a safe place.
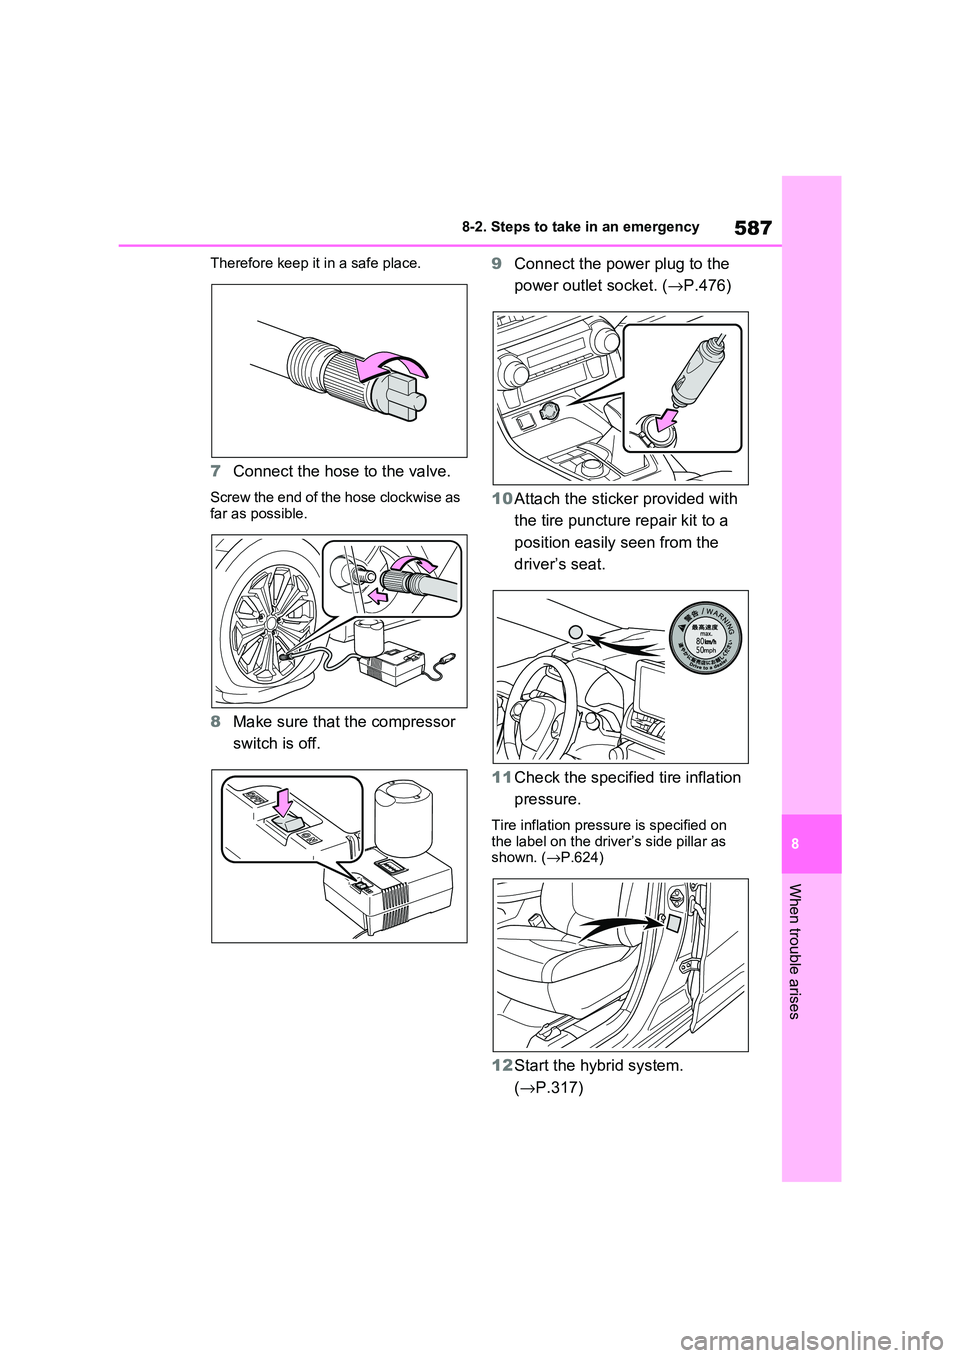
7 Connect the hose to the valve.
Screw the end of the hose clockwise as
far as possible.
8 Make sure that the compressor
switch is off.
9 Connect the power plug to the
power outlet socket. ( →P.476)
10 Attach the sticker provided with
the tire puncture repair kit to a
position easily seen from the
driver’s seat.
11 Check the specified tire inflation
pressure.
Tire inflation pressu re is specified on
the label on the driv er’s side pillar as
shown. ( →P.624)
12Start the hybrid system.
( →P.317)
Page 634 of 666
6329-2. Customization
*1: For details about each function: →P.186
*2: The default setting varies according to country.
*3: Available languages may differ depending on the target region.
*4: If equipped
*5: This can only be set if GPS calibration of clock is turned off in the multimedia sys-
tem settings.
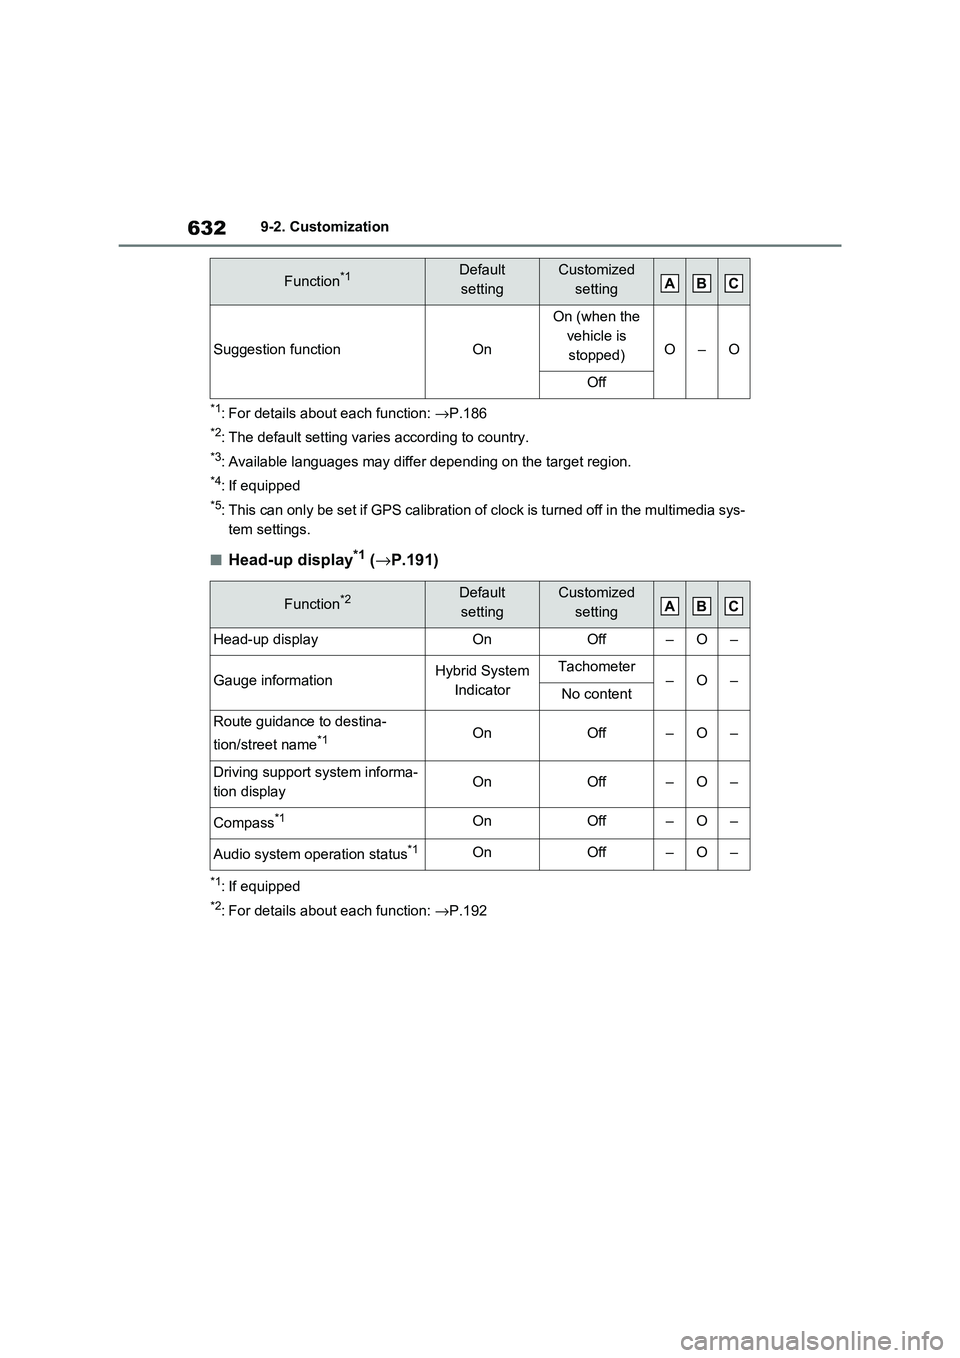
■Head-up display*1 ( →P.191)
*1: If equipped
*2: For details about each function: →P.192
Suggestion functionOn
On (when the
vehicle is
stopped)O–O
Off
Function*2Default
setting
Customized
setting
Head-up displayOnOff–O–
Gauge informationHybrid System
Indicator
Tachometer–O–No content
Route guidance to destina -
tion/street name*1OnOff–O–
Driving support system informa -
tion displayOnOff–O–
Compass*1OnOff–O–
Audio system operation status*1OnOff–O–
Function*1Default
setting
Customized
settingABC
ABC
Page 653 of 666
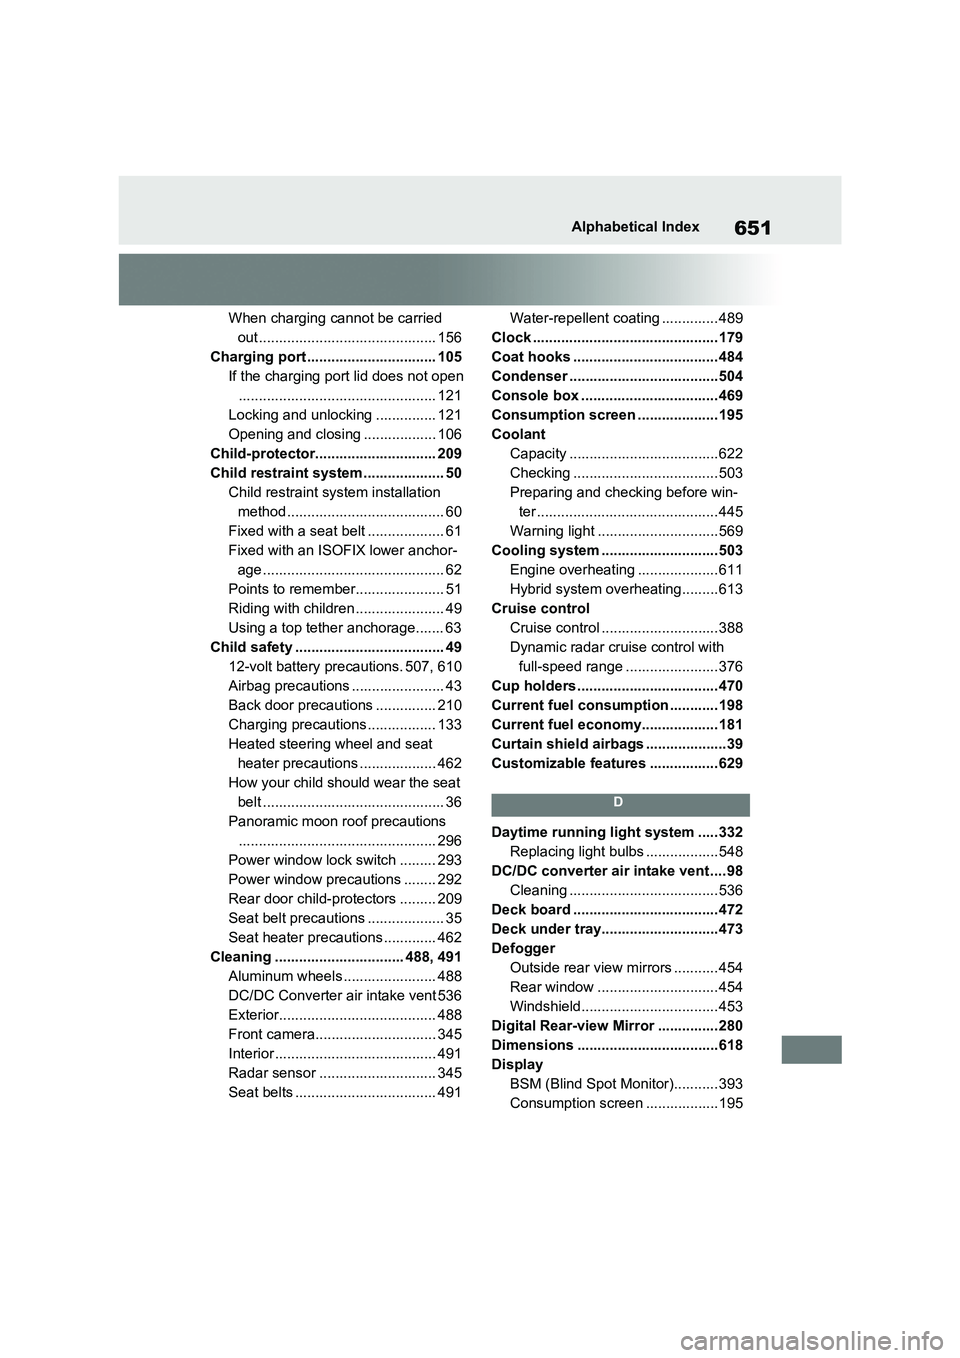
651Alphabetical Index
When charging cannot be carried
out ............................................ 156
Charging port ................................ 105
If the charging port lid does not open
................................................. 121
Locking and unlocking ............... 121
Opening and closing .................. 106
Child-protector.............................. 209
Child restraint system .................... 50
Child restraint syst em installation
method....................................... 60
Fixed with a seat belt ................... 61
Fixed with an ISOFIX lower anchor -
age ............................................. 62
Points to remember...................... 51
Riding with children ...................... 49
Using a top tether anchorage....... 63
Child safety ..................................... 49
12-volt battery precautions. 507, 610
Airbag precautions ....................... 43
Back door precautions ............... 210
Charging precautions ................. 133
Heated steering wheel and seat
heater precautions ................... 462
How your child should wear the seat
belt ............................................. 36
Panoramic moon roof precautions
................................................. 296
Power window lock switch ......... 293
Power window precautions ........ 292
Rear door child-protectors ......... 209
Seat belt precautions ................... 35
Seat heater precautions ............. 462
Cleaning ................................ 488, 491
Aluminum wheels ....................... 488
DC/DC Converter air intake vent 536
Exterior....................................... 488
Front camera.............................. 345
Interior ........................................ 491
Radar sensor .......... ................... 345
Seat belts ................................... 491
Water-repellent coating .............. 489
Clock ..............................................179
Coat hooks .................................... 484
Condenser .....................................504
Console box .................................. 469
Consumption screen .................... 195
Coolant
Capacity .....................................622
Checking .................................... 503
Preparing and ch ecking before win-
ter ............................................. 445
Warning light ..............................569
Cooling system .............................503
Engine overheating .................... 611
Hybrid system overh eating.........613
Cruise control
Cruise control .............................388
Dynamic radar cruise control with
full-speed range .......................376
Cup holders ...................................470
Current fuel consumption ............198
Current fuel economy................... 181
Curtain shield airbags .................... 39
Customizable features ................. 629
D
Daytime running light system ..... 332
Replacing light bulbs ..................548
DC/DC converter air intake vent .... 98
Cleaning .....................................536
Deck board .................................... 472
Deck under tray.............................473
Defogger
Outside rear view mirrors ........... 454
Rear window ..............................454
Windshield.................................. 453
Digital Rear-view Mirror ...............280
Dimensions ...................................618
Display
BSM (Blind Spot Monitor)........... 393
Consumption screen ..................195
Page 658 of 666
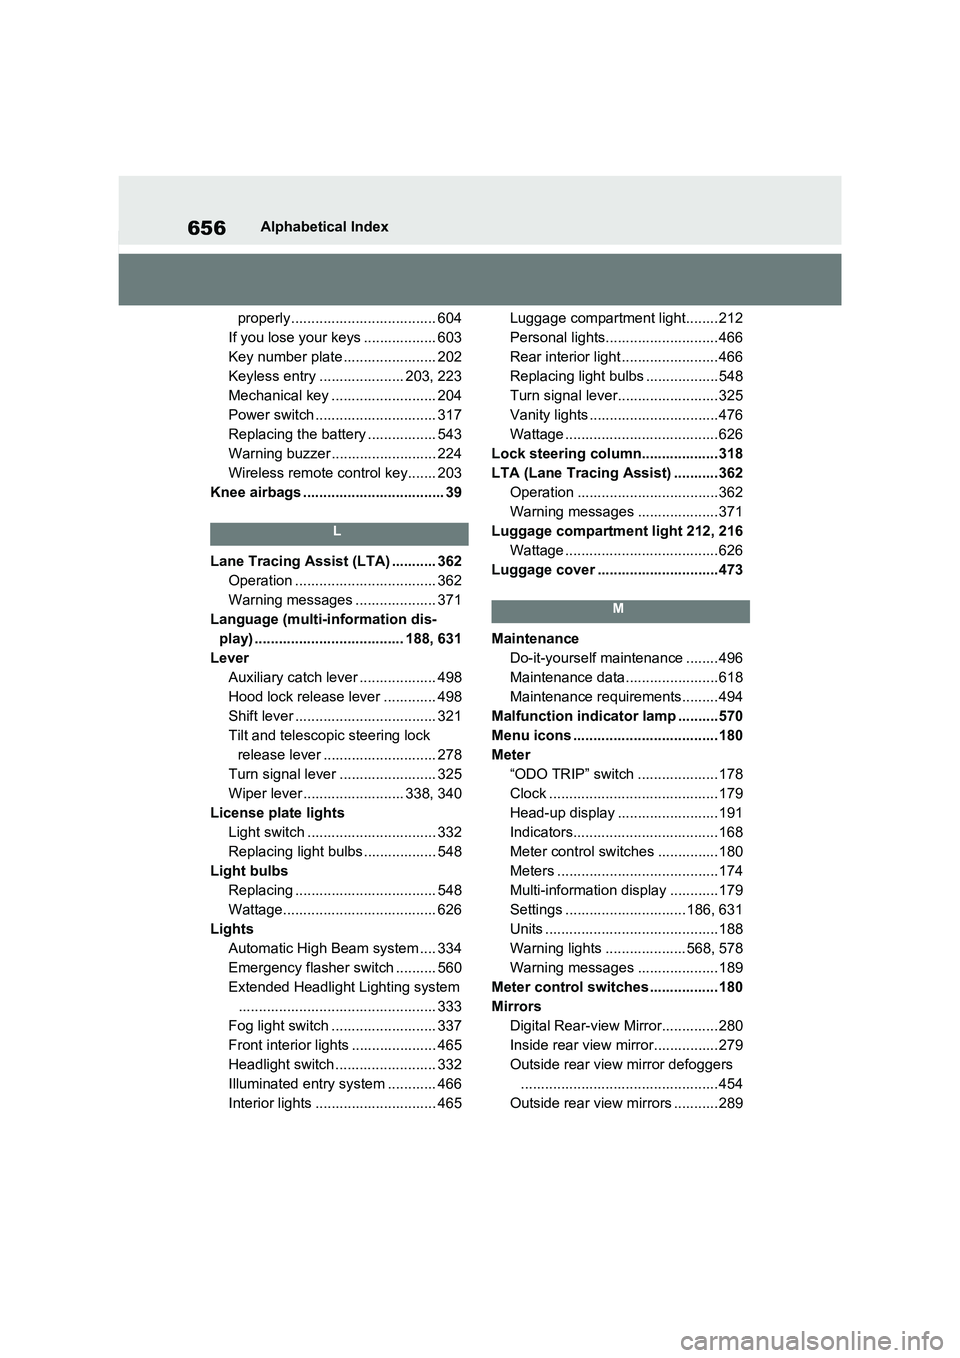
656Alphabetical Index
properly .................................... 604
If you lose your keys .................. 603
Key number plate ....................... 202
Keyless entry ..................... 203, 223
Mechanical key .......................... 204
Power switch .............................. 317
Replacing the battery ................. 543
Warning buzzer .......................... 224
Wireless remote control key....... 203
Knee airbags ................................... 39
L
Lane Tracing Assist (LTA) ........... 362
Operation ................................... 362
Warning messages .... ................ 371
Language (multi-information dis -
play) ..................................... 188, 631
Lever
Auxiliary catch lever ................... 498
Hood lock release l ever ............. 498
Shift lever ................................... 321
Tilt and telescopic steering lock
release lever ............................ 278
Turn signal lever ........................ 325
Wiper lever ......................... 338, 340
License plate lights
Light switch ................................ 332
Replacing light bulbs .................. 548
Light bulbs
Replacing ................................... 548
Wattage...................................... 626
Lights
Automatic High Beam system .... 334
Emergency flasher switch .......... 560
Extended Headlight Lighting system
................................................. 333
Fog light switch .......................... 337
Front interior lights ..................... 465
Headlight switch ...... ................... 332
Illuminated entry system ............ 466
Interior lights .............................. 465
Luggage compartment light........ 212
Personal lights............................ 466
Rear interior light ........................466
Replacing light bulbs ..................548
Turn signal lever......................... 325
Vanity lights ................................476
Wattage ......................................626
Lock steering column................... 318
LTA (Lane Tracing Assist) ........... 362
Operation ...................................362
Warning messages .................... 371
Luggage compartment light 212, 216
Wattage ......................................626
Luggage cover ..............................473
M
Maintenance
Do-it-yourself maintenance ........ 496
Maintenance data..... ..................618
Maintenance requirements......... 494
Malfunction indicator lamp ..........570
Menu icons .................................... 180
Meter
“ODO TRIP” switch .................... 178
Clock .......................................... 179
Head-up display ......................... 191
Indicators.................................... 168
Meter control switches ...............180
Meters ........................................174
Multi-information display ............179
Settings ..............................186, 631
Units ...........................................188
Warning lights .................... 568, 578
Warning messages .................... 189
Meter contro l switches ................. 180
Mirrors
Digital Rear-view Mirror.............. 280
Inside rear view mirror................279
Outside rear view mirror defoggers
.................................................454
Outside rear view mirrors ........... 289