ad blue TOYOTA RAV4 PRIME 2021 Owners Manual (in English)
[x] Cancel search | Manufacturer: TOYOTA, Model Year: 2021, Model line: RAV4 PRIME, Model: TOYOTA RAV4 PRIME 2021Pages: 616, PDF Size: 34.66 MB
Page 69 of 616
691-3. Emergency assistance
1
For safety and security
■Safety Connect Services Infor-
mation
●Phone calls using the vehicle’s
Bluetooth® technology will not be
possible when Safety Connect is
active and in use.
●Safety Connect is available begin-
ning Fall 2009 on select Toyota
models (in the contiguous United
States only). Contact with the
Safety Connect response center
is dependent upon the telematics
device being in operative condi-
tion, cellular connection availabil-
ity, and GPS satellite signal
reception, which can limit the abil-
ity to reach the response center or
receive emergency service sup-
port. Enrollment and Telematics
Subscription Service Agreement
are required. A variety of subscrip-
tion terms are available; charges
vary by subscription term selected
and location.
●Automatic Collision Notification,
Emergency Assistance and Stolen
Vehicle Location are available in
the United States, including
Hawaii and Alaska, Puerto Rico
and Canada, and Enhanced
Roadside Assistance are avail-
able in the United States, Puerto
Rico and Canada.
●Automatic Collision Notification,
Emergency Assist ance, Stolen
Vehicle and Enhanced Road
Assistance are not available in the
U.S. Virgin Islands.
For vehicles first sold in the U.S.
Virgin Islands, no Safety Connect
services will function in or outside
the U.S. Virgin Islands.
●Safety Connect ser vices are not
subject to section 255 of the Tele-
communications Act and the
device is not TTY compatible.
■Languages
The Safety Connect response cen-
ter will offer support in multiple lan-
guages. The Safety Connect system will offer voice prompts in English,
Spanish, and French. Please indi-
cate your language of choice when
enrolling.
■When contacting the response
center
You may be unable to contact the
response center if the network is
busy.
When the power switch is turned
to ON, the red indicator light
comes on for 2 seconds then
turns off. Afterward, the green
indicator light comes on, indicat-
ing that the service is active.
The following indicator light pat-
terns indicate specific system
usage conditions:
Green indicator light on =
Active service
Green indicator light flashing
= Safety Connect call in pro-
cess
Red indicator light (except at
vehicle start-up) = System
malfunction (contact your
Toyota dealer)
No indicator light (off) =
Safety Connect service not
active
■Automatic Collision Notifi-
cation
In case of either airbag deploy-
Safety Connect LED light
Indicators
Safety Connect services
Page 140 of 616
1402-2. Charging
charging schedule in a list using
icons.
“Add” button
Press to add a new item to the
charging schedule. (P.140)
“Edit” button
Press to change or delete regis-
tered items on the charging sched-
ule. ( P.141)
“Charge Now” button
Press to set “Charge Now” to on.
( P.142)
Return button
Press to close the “Charging
Schedule” screen.
Charging schedules (icon
display)
When an item is registered on the
charging schedule, an icon is dis-
played on the calendar.
Main content displayed on the
calendar:
*1: A row with a red line indicates
the current time.
*2: When “Charge Now” ( P.142) is
set to on, the orange icon moves to the position of the red line and
changes to display “Charge
Now”.
■Registering the charging
schedule
1 Display the “Charging Sched-
ule” screen. ( P.139)
2 Press “Add”.
The “Edit Charging Event” screen
will be displayed on the screen.
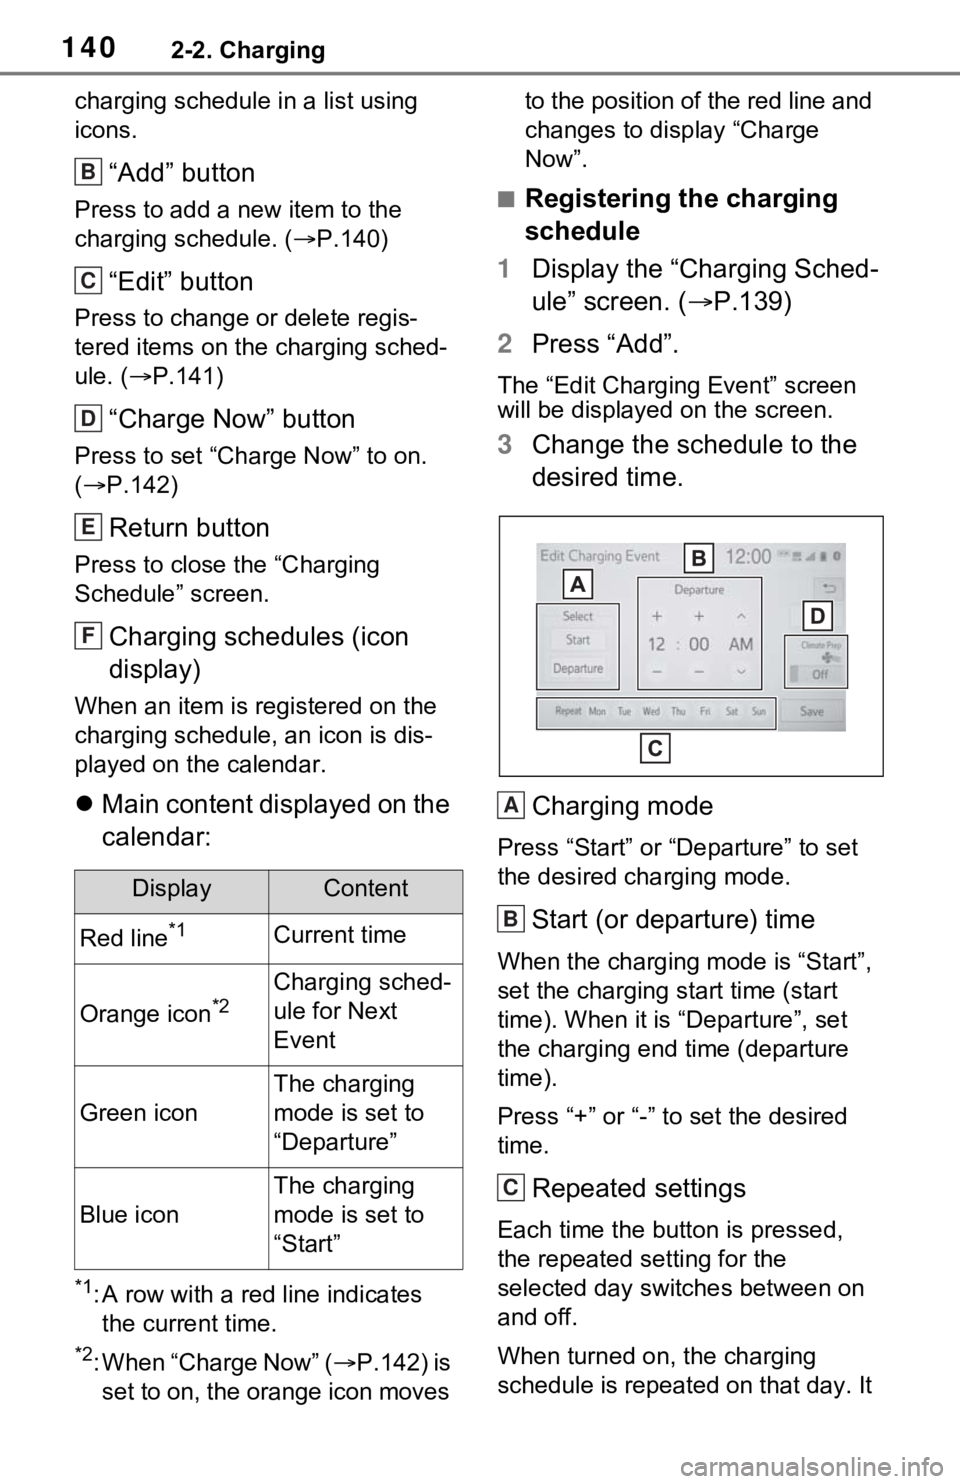
3Change the schedule to the
desired time.
Charging mode
Press “Start” or “Departure” to set
the desired charging mode.
Start (or departure) time
When the charging mode is “Start”,
set the charging start time (start
time). When it is “Departure”, set
the charging end time (departure
time).
Press “+” or “-” to set the desired
time.
Repeated settings
Each time the butt on is pressed,
the repeated se tting for the
selected day switches between on
and off.
When turned on, the charging
schedule is repeated on that day. It
DisplayContent
Red line*1Current time
Orange icon*2Charging sched-
ule for Next
Event
Green icon
The charging
mode is set to
“Departure”
Blue icon
The charging
mode is set to
“Start”
B
C
D
E
F
A
B
C
Page 166 of 616
1663-1. Instrument cluster
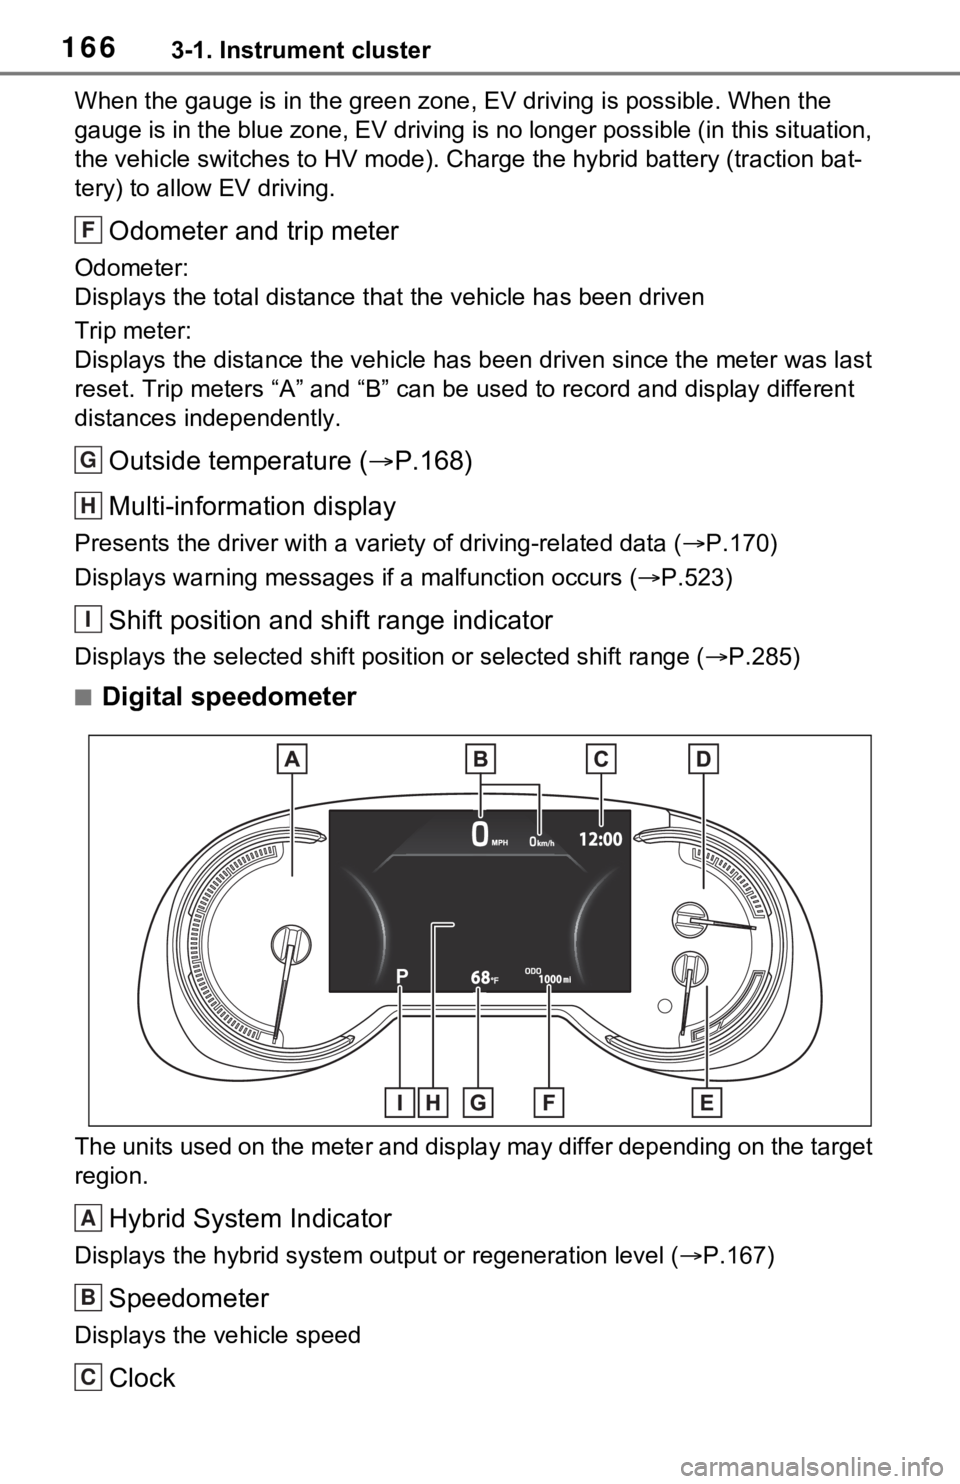
When the gauge is in the green zone, EV driving is possible. When the
gauge is in the blue zone, EV driving is no longer possible (in this situation,
the vehicle switches to HV mode) . Charge the hybrid battery (traction bat-
tery) to allow EV driving.
Odometer and trip meter
Odometer:
Displays the total distance th at the vehicle has been driven
Trip meter:
Displays the distance the vehicle has been driven since the meter was last
reset. Trip meters “A” and “B” c an be used to record and display different
distances independently.
Outside temperature ( P.168)
Multi-information display
Presents the driver with a variety of driving-related data ( P.170)
Displays warning messages if a malfunction occurs (P.523)
Shift position and shift range indicator
Displays the selected shift posit ion or selected shift range (P.285)
■Digital speedometer
The units used on the meter and display may differ depending on the target
region.
Hybrid System Indicator
Displays the hybrid system output or regeneration level ( P.167)
Speedometer
Displays the vehicle speed
Clock
F
G
H
I
A
B
C
Page 167 of 616
1673-1. Instrument cluster
3
Vehicle status information and indicators
Automatically adjusts the time by using the GPS time informatio n (GPS
clock).
For details, refer to “Navigation and Multimedia System Owner’s Manual” or
“Multimedia Owner’s Manual”.
Fuel gauge
Displays the quantity of fu el remaining in the tank
SOC (State of Charge) gauge
Displays the amount of charge rem aining in the traction battery.
When the gauge is in the green zo ne, EV driving is possible. When the
gauge is in the blue zone, EV driving is no longer possible (in this situation,
the vehicle switches to HV mode) . Charge the hybrid battery (traction bat-
tery) to allow EV driving.
Odometer and trip meter
Odometer:
Displays the total distance th at the vehicle has been driven
Trip meter:
Displays the distance the vehicle has been driven since the meter was last
reset. Trip meters “A” and “B” c an be used to record and display different
distances independently.
Outside temperature ( P.168)
Multi-information display
Presents the driver with a variety of driving-related data ( P.170)
Displays warning messages if a malfunction occurs (P.523)
Shift position and shift range indicator
Displays the selected shift posit ion or selected shift range (P.285)
■The meters and display illumi-
nate when
The power swit ch is in ON.
■When changing driving mode
Speedometer color is changed fol-
lowing the selected driving mode or
when Trail Mode is turned on.
( P.377, 379)
■Hybrid System Indicator
The display content s of the Hybrid
System Indicator are different in EV
mode and HV mode.
D
E
F
G
H
I
Page 173 of 616
1733-1. Instrument cluster
3
Vehicle status information and indicators
EV driving range
Displays the EV driving range with
charge remaining in the hybrid bat-
tery (traction battery). ( P.82)
Distance to empty
Displays the driving range with
remaining fuel. ( P.175)
Average fuel economy
Displays the average fuel economy
since the function was reset or the
average fuel economy after starting
or refueling.
*1, 2, 3
The average fuel economy selected
by “Fuel Economy” on the
screen is displayed. ( P.177)
Current fuel economy
Displays the instantaneous current
fuel economy.
*1: Use the displayed fuel consump-
tion as a reference only.
*2: Average fuel economy since the function was reset can be reset
by pressing and holding .
*3: Average fuel economy after starting is reset each time the
hybrid system stops.
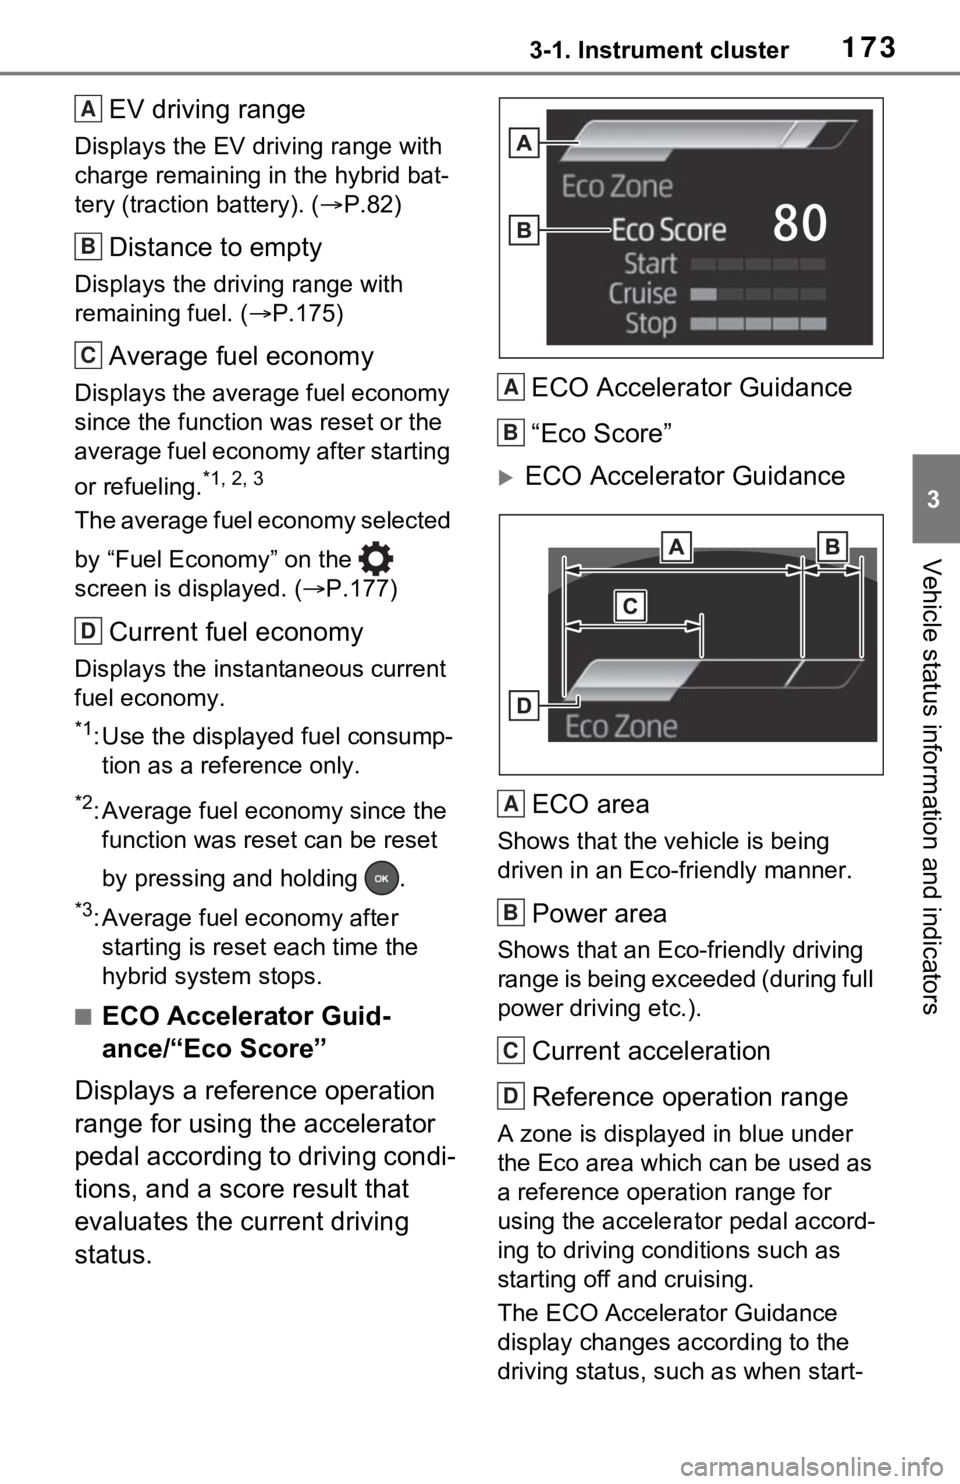
■ECO Accelerator Guid-
ance/“Eco Score”
Displays a reference operation
range for using the accelerator
pedal according to driving condi-
tions, and a score result that
evaluates the current driving
status. ECO Accelerator Guidance
“Eco Score”
ECO Accelerator Guidance
ECO area
Shows that the vehicle is being
driven in an Eco-friendly manner.
Power area
Shows that an Eco-friendly driving
range is being exceeded (during full
power driving etc.).
Current acceleration
Reference operation range
A zone is displayed in blue under
the Eco area which can be used as
a reference operation range for
using the accelerator pedal accord-
ing to driving conditions such as
starting off and cruising.
The ECO Accelerator Guidance
display changes according to the
driving status, such as when start-
A
B
C
D
A
B
A
B
C
D
Page 189 of 616
1893-1. Instrument cluster
3
Vehicle status information and indicators
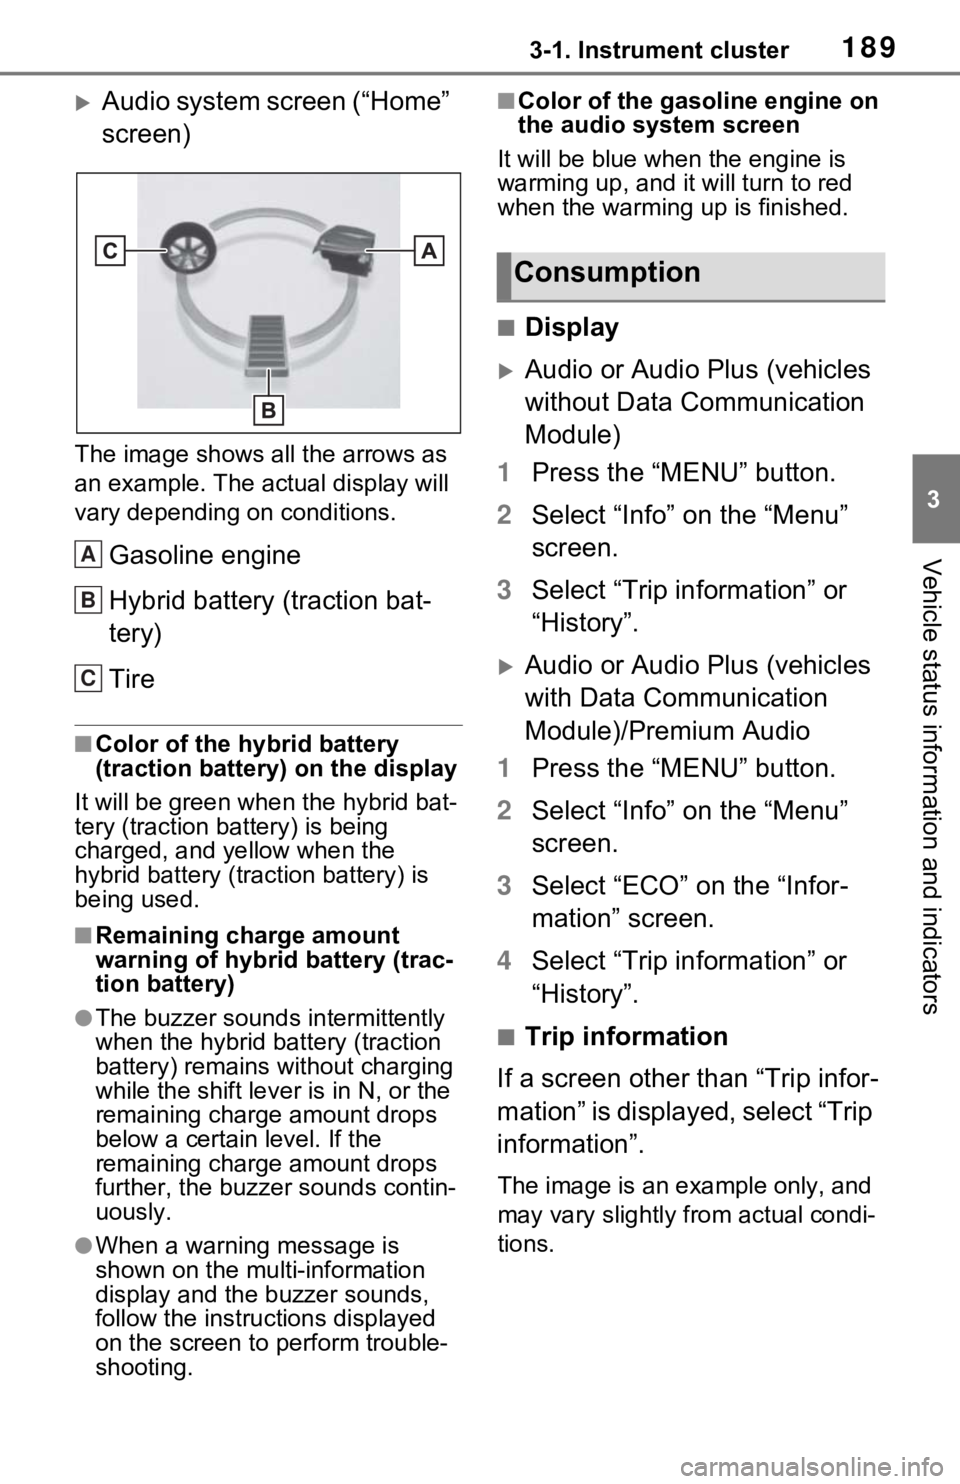
Audio system screen (“Home”
screen)
The image shows all the arrows as
an example. The actual display will
vary depending on conditions.
Gasoline engine
Hybrid battery (traction bat-
tery)
Tire
■Color of the hybrid battery
(traction battery) on the display
It will be green whe n the hybrid bat-
tery (traction battery) is being
charged, and yellow when the
hybrid battery (traction battery) is
being used.
■Remaining charge amount
warning of hybrid battery (trac-
tion battery)
●The buzzer sounds intermittently
when the hybrid battery (traction
battery) remains without charging
while the shift leve r is in N, or the
remaining charge amount drops
below a certain level. If the
remaining charge amount drops
further, the buzzer sounds contin-
uously.
●When a warning message is
shown on the multi-information
display and the buzzer sounds,
follow the instructions displayed
on the screen to p erform trouble-
shooting.
■Color of the gasoline engine on
the audio system screen
It will be blue when the engine is
warming up, and it will turn to red
when the warming up is finished.
■Display
Audio or Audio Plus (vehicles
without Data Communication
Module)
1 Press the “MENU” button.
2 Select “Info” on the “Menu”
screen.
3 Select “Trip information” or
“History”.
Audio or Audio Plus (vehicles
with Data Communication
Module)/Premium Audio
1 Press the “MENU” button.
2 Select “Info” on the “Menu”
screen.
3 Select “ECO” on the “Infor-
mation” screen.
4 Select “Trip information” or
“History”.
■Trip information
If a screen other than “Trip infor-
mation” is displayed, select “Trip
information”.
The image is an example only, and
may vary slightly from actual condi-
tions.
A
B
C
Consumption
Page 468 of 616
4687-3. Do-it-yourself maintenance
clamps.
Terminals
Hold-down clamp
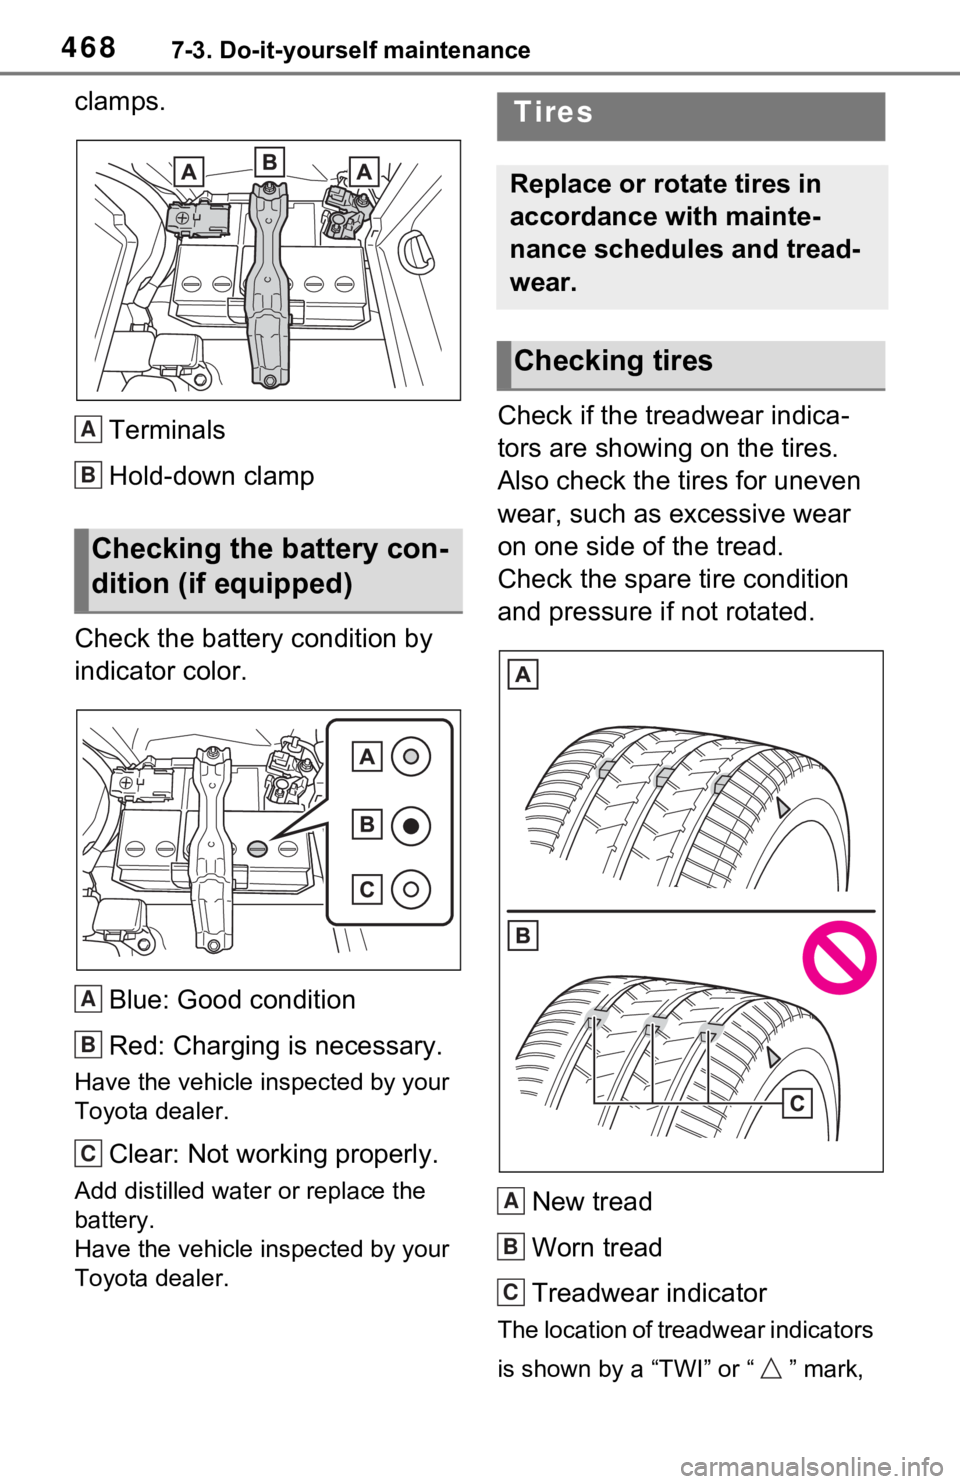
Check the battery condition by
indicator color.
Blue: Good condition
Red: Charging is necessary.
Have the vehicle inspected by your
Toyota dealer.
Clear: Not working properly.
Add distilled water or replace the
battery.
Have the vehicle inspected by your
Toyota dealer.
Check if the treadwear indica-
tors are showing on the tires.
Also check the tires for uneven
wear, such as excessive wear
on one side of the tread.
Check the spare tire condition
and pressure if not rotated.
New tread
Worn tread
Treadwear indicator
The location of treadwear indicators
is shown by a “TWI” or “ ” mark,
Checking the battery con-
dition (if equipped)
A
B
A
B
C
Tires
Replace or rotate tires in
accordance with mainte-
nance schedules and tread-
wear.
Checking tires
A
B
C