display TOYOTA SEQUOIA 2009 2.G Owner's Manual
[x] Cancel search | Manufacturer: TOYOTA, Model Year: 2009, Model line: SEQUOIA, Model: TOYOTA SEQUOIA 2009 2.GPages: 612
Page 175 of 612
175
2-2. Instrument cluster
2
When driving
After customize is complete, press the SETUP US/M button to
set the selected item.
If the customization fails, the previously setting will be displayed.
If no button is pressed for 10 seconds, the display change to normal
display.
■
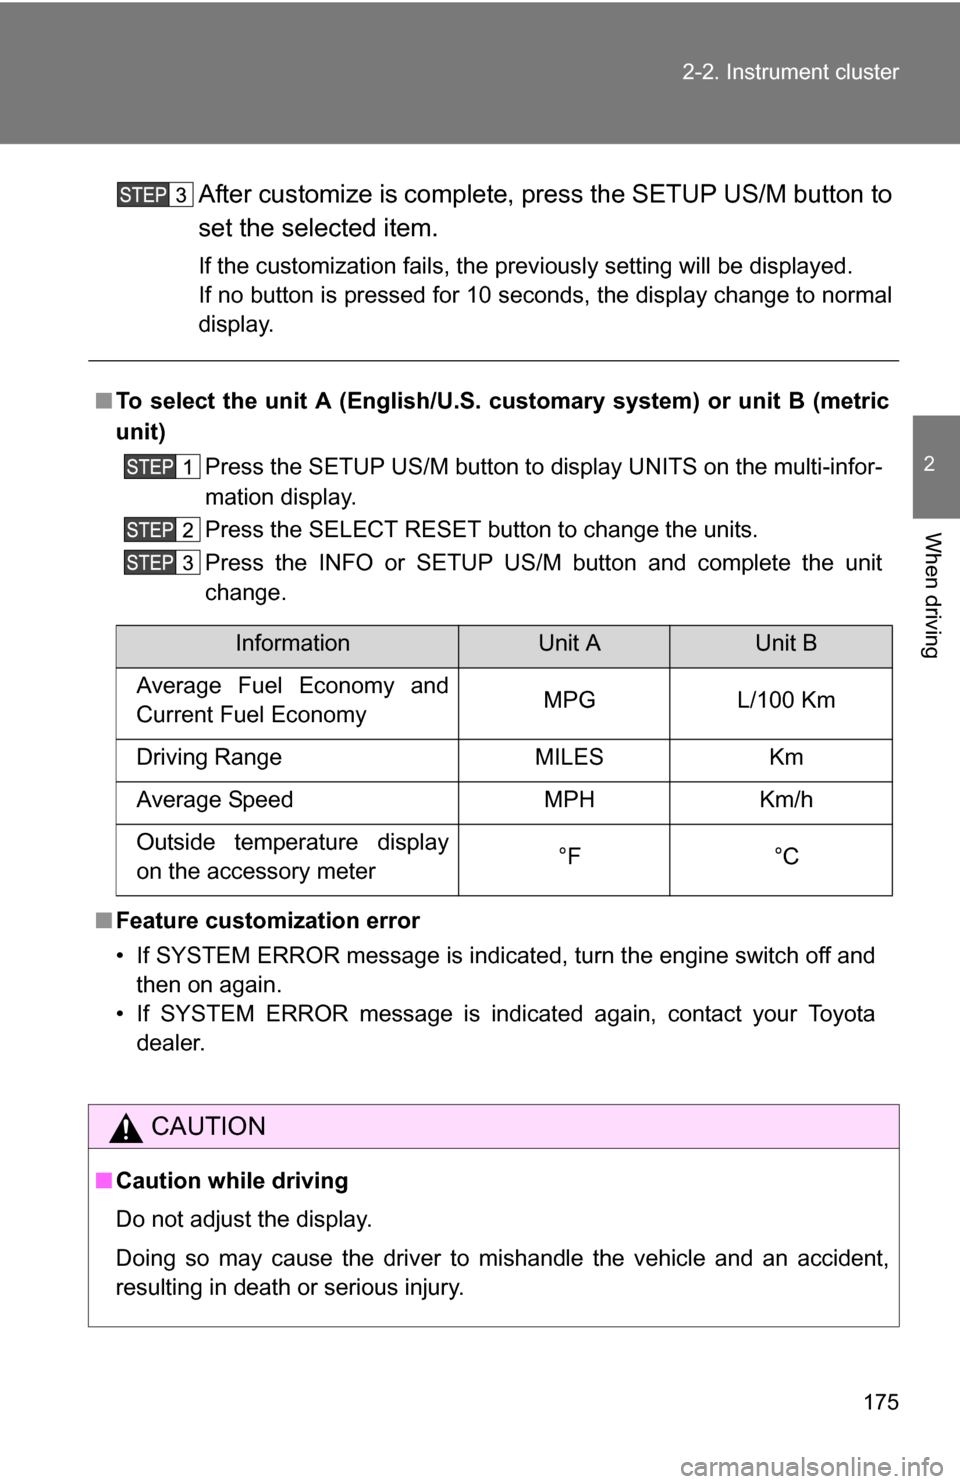
To select the unit A (English/U.S. customary system) or unit B (metric
unit)
Press the SETUP US/M button to display UNITS on the multi-infor-
mation display.
Press the SELECT RESET button to change the units.
Press the INFO or SETUP US/M button and complete the unit
change.
■ Feature customization error
• If SYSTEM ERROR message is indicated, turn the engine switch off and
then on again.
• If SYSTEM ERROR message is indicated again, contact your Toyota dealer.
CAUTION
■Caution while driving
Do not adjust the display.
Doing so may cause the driver to mishandle the vehicle and an accident,
resulting in death or serious injury.
InformationUnit AUnit B
Average Fuel Economy and
Current Fuel Economy MPG L/100 Km
Driving Range MILES Km
Average Speed MPH Km/h
Outside temperature display
on the accessory meter °F °C
Page 176 of 612
176 2-2. Instrument cluster
NOTICE
■The multi-information disp lay at low temperatures
Allow the interior of the vehicle to warm up before using the liquid crystal
information display. At extremely low temperatures, the information display
monitor may respond slowly, and display changes may be delayed.
Page 177 of 612
177
2-2. Instrument cluster
2
When driving
Accessor y meter
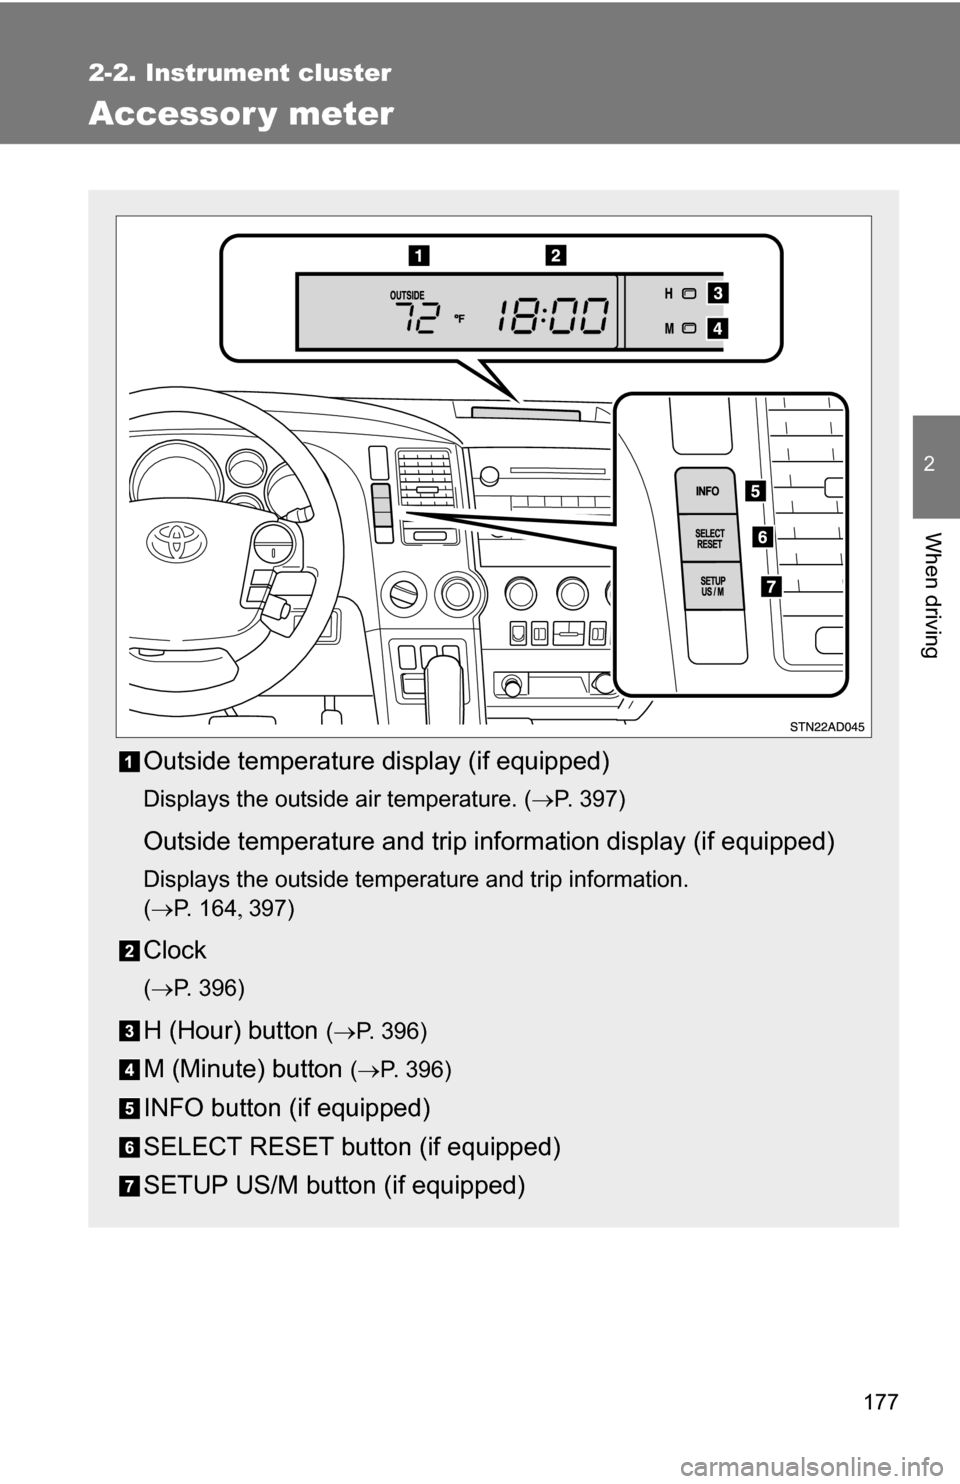
Outside temperature display (if equipped)
Displays the outside air temperature. (P. 397)
Outside temperature and trip information display (if equipped)
Displays the outside temperature and trip information.
(P. 1 6 4 397)
Clock
(P. 396)
H (Hour) button (P. 396)
M (Minute) button ( P. 396)
INFO button (if equipped)
SELECT RESET button (if equipped)
SETUP US/M button (if equipped)
Page 178 of 612
178 2-2. Instrument cluster
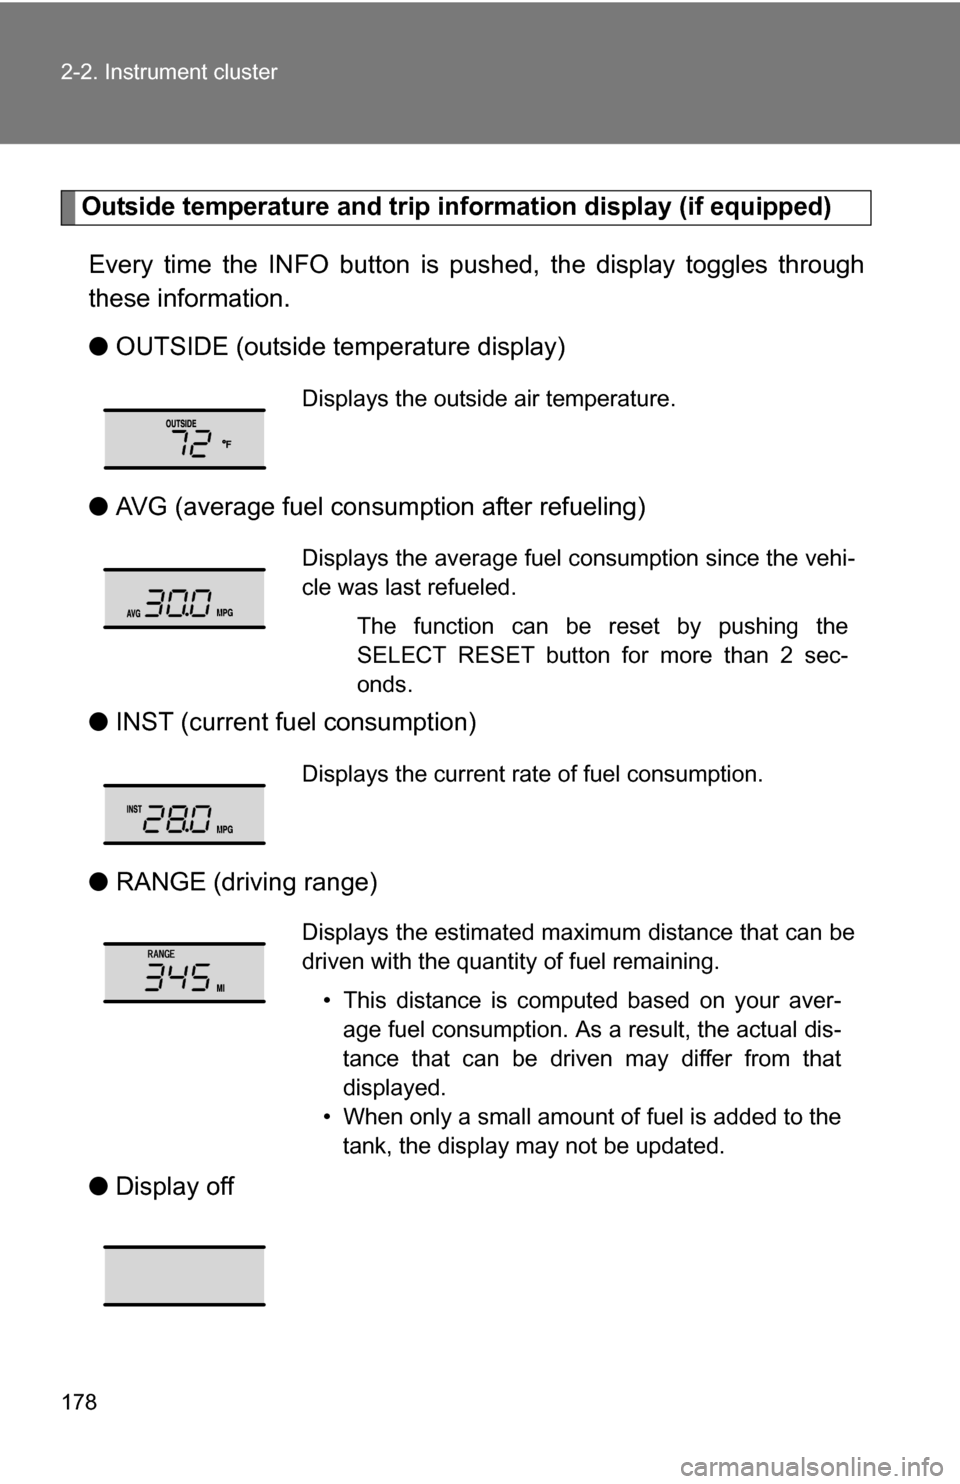
Outside temperature and trip information display (if equipped)
Every time the INFO button is pushed, the display toggles through
these information.
● OUTSIDE (outside temperature display)
● AVG (average fuel consumption after refueling)
● INST (current fu el consumption)
● RANGE (driving range)
● Display off
Displays the outside air temperature.
Displays the average fuel consumption since the vehi-
cle was last refueled.
The function can be reset by pushing the
SELECT RESET button for more than 2 sec-
onds.
Displays the current rate of fuel consumption.
Displays the estimated maximum distance that can be
driven with the quantity of fuel remaining.• This distance is computed based on your aver-age fuel consumption. As a result, the actual dis-
tance that can be driven may differ from that
displayed.
• When only a small amount of fuel is added to the tank, the display may not be updated.
Page 179 of 612
179
2-2. Instrument cluster
2
When driving
■
The accessory meter can be operated when
The engine switch must be in the ON position.
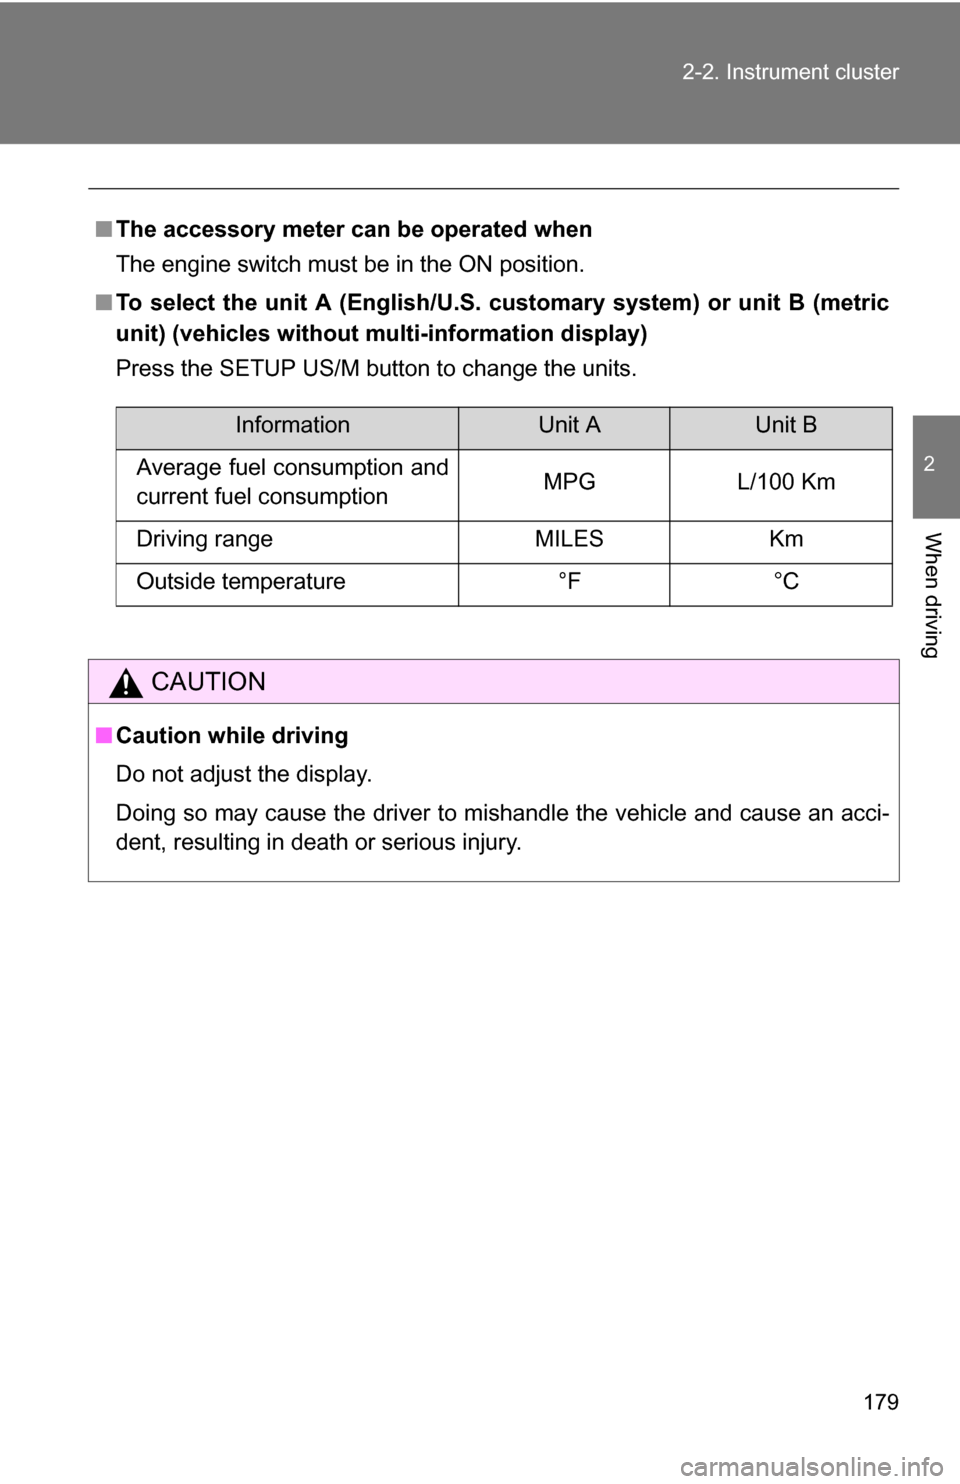
■ To select the unit A (English/U.S. customary system) or unit B (metric
unit) (vehicles without mu lti-information display)
Press the SETUP US/M button to change the units.
CAUTION
■ Caution while driving
Do not adjust the display.
Doing so may cause the driver to mishandle the vehicle and cause an acci-
dent, resulting in death or serious injury.
InformationUnit AUnit B
Average fuel consumption and
current fuel consumption MPG L/100 Km
Driving range MILES Km
Outside temperature °F °C
Page 181 of 612
181
2-3. Operating the lights and wipers
2
When driving
■
Daytime running light system (if equipped)
To make your vehicle more visible to other drivers, the front turn signal lights
turn on automatically whenever the engine is started and the parking brake
is released. Daytime running lights are not designed for use at night.
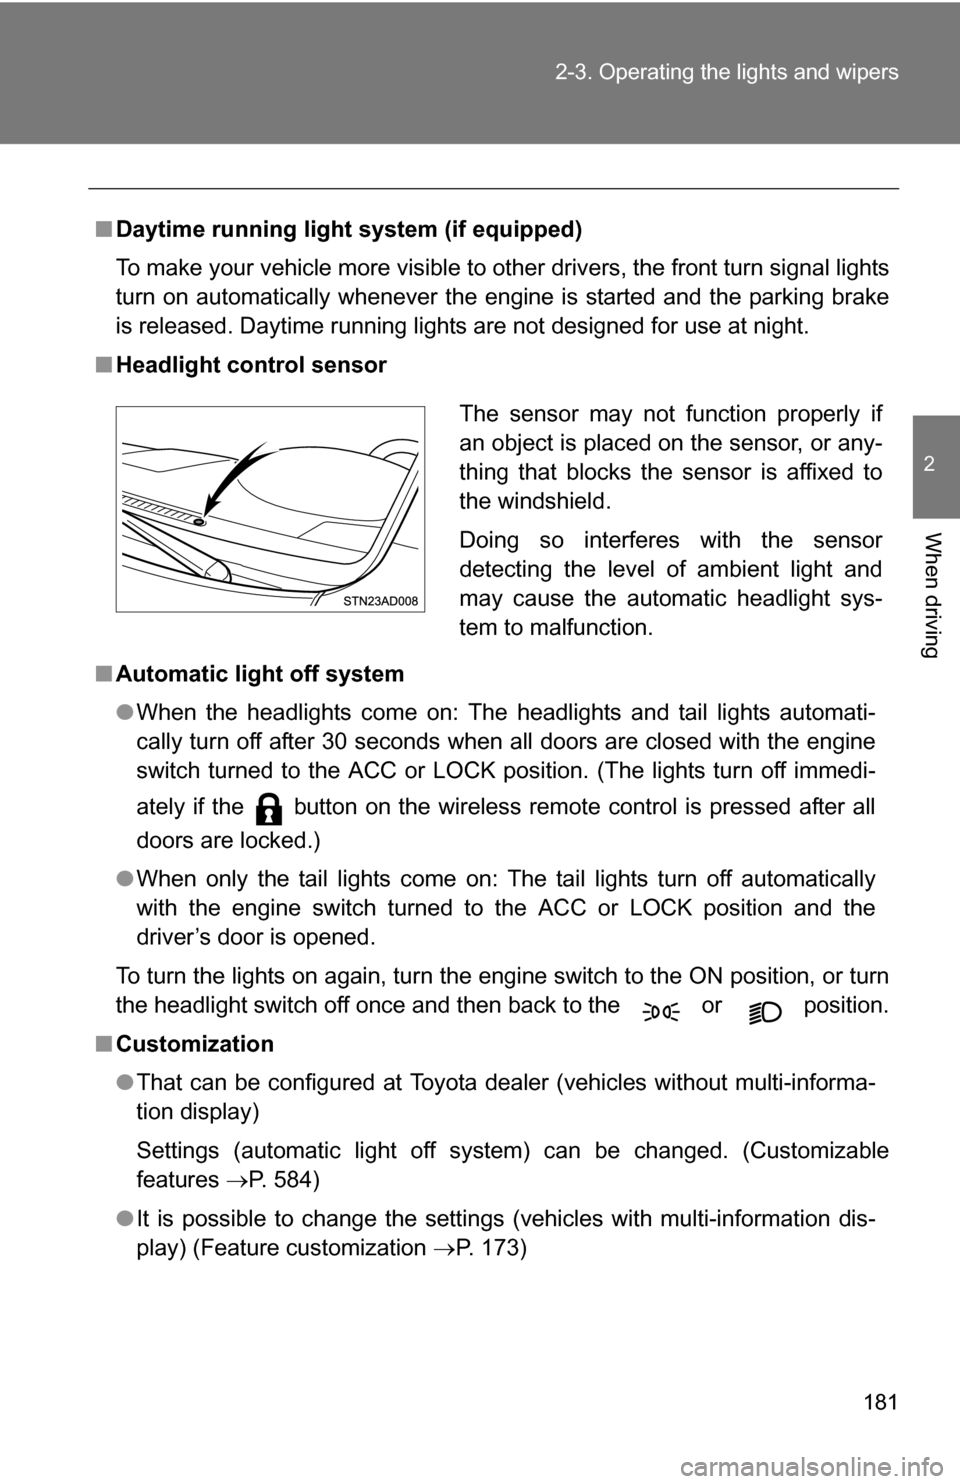
■ Headlight control sensor
■ Automatic light off system
●When the headlights come on: The headlights and tail lights automati-
cally turn off after 30 seconds when all doors are closed with the engine
switch turned to the ACC or LOCK position. (The lights turn off immedi-
ately if the button on the wireless remote control is pressed after all
doors are locked.)
● When only the tail lights come on: The tail lights turn off automatically
with the engine switch turned to the ACC or LOCK position and the
driver’s door is opened.
To turn the lights on again, turn the engine switch to the ON position, or turn
the headlight switch off once and then back to the or position.
■ Customization
●That can be configured at Toyota dealer (vehicles without multi-informa-
tion display)
Settings (automatic light off system) can be changed. (Customizable
features P. 584)
● It is possible to change the settings (vehicles with multi-information dis-
play) (Feature customization P. 173)
The sensor may not function properly if
an object is placed on the sensor, or any-
thing that blocks the sensor is affixed to
the windshield.
Doing so interferes with the sensor
detecting the level of ambient light and
may cause the automatic headlight sys-
tem to malfunction.
Page 191 of 612
191
2-4. Using other driving systems
2
When driving
Dynamic laser cruise control (if equipped)
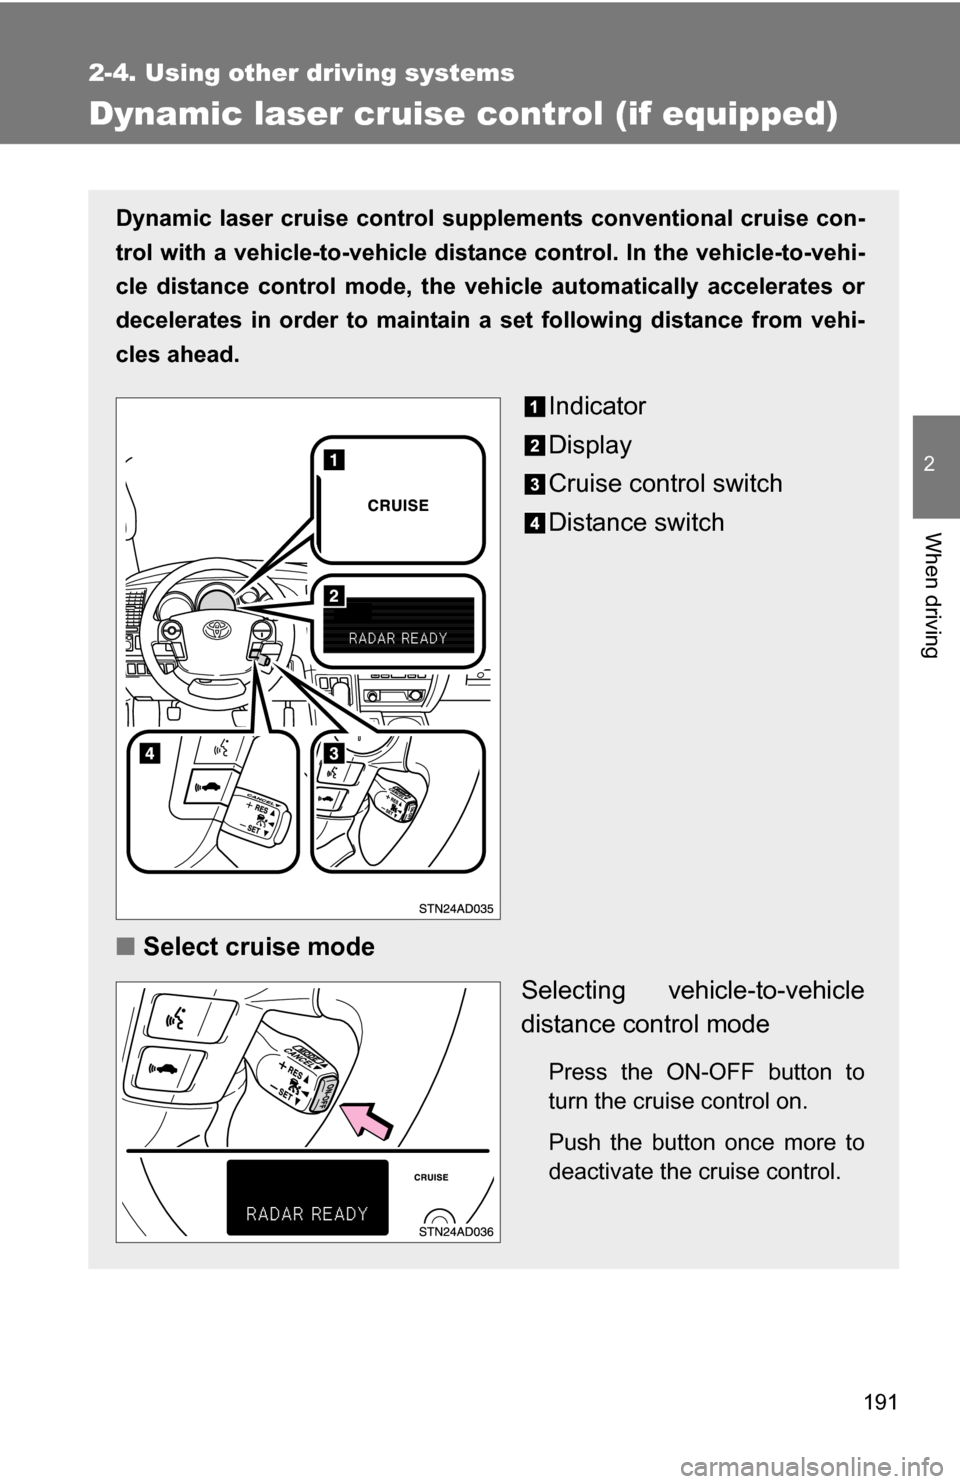
Dynamic laser cruise control supplements conventional cruise con-
trol with a vehicle-to-vehicle distan ce control. In the vehicle-to-vehi-
cle distance control mode, the vehicle automatically accelerates or
decelerates in order to maintain a set following distance from vehi-
cles ahead.
Indicator
Display
Cruise control switch
Distance switch
■ Select cruise mode
Selecting vehicle-to-vehicle
distance control mode
Press the ON-OFF button to
turn the cruise control on.
Push the button once more to
deactivate the cruise control.
Page 193 of 612
193
2-4. Using other
driving systems
2
When driving
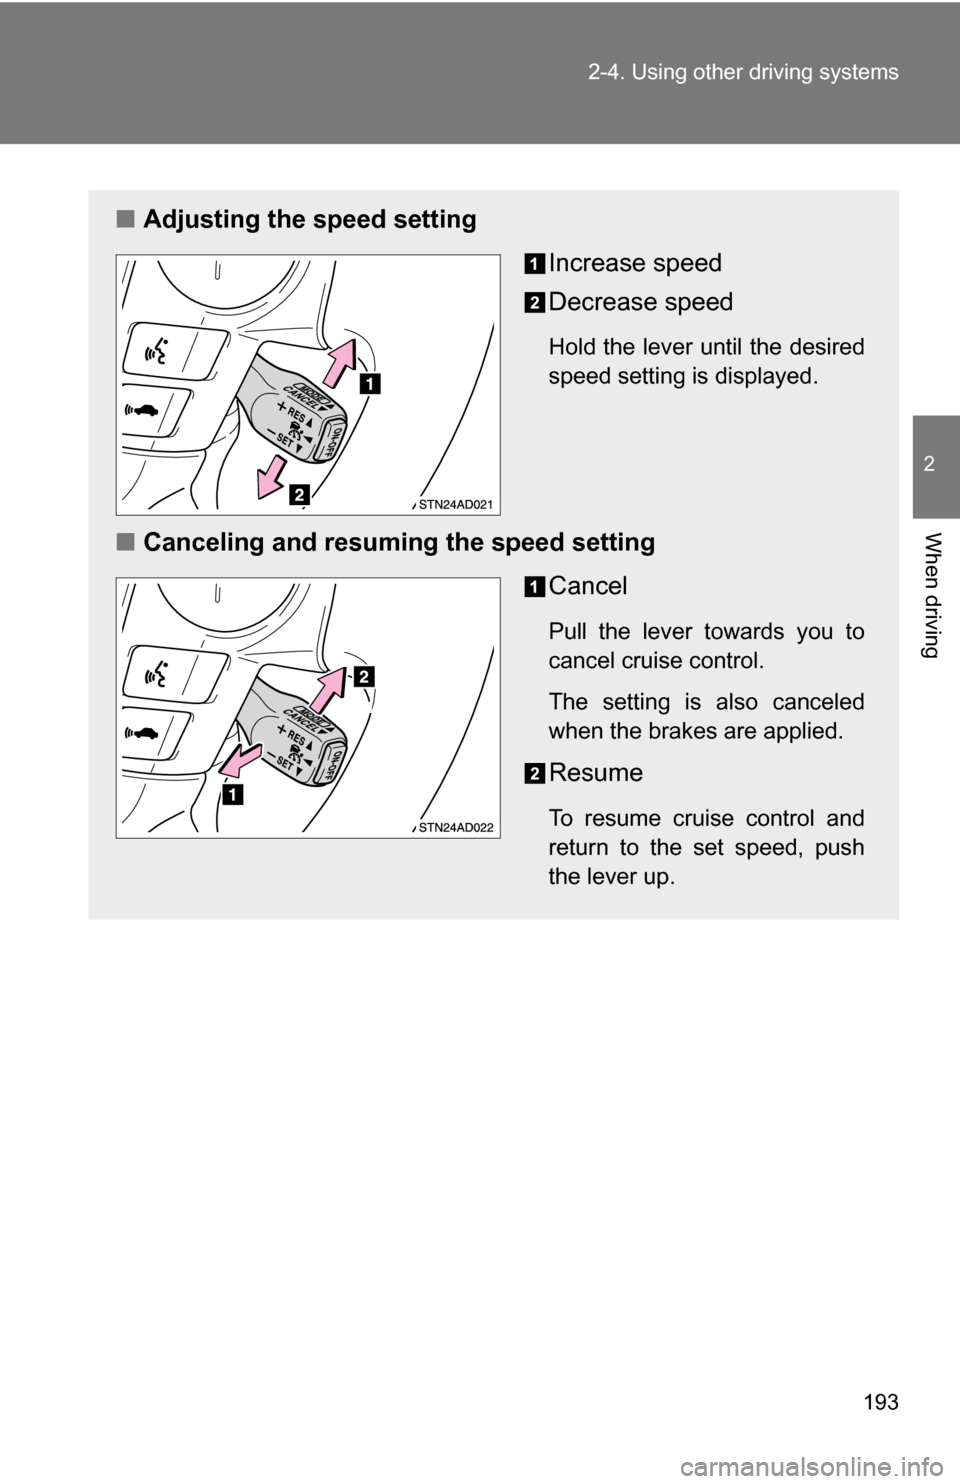
■Adjusting the speed setting
Increase speed
Decrease speed
Hold the lever until the desired
speed setting is displayed.
■Canceling and resuming the speed setting
Cancel
Pull the lever towards you to
cancel cruise control.
The setting is also canceled
when the brakes are applied.
Resume
To resume cruise control and
return to the set speed, push
the lever up.
Page 196 of 612
196 2-4. Using other driving systems
Example of follow-up cruising (when following a vehicle driving
slower than the set speed):
When the speed is set to 62 mph (100 km/h) and the vehicle ahead
is driving at 50 mph (80 km/h)
The system continues follow-up cruising while adjusting for changes in the
speed of the vehicle ahead in order to maintain the vehicle-to-vehicle dis-
tance set by the driver.
Example of acceleration (when there are no longer vehicles driving
slower than the set speed in the lane ahead):
When the speed is set to 62 mph (100 km/h) and the vehicle ahead
driving at 50 mph (80 km/h) is out of the lane
When the vehicle ahead of you executes a lane change, the system
slowly accelerates until the set vehicle speed is reached. The system then
returns to fixed speed cruising.
■Fine adjustment of the set speed
Adjustment of the set speed by the following speed can be made by lightly
pressing the lever up or down and releasing it.
In the constant speed control mode: Approximately 1.0 mph (1.6 km/h)
In the vehicle-to-vehicle distance control mode:U.S.A.: Approximately 5 mph (8 km/h)
Canada: Approximately 3 mph (5 km/h)
■ Dynamic laser cruise control warning lights, display and buzzers
Warning lights, display and buzzers are used to indicate a system malfunc-
tion or to alert you to the need for caution while driving. ( P. 527)
■ The dynamic laser cruise can be set when
●The shift lever is in D or the shift range position must be in 4 or 5 in S
mode (5-speed models).
● The shift lever is in D or the shift range position must be in between 4 and
6 in S mode (6-speed models).
● Vehicle speed is between approximately 27 mph (45 km/h) and 85 mph
(135 km/h).
■ Accelerating
The vehicle can be accelerated normally.
Page 214 of 612
214
2-4. Using other driving systems
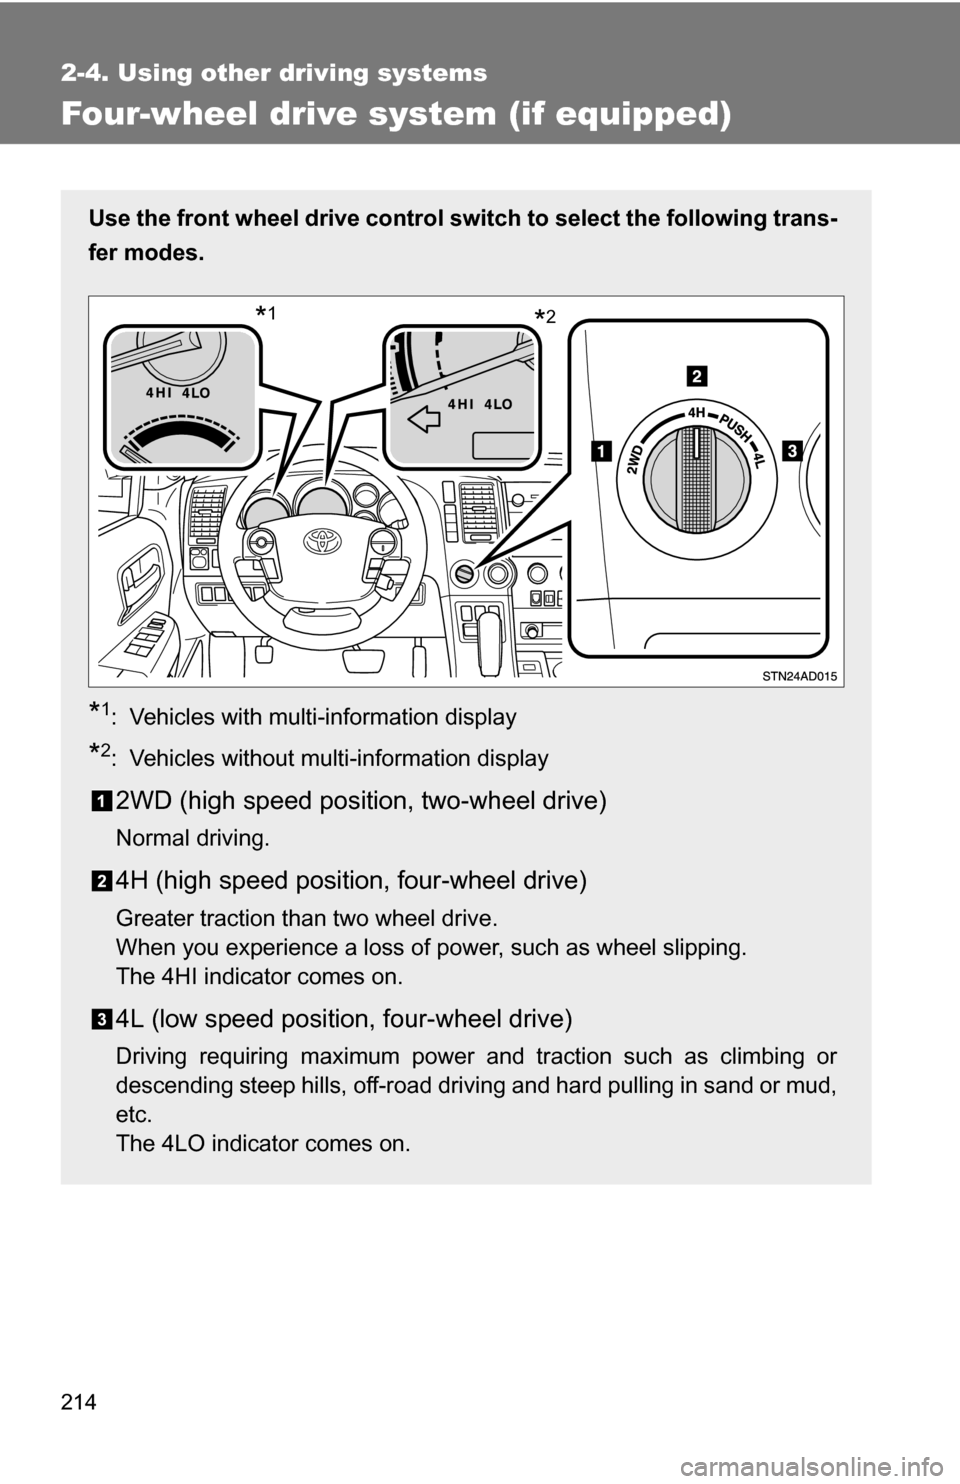
Four-wheel drive system (if equipped)
Use the front wheel drive control switch to select the following trans-
fer modes.
*1: Vehicles with multi-information display
*2: Vehicles without multi-information display
2WD (high speed position, two-wheel drive)
Normal driving.
4H (high speed position, four-wheel drive)
Greater traction than two wheel drive.
When you experience a loss of power, such as wheel slipping.
The 4HI indicator comes on.
4L (low speed position, four-wheel drive)
Driving requiring maximum power and traction such as climbing or
descending steep hills, off-road driving and hard pulling in sand or mud,
etc.
The 4LO indicator comes on.
*2*1