audio TOYOTA SEQUOIA 2016 2.G Navigation Manual
[x] Cancel search | Manufacturer: TOYOTA, Model Year: 2016, Model line: SEQUOIA, Model: TOYOTA SEQUOIA 2016 2.GPages: 324, PDF Size: 5.72 MB
Page 123 of 324
123
7. REAR SEAT ENTERTAINMENT SYSTEM OPERATION
AUDIO SYSTEM
3
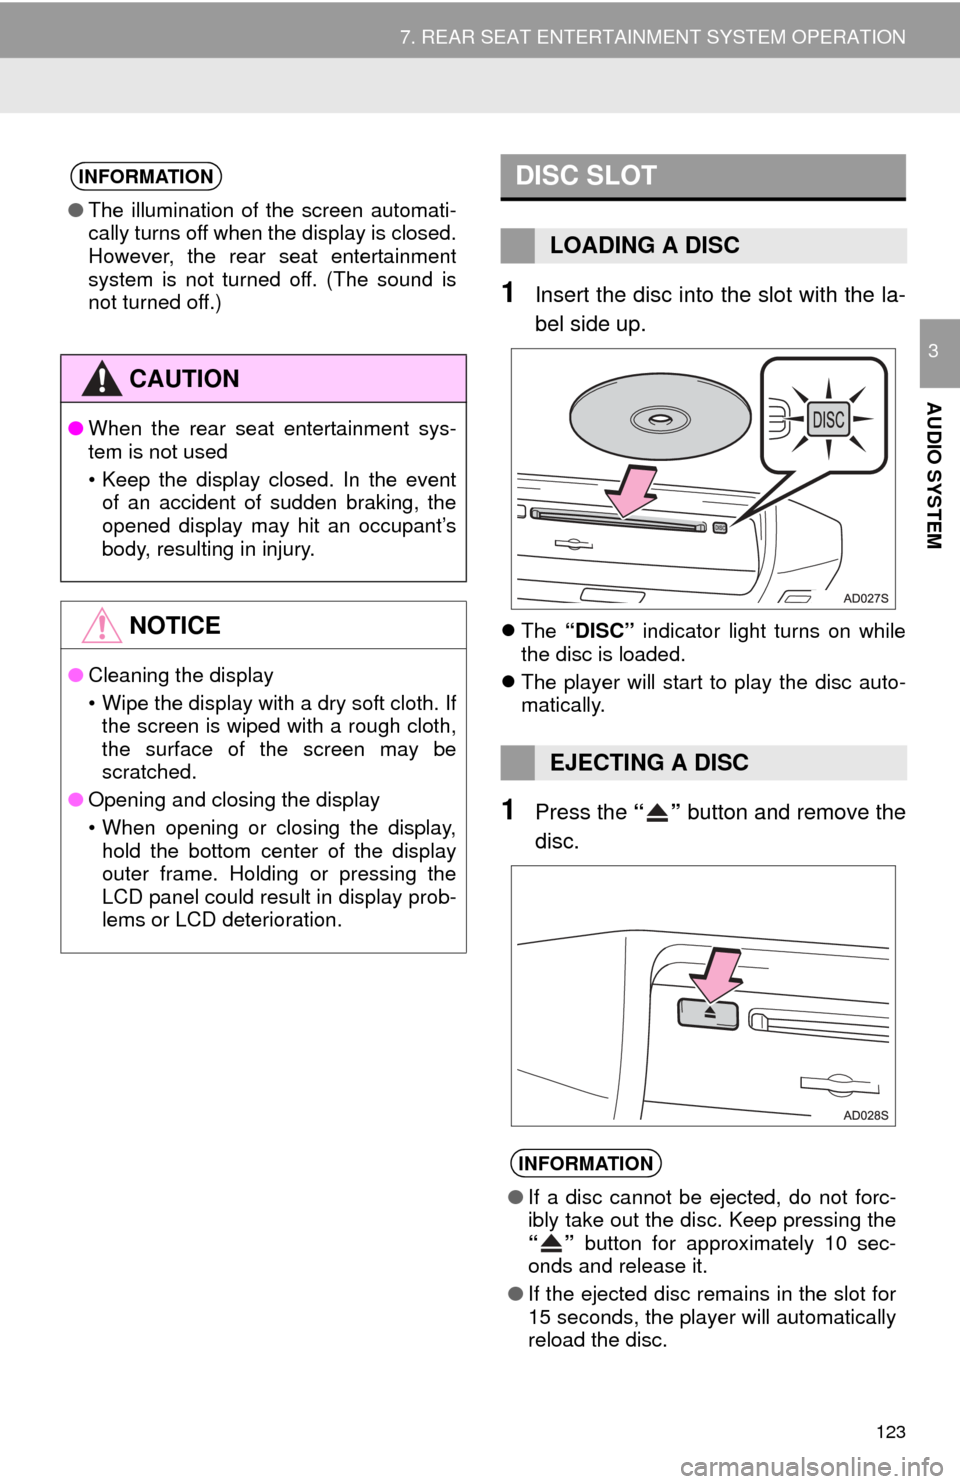
1Insert the disc into the slot with the la-
bel side up.
The “DISC” indicator light turns on while
the disc is loaded.
The player will start to play the disc auto-
matically.
1Press the “” button and remove the
disc.
INFORMATION
● The illumination of the screen automati-
cally turns off when the display is closed.
However, the rear seat entertainment
system is not turned off. (The sound is
not turned off.)
CAUTION
●When the rear seat entertainment sys-
tem is not used
• Keep the display closed. In the event
of an accident of sudden braking, the
opened display may hit an occupant’s
body, resulting in injury.
NOTICE
● Cleaning the display
• Wipe the display with a dry soft cloth. If
the screen is wiped with a rough cloth,
the surface of the screen may be
scratched.
● Opening and closing the display
• When opening or closing the display,
hold the bottom center of the display
outer frame. Holding or pressing the
LCD panel could result in display prob-
lems or LCD deterioration.
DISC SLOT
LOADING A DISC
EJECTING A DISC
INFORMATION
● If a disc cannot be ejected, do not forc-
ibly take out the disc. Keep pressing the
“” button for approximately 10 sec-
onds and release it.
● If the ejected disc remains in the slot for
15 seconds, the player will automatically
reload the disc.
Page 125 of 324
125
7. REAR SEAT ENTERTAINMENT SYSTEM OPERATION
AUDIO SYSTEM
3
1Press the button to turn on the
rear seat entertainment system.
Press the button once again to turn
off the system.
1Press “+” or “-” on the “VOL” button
to adjust the volume.
When the speaker output is off, the vol-
ume cannot be adjusted.
1Press the button to turn on/off
the speaker output.
On: The sound is available from both vehi-
cle speakers and headphones.
Off: The sound is available from the head-
phones only.
1Press the “DISC”, “SD” or “VIDEO”
button to change the audio/video
source.
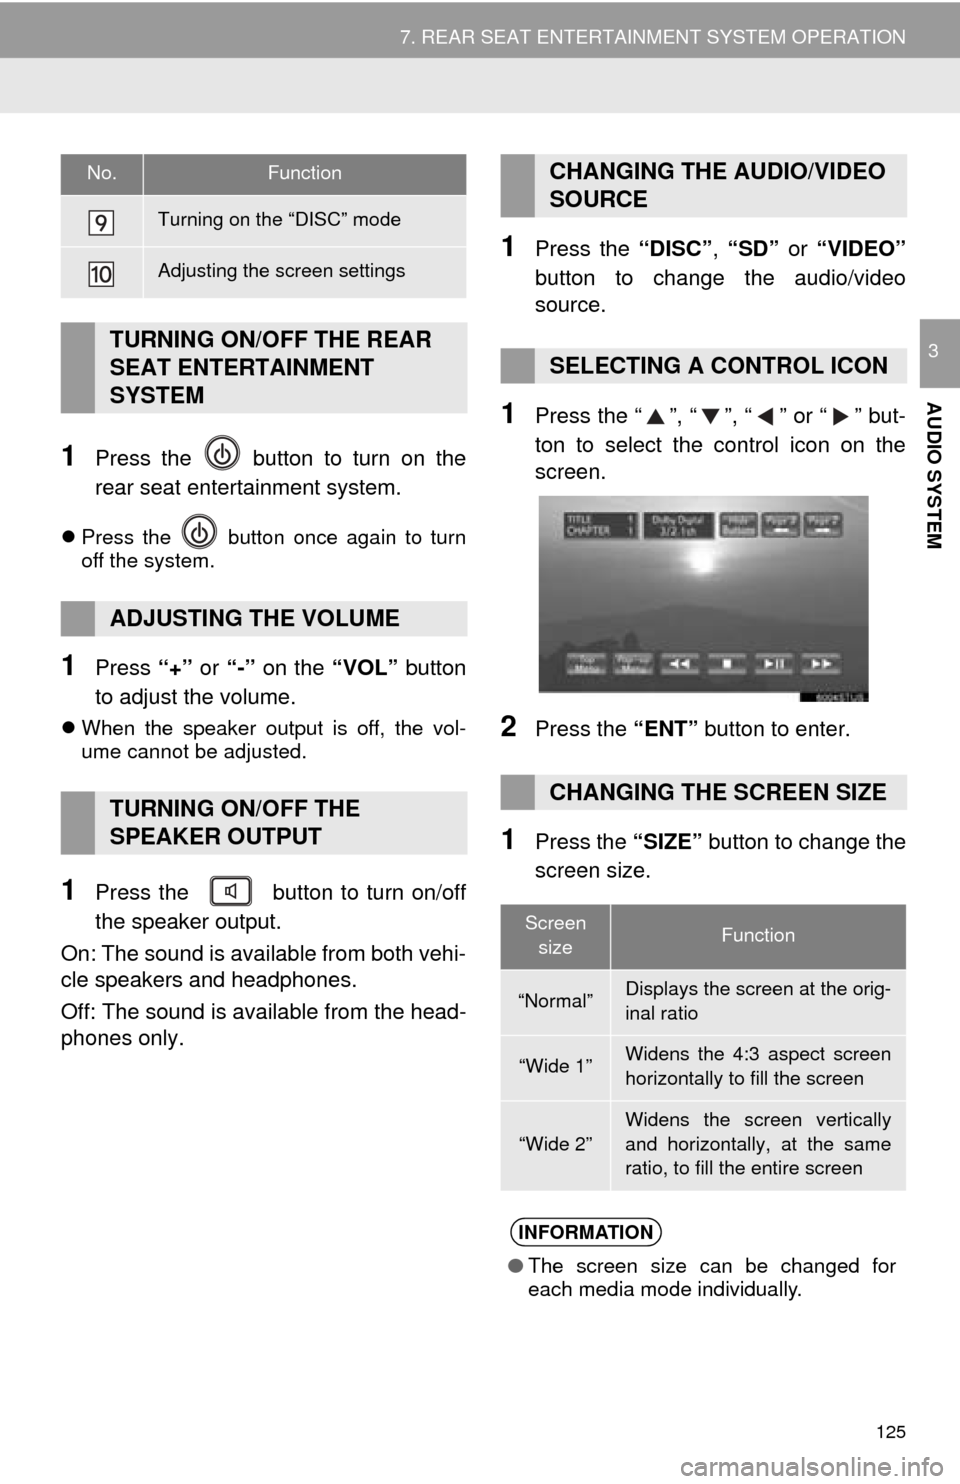
1Press the “”, “”, “” or “” but-
ton to select the control icon on the
screen.
2Press the “ENT” button to enter.
1Press the “SIZE” button to change the
screen size.
Turning on the “DISC” mode
Adjusting the screen settings
TURNING ON/OFF THE REAR
SEAT ENTERTAINMENT
SYSTEM
ADJUSTING THE VOLUME
TURNING ON/OFF THE
SPEAKER OUTPUT
No.FunctionCHANGING THE AUDIO/VIDEO
SOURCE
SELECTING A CONTROL ICON
CHANGING THE SCREEN SIZE
Screen sizeFunction
“Normal”Displays the screen at the orig-
inal ratio
“Wide 1”Widens the 4:3 aspect screen
horizontally to fill the screen
“Wide 2”
Widens the screen vertically
and horizontally, at the same
ratio, to fill the entire screen
INFORMATION
● The screen size can be changed for
each media mode individually.
Page 127 of 324
127
7. REAR SEAT ENTERTAINMENT SYSTEM OPERATION
AUDIO SYSTEM
3
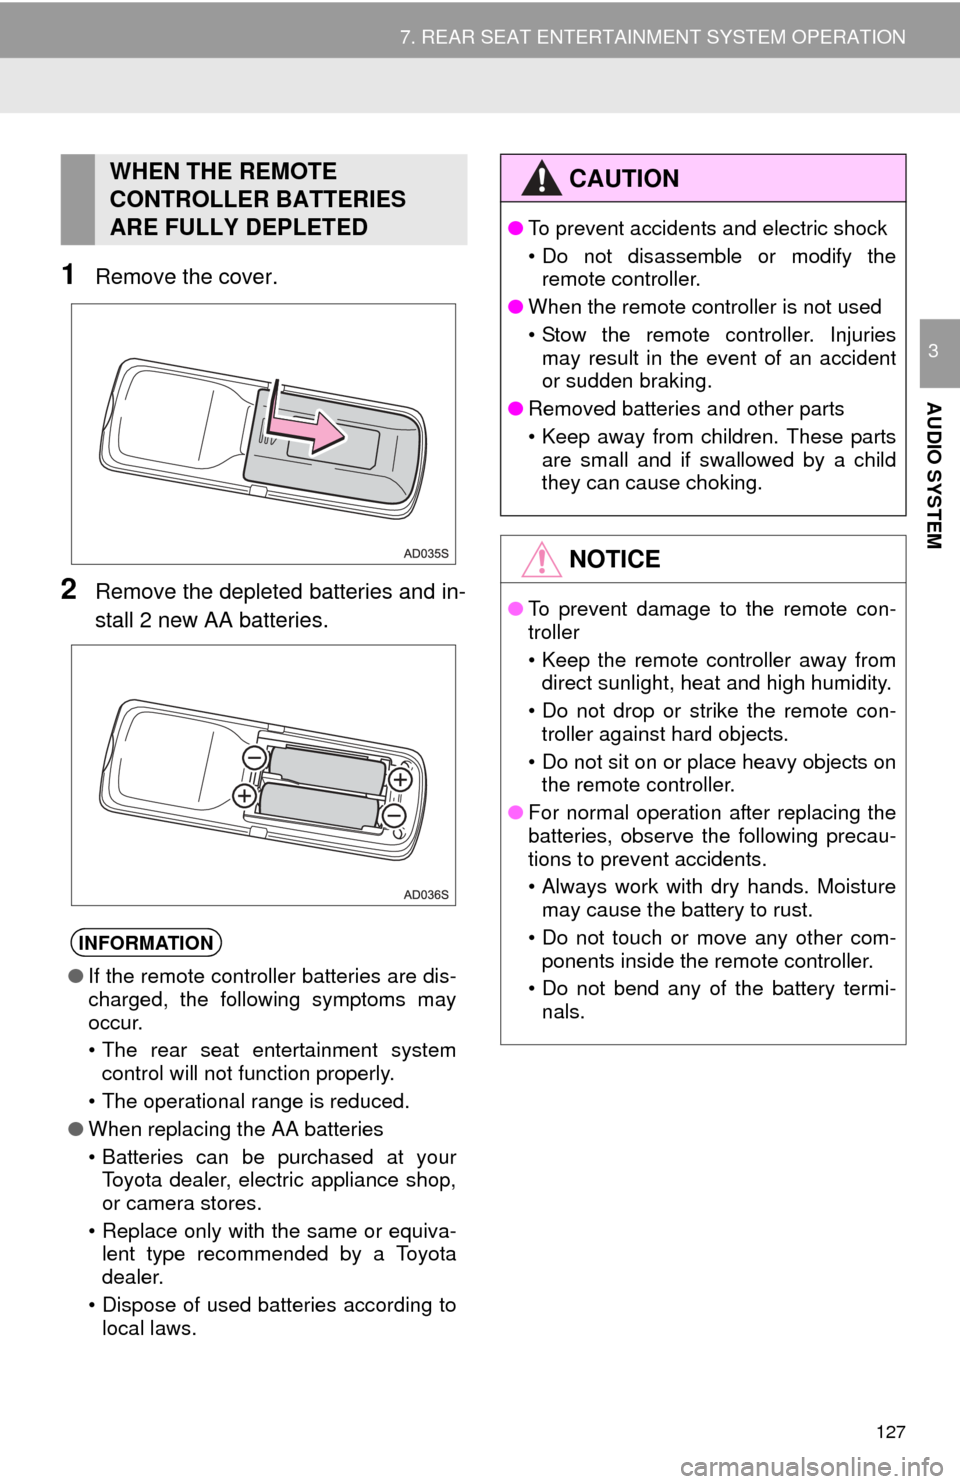
1Remove the cover.
2Remove the depleted batteries and in-
stall 2 new AA batteries.
WHEN THE REMOTE
CONTROLLER BATTERIES
ARE FULLY DEPLETED
INFORMATION
●If the remote controller batteries are dis-
charged, the following symptoms may
occur.
• The rear seat entertainment system
control will not function properly.
• The operational range is reduced.
● When replacing the AA batteries
• Batteries can be purchased at your
Toyota dealer, electric appliance shop,
or camera stores.
• Replace only with the same or equiva- lent type recommended by a Toyota
dealer.
• Dispose of used batteries according to local laws.
CAUTION
● To prevent accidents and electric shock
• Do not disassemble or modify the
remote controller.
● When the remote controller is not used
• Stow the remote controller. Injuries
may result in the event of an accident
or sudden braking.
● Removed batteries and other parts
• Keep away from children. These parts
are small and if swallowed by a child
they can cause choking.
NOTICE
● To prevent damage to the remote con-
troller
• Keep the remote controller away from
direct sunlight, heat and high humidity.
• Do not drop or strike the remote con- troller against hard objects.
• Do not sit on or place heavy objects on the remote controller.
● For normal operation after replacing the
batteries, observe the following precau-
tions to prevent accidents.
• Always work with dry hands. Moisture
may cause the battery to rust.
• Do not touch or move any other com- ponents inside the remote controller.
• Do not bend any of the battery termi- nals.
Page 128 of 324
128
7. REAR SEAT ENTERTAINMENT SYSTEM OPERATION
With some wireless headphones generally
available in the market, it may be difficult
to catch signals properly. Toyota recom-
mends the use of Toyota genuine wireless
headphones.
Please contact your Toyota dealer for fur-
ther details.
When the sound volume needs to be
changed while a wireless headphone is
used, adjust the volume using the wireless
headphone’s volume switch.
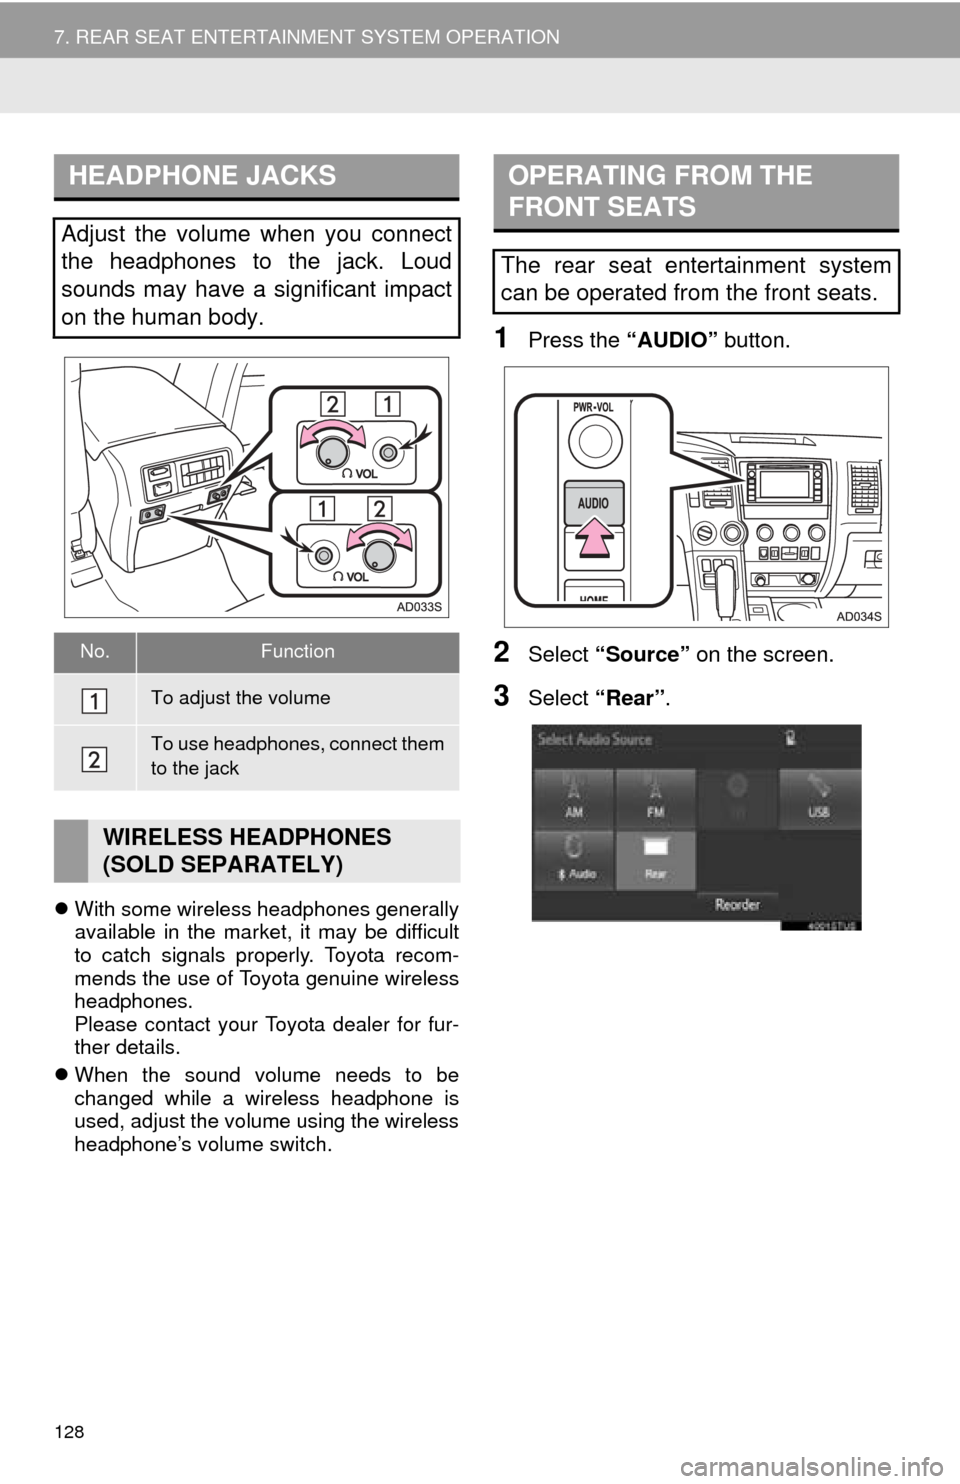
1Press the “AUDIO” button.
2Select “Source” on the screen.
3Select “Rear” .
HEADPHONE JACKS
Adjust the volume when you connect
the headphones to the jack. Loud
sounds may have a significant impact
on the human body.
No.Function
To adjust the volume
To use headphones, connect them
to the jack
WIRELESS HEADPHONES
(SOLD SEPARATELY)
OPERATING FROM THE
FRONT SEATS
The rear seat entertainment system
can be operated from the front seats.
Page 129 of 324
129
7. REAR SEAT ENTERTAINMENT SYSTEM OPERATION
AUDIO SYSTEM
3
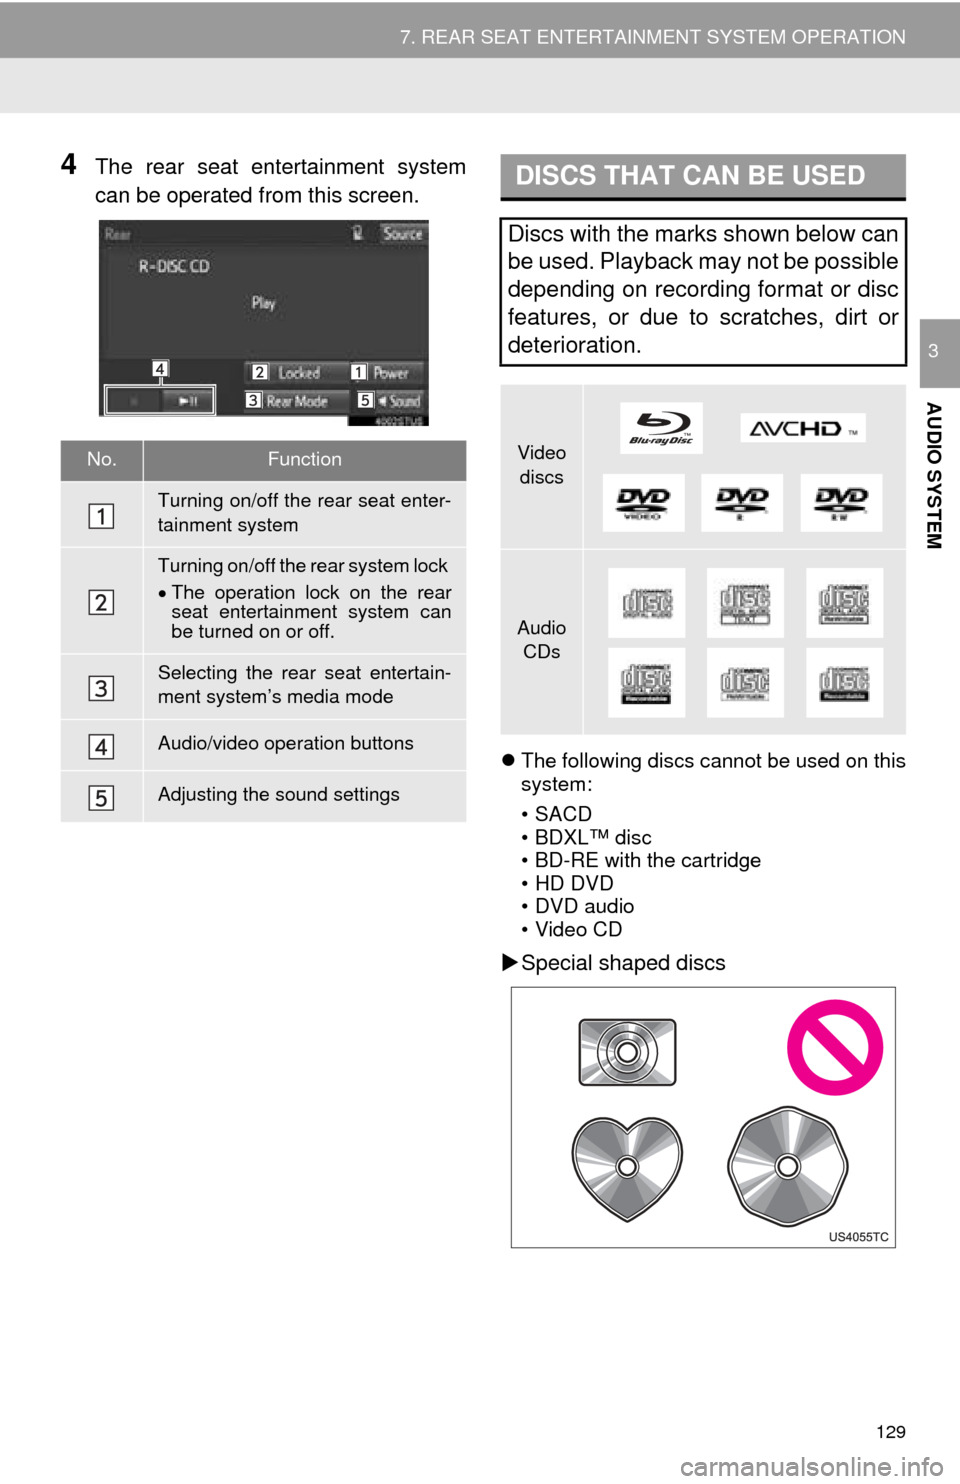
4The rear seat entertainment system
can be operated from this screen.
The following discs cannot be used on this
system:
•SACD
• BDXL™ disc
• BD-RE with the cartridge
• HD DVD
• DVD audio
• Video CD
Special shaped discs
No.Function
Turning on/off the rear seat enter-
tainment system
Turning on/off the rear system lock
The operation lock on the rear
seat entertainment system can
be turned on or off.
Selecting the rear seat entertain-
ment system’s media mode
Audio/video operation buttons
Adjusting the sound settings
DISCS THAT CAN BE USED
Discs with the marks shown below can
be used. Playback may not be possible
depending on recording format or disc
features, or due to scratches, dirt or
deterioration.
Video
discs
Audio CDs
Page 131 of 324
131
7. REAR SEAT ENTERTAINMENT SYSTEM OPERATION
AUDIO SYSTEM
3
Memory cards are restricted to the follow-
ing conditions based on SD standards.
• SD memory card (from 512MB to 2GB)
• SDHC memory card (from 4GB to 32GB)
• SDXC memory card (from 48GB to
64GB)
Mini SD cards and Micro SD cards can be
used, but must be used with an adaptor
card.
MultiMedia Card (MMC) cannot be used.
This system can play JPEG pictures and
AVCHD video images that are stored in an
SD card. It does not support music play-
back.
Local storage
• Some BD videos have a feature to mem-
orize disc information, such as a resume
point, in a local storage. The rear seat
entertainment system uses an SD card
as a local storage device. To use this
function, insert an SD card into the SD
card slot.
• The SD card memory function may differ
depending on the BD videos played.
• When an SD card that contains any kind of data is inserted, BD video disc infor-
mation will not be stored into the SD card
to protect the existing data in the card.
To use an SD card as a local storage,
use another SD card that does not con-
tain any data.
Blu-ray Disc™, Blu-ray™, BD-Live™,
BDXL™, and the logos are trademarks of
the Blu-ray Disc Association.
Java is a registered trademark of Oracle
and/or its affiliates.
“AVCHD” and the “AVCHD” logo are
trademarks of Panasonic Corporation and
Sony Corporation.
“DVD Logo” is a trademark of DVD For-
mat/Logo Licensing Corporation.
SDXC Logo is a trademark of SD-3C,
LLC.
Manufactured under license from Dolby
Laboratories. Dolby and the double-D
symbol are trademarks of Dolby Laborato-
ries.
SD CARD THAT CAN BE
USED
SD CARD FUNCTIONS
COPYRIGHTS AND
TRADEMARKS
Page 132 of 324
132
7. REAR SEAT ENTERTAINMENT SYSTEM OPERATION
For DTS patents, see http://patents.dts.com.
Manufactured under license from DTS
Licensing Limited. DTS, the Symbol, & DTS
and the Symbol together are registered
trademarks, and DTS 2.0 Channel is a
trademark of DTS, Inc.
DTS, Inc. All
Rights Reserved.
This product is licensed under the AVC
patent portfolio license and the VC-1
patent portfolio license for the personal
use of a consumer or other uses in which
it does not receive remuneration to (i)
encode video in compliance with the AVC
Standard and the VC-1 Standard (“AVC/
VC-1 Video”) and/or (ii) decode AVC/VC-1
Video that was encoded by a consumer
engaged in a personal activity and/or was
obtained from a video provider licensed to
provide AVC/VC-1 Video. No license is
granted or shall be implied for any other
use. Additional information may be
obtained from MPEG LA, LLC. See http://
www.mpegla.com.
Cinavia Notice
This product uses Cinavia technology to
limit the use of unauthorized copies of
some commercially-produced film and vid-
eos and their soundtracks. When a prohib-
ited use of an unauthorized copy is
detected, a message will be displayed and
playback or copying will be interrupted.
More information about Cinavia technolo-
gy is provided at the Cinavia Online Con-
sumer Information Center at http://
www.cinavia.com. To request additional
information about Cinavia by mail, send a
postcard with your mailing address to:
Cinavia Consumer Information Center,
P.O. Box 86851, San Diego, CA, 92138,
USA.
This product incorporates proprietary
technology under license from Verance
Corporation and is protected by U.S.
Patent 7,369,677 and other U.S. and
worldwide patents issued and pending as
well as copyright and trade secret protec-
tion for certain aspects of such technol-
ogy. Cinavia is a trademark of Verance
Corporation. Copyright 2004-2014 Ver-
ance Corporation. All rights reserved by
Verance. Reverse engineering or disas-
sembly is prohibited.
WMA (Windows Media Audio), Microsoft,
Windows, and Windows Media are the
registered trademarks of Microsoft Corpo-
ration in the U.S. and other countries.
This item incorporates copy protection
technology that is protected by U.S. pat-
ents and other intellectual property rights
of Rovi Corporation. Reverse engineering
and disassembly are prohibited.
Page 133 of 324
133
7. REAR SEAT ENTERTAINMENT SYSTEM OPERATION
AUDIO SYSTEM
3
This product incorporates the following
software:
(1) the software developed independently
by or for Panasonic Corporation,
(2) the software owned by third party and li-
censed to Panasonic Corporation,
(3) the software licensed under the GNU
General Public License, Version 2 (GPL
V2),
(4) the software licensed under the GNU
LESSER General Public License, Version
2.1 (LGPL v2.1) and/or,
(5) open sourced software other than the
software licensed under the GPL v2 and/or
LGPL v2.1
For the software categorized as (3) and
(4), please refer to the terms and
conditions of GPL v2 and LGPL v2.1, as
the case may be at http://www.gnu.org/
licenses/old-licenses/gpl-2.0.html and
http://www.gnu.org/licenses/old-licenses/
lgpl-2.1.html.
In addition, the software categorized as (3)
and (4) are copyrighted by several individ-
uals. Please refer to the copyright notice of
those individuals at http://car.panasonic.jp/
oss/c8u23ZXg/
The GPL/LGPL software is distributed in
the hope that it will be useful, but WITH-
OUT ANY WARRANTY, without even the
implied warranty of MERCHANTABILITY
or FITNESS FOR A PARTICULAR PUR-
POSE.
At least three (3) years from delivery of
products, we will give to any third party
who contacts us at the contact information
provided below, for a charge no more than
our cost of physically performing source
code distribution, a complete machine-
readable copy of the corresponding source
code covered under GPL v2/LGPL v2.1. [Contact address]
Engineering Administration Group Manag-
er
Panasonic Corporation 4261 Ikonobe-cho,
Tsuzuki-ku, Yokohama City 224-8520, Ja-
pan
Source code is also freely available to you
and any other member of the public via our
website bellow.
http://car.panasonic.jp/oss/c8u23ZXg/
For the software categorized as (5) in-
cludes as follows.
1. This product includes software devel-
oped by the OpenSSL Project for use in
the OpenSSL Toolkit. (http://www.opens-
sl.org/)
2. This product includes software devel-
oped by the University of California, Berke-
ley and its contributors.
3. Free Type code.
4. The Independent JPEG Group’s JPEG
software.
5. Vera Fonts. (http://www.gnome.org/
fonts/)
Page 134 of 324
134
7. REAR SEAT ENTERTAINMENT SYSTEM OPERATION
2. PLAYING A Blu-ray Disc™ (BD) AND DVD DISCS*
This system can play Blu-ray Disc™
(BD) videos with digital sound. In addi-
tion to commercial BD and DVD titles,
AVCHD and BDAV videos can be
played on this system, so digital TV re-
corded by home digital video recorders
and BD/DVD home videos recorded by
home digital video cameras can also
be played on this system.
Press the “DISC” button if a disc has
already been loaded in the disc slot.
CAUTION
● BD/DVD video precaution
• Conversational speech on some BDs/
DVDs is recorded at a low volume to
emphasize the impact of sound effects.
If you adjust the volume assuming that
the conversations represent the maxi-
mum volume level that the BD/DVD
will play, you may be startled by louder
sound effects or startled when you
change to a different audio source.
Loud sounds may have a significant
impact on the human body or pose a
driving hazard. Keep this in mind when
you adjust the volume.
*: If equipped
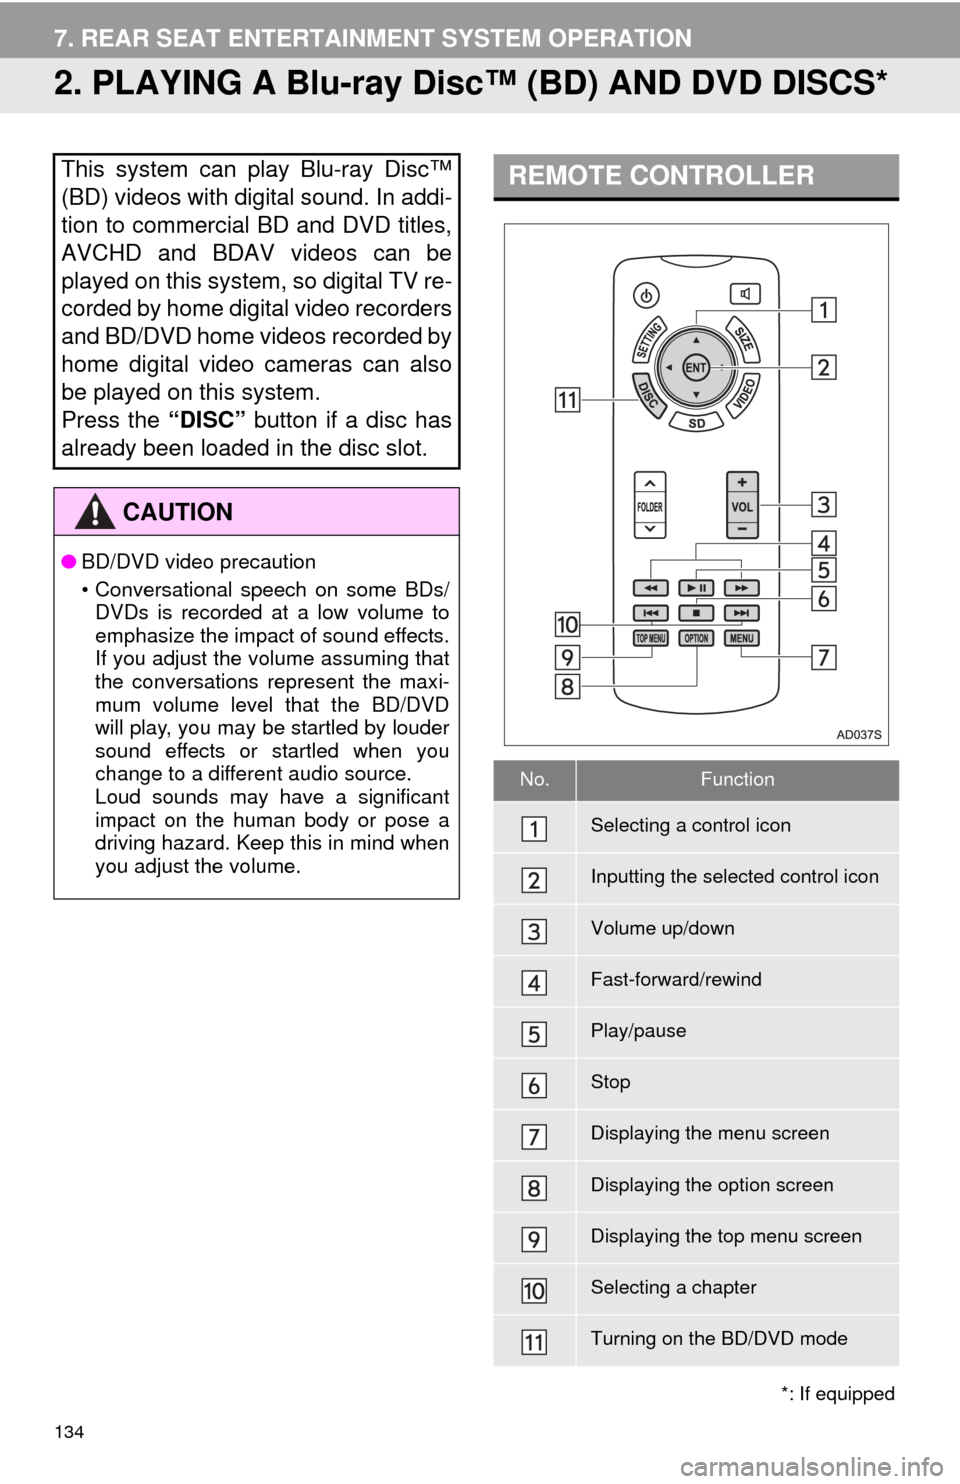
REMOTE CONTROLLER
No.Function
Selecting a control icon
Inputting the selected control icon
Volume up/down
Fast-forward/rewind
Play/pause
Stop
Displaying the menu screen
Displaying the option screen
Displaying the top menu screen
Selecting a chapter
Turning on the BD/DVD mode
Page 135 of 324
135
7. REAR SEAT ENTERTAINMENT SYSTEM OPERATION
AUDIO SYSTEM
3
1Insert a disc or press the “DISC” but-
ton.
The player will start to play the disc auto-
matically.
1Press the button to play/pause.
Press and hold the button while
pausing, the video is played slowly.
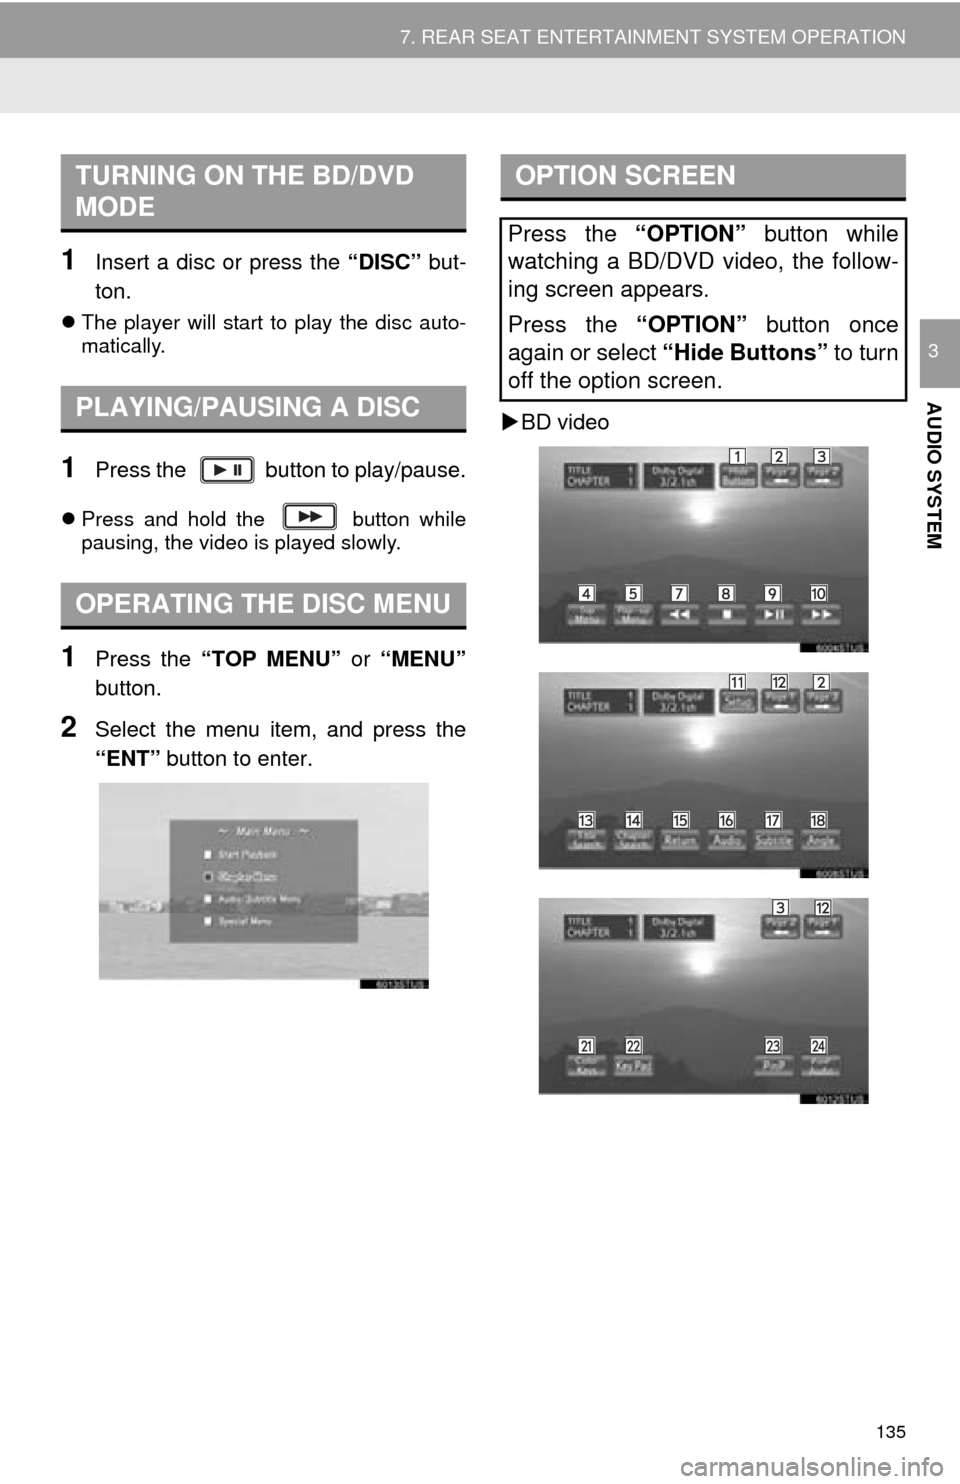
1Press the “TOP MENU” or “MENU”
button.
2Select the menu item, and press the
“ENT” button to enter.
BD video
TURNING ON THE BD/DVD
MODE
PLAYING/PAUSING A DISC
OPERATING THE DISC MENU
OPTION SCREEN
Press the “OPTION” button while
watching a BD/DVD video, the follow-
ing screen appears.
Press the “OPTION” button once
again or select “Hide Buttons” to turn
off the option screen.