audio TOYOTA SEQUOIA 2016 2.G Navigation Manual
[x] Cancel search | Manufacturer: TOYOTA, Model Year: 2016, Model line: SEQUOIA, Model: TOYOTA SEQUOIA 2016 2.GPages: 324, PDF Size: 5.72 MB
Page 149 of 324

149
7. REAR SEAT ENTERTAINMENT SYSTEM OPERATION
AUDIO SYSTEM
3
Compatible media
Media that can be used for MP3 and WMA
playback:
• CD-ROM/R/RW
• DVD-ROM/R/RW
Playback in some instances may not be
possible, depending on the status of the
disc. Playback may not be possible or the
audio may jump if the disc is scratched or
marked with fingerprints.
Compatible disc formats
The following disc formats can be used.
• Disc formats: CD-ROM Mode 1, CD-
ROM XA Mode 2 Form 1
• File formats: ISO9660 Level 1, Level 2
(Romeo, Joliet), UDF (2.01 or lower)
MP3 and WMA files written in any format
other than those listed above may not
play correctly, and their file names and
folder names may not be displayed cor-
rectly.
Items related to standards and limitations
are as follows.
• Maximum directory hierarchy: 8 levels
• Maximum length of folder names/file names: 20 characters
• Maximum number of folders: 255
(including the root)
• Maximum number of files per disc: 512
File names
The only files that can be recognized as
MP3/WMA and played are those with the
extension .mp3 or .wma.
Multi-sessions
As the audio system is compatible with
multi-sessions, it is possible to play discs
that contain MP3 and WMA files.
ID3 and WMA tags
ID3 tags can be added to MP3 files, mak-
ing it possible to record the track title, artist
name, etc.
The system is compatible with ID3 Ver.
1.0, 1.1, and Ver. 2.3 ID3 tags. (The num-
ber of characters is based on ID3 Ver. 1.0
and 1.1.)
WMA tags can be added to WMA files,
making it possible to record the track title
and artist name in the same way as with
ID3 tags.
MP3 and WMA playback
When a disc containing MP3 or WMA files
is inserted, all files on the disc are first
checked. Once the file check is finished,
the first MP3 or WMA file is played. To
make the file check finish more quickly, we
recommend you do not write in any files
other than MP3 or WMA files or create any
unnecessary folders.
If the discs contain a mixture of music data
and MP3 or WMA format data, only music
data can be played.
Extensions
If the file extensions .mp3 and .wma are
used for files other than MP3 and WMA
files, they will be mistakenly recognized
and played as MP3 and WMA files. This
may result in large amounts of interference
and damage to the speakers.
Playback
• To play MP3 files with steady sound
quality, we recommend a fixed bit rate of
128 kbps and a sampling frequency of
44.1 kHz.
• Playback may not be possible in some instances, depending on the characteris-
tics of the disc.
• There is a wide variety of freeware and other encoding software for MP3 and
WMA files on the market, and depending
on the status of the encoding and the file
format, poor sound quality or noise at the
start of playback may result. In some
cases, playback may not be possible at
all.
• When files other than MP3 or WMA files are recorded on a disc, it may take more
time to recognize the disc and in some
cases, playback may not be possible at
all.
Page 151 of 324
151
7. REAR SEAT ENTERTAINMENT SYSTEM OPERATION
AUDIO SYSTEM
3
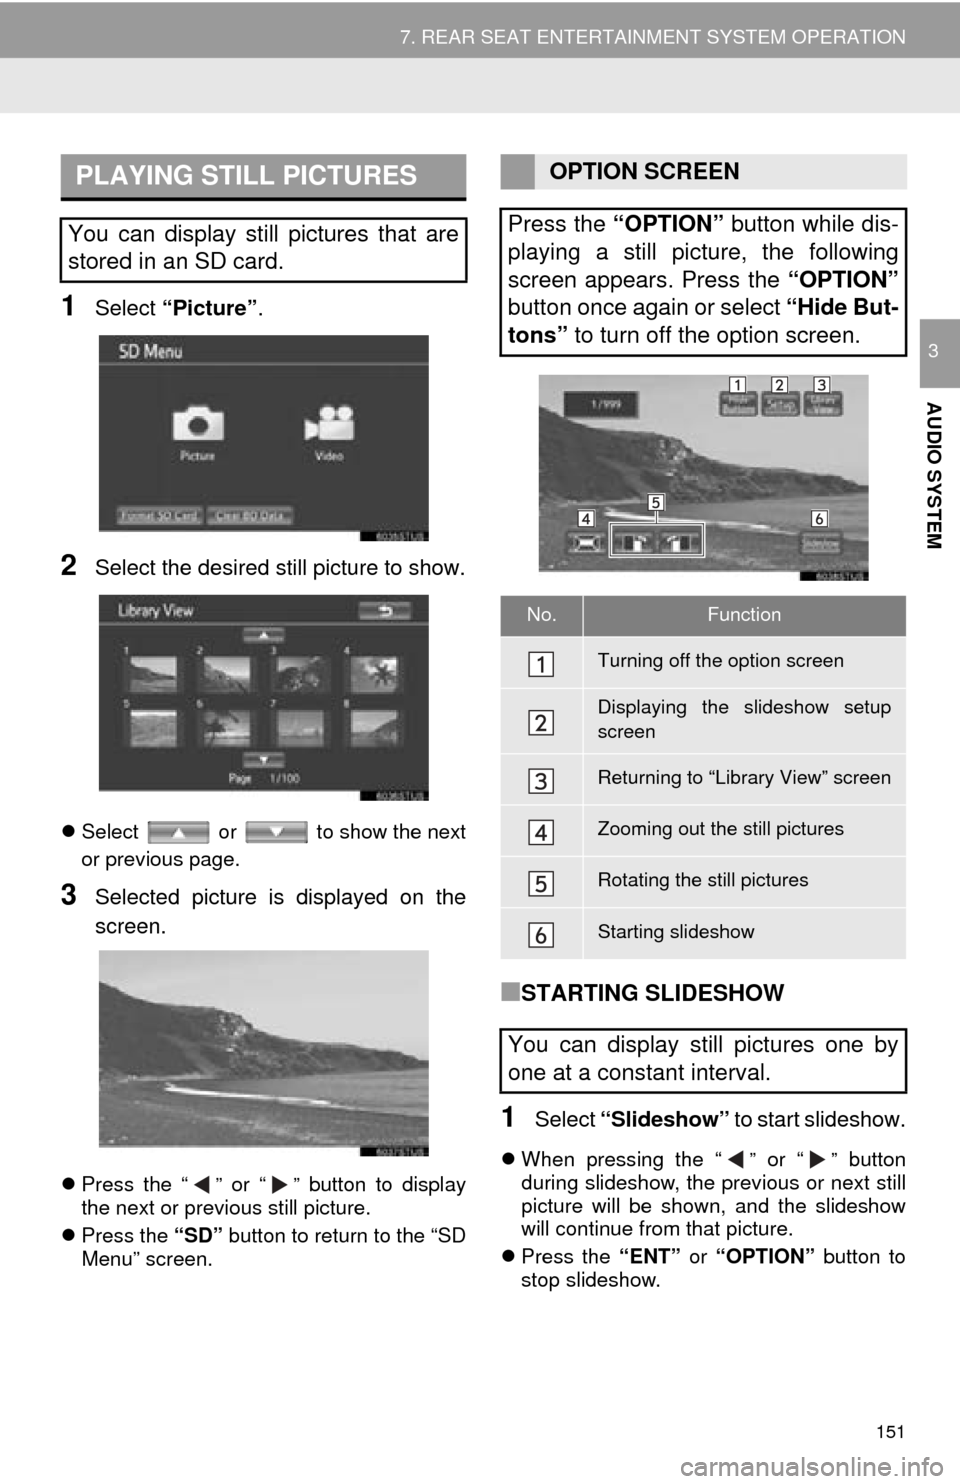
1Select “Picture”.
2Select the desired still picture to show.
Select or to show the next
or previous page.
3Selected picture is displayed on the
screen.
Press the “” or “” button to display
the next or previous still picture.
Press the “SD” button to return to the “SD
Menu” screen.
■STARTING SLIDESHOW
1Select “Slideshow” to start slideshow.
When pressing the “” or “” button
during slideshow, the previous or next still
picture will be shown, and the slideshow
will continue from that picture.
Press the “ENT” or “OPTION” button to
stop slideshow.
PLAYING STILL PICTURES
You can display still pictures that are
stored in an SD card.
OPTION SCREEN
Press the “OPTION” button while dis-
playing a still picture, the following
screen appears. Press the “OPTION”
button once again or select “Hide But-
tons” to turn off the option screen.
No.Function
Turning off the option screen
Displaying the slideshow setup
screen
Returning to “Library View” screen
Zooming out the still pictures
Rotating the still pictures
Starting slideshow
You can display still pictures one by
one at a constant interval.
Page 153 of 324
153
7. REAR SEAT ENTERTAINMENT SYSTEM OPERATION
AUDIO SYSTEM
3
1Select “Format SD Card” .
2Select “Yes” to format the SD card.
If the SD card is formatted, all data on the
card will be erased.
1Select “Clear BD Data” .
2Select “Yes” to delete the BD history
data.
Compatible files
The following files can be displayed.
Picture file format: JPEG
• Picture resolution: between 34 34
and 8192 8192 pixels
• Gray scale JPEG is not supported
Video file format: AVCHD
• For AVCHD playback, use a disc with
data that was saved using a video
recording device. .mts and .m2ts files
cannot be played by themselves.
Compatible formats
This system is compatible with SD memory
cards that meet SD card specifications
FAT16 formats, SDHC memory cards in
FAT32 format, and SDXC memory cards in
exFAT format.
An SD card is not provided with the rear
seat entertainment system and needs to
be purchased separately.
The Panasonic SD memory card format
software version 4.0 or higher is recom-
mended.
Data stored in an SD card may be lost.
Before playing back pictures and videos
stored in an SD card, make certain to back
up the data.
Before an SD card that contains any kind
of data is played, slide the lock switch on
the SD card to “LOCK” in order to prevent
any data from being accidentally deleted
or overwritten.
FORMATTING THE SD CARD
DELETING THE BD HISTORY
DATA
The BD history data such as book-
marks and resume information can be
deleted.
SD CARD INFORMATION
Page 155 of 324
155
7. REAR SEAT ENTERTAINMENT SYSTEM OPERATION
AUDIO SYSTEM
3
5. USING THE VIDEO MODE*
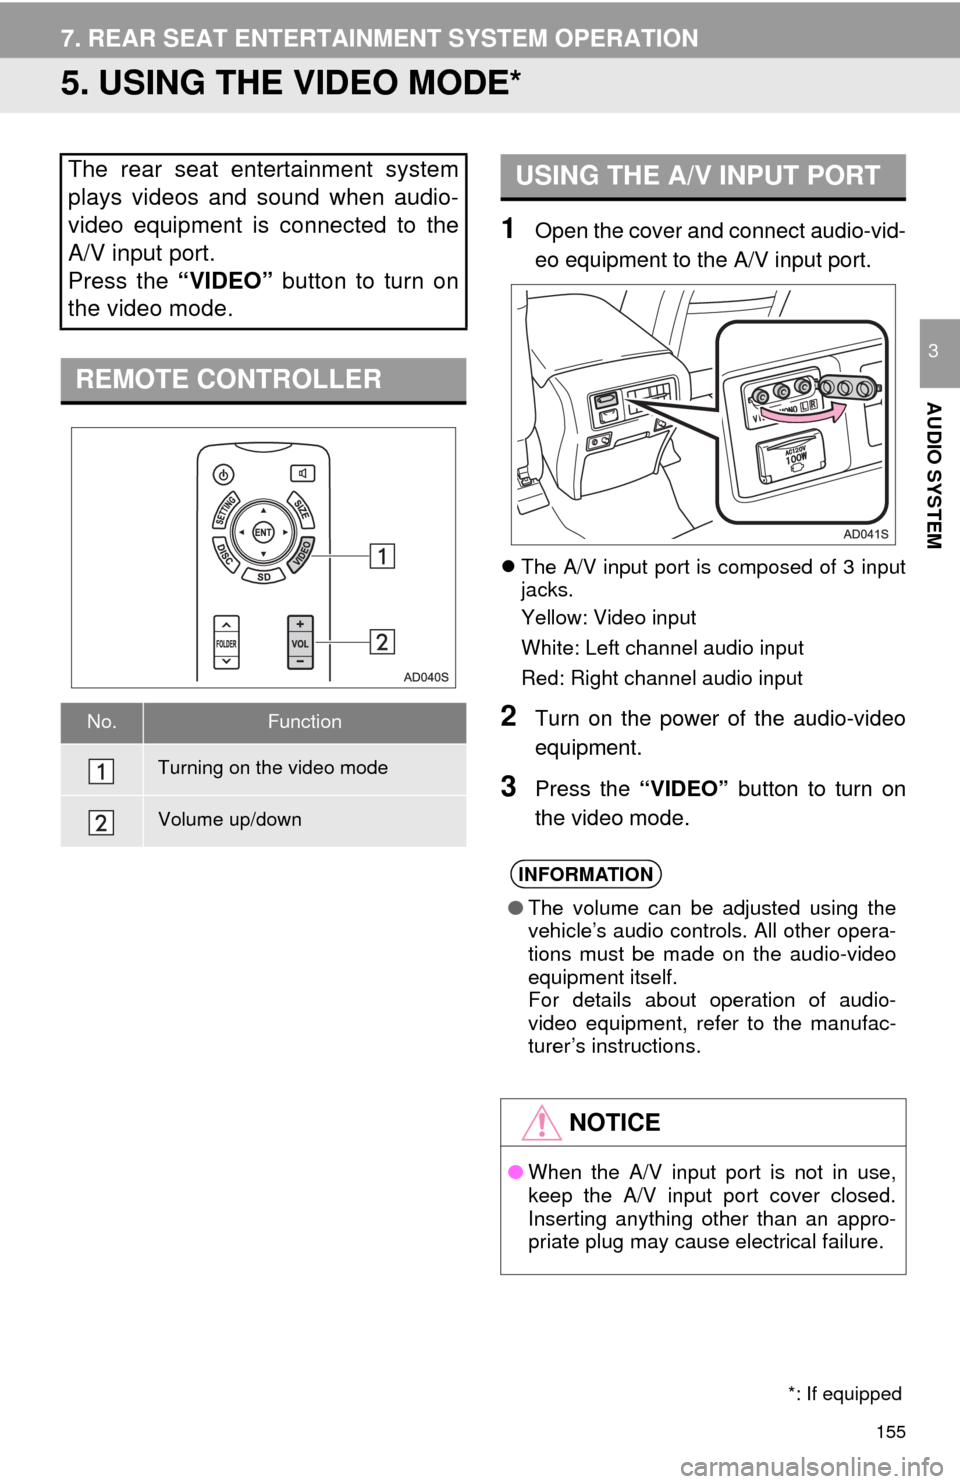
1Open the cover and connect audio-vid-
eo equipment to the A/V input port.
The A/V input port is composed of 3 input
jacks.
Yellow: Video input
White: Left channel audio input
Red: Right channel audio input
2Turn on the power of the audio-video
equipment.
3Press the “VIDEO” button to turn on
the video mode.
The rear seat entertainment system
plays videos and sound when audio-
video equipment is connected to the
A/V input port.
Press the “VIDEO” button to turn on
the video mode.
REMOTE CONTROLLER
No.Function
Turning on the video mode
Volume up/down
*: If equipped
USING THE A/V INPUT PORT
INFORMATION
● The volume can be adjusted using the
vehicle’s audio controls. All other opera-
tions must be made on the audio-video
equipment itself.
For details about operation of audio-
video equipment, refer to the manufac-
turer’s instructions.
NOTICE
●When the A/V input port is not in use,
keep the A/V input port cover closed.
Inserting anything other than an appro-
priate plug may cause electrical failure.
Page 158 of 324
158
1. VOICE COMMAND SYSTEM OPERATION
1. VOICE COMMAND SYSTEM
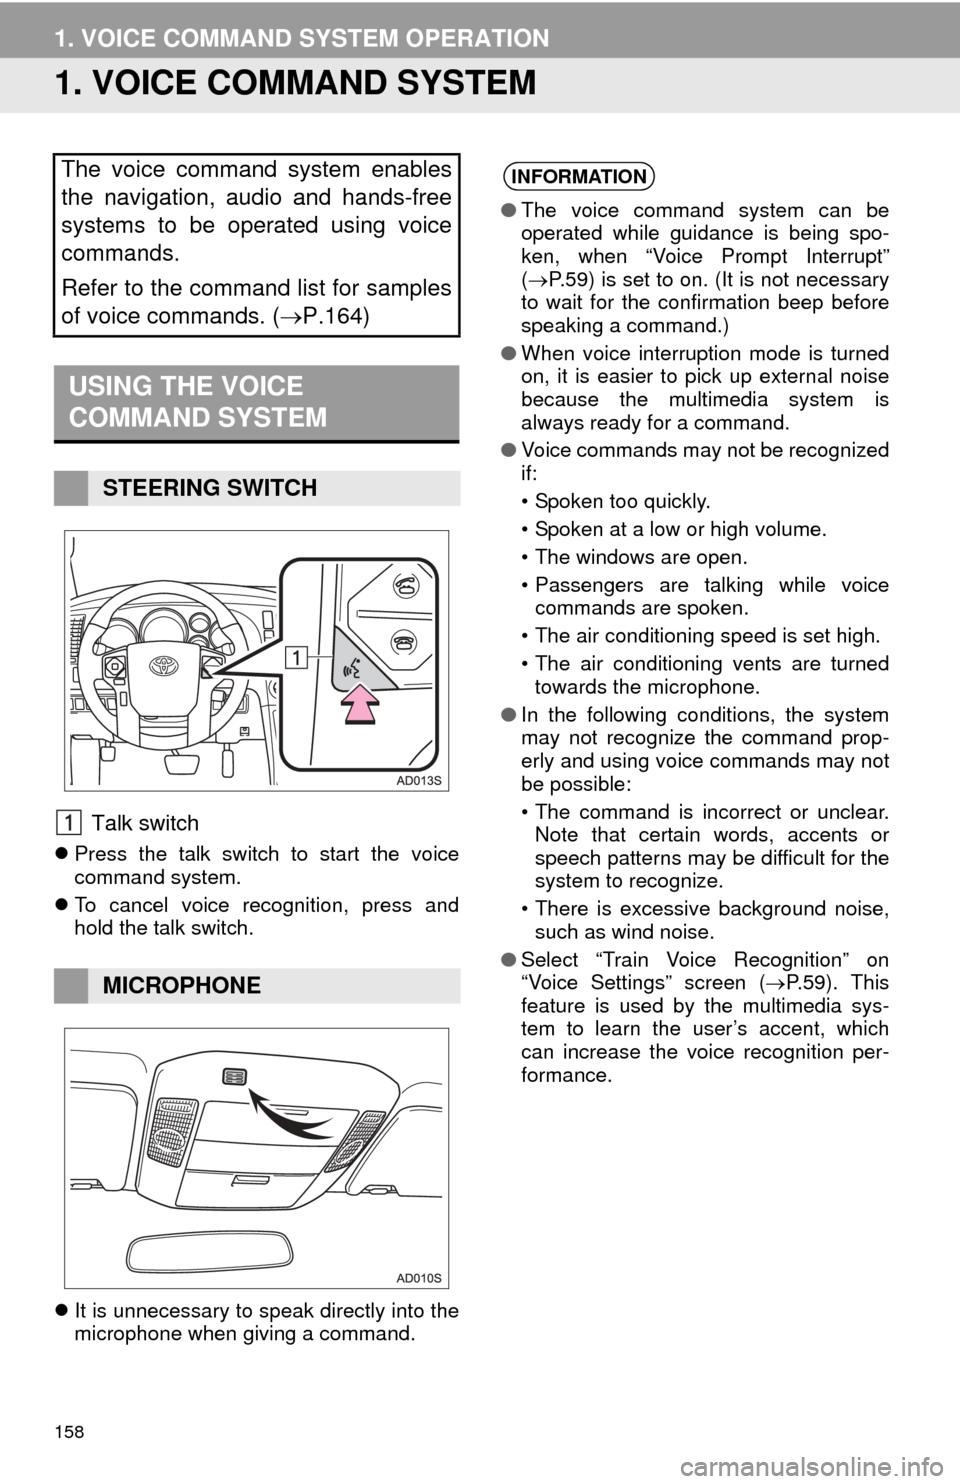
Talk switch
Press the talk switch to start the voice
command system.
To cancel voice recognition, press and
hold the talk switch.
It is unnecessary to speak directly into the
microphone when giving a command.
The voice command system enables
the navigation, audio and hands-free
systems to be operated using voice
commands.
Refer to the command list for samples
of voice commands. ( P.164)
USING THE VOICE
COMMAND SYSTEM
STEERING SWITCH
MICROPHONE
INFORMATION
●The voice command system can be
operated while guidance is being spo-
ken, when “Voice Prompt Interrupt”
( P.59) is set to on. (It is not necessary
to wait for the confirmation beep before
speaking a command.)
● When voice interruption mode is turned
on, it is easier to pick up external noise
because the multimedia system is
always ready for a command.
● Voice commands may not be recognized
if:
• Spoken too quickly.
• Spoken at a low or high volume.
• The windows are open.
• Passengers are talking while voice
commands are spoken.
• The air conditioning speed is set high.
• The air conditioning vents are turned towards the microphone.
● In the following conditions, the system
may not recognize the command prop-
erly and using voice commands may not
be possible:
• The command is incorrect or unclear.
Note that certain words, accents or
speech patterns may be difficult for the
system to recognize.
• There is excessive background noise, such as wind noise.
● Select “Train Voice Recognition” on
“Voice Settings” screen ( P. 5 9 ) . T h i s
feature is used by the multimedia sys-
tem to learn the user’s accent, which
can increase the voice recognition per-
formance.
Page 160 of 324
160
1. VOICE COMMAND SYSTEM OPERATION
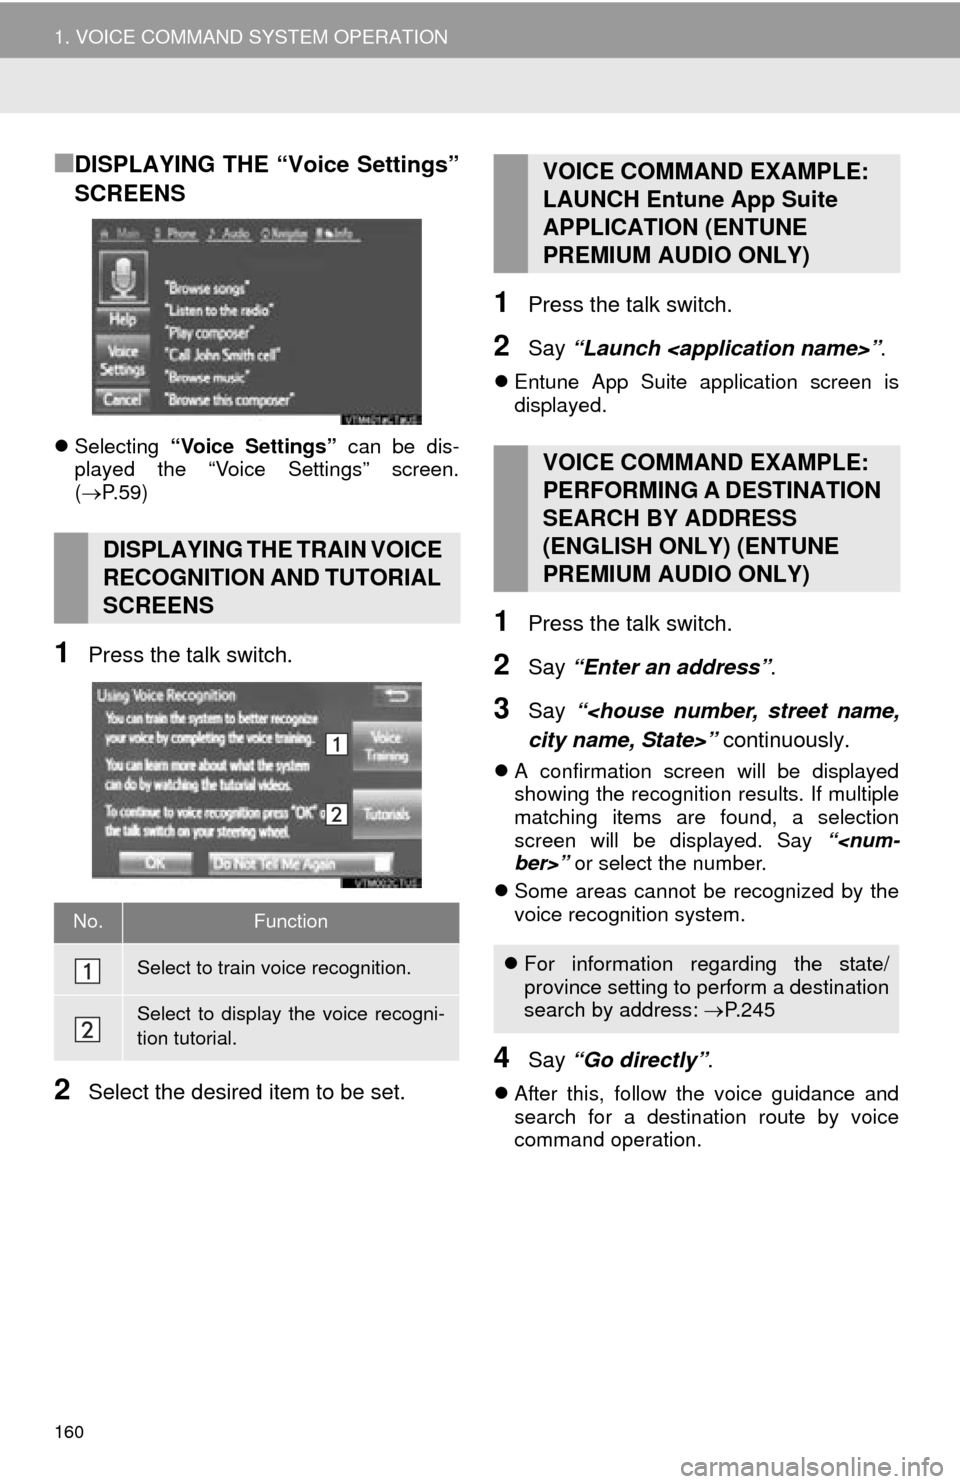
■DISPLAYING THE “Voice Settings”
SCREENS
Selecting “Voice Settings” can be dis-
played the “Voice Settings” screen.
( P.59)
1Press the talk switch.
2Select the desired item to be set.
1Press the talk switch.
2Say “Launch
Entune App Suite application screen is
displayed.
1Press the talk switch.
2Say “Enter an address” .
3Say “
A confirmation screen will be displayed
showing the recognition results. If multiple
matching items are found, a selection
screen will be displayed. Say “
Some areas cannot be recognized by the
voice recognition system.
4Say “Go directly” .
After this, follow the voice guidance and
search for a destination route by voice
command operation.
DISPLAYING THE TRAIN VOICE
RECOGNITION AND TUTORIAL
SCREENS
No.Function
Select to train voice recognition.
Select to display the voice recogni-
tion tutorial.
VOICE COMMAND EXAMPLE:
LAUNCH Entune App Suite
APPLICATION (ENTUNE
PREMIUM AUDIO ONLY)
VOICE COMMAND EXAMPLE:
PERFORMING A DESTINATION
SEARCH BY ADDRESS
(ENGLISH ONLY) (ENTUNE
PREMIUM AUDIO ONLY)
For information regarding the state/
province setting to perform a destination
search by address: P.245
Page 163 of 324
163
1. VOICE COMMAND SYSTEM OPERATION
VOICE COMMAND SYSTEM
4
2. CASUAL SPEECH RECOGNIZATION
Due to natural language speech recog-
nition technology, this system enables
recognition of a command when spo-
ken naturally. However, the system
cannot recognize every variation of
each command. In some situations, it
is possible to omit the command for the
procedure and directly state the de-
sired operation. Not all voice com-
mands are displayed in the function
menu.
INFORMATION
●If the command cannot be recognized
completely, the command input screen
will be displayed. (Search results will be
shown based on the part of the com-
mand that was recognized.)
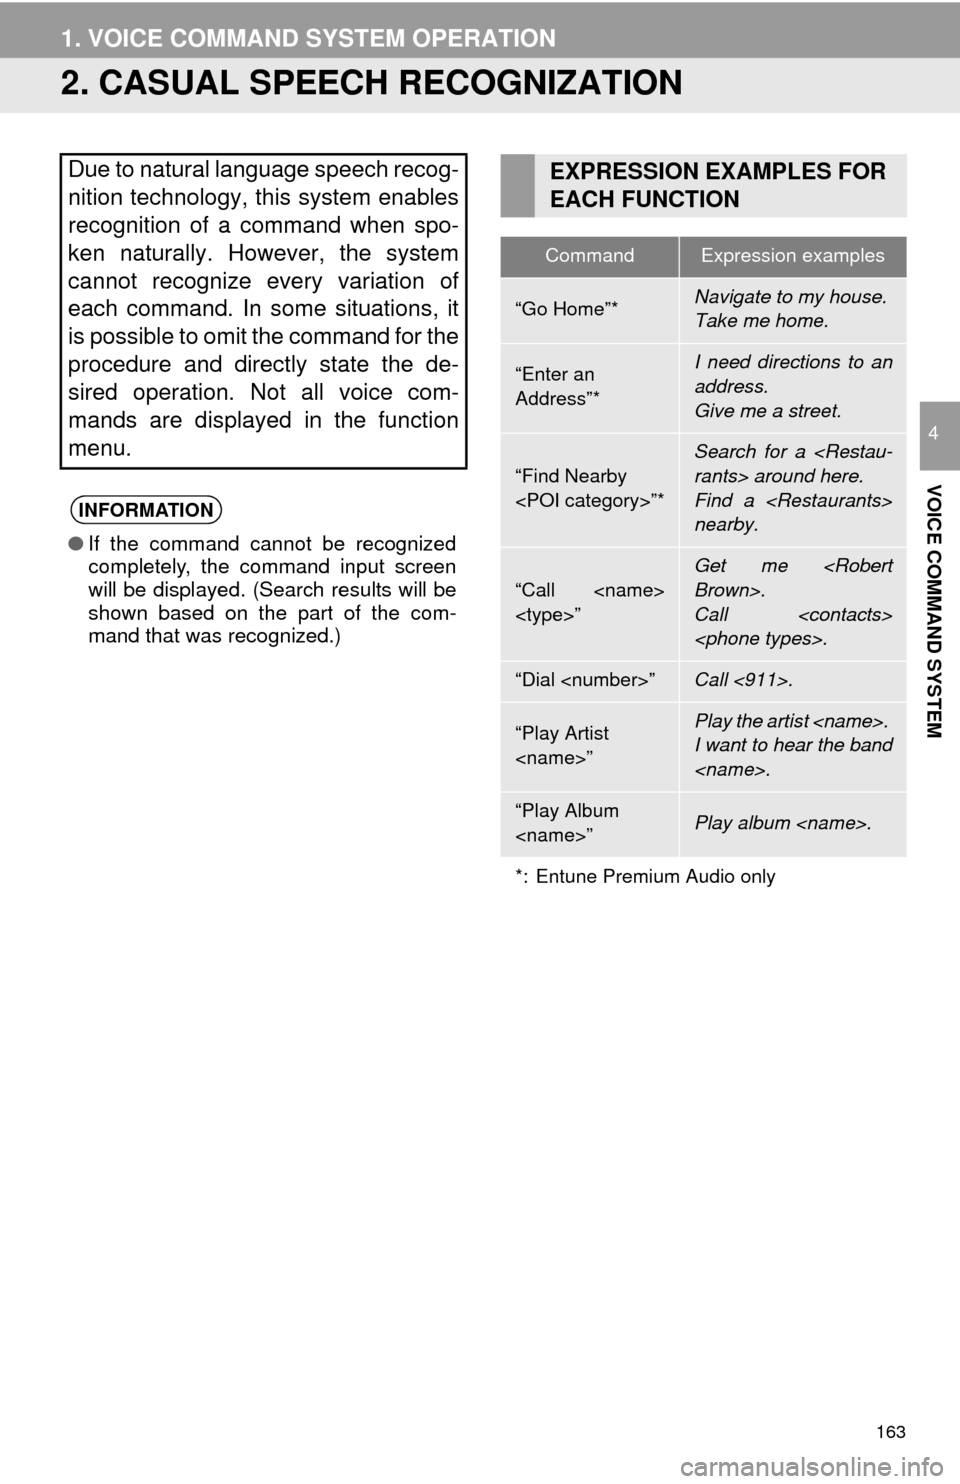
EXPRESSION EXAMPLES FOR
EACH FUNCTION
CommandExpression examples
“Go Home”*Navigate to my house.
Take me home.
“Enter an
Address”*I need directions to an
address.
Give me a street.
“Find Nearby
Search for a
Find a
nearby.
“Call
Call
“Dial
“Play Artist
I want to hear the band
“Play Album
*: Entune Premium Audio only
Page 164 of 324
164
1. VOICE COMMAND SYSTEM OPERATION
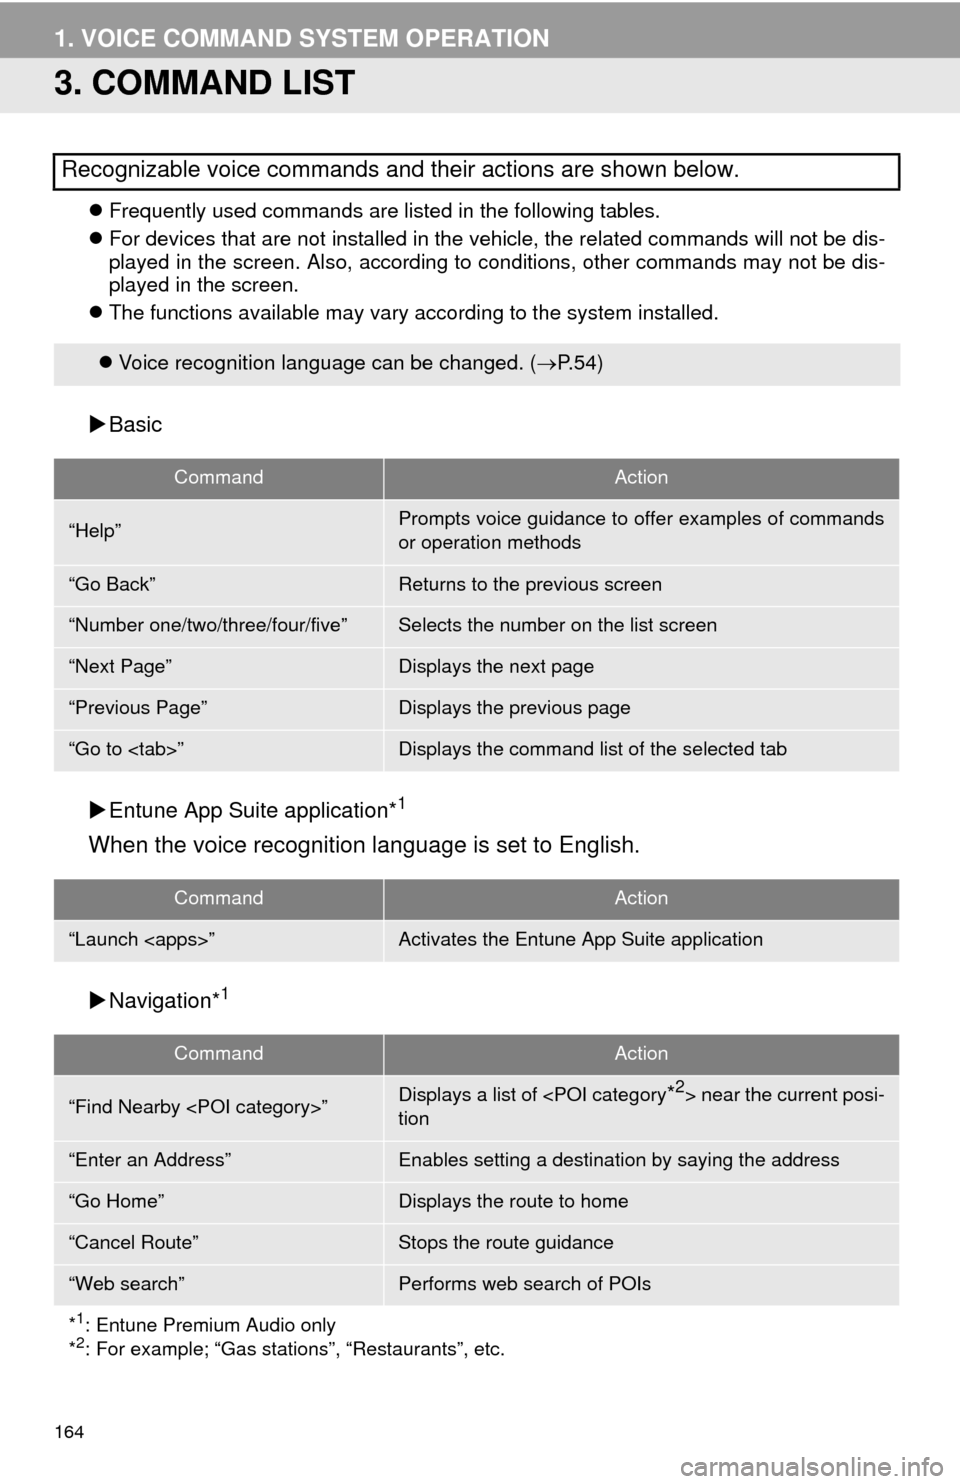
3. COMMAND LIST
Frequently used commands are listed in the following tables.
For devices that are not installed in the vehicle, the related commands will not be dis-
played in the screen. Also, according to conditions, other commands may not be dis-
played in the screen.
The functions available may vary according to the system installed.
Basic
Entune App Suite application*
1
When the voice recognition language is set to English.
Navigation*1
Recognizable voice commands and their actions are shown below.
Voice recognition language can be changed. ( P.54)
CommandAction
“Help”Prompts voice guidance to offer examples of commands
or operation methods
“Go Back”Returns to the previous screen
“Number one/two/three/four/five”Selects the number on the list screen
“Next Page”Displays the next page
“Previous Page”Displays the previous page
“Go to
CommandAction
“Launch
CommandAction
“Find Nearby
tion
“Enter an Address”Enables setting a destina tion by saying the address
“Go Home”Displays the route to home
“Cancel Route”Stops the route guidance
“Web search”Performs web search of POIs
*
1: Entune Premium Audio only
*2: For example; “Gas stations”, “Restaurants”, etc.
Page 165 of 324
165
1. VOICE COMMAND SYSTEM OPERATION
VOICE COMMAND SYSTEM
4
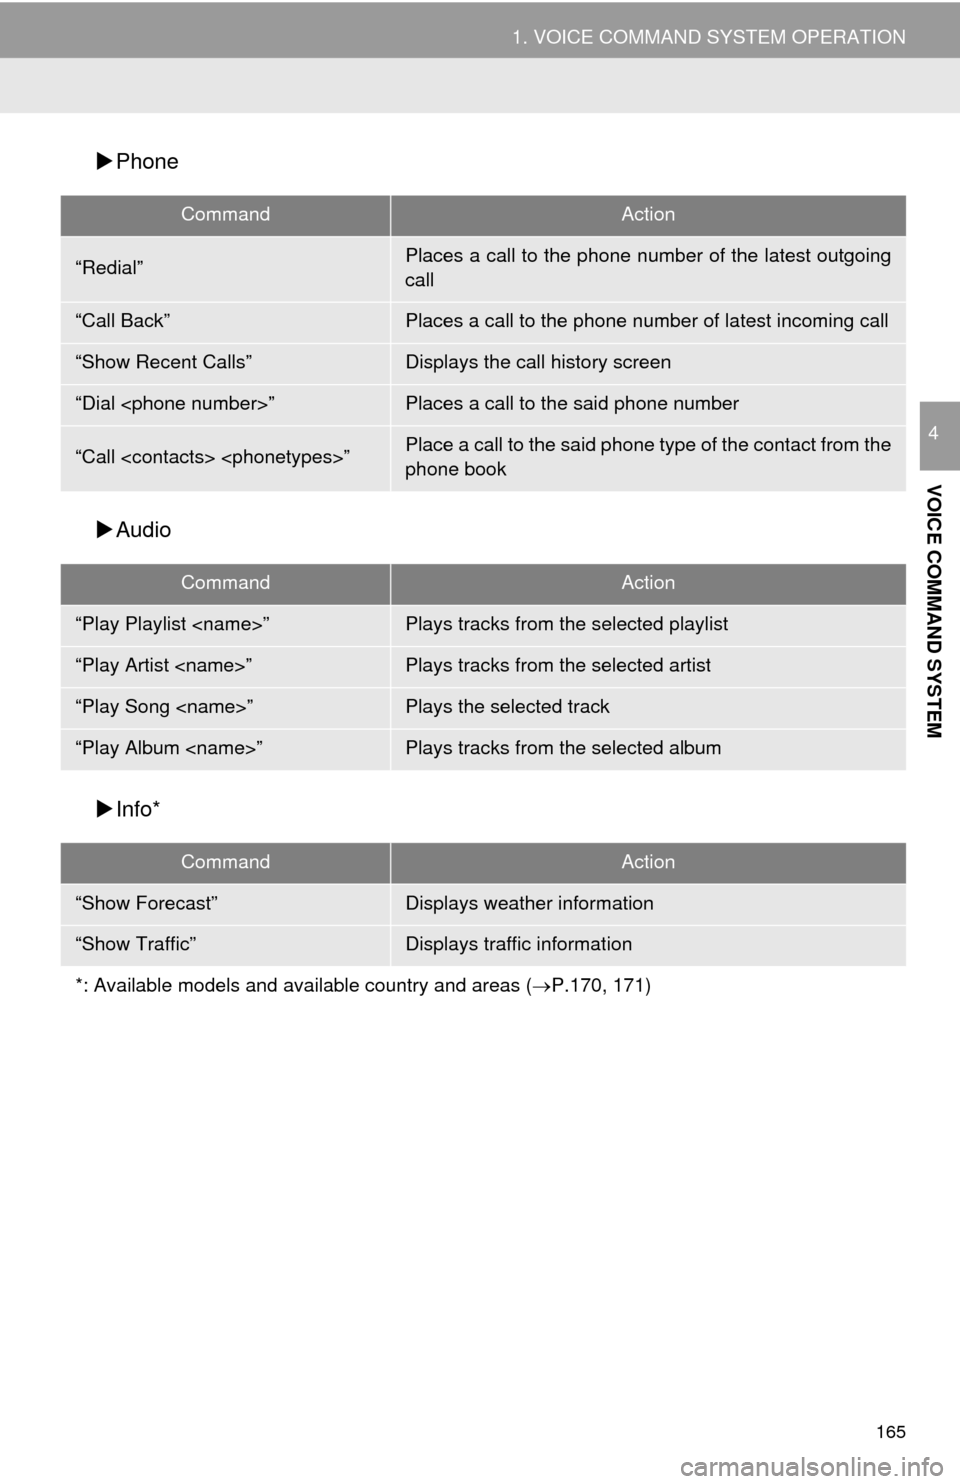
Phone
Audio
Info*
CommandAction
“Redial”Places a call to the phone number of the latest outgoing
call
“Call Back”Places a call to the phone number of latest incoming call
“Show Recent Calls”Displays the call history screen
“Dial
“Call
phone book
CommandAction
“Play Playlist
“Play Artist
“Play Song
“Play Album
CommandAction
“Show Forecast”Displays weather information
“Show Traffic”Displays traffic information
*: Available models and ava ilable country and areas (P.170, 171)
Page 166 of 324
166
2. MOBILE ASSISTANT OPERATION
1. MOBILE ASSISTANT
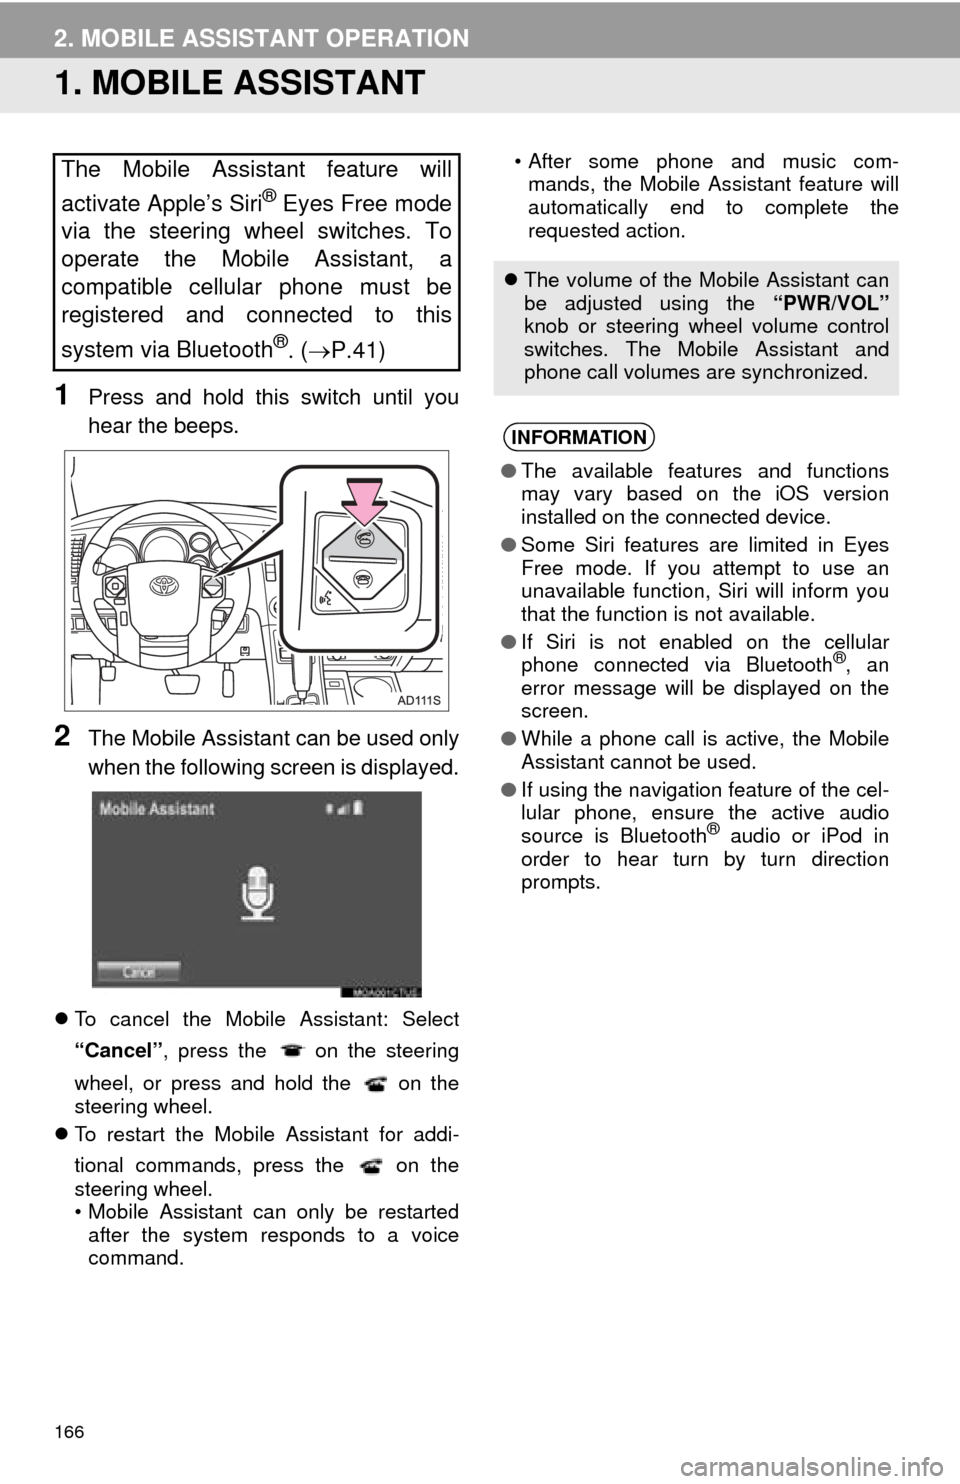
1Press and hold this switch until you
hear the beeps.
2The Mobile Assistant can be used only
when the following screen is displayed.
To cancel the Mobile Assistant: Select
“Cancel” , press the on the steering
wheel, or press and hold the on the
steering wheel.
To restart the Mobile Assistant for addi-
tional commands, press the on the
steering wheel.
• Mobile Assistant can only be restarted
after the system responds to a voice
command. • After some phone and music com-
mands, the Mobile Assistant feature will
automatically end to complete the
requested action.
The Mobile Assistant feature will
activate Apple’s Siri
® Eyes Free mode
via the steering wheel switches. To
operate the Mobile Assistant, a
compatible cellular phone must be
registered and connected to this
system via Bluetooth
®. ( P.41)
The volume of the Mobile Assistant can
be adjusted using the “PWR/VOL”
knob or steering wheel volume control
switches. The Mobile Assistant and
phone call volumes are synchronized.
INFORMATION
● The available features and functions
may vary based on the iOS version
installed on the connected device.
● Some Siri features are limited in Eyes
Free mode. If you attempt to use an
unavailable function, Siri will inform you
that the function is not available.
● If Siri is not enabled on the cellular
phone connected via Bluetooth
®, an
error message will be displayed on the
screen.
● While a phone call is active, the Mobile
Assistant cannot be used.
● If using the navigation feature of the cel-
lular phone, ensure the active audio
source is Bluetooth
® audio or iPod in
order to hear turn by turn direction
prompts.