TOYOTA SEQUOIA HYBRID 2023 Owners Manual
Manufacturer: TOYOTA, Model Year: 2023, Model line: SEQUOIA HYBRID, Model: TOYOTA SEQUOIA HYBRID 2023Pages: 628, PDF Size: 14.27 MB
Page 481 of 628
4816-3. Do-it-yourself maintenance
Owners Manual_USA_M0C043_en
6
Maintenance and care
1 Park the vehicle in a safe
place, wait for approximately
20 minutes, and then start
the hybrid system.
2 Press or of the meter
control switch to select .
3 Press or to select
“Vehicle Settings” and then
press and hold .
4 Press or to select
“TPWS” and then press .
5 Press or to select
“Change Wheel”. Then press
and hold until the tire
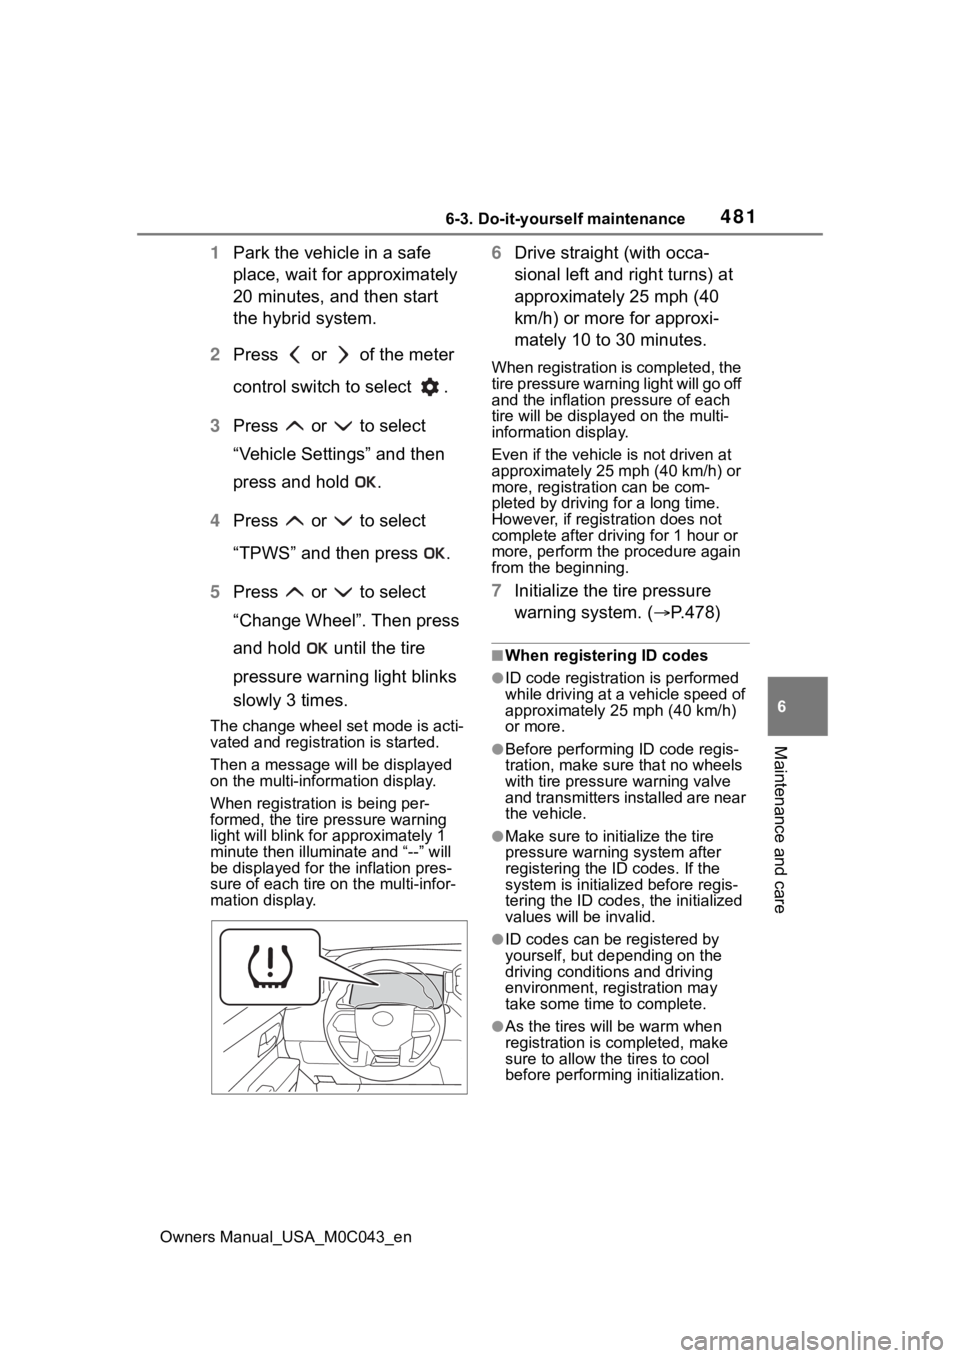
pressure warning light blinks
slowly 3 times.
The change wheel set mode is acti-
vated and registration is started.
Then a message w ill be displayed
on the multi-information display.
When registration is being per-
formed, the tire pressure warning
light will blink for approximately 1
minute then illumi nate and “--” will
be displayed for the inflation pres-
sure of each tire on the multi-infor-
mation display.
6 Drive straight (with occa-
sional left and right turns) at
approximately 25 mph (40
km/h) or more for approxi-
mately 10 to 30 minutes.
When registration is completed, the
tire pressure warni ng light will go off
and the inflation pressure of each
tire will be displaye d on the multi-
information display.
Even if the vehicle is not driven at
approximately 25 mph (40 km/h) or
more, registration can be com-
pleted by driving for a long time.
However, if registration does not
complete after driving for 1 hour or
more, perform the p rocedure again
from the beginning.
7 Initialize the tire pressure
warning system. ( P.478)
■When registering ID codes
●ID code registrati on is performed
while driving at a vehicle speed of
approximately 25 mph (40 km/h)
or more.
●Before performing ID code regis-
tration, make sure that no wheels
with tire pressure warning valve
and transmitters installed are near
the vehicle.
●Make sure to initi alize the tire
pressure warning system after
registering the ID codes. If the
system is initialized before regis-
tering the ID codes , the initialized
values will be invalid.
●ID codes can be registered by
yourself, but depending on the
driving conditions and driving
environment, registration may
take some time to complete.
●As the tires will be warm when
registration is completed, make
sure to allow the tires to cool
before performin g initialization.
Page 482 of 628

4826-3. Do-it-yourself maintenance
Owners Manual_USA_M0C043_en
■Canceling ID code registration
●To cancel ID code registration
after it has been started, select
“Change Wheel” on the multi-
information display and press and
hold again.
●If ID code registration has been
canceled, the tire pressure warn-
ing light will blink for approxi-
mately 1 minute when the power
switch is turned to ON and then
illuminate. The tire pressure warn-
ing system will be operational
when the tire pressure warning
light turns off.
●If the warning light does not turn
off even after several minutes
have elapsed, ID code registration
may not have bee n canceled cor-
rectly. To cancel registration, per-
form the ID code registration start
procedure again and then turn the
power switch off before driving.
■If ID codes are not registered
properly
●In the following situations, ID code
registration may take longer than
usual to be completed or may not
be possible. Normally, registration
completes within approximately
30 minutes.
If ID code registration is not com-
plete after driving for approxi-
mately 30 minutes, continue
driving for a while.
• Vehicle is not pa rked for approxi-
mately 20 minutes or more before
driving
• Vehicle is not driven at approxi-
mately 25 mph ( 40 km/h) or more
• Vehicle is driven on unpaved roads
• Vehicle is driven near other vehi- cles and system cannot recog-
nize tire pressure warning valve
and transmitters of your vehicle
over those of other vehicles
• Wheel with tire p ressure warning
valve and transmitter installed is
inside or near the vehicle
If registration does not complete after driving for 1 hour or more, per-
form the ID code registration proce-
dure again from the beginning.
●If the vehicle is reversed during
registration, the data up to that
point is reset, so p
erform the reg-
istration procedure again from the
beginning.
●In the following situations, ID code
registration will not be started or
was not completed properly and
the system will not operate prop-
erly. Perform the ID code registra-
tion procedure again.
• If, when attempt ing to start ID
code registration, the tire pressure
warning light does not blink slowly
3 times.
• If, when the veh icle has been
driven for about 20 minutes after
performing ID code registration,
the tire pressure warning light
blinks for approximately 1 minute
and then illuminates.
●If ID code registration cannot be
completed after performing the
above procedure, contact your
Toyota dealer.
Your vehicle is equipped with
tire pressure warning system
with the function to have ID
codes registered for a second
wheel set, for example a winter
set. You can register a second
wheel set by yourself or your
Toyota dealer.
After registration of a second
wheel set, either of these two
wheel sets can be selected for
usage with the tire pressure
warning system.
Selecting wheel set
Page 483 of 628
4836-3. Do-it-yourself maintenance
Owners Manual_USA_M0C043_en
6
Maintenance and care
■Operating conditions for
the function
This function will perform the
change of wheel set only if a
second wheel set has been
registered. If no second wheel
set has been registered, no
change will be made when
selecting this function in the
menu.
Only a change between both
registered wheel set is possi-
ble, mixing between these
wheel sets is not supported.
■How to change between
wheel sets
1 Have the vehicle fitted with
the preferred wheel set.
2 Press or of the meter
control switches on the steer-
ing wheel and select .
3 Press or of the meter
control switches and select
“Vehicle Settings”, and then
press and hold .
4 Press or of the meter
control switches and select
“TPWS”, and then press .
5 Press or of the meter
control switches and select
“Change Wheel”. Then press
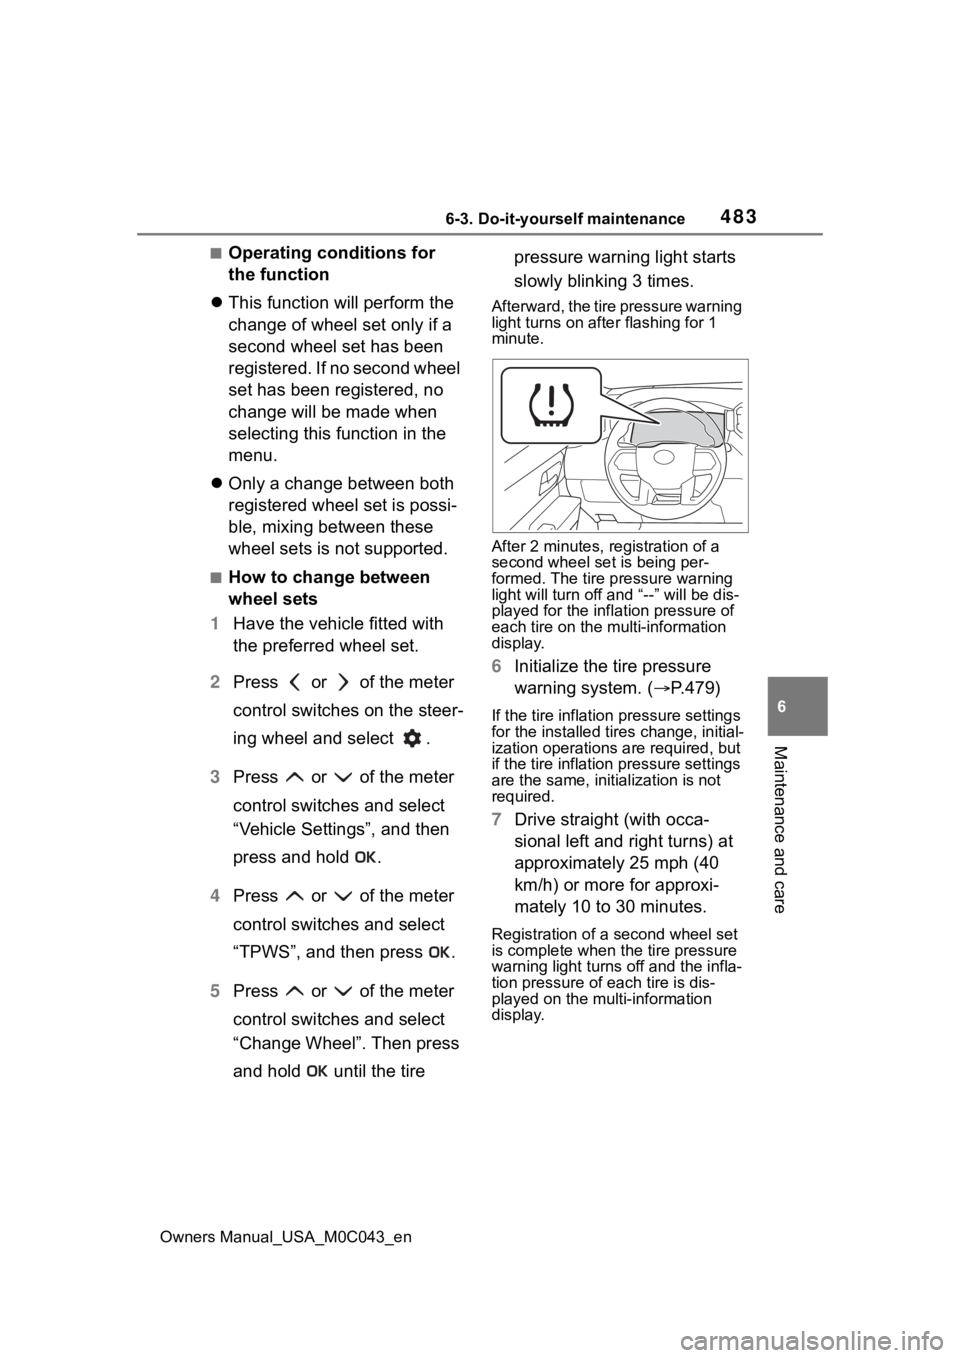
and hold until the tire pressure warning light starts
slowly blinking 3 times.
Afterward, the tire pressure warning
light turns on afte
r flashing for 1
minute.
After 2 minutes, registration of a
second wheel set is being per-
formed. The tire pressure warning
light will turn off and “--” will be dis-
played for the infl ation pressure of
each tire on the m ulti-information
display.
6 Initialize the tire pressure
warning system. ( P.479)
If the tire inflation pressure settings
for the installed ti res change, initial-
ization operations are required, but
if the tire inflation pressure settings
are the same, init ialization is not
required.
7 Drive straight (with occa-
sional left and right turns) at
approximately 25 mph (40
km/h) or more for approxi-
mately 10 to 30 minutes.
Registration of a second wheel set
is complete when the tire pressure
warning light t urns off and the infla-
tion pressure of each tire is dis-
played on the multi-information
display.
Page 484 of 628
4846-3. Do-it-yourself maintenance
Owners Manual_USA_M0C043_en
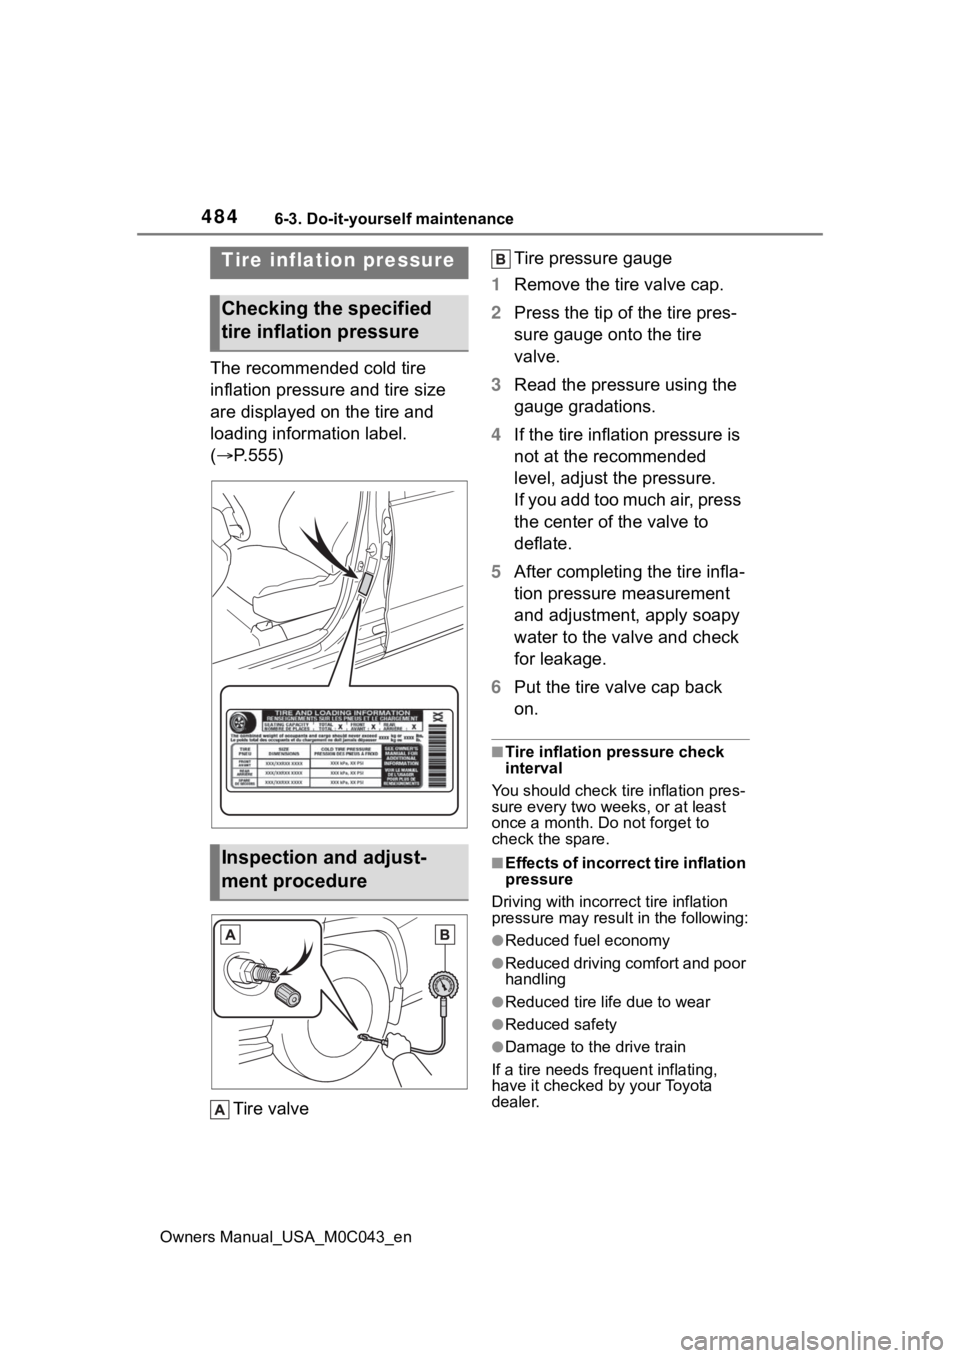
The recommended cold tire
inflation pressure and tire size
are displayed on the tire and
loading information label.
(P.555)
Tire valve Tire pressure gauge
1 Remove the tire valve cap.
2 Press the tip of the tire pres-
sure gauge onto the tire
valve.
3 Read the pressure using the
gauge gradations.
4 If the tire inflation pressure is
not at the recommended
level, adjust the pressure.
If you add too much air, press
the center of the valve to
deflate.
5 After completing the tire infla-
tion pressure measurement
and adjustment, apply soapy
water to the valve and check
for leakage.
6 Put the tire valve cap back
on.
■Tire inflation pressure check
interval
You should check ti re inflation pres-
sure every two week s, or at least
once a month. Do not forget to
check the spare.
■Effects of incorrect tire inflation
pressure
Driving with incorrec t tire inflation
pressure may resul t in the following:
●Reduced fuel economy
●Reduced driving comfort and poor
handling
●Reduced tire life due to wear
●Reduced safety
●Damage to the drive train
If a tire needs frequent inflating,
have it checked by your Toyota
dealer.
Tire inflation pressure
Checking the specified
tire inflation pressure
Inspection and adjust-
ment procedure
Page 485 of 628
4856-3. Do-it-yourself maintenance
Owners Manual_USA_M0C043_en
6
Maintenance and care
■Instructions for checking tire
inflation pressure
When checking tire inflation pres-
sure, observe the following:
●Check only when the tires are
cold.
If your vehicle has been parked for
at least 3 hours or has not been
driven for more tha n 1 mile or 1.5
km, you will get an accurate cold
tire inflation pressure reading.
●Always use a tire pressure gauge.
It is difficult to judge if a tire is
properly inflated based only on its
appearance.
●It is normal for the tire inflation
pressure to be higher after driving
as heat is generated in the tire. Do
not reduce tire inflation pressure
after driving.
●Never exceed the vehicle capacity
weight.
Passengers and luggage weight
should be placed so that the vehi-
cle is balanced.
WARNING
■Proper inflation is critical to
save tire performance
Keep your tires properly inflated.
If the tires are not properly
inflated, the following conditions
may occur which could lead to an
accident resulting in death or seri-
ous injury:
●Excessive wear
●Uneven wear
●Poor handling
●Possibility of blowouts resulting
from overheated tires
●Air leaking from between tire
and wheel
●Wheel deformation and/or tire
damage
●Greater possibi lity of tire dam-
age while driving (due to road
hazards, expansion joints,
sharp edges in the road, etc.)
NOTICE
■When inspecting and adjust-
ing tire inflation pressure
Be sure to put the tire valve caps
back on.
If a valve cap is no t installed, dirt
or moisture may get into the valve
and cause an air leak, resulting in
decreased tire inflation pressure.
Page 486 of 628
4866-3. Do-it-yourself maintenance
Owners Manual_USA_M0C043_en
When replacing wheels, care
should be taken to ensure that
they are equivalent to those
removed in load capacity, diam-
eter, rim width and inset
*.
Replacement wheels are avail-
able at your Toyota dealer.
*: Conventionally referred to as off- set.
Toyota does not recommend
using the following:
Wheels of different sizes or
types
Used wheels
Bent wheels that have been
straightened
■When replacing wheels
The wheels of your vehicle are
equipped with tire pressure warning
valves and transmitters that allow
the tire pressure warning system to
provide advance warning in the
event of a loss in tire inflation pres-
sure. Whenever wheels are
replaced, the tire pressure warning
valves and transmitters must be
installed. ( P.478)
Wheels
If a wheel is bent, cracked or
heavily corroded, it should
be replaced. Otherwise, the
tire may separate from the
wheel or cause a loss of
handling control.
Wheel selection
WARNING
■When replacing wheels
●Do not use wheels that are a dif-
ferent size from those recom-
mended in the Owner’s Manual
or certification label, as this may
result in a loss of handling con-
trol.
●Never use an inner tube in a
leaking wheel which is designed
for a tubeless tire.
Doing so may result in an acci-
dent, causing death or serious
injury.
■When installing the wheel
nuts
Never use oil or grease on the
wheel bolts or wheel nuts. Oil and
grease may cause the wheel nuts
to be excessively tightened, lead-
ing to bolt or disc wheel damage.
In addition, the oil or grease can
cause the wheel nuts to loosen
and the wheel may fall off, caus-
ing an accident and resulting in
death or serious injury. Remove
any oil or grease from the wheel
bolts or wheel nuts.
■Use of defective wheels pro-
hibited
Do not use cracke d or deformed
wheels. Doing so could cause the
tire to leak air during driving, pos-
sibly causing an accident.
Page 487 of 628
4876-3. Do-it-yourself maintenance
Owners Manual_USA_M0C043_en
6
Maintenance and care
Use only Toyota wheel nuts
and wheel nut wrenches
designed for use with your
aluminum wheels.
When rotating, repairing or
changing your tires, check
that the wheel nuts are still
tight after driving 1000 miles
(1600 km).
Be careful not to damage the
aluminum wheels when using
tire chains.
Use only Toyota genuine bal-
ance weights or equivalent
and a plastic or rubber ham-
mer when balancing your
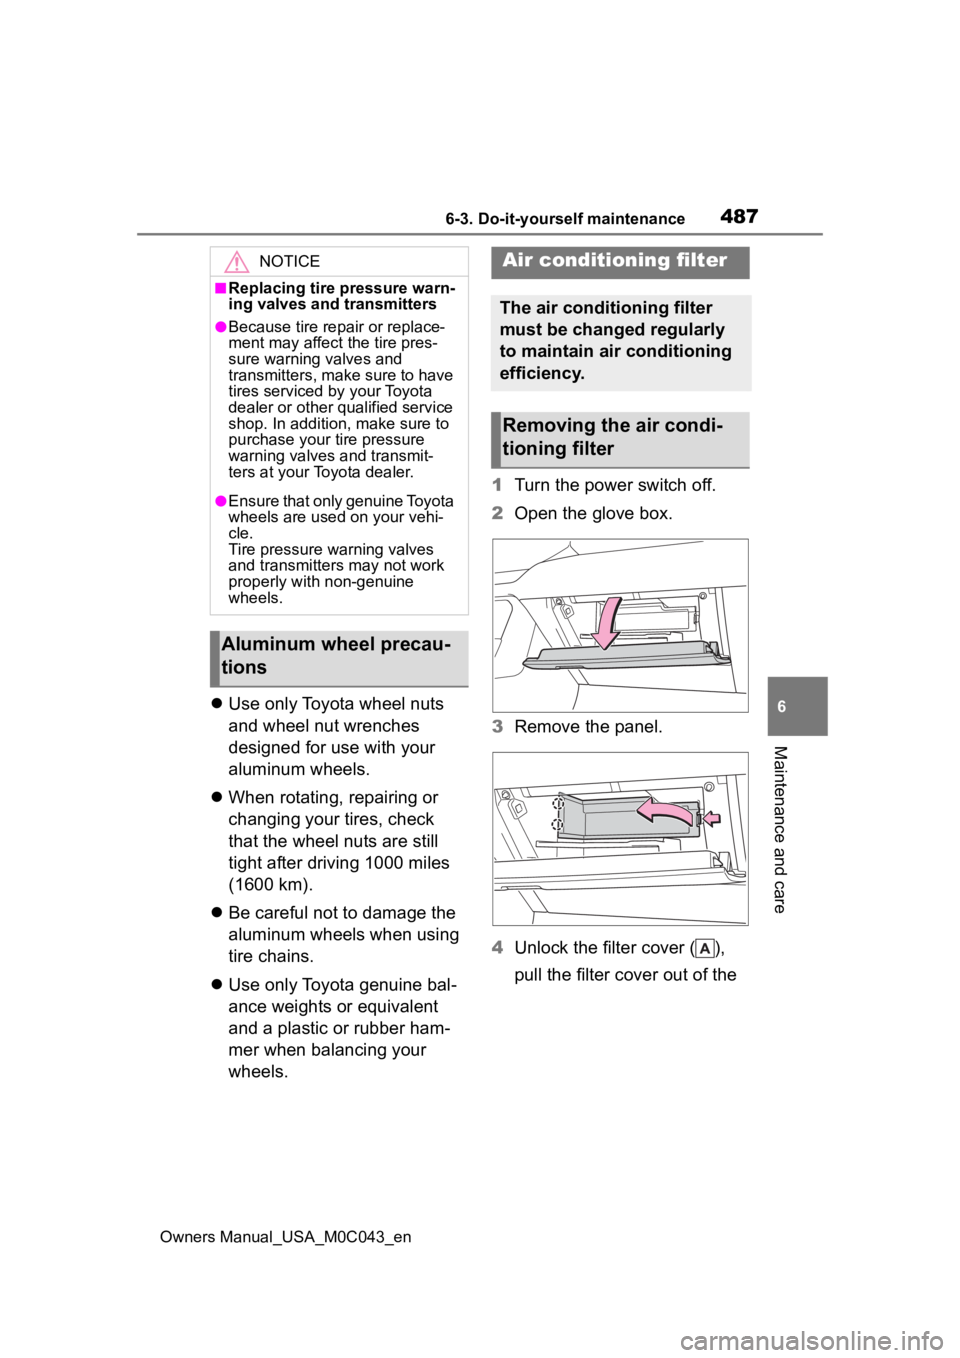
wheels. 1
Turn the power switch off.
2 Open the glove box.
3 Remove the panel.
4 Unlock the filter cover ( ),
pull the filter cover out of the
NOTICE
■Replacing tire pressure warn-
ing valves and transmitters
●Because tire repair or replace-
ment may affect the tire pres-
sure warning valves and
transmitters, make sure to have
tires serviced by your Toyota
dealer or other qualified service
shop. In addition, make sure to
purchase your tire pressure
warning valves and transmit-
ters at your Toyota dealer.
●Ensure that only genuine Toyota
wheels are used on your vehi-
cle.
Tire pressure warning valves
and transmitters may not work
properly with non-genuine
wheels.
Aluminum wheel precau-
tions
Air conditioning filter
The air conditioning filter
must be changed regularly
to maintain air conditioning
efficiency.
Removing the air condi-
tioning filter
Page 488 of 628
4886-3. Do-it-yourself maintenance
Owners Manual_USA_M0C043_en
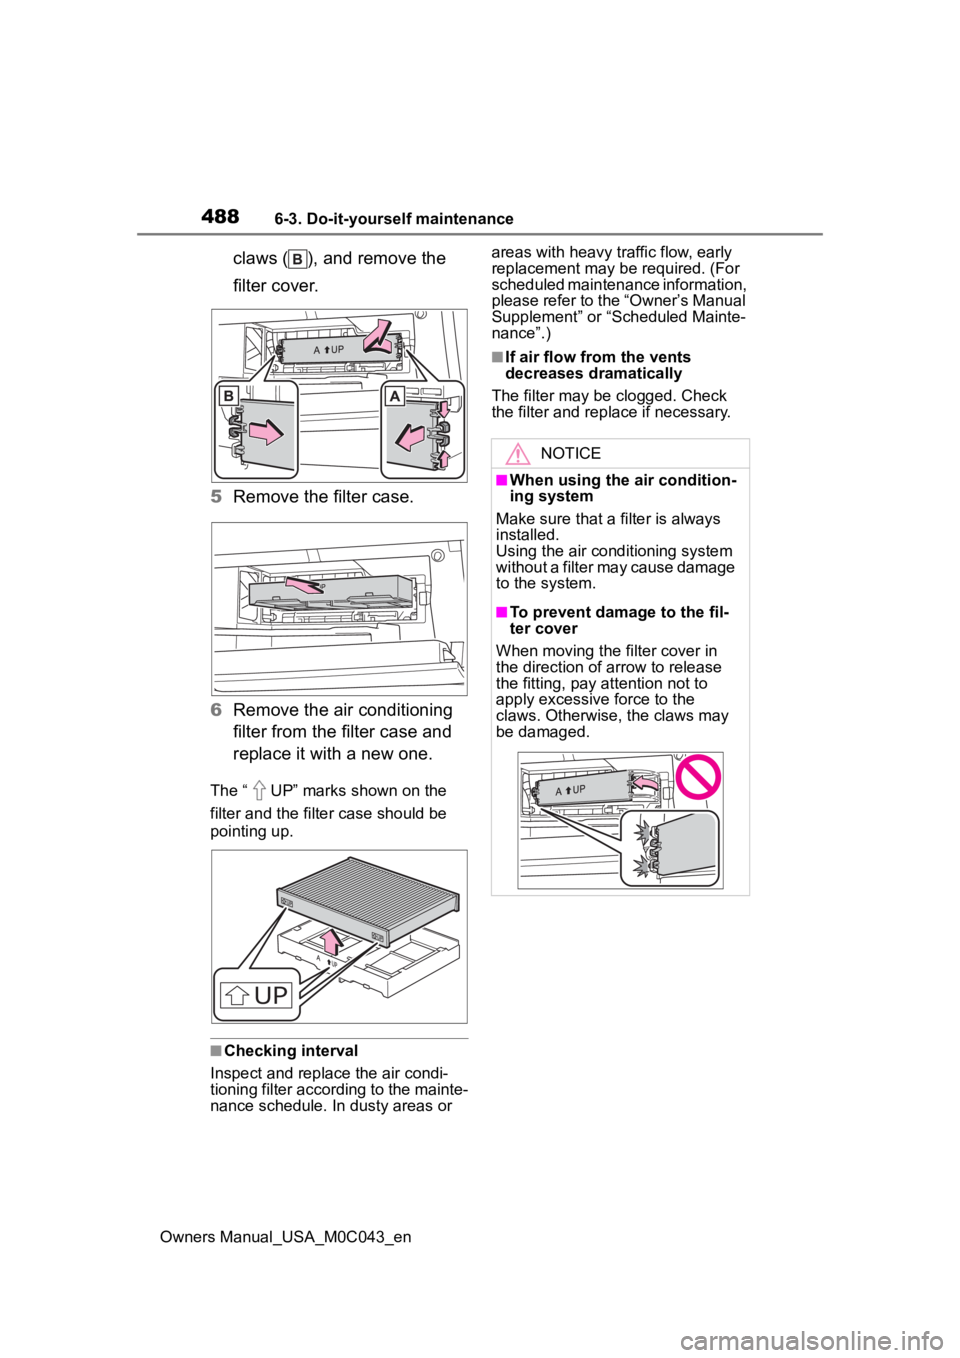
claws ( ), and remove the
filter cover.
5 Remove the filter case.
6 Remove the air conditioning
filter from the filter case and
replace it with a new one.
The “ UP” marks shown on the
filter and the filter case should be
pointing up.
■Checking interval
Inspect and replace the air condi-
tioning filter according to the mainte-
nance schedule. In dusty areas or areas with heavy traffic flow, early
replacement may be required. (For
scheduled maintenance information,
please refer to the “Owner’s Manual
Supplement” or “Scheduled Mainte-
nance”.)
■If air flow from the vents
decreases dramatically
The filter may be clogged. Check
the filter and rep lace if necessary.
NOTICE
■When using the air condition-
ing system
Make sure that a filter is always
installed.
Using the air conditioning system
without a filter may cause damage
to the system.
■To prevent damage to the fil-
ter cover
When moving the filter cover in
the direction of arrow to release
the fitting, pay attention not to
apply excessive force to the
claws. Otherwise, the claws may
be damaged.
Page 489 of 628
4896-3. Do-it-yourself maintenance
Owners Manual_USA_M0C043_en
6
Maintenance and care
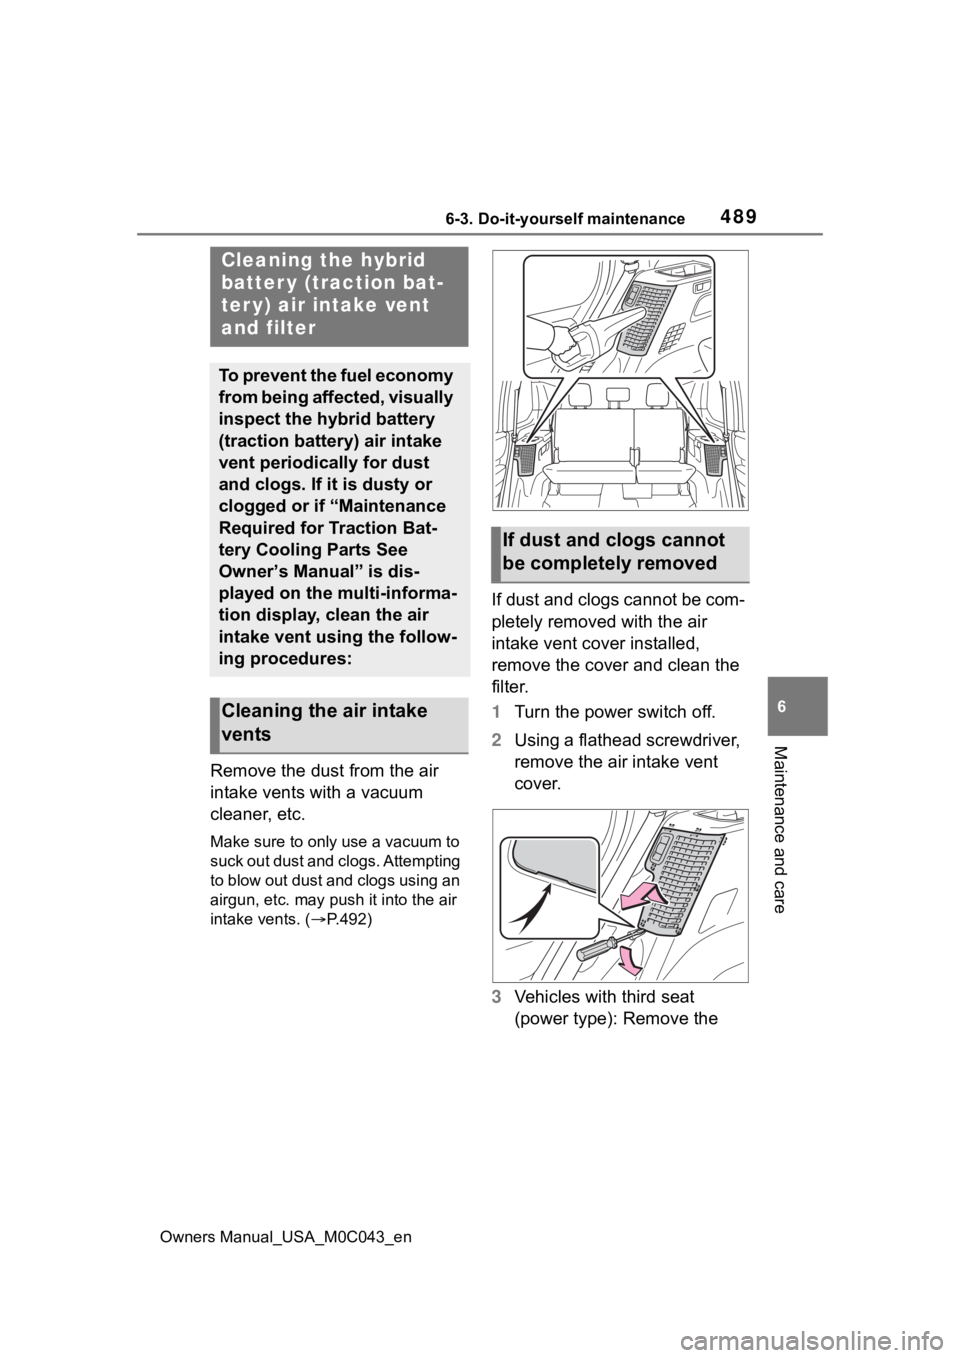
Remove the dust from the air
intake vents with a vacuum
cleaner, etc.
Make sure to only use a vacuum to
suck out dust and clogs. Attempting
to blow out dust and clogs using an
airgun, etc. may push it into the air
intake vents. ( P.492)
If dust and clogs cannot be com-
pletely removed with the air
intake vent cover installed,
remove the cover and clean the
filter.
1Turn the power switch off.
2 Using a flathead screwdriver,
remove the air intake vent
cover.
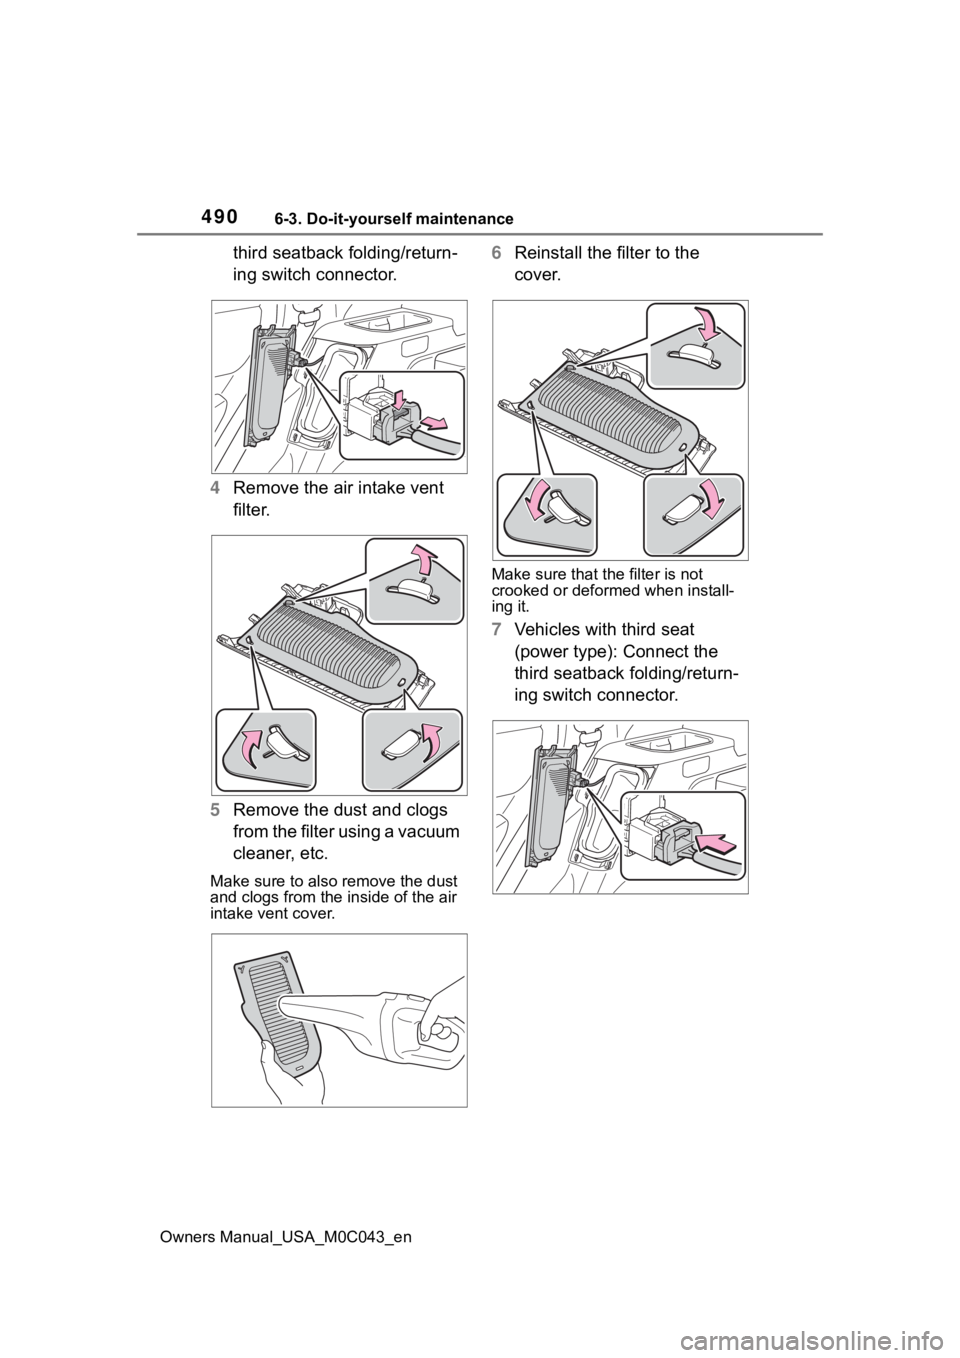
3 Vehicles with third seat
(power type): Remove the
Cleaning the hybrid
batter y (traction bat-
ter y) air intake vent
and filter
To prevent the fuel economy
from being affected, visually
inspect the hybrid battery
(traction battery) air intake
vent periodically for dust
and clogs. If it is dusty or
clogged or if “Maintenance
Required for Traction Bat-
tery Cooling Parts See
Owner’s Manual” is dis-
played on the multi-informa-
tion display, clean the air
intake vent using the follow-
ing procedures:
Cleaning the air intake
vents
If dust and clogs cannot
be completely removed
Page 490 of 628
4906-3. Do-it-yourself maintenance
Owners Manual_USA_M0C043_en
third seatback folding/return-
ing switch connector.
4 Remove the air intake vent
filter.
5 Remove the dust and clogs
from the filter using a vacuum
cleaner, etc.
Make sure to also remove the dust
and clogs from the inside of the air
intake vent cover.
6Reinstall the filter to the
cover.
Make sure that the filter is not
crooked or deformed when install-
ing it.
7Vehicles with third seat
(power type): Connect the
third seatback folding/return-
ing switch connector.