TOYOTA SIENNA 2007 Service Repair Manual
Manufacturer: TOYOTA, Model Year: 2007, Model line: SIENNA, Model: TOYOTA SIENNA 2007Pages: 3000, PDF Size: 52.26 MB
Page 1101 of 3000
EM–1542GR-FE ENGINE MECHANICAL – ENGINE UNIT
EM
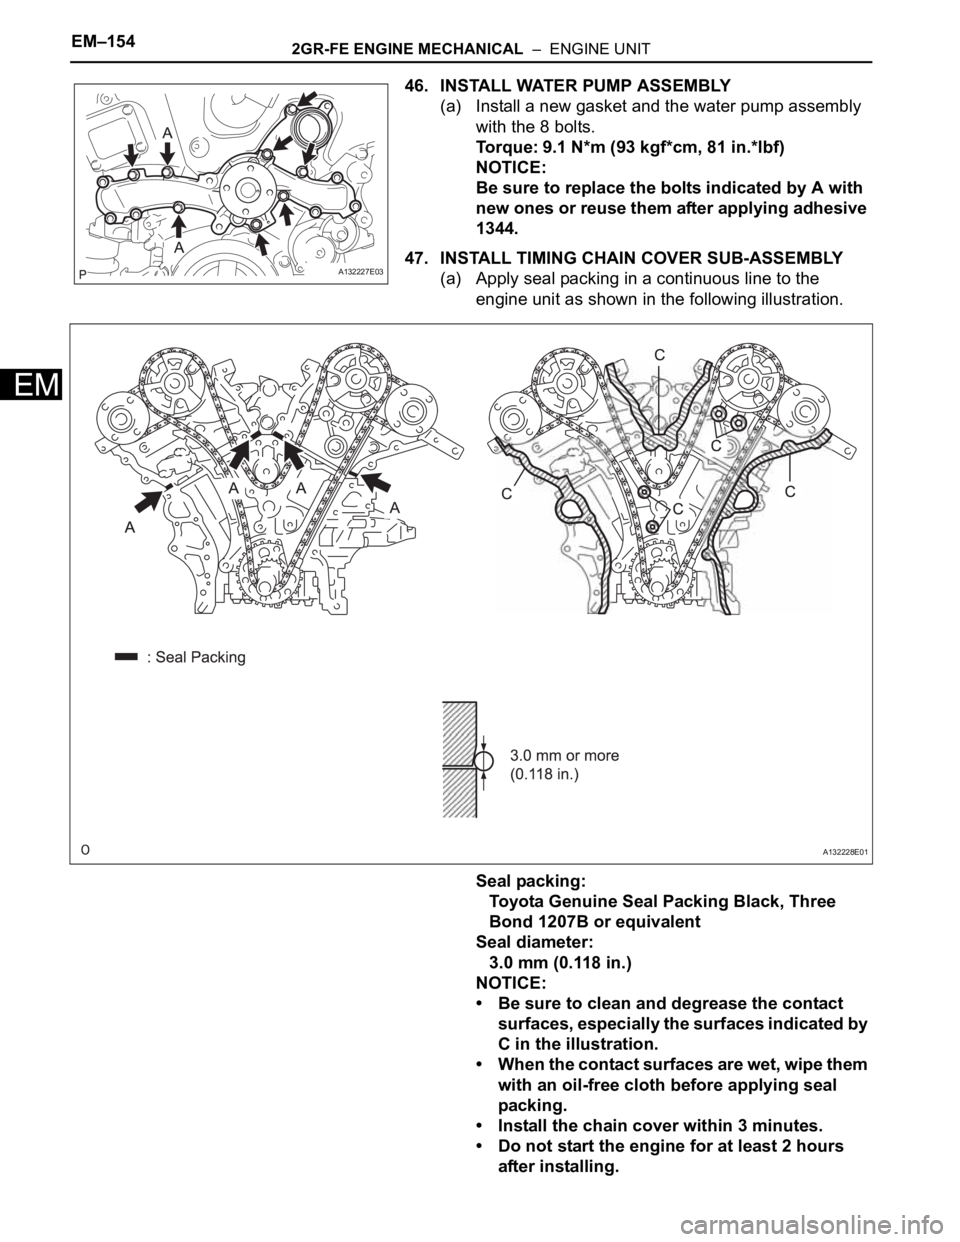
46. INSTALL WATER PUMP ASSEMBLY
(a) Install a new gasket and the water pump assembly
with the 8 bolts.
Torque: 9.1 N*m (93 kgf*cm, 81 in.*lbf)
NOTICE:
Be sure to replace the bolts indicated by A with
new ones or reuse them after applying adhesive
1344.
47. INSTALL TIMING CHAIN COVER SUB-ASSEMBLY
(a) Apply seal packing in a continuous line to the
engine unit as shown in the following illustration.
Seal packing:
Toyota Genuine Seal Packing Black, Three
Bond 1207B or equivalent
Seal diameter:
3.0 mm (0.118 in.)
NOTICE:
• Be sure to clean and degrease the contact
surfaces, especially the surfaces indicated by
C in the illustration.
• When the contact surfaces are wet, wipe them
with an oil-free cloth before applying seal
packing.
• Install the chain cover within 3 minutes.
• Do not start the engine for at least 2 hours
after installing.
A132227E03
A132228E01
Page 1102 of 3000
2GR-FE ENGINE MECHANICAL – ENGINE UNITEM–155
EM
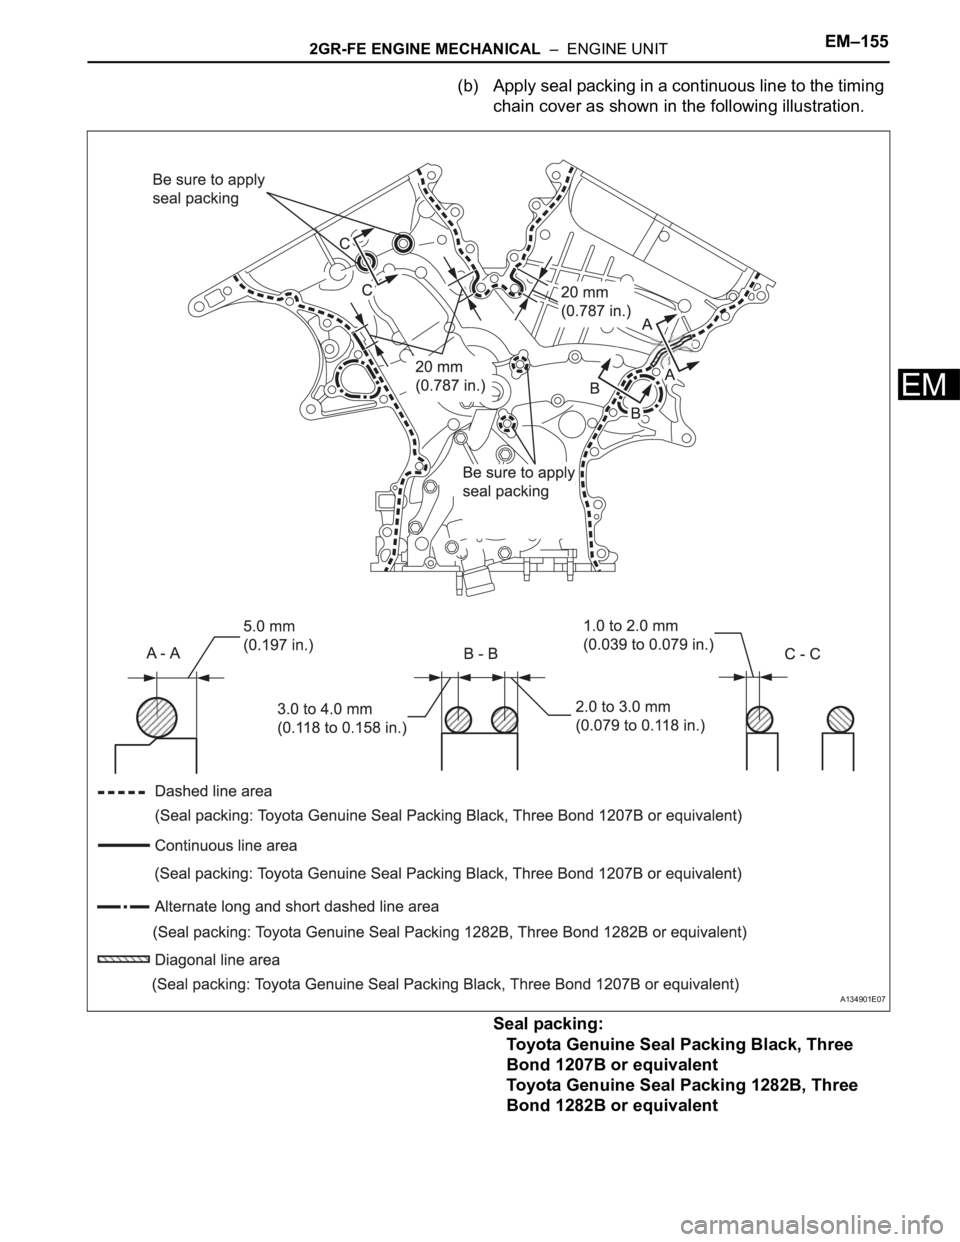
(b) Apply seal packing in a continuous line to the timing
chain cover as shown in the following illustration.
Seal packing:
Toyota Genuine Seal Packing Black, Three
Bond 1207B or equivalent
Toyota Genuine Seal Packing 1282B, Three
Bond 1282B or equivalent
A134901E07
Page 1103 of 3000
EM–1562GR-FE ENGINE MECHANICAL – ENGINE UNIT
EM
NOTICE:
• When the contact surfaces are wet, wipe them
with an oil-free cloth before applying seal
packing.
• Install the chain cover within 3 minutes and
tighten the bolts within 15 minutes after
applying seal packing.
• Do not start the engine for at least 2 hours
after installing.
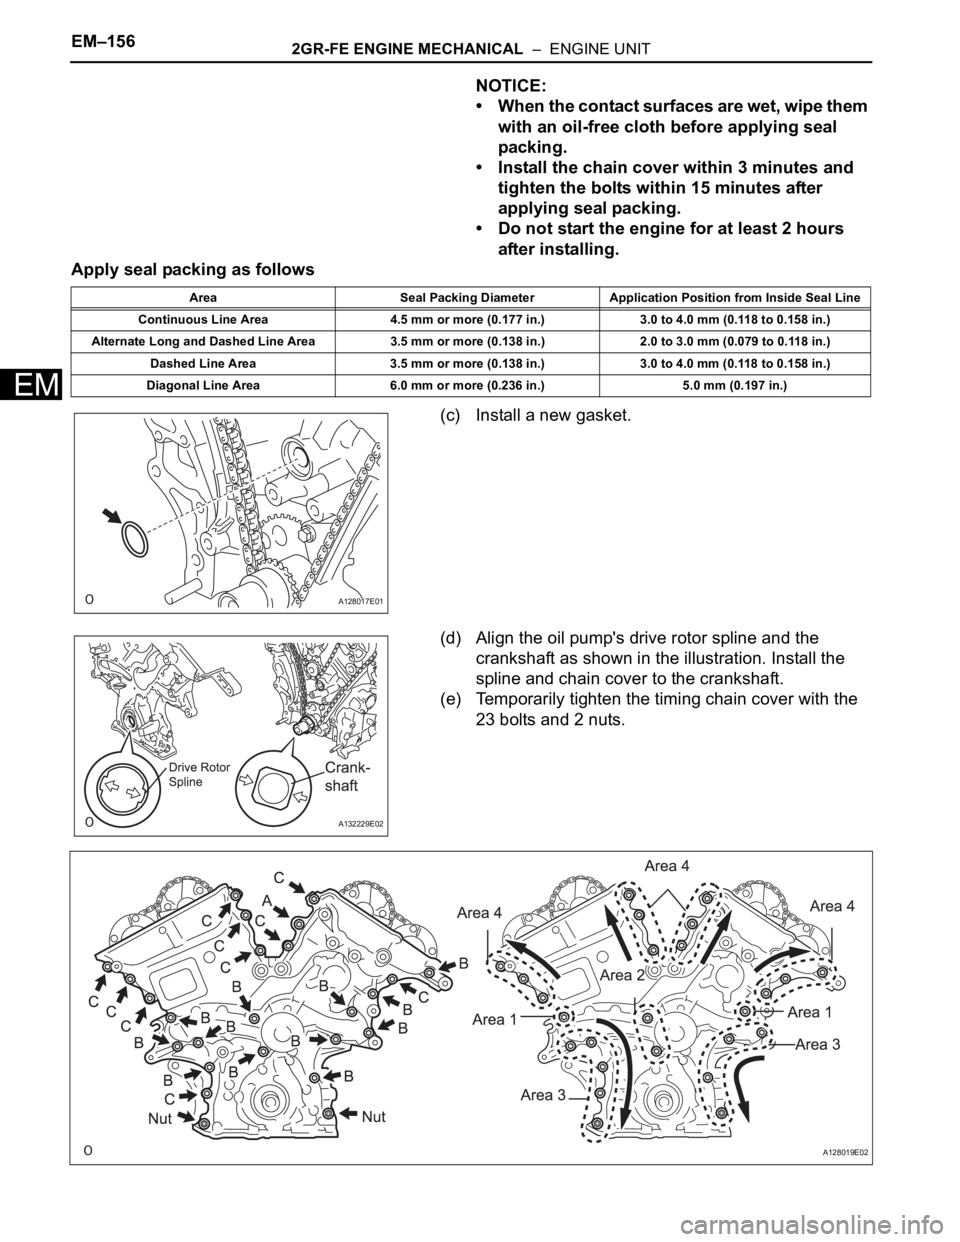
Apply seal packing as follows
(c) Install a new gasket.
(d) Align the oil pump's drive rotor spline and the
crankshaft as shown in the illustration. Install the
spline and chain cover to the crankshaft.
(e) Temporarily tighten the timing chain cover with the
23 bolts and 2 nuts.
Area Seal Packing Diameter Application Position from Inside Seal Line
Continuous Line Area 4.5 mm or more (0.177 in.) 3.0 to 4.0 mm (0.118 to 0.158 in.)
Alternate Long and Dashed Line Area 3.5 mm or more (0.138 in.) 2.0 to 3.0 mm (0.079 to 0.118 in.)
Dashed Line Area 3.5 mm or more (0.138 in.) 3.0 to 4.0 mm (0.118 to 0.158 in.)
Diagonal Line Area 6.0 mm or more (0.236 in.) 5.0 mm (0.197 in.)
A128017E01
A132229E02
A128019E02
Page 1104 of 3000
2GR-FE ENGINE MECHANICAL – ENGINE UNITEM–157
EM
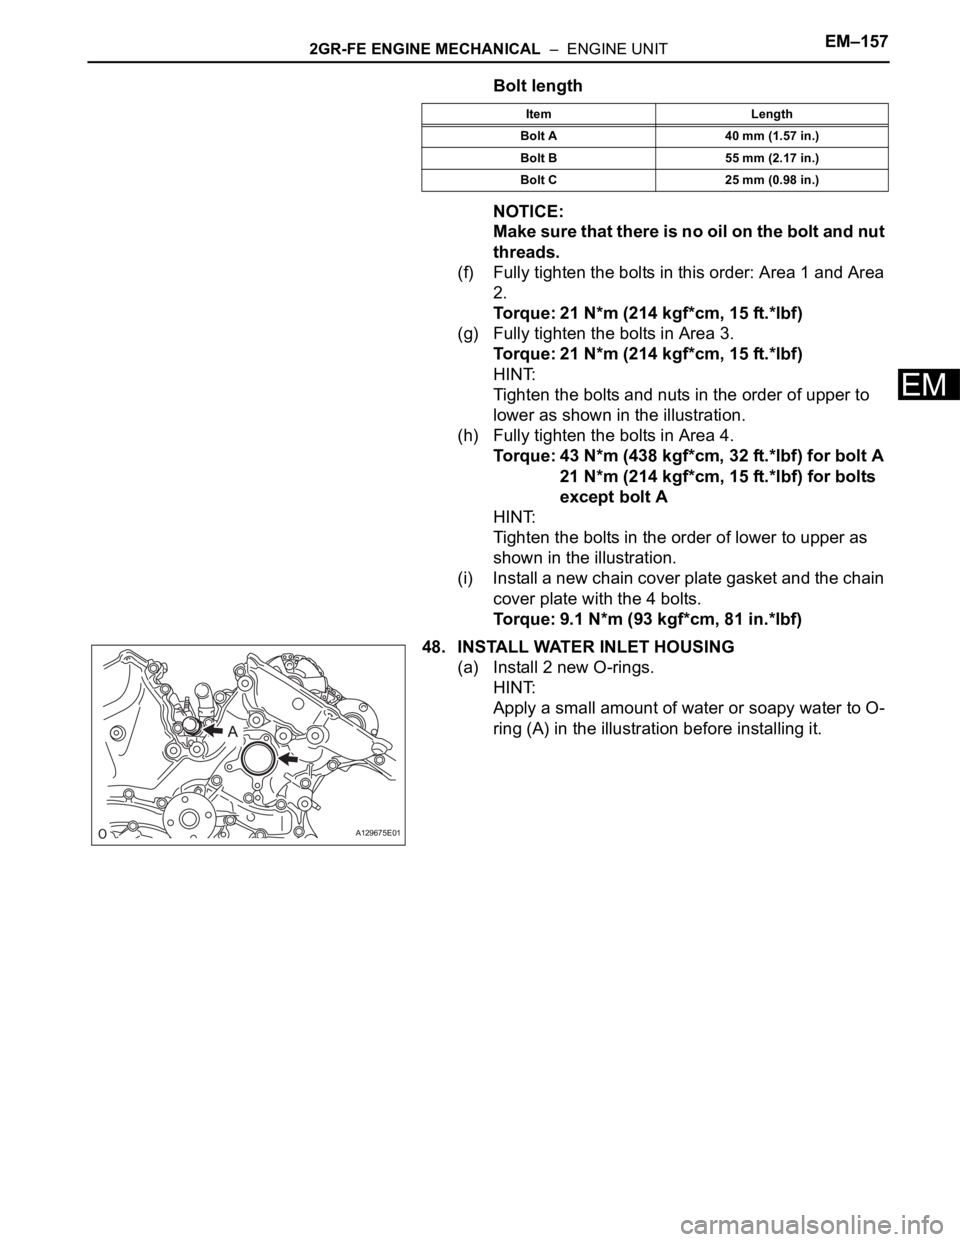
Bolt length
NOTICE:
Make sure that there is no oil on the bolt and nut
threads.
(f) Fully tighten the bolts in this order: Area 1 and Area
2.
Torque: 21 N*m (214 kgf*cm, 15 ft.*lbf)
(g) Fully tighten the bolts in Area 3.
Torque: 21 N*m (214 kgf*cm, 15 ft.*lbf)
HINT:
Tighten the bolts and nuts in the order of upper to
lower as shown in the illustration.
(h) Fully tighten the bolts in Area 4.
Torque: 43 N*m (438 kgf*cm, 32 ft.*lbf) for bolt A
21 N*m (214 kgf*cm, 15 ft.*lbf) for bolts
except bolt A
HINT:
Tighten the bolts in the order of lower to upper as
shown in the illustration.
(i) Install a new chain cover plate gasket and the chain
cover plate with the 4 bolts.
Torque: 9.1 N*m (93 kgf*cm, 81 in.*lbf)
48. INSTALL WATER INLET HOUSING
(a) Install 2 new O-rings.
HINT:
Apply a small amount of water or soapy water to O-
ring (A) in the illustration before installing it.
Item Length
Bolt A 40 mm (1.57 in.)
Bolt B 55 mm (2.17 in.)
Bolt C 25 mm (0.98 in.)
A129675E01
Page 1105 of 3000
EM–1582GR-FE ENGINE MECHANICAL – ENGINE UNIT
EM
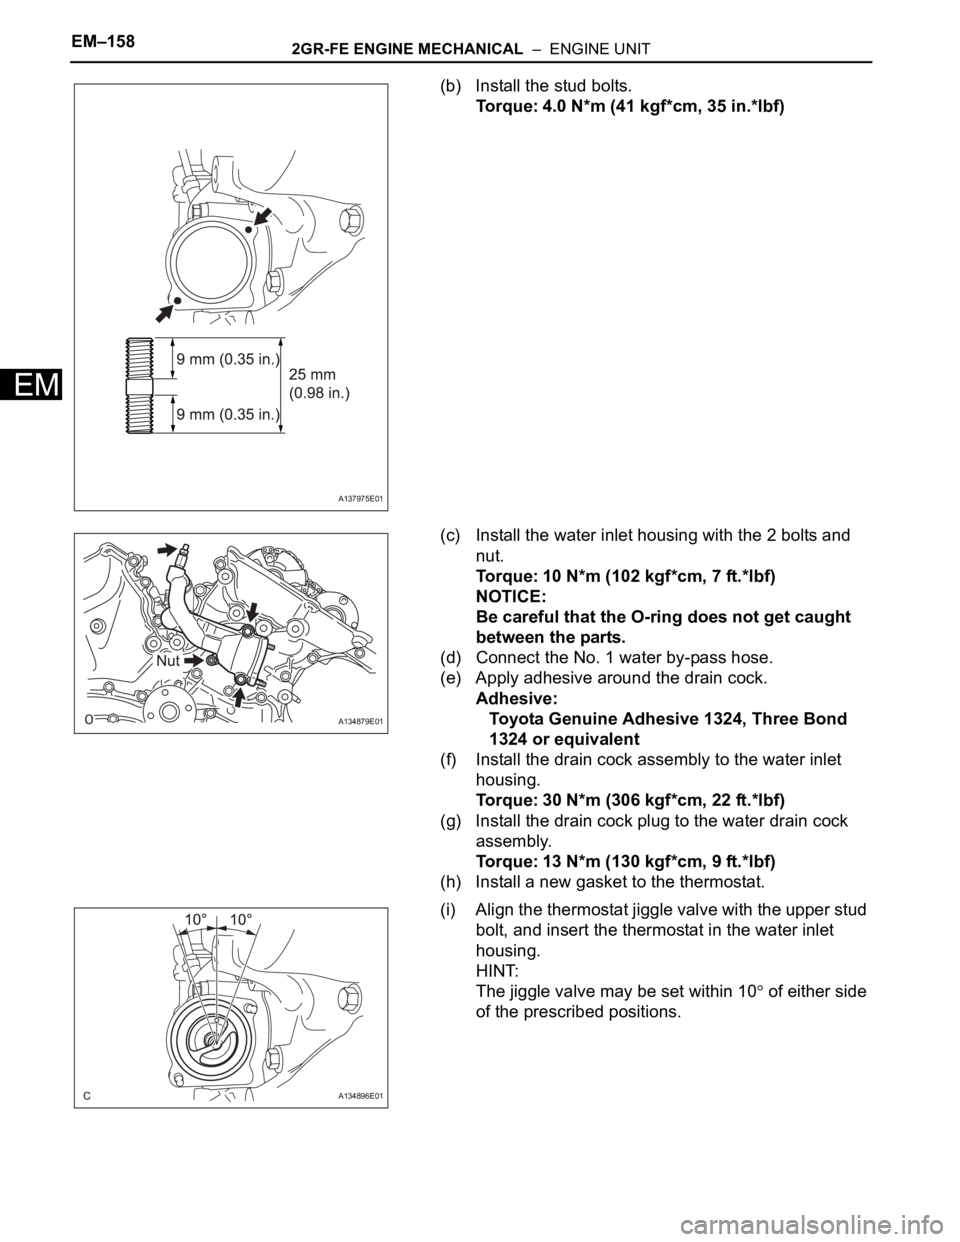
(b) Install the stud bolts.
Torque: 4.0 N*m (41 kgf*cm, 35 in.*lbf)
(c) Install the water inlet housing with the 2 bolts and
nut.
Torque: 10 N*m (102 kgf*cm, 7 ft.*lbf)
NOTICE:
Be careful that the O-ring does not get caught
between the parts.
(d) Connect the No. 1 water by-pass hose.
(e) Apply adhesive around the drain cock.
Adhesive:
Toyota Genuine Adhesive 1324, Three Bond
1324 or equivalent
(f) Install the drain cock assembly to the water inlet
housing.
Torque: 30 N*m (306 kgf*cm, 22 ft.*lbf)
(g) Install the drain cock plug to the water drain cock
assembly.
Torque: 13 N*m (130 kgf*cm, 9 ft.*lbf)
(h) Install a new gasket to the thermostat.
(i) Align the thermostat jiggle valve with the upper stud
bolt, and insert the thermostat in the water inlet
housing.
HINT:
The jiggle valve may be set within 10
of either side
of the prescribed positions.
A137975E01
A134879E01
A134896E01
Page 1106 of 3000
2GR-FE ENGINE MECHANICAL – ENGINE UNITEM–159
EM
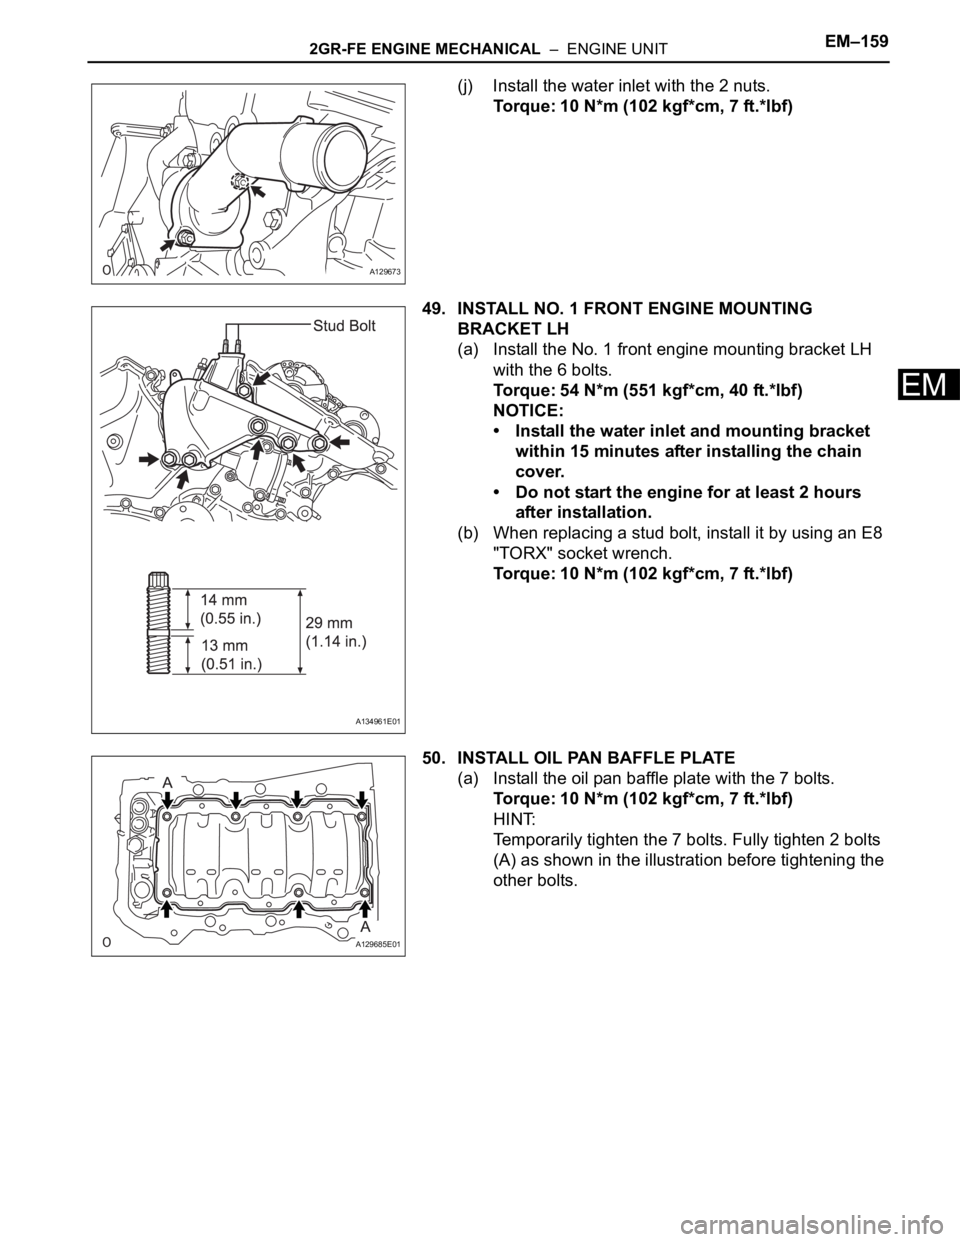
(j) Install the water inlet with the 2 nuts.
Torque: 10 N*m (102 kgf*cm, 7 ft.*lbf)
49. INSTALL NO. 1 FRONT ENGINE MOUNTING
BRACKET LH
(a) Install the No. 1 front engine mounting bracket LH
with the 6 bolts.
Torque: 54 N*m (551 kgf*cm, 40 ft.*lbf)
NOTICE:
• Install the water inlet and mounting bracket
within 15 minutes after installing the chain
cover.
• Do not start the engine for at least 2 hours
after installation.
(b) When replacing a stud bolt, install it by using an E8
"TORX" socket wrench.
Torque: 10 N*m (102 kgf*cm, 7 ft.*lbf)
50. INSTALL OIL PAN BAFFLE PLATE
(a) Install the oil pan baffle plate with the 7 bolts.
Torque: 10 N*m (102 kgf*cm, 7 ft.*lbf)
HINT:
Temporarily tighten the 7 bolts. Fully tighten 2 bolts
(A) as shown in the illustration before tightening the
other bolts.
A129673
A134961E01
A129685E01
Page 1107 of 3000
EM–1602GR-FE ENGINE MECHANICAL – ENGINE UNIT
EM
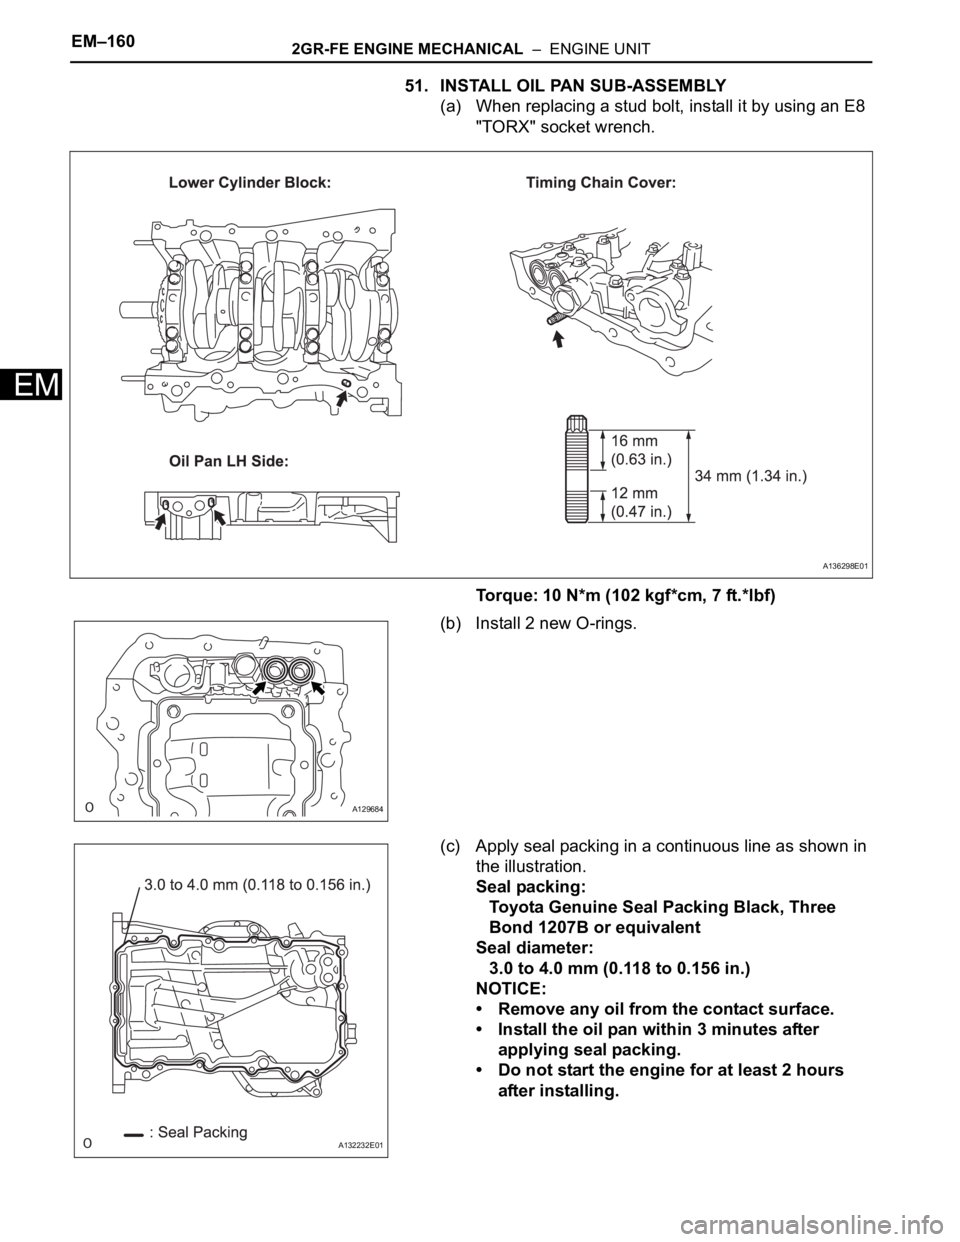
51. INSTALL OIL PAN SUB-ASSEMBLY
(a) When replacing a stud bolt, install it by using an E8
"TORX" socket wrench.
Torque: 10 N*m (102 kgf*cm, 7 ft.*lbf)
(b) Install 2 new O-rings.
(c) Apply seal packing in a continuous line as shown in
the illustration.
Seal packing:
Toyota Genuine Seal Packing Black, Three
Bond 1207B or equivalent
Seal diameter:
3.0 to 4.0 mm (0.118 to 0.156 in.)
NOTICE:
• Remove any oil from the contact surface.
• Install the oil pan within 3 minutes after
applying seal packing.
• Do not start the engine for at least 2 hours
after installing.
A136298E01
A129684
A132232E01
Page 1108 of 3000
2GR-FE ENGINE MECHANICAL – ENGINE UNITEM–161
EM
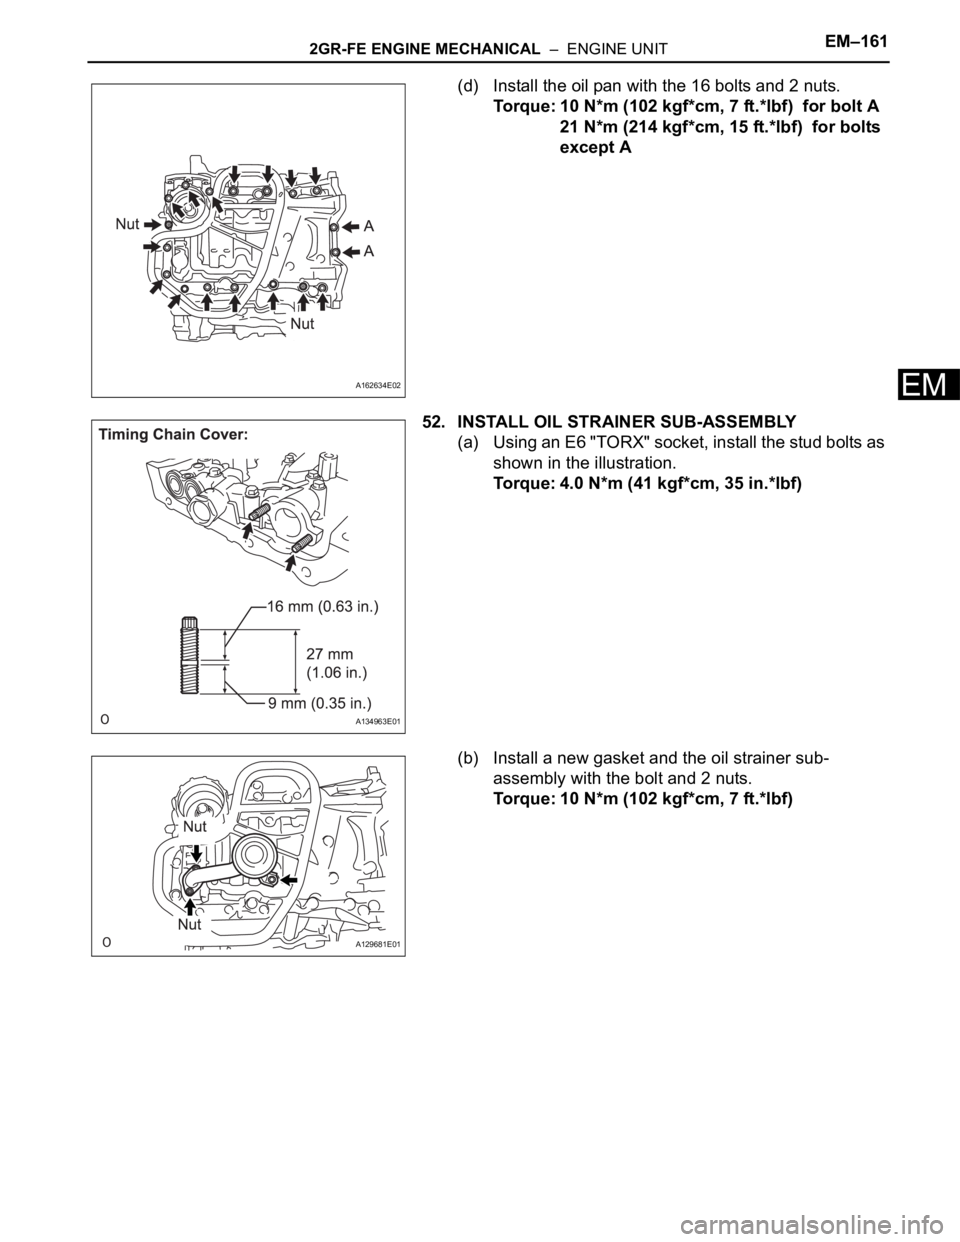
(d) Install the oil pan with the 16 bolts and 2 nuts.
Torque: 10 N*m (102 kgf*cm, 7 ft.*lbf) for bolt A
21 N*m (214 kgf*cm, 15 ft.*lbf) for bolts
except A
52. INSTALL OIL STRAINER SUB-ASSEMBLY
(a) Using an E6 "TORX" socket, install the stud bolts as
shown in the illustration.
Torque: 4.0 N*m (41 kgf*cm, 35 in.*lbf)
(b) Install a new gasket and the oil strainer sub-
assembly with the bolt and 2 nuts.
Torque: 10 N*m (102 kgf*cm, 7 ft.*lbf)
A162634E02
A134963E01
A129681E01
Page 1109 of 3000
EM–1622GR-FE ENGINE MECHANICAL – ENGINE UNIT
EM
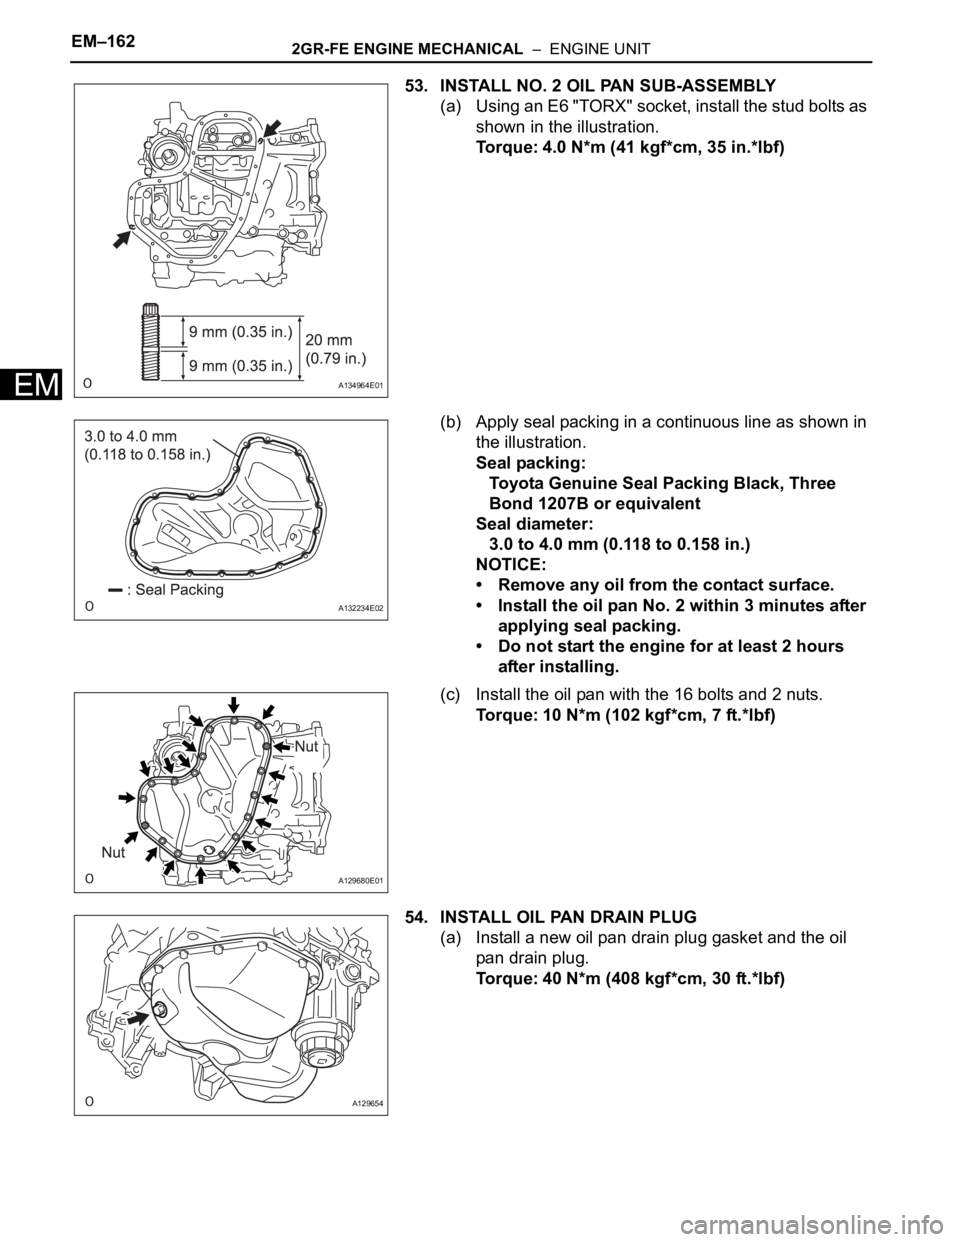
53. INSTALL NO. 2 OIL PAN SUB-ASSEMBLY
(a) Using an E6 "TORX" socket, install the stud bolts as
shown in the illustration.
Torque: 4.0 N*m (41 kgf*cm, 35 in.*lbf)
(b) Apply seal packing in a continuous line as shown in
the illustration.
Seal packing:
Toyota Genuine Seal Packing Black, Three
Bond 1207B or equivalent
Seal diameter:
3.0 to 4.0 mm (0.118 to 0.158 in.)
NOTICE:
• Remove any oil from the contact surface.
• Install the oil pan No. 2 within 3 minutes after
applying seal packing.
• Do not start the engine for at least 2 hours
after installing.
(c) Install the oil pan with the 16 bolts and 2 nuts.
Torque: 10 N*m (102 kgf*cm, 7 ft.*lbf)
54. INSTALL OIL PAN DRAIN PLUG
(a) Install a new oil pan drain plug gasket and the oil
pan drain plug.
Torque: 40 N*m (408 kgf*cm, 30 ft.*lbf)
A134964E01
A132234E02
A129680E01
A129654
Page 1110 of 3000
2GR-FE ENGINE MECHANICAL – ENGINE UNITEM–163
EM
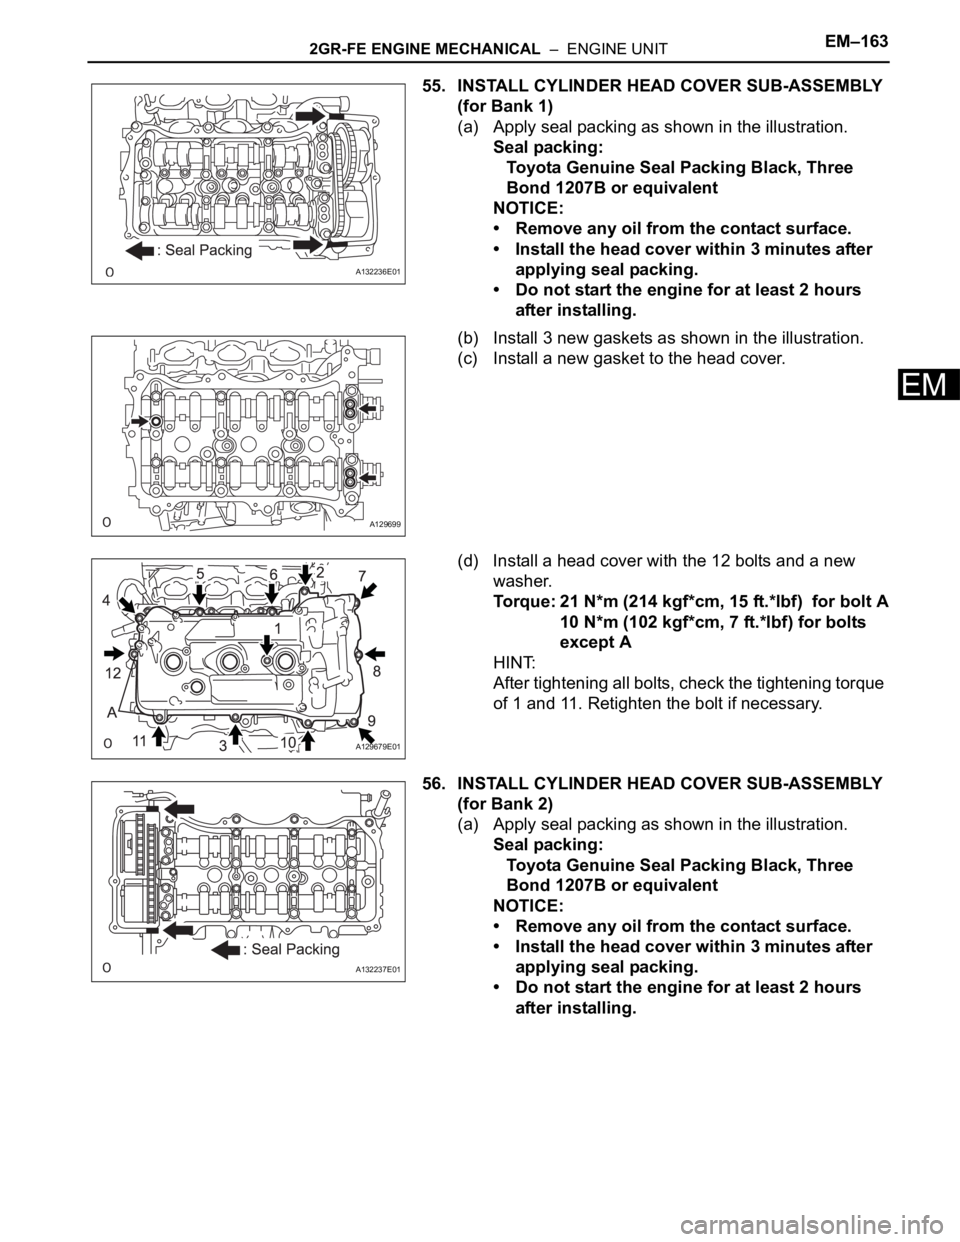
55. INSTALL CYLINDER HEAD COVER SUB-ASSEMBLY
(for Bank 1)
(a) Apply seal packing as shown in the illustration.
Seal packing:
Toyota Genuine Seal Packing Black, Three
Bond 1207B or equivalent
NOTICE:
• Remove any oil from the contact surface.
• Install the head cover within 3 minutes after
applying seal packing.
• Do not start the engine for at least 2 hours
after installing.
(b) Install 3 new gaskets as shown in the illustration.
(c) Install a new gasket to the head cover.
(d) Install a head cover with the 12 bolts and a new
washer.
Torque: 21 N*m (214 kgf*cm, 15 ft.*lbf) for bolt A
10 N*m (102 kgf*cm, 7 ft.*lbf) for bolts
except A
HINT:
After tightening all bolts, check the tightening torque
of 1 and 11. Retighten the bolt if necessary.
56. INSTALL CYLINDER HEAD COVER SUB-ASSEMBLY
(for Bank 2)
(a) Apply seal packing as shown in the illustration.
Seal packing:
Toyota Genuine Seal Packing Black, Three
Bond 1207B or equivalent
NOTICE:
• Remove any oil from the contact surface.
• Install the head cover within 3 minutes after
applying seal packing.
• Do not start the engine for at least 2 hours
after installing.
A132236E01
A129699
A129679E01
A132237E01