TOYOTA SIENNA 2007 Service Repair Manual
Manufacturer: TOYOTA, Model Year: 2007, Model line: SIENNA, Model: TOYOTA SIENNA 2007Pages: 3000, PDF Size: 52.26 MB
Page 1251 of 3000
CO–362GR-FE COOLING – RADIATOR
CO
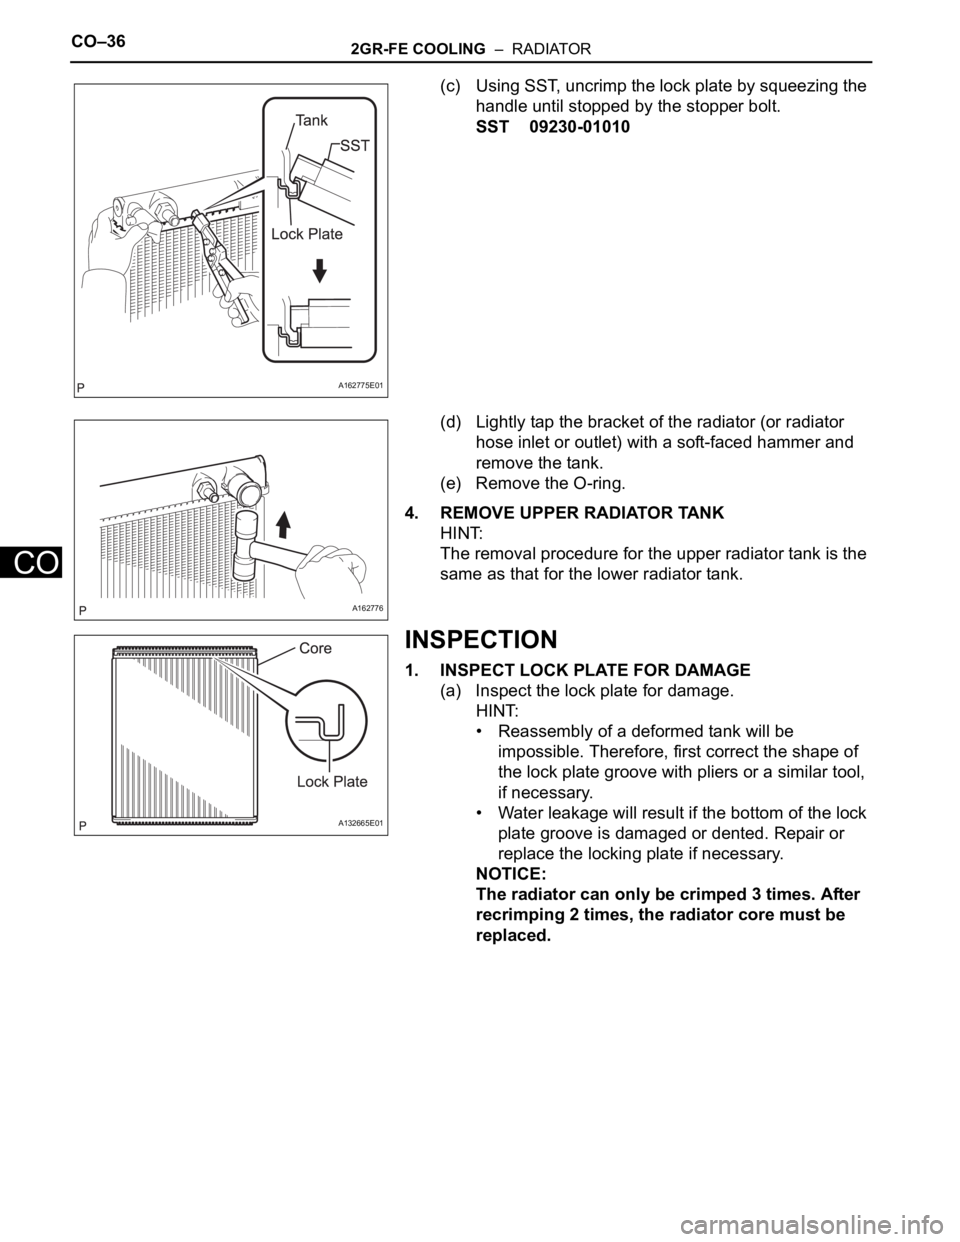
(c) Using SST, uncrimp the lock plate by squeezing the
handle until stopped by the stopper bolt.
SST 09230-01010
(d) Lightly tap the bracket of the radiator (or radiator
hose inlet or outlet) with a soft-faced hammer and
remove the tank.
(e) Remove the O-ring.
4. REMOVE UPPER RADIATOR TANK
HINT:
The removal procedure for the upper radiator tank is the
same as that for the lower radiator tank.
INSPECTION
1. INSPECT LOCK PLATE FOR DAMAGE
(a) Inspect the lock plate for damage.
HINT:
• Reassembly of a deformed tank will be
impossible. Therefore, first correct the shape of
the lock plate groove with pliers or a similar tool,
if necessary.
• Water leakage will result if the bottom of the lock
plate groove is damaged or dented. Repair or
replace the locking plate if necessary.
NOTICE:
The radiator can only be crimped 3 times. After
recrimping 2 times, the radiator core must be
replaced.
A162775E01
A162776
A132665E01
Page 1252 of 3000
CO–62GR-FE COOLING – COOLANT
CO
COOLANT
REPLACEMENT
1. REMOVE NO. 1 ENGINE UNDER COVER (See page
EM-26)
2. REMOVE V-BANK COVER SUB-ASSEMBLY (See
page EM-28)
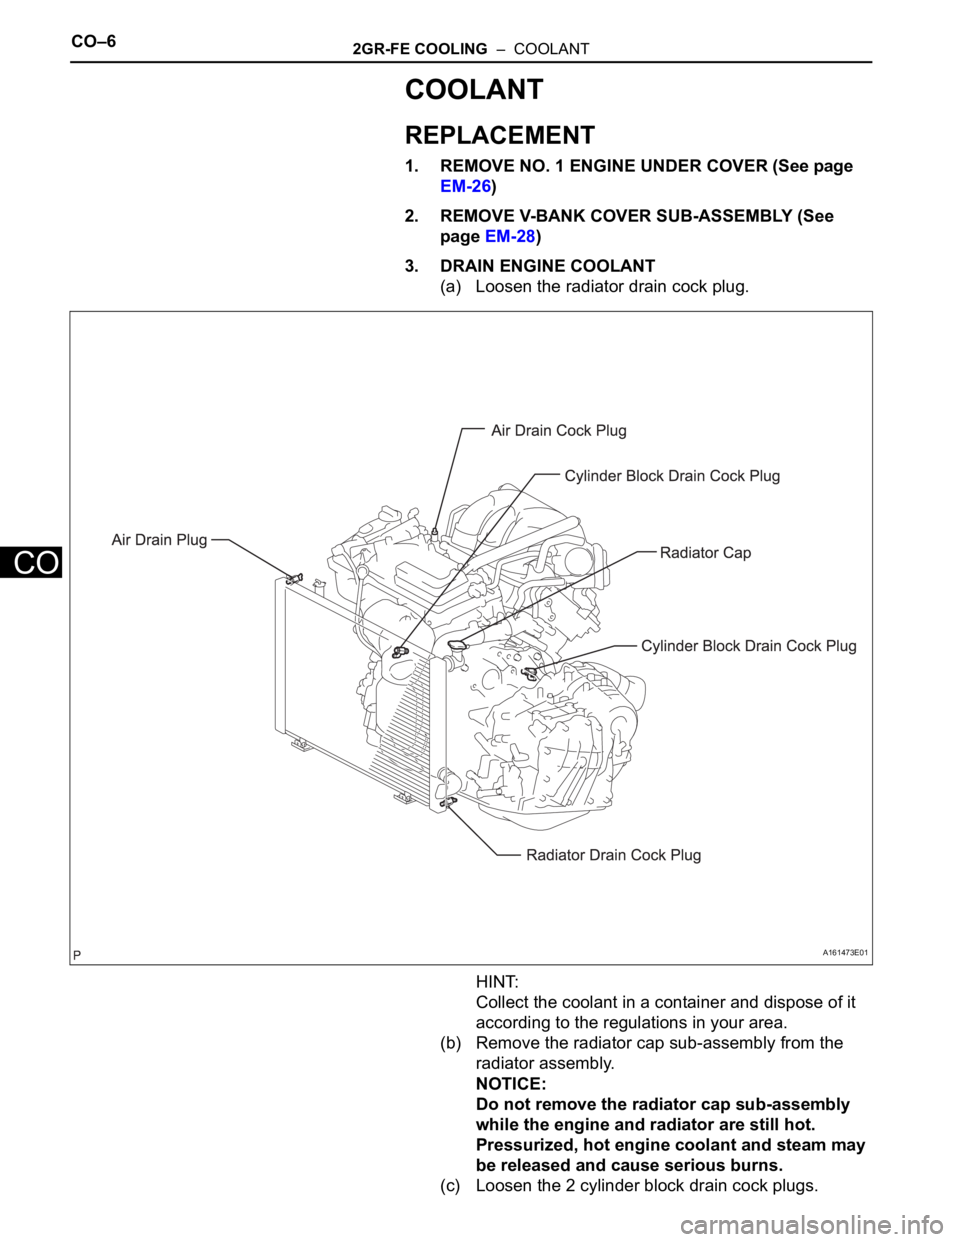
3. DRAIN ENGINE COOLANT
(a) Loosen the radiator drain cock plug.
HINT:
Collect the coolant in a container and dispose of it
according to the regulations in your area.
(b) Remove the radiator cap sub-assembly from the
radiator assembly.
NOTICE:
Do not remove the radiator cap sub-assembly
while the engine and radiator are still hot.
Pressurized, hot engine coolant and steam may
be released and cause serious burns.
(c) Loosen the 2 cylinder block drain cock plugs.
A161473E01
Page 1253 of 3000
2GR-FE COOLING – COOLANTCO–7
CO
4. ADD ENGINE COOLANT
(a) Tighten the radiator drain cock plug by hand.
(b) Tighten the 2 cylinder block drain cock plugs.
Torque: 13 N*m (130 kgf*cm, 9 ft.*lbf) for
cylinder block drain cock plugs
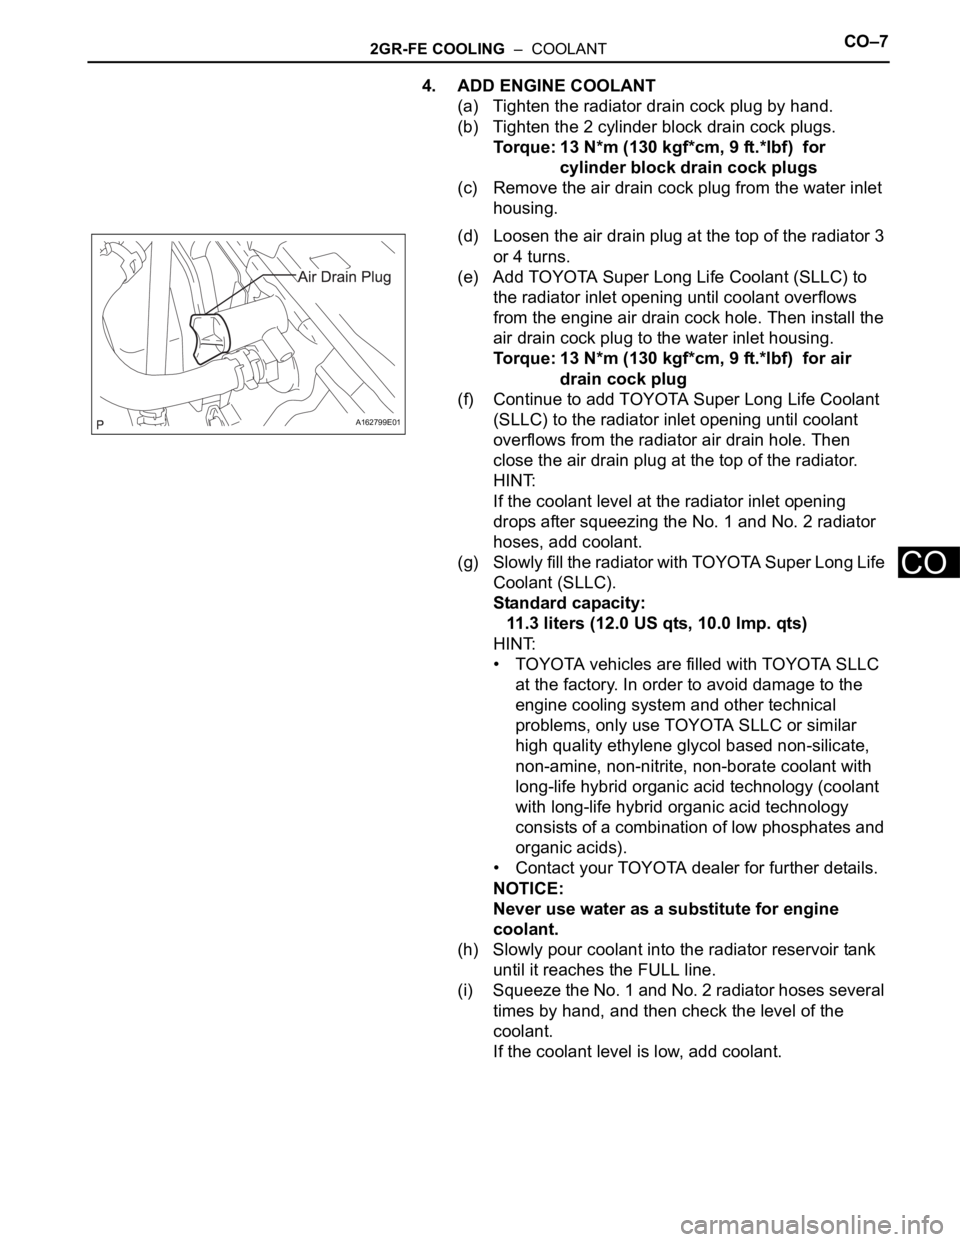
(c) Remove the air drain cock plug from the water inlet
housing.
(d) Loosen the air drain plug at the top of the radiator 3
or 4 turns.
(e) Add TOYOTA Super Long Life Coolant (SLLC) to
the radiator inlet opening until coolant overflows
from the engine air drain cock hole. Then install the
air drain cock plug to the water inlet housing.
Torque: 13 N*m (130 kgf*cm, 9 ft.*lbf) for air
drain cock plug
(f) Continue to add TOYOTA Super Long Life Coolant
(SLLC) to the radiator inlet opening until coolant
overflows from the radiator air drain hole. Then
close the air drain plug at the top of the radiator.
HINT:
If the coolant level at the radiator inlet opening
drops after squeezing the No. 1 and No. 2 radiator
hoses, add coolant.
(g) Slowly fill the radiator with TOYOTA Super Long Life
Coolant (SLLC).
Standard capacity:
11.3 liters (12.0 US qts, 10.0 Imp. qts)
HINT:
• TOYOTA vehicles are filled with TOYOTA SLLC
at the factory. In order to avoid damage to the
engine cooling system and other technical
problems, only use TOYOTA SLLC or similar
high quality ethylene glycol based non-silicate,
non-amine, non-nitrite, non-borate coolant with
long-life hybrid organic acid technology (coolant
with long-life hybrid organic acid technology
consists of a combination of low phosphates and
organic acids).
• Contact your TOYOTA dealer for further details.
NOTICE:
Never use water as a substitute for engine
coolant.
(h) Slowly pour coolant into the radiator reservoir tank
until it reaches the FULL line.
(i) Squeeze the No. 1 and No. 2 radiator hoses several
times by hand, and then check the level of the
coolant.
If the coolant level is low, add coolant.
A162799E01
Page 1254 of 3000
CO–82GR-FE COOLING – COOLANT
CO
(j) Bleed air from the cooling system.
(1) Warm up the engine until the thermostat opens.
While the thermostat is open, circulate the
coolant for several minutes.
HINT:
The thermostat open timing can be confirmed
by squeezing the inlet radiator hose by hand,
and checking when the engine coolant starts to
flow inside the hose.
(2) Maintain the engine speed at 2500 to 3000
rpm.
(3) Squeeze the inlet and outlet radiator hoses
several times by hand to bleed air.
CAUTION:
When squeezing the radiator hoses:
• Wear protective gloves.
• Be careful as the radiator hoses are hot.
• Keep your hands away from the radiator
fan.
NOTICE:
• Make sure that the radiator reservoir still
has some coolant in it.
• If the coolant temperature gauge
indicates an excessive temperature, turn
off the engine and let it cool.
• If there is not enough coolant, the engine
may overheat or be seriously damaged.
• If the radiator reservoir does not have
enough coolant, perform the following: 1)
stop the engine, 2) wait until the coolant
has cooled down, and 3) add coolant
until the coolant is filled to the FULL line.
(k) Stop the engine and wait until the engine coolant
cools down.
(l) Add engine coolant to the FULL line on the radiator
reservoir.
5. INSPECT FOR COOLANT LEAK (See page CO-1)
6. INSTALL V-BANK COVER SUB-ASSEMBLY (See
page EM-63)
7. INSTALL NO. 1 ENGINE UNDER COVER (See page
EM-63)
Page 1255 of 3000
2GR-FE COOLING – RADIATORCO–37
CO
REASSEMBLY
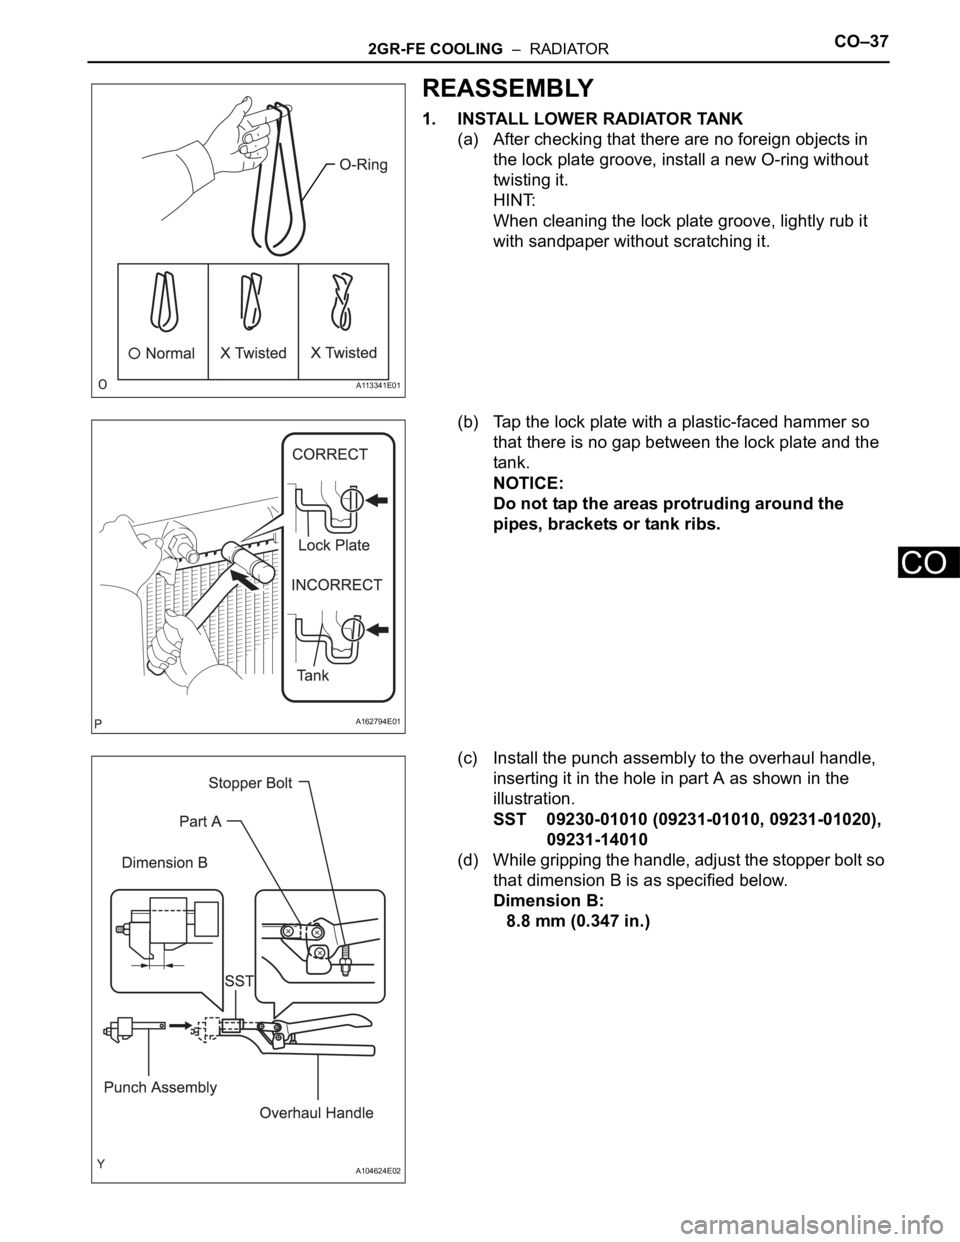
1. INSTALL LOWER RADIATOR TANK
(a) After checking that there are no foreign objects in
the lock plate groove, install a new O-ring without
twisting it.
HINT:
When cleaning the lock plate groove, lightly rub it
with sandpaper without scratching it.
(b) Tap the lock plate with a plastic-faced hammer so
that there is no gap between the lock plate and the
tank.
NOTICE:
Do not tap the areas protruding around the
pipes, brackets or tank ribs.
(c) Install the punch assembly to the overhaul handle,
inserting it in the hole in part A as shown in the
illustration.
SST 09230-01010 (09231-01010, 09231-01020),
09231-14010
(d) While gripping the handle, adjust the stopper bolt so
that dimension B is as specified below.
Dimension B:
8.8 mm (0.347 in.)
A113341E01
A162794E01
A104624E02
Page 1256 of 3000
CO–382GR-FE COOLING – RADIATOR
CO
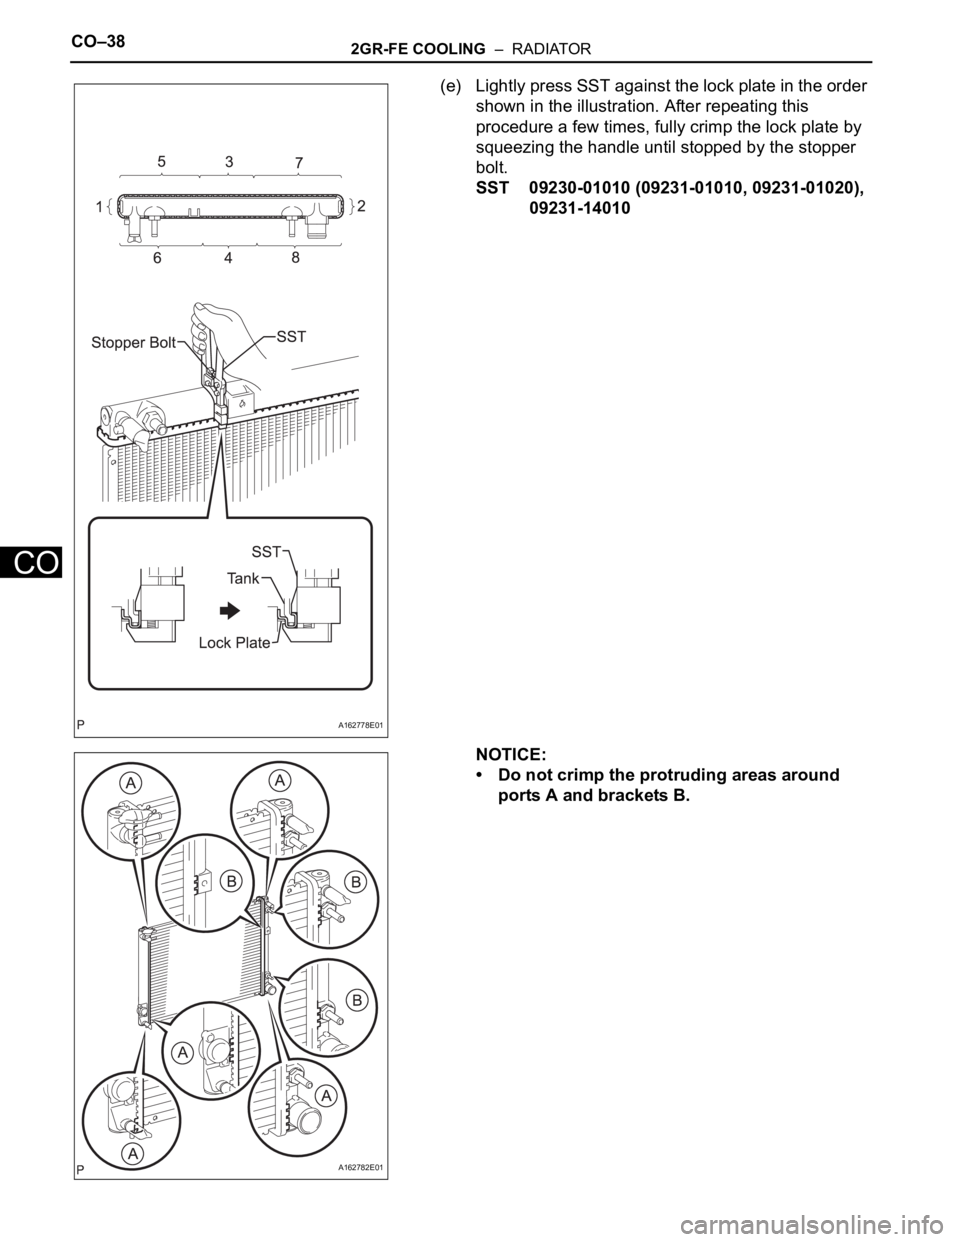
(e) Lightly press SST against the lock plate in the order
shown in the illustration. After repeating this
procedure a few times, fully crimp the lock plate by
squeezing the handle until stopped by the stopper
bolt.
SST 09230-01010 (09231-01010, 09231-01020),
09231-14010
NOTICE:
• Do not crimp the protruding areas around
ports A and brackets B.
A162778E01
A162782E01
Page 1257 of 3000
2GR-FE COOLING – RADIATORCO–39
CO
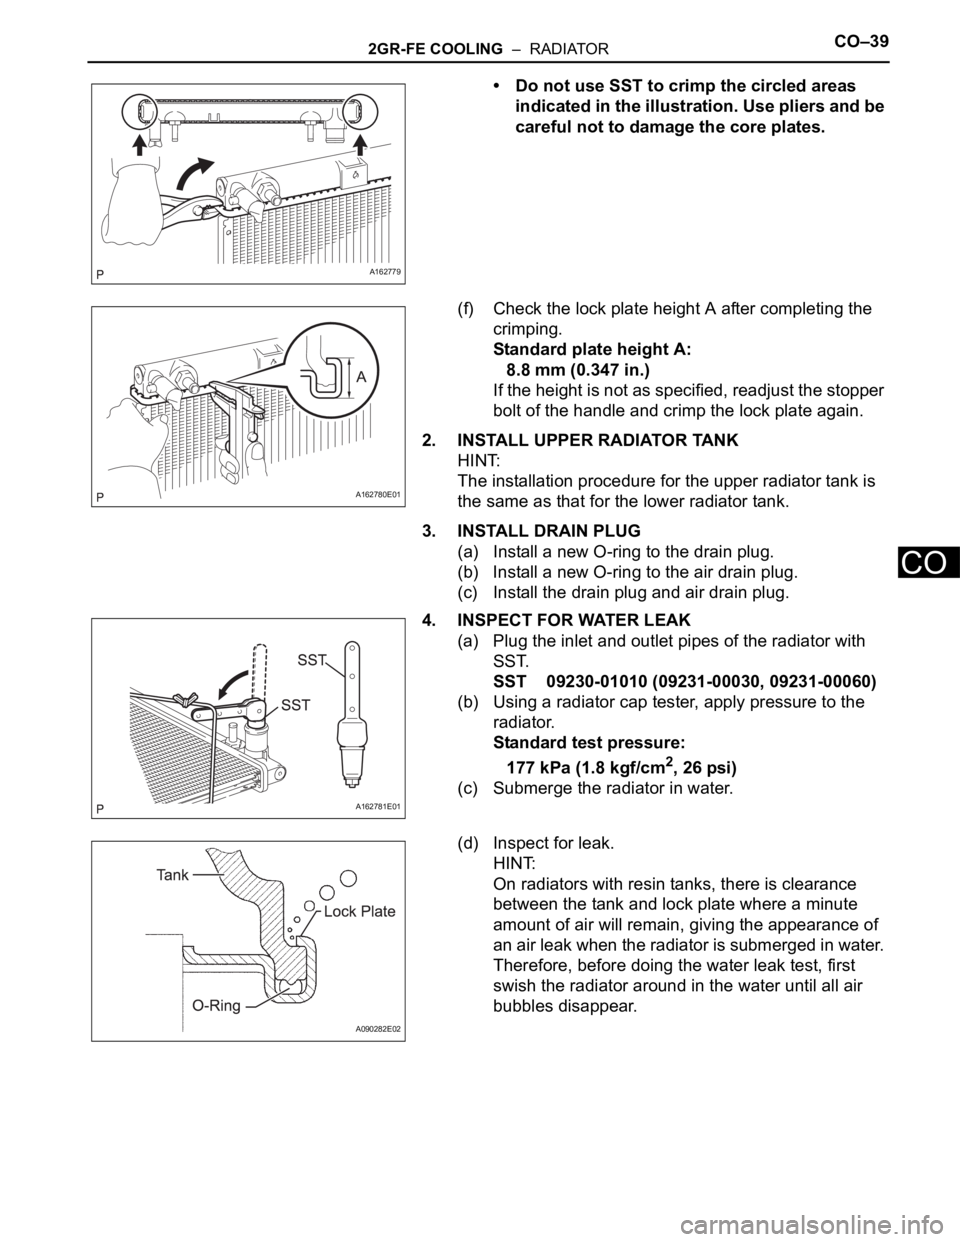
• Do not use SST to crimp the circled areas
indicated in the illustration. Use pliers and be
careful not to damage the core plates.
(f) Check the lock plate height A after completing the
crimping.
Standard plate height A:
8.8 mm (0.347 in.)
If the height is not as specified, readjust the stopper
bolt of the handle and crimp the lock plate again.
2. INSTALL UPPER RADIATOR TANK
HINT:
The installation procedure for the upper radiator tank is
the same as that for the lower radiator tank.
3. INSTALL DRAIN PLUG
(a) Install a new O-ring to the drain plug.
(b) Install a new O-ring to the air drain plug.
(c) Install the drain plug and air drain plug.
4. INSPECT FOR WATER LEAK
(a) Plug the inlet and outlet pipes of the radiator with
SST.
SST 09230-01010 (09231-00030, 09231-00060)
(b) Using a radiator cap tester, apply pressure to the
radiator.
Standard test pressure:
177 kPa (1.8 kgf/cm
2, 26 psi)
(c) Submerge the radiator in water.
(d) Inspect for leak.
HINT:
On radiators with resin tanks, there is clearance
between the tank and lock plate where a minute
amount of air will remain, giving the appearance of
an air leak when the radiator is submerged in water.
Therefore, before doing the water leak test, first
swish the radiator around in the water until all air
bubbles disappear.
A162779
A162780E01
A162781E01
A090282E02
Page 1258 of 3000
CO–402GR-FE COOLING – RADIATOR
CO
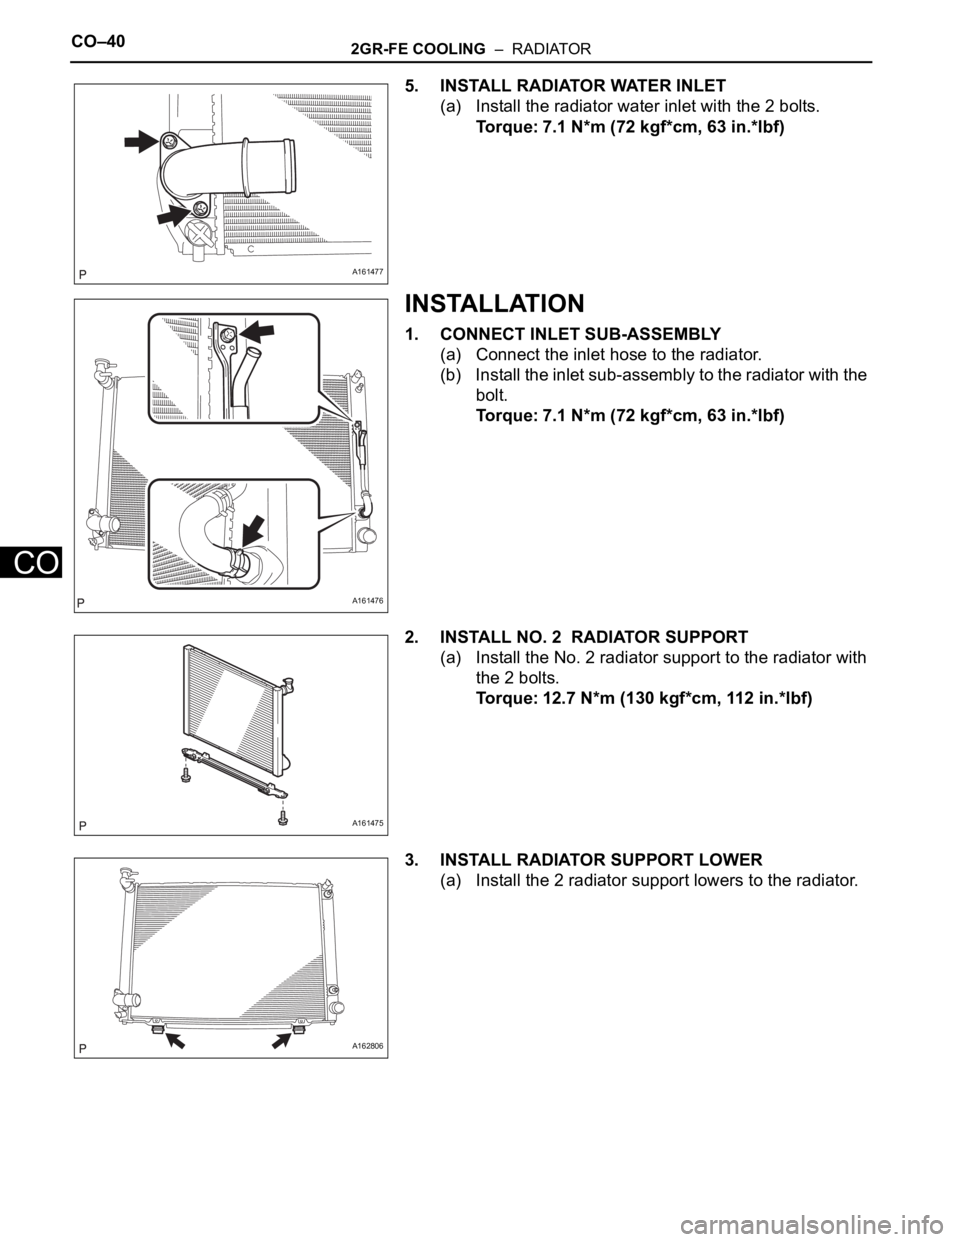
5. INSTALL RADIATOR WATER INLET
(a) Install the radiator water inlet with the 2 bolts.
Torque: 7.1 N*m (72 kgf*cm, 63 in.*lbf)
INSTALLATION
1. CONNECT INLET SUB-ASSEMBLY
(a) Connect the inlet hose to the radiator.
(b) Install the inlet sub-assembly to the radiator with the
bolt.
Torque: 7.1 N*m (72 kgf*cm, 63 in.*lbf)
2. INSTALL NO. 2 RADIATOR SUPPORT
(a) Install the No. 2 radiator support to the radiator with
the 2 bolts.
Torque: 12.7 N*m (130 kgf*cm, 112 in.*lbf)
3. INSTALL RADIATOR SUPPORT LOWER
(a) Install the 2 radiator support lowers to the radiator.
A161477
A161476
A161475
A162806
Page 1259 of 3000
2GR-FE COOLING – RADIATORCO–41
CO
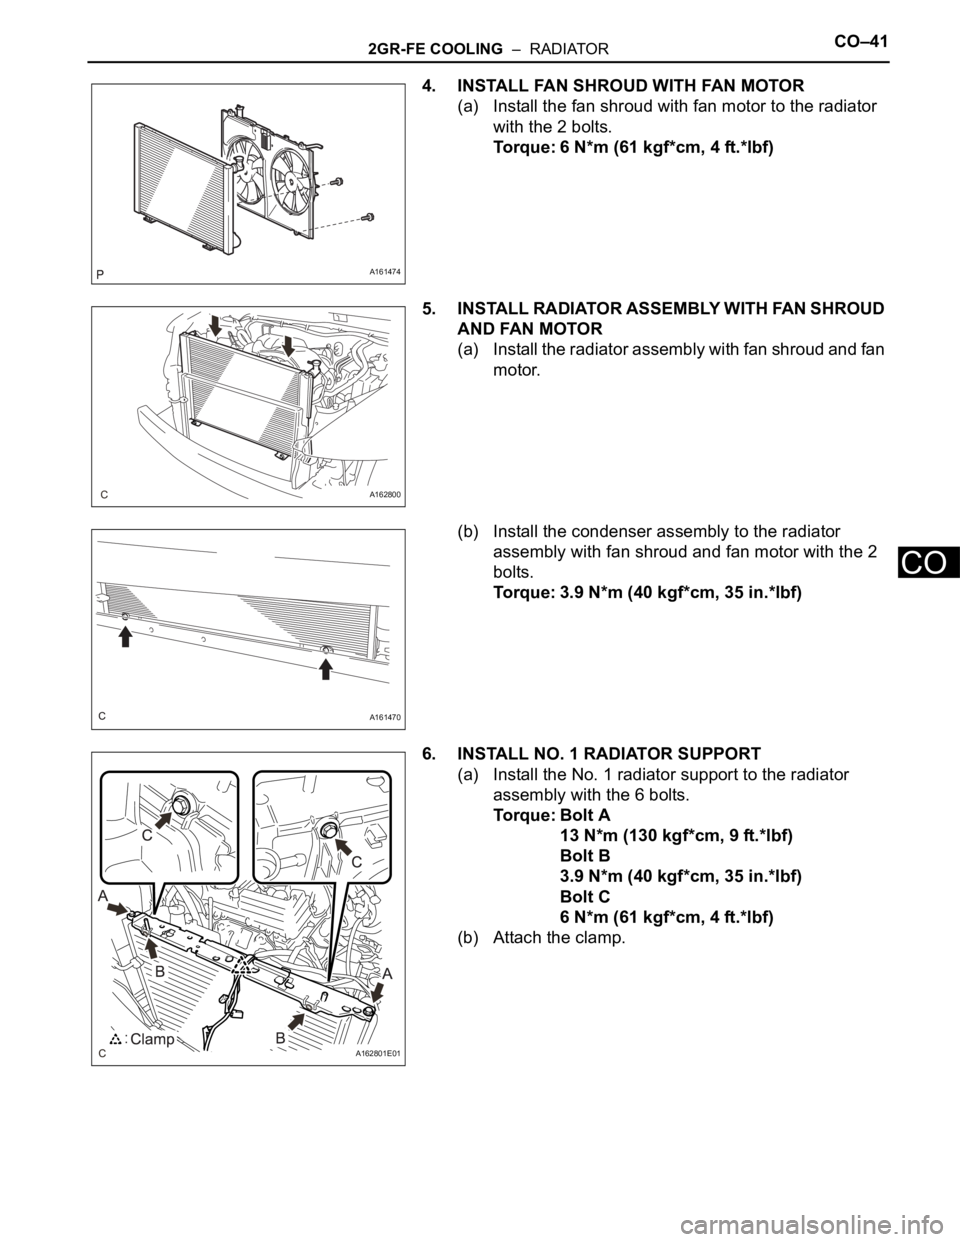
4. INSTALL FAN SHROUD WITH FAN MOTOR
(a) Install the fan shroud with fan motor to the radiator
with the 2 bolts.
Torque: 6 N*m (61 kgf*cm, 4 ft.*lbf)
5. INSTALL RADIATOR ASSEMBLY WITH FAN SHROUD
AND FAN MOTOR
(a) Install the radiator assembly with fan shroud and fan
motor.
(b) Install the condenser assembly to the radiator
assembly with fan shroud and fan motor with the 2
bolts.
Torque: 3.9 N*m (40 kgf*cm, 35 in.*lbf)
6. INSTALL NO. 1 RADIATOR SUPPORT
(a) Install the No. 1 radiator support to the radiator
assembly with the 6 bolts.
Torque: Bolt A
13 N*m (130 kgf*cm, 9 ft.*lbf)
Bolt B
3.9 N*m (40 kgf*cm, 35 in.*lbf)
Bolt C
6 N*m (61 kgf*cm, 4 ft.*lbf)
(b) Attach the clamp.
A161474
A162800
A161470
A162801E01
Page 1260 of 3000
CO–422GR-FE COOLING – RADIATOR
CO
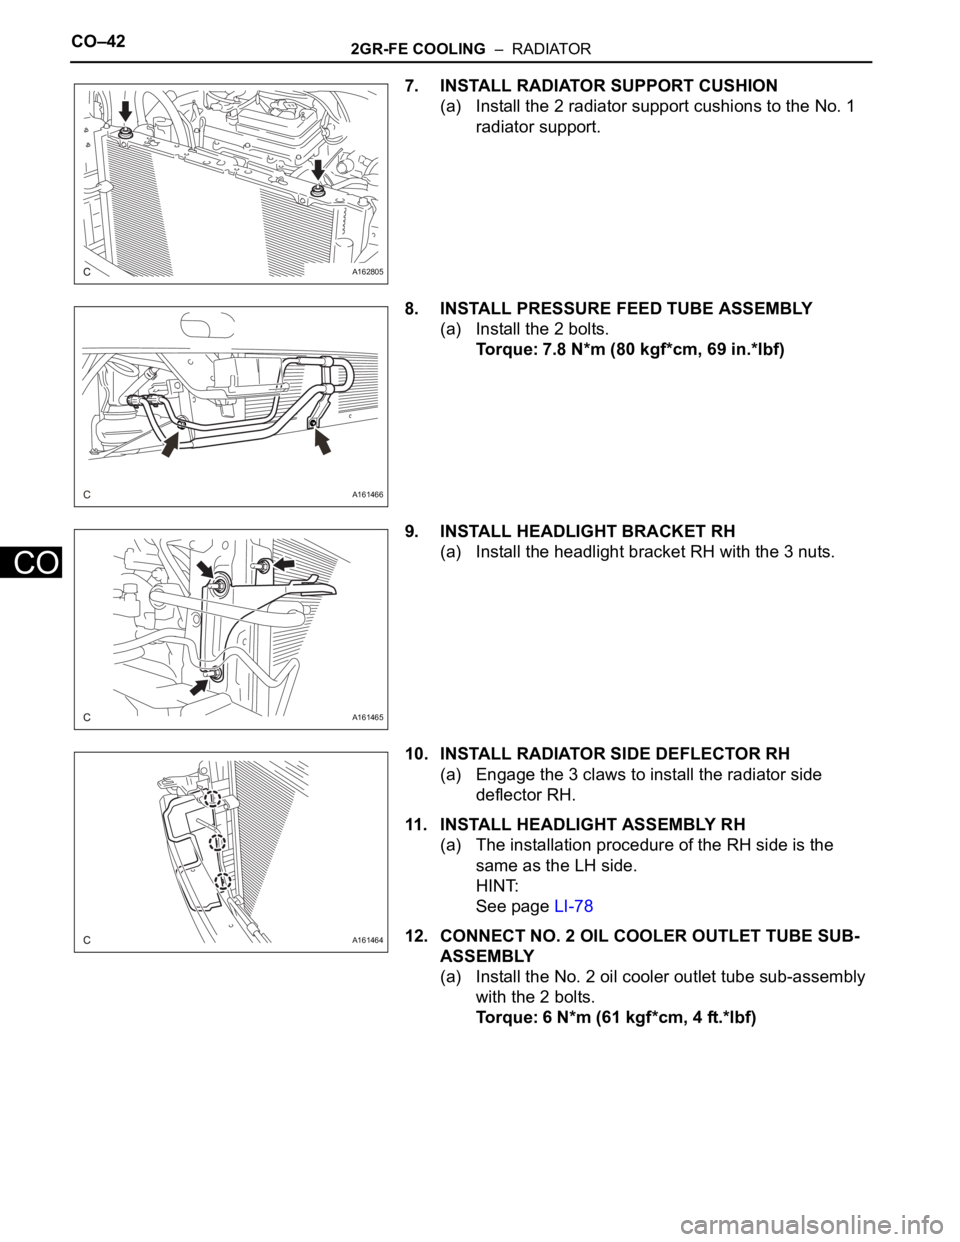
7. INSTALL RADIATOR SUPPORT CUSHION
(a) Install the 2 radiator support cushions to the No. 1
radiator support.
8. INSTALL PRESSURE FEED TUBE ASSEMBLY
(a) Install the 2 bolts.
Torque: 7.8 N*m (80 kgf*cm, 69 in.*lbf)
9. INSTALL HEADLIGHT BRACKET RH
(a) Install the headlight bracket RH with the 3 nuts.
10. INSTALL RADIATOR SIDE DEFLECTOR RH
(a) Engage the 3 claws to install the radiator side
deflector RH.
11. INSTALL HEADLIGHT ASSEMBLY RH
(a) The installation procedure of the RH side is the
same as the LH side.
HINT:
See page LI-78
12. CONNECT NO. 2 OIL COOLER OUTLET TUBE SUB-
ASSEMBLY
(a) Install the No. 2 oil cooler outlet tube sub-assembly
with the 2 bolts.
Torque: 6 N*m (61 kgf*cm, 4 ft.*lbf)
A162805
A161466
A161465
A161464