differential TOYOTA SIENNA 2007 Service Manual PDF
[x] Cancel search | Manufacturer: TOYOTA, Model Year: 2007, Model line: SIENNA, Model: TOYOTA SIENNA 2007Pages: 3000, PDF Size: 52.26 MB
Page 1965 of 3000
AX–280U151F AUTOMATIC TRANSAXLE – DIFFERENTIAL CASE
AX
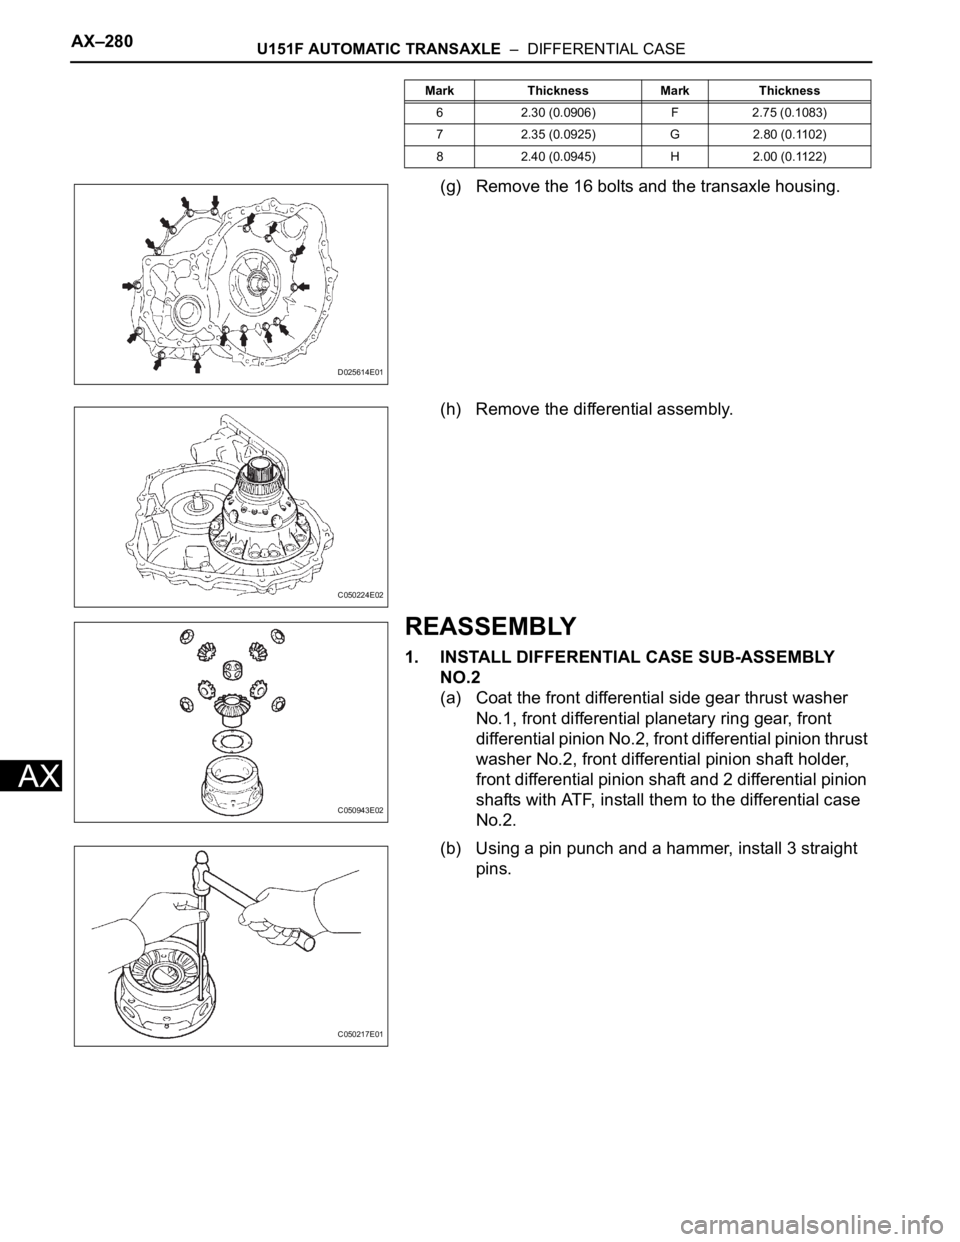
(g) Remove the 16 bolts and the transaxle housing.
(h) Remove the differential assembly.
REASSEMBLY
1. INSTALL DIFFERENTIAL CASE SUB-ASSEMBLY
NO.2
(a) Coat the front differential side gear thrust washer
No.1, front differential planetary ring gear, front
differential pinion No.2, front differential pinion thrust
washer No.2, front differential pinion shaft holder,
front differential pinion shaft and 2 differential pinion
shafts with ATF, install them to the differential case
No.2.
(b) Using a pin punch and a hammer, install 3 straight
pins.
6 2.30 (0.0906) F 2.75 (0.1083)
7 2.35 (0.0925) G 2.80 (0.1102)
8 2.40 (0.0945) H 2.00 (0.1122) Mark Thickness Mark Thickness
D025614E01
C050224E02
C050943E02
C050217E01
Page 1966 of 3000
U151F AUTOMATIC TRANSAXLE – DIFFERENTIAL CASEAX–281
AX
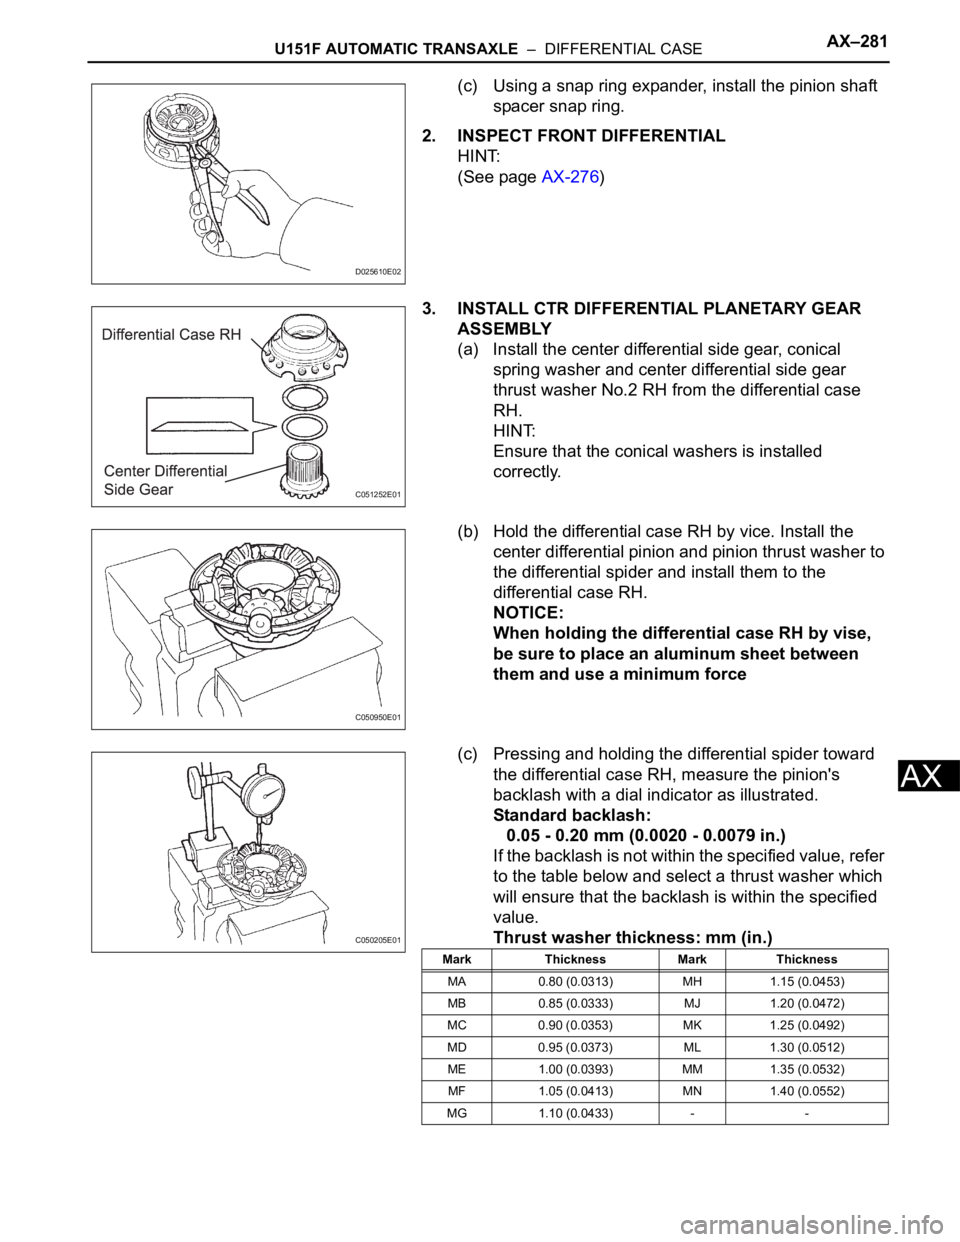
(c) Using a snap ring expander, install the pinion shaft
spacer snap ring.
2. INSPECT FRONT DIFFERENTIAL
HINT:
(See page AX-276)
3. INSTALL CTR DIFFERENTIAL PLANETARY GEAR
ASSEMBLY
(a) Install the center differential side gear, conical
spring washer and center differential side gear
thrust washer No.2 RH from the differential case
RH.
HINT:
Ensure that the conical washers is installed
correctly.
(b) Hold the differential case RH by vice. Install the
center differential pinion and pinion thrust washer to
the differential spider and install them to the
differential case RH.
NOTICE:
When holding the differential case RH by vise,
be sure to place an aluminum sheet between
them and use a minimum force
(c) Pressing and holding the differential spider toward
the differential case RH, measure the pinion's
backlash with a dial indicator as illustrated.
Standard backlash:
0.05 - 0.20 mm (0.0020 - 0.0079 in.)
If the backlash is not within the specified value, refer
to the table below and select a thrust washer which
will ensure that the backlash is within the specified
value.
Thrust washer thickness: mm (in.)
D025610E02
C051252E01
C050950E01
C050205E01
Mark Thickness Mark Thickness
MA 0.80 (0.0313) MH 1.15 (0.0453)
MB 0.85 (0.0333) MJ 1.20 (0.0472)
MC 0.90 (0.0353) MK 1.25 (0.0492)
MD 0.95 (0.0373) ML 1.30 (0.0512)
ME 1.00 (0.0393) MM 1.35 (0.0532)
MF 1.05 (0.0413) MN 1.40 (0.0552)
MG 1.10 (0.0433) - -
Page 1967 of 3000
AX–282U151F AUTOMATIC TRANSAXLE – DIFFERENTIAL CASE
AX
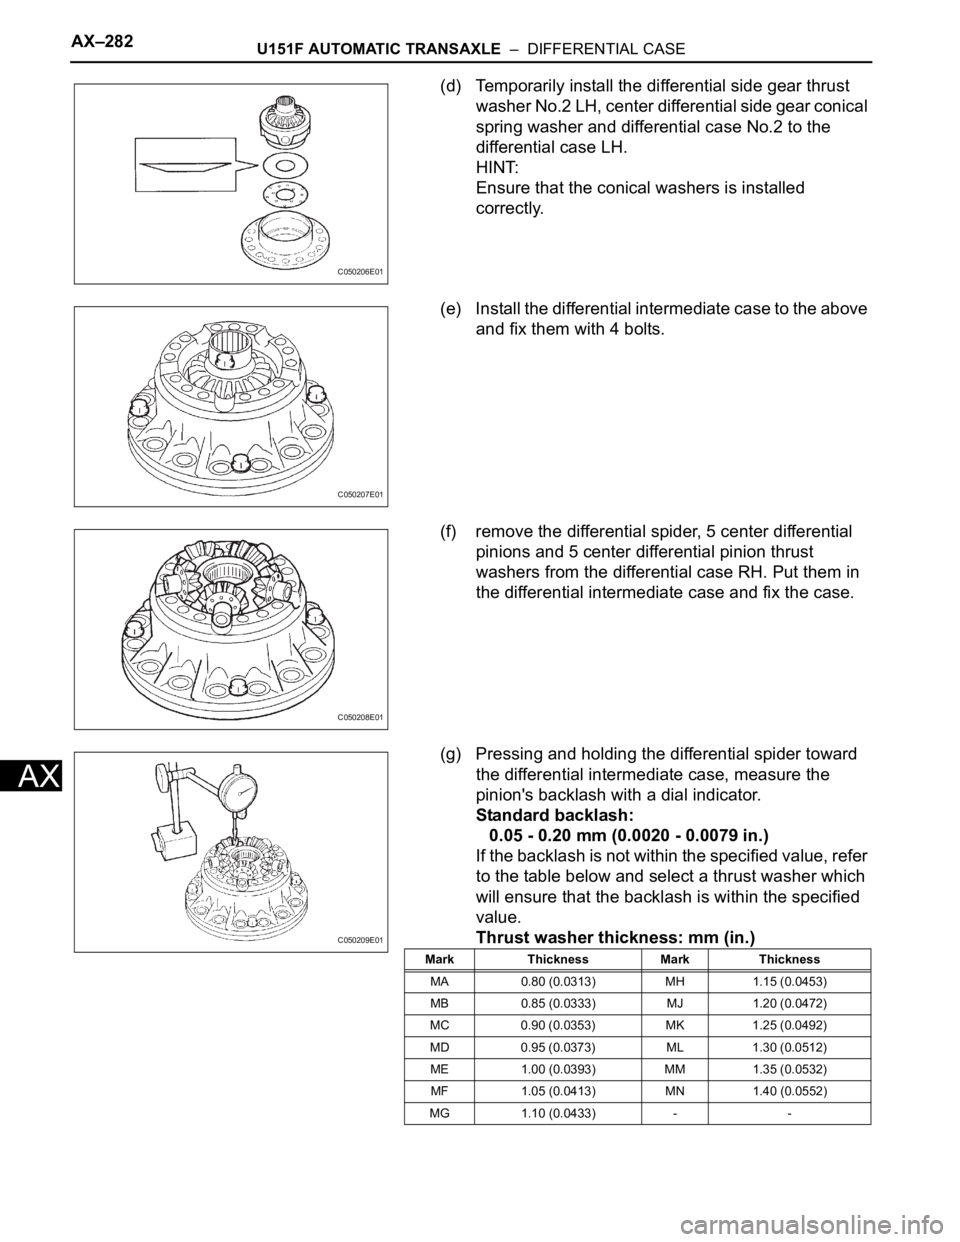
(d) Temporarily install the differential side gear thrust
washer No.2 LH, center differential side gear conical
spring washer and differential case No.2 to the
differential case LH.
HINT:
Ensure that the conical washers is installed
correctly.
(e) Install the differential intermediate case to the above
and fix them with 4 bolts.
(f) remove the differential spider, 5 center differential
pinions and 5 center differential pinion thrust
washers from the differential case RH. Put them in
the differential intermediate case and fix the case.
(g) Pressing and holding the differential spider toward
the differential intermediate case, measure the
pinion's backlash with a dial indicator.
Standard backlash:
0.05 - 0.20 mm (0.0020 - 0.0079 in.)
If the backlash is not within the specified value, refer
to the table below and select a thrust washer which
will ensure that the backlash is within the specified
value.
Thrust washer thickness: mm (in.)
C050206E01
C050207E01
C050208E01
C050209E01
Mark Thickness Mark Thickness
MA 0.80 (0.0313) MH 1.15 (0.0453)
MB 0.85 (0.0333) MJ 1.20 (0.0472)
MC 0.90 (0.0353) MK 1.25 (0.0492)
MD 0.95 (0.0373) ML 1.30 (0.0512)
ME 1.00 (0.0393) MM 1.35 (0.0532)
MF 1.05 (0.0413) MN 1.40 (0.0552)
MG 1.10 (0.0433) - -
Page 1968 of 3000
U151F AUTOMATIC TRANSAXLE – DIFFERENTIAL CASEAX–283
AX
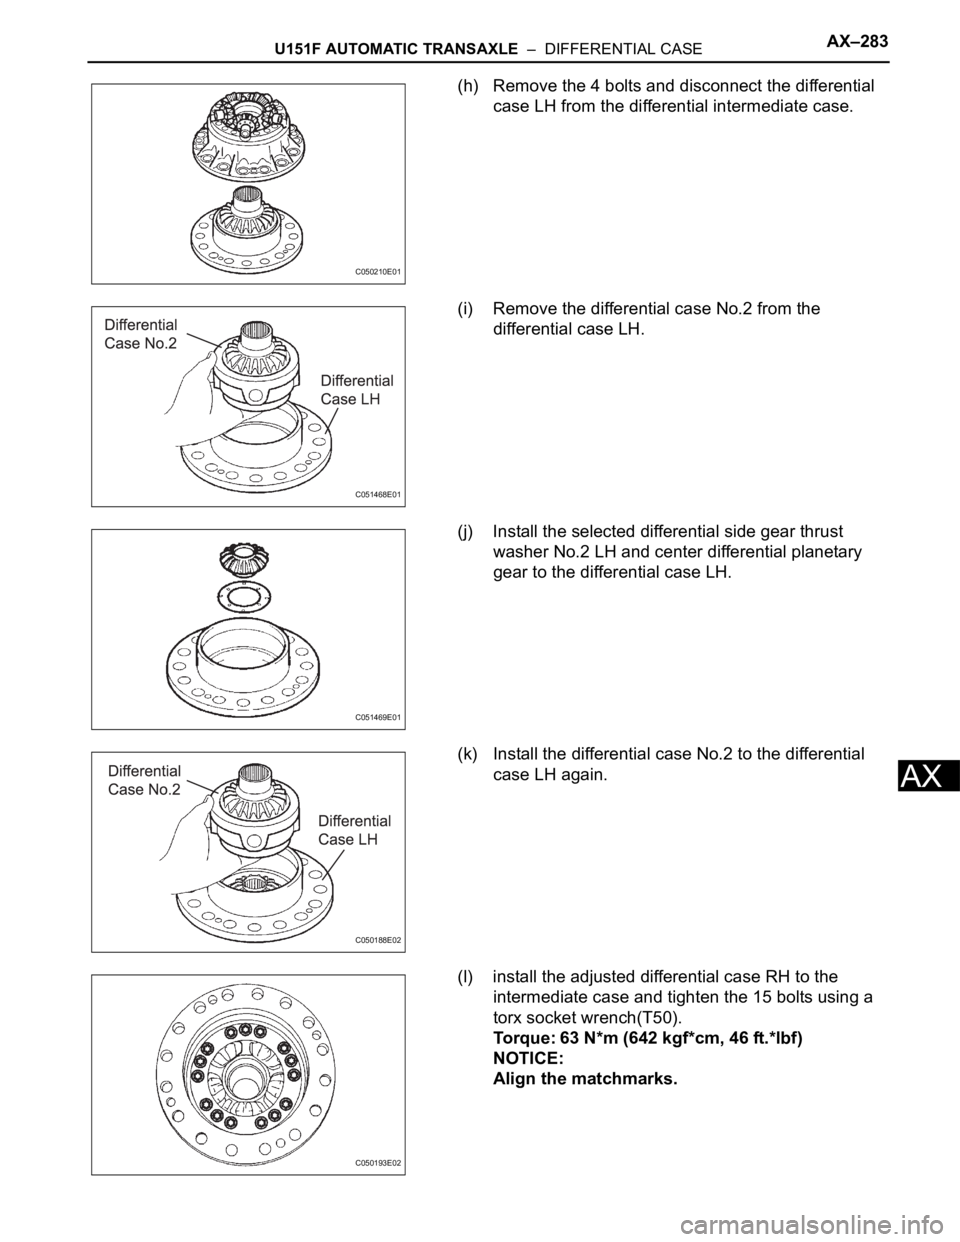
(h) Remove the 4 bolts and disconnect the differential
case LH from the differential intermediate case.
(i) Remove the differential case No.2 from the
differential case LH.
(j) Install the selected differential side gear thrust
washer No.2 LH and center differential planetary
gear to the differential case LH.
(k) Install the differential case No.2 to the differential
case LH again.
(l) install the adjusted differential case RH to the
intermediate case and tighten the 15 bolts using a
torx socket wrench(T50).
Torque: 63 N*m (642 kgf*cm, 46 ft.*lbf)
NOTICE:
Align the matchmarks.
C050210E01
C051468E01
C051469E01
C050188E02
C050193E02
Page 1969 of 3000
AX–284U151F AUTOMATIC TRANSAXLE – DIFFERENTIAL CASE
AX
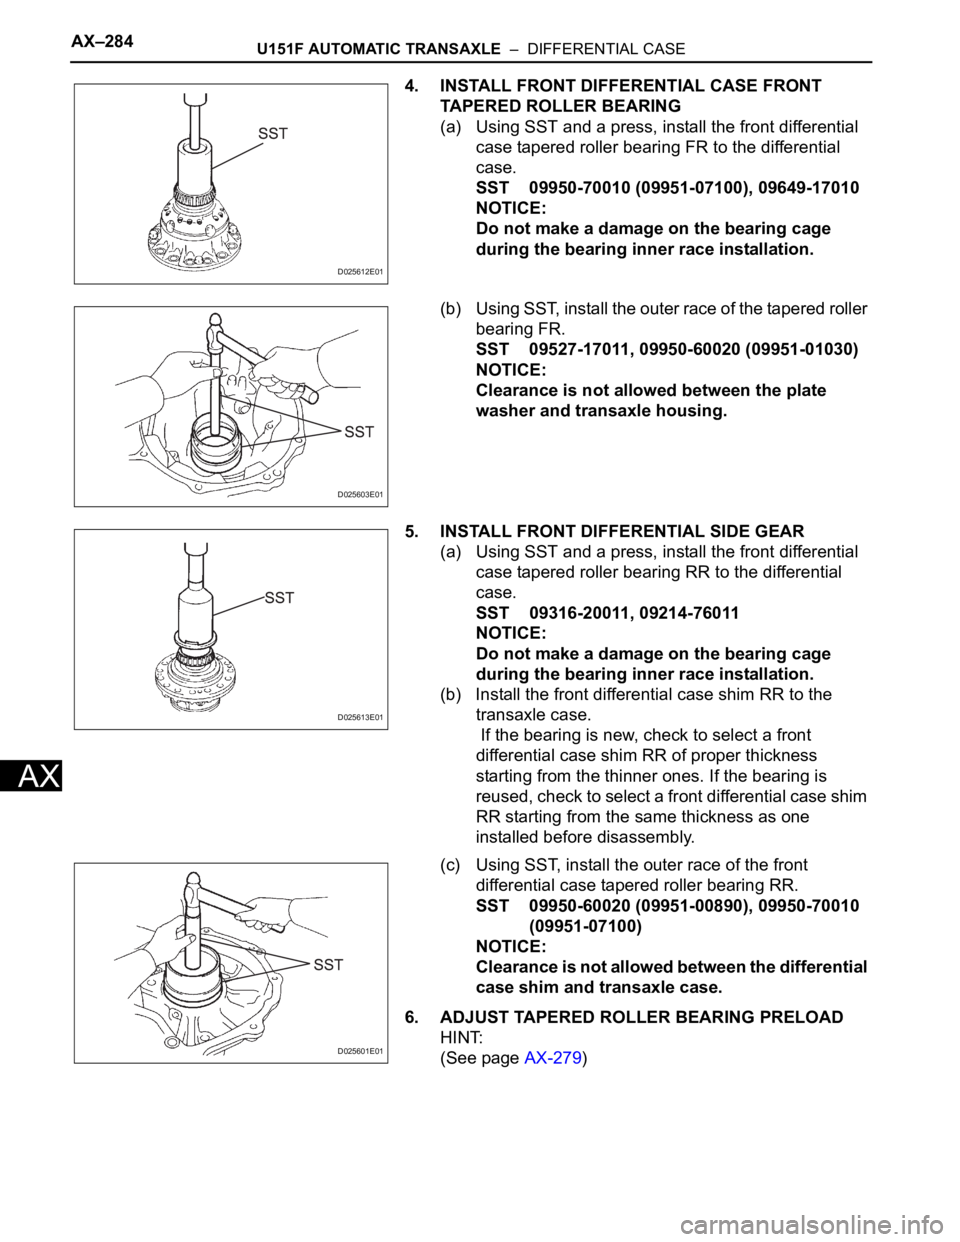
4. INSTALL FRONT DIFFERENTIAL CASE FRONT
TAPERED ROLLER BEARING
(a) Using SST and a press, install the front differential
case tapered roller bearing FR to the differential
case.
SST 09950-70010 (09951-07100), 09649-17010
NOTICE:
Do not make a damage on the bearing cage
during the bearing inner race installation.
(b) Using SST, install the outer race of the tapered roller
bearing FR.
SST 09527-17011, 09950-60020 (09951-01030)
NOTICE:
Clearance is not allowed between the plate
washer and transaxle housing.
5. INSTALL FRONT DIFFERENTIAL SIDE GEAR
(a) Using SST and a press, install the front differential
case tapered roller bearing RR to the differential
case.
SST 09316-20011, 09214-76011
NOTICE:
Do not make a damage on the bearing cage
during the bearing inner race installation.
(b) Install the front differential case shim RR to the
transaxle case.
If the bearing is new, check to select a front
differential case shim RR of proper thickness
starting from the thinner ones. If the bearing is
reused, check to select a front differential case shim
RR starting from the same thickness as one
installed before disassembly.
(c) Using SST, install the outer race of the front
differential case tapered roller bearing RR.
SST 09950-60020 (09951-00890), 09950-70010
(09951-07100)
NOTICE:
Clearance is not allowed between the differential
case shim and transaxle case.
6. ADJUST TAPERED ROLLER BEARING PRELOAD
HINT:
(See page AX-279)
D025612E01
D025603E01
D025613E01
D025601E01
Page 1970 of 3000
U151F AUTOMATIC TRANSAXLE – DIFFERENTIAL CASEAX–285
AX
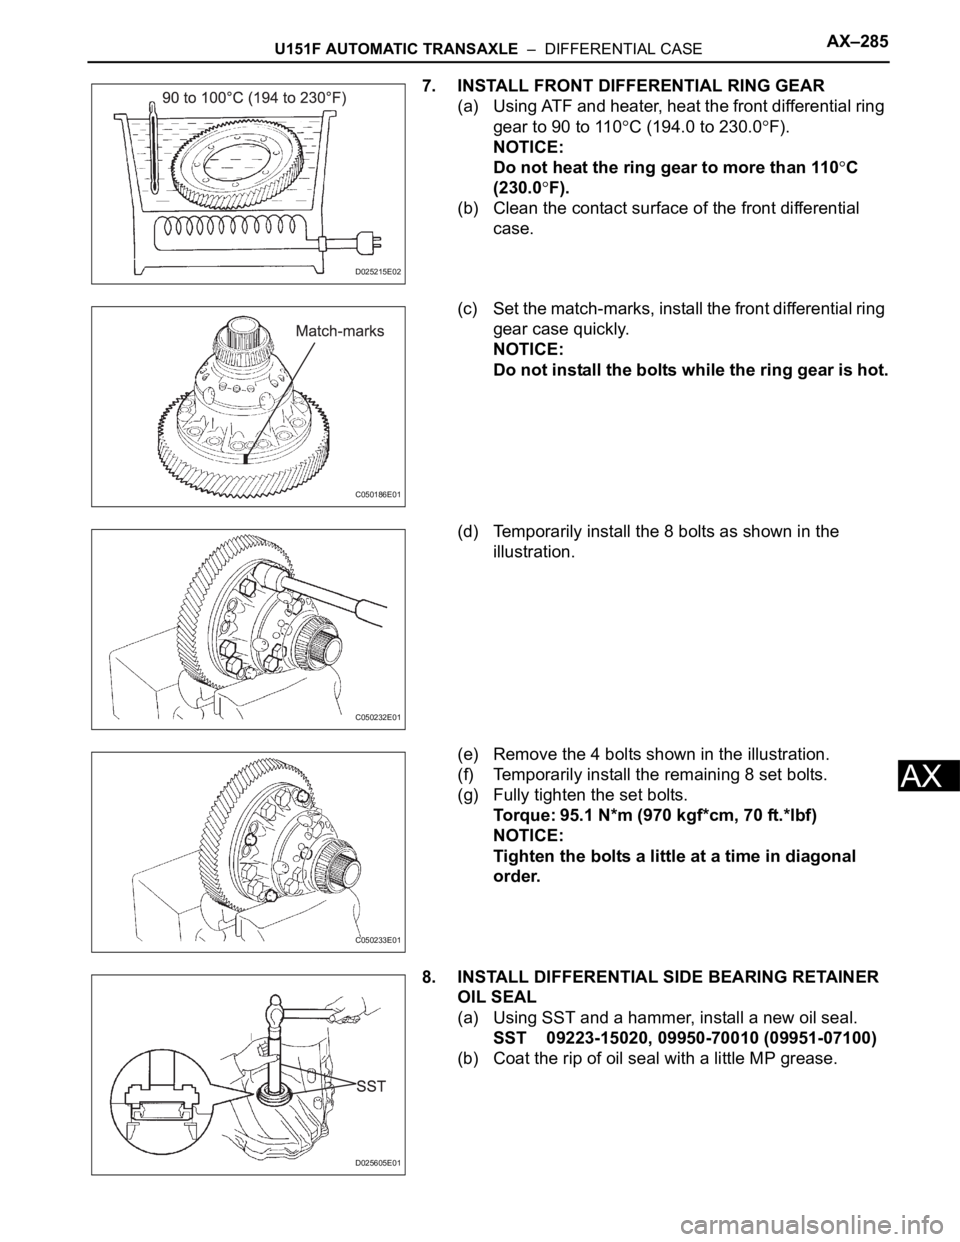
7. INSTALL FRONT DIFFERENTIAL RING GEAR
(a) Using ATF and heater, heat the front differential ring
gear to 90 to 110
C (194.0 to 230.0F).
NOTICE:
Do not heat the ring gear to more than 110
C
(230.0
F).
(b) Clean the contact surface of the front differential
case.
(c) Set the match-marks, install the front differential ring
gear case quickly.
NOTICE:
Do not install the bolts while the ring gear is hot.
(d) Temporarily install the 8 bolts as shown in the
illustration.
(e) Remove the 4 bolts shown in the illustration.
(f) Temporarily install the remaining 8 set bolts.
(g) Fully tighten the set bolts.
Torque: 95.1 N*m (970 kgf*cm, 70 ft.*lbf)
NOTICE:
Tighten the bolts a little at a time in diagonal
order.
8. INSTALL DIFFERENTIAL SIDE BEARING RETAINER
OIL SEAL
(a) Using SST and a hammer, install a new oil seal.
SST 09223-15020, 09950-70010 (09951-07100)
(b) Coat the rip of oil seal with a little MP grease.
D025215E02
C050186E01
C050232E01
C050233E01
D025605E01
Page 1971 of 3000
AX–286U151F AUTOMATIC TRANSAXLE – DIFFERENTIAL CASE
AX
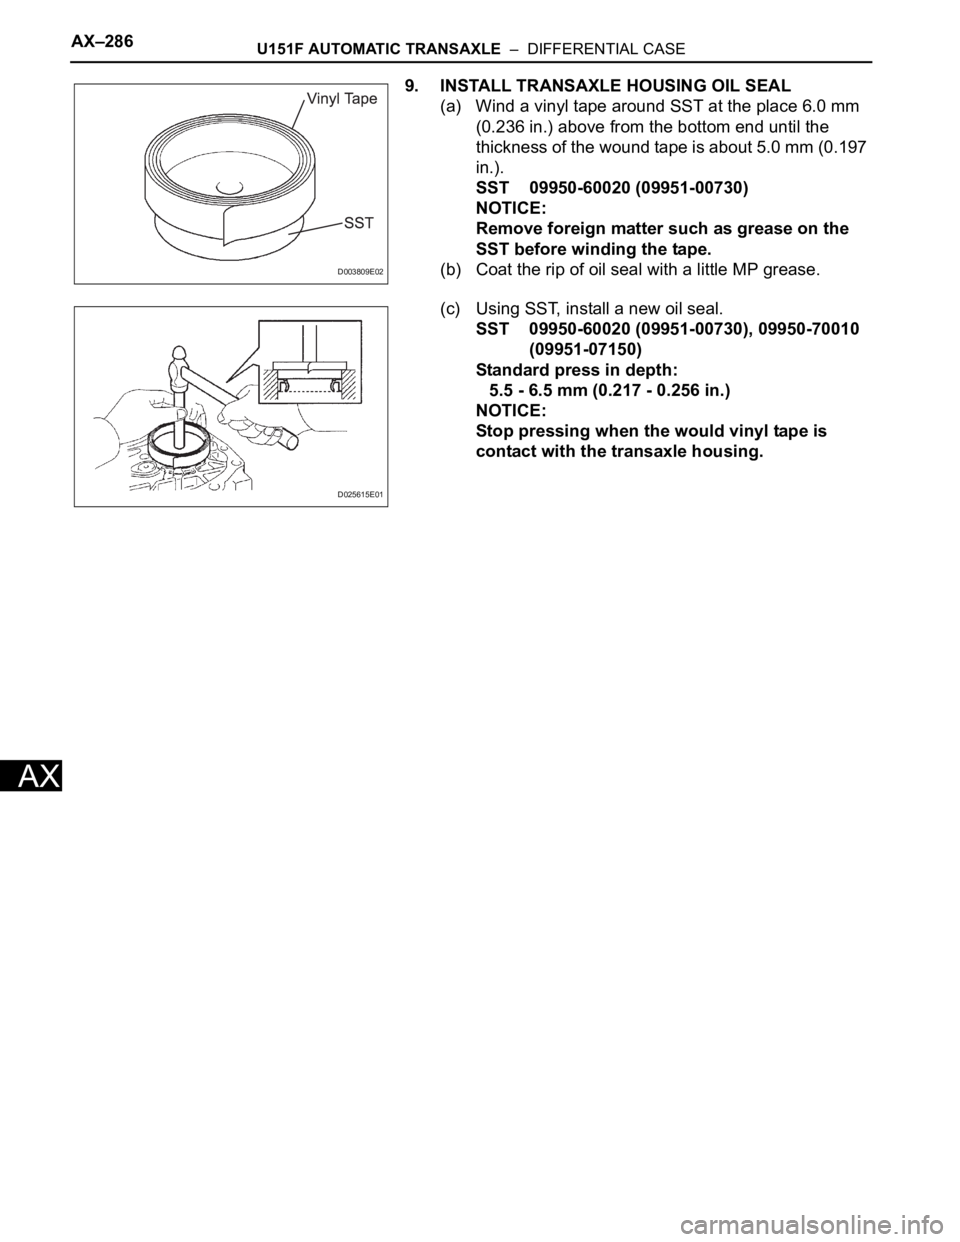
9. INSTALL TRANSAXLE HOUSING OIL SEAL
(a) Wind a vinyl tape around SST at the place 6.0 mm
(0.236 in.) above from the bottom end until the
thickness of the wound tape is about 5.0 mm (0.197
in.).
SST 09950-60020 (09951-00730)
NOTICE:
Remove foreign matter such as grease on the
SST before winding the tape.
(b) Coat the rip of oil seal with a little MP grease.
(c) Using SST, install a new oil seal.
SST 09950-60020 (09951-00730), 09950-70010
(09951-07150)
Standard press in depth:
5.5 - 6.5 mm (0.217 - 0.256 in.)
NOTICE:
Stop pressing when the would vinyl tape is
contact with the transaxle housing.
D003809E02
D025615E01
Page 1981 of 3000
U151F AUTOMATIC TRANSAXLE – UNDERDRIVE PLANETARY GEARAX–259
AX
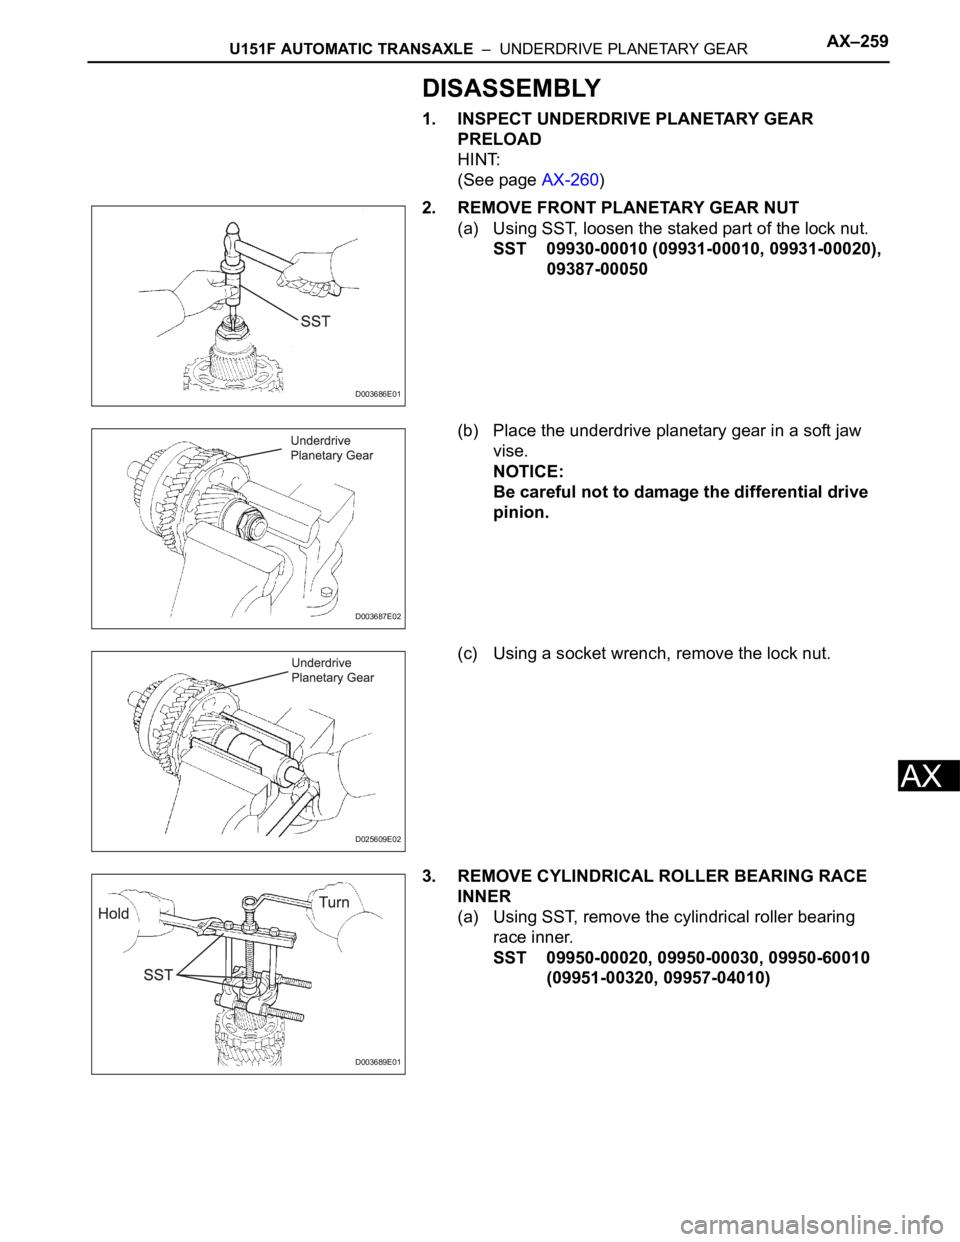
DISASSEMBLY
1. INSPECT UNDERDRIVE PLANETARY GEAR
PRELOAD
HINT:
(See page AX-260)
2. REMOVE FRONT PLANETARY GEAR NUT
(a) Using SST, loosen the staked part of the lock nut.
SST 09930-00010 (09931-00010, 09931-00020),
09387-00050
(b) Place the underdrive planetary gear in a soft jaw
vise.
NOTICE:
Be careful not to damage the differential drive
pinion.
(c) Using a socket wrench, remove the lock nut.
3. REMOVE CYLINDRICAL ROLLER BEARING RACE
INNER
(a) Using SST, remove the cylindrical roller bearing
race inner.
SST 09950-00020, 09950-00030, 09950-60010
(09951-00320, 09957-04010)
D003686E01
D003687E02
D025609E02
D003689E01
Page 1982 of 3000
AX–260U151F AUTOMATIC TRANSAXLE – UNDERDRIVE PLANETARY GEAR
AX
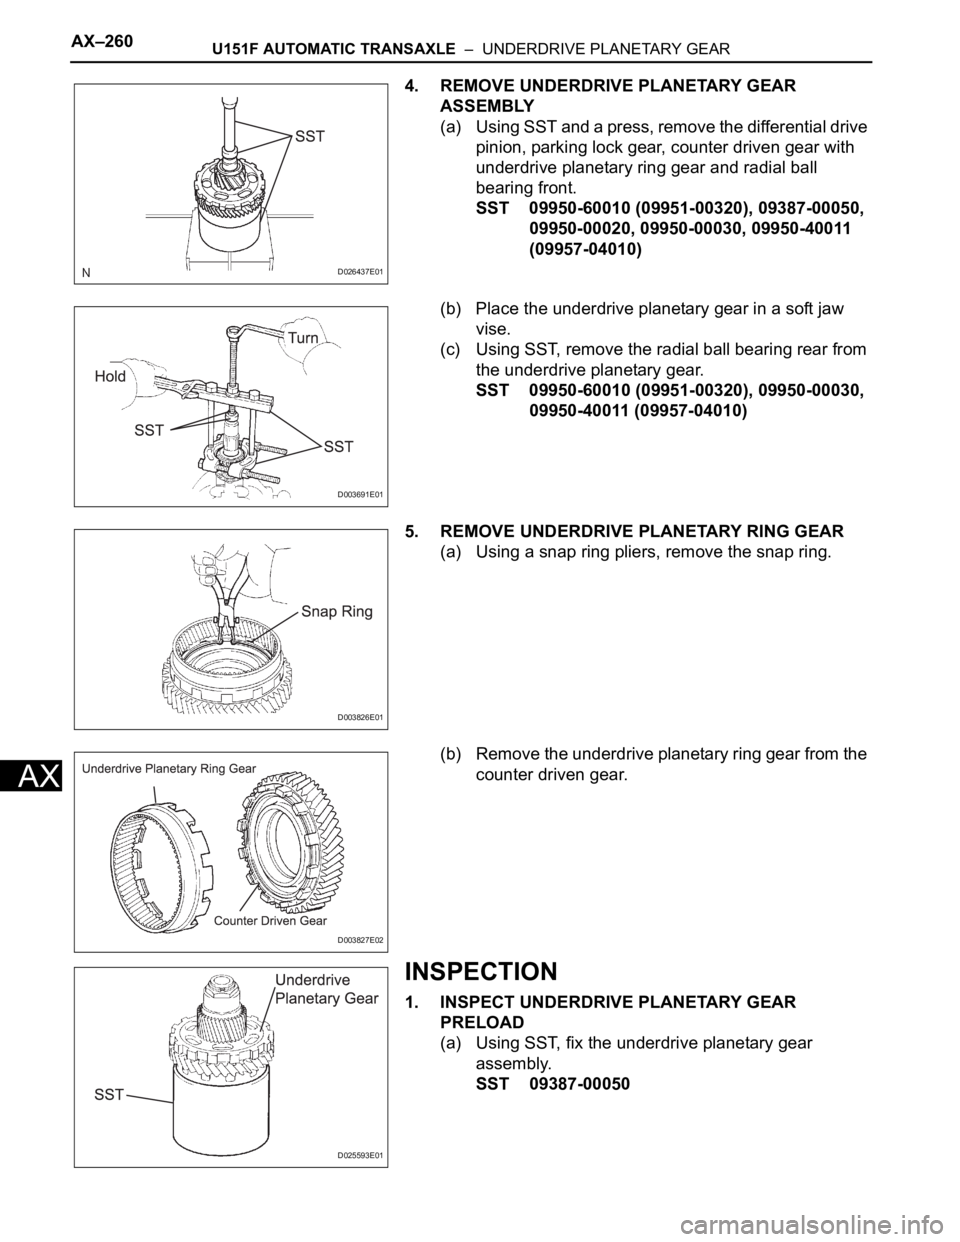
4. REMOVE UNDERDRIVE PLANETARY GEAR
ASSEMBLY
(a) Using SST and a press, remove the differential drive
pinion, parking lock gear, counter driven gear with
underdrive planetary ring gear and radial ball
bearing front.
SST 09950-60010 (09951-00320), 09387-00050,
09950-00020, 09950-00030, 09950-40011
(09957-04010)
(b) Place the underdrive planetary gear in a soft jaw
vise.
(c) Using SST, remove the radial ball bearing rear from
the underdrive planetary gear.
SST 09950-60010 (09951-00320), 09950-00030,
09950-40011 (09957-04010)
5. REMOVE UNDERDRIVE PLANETARY RING GEAR
(a) Using a snap ring pliers, remove the snap ring.
(b) Remove the underdrive planetary ring gear from the
counter driven gear.
INSPECTION
1. INSPECT UNDERDRIVE PLANETARY GEAR
PRELOAD
(a) Using SST, fix the underdrive planetary gear
assembly.
SST 09387-00050
D026437E01
D003691E01
D003826E01
D003827E02
D025593E01
Page 1985 of 3000
U151F AUTOMATIC TRANSAXLE – UNDERDRIVE PLANETARY GEARAX–263
AX
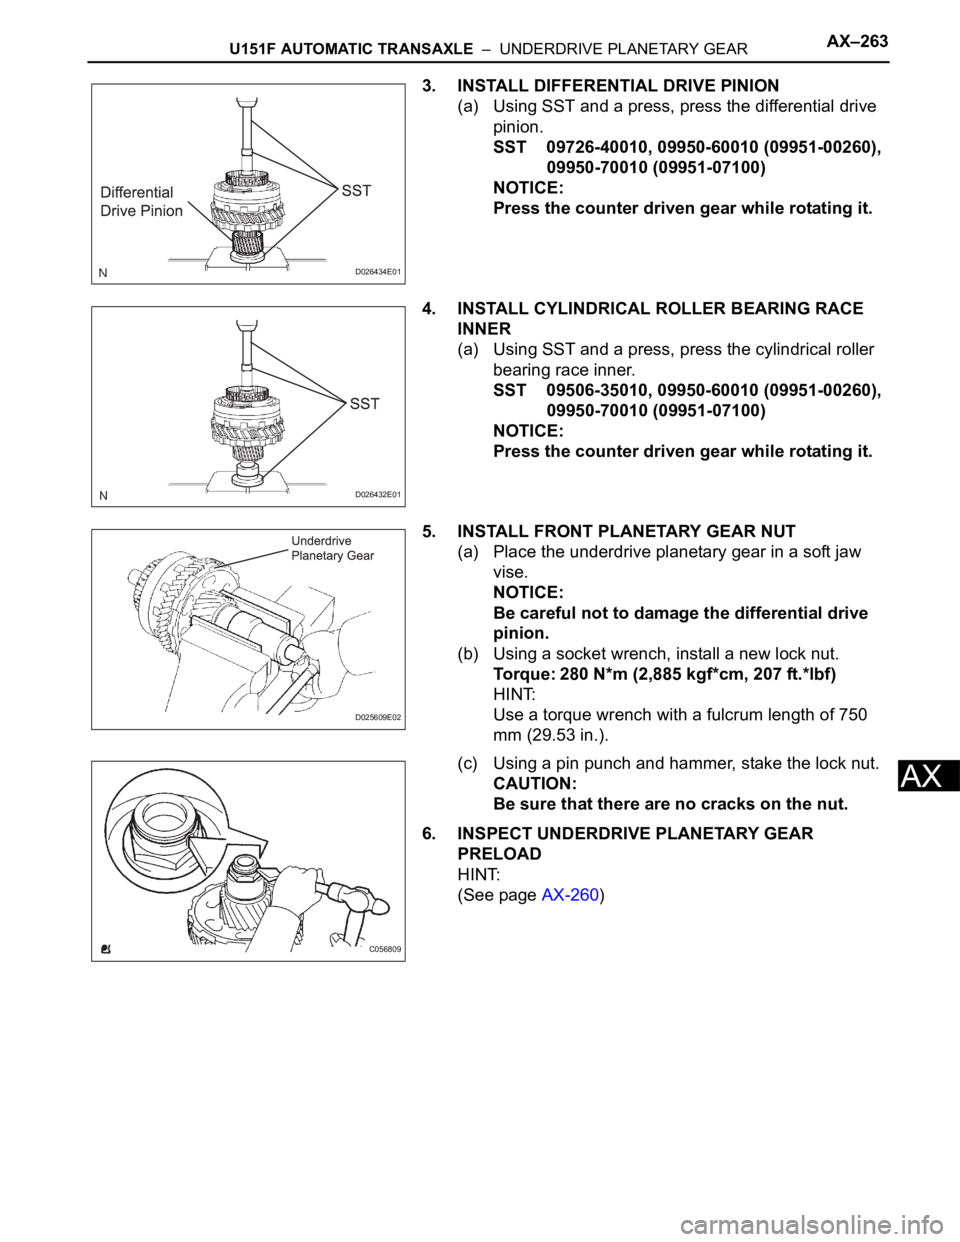
3. INSTALL DIFFERENTIAL DRIVE PINION
(a) Using SST and a press, press the differential drive
pinion.
SST 09726-40010, 09950-60010 (09951-00260),
09950-70010 (09951-07100)
NOTICE:
Press the counter driven gear while rotating it.
4. INSTALL CYLINDRICAL ROLLER BEARING RACE
INNER
(a) Using SST and a press, press the cylindrical roller
bearing race inner.
SST 09506-35010, 09950-60010 (09951-00260),
09950-70010 (09951-07100)
NOTICE:
Press the counter driven gear while rotating it.
5. INSTALL FRONT PLANETARY GEAR NUT
(a) Place the underdrive planetary gear in a soft jaw
vise.
NOTICE:
Be careful not to damage the differential drive
pinion.
(b) Using a socket wrench, install a new lock nut.
Torque: 280 N*m (2,885 kgf*cm, 207 ft.*lbf)
HINT:
Use a torque wrench with a fulcrum length of 750
mm (29.53 in.).
(c) Using a pin punch and hammer, stake the lock nut.
CAUTION:
Be sure that there are no cracks on the nut.
6. INSPECT UNDERDRIVE PLANETARY GEAR
PRELOAD
HINT:
(See page AX-260)
D026434E01
D026432E01
D025609E02
C056809