Position TOYOTA SIENNA 2007 Service Manual Online
[x] Cancel search | Manufacturer: TOYOTA, Model Year: 2007, Model line: SIENNA, Model: TOYOTA SIENNA 2007Pages: 3000, PDF Size: 52.26 MB
Page 414 of 3000
ES–1082GR-FE ENGINE CONTROL SYSTEM – SFI SYSTEM
ES
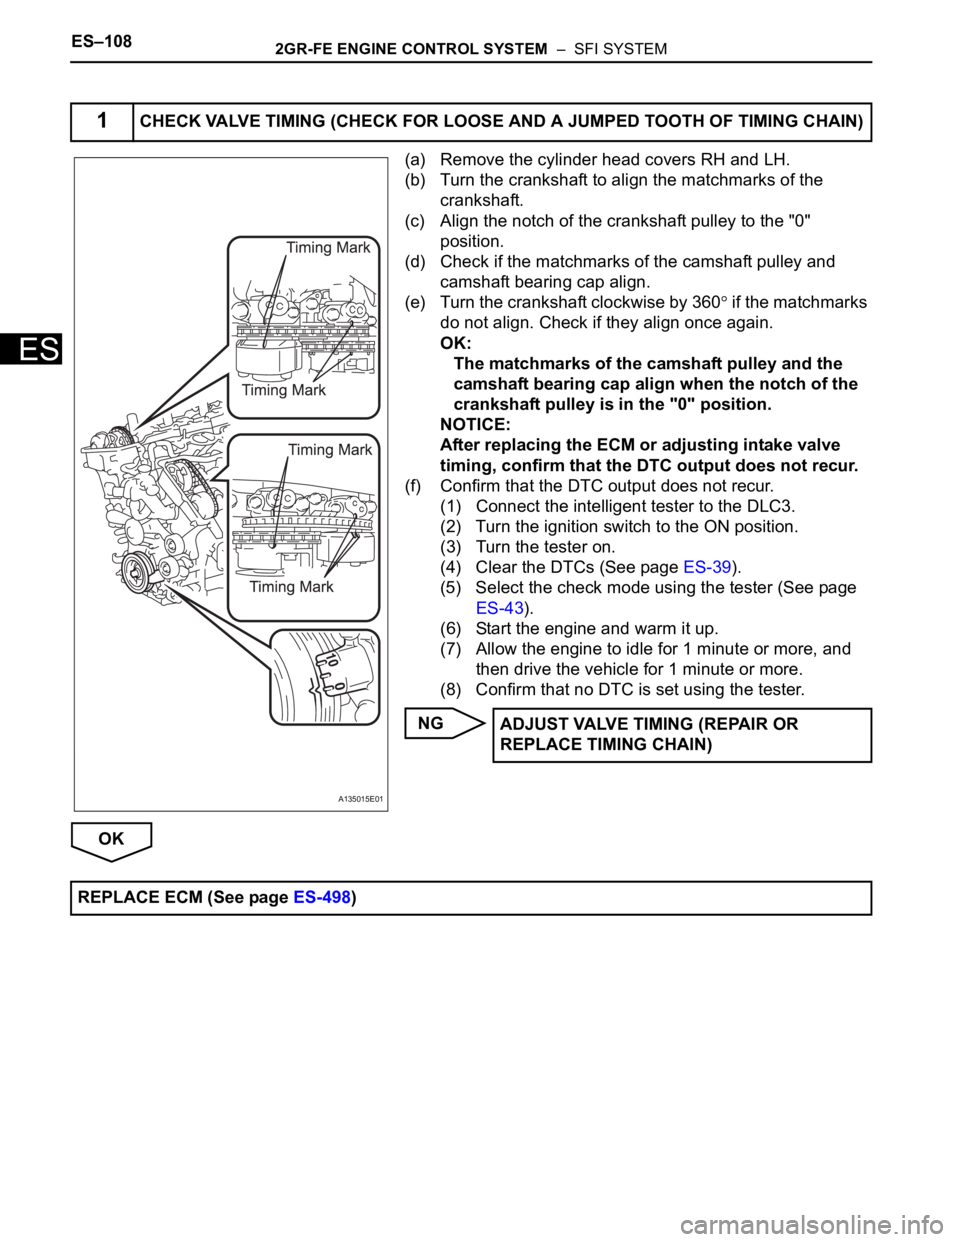
(a) Remove the cylinder head covers RH and LH.
(b) Turn the crankshaft to align the matchmarks of the
crankshaft.
(c) Align the notch of the crankshaft pulley to the "0"
position.
(d) Check if the matchmarks of the camshaft pulley and
camshaft bearing cap align.
(e) Turn the crankshaft clockwise by 360
if the matchmarks
do not align. Check if they align once again.
OK:
The matchmarks of the camshaft pulley and the
camshaft bearing cap align when the notch of the
crankshaft pulley is in the "0" position.
NOTICE:
After replacing the ECM or adjusting intake valve
timing, confirm that the DTC output does not recur.
(f) Confirm that the DTC output does not recur.
(1) Connect the intelligent tester to the DLC3.
(2) Turn the ignition switch to the ON position.
(3) Turn the tester on.
(4) Clear the DTCs (See page ES-39).
(5) Select the check mode using the tester (See page
ES-43).
(6) Start the engine and warm it up.
(7) Allow the engine to idle for 1 minute or more, and
then drive the vehicle for 1 minute or more.
(8) Confirm that no DTC is set using the tester.
NG
OK
1CHECK VALVE TIMING (CHECK FOR LOOSE AND A JUMPED TOOTH OF TIMING CHAIN)
A135015E01
ADJUST VALVE TIMING (REPAIR OR
REPLACE TIMING CHAIN)
REPLACE ECM (See page ES-498)
Page 418 of 3000

ES–1122GR-FE ENGINE CONTROL SYSTEM – SFI SYSTEM
ES
(a) Disconnect the A5 or A6 A/F sensor connector.
(b) Measure the resistance according to the value(s) in the
table below.
Standard resistance:
Bank 1
Bank 2
(c) Reconnect the A/F sensor connector.
Result
B
C
A
(a) Disconnect the A5 or A6 A/F sensor connector.
(b) Turn the ignition switch to the ON position.
(c) Measure the voltage according to the value(s) in the
table below.
Standard voltage
(d) Reconnect the A/F sensor connector.
OK
NG
1INSPECT AIR FUEL RATIO SENSOR (HEATER RESISTANCE)
A126269E35
Tester Connection Condition Specified Condition
HT (1) - +B (2) 20
C (68F) 1.8 to 3.4
HT (1) - AF- (4) Always 10 k or higher
Tester Connection Condition Specified Condition
HT (1) - +B (2) 20
C (68F) 1.8 to 3.4
HT (1) - AF- (4) Always 10 k or higher
Result Proceed to
OK A
NG (for 2WD model) B
NG (for 4WD model) C
REPLACE AIR FUEL RATIO SENSOR (See
page EC-19)
REPLACE AIR FUEL RATIO SENSOR (See
page EC-26)
2CHECK TERMINAL VOLTAGE (+B OF A/F SENSOR)
A076787E21
Tester Connection Specified Condition
+B (A5-2) - Body ground 9 to 14 V
+B (A6-2) - Body ground 9 to 14 V
Go to step 7
Page 421 of 3000
2GR-FE ENGINE CONTROL SYSTEM – SFI SYSTEMES–115
ES
OK
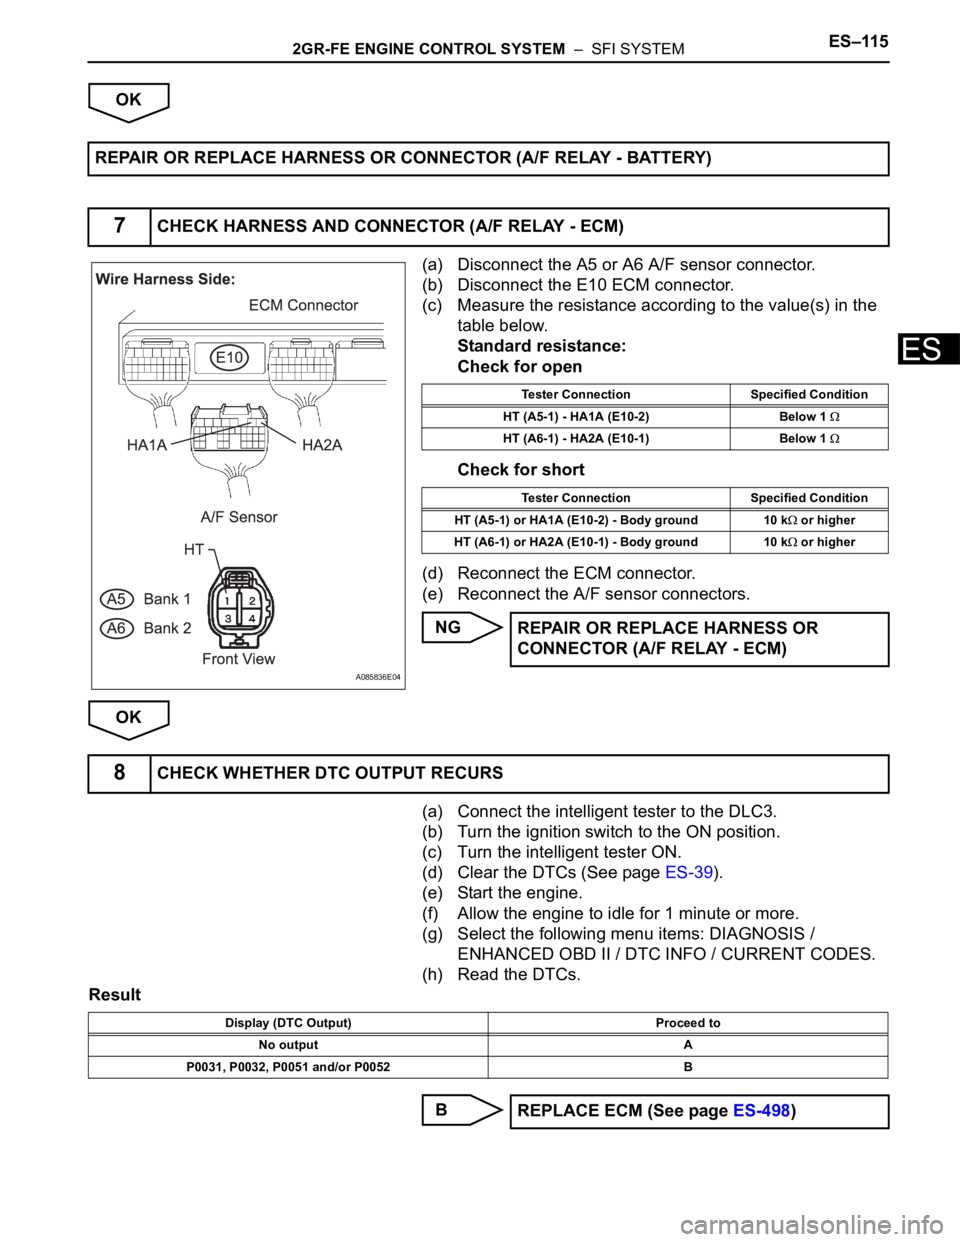
(a) Disconnect the A5 or A6 A/F sensor connector.
(b) Disconnect the E10 ECM connector.
(c) Measure the resistance according to the value(s) in the
table below.
Standard resistance:
Check for open
Check for short
(d) Reconnect the ECM connector.
(e) Reconnect the A/F sensor connectors.
NG
OK
(a) Connect the intelligent tester to the DLC3.
(b) Turn the ignition switch to the ON position.
(c) Turn the intelligent tester ON.
(d) Clear the DTCs (See page ES-39).
(e) Start the engine.
(f) Allow the engine to idle for 1 minute or more.
(g) Select the following menu items: DIAGNOSIS /
ENHANCED OBD II / DTC INFO / CURRENT CODES.
(h) Read the DTCs.
Result
B REPAIR OR REPLACE HARNESS OR CONNECTOR (A/F RELAY - BATTERY)
7CHECK HARNESS AND CONNECTOR (A/F RELAY - ECM)
A085836E04
Tester Connection Specified Condition
HT (A5-1) - HA1A (E10-2) Below 1
HT (A6-1) - HA2A (E10-1) Below 1
Tester Connection Specified Condition
HT (A5-1) or HA1A (E10-2) - Body ground 10 k
or higher
HT (A6-1) or HA2A (E10-1) - Body ground 10 k
or higher
REPAIR OR REPLACE HARNESS OR
CONNECTOR (A/F RELAY - ECM)
8CHECK WHETHER DTC OUTPUT RECURS
Display (DTC Output) Proceed to
No output A
P0031, P0032, P0051 and/or P0052 B
REPLACE ECM (See page ES-498)
Page 424 of 3000
ES–1182GR-FE ENGINE CONTROL SYSTEM – SFI SYSTEM
ES
HINT:
• Bank 1 refers to the bank that includes cylinder No. 1.
• Bank 2 refers to the bank that does not include cylinder No. 1.
• Sensor 1 refers to the sensor closest to the engine assembly.
• Sensor 2 refers to the sensor furthest away from the engine assembly.
MONITOR DESCRIPTION
The sensing position of the Heated Oxygen (HO2) sensor has a zirconia element which is used to detect
the oxygen concentration in the exhaust gas. If the zirconia element is at the appropriate temperature,
and the difference between the oxygen concentrations surrounding the inside and outside surfaces of the
sensor is large, the zirconia element generates voltage signals. In order to increase the oxygen
concentration detecting capacity of the zirconia element, the ECM supplements the heat from the exhaust
with heat from a heating element inside the sensor.
Heated oxygen sensor heater range check (P0037, P0038, P0057 and P0058):
The ECM monitors the current applied to the O2 sensor heater to check the heater for malfunctions. If the
current is below the threshold value, the ECM will determine that there is an open circuit in the heater. If
the current is above the threshold value, the ECM will determine that there is a short circuit in the heater.
Example:
The ECM sets DTC P0038 or P0058 when the current in the HO2 sensor heater is more than 2 A.
Conversely, when the heater current is less than 0.3 A, DTC P0037 or P0057 is set.
Heated oxygen sensor heater performance (P0141 and P0161):
After the accumulated heater ON time exceeds 100 seconds, the ECM calculates the heater resistance
using the battery voltage and the current applied to the heater. If the resistance is above the threshold
value, the ECM will determine that there is a malfunction in the HO2S heater and set DTC P0141 and
P0161.
MONITOR STRATEGY
DTC No. DTC Detection Condition Trouble Area
P0037
P0057Heated Oxygen (HO2) sensor heater current is less
than 0.3 A (1 trip detection logic)• Open in HO2 sensor heater circuit
• HO2 sensor heater
• EFI relay
•ECM
P0038
P0058Heated Oxygen (HO2) sensor heater current is more
than 2 A (1 trip detection logic)• Open in HO2 sensor heater circuit
• HO2 sensor heater
• EFI relay
•ECM
P0141
P0161Cumulative heater resistance correction value exceeds
the acceptable threshold (2 trip detection logic)• HO2 sensor
•ECM
Related DTCsP0037: Heated oxygen sensor heater (bank 1) open/short (Low electrical current)
P0038: Heated oxygen sensor heater (bank 1) open/short (High electrical current)
P0057: Heated oxygen sensor heater (bank 2) open/short (Low electrical current)
P0058: Heated oxygen sensor heater (bank 2) open/short (High electrical current)
P0141: Heated oxygen sensor heater performance (bank 1 sensor 2)
P0161: Heated oxygen sensor heater performance (bank 2 sensor 2)
Required Sensors / Components (Main) Heated oxygen sensor heater (bank 1 and 2)
Required Sensors / Components (Related) Vehicle speed sensor
Frequency of Operation Continuous
Duration0.5 seconds: P0037 and P0057
1 second: P0038 and P0058
10 seconds: P0141 and P0161
MIL OperationImmediate: P0037, P0038, P0057 and P0058
2 driving cycles: P0141 and P0161
Sequence of Operation None
Page 427 of 3000
2GR-FE ENGINE CONTROL SYSTEM – SFI SYSTEMES–121
ES
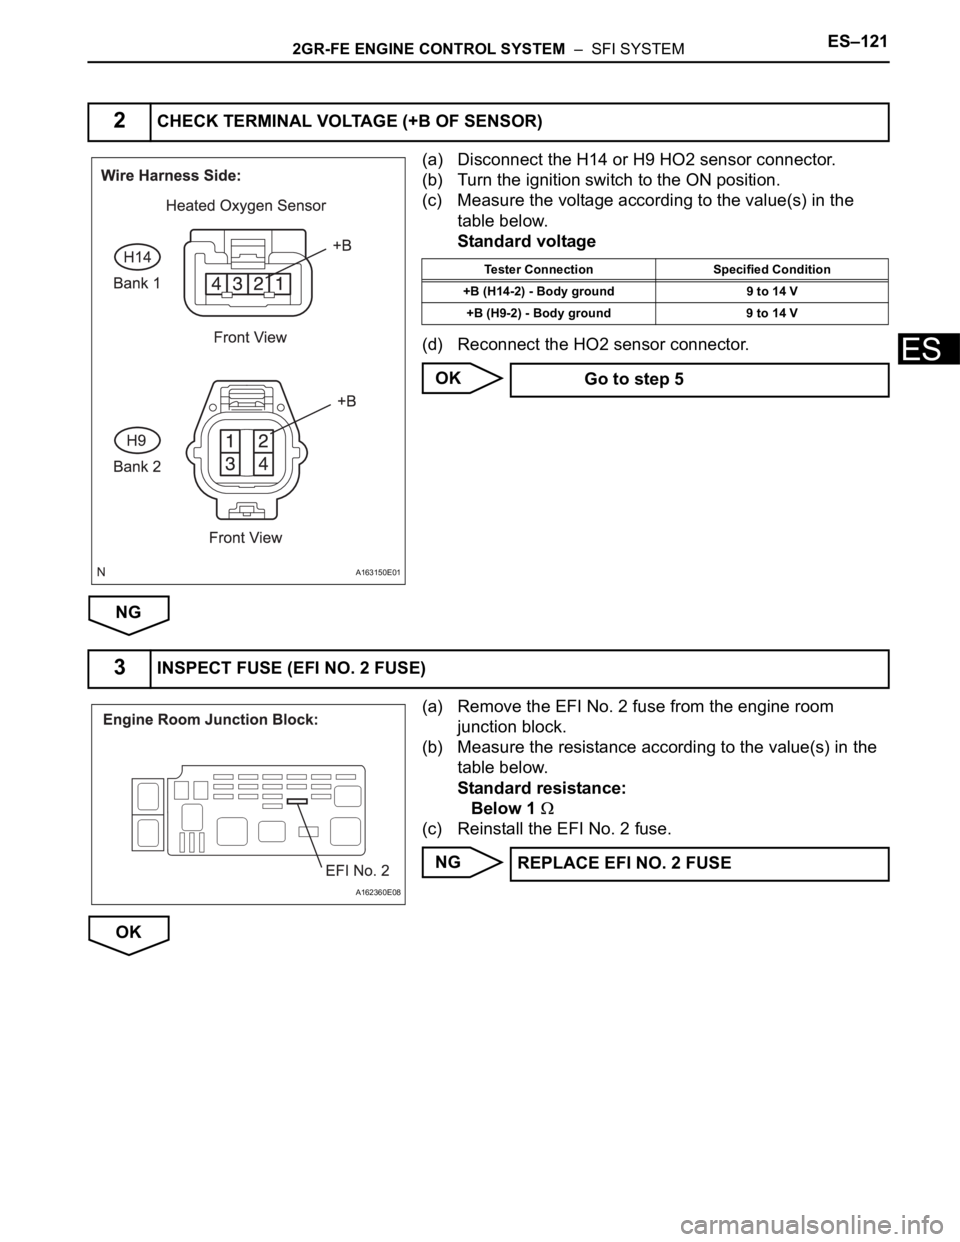
(a) Disconnect the H14 or H9 HO2 sensor connector.
(b) Turn the ignition switch to the ON position.
(c) Measure the voltage according to the value(s) in the
table below.
Standard voltage
(d) Reconnect the HO2 sensor connector.
OK
NG
(a) Remove the EFI No. 2 fuse from the engine room
junction block.
(b) Measure the resistance according to the value(s) in the
table below.
Standard resistance:
Below 1
(c) Reinstall the EFI No. 2 fuse.
NG
OK
2CHECK TERMINAL VOLTAGE (+B OF SENSOR)
A163150E01
Tester Connection Specified Condition
+B (H14-2) - Body ground 9 to 14 V
+B (H9-2) - Body ground 9 to 14 V
Go to step 5
3INSPECT FUSE (EFI NO. 2 FUSE)
A162360E08
REPLACE EFI NO. 2 FUSE
Page 429 of 3000
2GR-FE ENGINE CONTROL SYSTEM – SFI SYSTEMES–123
ES
OK
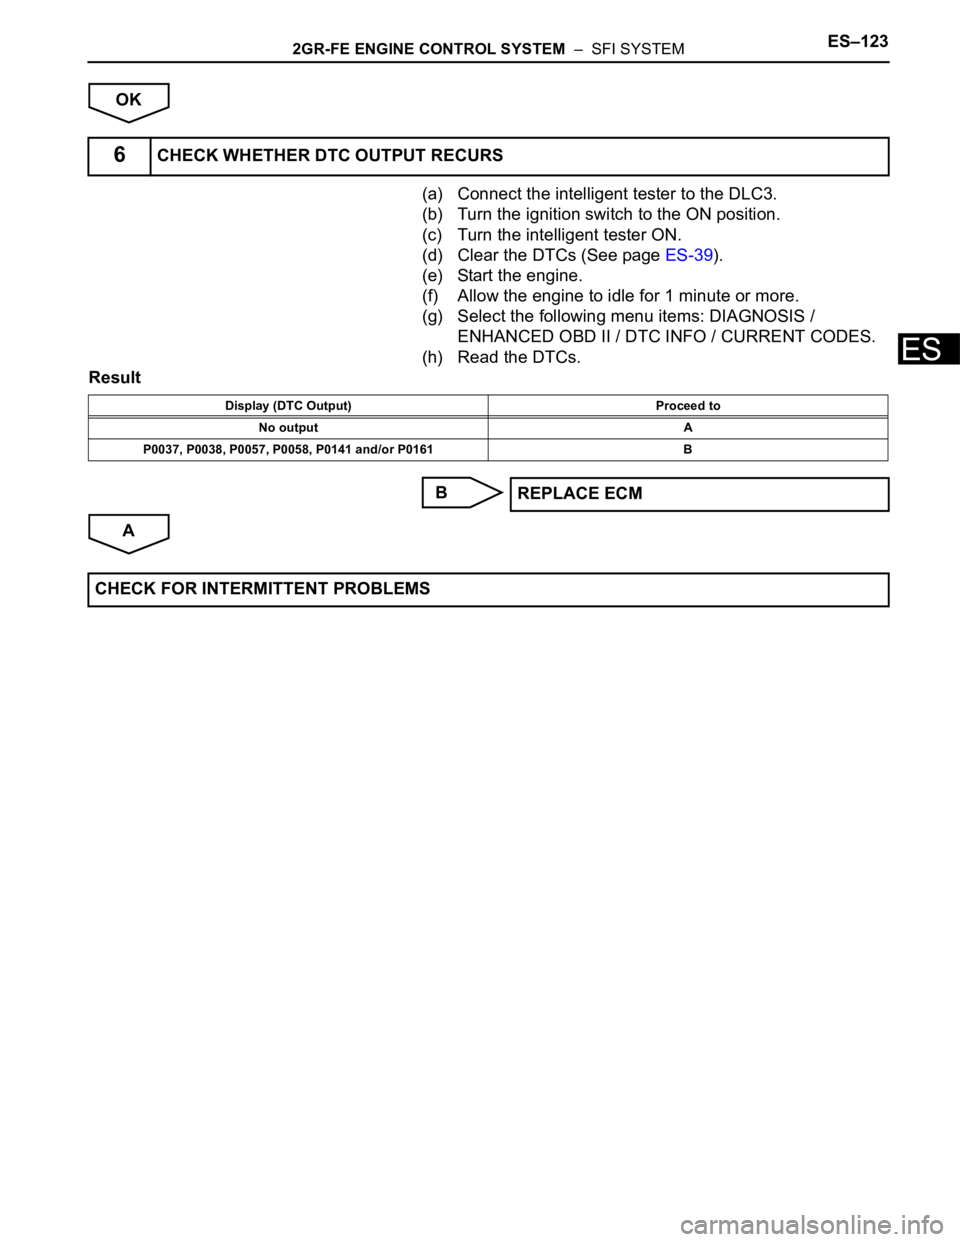
(a) Connect the intelligent tester to the DLC3.
(b) Turn the ignition switch to the ON position.
(c) Turn the intelligent tester ON.
(d) Clear the DTCs (See page ES-39).
(e) Start the engine.
(f) Allow the engine to idle for 1 minute or more.
(g) Select the following menu items: DIAGNOSIS /
ENHANCED OBD II / DTC INFO / CURRENT CODES.
(h) Read the DTCs.
Result
B
A
6CHECK WHETHER DTC OUTPUT RECURS
Display (DTC Output) Proceed to
No output A
P0037, P0038, P0057, P0058, P0141 and/or P0161 B
REPLACE ECM
CHECK FOR INTERMITTENT PROBLEMS
Page 430 of 3000
ES–1242GR-FE ENGINE CONTROL SYSTEM – SFI SYSTEM
ES
DESCRIPTION
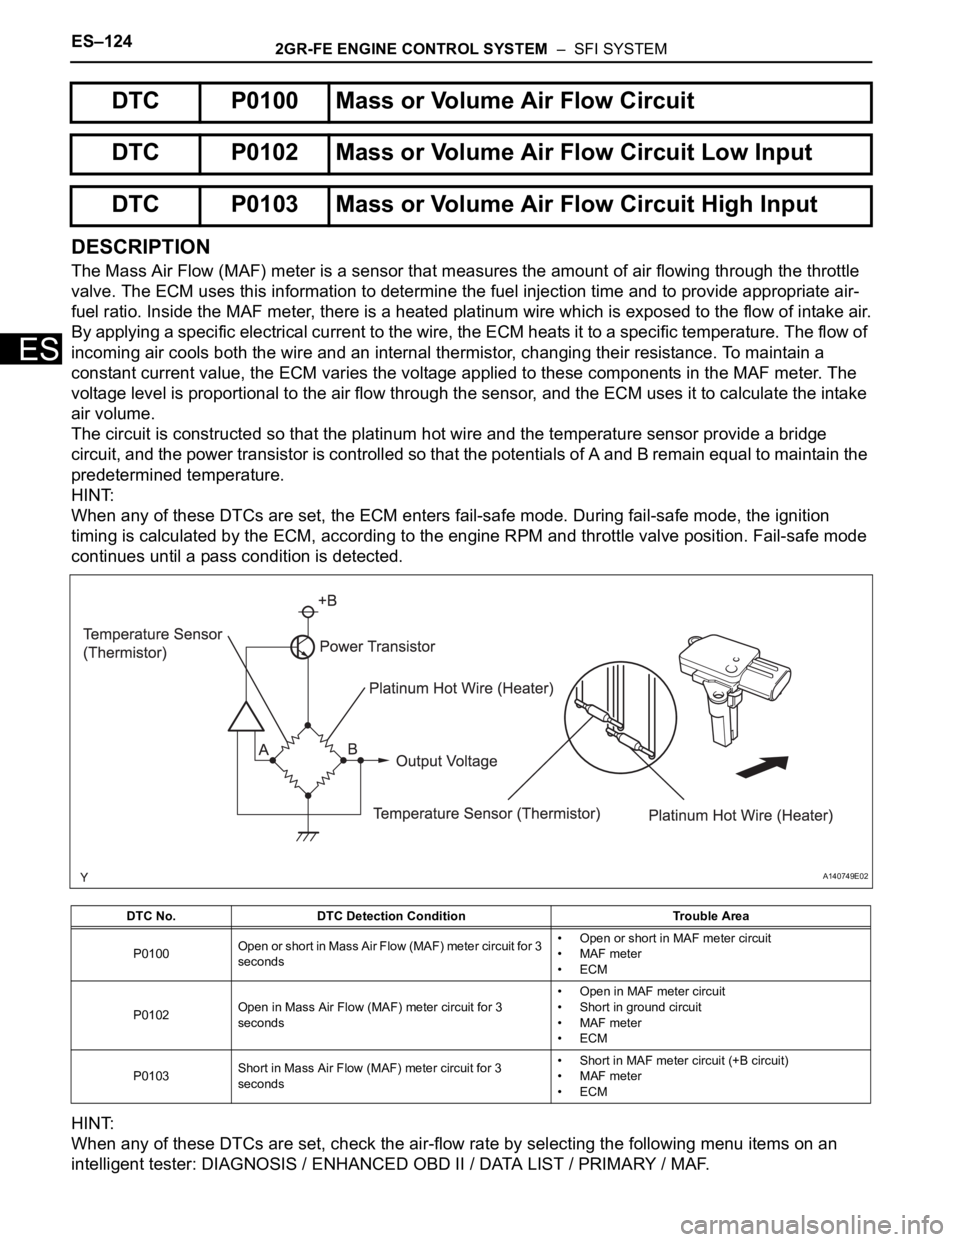
The Mass Air Flow (MAF) meter is a sensor that measures the amount of air flowing through the throttle
valve. The ECM uses this information to determine the fuel injection time and to provide appropriate air-
fuel ratio. Inside the MAF meter, there is a heated platinum wire which is exposed to the flow of intake air.
By applying a specific electrical current to the wire, the ECM heats it to a specific temperature. The flow of
incoming air cools both the wire and an internal thermistor, changing their resistance. To maintain a
constant current value, the ECM varies the voltage applied to these components in the MAF meter. The
voltage level is proportional to the air flow through the sensor, and the ECM uses it to calculate the intake
air volume.
The circuit is constructed so that the platinum hot wire and the temperature sensor provide a bridge
circuit, and the power transistor is controlled so that the potentials of A and B remain equal to maintain the
predetermined temperature.
HINT:
When any of these DTCs are set, the ECM enters fail-safe mode. During fail-safe mode, the ignition
timing is calculated by the ECM, according to the engine RPM and throttle valve position. Fail-safe mode
continues until a pass condition is detected.
HINT:
When any of these DTCs are set, check the air-flow rate by selecting the following menu items on an
intelligent tester: DIAGNOSIS / ENHANCED OBD II / DATA LIST / PRIMARY / MAF.
DTC P0100 Mass or Volume Air Flow Circuit
DTC P0102 Mass or Volume Air Flow Circuit Low Input
DTC P0103 Mass or Volume Air Flow Circuit High Input
DTC No. DTC Detection Condition Trouble Area
P0100Open or short in Mass Air Flow (MAF) meter circuit for 3
seconds• Open or short in MAF meter circuit
• MAF meter
•ECM
P0102Open in Mass Air Flow (MAF) meter circuit for 3
seconds• Open in MAF meter circuit
• Short in ground circuit
• MAF meter
•ECM
P0103Short in Mass Air Flow (MAF) meter circuit for 3
seconds• Short in MAF meter circuit (+B circuit)
• MAF meter
•ECM
A140749E02
Page 431 of 3000

2GR-FE ENGINE CONTROL SYSTEM – SFI SYSTEMES–125
ES
MONITOR DESCRIPTION
If there is a defect in the MAF meter or an open or short circuit, the voltage level deviates from the normal
operating range. The ECM interprets this deviation as a malfunction in the MAF meter and sets a DTC.
Example:
When the sensor voltage output remains less than 0.2 V, or more than 4.9 V, for more than 3 seconds, the
ECM sets a DTC.
If the malfunction is not repaired successfully, a DTC is set 3 seconds after the engine is next started.
MONITOR STRATEGY
TYPICAL ENABLING CONDITIONS
TYPICAL MALFUNCTION THRESHOLDS
P0100:
P0102:
P0103:
COMPONENT OPERATING RANGE
Mass Air Flow Rate (gm/s) Malfunctions
Approximately 0.0• Open in Mass Air Flow (MAF) meter power source circuit
• Open or short in VG circuit
271.0 or more Open in E2G circuit
Related DTCsP0100: Mass air flow meter range check (Fluctuating)
P0102: Mass air flow meter range check (Low voltage)
P0103: Mass air flow meter range check (High voltage)
Required Sensors / Components (Main) MAF meter
Required Sensors / Components (Related) Crankshaft position sensor
Frequency of Operation Continuous
Duration 3 seconds
MIL OperationImmediate: Engine RPM less than 4000 rpm
2 driving cycles: Engine RPM 4000 rpm or more
Sequence of Operation None
The monitor will run whenever these DTCs are not
presentNone
Mass air flow meter voltage Less than 0.2 V, or more than 4.9 V
Mass air flow meter voltage Less than 0.2 V
Mass air flow meter voltage More than 4.9 V
Mass air flow meter voltage Between 0.4 V and 2.2 V
Page 433 of 3000

2GR-FE ENGINE CONTROL SYSTEM – SFI SYSTEMES–127
ES
Result
*1: The value must be changed when the throttle valve is
open or closed.
B
C
A
(a) Disconnect the M6 Mass Air Flow (MAF) meter
connector.
(b) Turn the ignition switch to the ON position.
(c) Measure the voltage according to the value(s) in the
table below.
Standard voltage
(d) Reconnect the MAF meter connector.
NG
OK
(a) Start the engine.
(b) Measure the voltage between the terminals of the E9
ECM connector.
HINT:
The transmission gear selector lever should be in the P
or N position and the A/C switch should be turned off.
Standard voltage
OK
NG
Mass Air Flow Rate (gm/s) Proceed to
0.0 A
271.0 or more B
Between 1.0 and 270.0 (*1) C
Go to step 6
CHECK FOR INTERMITTENT PROBLEMS
2INSPECT MASS AIR FLOW METER (POWER SOURCE VOLTAGE)
A127724E33
Tester Connection Specified Condition
+B (M6-3) - Body ground 9 to 14 V
Go to step 5
3INSPECT ECM (VG VOLTAGE)
A162489E01
Tester Connection Condition Specified Condition
VG (E9-30) - E2G (E9-
29)Engine idling 0.5 to 3.0 V
REPLACE ECM (See page ES-498)
Page 436 of 3000
ES–1302GR-FE ENGINE CONTROL SYSTEM – SFI SYSTEM
ES
DESCRIPTION
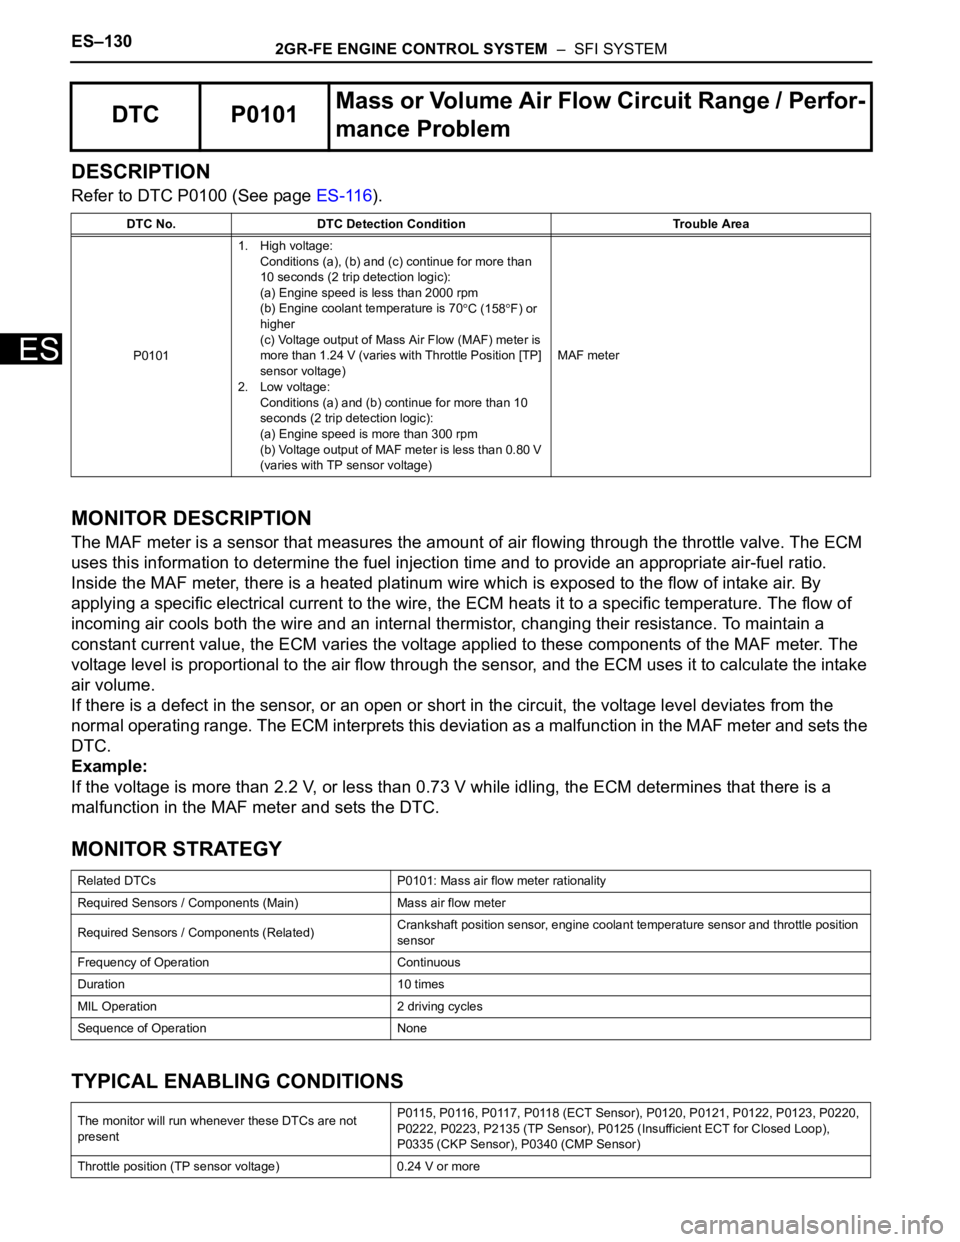
Refer to DTC P0100 (See page ES-116).
MONITOR DESCRIPTION
The MAF meter is a sensor that measures the amount of air flowing through the throttle valve. The ECM
uses this information to determine the fuel injection time and to provide an appropriate air-fuel ratio.
Inside the MAF meter, there is a heated platinum wire which is exposed to the flow of intake air. By
applying a specific electrical current to the wire, the ECM heats it to a specific temperature. The flow of
incoming air cools both the wire and an internal thermistor, changing their resistance. To maintain a
constant current value, the ECM varies the voltage applied to these components of the MAF meter. The
voltage level is proportional to the air flow through the sensor, and the ECM uses it to calculate the intake
air volume.
If there is a defect in the sensor, or an open or short in the circuit, the voltage level deviates from the
normal operating range. The ECM interprets this deviation as a malfunction in the MAF meter and sets the
DTC.
Example:
If the voltage is more than 2.2 V, or less than 0.73 V while idling, the ECM determines that there is a
malfunction in the MAF meter and sets the DTC.
MONITOR STRATEGY
TYPICAL ENABLING CONDITIONS
DTC P0101Mass or Volume Air Flow Circuit Range / Perfor-
mance Problem
DTC No. DTC Detection Condition Trouble Area
P01011. High voltage:
Conditions (a), (b) and (c) continue for more than
10 seconds (2 trip detection logic):
(a) Engine speed is less than 2000 rpm
(b) Engine coolant temperature is 70
C (158F) or
higher
(c) Voltage output of Mass Air Flow (MAF) meter is
more than 1.24 V (varies with Throttle Position [TP]
sensor voltage)
2. Low voltage:
Conditions (a) and (b) continue for more than 10
seconds (2 trip detection logic):
(a) Engine speed is more than 300 rpm
(b) Voltage output of MAF meter is less than 0.80 V
(varies with TP sensor voltage)MAF meter
Related DTCs P0101: Mass air flow meter rationality
Required Sensors / Components (Main) Mass air flow meter
Required Sensors / Components (Related)Crankshaft position sensor, engine coolant temperature sensor and throttle position
sensor
Frequency of Operation Continuous
Duration 10 times
MIL Operation 2 driving cycles
Sequence of Operation None
The monitor will run whenever these DTCs are not
presentP0115, P0116, P0117, P0118 (ECT Sensor), P0120, P0121, P0122, P0123, P0220,
P0222, P0223, P2135 (TP Sensor), P0125 (Insufficient ECT for Closed Loop),
P0335 (CKP Sensor), P0340 (CMP Sensor)
Throttle position (TP sensor voltage) 0.24 V or more