brake TOYOTA SIENNA 2007 Service Manual Online
[x] Cancel search | Manufacturer: TOYOTA, Model Year: 2007, Model line: SIENNA, Model: TOYOTA SIENNA 2007Pages: 3000, PDF Size: 52.26 MB
Page 1575 of 3000
AX–196U151E AUTOMATIC TRANSAXLE – AUTOMATIC TRANSAXLE UNIT
AX
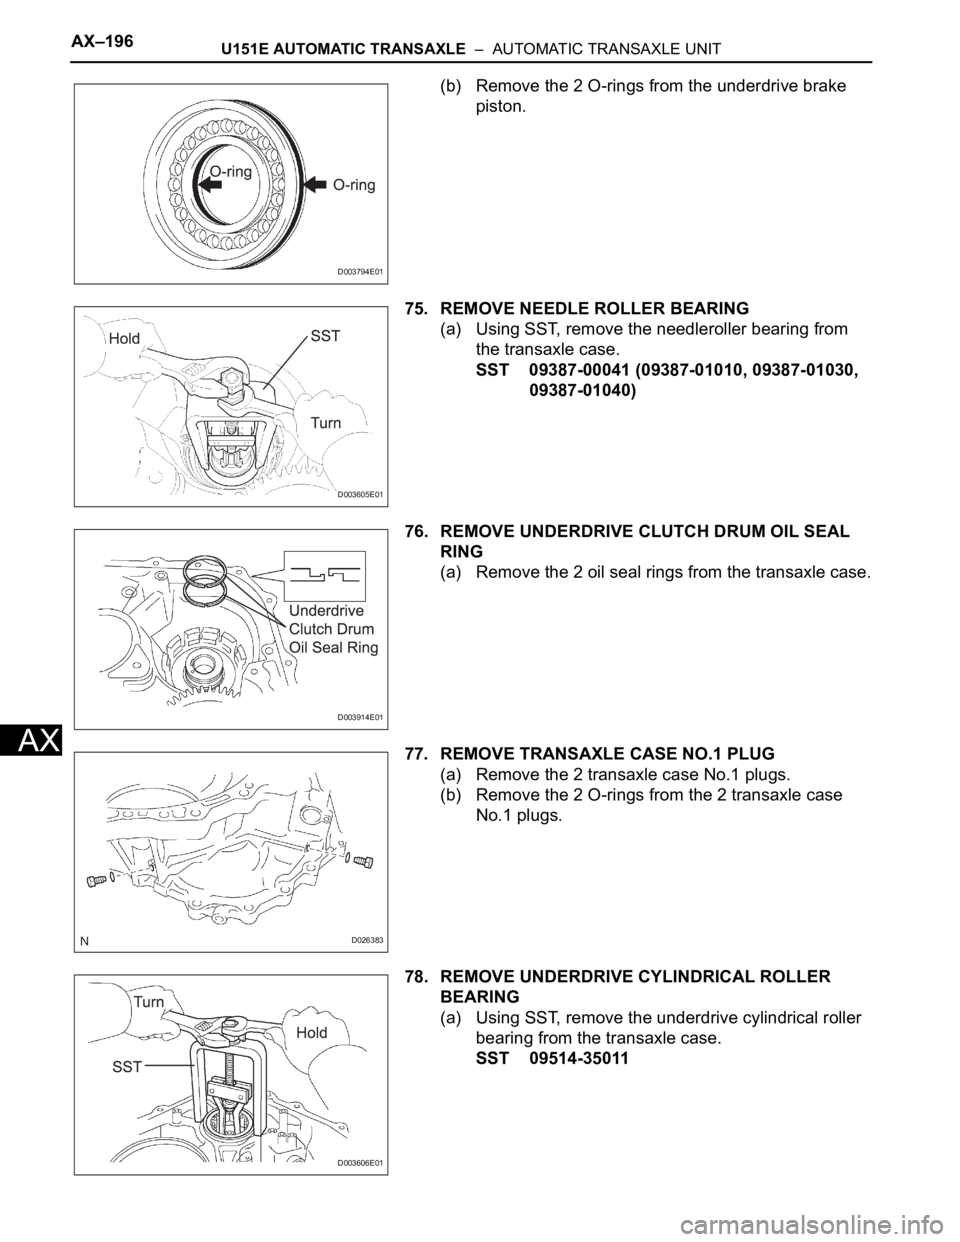
(b) Remove the 2 O-rings from the underdrive brake
piston.
75. REMOVE NEEDLE ROLLER BEARING
(a) Using SST, remove the needleroller bearing from
the transaxle case.
SST 09387-00041 (09387-01010, 09387-01030,
09387-01040)
76. REMOVE UNDERDRIVE CLUTCH DRUM OIL SEAL
RING
(a) Remove the 2 oil seal rings from the transaxle case.
77. REMOVE TRANSAXLE CASE NO.1 PLUG
(a) Remove the 2 transaxle case No.1 plugs.
(b) Remove the 2 O-rings from the 2 transaxle case
No.1 plugs.
78. REMOVE UNDERDRIVE CYLINDRICAL ROLLER
BEARING
(a) Using SST, remove the underdrive cylindrical roller
bearing from the transaxle case.
SST 09514-35011
D003794E01
D003605E01
D003914E01
D026383
D003606E01
Page 1577 of 3000

AX–198U151E AUTOMATIC TRANSAXLE – AUTOMATIC TRANSAXLE UNIT
AX
3. INSPECT OVERDRIVE DIRECT CLUTCH DRUM SUB-
ASSEMBLY
(a) Using a dial indicator, measure the inside diameter
of the forward clutch hub bushing.
Standard inside diameter:
23.025 to 23.046 mm (0.9065 to 0.9073 in.)
Maximum inside diameter:
23.09 mm (0.9091 in.)
NOTICE:
Check the contact surface of the bushing in the
direct clutch shaft. If any scratch or
discoloration is found, replace the direct clutch
sub-assembly with a new one.
If the inside diameter is greater than the maximum,
replace the forward clutch hub with a new one.
4. INSPECT 2ND BRAKE CLUTCH DISC
(a) Check if the sliding surface of the disc, plate and
flange are worn or burnt.
If necessary, replace them.
NOTICE:
• If the lining of the disc comes off or discolors,
or if a part of the groove is worn, replace all
discs.
• Before installing new discs, immerse them in
ATF for at least 15 minutes.
5. INSPECT 1ST AND REVERSE BRAKE CLUTCH DISC
(a) Check if the sliding surface of the disc, plate and
flange are worn or burnt.
If necessary, replace them.
NOTICE:
• If the lining of the disc comes off or discolors,
or if a part of the groove is worn, replace all
discs.
• Before installing new discs, immerse them in
ATF for at least 15 minutes.
6. INSPECT 1ST AND REVERSE BRAKE RETURN
SPRING SUB-ASSEMBLY
(a) Using a vernier calipers, measure the free length of
the spring together with the spring seat.
Standard free length:
17.61 mm (0.6933 in.)
HINT:
If the result is not as specified, replace the spring.
D003829E01
D026717
D009189
D030852E07
Page 1578 of 3000

U151E AUTOMATIC TRANSAXLE – AUTOMATIC TRANSAXLE UNITAX–199
AX
7. INSPECT UNDERDRIVE BRAKE RETURN SPRING
SUB-ASSEMBLY
(a) Using a vernier calipers, measure the free length of
the spring together with the spring seat.
Standard free length:
13.24 mm (0.5213 in.)
HINT:
If the result is not as specified, replace the spring.
8. INSPECT PACK CLEARANCE OF 1ST AND
REVERSE BRAKE
(a) Using vernier calipers, measure the distance
between the disc surface and the contact surface of
the 2nd brake cylinder and transaxle case
(Dimension A).
(b) Select an appropriate flange so that the pack
clearance will meet the specified value.
Pack clearance:
1.16 to 1.35 mm (0.0457 to 0.0531 in.)
HINT:
Piston stroke = Dimension A - Flange thickness
Flange thickness: mm (in.)
(c) Install the flange.
9. INSPECT PACK CLEARANCE OF 2ND BRAKE
(a) Using a vernier calipers, measure the distance
between the disc surface and snap ring surface
(Dimension B).
(b) Select an appropriate flange so that the pack
clearance will meet the specified value.
Pack clearance:
0.62 to 0.91 mm (0.0244 to 0.0358 in.)
HINT:
Piston stroke = Dimension B - Flange thickness -
Snap ring thickness 1.6 mm (0.063 in.)
Flange thickness: mm (in.)
D030852E01
D026452E01
Mark Thickness Mark Thickness
1 1.8 (0.071) 5 2.2 (0.087)
2 1.9 (0.075) 6 2.3 (0.091)
3 2.0 (0.079) 7 2.4 (0.094)
4 2.1 (0.083) 8 2.5 (0.098)
D026453E01
Mark Thickness Mark Thickness
1 3.0 (0.118) 5 3.4 (0.134)
2 3.1 (0.122) 6 3.5 (0.138)
3 3.2 (0.126) 7 3.6 (0.142)
4 3.3 (0.130) 8 -
Page 1579 of 3000

AX–200U151E AUTOMATIC TRANSAXLE – AUTOMATIC TRANSAXLE UNIT
AX
10. INSPECT PACK CLEARANCE OF UNDERDRIVE
BRAKE
(a) Using a dial indicator, measure the underdrive brake
pack clearance while applying and releasing
compressed air (392 kPa, 4.0 kgf/cm
2, 57 psi).
Pack clearance:
1.81 to 2.20 mm (0.0713 to 0.0866 in.)
HINT:
Select an appropriate flange from the table below so
that it will meet the specified value.
Flange thickness: mm (in.)
(b) Temporarily remove the snap ring and attach it to
the flange.
(c) Reinstall the snap ring.
11. INSPECT UNDERDRIVE 1-WAY CLUTCH ASSEMBLY
(a) Install the underdrive clutch assembly to the 1-way
clutch.
(b) Rotate the underdrive 1-way clutch assembly to
check the rotating direction for the lock or free
operation.
HINT:
If the result is not as specified, replace the
underdrive 1-way clutch.
12. INSPECT INPUT SHAFT END PLAY
(a) Using a dial indicator, measure the input shaft end
play.
End play:
0.262 to 1.244 mm (0.01 to 0.049 in.)
HINT:
If the result is not as specified, replace the input
shaft or thrust needle roller bearing.
D008082
Mark Thickness Mark Thickness
1 3.0 (0.118) 4 3.1 (0.122)
2 3.2 (0.126) 5 3.3 (0.130)
3 3.4 (0.134) - -
D003925E01
D008091
Page 1589 of 3000
U151E AUTOMATIC TRANSAXLE – AUTOMATIC TRANSAXLE UNITAX–203
AX
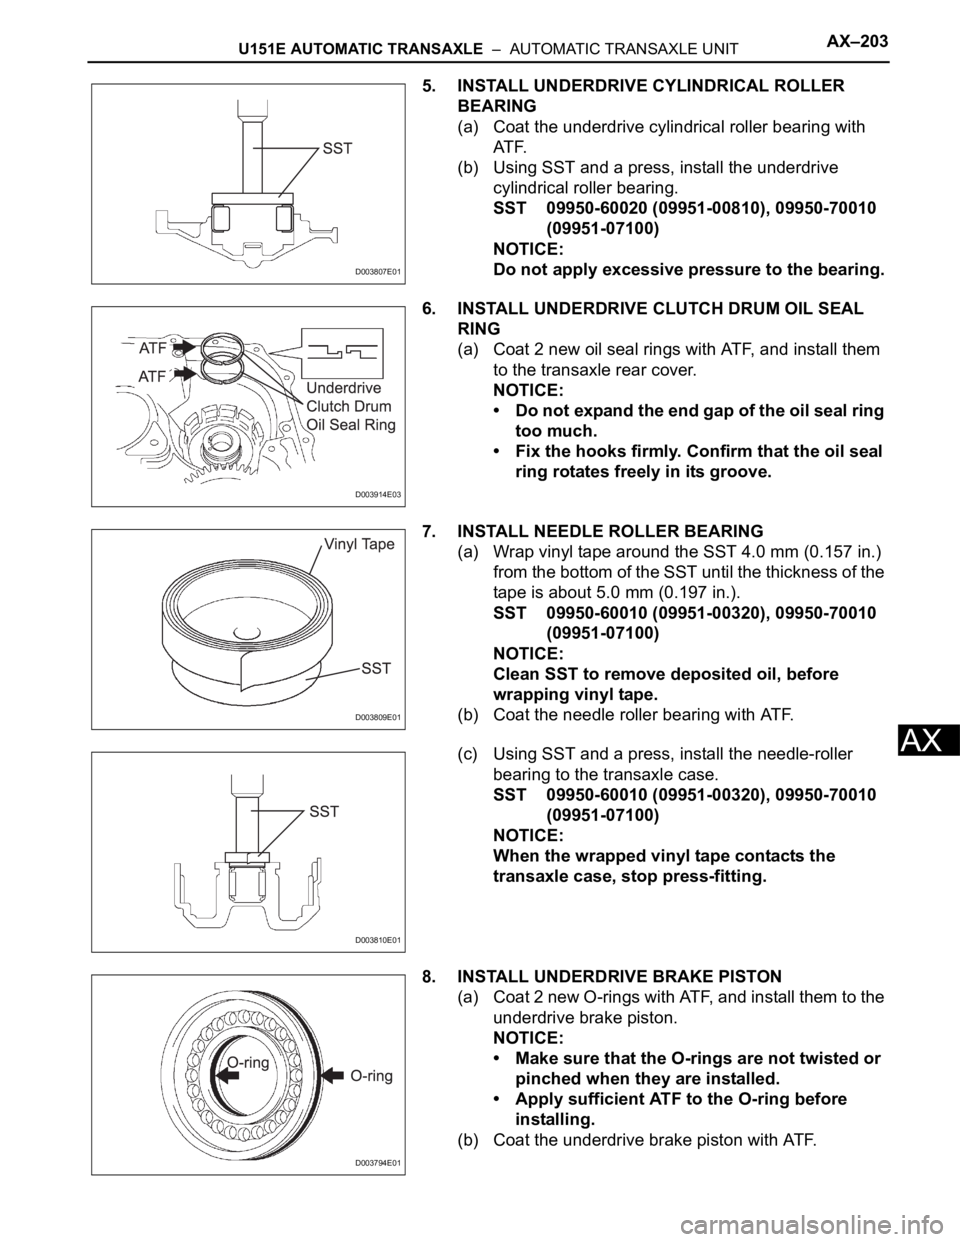
5. INSTALL UNDERDRIVE CYLINDRICAL ROLLER
BEARING
(a) Coat the underdrive cylindrical roller bearing with
AT F.
(b) Using SST and a press, install the underdrive
cylindrical roller bearing.
SST 09950-60020 (09951-00810), 09950-70010
(09951-07100)
NOTICE:
Do not apply excessive pressure to the bearing.
6. INSTALL UNDERDRIVE CLUTCH DRUM OIL SEAL
RING
(a) Coat 2 new oil seal rings with ATF, and install them
to the transaxle rear cover.
NOTICE:
• Do not expand the end gap of the oil seal ring
too much.
• Fix the hooks firmly. Confirm that the oil seal
ring rotates freely in its groove.
7. INSTALL NEEDLE ROLLER BEARING
(a) Wrap vinyl tape around the SST 4.0 mm (0.157 in.)
from the bottom of the SST until the thickness of the
tape is about 5.0 mm (0.197 in.).
SST 09950-60010 (09951-00320), 09950-70010
(09951-07100)
NOTICE:
Clean SST to remove deposited oil, before
wrapping vinyl tape.
(b) Coat the needle roller bearing with ATF.
(c) Using SST and a press, install the needle-roller
bearing to the transaxle case.
SST 09950-60010 (09951-00320), 09950-70010
(09951-07100)
NOTICE:
When the wrapped vinyl tape contacts the
transaxle case, stop press-fitting.
8. INSTALL UNDERDRIVE BRAKE PISTON
(a) Coat 2 new O-rings with ATF, and install them to the
underdrive brake piston.
NOTICE:
• Make sure that the O-rings are not twisted or
pinched when they are installed.
• Apply sufficient ATF to the O-ring before
installing.
(b) Coat the underdrive brake piston with ATF.
D003807E01
D003914E03
D003809E01
D003810E01
D003794E01
Page 1590 of 3000

AX–204U151E AUTOMATIC TRANSAXLE – AUTOMATIC TRANSAXLE UNIT
AX
(c) Install the underdrive brake piston to the transaxle
case.
NOTICE:
Be careful not to damage the O-ring.
9. INSTALL UNDERDRIVE BRAKE RETURN SPRING
SUB-ASSEMBLY
(a) Place SST on the return spring and compress the
return spring with a press.
SST 09387-00020
(b) Using a snap ring expander, install the snap ring to
the transaxle case.
NOTICE:
• Stop the press when the spring seat is
lowered 1 to 2 mm (0.039 to 0.078 in.) from the
snap ring groove, to prevent the spring seat
from being deformed.
• Do not expand the snap ring excessively.
• Installing the spring sub-assembly, check
that all of the springs are fit in the piston
correctly.
• The snap ring should be fully engaged in the
groove of the transaxle case.
10. INSTALL BREATHER PLUG NO.2 (ATM)
11. INSTALL COUNTER DRIVE GEAR BEARING
(a) Coat the counterdrive gear bearing with ATF.
(b) Using SST and a press, install the bearing outer
race.
SST 09950-60020 (09951-01030), 09950-70010
(09951-07150), 09649-17010
NOTICE:
• Do not apply excessive pressure to the
bearing.
• Press-fit the bearing outer race until it
contacts the transaxle case.
(c) Using a snap ring expander, install the snap ring.
NOTICE:
The white mark side of the snap ring should face
upward.
D026764E01
D026407E01
C089126E01
D026467E01
Page 1591 of 3000

U151E AUTOMATIC TRANSAXLE – AUTOMATIC TRANSAXLE UNITAX–205
AX
12. INSTALL COUNTER DRIVE GEAR
(a) Coat the couterdrive gear with ATF.
(b) Using SST and a press, install the tapered roller
bearing to the counter drive gear.
SST 09950-70010 (09951-07150), 09649-17010
NOTICE:
Do not apply excessive pressure to the bearing.
(c) Using SST and a press, install the counter drive
gear and bearing to the transaxle case.
SST 09950-70010 (09951-07150), 09223-15030,
09527-17011, 09950-60020 (09951-00750)
NOTICE:
Do not apply excessive pressure to the counter
drive gear.
13. INSTALL 1ST AND REVERSE BRAKE PISTON
(a) Coat 2 new O-rings with ATF.
(b) Install the 2 O-rings to the 1st and reverse brake
piston.
NOTICE:
• Make sure that the O-rings are not twisted or
pinched when they are installed.
• Apply sufficient ATF to the O-ring prior to
assembling.
(c) Coat the 1st and reverse brake piston with ATF, and
install it to the transaxle case.
NOTICE:
Be careful not to damage the O-ring.
D026410E01
C089122E02
D026713E01
D026593E01
Page 1592 of 3000

AX–206U151E AUTOMATIC TRANSAXLE – AUTOMATIC TRANSAXLE UNIT
AX
14. INSTALL 1ST AND REVERSE BRAKE RETURN
SPRING SUB-ASSEMBLY
(a) Place SST on the return spring and compress the
return spring with a press.
SST 09387-00070
(b) Using a snap ring expander, install the snap ring to
the transaxle case.
NOTICE:
• Stop the press when the spring seat is
lowered to the place 1 to 2 mm (0.039 to 0.078
in.) from the snap ring groove, preventing the
spring seat from being deformed.
• Do not expand the snap ring excessively.
• Installing the spring sub-assembly, check
that all of the springs are fit in the piston
correctly.
• The snap ring should be fully engaged in the
groove of the cylinder.
• Fix the snap ring to the inside of the claw of
the spring seat firmly.
15. INSTALL FRONT PLANETARY RING GEAR
(a) Using a screwdriver, install the front planetary ring
gear and snap ring to the brake hub.
NOTICE:
Confirm that the snap ring is engaged in the
groove of the brake hub correctly.
16. INSTALL FRONT PLANETARY GEAR ASSEMBLY
(a) Install the front planetary gear assembly to the
brake hub.
D003600E01
D003615E02
D026763E01
Page 1595 of 3000

U151E AUTOMATIC TRANSAXLE – AUTOMATIC TRANSAXLE UNITAX–209
AX
18. INSTALL REAR PLANETARY GEAR ASSEMBLY
(a) Install the rear planetary gear assembly to the rear
planetary ring gear.
(b) Using a screwdriver, install the snap ring.
NOTICE:
Confirm that the snap ring is fixed in the groove
of the 1st and reverse brake hub correctly.
19. INSTALL 1ST AND REVERSE BRAKE CLUTCH DISC
(a) Coat the 6 discs with ATF.
(b) Install the 7 plates and 6 discs.
NOTICE:
Make sure that the plates, discs, and flange are
installed as shown in the illustration.
20. INSPECT PACK CLEARANCE OF FIRST AND
REVERSE BRAKE
(a) Using vernier calipers, measure the distance
between the disc surface and the contact surface of
the 2nd brake cylinder and transaxle case
(Dimension A).
(b) Select an appropriate flange so that the pack
clearance will meet the specified value.
Pack clearance:
1.16 to 1.35 mm (0.0457 to 0.0531 in.)
HINT:
Piston stroke = Dimension A - Flange thickness
Flange thickness: mm (in.)
D026591E02
D003616E01
D026413E01
D026452E01
Mark Thickness Mark Thickness
1 1.8 (0.071) 5 2.2 (0.087)
2 1.9 (0.075) 6 2.3 (0.091)
3 2.0 (0.079) 7 2.4 (0.094)
4 2.1 (0.083) 8 2.5 (0.098)
Page 1596 of 3000

AX–210U151E AUTOMATIC TRANSAXLE – AUTOMATIC TRANSAXLE UNIT
AX
(c) Install the flange.
21. INSTALL SECOND BRAKE PISTON ASSEMBLY
(a) Install the second brake piston assembly to the
transaxle case.
(b) Install the snap ring and measure the inside
diameter.
Inside diameter:
Greater than 167 mm (6.57 in.)
NOTICE:
• Make sure that the taper snap ring is installed
in the correct direction.
• When the diameter does not meet the
specified value, replace the snap ring with a
new one.
• After installing, confirm that there is no
clearance between the 2nd brake cylinder
and the fitting surface of the cylinder in the
transaxle case.
22. INSTALL 1-WAY CLUTCH SLEEVE OUTER
(a) Install the 1-way clutch sleeve outer to the 2nd
brake cylinder assembly.
NOTICE:
Make sure that the outer sleeve is installed in
the correct direction.
D003815
D026396E03
D008058E01
C092977E01