power steering TOYOTA SIENNA HYBRID 2021 (in English) User Guide
[x] Cancel search | Manufacturer: TOYOTA, Model Year: 2021, Model line: SIENNA HYBRID, Model: TOYOTA SIENNA HYBRID 2021Pages: 601, PDF Size: 32.07 MB
Page 182 of 601

1813-3. Adjusting the seats
3
Before driving
■Recall procedure
1 Make sure that the doors are
locked before recalling the
driving position.Carry the
electronic key that has been
registered to the driving posi-
tion, and then unlock and
open the driver’s door using
the smart key system or wire-
less remote control.
The driving positi on will move to the
recorded position (not including the
steering wheel and head-up display
[if equipped]). However, the seat
will move to a position slightly
behind the recorded position in
order to make entering the vehicle
easier.
If the driving position is in a position
that has already been recorded, the
seat will not move.
2 Turn the power switch to
ACC or ON, or fasten a seat
belt.
The seat, steering wheel and head-
up display (if equipped) will move to
the recorded position.
■Cancelation procedure
Carry only the key you want to
cancel and then close the
driver’s door.
If 2 or more keys are in the vehi-
cle, the driving position cannot
be canceled properly.
1 Check that the shift lever is in
P.
2 Turn the power switch to ON.
3 While pressing the “SET” but-
ton, press and hold the door
lock switch (either lock or unlock) until the buzzer
sounds twice.
If the button could not be canceled,
the buzzer sounds c
ontinuously for
approximately 3 seconds.
■Recalling the driving position
using the memory recall func-
tion
●Different driving p ositions can be
registered for each electronic key.
Therefore, the driving position that
is recalled may be different
depending on the key being car-
ried.
●If a door other than the driver’s
door is unlocked with smart key
system, the driving position can-
not be recalled. In this case, press
the driving position button which
has been set.
■Customization
Settings (e.g. the unlock door set-
tings of the memory recall function)
can be customized. (Customizable
features: P.547)
Page 186 of 601
1853-4. Adjusting the steering wheel and mirrors
3
Before driving
3-4.Adjusting the steering wheel and mirrors
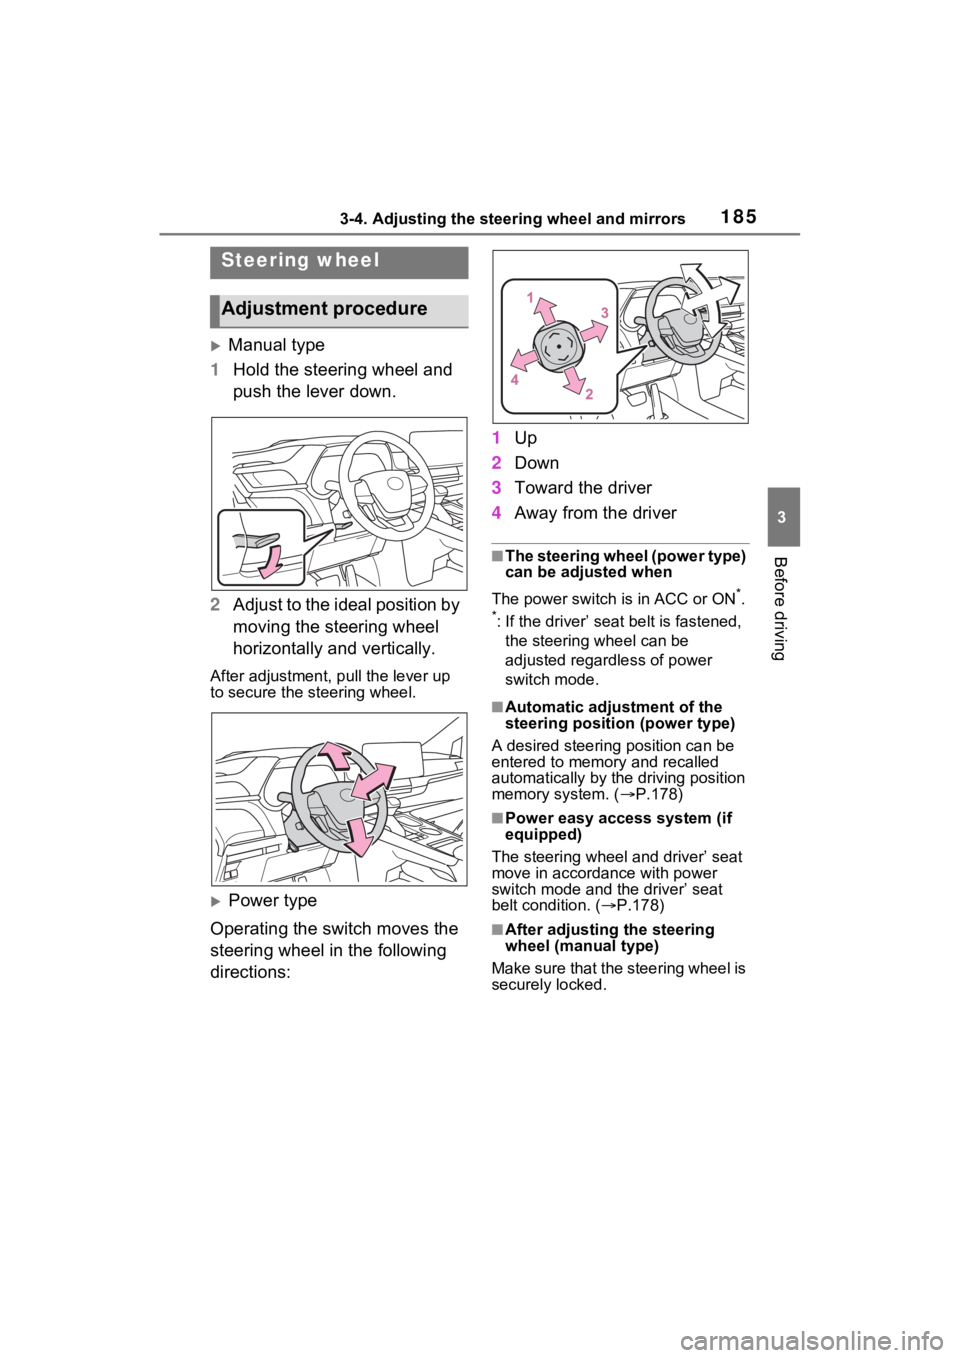
Manual type
1 Hold the steering wheel and
push the lever down.
2 Adjust to the ideal position by
moving the steering wheel
horizontally and vertically.
After adjustment, pull the lever up
to secure the steering wheel.
Power type
Operating the switch moves the
steering wheel in the following
directions: 1
Up
2 Down
3 Toward the driver
4 Away from the driver
■The steering wheel (power type)
can be adjusted when
The power switch is in ACC or ON
*.
*: If the driver’ seat belt is fastened, the steering wheel can be
adjusted regardless of power
switch mode.
■Automatic adjustment of the
steering position (power type)
A desired steering position can be
entered to memory and recalled
automatically by the driving position
memory system. ( P.178)
■Power easy access system (if
equipped)
The steering wheel and driver’ seat
move in accordance with power
switch mode and the driver’ seat
belt condition. ( P.178)
■After adjusting the steering
wheel (manual type)
Make sure that the steering wheel is
securely locked.
Steering wheel
Adjustment procedure
Page 188 of 601
1873-4. Adjusting the steering wheel and mirrors
3
Before driving
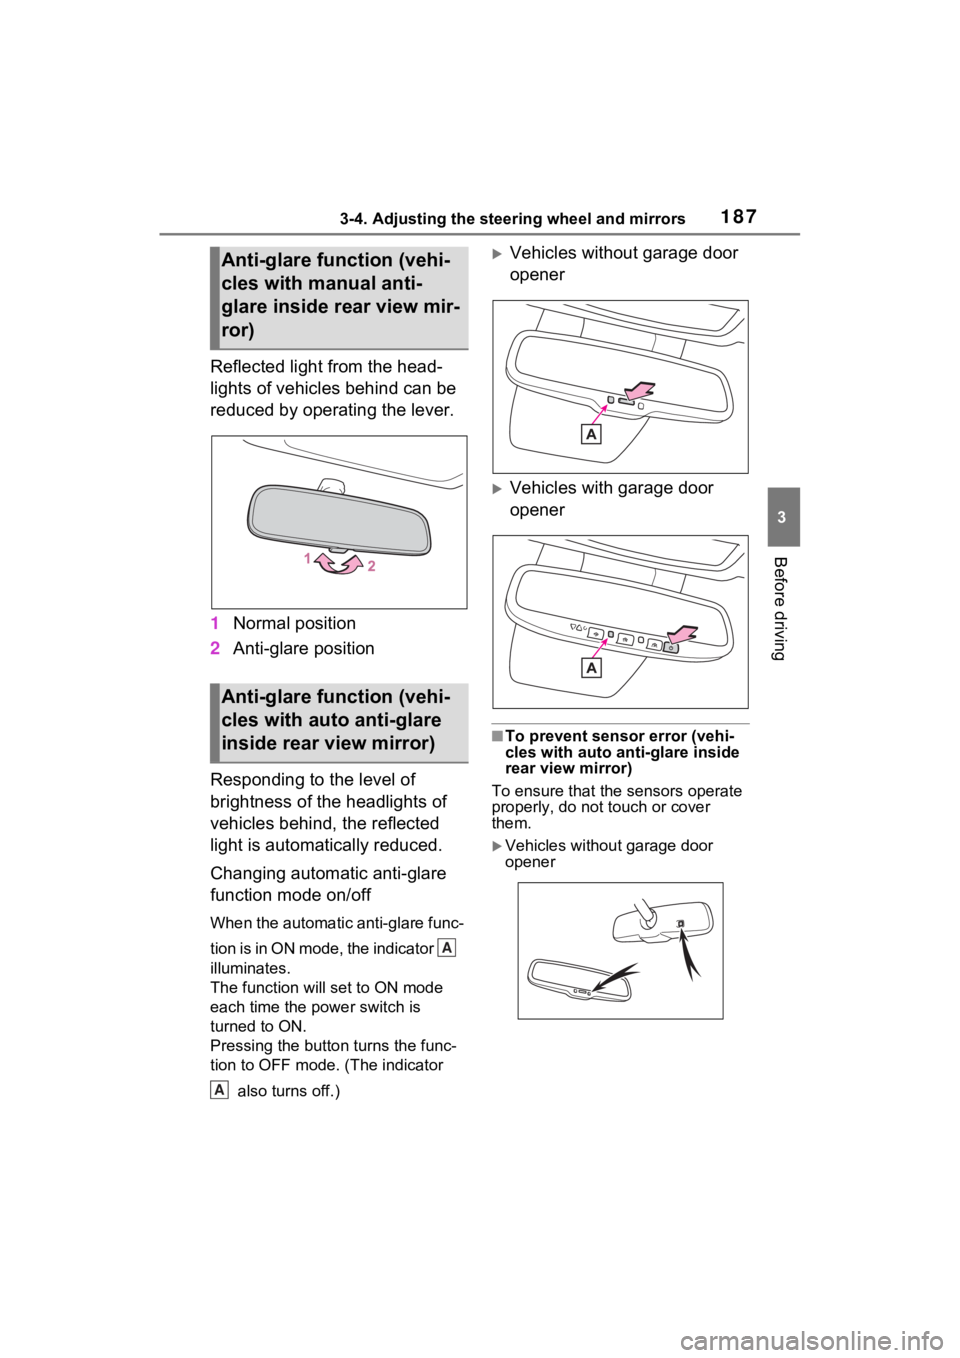
Reflected light from the head-
lights of vehicles behind can be
reduced by operating the lever.
1Normal position
2 Anti-glare position
Responding to the level of
brightness of the headlights of
vehicles behind, the reflected
light is automatically reduced.
Changing automatic anti-glare
function mode on/off
When the automatic anti-glare func-
tion is in ON mode, the indicator
illuminates.
The function will set to ON mode
each time the power switch is
turned to ON.
Pressing the button turns the func-
tion to OFF mode. (The indicator also turns off.)
Vehicles without garage door
opener
Vehicles with garage door
opener
■To prevent sensor error (vehi-
cles with auto ant i-glare inside
rear view mirror)
To ensure that the sensors operate
properly, do not touch or cover
them.
Vehicles without garage door
opener
Anti-glare function (vehi-
cles with manual anti-
glare inside rear view mir-
ror)
Anti-glare function (vehi-
cles with auto anti-glare
inside rear view mirror)
A
A
Page 190 of 601
1893-4. Adjusting the steering wheel and mirrors
3
Before driving
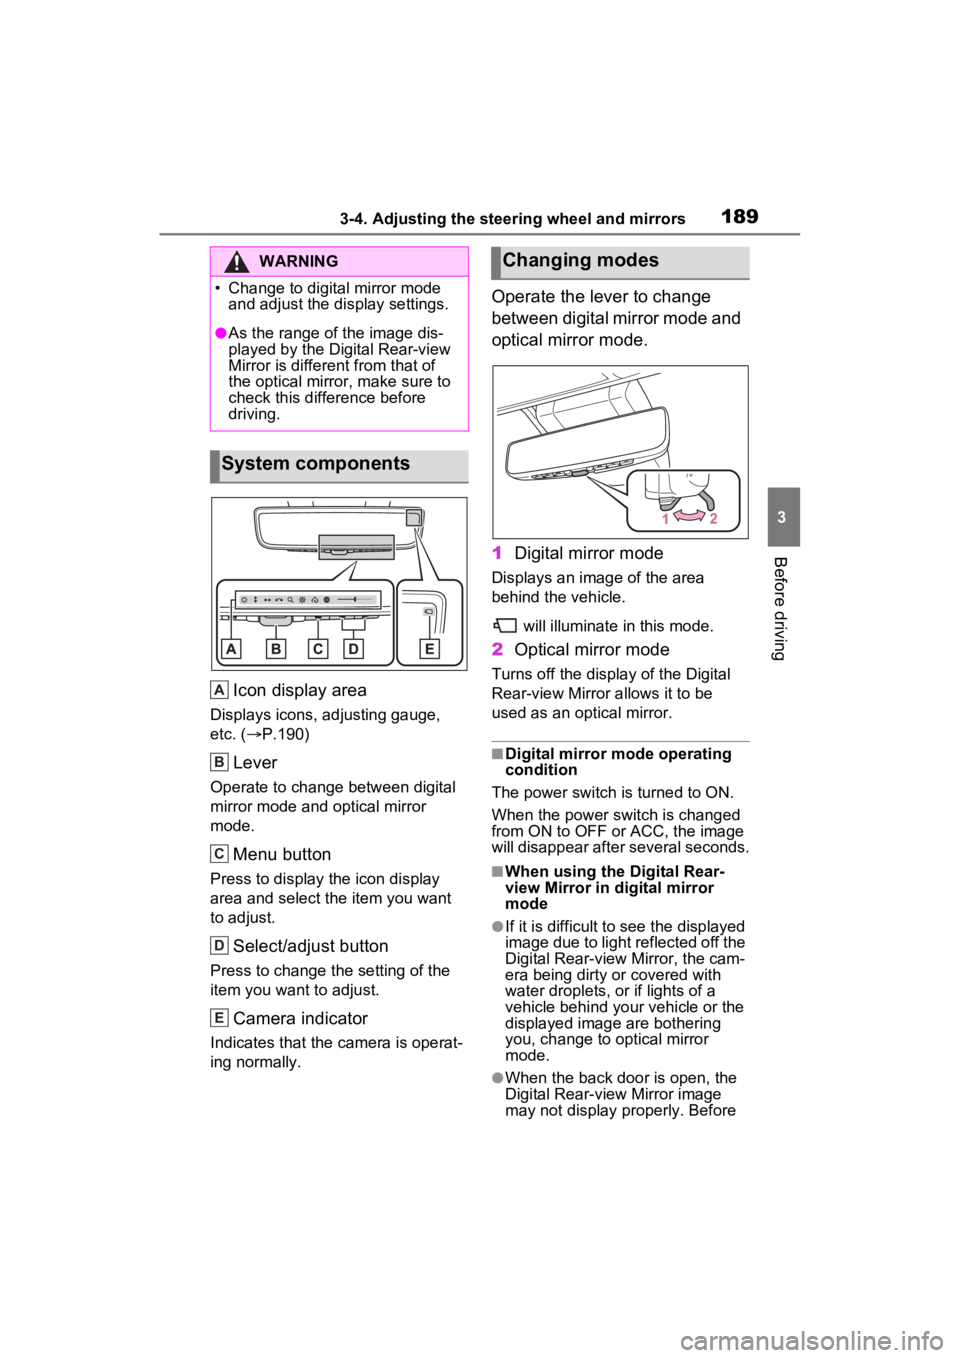
Icon display area
Displays icons, adjusting gauge,
etc. (P.190)
Lever
Operate to change between digital
mirror mode and optical mirror
mode.
Menu button
Press to display the icon display
area and select the item you want
to adjust.
Select/adjust button
Press to change the setting of the
item you want to adjust.
Camera indicator
Indicates that the camera is operat-
ing normally.
Operate the lever to change
between digital mirror mode and
optical mirror mode.
1 Digital mirror mode
Displays an ima ge of the area
behind the vehicle.
will illuminate in this mode.
2Optical mirror mode
Turns off the display of the Digital
Rear-view Mirror allows it to be
used as an optical mirror.
■Digital mirror mode operating
condition
The power switch is turned to ON.
When the power switch is changed
from ON to OFF or ACC, the image
will disappear after several seconds.
■When using the Digital Rear-
view Mirror in d igital mirror
mode
●If it is difficult to see the displayed
image due to light reflected off the
Digital Rear-view Mirror, the cam-
era being dirty or covered with
water droplets, or if lights of a
vehicle behind your vehicle or the
displayed image are bothering
you, change to optical mirror
mode.
●When the back door is open, the
Digital Rear-view Mirror image
may not display properly. Before
WARNING
�
Page 192 of 601
1913-4. Adjusting the steering wheel and mirrors
3
Before driving
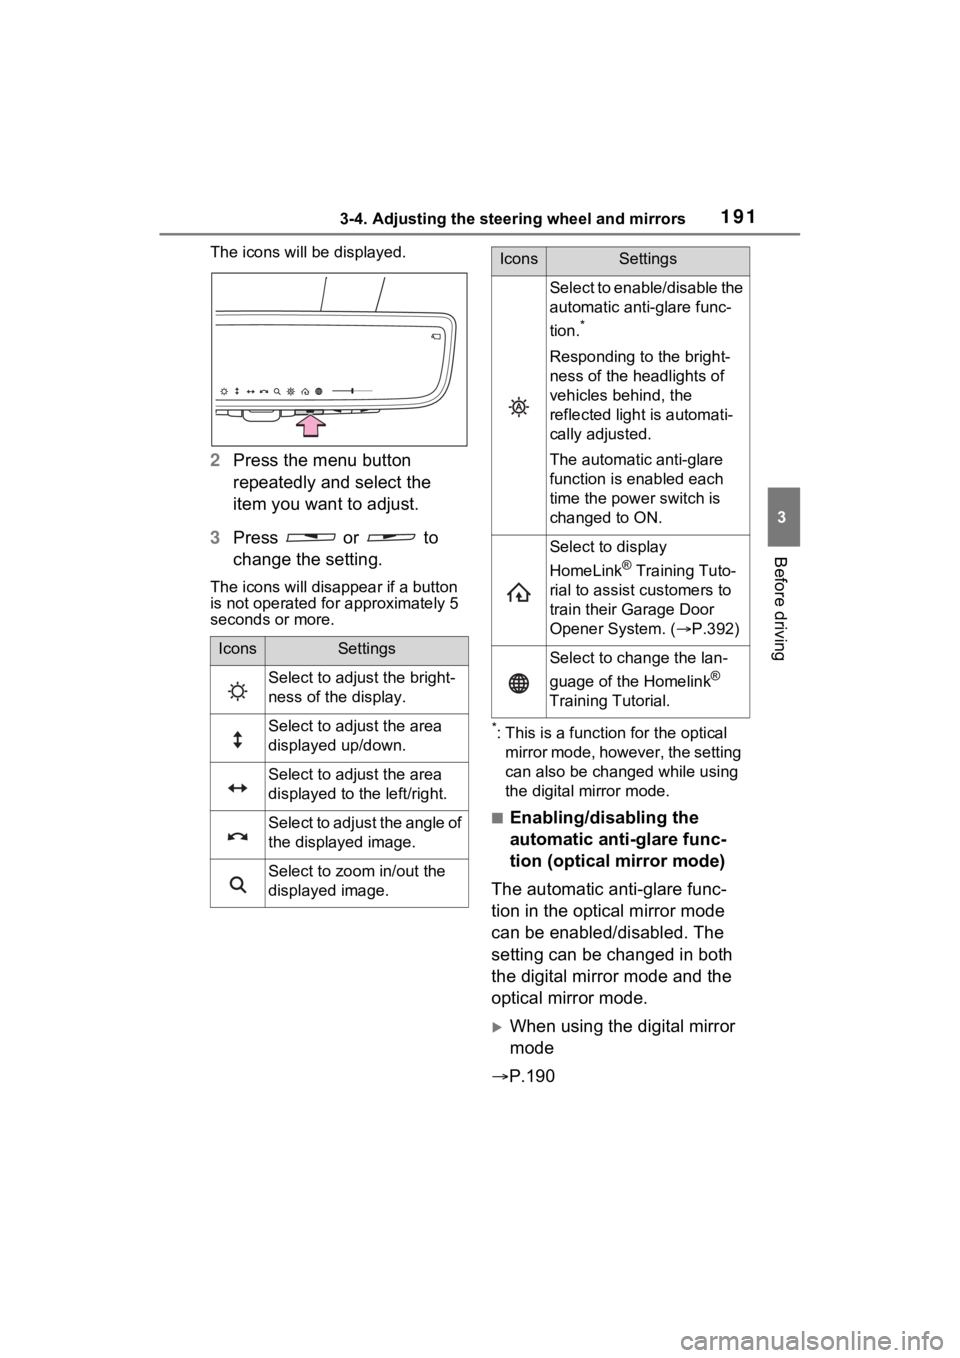
The icons will be displayed.
2Press the menu button
repeatedly and select the
item you want to adjust.
3 Press or to
change the setting.
The icons will disapp ear if a button
is not operated fo r approximately 5
seconds or more.
*: This is a functi on for the optical
mirror mode, however, the setting
can also be changed while using
the digital mirror mode.
■Enabling/disabling the
automatic anti-glare func-
tion (optical mirror mode)
The automatic anti-glare func-
tion in the optical mirror mode
can be enabled/disabled. The
setting can be changed in both
the digital mirror mode and the
optical mirror mode.
When using the digital mirror
mode
P.190
IconsSettings
Select to adjust the bright-
ness of the display.
Select to adjust the area
displayed up/down.
Select to adjust the area
displayed to the left/right.
Select to adjust the angle of
the displayed image.
Select to zoom in/out the
displayed image.
Select to enable/disable the
automatic anti-glare func-
tion.
*
Responding to the bright-
ness of the headlights of
vehicles behind, the
reflected light is automati-
cally adjusted.
The automatic anti-glare
function is enabled each
time the power switch is
changed to ON.
Select to display
HomeLink
® Training Tuto-
rial to assist customers to
train their Garage Door
Opener System. ( P.392)
Select to change the lan-
guage of the Homelink
®
Training Tutorial.
IconsSettings
Page 196 of 601
1953-4. Adjusting the steering wheel and mirrors
3
Before driving
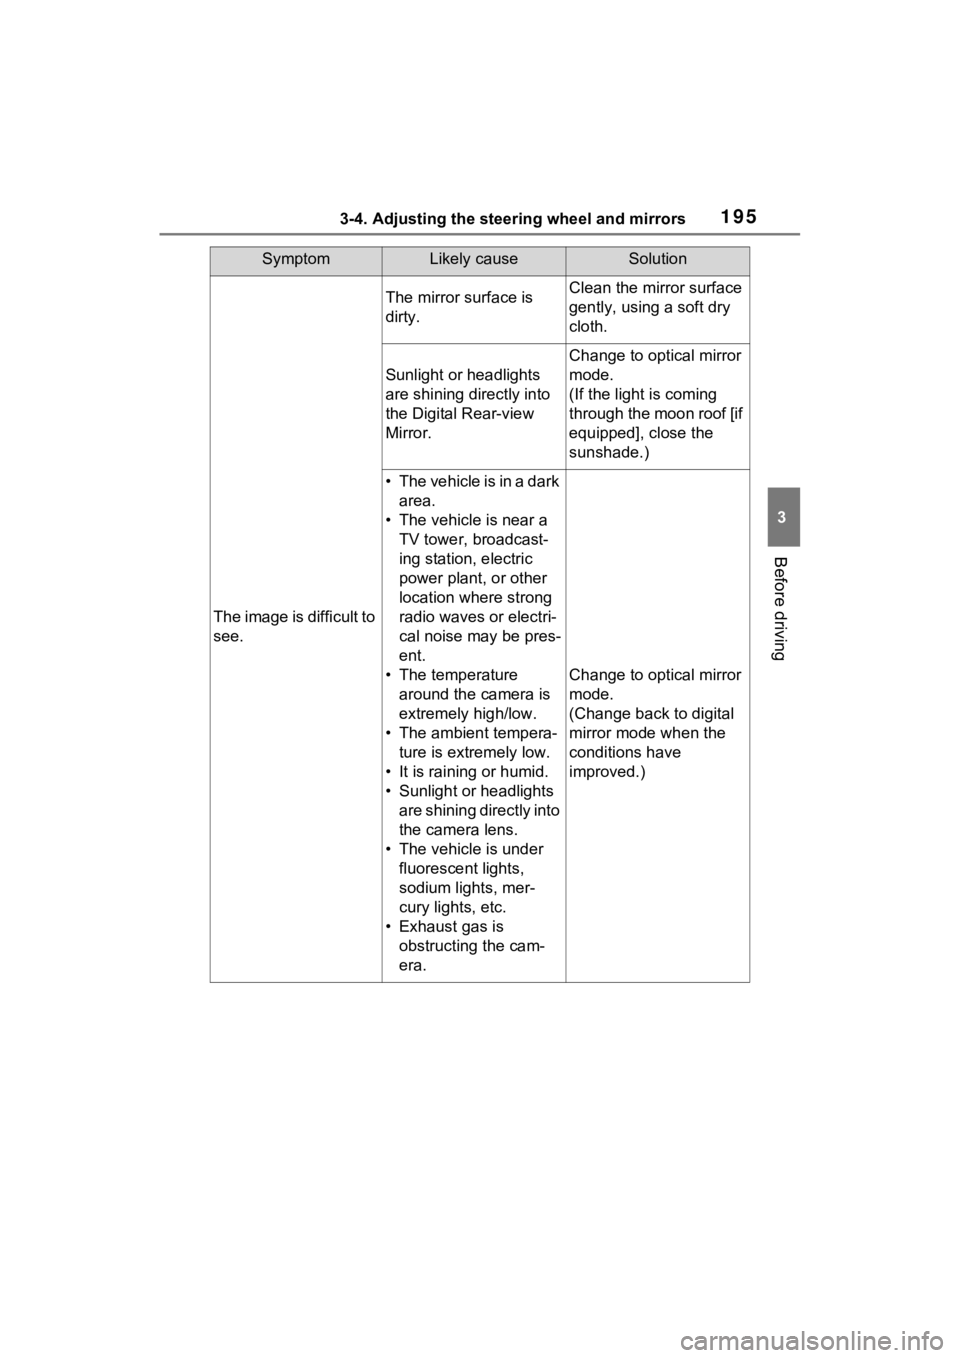
SymptomLikely causeSolution
The image is difficult to
see.
The mirror surface is
dirty.Clean the mirror surface
gently, using a soft dry
cloth.
Sunlight or headlights
are shining directly into
the Digital Rear-view
Mirror.
Change to optical mirror
mode.
(If the light is coming
through the moon roof [if
equipped], close the
sunshade.)
• T h e v e h i c l e i s i n a d a r k area.
• The vehicle is near a TV tower, broadcast-
ing station, electric
power plant, or other
location where strong
radio waves or electri-
cal noise may be pres-
ent.
• The temperature around the camera is
extremely high/low.
• The ambient tempera- ture is extremely low.
• It is raining or humid.
• Sunlight or headlights are shining directly into
the camera lens.
• The vehicle is under fluorescent lights,
sodium lights, mer-
cury lights, etc.
• Exhaust gas is obstructing the cam-
era.
Change to optical mirror
mode.
(Change back to digital
mirror mode when the
conditions have
improved.)
Page 199 of 601
1983-4. Adjusting the steering wheel and mirrors
■Defogging the mirrors (if
equipped)
The outside rear v iew mirrors can
be cleared using the mirror defog-
gers. Turn on the rear window
defogger to turn on the outside rear
view mirror defoggers.
( P.350)
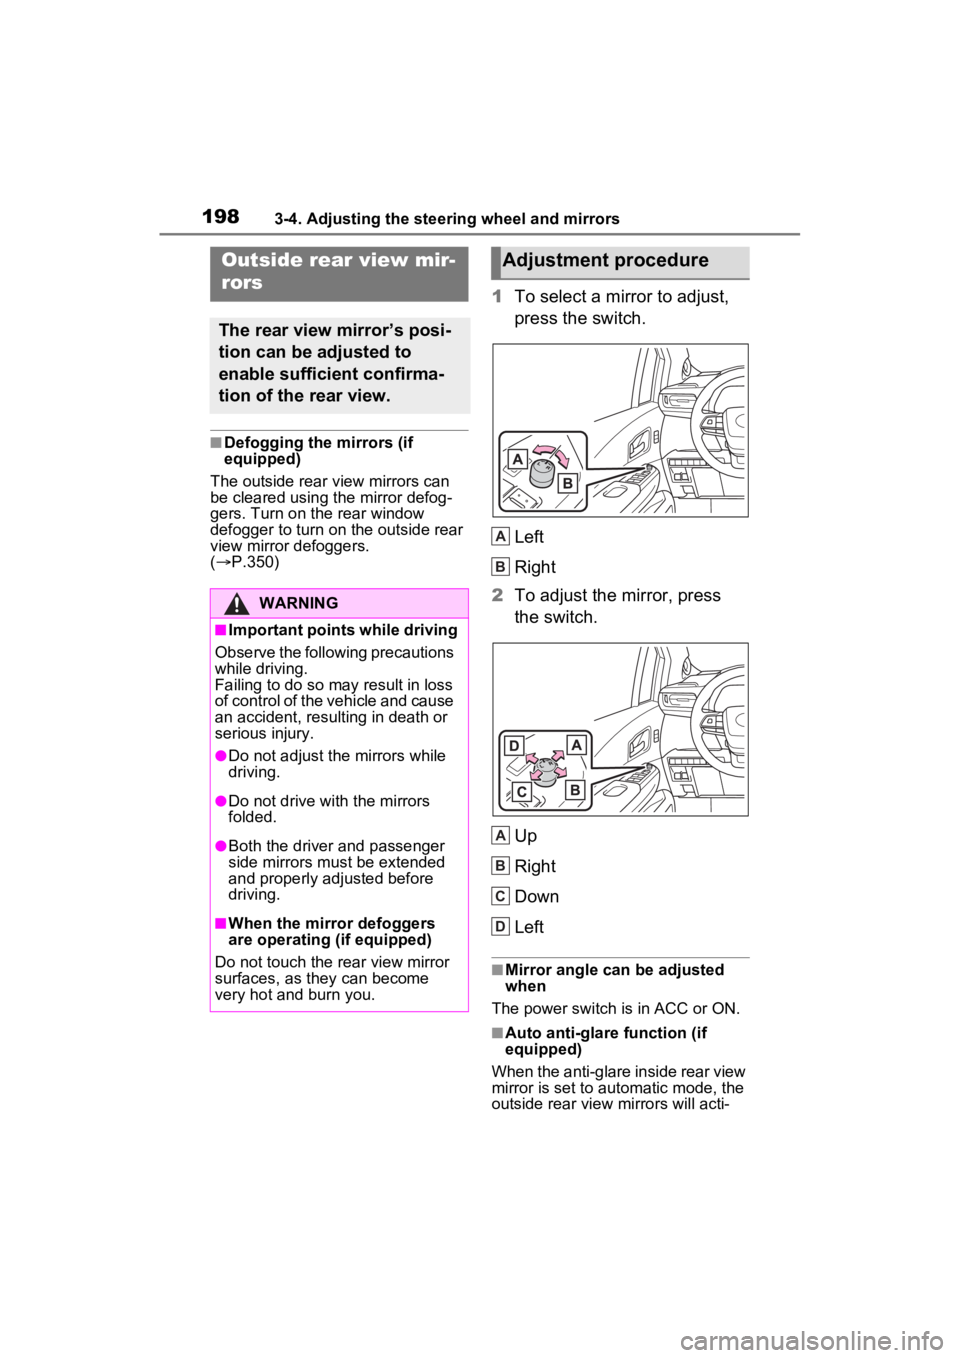
1 To select a mirror to adjust,
press the switch.
Left
Right
2 To adjust the mirror, press
the switch.
Up
Right
Down
Left
■Mirror angle can be adjusted
when
The power switch is in ACC or ON.
■Auto anti-glare function (if
equipped)
When the anti-glare inside rear view
mirror is set to au tomatic mode, the
outside rear view mirrors will acti-
Outside rear view mir-
rors
The rear view mirror’s posi-
tion can be adjusted to
enable sufficient confirma-
tion of the rear view.
WARNING
■Important points while driving
Observe the following precautions
while driving.
Failing to do so may result in loss
of control of the vehicle and cause
an accident, resul ting in death or
serious injury.
●Do not adjust the mirrors while
driving.
●Do not drive with the mirrors
folded.
●Both the driver and passenger
side mirrors must be extended
and properly adjusted before
driving.
■When the mirror defoggers
are operating (if equipped)
Do not touch the rear view mirror
surfaces, as they can become
very hot and burn you.
Adjustment procedure
A
B
A
B
C
D
Page 200 of 601
1993-4. Adjusting the steering wheel and mirrors
3
Before driving
vate in conjunction with the anti-
glare inside rear view mirror to
reduce reflected light.
■Automatic adjustment of the
mirror angle (vehicles with driv-
ing position memory)
A desired mirror f ace angle can be
entered to memory and recalled
automatically by the driving position
memory. ( P.178)
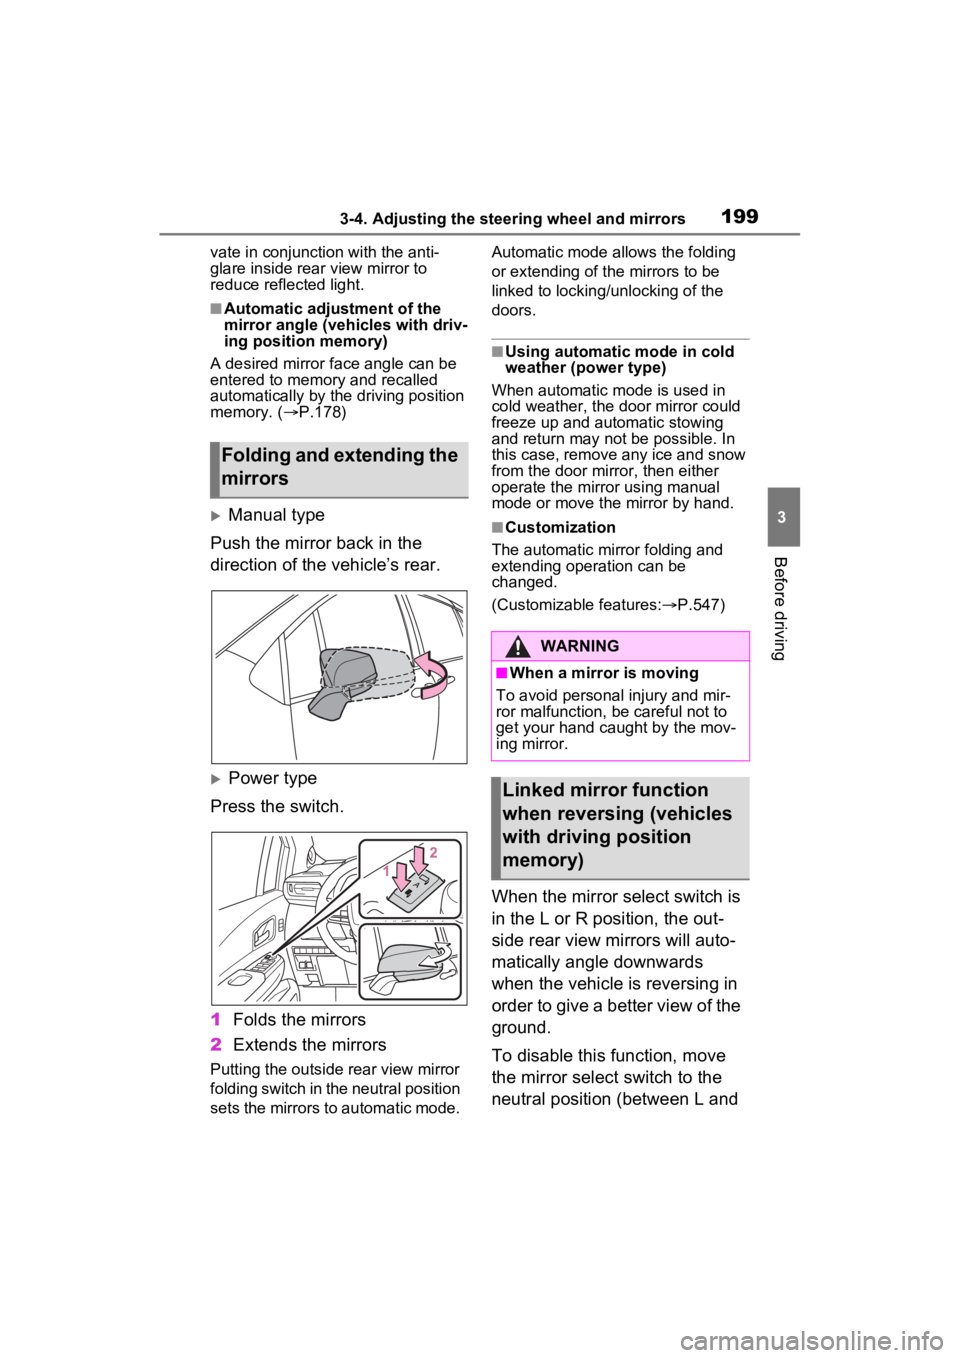
Manual type
Push the mirror back in the
direction of the vehicle’s rear.
Power type
Press the switch.
1 Folds the mirrors
2 Extends the mirrors
Putting the outside rear view mirror
folding switch in the neutral position
sets the mirrors to automatic mode. Automatic mode allows the folding
or extending of the mirrors to be
linked to locking/unlocking of the
doors.
■Using automatic mode in cold
weather (power type)
When automatic mode is used in
cold weather, the door mirror could
freeze up and automatic stowing
and return may not be possible. In
this case, remove any ice and snow
from the door mirror, then either
operate the mirror using manual
mode or move the mirror by hand.
■Customization
The automatic mirror folding and
extending operation can be
changed.
(Customizable features: P.547)
When the mirror select switch is
in the L or R position, the out-
side rear view mirrors will auto-
matically angle downwards
when the vehicle is reversing in
order to give a better view of the
ground.
To disable this function, move
the mirror select switch to the
neutral position (between L and
Folding and extending the
mirrors
WARNING
■When a mirror is moving
To avoid personal injury and mir-
ror malfunction, be careful not to
get your hand caught by the mov-
ing mirror.
Linked mirror function
when reversing (vehicles
with driving position
memory)
Page 211 of 601
2104-1. Before driving
for extended periods.
■Operating your vehicle in a for-
eign country
Comply with the relevant vehicle
registration laws and confirm the
availability of the correct fuel.
( P.520)
WARNING
Observe the following precau-
tions.
Failure to do so m ay result in
death or serious injury.
■When starting the vehicle
Always keep your foot on the
brake pedal while stopped with
the “READY” indicator is illumi-
nated. This prevents the vehicle
from creeping.
■When driving the vehicle
●Do not drive if y ou are unfamil-
iar with the location of the brake
and accelerator pedals to avoid
depressing the wrong pedal.
• Accidentally depressing the accelerator pedal instead of the
brake pedal will result in sudden
acceleration that may lead to an
accident.
• When backing up, you may twist your body around, leading to a
difficulty in operating the pedals.
Make sure to operate the pedals
properly.
• Make sure to keep a correct driving posture even when mov-
ing the vehicle only slightly. This
allows you to depress the brake
and accelerator pedals properly.
• Depress the brake pedal using your right foot. Depressing the
brake pedal using your left foot
may delay respon se in an emer-
gency, resulting in an accident.
●The driver should pay extra
attention to pedestrians when
the vehicle is powered only by
the electric motor (traction
motor). As there is no engine
noise, the pedestrians may mis-
judge the vehicle’s movement.
Even though the vehicle is
equipped with the Acoustic
Vehicle Alerting System, drive
with care as pedestrians in the
vicinity may still not notice the
vehicle if the surrounding area
is noisy.
●Do not drive the vehicle over or
stop the vehicle near flammable
materials such as leaves, paper
or rags.
The exhaust system and
exhaust gases can be
extremely hot. These hot parts
may cause a fire i f there is any
flammable material nearby.
●During normal driving, do not
turn off the hybrid system. Turn-
ing the hybrid s ystem off while
driving will not cause loss of
steering or braking control, how-
ever, power assist to the steer-
ing will be lost. This will make it
more difficult to steer smoothly,
so you should pull over and stop
the vehicle as soon as it is safe
to do so. In the event of an
emergency, such as if it
becomes impossible to stop the
vehicle in the normal way:
P.459
●Use engine braking (downshift)
to maintain a safe speed when
driving down a steep hill.
Using the brakes continuously
may cause the brakes to over-
heat and lose effectiveness.
( P.238)
Page 215 of 601
2144-1. Before driving
NOTICE
■Avoiding damage to vehicle
parts
●Do not turn the steering wheel
fully in either direction and hold
it there for an extended period
of time.
Doing so may damage the
power steering motor.
●When driving over bumps in the
road, drive as slowly as possible
to avoid damaging the wheels,
underside of the vehicle, etc.
■If you get a flat tire while driv-
ing
A flat or damaged tire may cause
the following situations.
●It may be difficult to control your
vehicle.
●The vehicle will make abnormal
sounds or vibrations.
●The vehicle will lean abnor-
mally.
Hold the steering wheel firmly and
gradually depress the brake pedal
to slow down the vehicle.
Information on what to do in case
of a flat tire ( P.491)
■When encountering flooded
roads
Do not drive on a road that has
flooded after heavy rain, etc.
Doing so may cause the following
serious damage to the vehicle:
●Engine stalling
●Short in electrical components
●Engine damage caused by
water immersion
In the event that you drive on a
flooded road and the vehicle is
flooded, be sure to have your
Toyota dealer c heck the following:
●Brake function
●Changes in quantity and quality
of oil and fluid used for the
engine, hybrid transmission
(front and rear), etc.
●Lubricant condition for the bear-
ings and suspension joints
(where possible), and the func-
tion of all joints, bearings, etc.
■When parking the vehicle
Always set the parking brake, and
shift the shift lever to P. Failure to
do so may cause the vehicle to
move or the vehicle may acceler-
ate suddenly if t he accelerator
pedal is accidentally depressed.