TOYOTA TUNDRA HYBRID 2022 Owners Manual
Manufacturer: TOYOTA, Model Year: 2022, Model line: TUNDRA HYBRID, Model: TOYOTA TUNDRA HYBRID 2022Pages: 618, PDF Size: 19.91 MB
Page 321 of 618
3214-5. Using the driving support systems
Owners Manual_USA_M0C031_en
4
Driving
and the buzzer sounds.
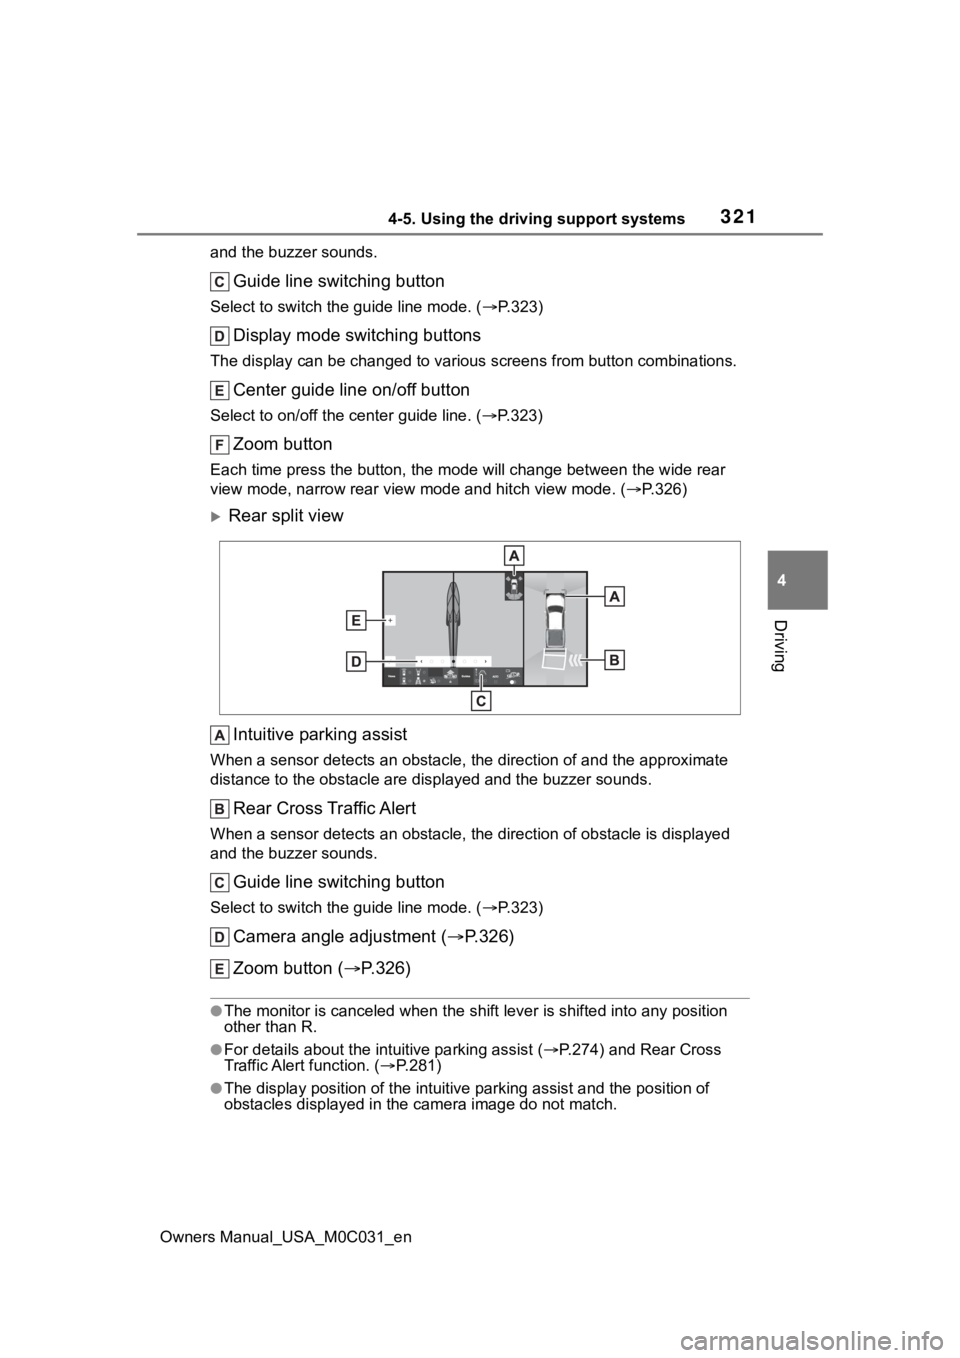
Guide line switching button
Select to switch the guide line mode. ( P.323)
Display mode switching buttons
The display can be changed to var ious screens from button combinations.
Center guide line on/off button
Select to on/off the center guide line. (P.323)
Zoom button
Each time press the button, the mode will change between the wi de rear
view mode, narrow rear view mode and hitch view mode. (P.326)
Rear split view
Intuitive parking assist
When a sensor detects an obstacle, the direction of and the app roximate
distance to the obsta cle are displayed and the buzzer sounds.
Rear Cross Traffic Alert
When a sensor detects an obstacle, the direction of obstacle is displayed
and the buzzer sounds.
Guide line switching button
Select to switch the guide line mode. ( P.323)
Camera angle adjustment ( P.326)
Zoom button ( P.326)
●The monitor is canceled when the shift lever is shifted into any position
other than R.
●For details about the int uitive parking assist (P.274) and Rear Cross
Traffic Alert function. ( P.281)
●The display position of the intuitive parking assist and the po sition of
obstacles displayed in the camera image do not match.
Page 322 of 618
3224-5. Using the driving support systems
Owners Manual_USA_M0C031_en
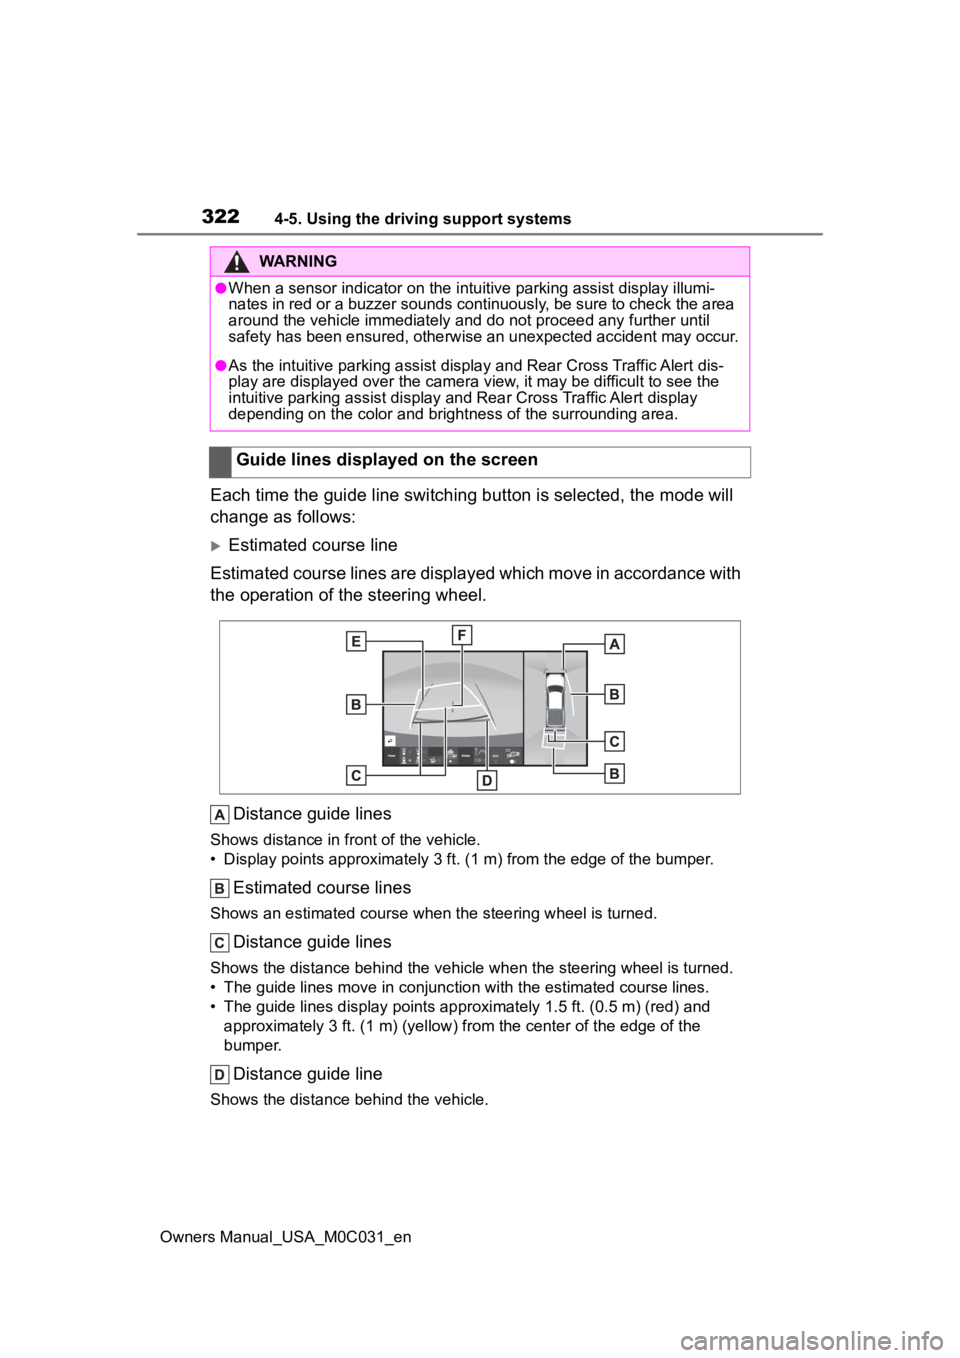
Each time the guide line switching button is selected, the mode will
change as follows:
Estimated course line
Estimated course lines are displ ayed which move in accordance w ith
the operation of the steering wheel.
Distance guide lines
Shows distance in fr ont of the vehicle.
• Display points approximately 3 ft. (1 m) from the edge of the bumper.
Estimated course lines
Shows an estimated course when the steering wheel is turned.
Distance guide lines
Shows the distance behind the vehicle when the steering wheel is turned.
• The guide lines move in conjunc tion with the estimated course lines.
• The guide lines display points approximately 1. 5 ft. (0.5 m) (red) and
approximately 3 ft. (1 m) (yello w) from the center of the edge of the
bumper.
Distance guide line
Shows the distance behind the vehicle.
WARNING
●When a sensor indicator on the in tuitive parking assist display illumi-
nates in red or a buzzer sounds continuously, be sure to check the area
around the vehicle immediately a nd do not proceed any further until
safety has been ensured, otherwise an unexpected accident may o ccur.
●As the intuitive parking assist display and Rear Cross Traffic Alert dis-
play are displayed over the camera view, it may be difficult to see the
intuitive parking assist display and Rear Cross Traffic Alert display
depending on the color and brigh tness of the surrounding area.
Guide lines displayed on the screen
Page 323 of 618
3234-5. Using the driving support systems
Owners Manual_USA_M0C031_en
4
Driving
• Displays a point approximately 1.5 ft. (0.5 m) (blue) from the edge of the
bumper.
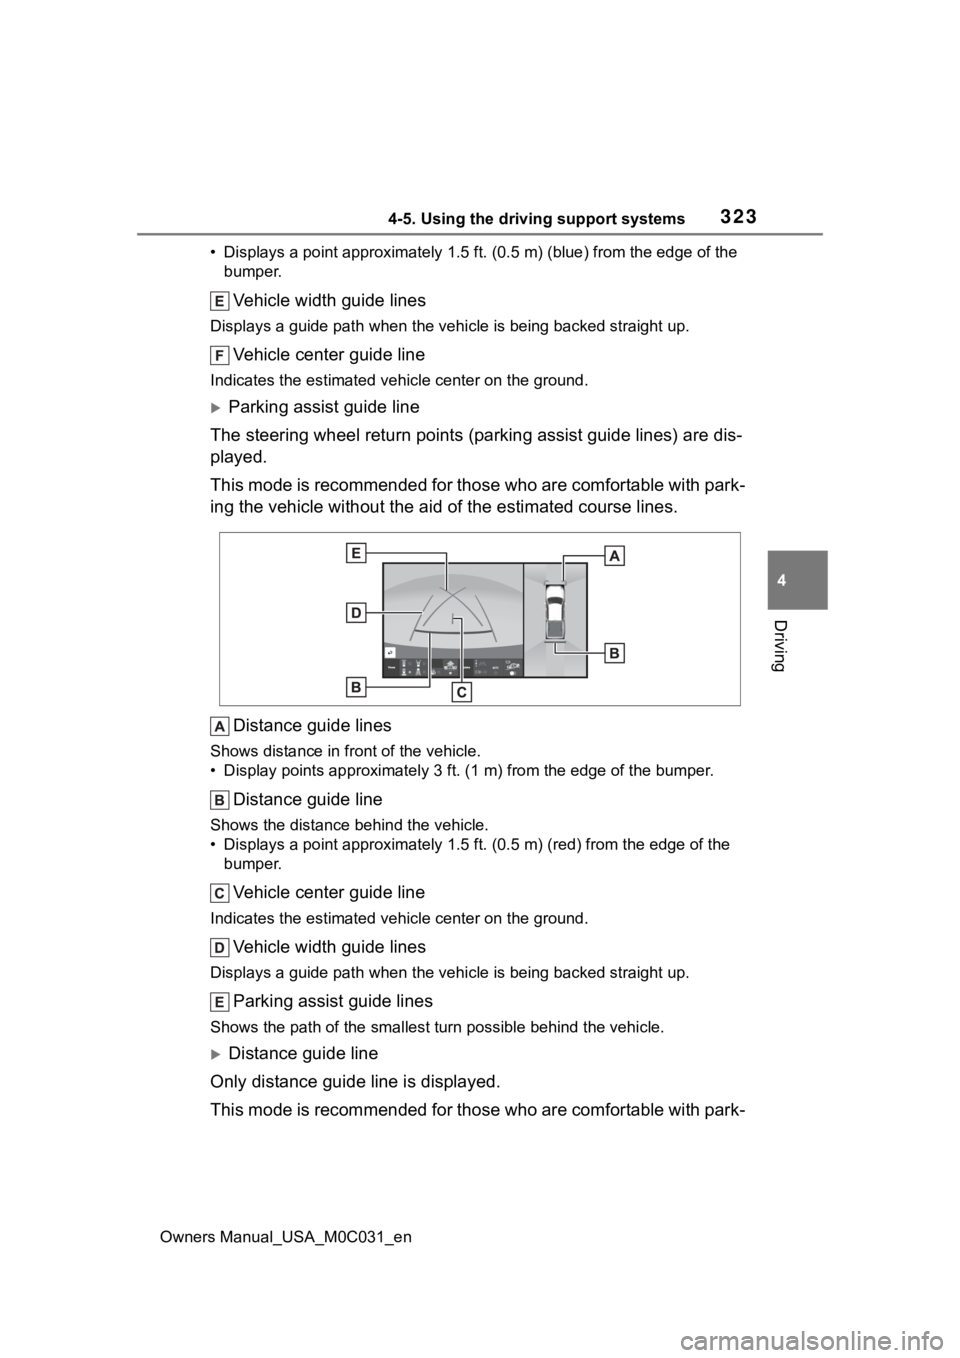
Vehicle width guide lines
Displays a guide path w hen the vehicle is being backed straight up.
Vehicle center guide line
Indicates the estimated vehicle center on the ground.
Parking assist guide line
The steering wheel return points (parking assist guide lines) are dis-
played.
This mode is recommended for those who are comfortable with par k-
ing the vehicle without the aid of the estimated course lines.
Distance guide lines
Shows distance in front of the vehicle.
• Display points approximately 3 ft. (1 m) from the edge of the bumper.
Distance guide line
Shows the distance behind the vehicle.
• Displays a point approximately 1.5 ft. (0.5 m) (red) from the edge of the
bumper.
Vehicle center guide line
Indicates the estimated ve hicle center on the ground.
Vehicle width guide lines
Displays a guide path when the vehicle is being backed straight up.
Parking assist guide lines
Shows the path of the smallest turn possible behind the vehicle .
Distance guide line
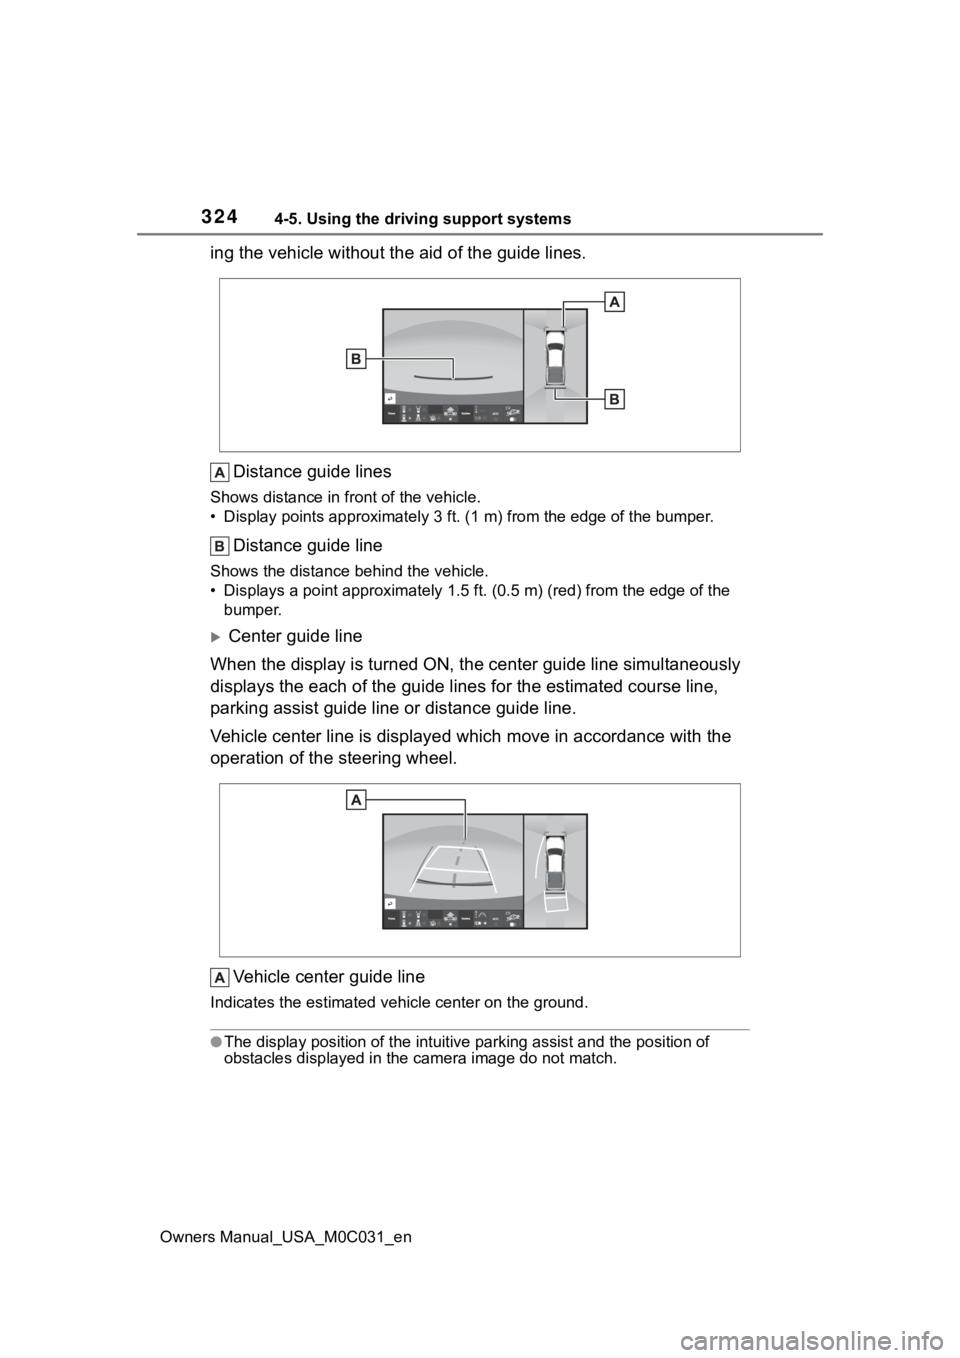
Only distance guide line is displayed.
This mode is recommended for those who are comfortable with par k-
Page 324 of 618
3244-5. Using the driving support systems
Owners Manual_USA_M0C031_en
ing the vehicle without the aid of the guide lines.Distance guide lines
Shows distance in front of the vehicle.
• Display points approximately 3 ft. (1 m) from the edge of the bumper.
Distance guide line
Shows the distance behind the vehicle.
• Displays a point approximately 1.5 ft. (0.5 m) (red) from the edge of the
bumper.
Center guide line
When the display is turned ON, the center guide line simultaneo usly
displays the each of the guide li nes for the estimated course line,
parking assist guide line or distance guide line.
Vehicle center line is displayed which move in accordance with the
operation of the steering wheel.
Vehicle center guide line
Indicates the estimated ve hicle center on the ground.
●The display position of the intuitive parking assist and the po sition of
obstacles displayed in the camera image do not match.
Page 325 of 618
3254-5. Using the driving support systems
Owners Manual_USA_M0C031_en
4
Driving
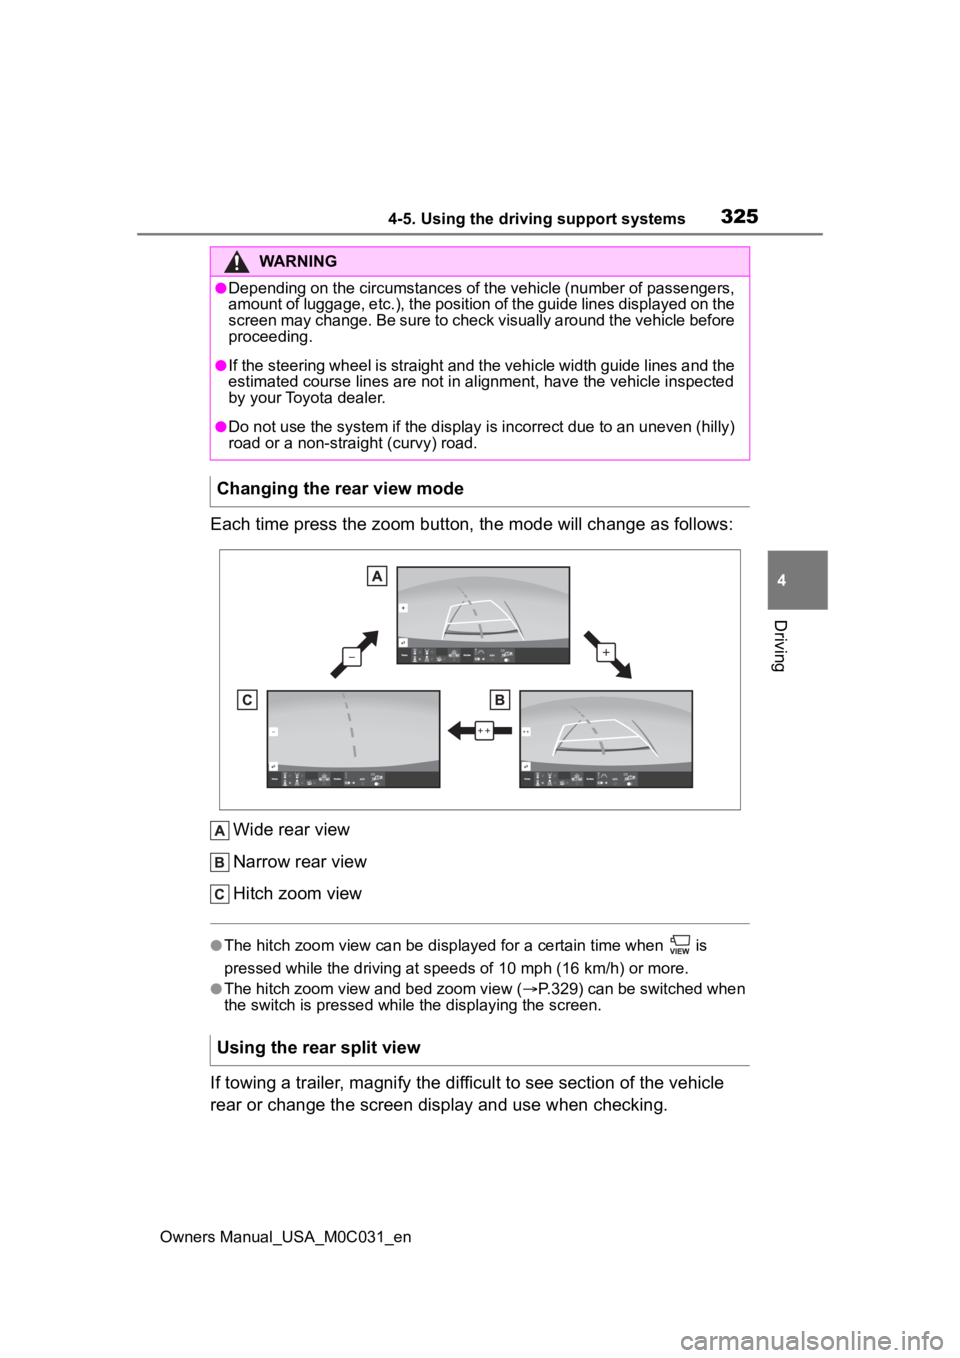
Each time press the zoom button, the mode will change as follow s:
Wide rear view
Narrow rear view
Hitch zoom view
●The hitch zoom view can be displayed for a certain time when i s
pressed while the driving at speeds of 10 mp h (16 km/h) or more.
●The hitch zoom view and bed zoom view (P.329) can be switched when
the switch is pressed while the displaying the screen.
If towing a trailer, magnify the difficult to see section of th e vehicle
rear or change the screen display and use when checking.
WARNING
●Depending on the circumstances of the vehicle (number of passen gers,
amount of luggage, etc.), the position of the guide lines displ ayed on the
screen may change. Be sure to check visually around the vehicle before
proceeding.
●If the steering wheel is straight and the vehicle width guide l ines and the
estimated course lines are not in alignment, have the vehicle i nspected
by your Toyota dealer.
●Do not use the system if the display is incorrect due to an une ven (hilly)
road or a non-straight (curvy) road.
Changing the rear view mode
Using the rear split view
Page 326 of 618
3264-5. Using the driving support systems
Owners Manual_USA_M0C031_en
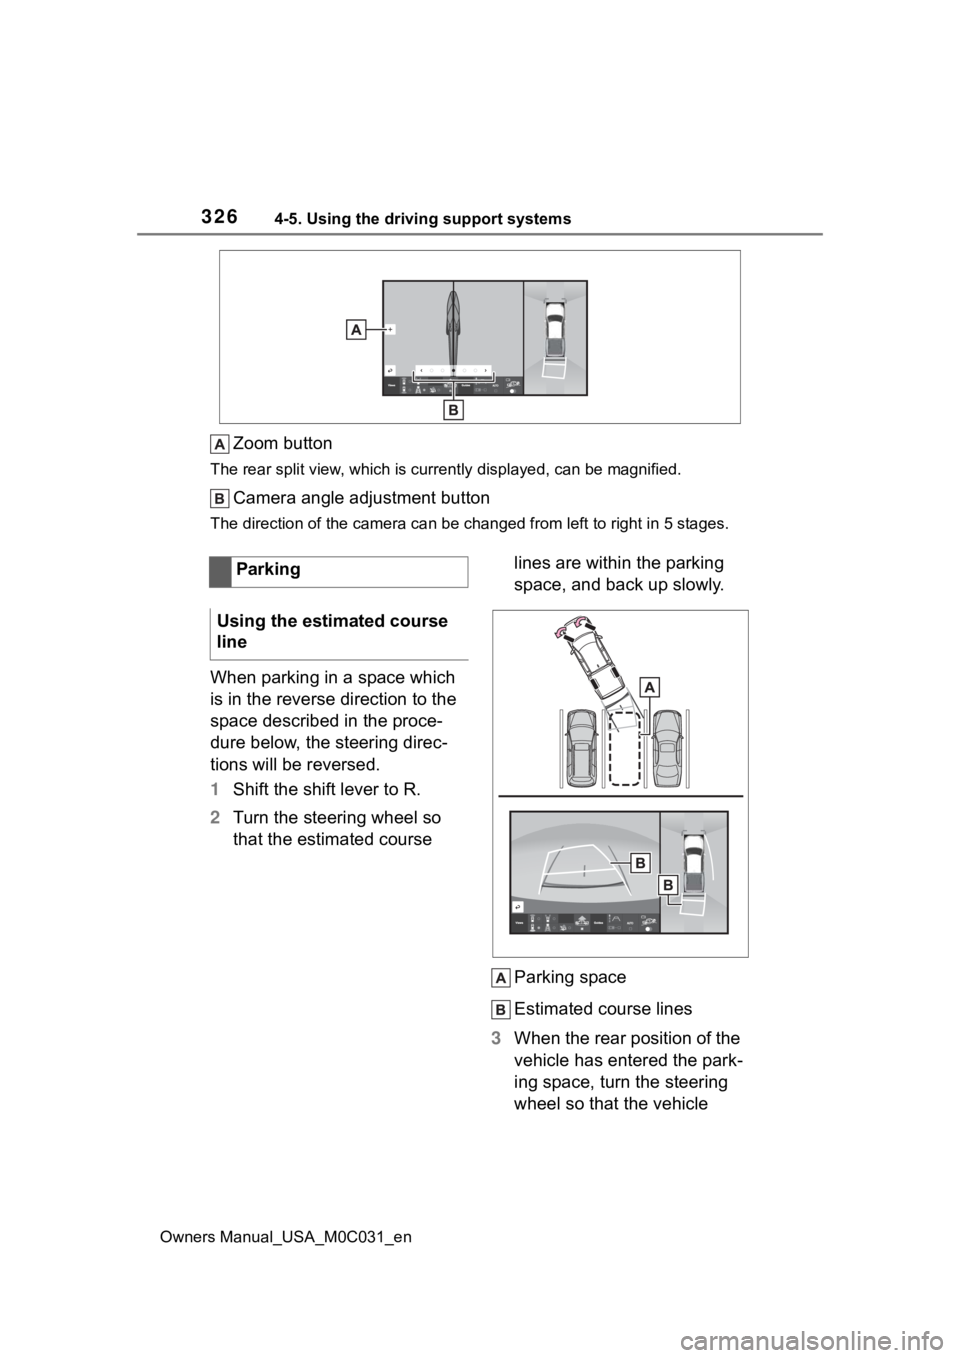
Zoom button
The rear split view, which is currently displayed, can be magni fied.
Camera angle adjustment button
The direction of the camera can be changed from left to right i n 5 stages.
When parking in a space which
is in the reverse direction to the
space described in the proce-
dure below, the steering direc-
tions will be reversed.
1Shift the shift lever to R.
2 Turn the steering wheel so
that the estimated course lines are within the parking
space, and back up slowly.
Parking space
Estimated course lines
3 When the rear position of the
vehicle has entered the park-
ing space, turn the steering
wheel so that the vehicle
Parking
Using the estimated course
line
Page 327 of 618
3274-5. Using the driving support systems
Owners Manual_USA_M0C031_en
4
Driving
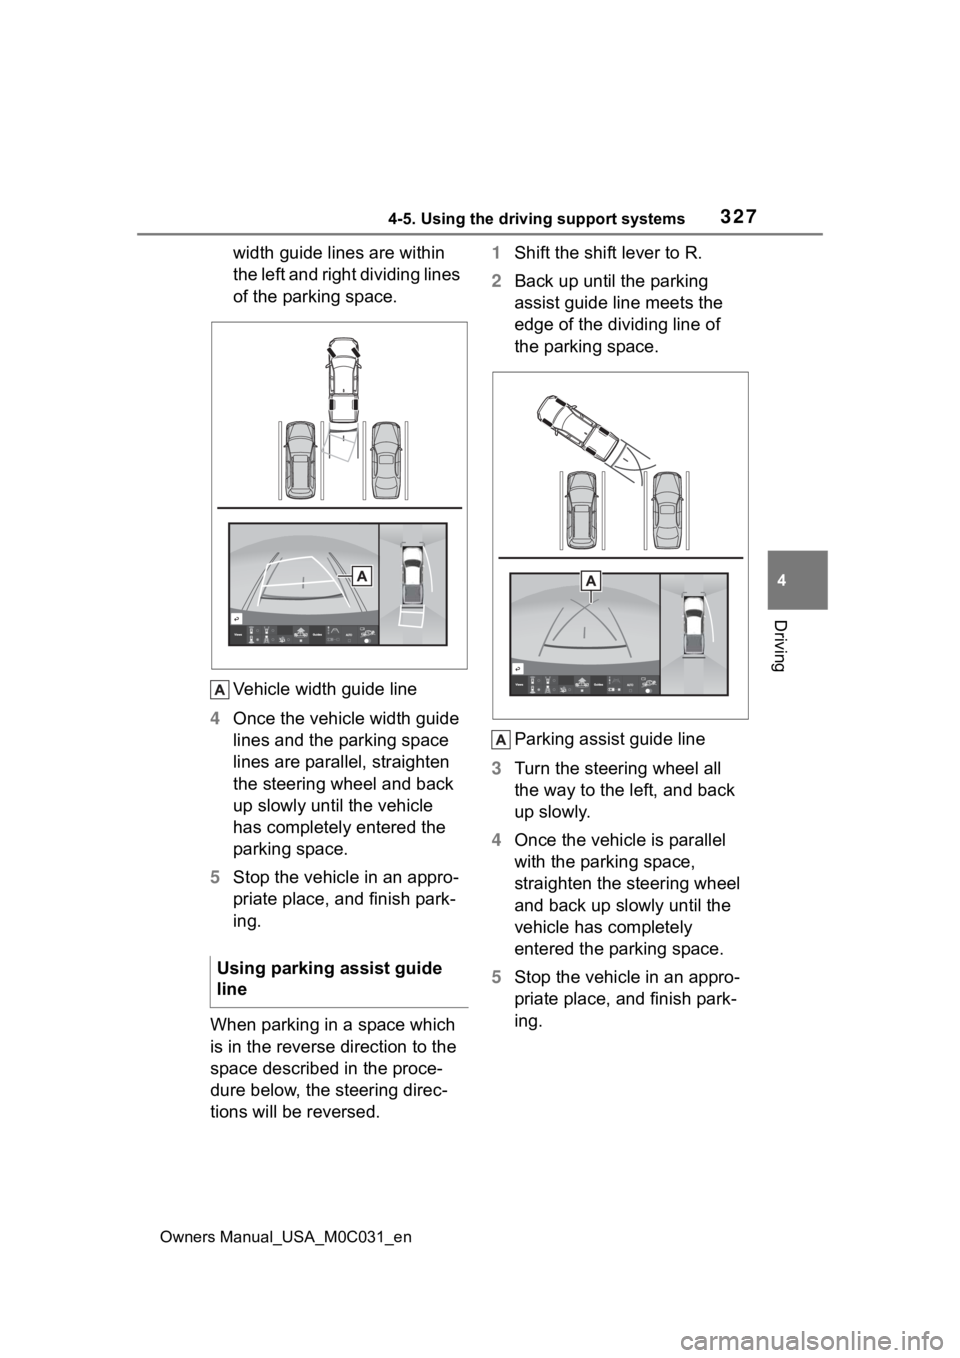
width guide lines are within
the left and right dividing lines
of the parking space.
Vehicle width guide line
4 Once the vehicle width guide
lines and the parking space
lines are parallel, straighten
the steering wheel and back
up slowly until the vehicle
has completely entered the
parking space.
5 Stop the vehicle in an appro-
priate place, and finish park-
ing.
When parking in a space which
is in the reverse direction to the
space described in the proce-
dure below, the steering direc-
tions will be reversed. 1
Shift the shift lever to R.
2 Back up until the parking
assist guide line meets the
edge of the dividing line of
the parking space.
Parking assist guide line
3 Turn the steering wheel all
the way to the left, and back
up slowly.
4 Once the vehicle is parallel
with the parking space,
straighten the steering wheel
and back up slowly until the
vehicle has completely
entered the parking space.
5 Stop the vehicle in an appro-
priate place, and finish park-
ing.
Using parking assist guide
line
Page 328 of 618
3284-5. Using the driving support systems
Owners Manual_USA_M0C031_en
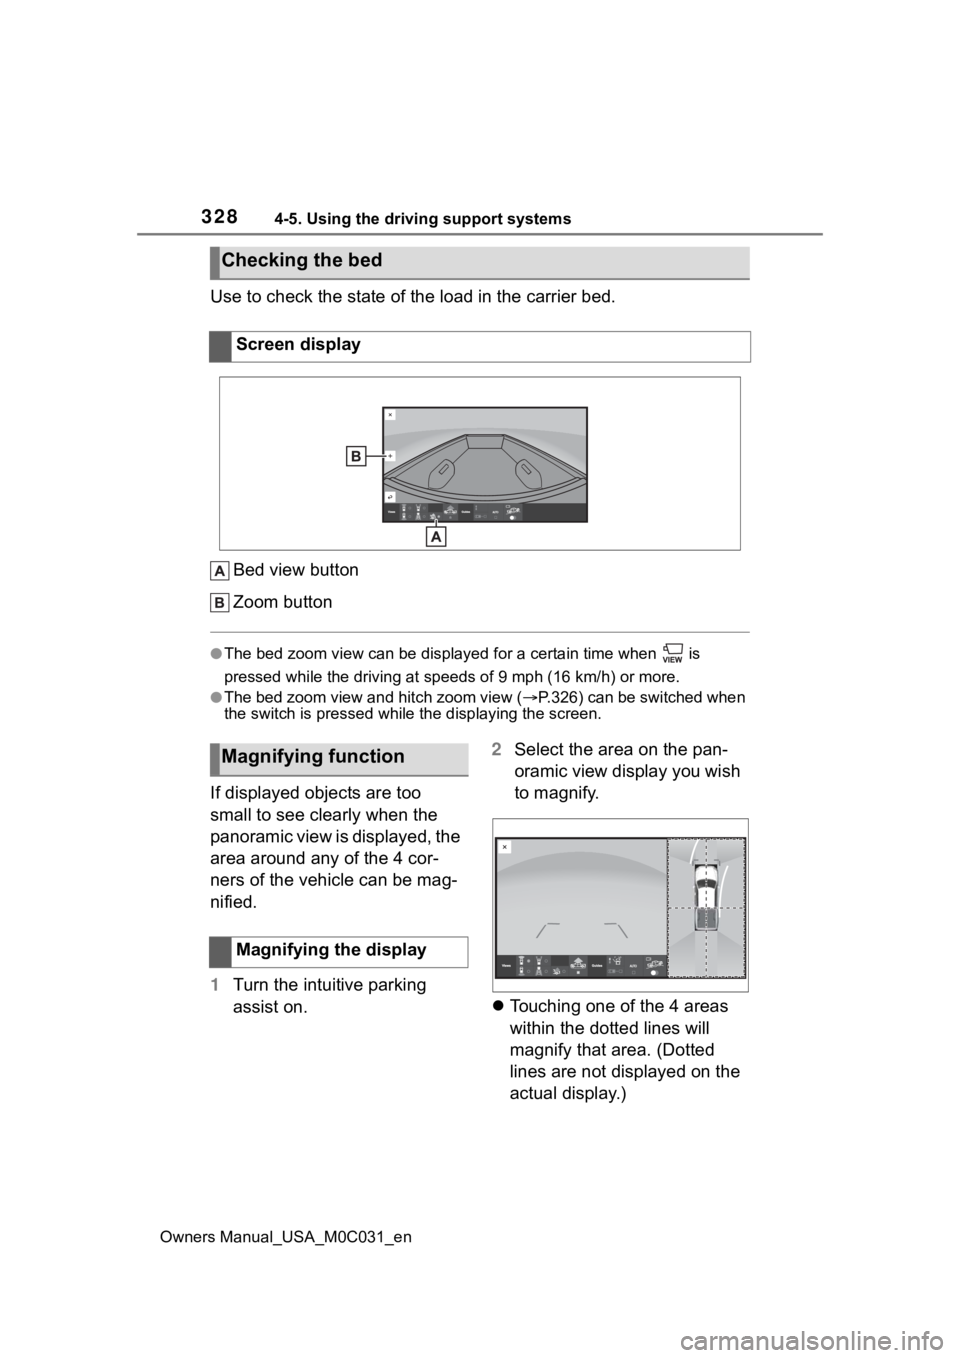
Use to check the state of the load in the carrier bed.Bed view button
Zoom button
●The bed zoom view can be displayed for a certain time when is
pressed while the driving at speeds of 9 mph (16 km/h) or more.
●The bed zoom view and hitch zoom view ( P.326) can be switched when
the switch is pressed while the displaying the screen.
If displayed objects are too
small to see clearly when the
panoramic view is displayed, the
area around any of the 4 cor-
ners of the vehicle can be mag-
nified.
1 Turn the intuitive parking
assist on. 2
Select the area on the pan-
oramic view display you wish
to magnify.
Touching one of the 4 areas
within the dotted lines will
magnify that area. (Dotted
lines are not displayed on the
actual display.)
Checking the bed
Screen display
Magnifying function
Magnifying the display
Page 329 of 618
3294-5. Using the driving support systems
Owners Manual_USA_M0C031_en
4
Driving
To return to the normal view,
touch the panoramic view dis-
play again.
●The magnifying function is
enabled when all of the following
conditions are met:
• The panoramic view & front view
or the panoramic view & rear view
is displayed.
• The vehicle speed is below
approximately 10 mph (16 km/h).
• The intuitive parking assist is available.
●In the following situations, the
magnified displa y will be can-
celed automatically:
• The vehicle speed is approxi- mately 10 mph (16 km/h) or
higher.
• The intuitive parking assist is unavailable.
●When the display is magnified, the
guide lines will no t be displayed.
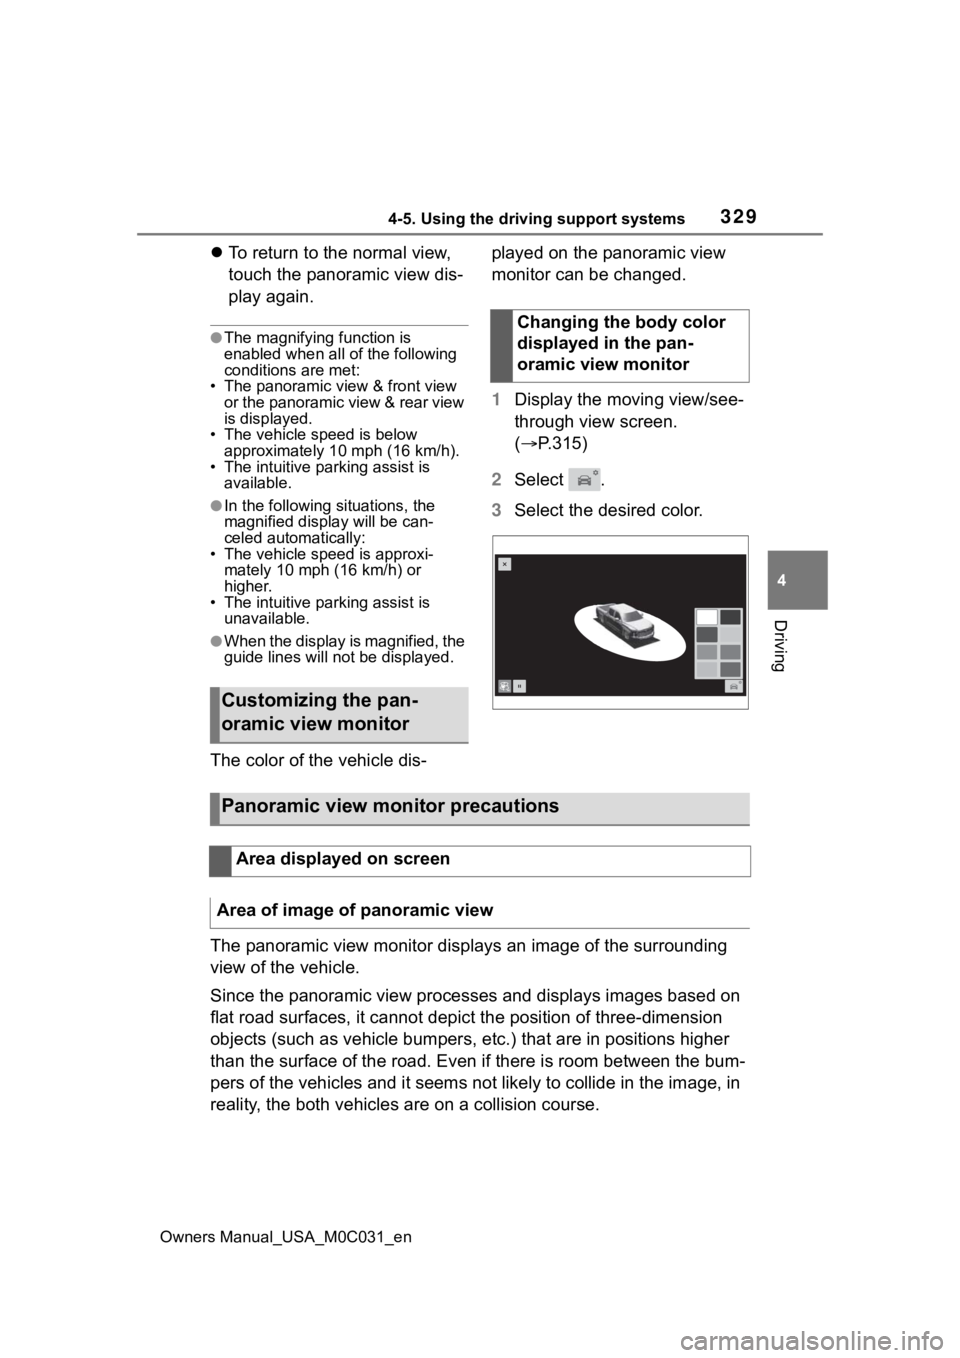
The color of the vehicle dis- played on the panoramic view
monitor can be changed.
1
Display the moving view/see-
through view screen.
( P.315)
2 Select .
3 Select the desired color.
The panoramic view monitor disp lays an image of the surrounding
view of the vehicle.
Since the panoramic view processes and displays images based on
flat road surfaces, it cannot depict the position of three-dime nsion
objects (such as vehicle bumpers , etc.) that are in positions higher
than the surface of the road. Even if there is room between the bum-
pers of the vehicles and it seems not likely to collide in the image, in
reality, the both vehicles are on a collision course.
Customizing the pan-
oramic view monitor
Changing the body color
displayed in the pan-
oramic view monitor
Panoramic view monitor precautions
Area displayed on screen
Area of image of panoramic view
Page 330 of 618
3304-5. Using the driving support systems
Owners Manual_USA_M0C031_en
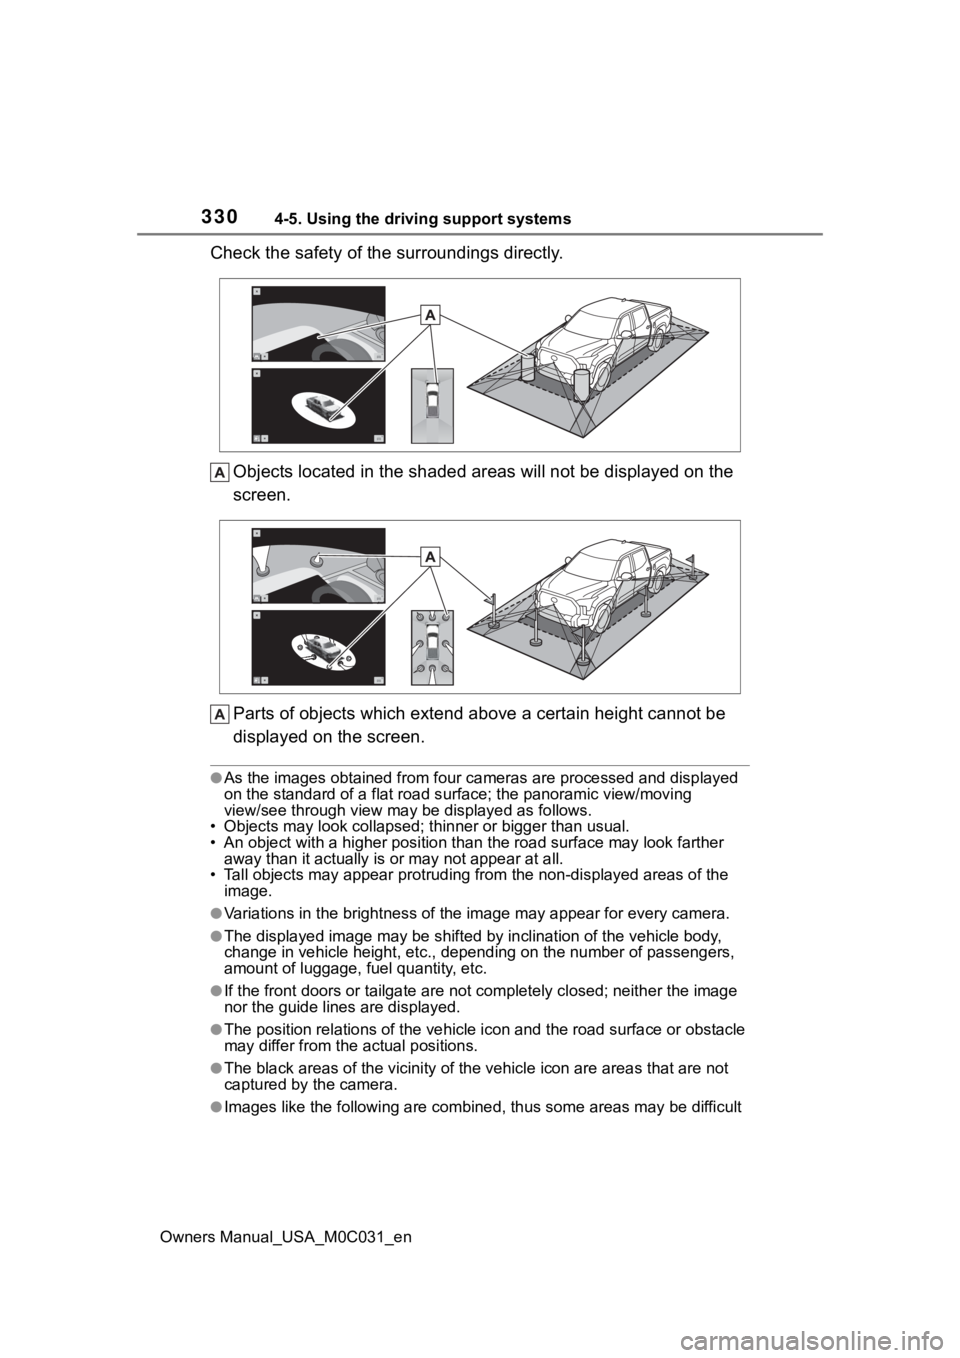
Check the safety of the surroundings directly.Objects located in the shaded areas will not be displayed on th e
screen.
Parts of objects which exten d above a certain height cannot be
displayed on the screen.
●As the images obtained from four cameras are processed and displayed
on the standard of a flat road s urface; the panoramic view/moving
view/see through view may be displayed as follows.
• Objects may look collapsed; t hinner or bigger than usual.
• An object with a higher positi on than the road surface may look farther
away than it actually is or may not appear at all.
• Tall objects may appear protrudi ng from the non-displayed areas of the
image.
●Variations in the brightness of the image may appear for every camera.
●The displayed image may be shift ed by inclination of the vehicle body,
change in vehicle height, etc., d epending on the number of pass engers,
amount of luggage, fuel quantity, etc.
●If the front doors or tailgate are not completely closed; neith er the image
nor the guide lines are displayed.
●The position relations of the ve hicle icon and the road surface or obstacle
may differ from the actual positions.
●The black areas of the vicinity of the vehicle icon are areas t hat are not
captured by the camera.
●Images like the following are combined, thus some areas may be difficult