TOYOTA VENZA 2014 Accessories, Audio & Navigation (in English)
Manufacturer: TOYOTA, Model Year: 2014, Model line: VENZA, Model: TOYOTA VENZA 2014Pages: 363, PDF Size: 21.59 MB
Page 191 of 363
5
191
1
2
3
4
5
6
7
8
9
VENZA_Navi_OM73020U_(U)
13.05.09 20:08
5. RADIO OPERATION(XM Satellite Radio
BROADCAST) ........... .................208
HOW TO SUBSCRIBE TO AN
XM Satellite Radio............................. 208
DISPLAYING THE RADIO ID .............. 209
LISTENING TO SATELLITE RADIO ............................................... 209
CHANNEL CATEGORY ...................... 210
PRESETTING A CHANNEL ................ 210
SELECTING A CHANNEL ................... 210
DISPLAYING THE TITLE AND NAME ....................................... 211
IF THE SATELLITE RADIO TUNER MALFUNCTIONS .............................. 212
6. RADIO OPERATION (INTERNET RADIO
BROADCAST) ........... ................ 214
LISTENING TO INTERNET RADIO .... 214
7. DVD PLAYER OPERATION ........ 215
INSERTING A DISC ............................ 215
EJECTING A DISC .............................. 215
PLAYING A DISC ................................ 216
PLAYING AN AUDIO DISC ................. 217
PLAYING AN MP3/WMA DISC ........... 219
OPERATING A DVD DISC .................. 222
PLAYING A DVD DISC ....................... 223
DVD OPTIONS .................................... 225
IF THE PLAYER MALFUNCTIONS..... 234
DVD PLAYER AND DVD VIDEO
DISC INFORMATION ....................... 234
8. USB MEMORY OPERATION ...... 237
CONNECTING A USB MEMORY ........ 237
PLAYING A USB MEMORY ................ 238
9. iPod OPERATION ....................... 242
CONNECTING iPod............................. 242
PLAYING iPod ..................................... 243
10. Bluetooth® AUDIO
OPERATI
ON ............................. 246
CONNECTING A Bluetooth® AUDIO
PLAYER ............................................ 249
PLAYING Bluetooth
® AUDIO ............... 251
11. AUDIO/VIDEO REMOTE CONTROLS
(STEERING SWITCHES) ........... 256
12. AUDIO/VIDEO SYSTEM OPERATING HINTS.................. 257
RADIO RECEPTION............................ 257
iPod ...................................................... 258
USB MEMORY .................................... 259
CARING FOR YOUR DVD PLAYER
AND DISC ......................................... 259
MP3/WMA FILES ................................. 261
CD-R AND CD-RW DISCS .................. 263
TERMS ................................................ 263
1. AUDIO SETTINGS ...................... 267
HD Radio™ SYSTEM SETTINGS ....... 267
iPod SETTINGS ................................... 268
2SETUP
AUDIO/VIDEO SYSTEM
Page 192 of 363
192
VENZA_Navi_OM73020U_(U)
13.05.13 14:12
1. AUDIO/VIDEO SYSTEM OPERATION
1.QUICK REFERENCE
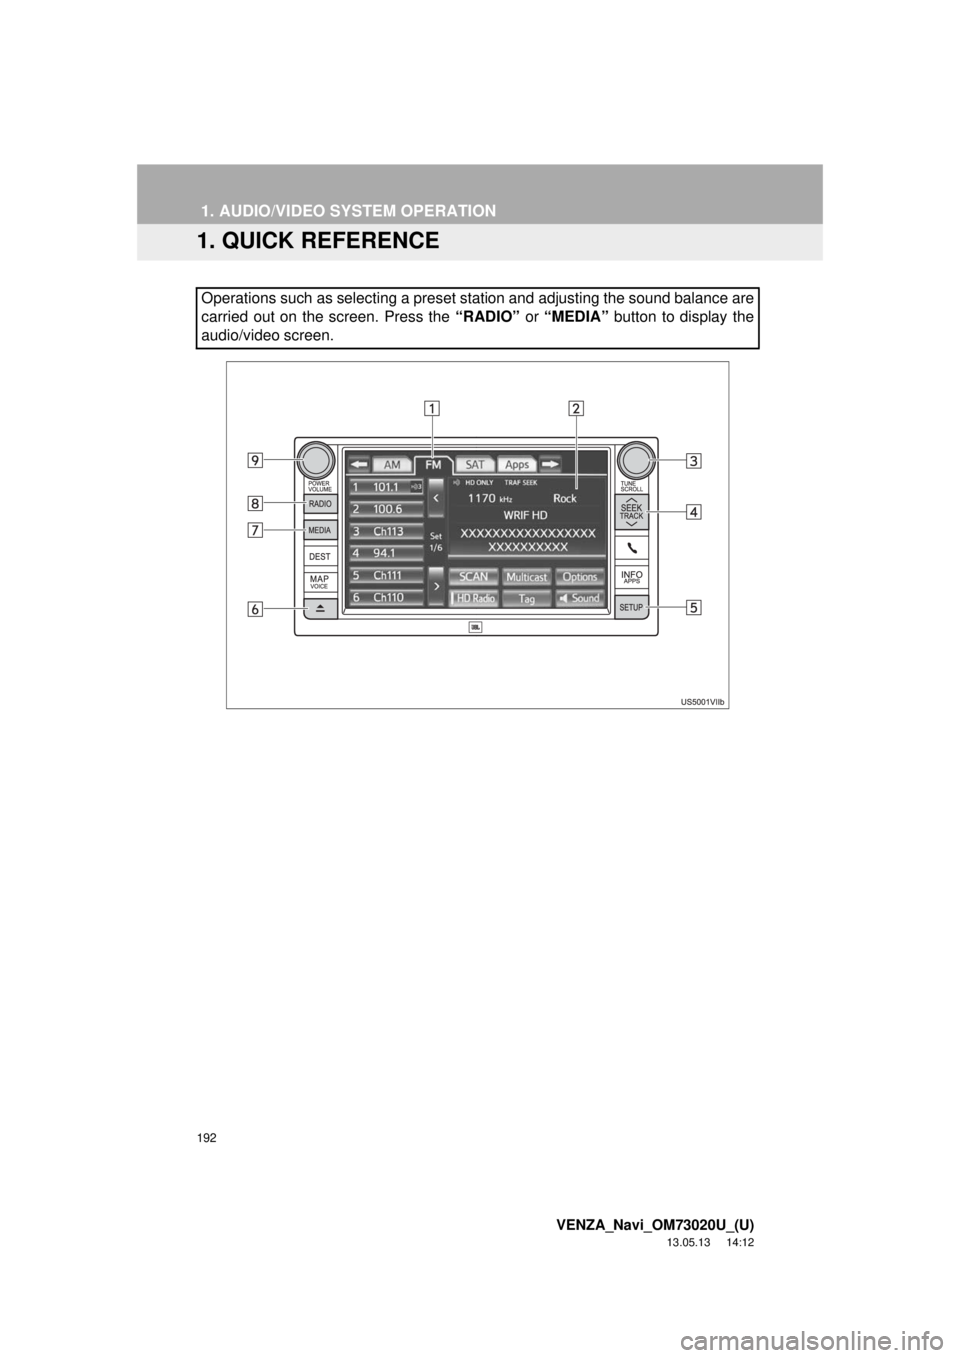
Operations such as selecting a preset station and adjusting the sound balance are
carried out on the screen. Press the “RADIO” or “MEDIA” button to display the
audio/video screen.
Page 193 of 363
193
1. AUDIO/VIDEO SYSTEM OPERATION
5
AUDIO/VIDEO SYSTEM
VENZA_Navi_OM73020U_(U)
13.05.13 14:12
No.NameFunctionPage
Function menu tabTouch the desired radio or media mode screen
tab.196
Function menu dis-
play screenTouch to control the selected radio or media
mode.196
“TUNE/SCROLL”
knob
Turn to step up and step down the station band,
change to the next or previous satellite radio
channel, or skip to the next or previous track,
DVD chapter, etc. Also, the knob can be used to
enter selections on the track/file and album/folder
screens by pressing it.200, 209,
217, 219,
223, 238,
243, 251
“SEEK/TRACK”
buttonPress the “” or “” button to seek up or down
for a station or channel, or to access a desired
track, file or chapter.201, 210,
217, 219,
223, 238,
243, 251
“SETUP” buttonPress to display the “Setup” screen.267
“ ” buttonPress to insert or eject a disc.199, 215
“MEDIA” buttonPress to display the media control screen.195
“RADIO” buttonPress to display the radio control screen.195
“POWER/
VOLUME” knobPress to turn the audio/video system on and off,
and turn to adjust the volume.195
Page 194 of 363
194
1. AUDIO/VIDEO SYSTEM OPERATION
VENZA_Navi_OM73020U_(U)
13.05.13 14:12
2. SOME BASICS
This section describes some of the ba-
sic features of the audio/video system.
Some information may not pertain to
your system.
Vehicles with a smart key system
Your audio/video system works when
the “ENGINE START STOP” switch is
turned to ACCESSORY or IGNITION
ON mode.
Vehicles without a smart key system
Your audio/video system works when
the engine switch is turned to the
“ACC” or “ON” position.
CAUTION
●For vehicles sold in U.S.A. and Canada:
Part 15 of the FCC Rules
FCC Warning: Changes or modifications
in construction not expressly approved
by the party responsible for compliance
could void the user’s authority to operate
the equipment. Radio frequency
exposure. This device is approved for
Mobile Application only and, to comply
with applicable FCC radio frequency
exposure regulations, must be used with
a distance of at least 7.9 in. (20 cm)
between the antenna and the body of
any person at all time during use.
CAUTION
●Laser products
• Do not take this unit apart or attempt to
make any changes yourself. This is an
intricate unit that uses a laser pickup to
retrieve information from the surface of
compact discs. The laser is carefully
shielded so that its rays remain inside
the cabinet. Therefore, never try to
disassemble the player or alter any of
its parts since you may be exposed to
laser rays and dangerous voltages.
• This product utilizes a laser. Use of
controls or adjustments or
performance of procedures other than
those specified herein may result in
hazardous radiation exposure.
NOTICE
●To prevent the battery from being dis-
charged, do not leave the audio/video
system on longer than necessary when
the engine is not running.
Page 195 of 363
195
1. AUDIO/VIDEO SYSTEM OPERATION
5
AUDIO/VIDEO SYSTEM
VENZA_Navi_OM73020U_(U)
13.05.13 14:12
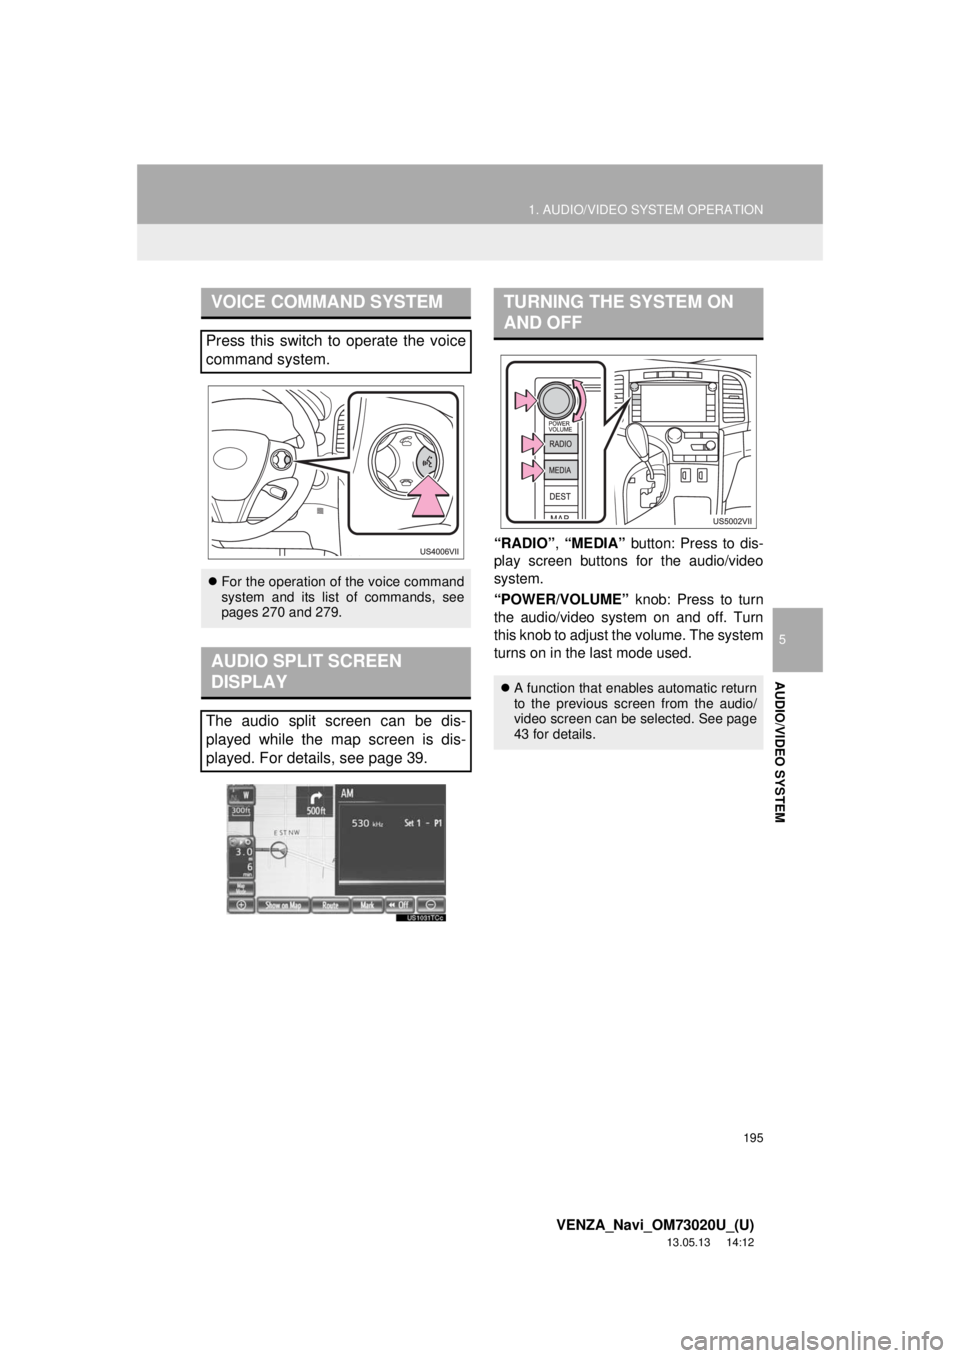
“RADIO”, “MEDIA” button: Press to dis-
play screen buttons for the audio/video
system.
“POWER/VOLUME” knob: Press to turn
the audio/video system on and off. Turn
this knob to adjust the volume. The system
turns on in the last mode used.
VOICE COMMAND SYSTEM
Press this switch to operate the voice
command system.
For the operation of the voice command
system and its list of commands, see
pages 270 and 279.
AUDIO SPLIT SCREEN
DISPLAY
The audio split screen can be dis-
played while the map screen is dis-
played. For details, see page 39.
TURNING THE SYSTEM ON
AND OFF
A function that enables automatic return
to the previous screen from the audio/
video screen can be selected. See page
43 for details.
Page 196 of 363
196
1. AUDIO/VIDEO SYSTEM OPERATION
VENZA_Navi_OM73020U_(U)
13.05.13 14:12
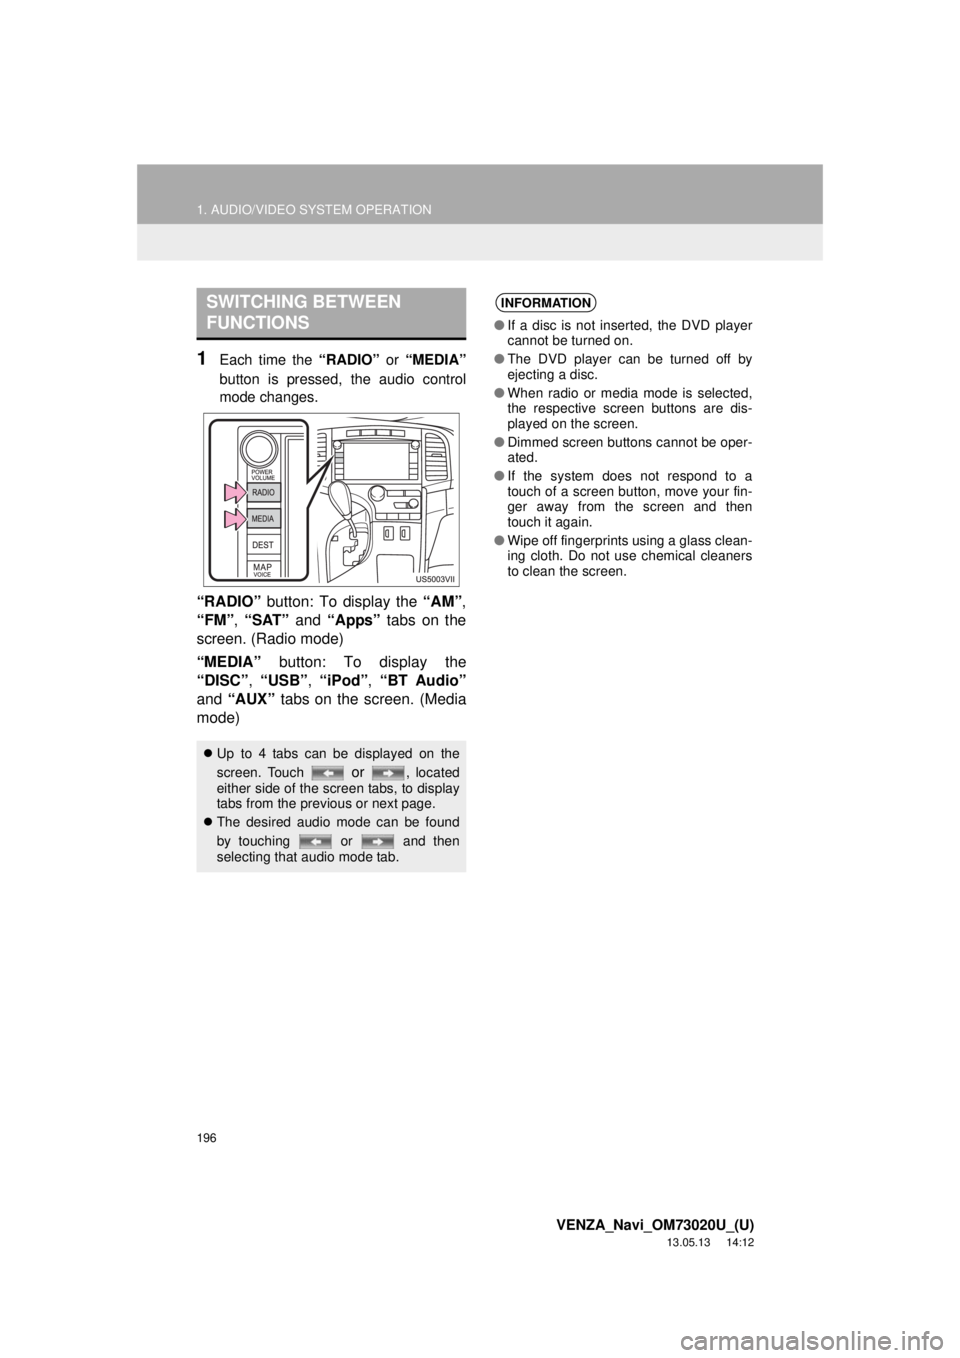
1Each time the “RADIO” or “MEDIA”
button is pressed, the audio control
mode changes.
“RADIO” button: To display the “AM”,
“FM”, “SAT” and “Apps” tabs on the
screen. (Radio mode)
“MEDIA” button: To display the
“DISC”, “USB”, “iPod”, “BT Audio”
and “AUX” tabs on the screen. (Media
mode)
SWITCHING BETWEEN
FUNCTIONS
Up to 4 tabs can be displayed on the
screen. Touch
or , located
either side of the screen tabs, to display
tabs from the previous or next page.
The desired audio mode can be found
by touching or and then
selecting that audio mode tab.
INFORMATION
●If a disc is not inserted, the DVD player
cannot be turned on.
●The DVD player can be turned off by
ejecting a disc.
●When radio or media mode is selected,
the respective screen buttons are dis-
played on the screen.
●Dimmed screen buttons cannot be oper-
ated.
●If the system does not respond to a
touch of a screen button, move your fin-
ger away from the screen and then
touch it again.
●Wipe off fingerprints using a glass clean-
ing cloth. Do not use chemical cleaners
to clean the screen.
Page 197 of 363
197
1. AUDIO/VIDEO SYSTEM OPERATION
5
AUDIO/VIDEO SYSTEM
VENZA_Navi_OM73020U_(U)
13.05.13 14:12
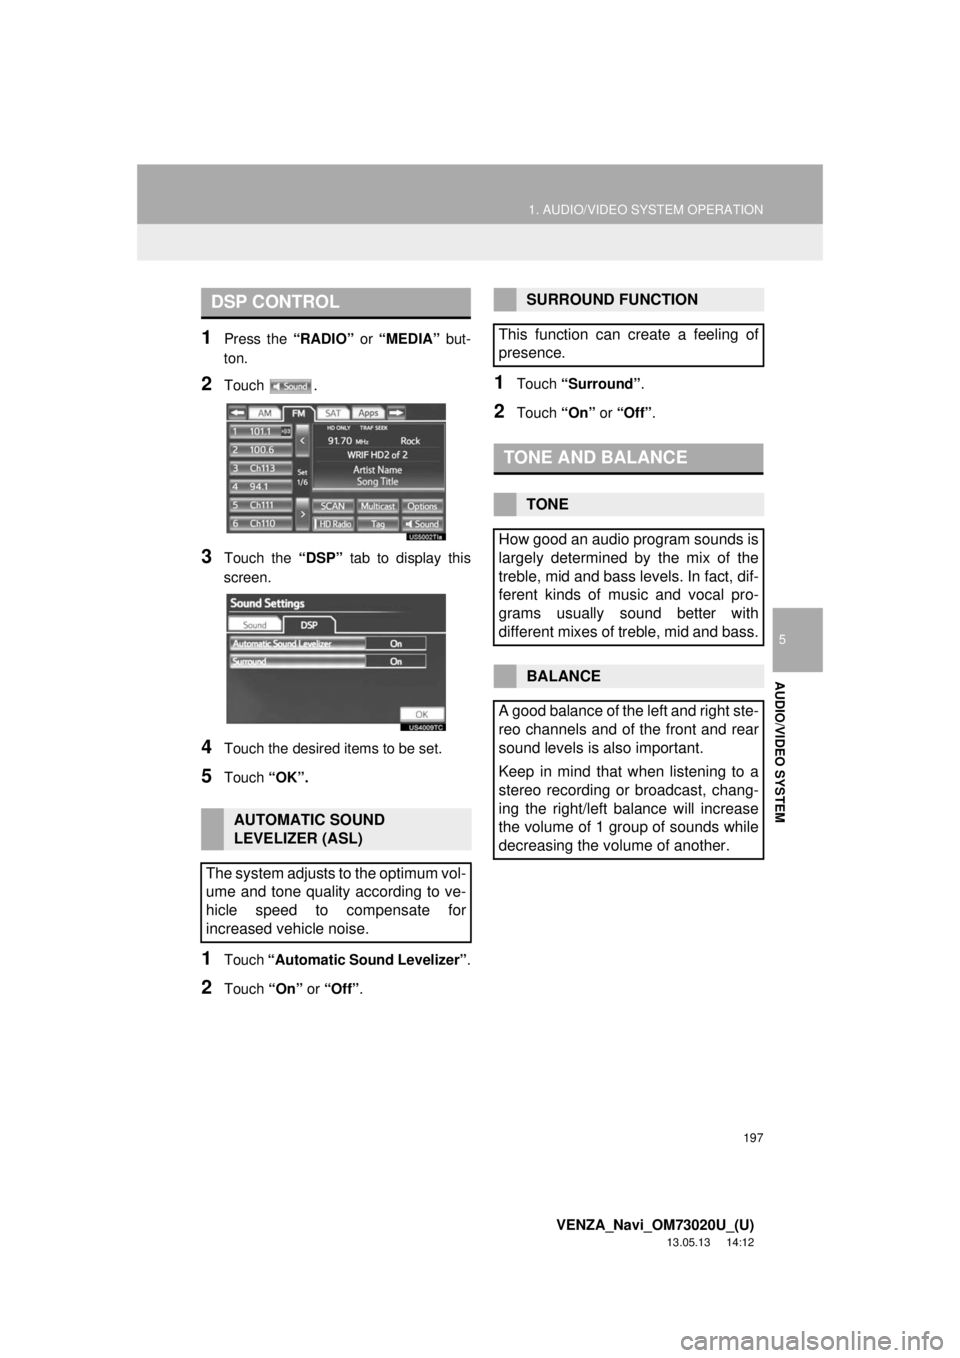
1Press the “RADIO” or “MEDIA” but-
ton.
2Touch .
3Touch the “DSP” tab to display this
screen.
4Touch the desired items to be set.
5Touch “OK”.
1Touch “Automatic Sound Levelizer”.
2Touch “On” or “Off”.
1Touch “Surround”.
2Touch “On” or “Off”.
DSP CONTROL
AUTOMATIC SOUND
LEVELIZER (ASL)
The system adjusts to the optimum vol-
ume and tone quality according to ve-
hicle speed to compensate for
increased vehicle noise.
SURROUND FUNCTION
This function can create a feeling of
presence.
TONE AND BALANCE
TONE
How good an audio program sounds is
largely determined by the mix of the
treble, mid and bass levels. In fact, dif-
ferent kinds of music and vocal pro-
grams usually sound better with
different mixes of treble, mid and bass.
BALANCE
A good balance of the left and right ste-
reo channels and of the front and rear
sound levels is also important.
Keep in mind that when listening to a
stereo recording or broadcast, chang-
ing the right/left balance will increase
the volume of 1 group of sounds while
decreasing the volume of another.
Page 198 of 363
198
1. AUDIO/VIDEO SYSTEM OPERATION
VENZA_Navi_OM73020U_(U)
13.05.13 14:12
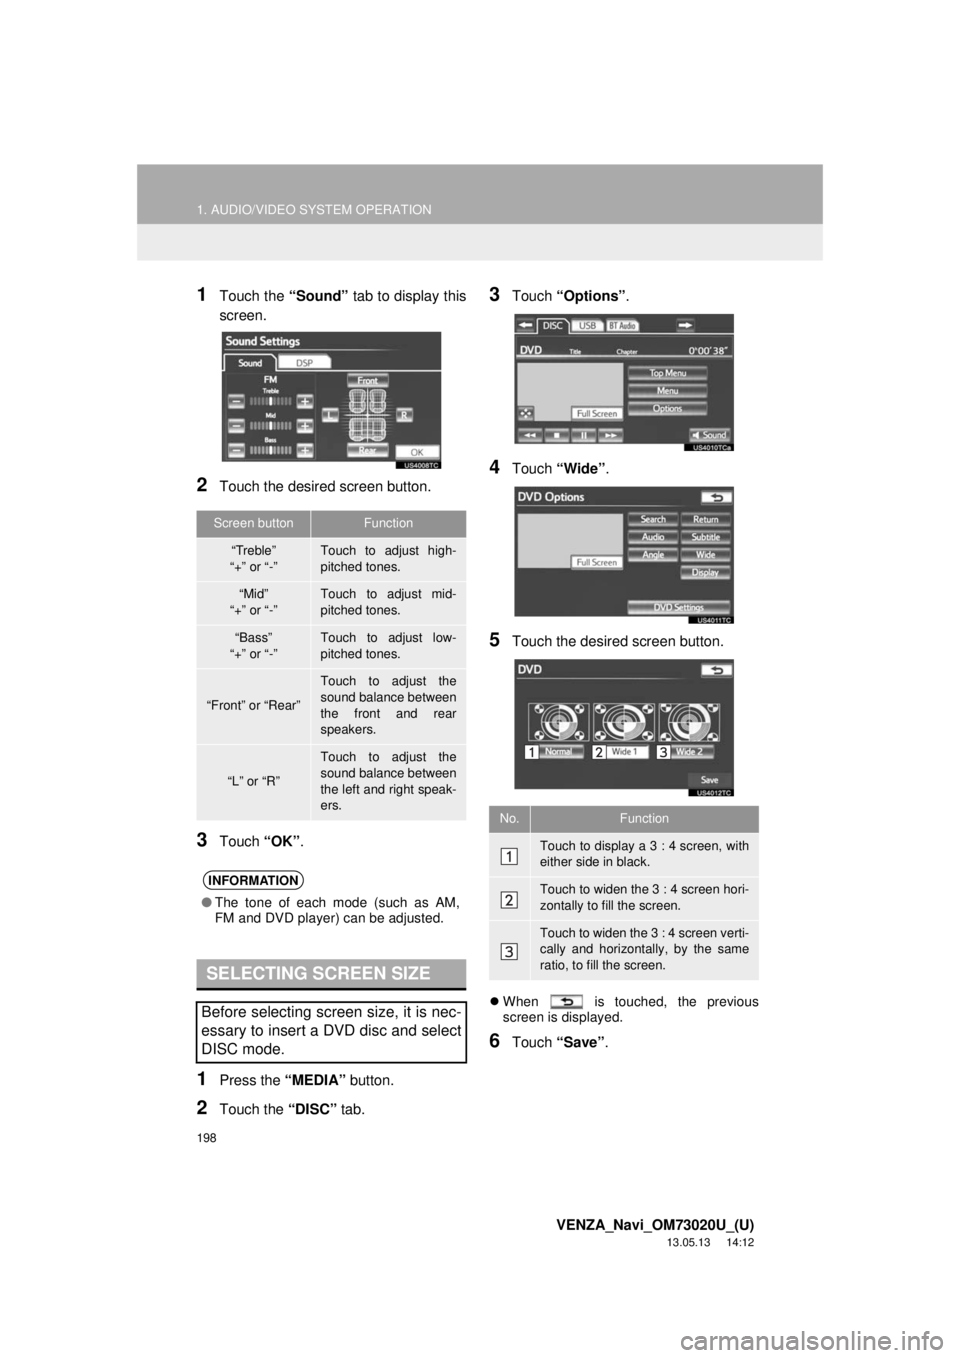
1Touch the “Sound” tab to display this
screen.
2Touch the desired screen button.
3Touch “OK”.
1Press the “MEDIA” button.
2Touch the “DISC” tab.
3Touch “Options”.
4Touch “Wide”.
5Touch the desired screen button.
When is touched, the previous
screen is displayed.
6Touch “Save”.
Screen buttonFunction
“Treble”
“+” or “-”Touch to adjust high-
pitched tones.
“Mid”
“+” or “-”Touch to adjust mid-
pitched tones.
“Bass”
“+” or “-”Touch to adjust low-
pitched tones.
“Front” or “Rear”
Touch to adjust the
sound balance between
the front and rear
speakers.
“L” or “R”
Touch to adjust the
sound balance between
the left and right speak-
ers.
INFORMATION
●The tone of each mode (such as AM,
FM and DVD player) can be adjusted.
SELECTING SCREEN SIZE
Before selecting screen size, it is nec-
essary to insert a DVD disc and select
DISC mode.
No.Function
Touch to display a 3 : 4 screen, with
either side in black.
Touch to widen the 3 : 4 screen hori-
zontally to fill the screen.
Touch to widen the 3 : 4 screen verti-
cally and horizontally, by the same
ratio, to fill the screen.
Page 199 of 363
199
1. AUDIO/VIDEO SYSTEM OPERATION
5
AUDIO/VIDEO SYSTEM
VENZA_Navi_OM73020U_(U)
13.05.13 14:12
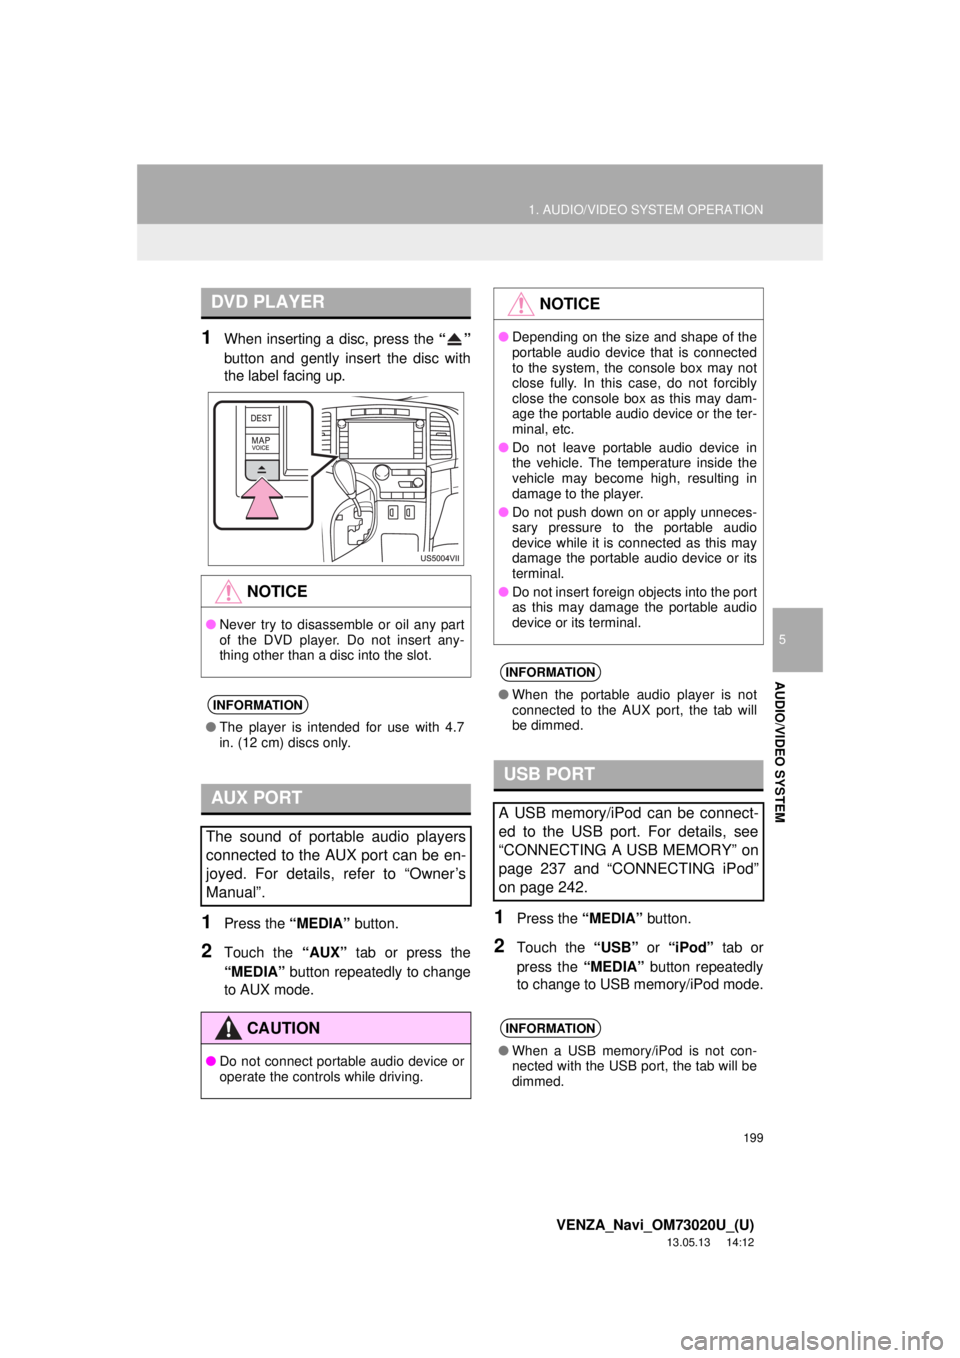
1When inserting a disc, press the “”
button and gently insert the disc with
the label facing up.
1Press the “MEDIA” button.
2Touch the “AUX” tab or press the
“MEDIA” button repeatedly to change
to AUX mode.
1Press the “MEDIA” button.
2Touch the “USB” or “iPod” tab or
press the “MEDIA” button repeatedly
to change to USB memory/iPod mode.
DVD PLAYER
NOTICE
●Never try to disassemble or oil any part
of the DVD player. Do not insert any-
thing other than a disc into the slot.
INFORMATION
●The player is intended for use with 4.7
in. (12 cm) discs only.
AUX PORT
The sound of portable audio players
connected to the AUX port can be en-
joyed. For details, refer to “Owner’s
Manual”.
CAUTION
●Do not connect portable audio device or
operate the controls while driving.
NOTICE
●Depending on the size and shape of the
portable audio device that is connected
to the system, the console box may not
close fully. In this case, do not forcibly
close the console box as this may dam-
age the portable audio device or the ter-
minal, etc.
●Do not leave portable audio device in
the vehicle. The temperature inside the
vehicle may become high, resulting in
damage to the player.
●Do not push down on or apply unneces-
sary pressure to the portable audio
device while it is connected as this may
damage the portable audio device or its
terminal.
●Do not insert foreign objects into the port
as this may damage the portable audio
device or its terminal.
INFORMATION
●When the portable audio player is not
connected to the AUX port, the tab will
be dimmed.
USB PORT
A USB memory/iPod can be connect-
ed to the USB port. For details, see
“CONNECTING A USB MEMORY” on
page 237 and “CONNECTING iPod”
on page 242.
INFORMATION
●When a USB memory/iPod is not con-
nected with the USB port, the tab will be
dimmed.
Page 200 of 363
200
1. AUDIO/VIDEO SYSTEM OPERATION
VENZA_Navi_OM73020U_(U)
13.05.13 14:12
3. RADIO OPERATION
1Press the “RADIO” button.
2Touch the “AM”, “FM”, “SAT” or
“Apps” tab or press the “RADIO” but-
ton repeatedly to select the desired
tab.
1Turn the knob clockwise to step up the
station band or counterclockwise to
step down.
1Tune in the desired station.
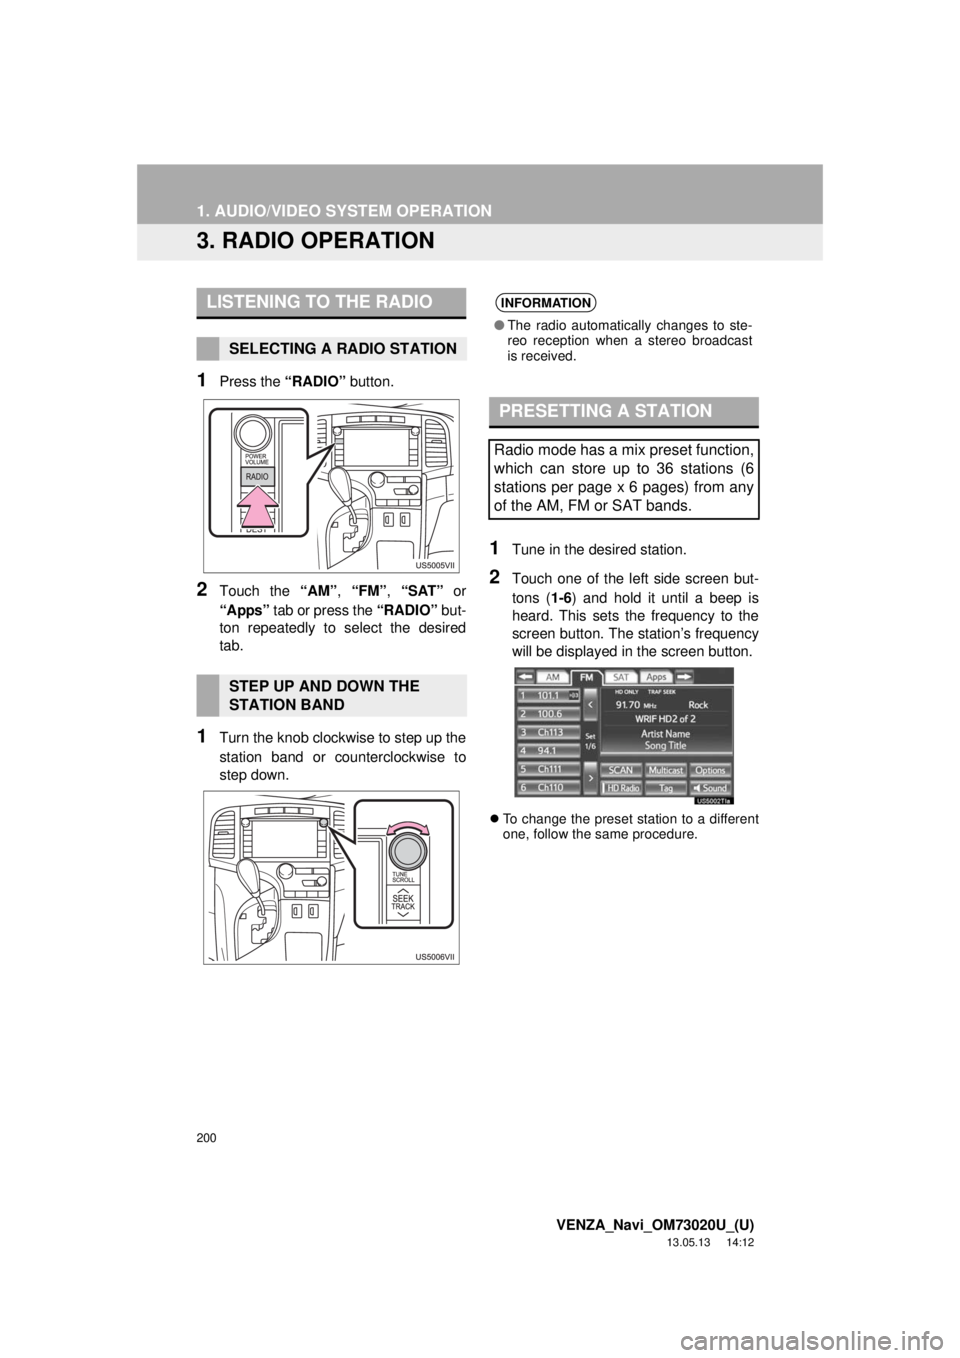
2Touch one of the left side screen but-
tons (1-6) and hold it until a beep is
heard. This sets the frequency to the
screen button. The station’s frequency
will be displayed in the screen button.
To change the preset station to a different
one, follow the same procedure.
LISTENING TO THE RADIO
SELECTING A RADIO STATION
STEP UP AND DOWN THE
STATION BAND
INFORMATION
●The radio automatically changes to ste-
reo reception when a stereo broadcast
is received.
PRESETTING A STATION
Radio mode has a mix preset function,
which can store up to 36 stations (6
stations per page x 6 pages) from any
of the AM, FM or SAT bands.