TOYOTA xB 2008 Accessories, Audio & Navigation (in English)
Manufacturer: TOYOTA, Model Year: 2008, Model line: xB, Model: TOYOTA xB 2008Pages: 44, PDF Size: 0.99 MB
Page 11 of 44
4MULTI SELECTOR
Press the center of the MULTI
SELECTOR to display the registered
broadcasting station list in PRESET1-
6. Turn the MULTI SELECTOR to
select a station, press the MULTI
SELECTOR again to set the station.
When the station is set, the cursor
inverts into white.
• TUNE
Press the MULTI SELECTOR right to
manually select (one step at a time)
the station with the next higher fre-
quency.
Press the MULTI SELECTOR up and
hold until you hear a beep, and auto-
matic station selection begins to
select stations in order of increasing
frequency.
• TUNE
Press the MULTI SELECTOR left to
manually select (one step at a time)
the station with the next lower fre-
quency.
Press the MULTI SELECTOR down
and hold until you hear a beep, and
automatic station selection begins to
select stations in order of decreasing
frequency.
5PRESET 1-6
Press to recall previously stored sta-
tions (Preset Channels).
Press and hold until you hear a beep,
and the station you are currently
tuned to is stored as a Preset
Channel.
6SCAN
If you press, SCANis indicated in
the display and SCAN begins search-
ing for stations with good reception.
If you press and hold until you hear a
beep,
SCANis indicated in the dis-
play and SCAN of preset channels
begins.
NOTICE
You can store up to 6 stations
per band.
11
Page 12 of 44
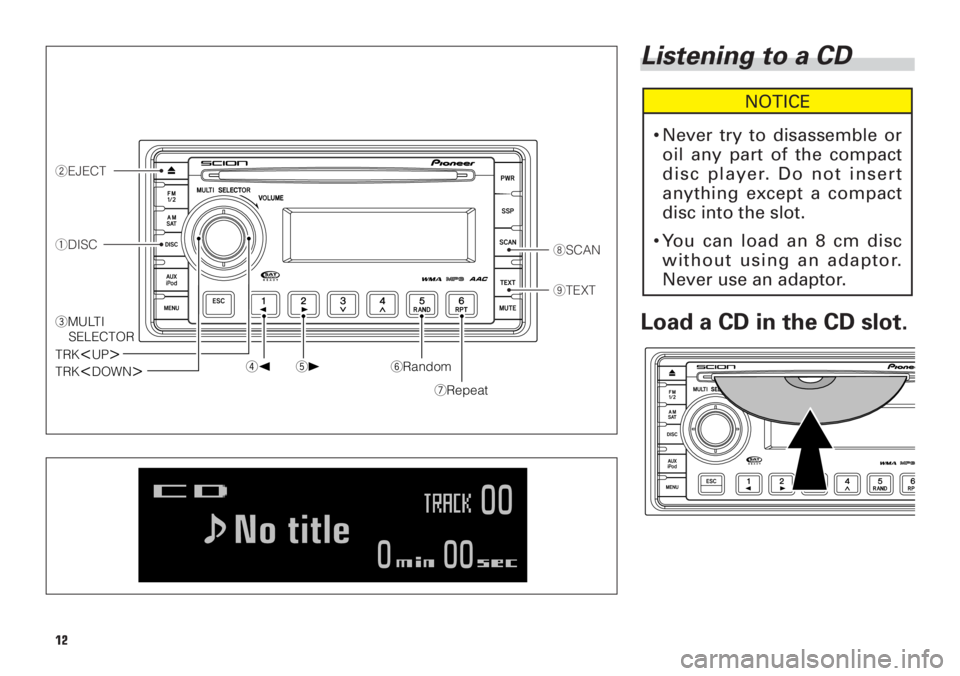
Listening to a CD
Load a CD in the CD slot.
NOTICE
•Never try to disassemble or
oil any part of the compact
disc player. Do not insert
anything except a compact
disc into the slot.
•You can load an 8 cm disc
without using an adaptor.
Never use an adaptor.
8SCAN
9TEXT
2EJECT
1DISC
4
[5
]6Random
7Repeat
TRK
3MULTI
SELECTOR
TRK
12
Page 13 of 44
1DISC
Switches to the CD mode. (Only
effective if a disc is loaded)
20(EJECT)
Press to eject the disc currently play-
ing.
3MULTI SELECTOR
• TRK
Press the MULTI SELECTOR to the
right to proceed to the next track.
• TRK
Pressing the MULTI SELECTOR to
the left takes you back to the start of
the track currently playing. Press the
MULTI SELECTOR to the left once
more to return to the previous track.
4PRESET 1 (2)
Press the PRESET1 to return to the
previous track.
While this is pressed, play of the
track is reversed. (There is sound.)
5PRESET 2 (3)
Press the PRESET2 to go to the next
track.
While this is pressed, play of the
track is fast forwarded. (There is
sound.)
6PRESET 5 (Random)
If you press this, is indicated
in the display and starts to play tracks
on the disc being played in random
order. Press again to cancel.
7PRESET 6 (Repeat)
If you press this, is indicated
in the display and starts to repeat the
track being played. Press again to
cancel.
8SCAN
If you press this, is indicated
in the display and starts to play the
first 10 seconds of each track on the
CD being played. Press again to can-
cel.
9TEXT
Press, and display indications change
as follows:
ELAPSED TIME =DISC TITLE =TR
TITLE (track title)
When 3is displayed, if you press
and hold until you hear a beep, the
display will change to the next page.
A maximum of 2 pages (32 charac-
ters) can be displayed.
CAUTION
Compact disc players use an
invisible laser beam which
could cause hazardous radia-
tion exposure if directed out-
side the unit. Be sure to oper-
ate the player correctly.
13
Page 14 of 44
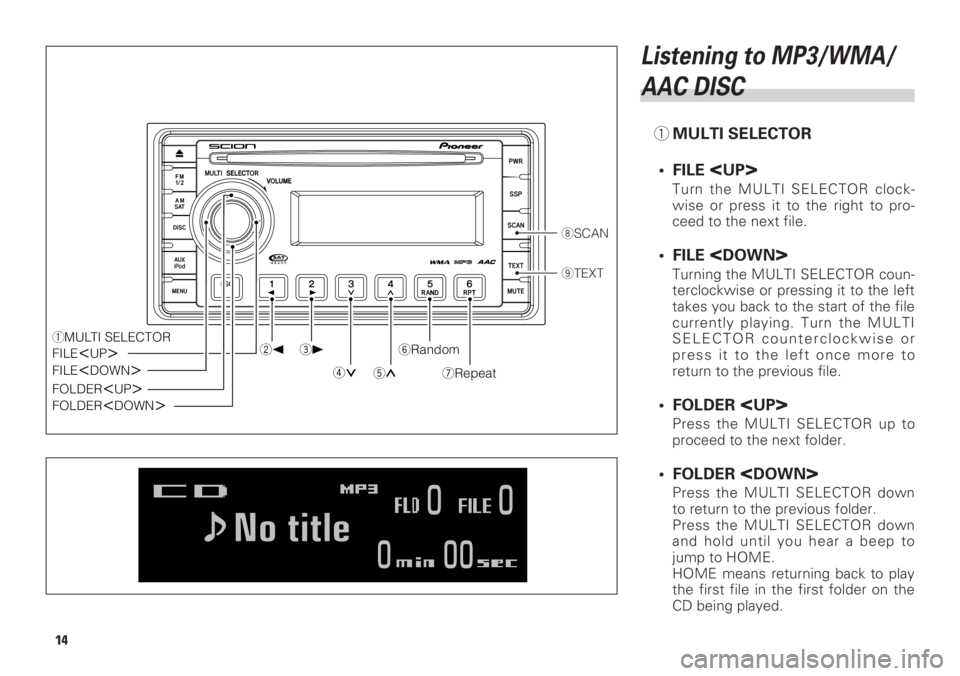
Listening to MP3/WMA/
AAC DISC
1MULTI SELECTOR
• FILE
Turn the MULTI SELECTOR clock-
wise or press it to the right to pro-
ceed to the next file.
• FILE
Turning the MULTI SELECTOR coun-
terclockwise or pressing it to the left
takes you back to the start of the file
currently playing. Turn the MULTI
SELECTOR counterclockwise or
press it to the left once more to
return to the previous file.
• FOLDER
Press the MULTI SELECTOR up to
proceed to the next folder.
• FOLDER
Press the MULTI SELECTOR down
to return to the previous folder.
Press the MULTI SELECTOR down
and hold until you hear a beep to
jump to HOME.
HOME means returning back to play
the first file in the first folder on the
CD being played.
8SCAN
9TEXT
2
[3
]6Random
7Repeat4 5
FILE
FILE
FOLDER
FOLDER
14
Page 15 of 44
15
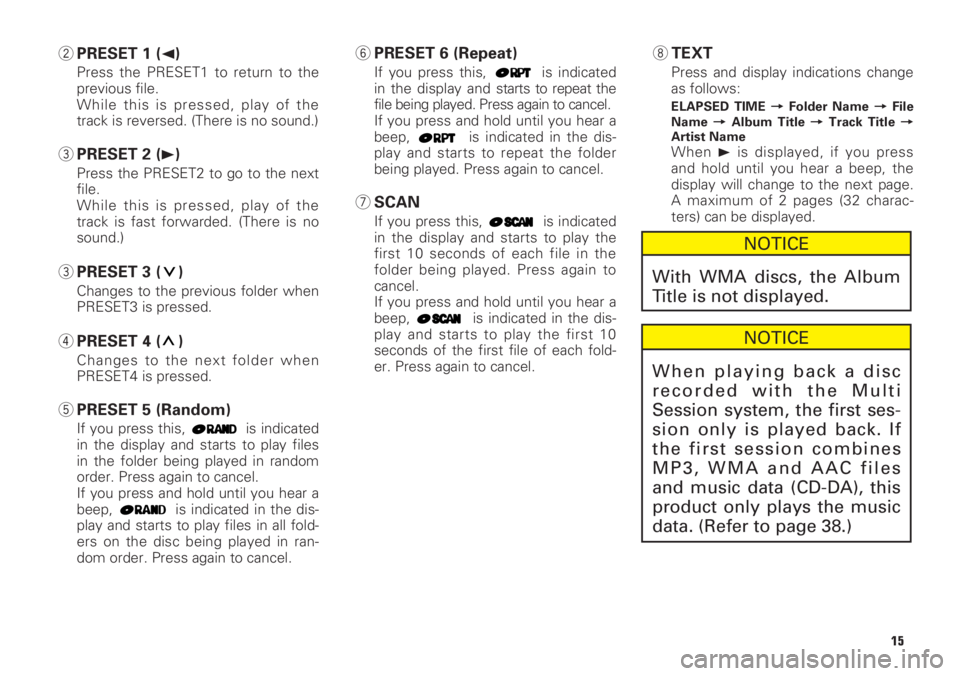
2PRESET 1 (2)
Press the PRESET1 to return to the
previous file.
While this is pressed, play of the
track is reversed. (There is no sound.)
3PRESET 2 (3)
Press the PRESET2 to go to the next
file.
While this is pressed, play of the
track is fast forwarded. (There is no
sound.)
3PRESET 3 ( )
Changes to the previous folder when
PRESET3 is pressed.
4PRESET 4 ( )
Changes to the next folder when
PRESET4 is pressed.
5PRESET 5 (Random)
If you press this, is indicated
in the display and starts to play files
in the folder being played in random
order. Press again to cancel.
If you press and hold until you hear a
beep, is indicated in the dis-
play and starts to play files in all fold-
ers on the disc being played in ran-
dom order. Press again to cancel.
6PRESET 6 (Repeat)
If you press this, is indicated
in the display and starts to repeat the
file being played. Press again to cancel.
If you press and hold until you hear a
beep, is indicated in the dis-
play and starts to repeat the folder
being played. Press again to cancel.
7SCAN
If you press this, is indicated
in the display and starts to play the
first 10 seconds of each file in the
folder being played. Press again to
cancel.
If you press and hold until you hear a
beep, is indicated in the dis-
play and starts to play the first 10
seconds of the first file of each fold-
er. Press again to cancel.
8TEXT
Press and display indications change
as follows:
ELAPSED TIME =Folder Name =File
Name =Album Title =Track Title =
Artist Name
When 3is displayed, if you press
and hold until you hear a beep, the
display will change to the next page.
A maximum of 2 pages (32 charac-
ters) can be displayed.
NOTICE
When playing back a disc
recorded with the Multi
Session system, the first ses-
sion only is played back. If
the first session combines
MP3, WMA and AAC files
and music data (CD-DA), this
product only plays the music
data. (Refer to page 38.)
NOTICE
With WMA discs, the Album
Title is not displayed.
Page 16 of 44
About handling the
iPod
About iPod settings
•This unit supports only an iPod
featuring the Dock connector
port.
•This unit does not support soft-
ware versions prior to iPod
updater 2004-10-20.
•Operations may vary depending
on the software version of iPod.
•You cannot operate the iPod
Equalizer on products. We recom-
mend that you set the iPod
Equalizer to off, before connect-
ing the iPod to this unit.
•The Shuffle function of the iPod is
operated as Random on this unit.
For details, refer to your iPod
Owner’s Manual.
Connecting the iPod
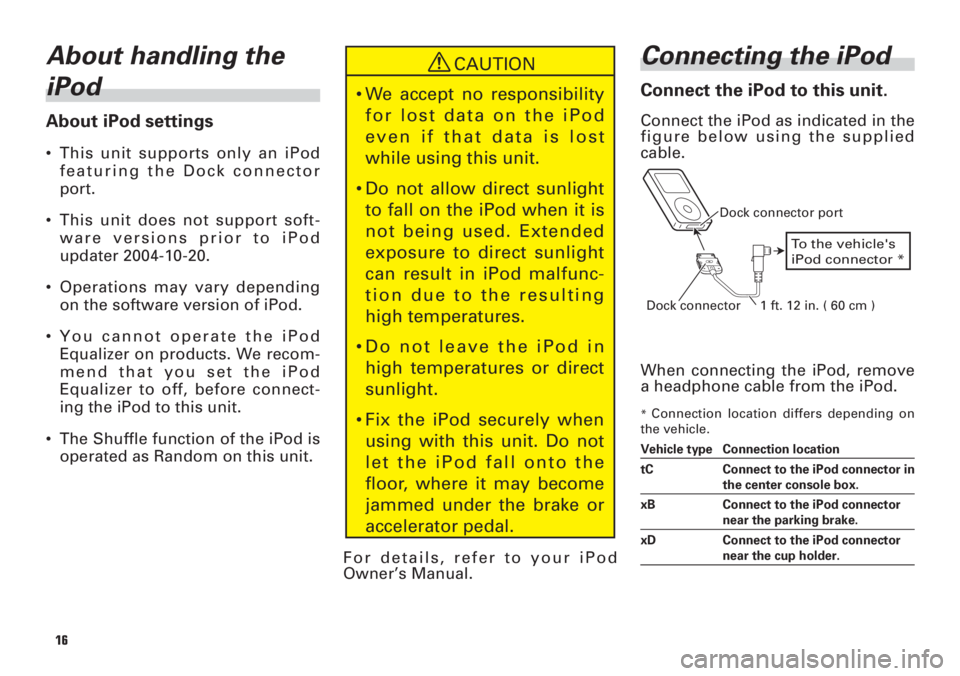
Connect the iPod to this unit.
Connect the iPod as indicated in the
figure below using the supplied
cable.
When connecting the iPod, remove
a headphone cable from the iPod.
*Connection location differs depending on
the vehicle.
Vehicle type Connection location
tC Connect to the iPod connector in
the center console box.
xB Connect to the iPod connector
near the parking brake.
xD Connect to the iPod connector
near the cup holder.
To the vehicle's
iPod connector *
Dock connector port
Dock connector 1 ft. 12 in. ( 60 cm )
16
CAUTION
•We accept no responsibility
for lost data on the iPod
even if that data is lost
while using this unit.
•Do not allow direct sunlight
to fall on the iPod when it is
not being used. Extended
exposure to direct sunlight
can result in iPod malfunc-
tion due to the resulting
high temperatures.
•Do not leave the iPod in
high temperatures or direct
sunlight.
•Fix the iPod securely when
using with this unit. Do not
let the iPod fall onto the
floor, where it may become
jammed under the brake or
accelerator pedal.
Page 17 of 44
As soon as the iPod is connected,
its power is automatically turned
on.
While the iPod is connected to this
unit, SCION(or (check mark)) is
displayed on the iPod.
•When the ignition switch is set to
ACC or ON, the iPod's battery is
charged while the iPod is con-
nected to this unit.
•While the iPod is connected to
this unit, the iPod itself cannot be
turned on or off.
•The iPod connected to this unit is
turned off about two minutes
after the ignition switch is set to
OFF.NOTICE
•Push in until you hear a click
to connect firmly. If it does
not go in smoothly, it may
be upside down so do not
force it in as this may result
in damage.
•Connect the Dock connector
directly to the Dock connec-
tor port. Do not connect it
via the iPod Dock or other
connection.
•When not using the iPod, be
sure to attach the dustproof
cap to the supplied cable
and store where it does not
obstruct driving.
•When the iPod is connected
to this unit, sound will also
be heard from the head-
phone of the iPod. Use with-
out the headphone.
•If you install an audio sys-
tem other than a Scion
Genuine Audio, you will not
be able to use the iPod
adapter.•If the iPod does not operate
with Scion Audio system,
disconnect the connector
from the iPod and re-con-
nect again.
•To reset the iPod, disconnect
the connector from the iPod,
and then re-connect to the
iPod when the operation
screen displays.
17
NOTICE
To resolve most problems
when using your iPod with
the Scion Audio system, dis-
connect your iPod from the
vehicle iPod connection and
reset it.
For instructions on how to
reset your iPod, refer to your
iPod Owner’s Manual.
Page 18 of 44
Disconnecting the
iPod
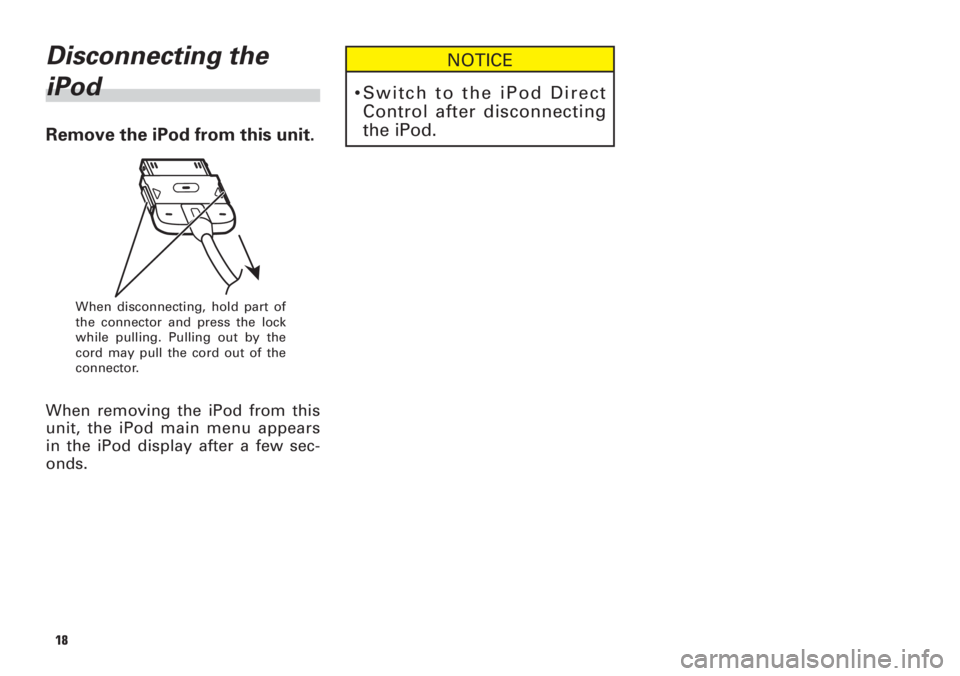
Remove the iPod from this unit.
When removing the iPod from this
unit, the iPod main menu appears
in the iPod display after a few sec-
onds.
When disconnecting, hold part of
the connector and press the lock
while pulling. Pulling out by the
cord may pull the cord out of the
connector.
18
NOTICE
•Switch to the iPod Direct
Control after disconnecting
the iPod.
Page 19 of 44

19
Page 20 of 44
![TOYOTA xB 2008 Accessories, Audio & Navigation (in English) 3
[4
]5Random
6Repeat
TRK<UP>
2MULTI
SELECTOR
TRK
<DOWN>
7TEXT1AUX•iPod
20
Listening to songs on
iPod
1AUX•iPod
Press the button repeatedly until the
source becomes iPod.
2MULTI SELECTOR
• TRK
TOYOTA xB 2008 Accessories, Audio & Navigation (in English) 3
[4
]5Random
6Repeat
TRK<UP>
2MULTI
SELECTOR
TRK
<DOWN>
7TEXT1AUX•iPod
20
Listening to songs on
iPod
1AUX•iPod
Press the button repeatedly until the
source becomes iPod.
2MULTI SELECTOR
• TRK](/img/14/43344/w960_43344-19.png)
3
[4
]5Random
6Repeat
TRK
2MULTI
SELECTOR
TRK
7TEXT1AUX•iPod
20
Listening to songs on
iPod
1AUX•iPod
Press the button repeatedly until the
source becomes iPod.
2MULTI SELECTOR
• TRK
Press the MULTI SELECTOR right to
proceed to the next track.
• TRK
Pressing the MULTI SELECTOR left
takes you back to the beginning of
the track currently playing.
Press the MULTI SELECTOR left
once more to return to the previous
track.
NOTICE
If an iPod is not connected, it
will not switch to iPod even if
you press the AUX•iPod but-
ton.