TOYOTA YARIS 2022 Owners Manual
Manufacturer: TOYOTA, Model Year: 2022, Model line: YARIS, Model: TOYOTA YARIS 2022Pages: 590, PDF Size: 128.6 MB
Page 361 of 590
359
6
HV Owner's Manual_Europe_M52N30_en
6-3. Do-it-yourself maintenance
Maintenance and care
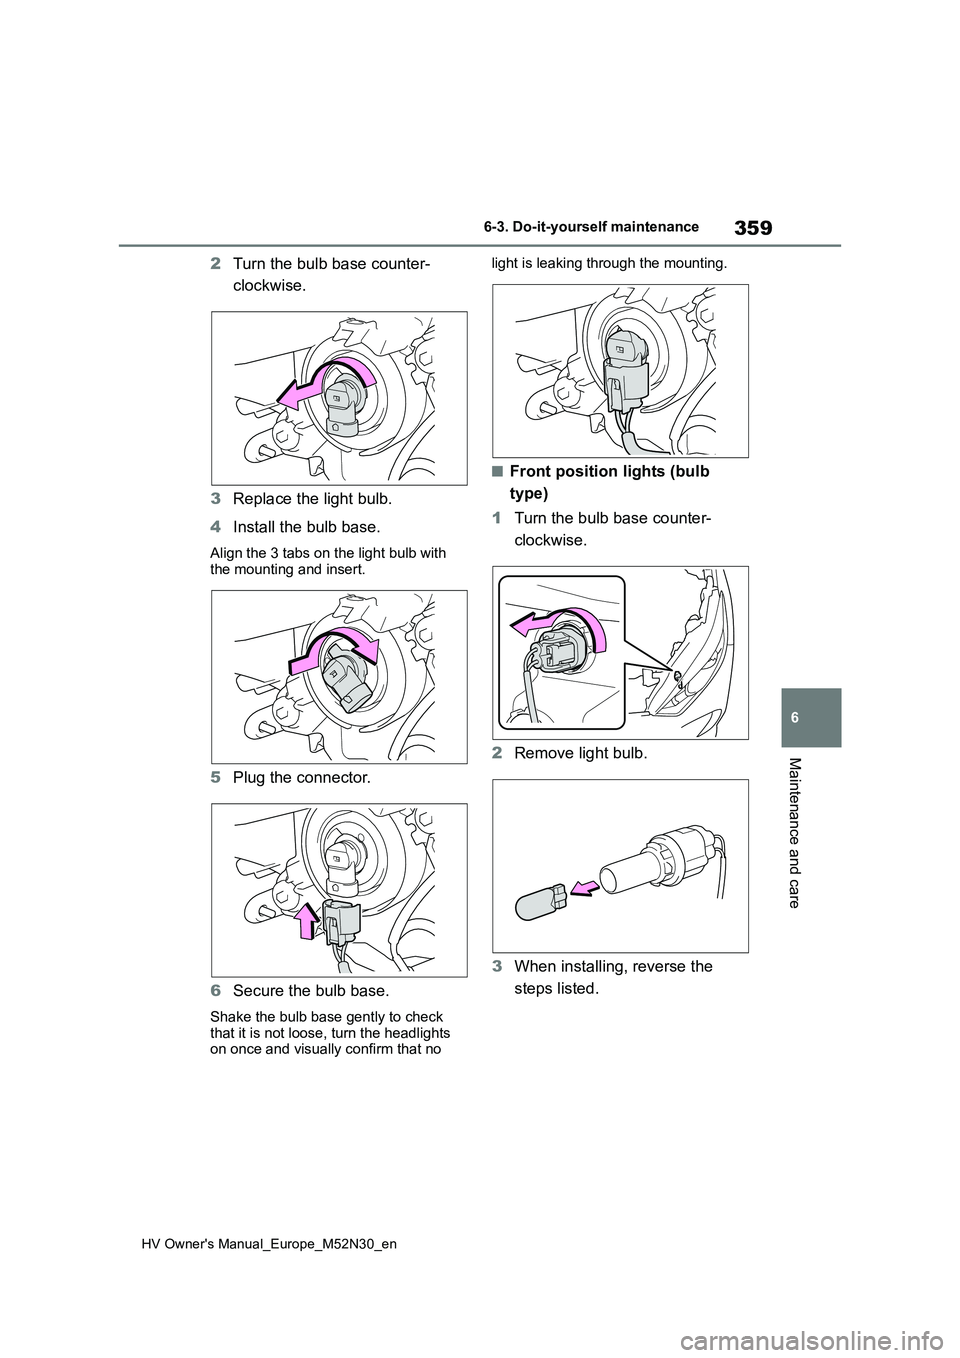
2Turn the bulb base counter-
clockwise.
3 Replace the light bulb.
4 Install the bulb base.
Align the 3 tabs on the light bulb with the mounting and insert.
5 Plug the connector.
6 Secure the bulb base.
Shake the bulb base gently to check
that it is not loose, turn the headlights on once and visually confirm that no
light is leaking through the mounting.
■Front position lights (bulb
type)
1 Turn the bulb base counter-
clockwise.
2 Remove light bulb.
3 When installing, reverse the
steps listed.
Page 362 of 590
360
HV Owner's Manual_Europe_M52N30_en
6-3. Do-it-yourself maintenance
■Front turn signal lights (bulb
type)
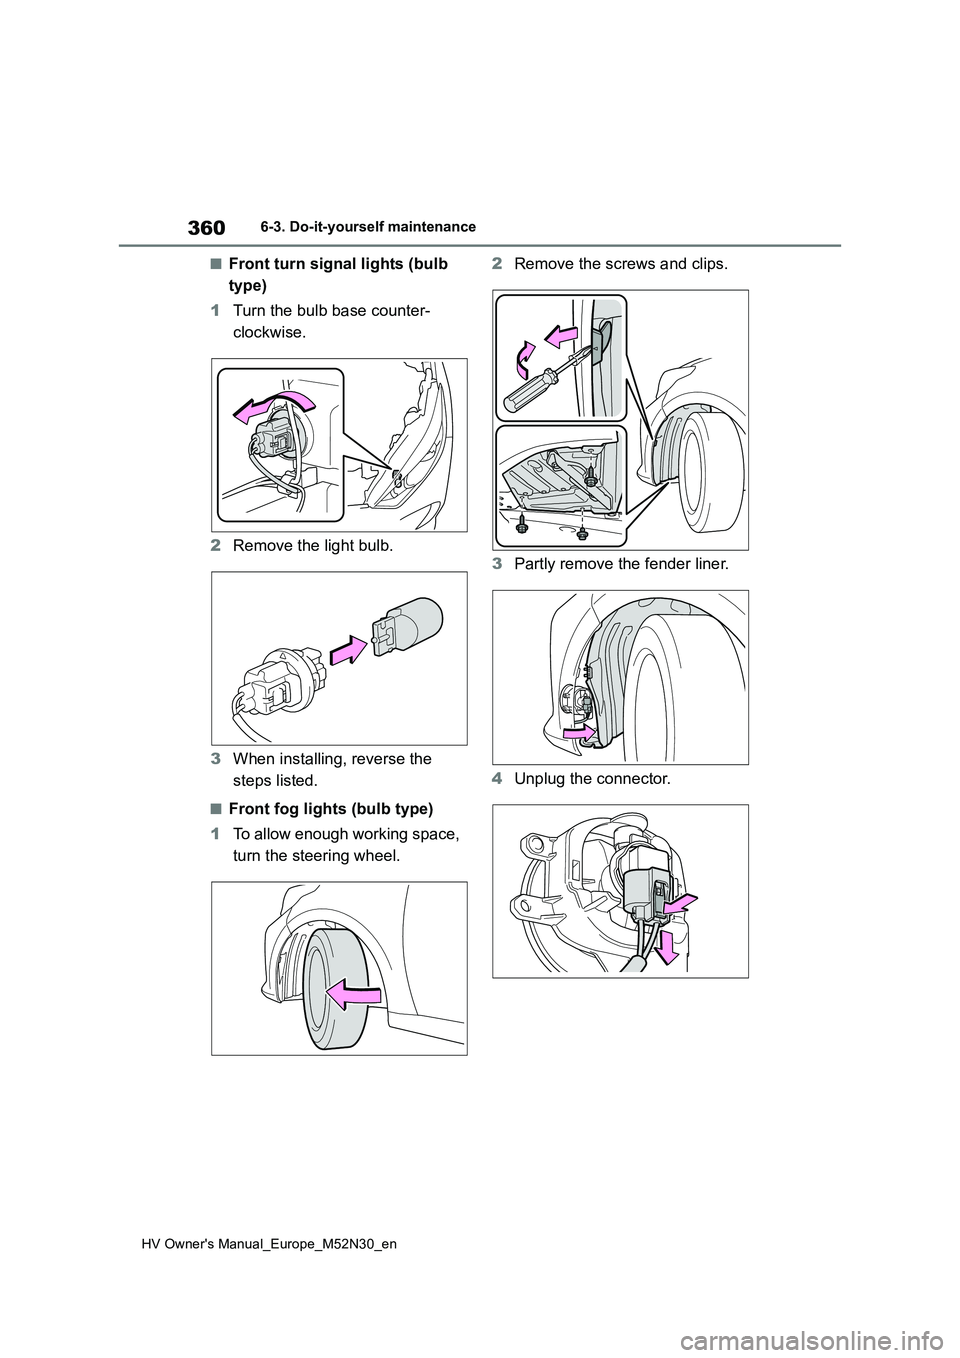
1 Turn the bulb base counter-
clockwise.
2 Remove the light bulb.
3 When installing, reverse the
steps listed.
■Front fog lights (bulb type)
1 To allow enough working space,
turn the steering wheel.
2 Remove the screws and clips.
3 Partly remove the fender liner.
4 Unplug the connector.
Page 363 of 590
361
6
HV Owner's Manual_Europe_M52N30_en
6-3. Do-it-yourself maintenance
Maintenance and care
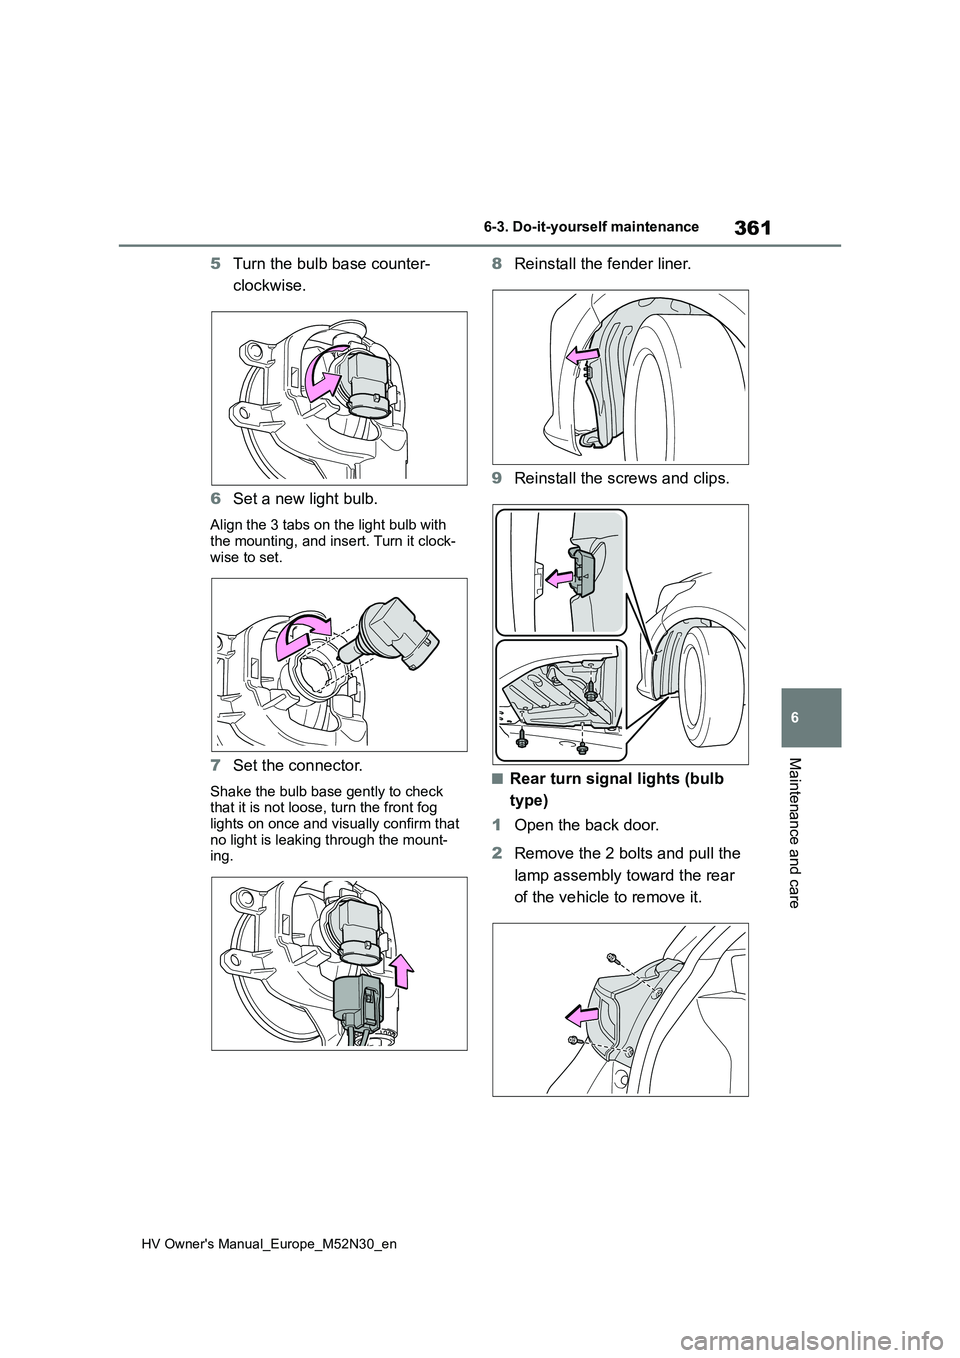
5Turn the bulb base counter-
clockwise.
6 Set a new light bulb.
Align the 3 tabs on the light bulb with the mounting, and insert. Turn it clock-
wise to set.
7 Set the connector.
Shake the bulb base gently to check that it is not loose, turn the front fog
lights on once and visually confirm that no light is leaking through the mount-ing.
8 Reinstall the fender liner.
9 Reinstall the screws and clips.
■Rear turn signal lights (bulb
type)
1 Open the back door.
2 Remove the 2 bolts and pull the
lamp assembly toward the rear
of the vehicle to remove it.
Page 364 of 590
362
HV Owner's Manual_Europe_M52N30_en
6-3. Do-it-yourself maintenance
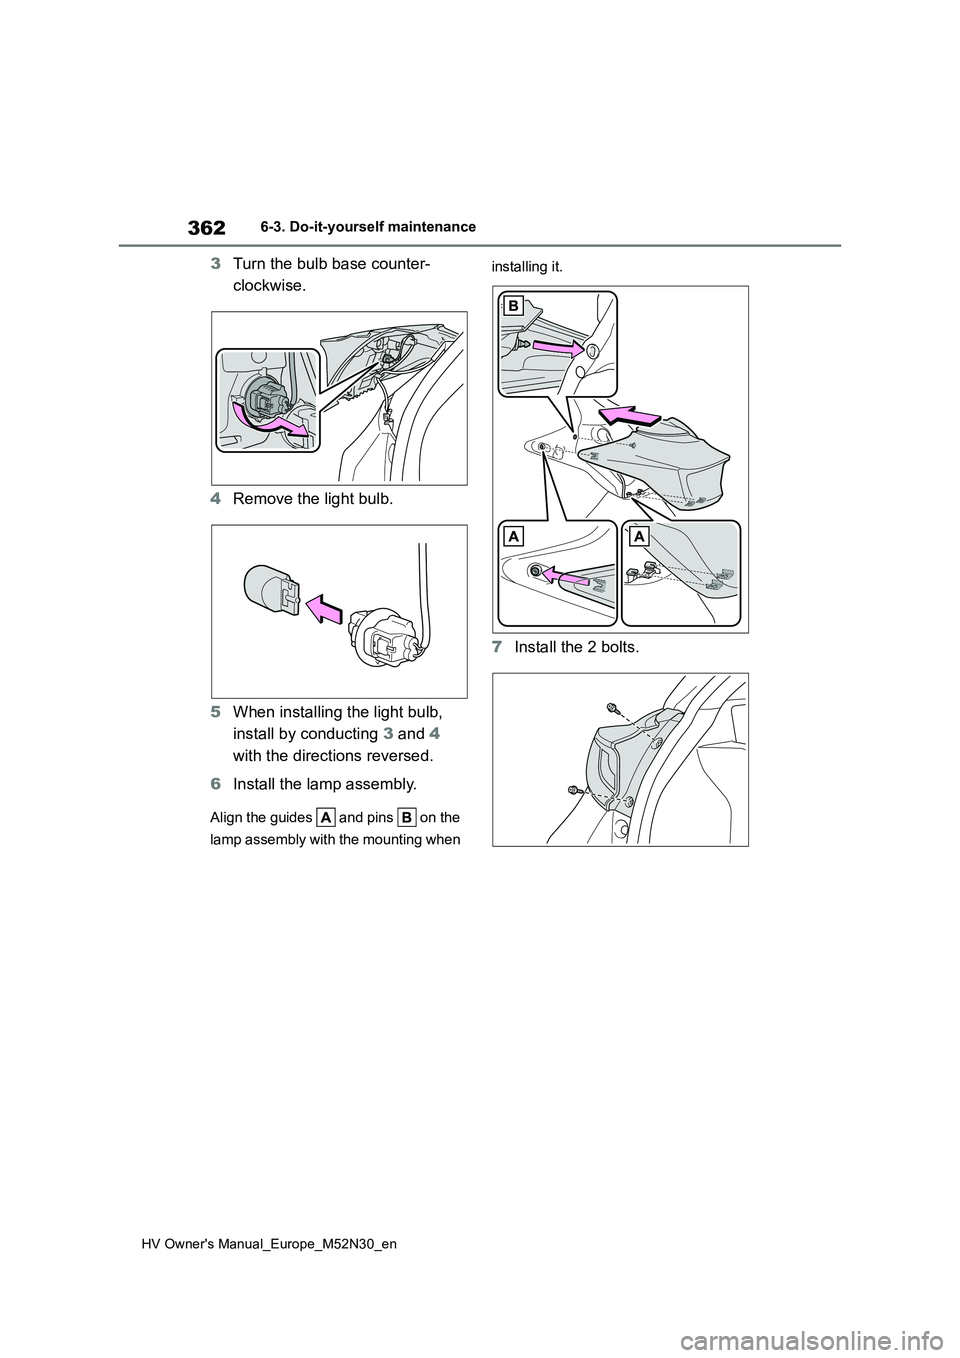
3Turn the bulb base counter-
clockwise.
4 Remove the light bulb.
5 When installing the light bulb,
install by conducting 3 and 4
with the directions reversed.
6 Install the lamp assembly.
Align the guides and pins on the
lamp assembly with the mounting when
installing it.
7 Install the 2 bolts.
Page 365 of 590
363
6
HV Owner's Manual_Europe_M52N30_en
6-3. Do-it-yourself maintenance
Maintenance and care
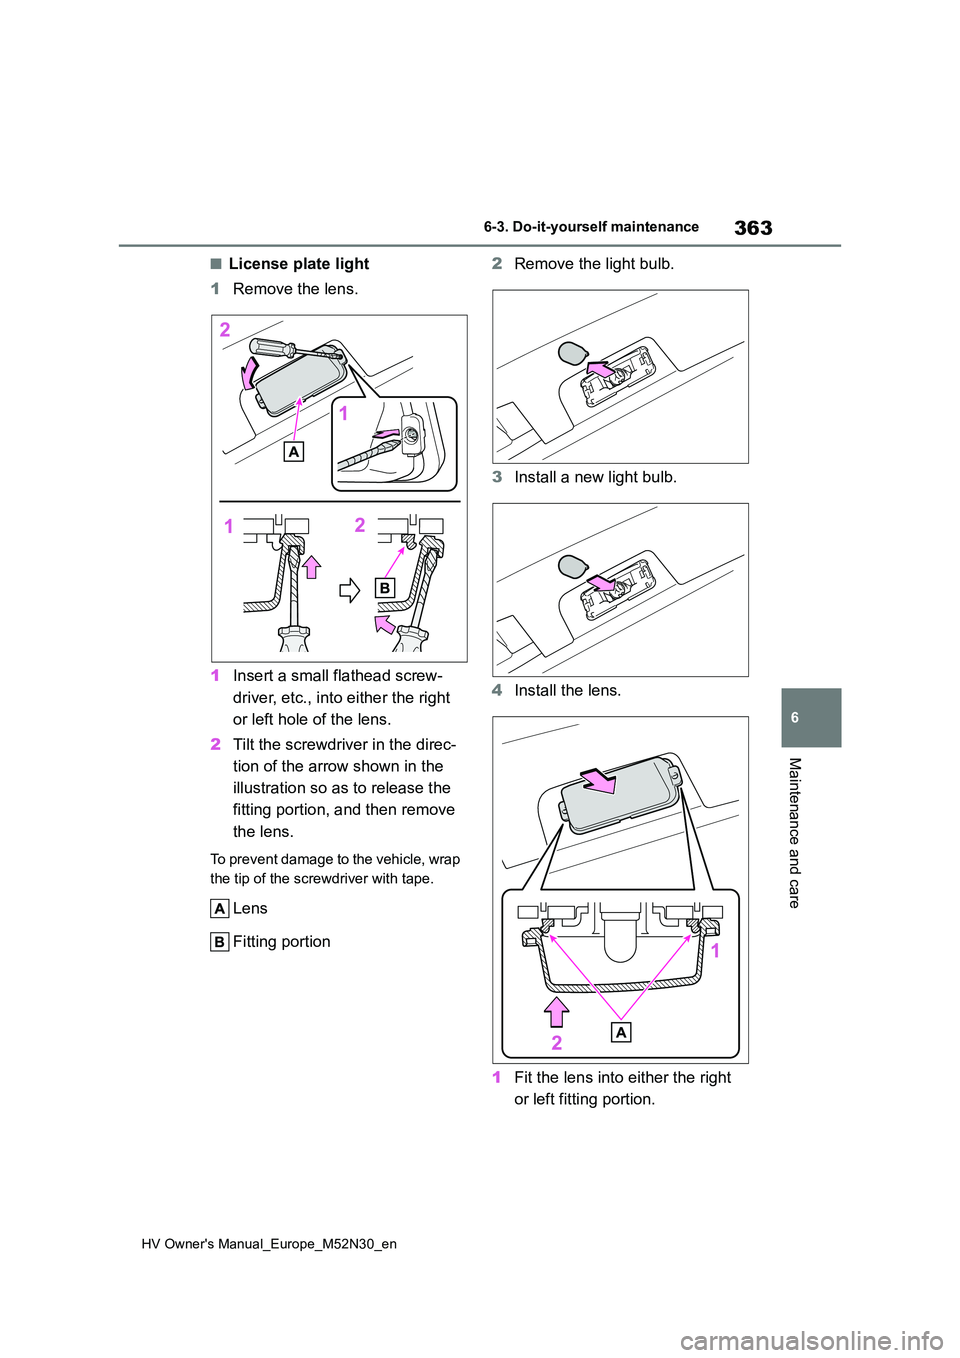
■License plate light
1 Remove the lens.
1 Insert a small flathead screw-
driver, etc., into either the right
or left hole of the lens.
2 Tilt the screwdriver in the direc-
tion of the arrow shown in the
illustration so as to release the
fitting portion, and then remove
the lens.
To prevent damage to the vehicle, wrap
the tip of the screwdriver with tape.
Lens
Fitting portion
2 Remove the light bulb.
3 Install a new light bulb.
4 Install the lens.
1 Fit the lens into either the right
or left fitting portion.
Page 366 of 590
364
HV Owner's Manual_Europe_M52N30_en
6-3. Do-it-yourself maintenance
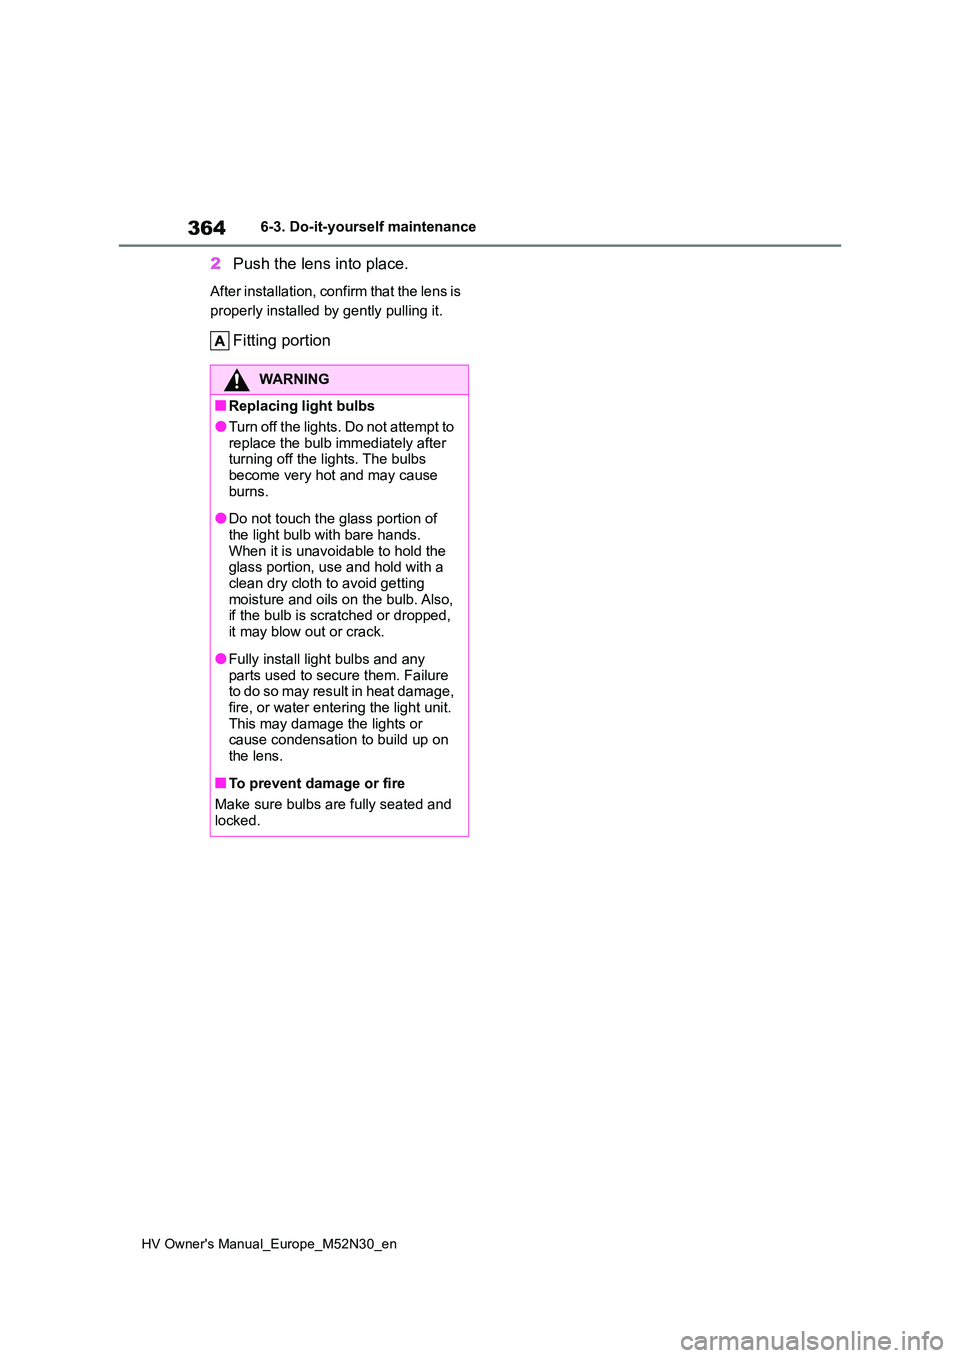
2Push the lens into place.
After installation, confirm that the lens is
properly installed by gently pulling it.
Fitting portion
WARNING
■Replacing light bulbs
●Tur n o ff t h e li g ht s. D o n o t at t e mp t t o
replace the bulb immediately after turning off the lights. The bulbs become very hot and may cause
burns.
●Do not touch the glass portion of
the light bulb with bare hands. When it is unavoidable to hold the glass portion, use and hold with a
clean dry cloth to avoid getting moisture and oils on the bulb. Also, if the bulb is scratched or dropped,
it may blow out or crack.
●Fully install light bulbs and any
parts used to secure them. Failure to do so may result in heat damage, fire, or water entering the light unit.
This may damage the lights or cause condensation to build up on the lens.
■To prevent damage or fire
Make sure bulbs are fully seated and
locked.
Page 367 of 590
7
365
HV Owner's Manual_Europe_M52N30_en
7
When trouble arises
When trouble arises
7-1. Essential information
Emergency flashers .......... 366
If your vehicle has to be
stopped in an emergency 366
If the vehicle is submerged or
water on the road is rising
....................................... 367
7-2. Steps to take in an emer-
gency
If your vehicle needs to be
towed .............................. 369
If you think something is wrong
....................................... 372
If a warning light turns on or a
warning buzzer sounds... 374
If a warning message is dis-
played ............................. 383
If you have a flat tire (vehicles
with an emergency tire punc-
ture repair kit) ................. 386
If you have a flat tire (vehicles
with a spare tire) ............. 397
If the hybrid system will not
start ................................ 405
If you lose your keys ......... 407
If the electronic key does not
operate properly (vehicles
with a smart entry & start sys-
tem) ................................ 407
If the 12-volt battery is dis-
charged .......................... 409
If your vehicle overheats... 414
If the vehicle becomes stuck
....................................... 417
Page 368 of 590
366
HV Owner's Manual_Europe_M52N30_en
7-1. Essential information
7-1.Esse ntial informa tion
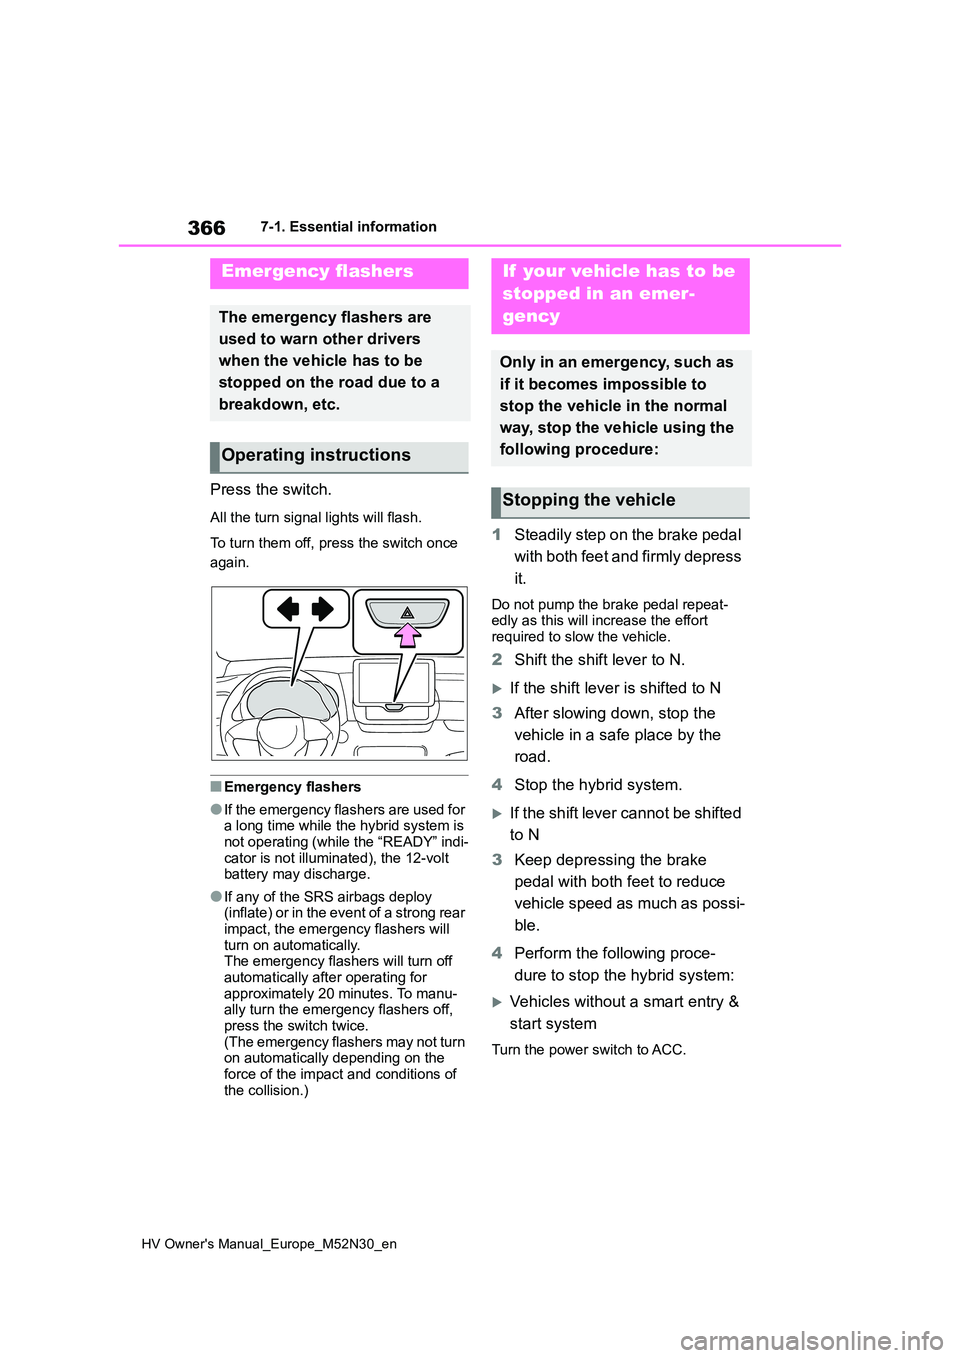
Press the switch.
All the turn signal lights will flash.
To turn them off, press the switch once
again.
■Emergency flashers
●If the emergency flashers are used for a long time while the hybrid system is
not operating (while the “READY” indi- cator is not illuminated), the 12-volt battery may discharge.
●If any of the SRS airbags deploy (inflate) or in the event of a strong rear
impact, the emergency flashers will turn on automatically. The emergency flashers will turn off
automatically after operating for approximately 20 minutes. To manu-ally turn the emergency flashers off,
press the switch twice. (The emergency flashers may not turn on automatically depending on the
force of the impact and conditions of the collision.)
1 Steadily step on the brake pedal
with both feet and firmly depress
it.
Do not pump the brake pedal repeat- edly as this will increase the effort required to slow the vehicle.
2 Shift the shift lever to N.
If the shift lever is shifted to N
3 After slowing down, stop the
vehicle in a safe place by the
road.
4 Stop the hybrid system.
If the shift lever cannot be shifted
to N
3 Keep depressing the brake
pedal with both feet to reduce
vehicle speed as much as possi-
ble.
4 Perform the following proce-
dure to stop the hybrid system:
Vehicles without a smart entry &
start system
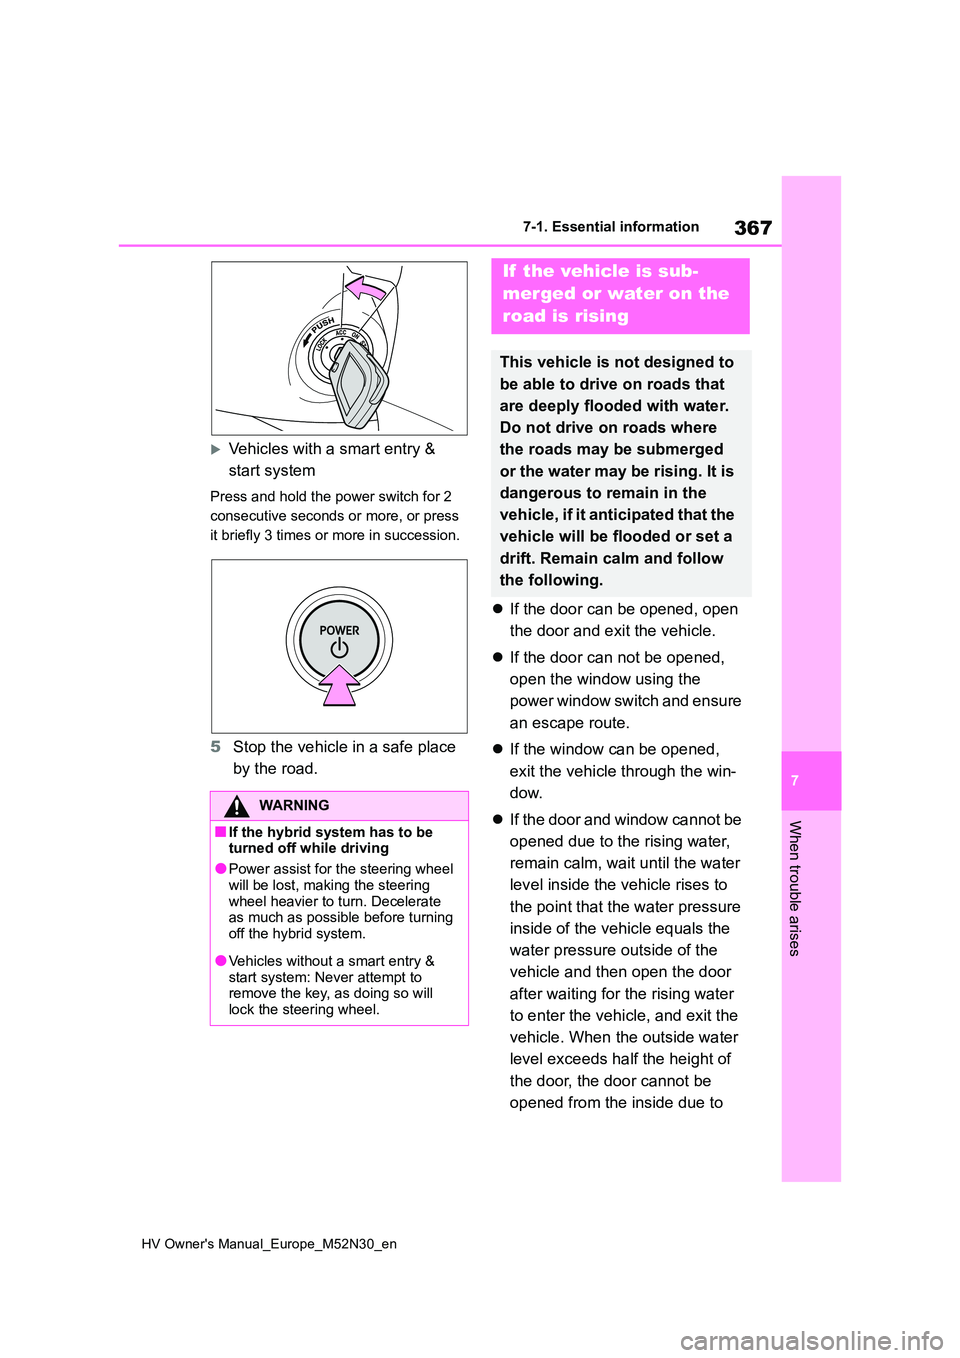
Turn the power switch to ACC.
Emergency flashers
The emergency flashers are
used to warn other drivers
when the vehicle has to be
stopped on the road due to a
breakdown, etc.
Operating instructions
If your vehicle has to be
stopped in an emer-
gency
Only in an emergency, such as
if it becomes impossible to
stop the vehicle in the normal
way, stop the vehicle using the
following procedure:
Stopping the vehicle
Page 369 of 590
367
7
HV Owner's Manual_Europe_M52N30_en
7-1. Essential information
When trouble arises
Vehicles with a smart entry &
start system
Press and hold the power switch for 2
consecutive seconds or more, or press
it briefly 3 times or more in succession.
5 Stop the vehicle in a safe place
by the road.
If the door can be opened, open
the door and exit the vehicle.
If the door can not be opened,
open the window using the
power window switch and ensure
an escape route.
If the window can be opened,
exit the vehicle through the win-
dow.
If the door and window cannot be
opened due to the rising water,
remain calm, wait until the water
level inside the vehicle rises to
the point that the water pressure
inside of the vehicle equals the
water pressure outside of the
vehicle and then open the door
after waiting for the rising water
to enter the vehicle, and exit the
vehicle. When the outside water
level exceeds half the height of
the door, the door cannot be
opened from the inside due to
WARNING
■If the hybrid system has to be turned off while driving
●Power assist for the steering wheel
will be lost, making the steering wheel heavier to turn. Decelerate as much as possible before turning
off the hybrid system.
●Vehicles without a smart entry &
start system: Never attempt to remove the key, as doing so will lock the steering wheel.
If the vehicle is sub-
merged or water on the
road is rising
This vehicle is not designed to
be able to drive on roads that
are deeply flooded with water.
Do not drive on roads where
the roads may be submerged
or the water may be rising. It is
dangerous to remain in the
vehicle, if it anticipated that the
vehicle will be flooded or set a
drift. Remain calm and follow
the following.
Page 370 of 590
368
HV Owner's Manual_Europe_M52N30_en
7-1. Essential information
water pressure.
■Water level exceeds the floor
When the water level exceeds the floor and time has passed, the electrical equipment will get damaged, the power
windows will not operate, the engine and motor stop, and the vehicle may not be able to get moving.
■Using an emergency escape ham-
mer*
Laminated glass is used in the wind- shield on this vehicle. Laminated glass
cannot be shattered with an emergency
hammer*.
Tempered glass is used in the windows
on this vehicle.*: Contact any authorized Toyota retailer
or Toyota authorized repairer, or any
reliable repairer, or aftermarket acces-
sory manufacturer for further informa-
tion about an emergency hammer.
WARNING
■Caution while driving
Do not drive on roads where the roads may be submerged or the water may be rising. Otherwise the vehicle
may be damaged and cannot move, as well as become flooded and set a drift, which may lead to death.