headlights TOYOTA YARIS CROSS 2023 User Guide
[x] Cancel search | Manufacturer: TOYOTA, Model Year: 2023, Model line: YARIS CROSS, Model: TOYOTA YARIS CROSS 2023Pages: 698, PDF Size: 147.65 MB
Page 219 of 698
217
4
Owners Manual_Europe_M52N75_en
4-3. Operating the lights and wipers
Driving
fog, mist, ice, dirt, etc.
• When the windshield is cracked or damaged• When the front camera is deformed or
dirty • When the temperature of the front camera is extremely high
• When the surrounding brightness level is equal to that of headlights, tail lights or fog lights
• When headlights or tail lights of vehi- cles ahead are turned off, dirty, chang-ing color, or not aimed properly
• When the vehicle is hit by water, snow, dust, etc., from a preceding vehicle
• When driving through an area of inter- mittently changing brightness and darkness
• When frequently and repeatedly driv- ing ascending/descending roads, or roads with rough, bumpy or uneven
surfaces (such as stone-paved roads, gravel roads, etc.)• When frequently and repeatedly tak-
ing curves or driving on a winding road• When there is a highly reflective
object ahead of the vehicle, such as a sign or mirror• When the back of a preceding vehicle
is highly reflective, such as a con- tainer on a truck• When the vehicle’s headlights are
damaged or dirty, or are not aimed properly• When the vehicle is listing or titling
due to a flat tire, a trailer being towed, etc.• When the headlights are changed
between the high beams and low beams repeatedly in an abnormal manner
• When the driver believes that the high beams may be flashing or dazzling pedestrians or other drivers
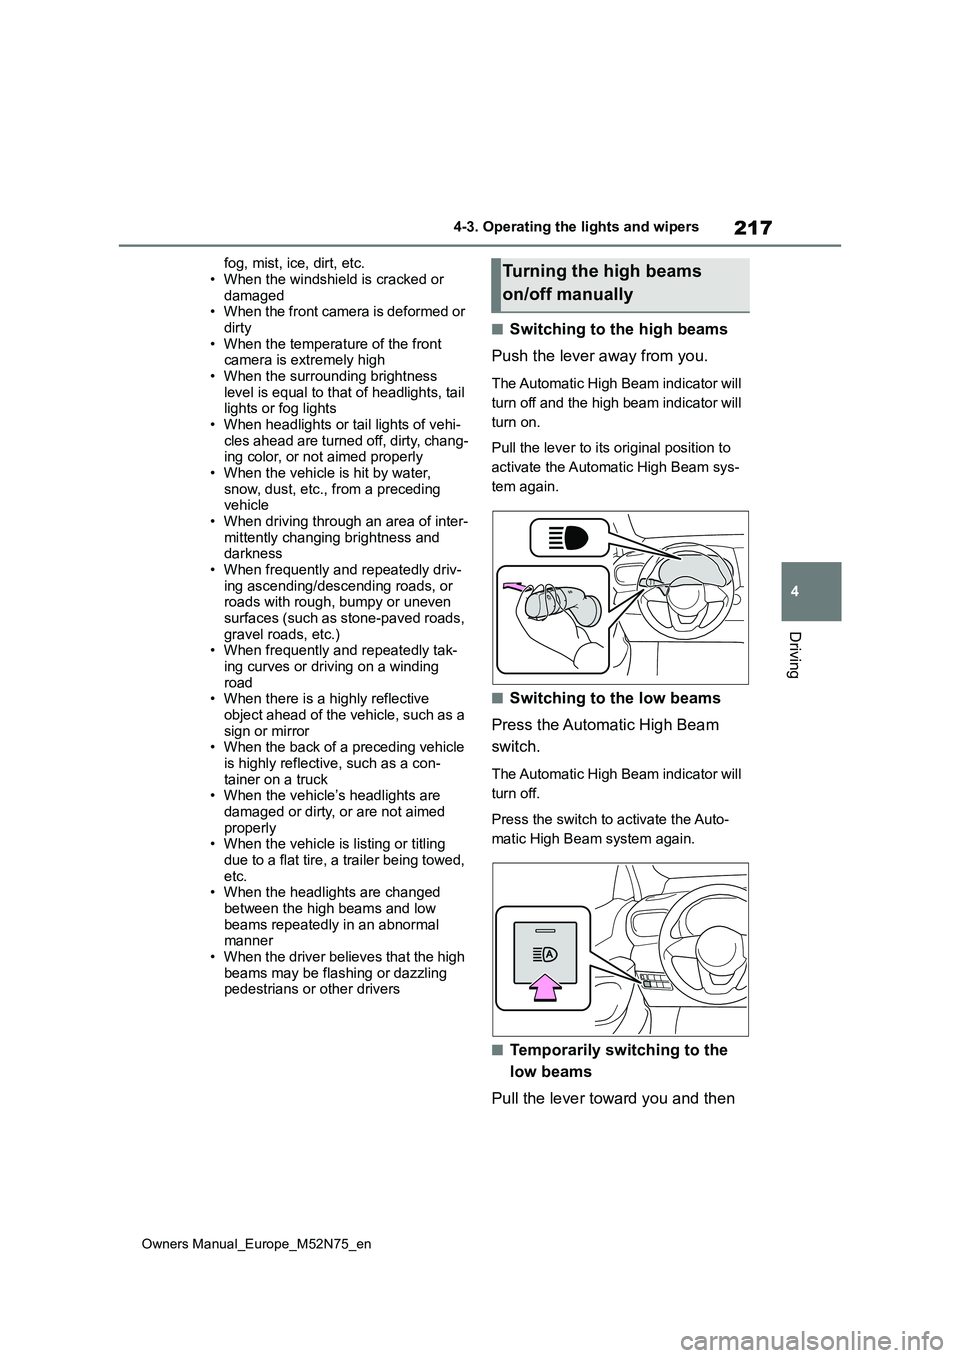
■Switching to the high beams
Push the lever away from you.
The Automatic High Beam indicator will
turn off and the high beam indicator will
turn on.
Pull the lever to its original position to
activate the Automatic High Beam sys-
tem again.
■Switching to the low beams
Press the Automatic High Beam
switch.
The Automatic High Beam indicator will
turn off.
Press the switch to activate the Auto-
matic High Beam system again.
■Temporarily switching to the
low beams
Pull the lever toward you and then
Turning the high beams
on/off manually
Page 221 of 698
219
4
Owners Manual_Europe_M52N75_en
4-3. Operating the lights and wipers
Driving
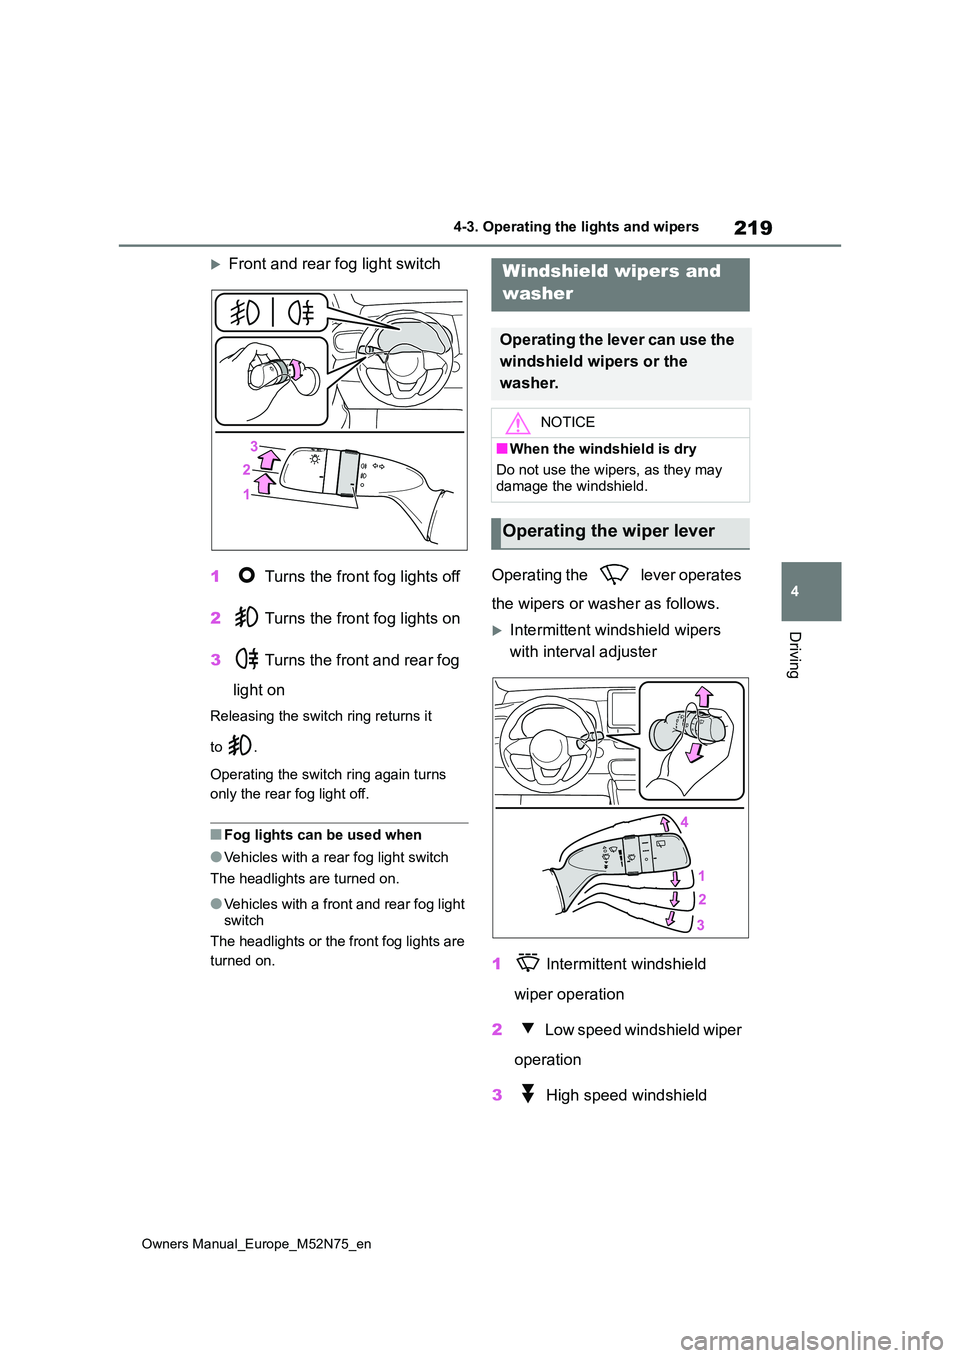
Front and rear fog light switch
1 Turns the front fog lights off
2 Turns the front fog lights on
3 Turns the front and rear fog
light on
Releasing the switch ring returns it
to .
Operating the switch ring again turns
only the rear fog light off.
■Fog lights can be used when
●Vehicles with a rear fog light switch
The headlights are turned on.
●Vehicles with a front and rear fog light switch
The headlights or the front fog lights are
turned on.
Operating the lever operates
the wipers or washer as follows.
Intermittent windshield wipers
with interval adjuster
1 Intermittent windshield
wiper operation
2 Low speed windshield wiper
operation
3 High speed windshield
Windshield wipers and
washer
Operating the lever can use the
windshield wipers or the
washer.
NOTICE
■When the windshield is dry
Do not use the wipers, as they may
damage the windshield.
Operating the wiper lever
Page 230 of 698
228
Owners Manual_Europe_M52N75_en
4-5. Using the driving support systems
WARNING
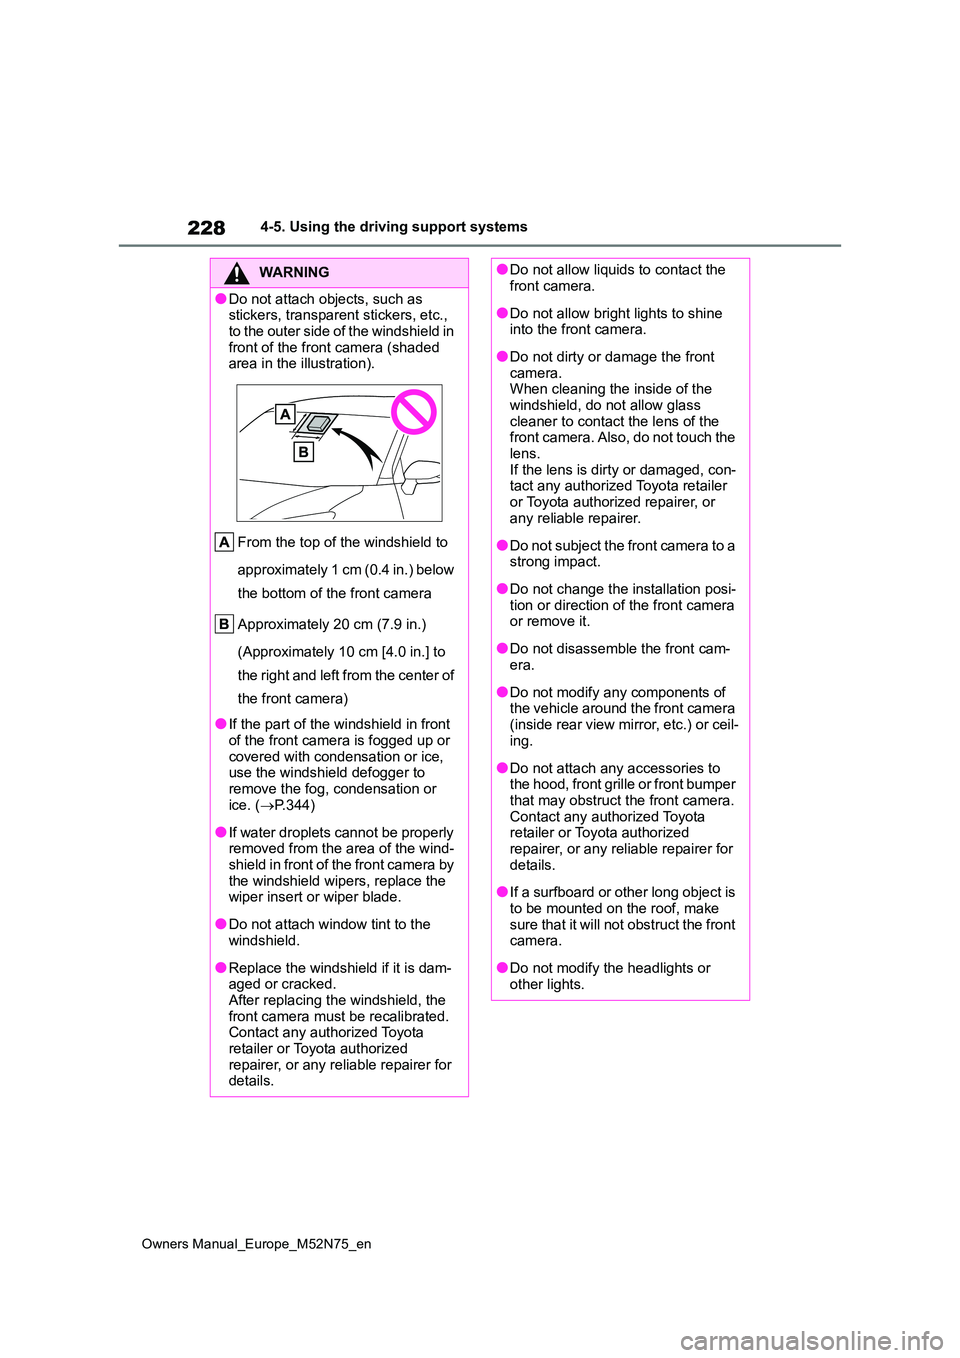
●Do not attach objects, such as stickers, transparent stickers, etc.,
to the outer side of the windshield in front of the front camera (shaded area in the illustration).
From the top of the windshield to
approximately 1 cm (0.4 in.) below
the bottom of the front camera
Approximately 20 cm (7.9 in.)
(Approximately 10 cm [4.0 in.] to
the right and left from the center of
the front camera)
●If the part of the windshield in front
of the front camera is fogged up or covered with condensation or ice, use the windshield defogger to
remove the fog, condensation or ice. ( P.344)
●If water droplets cannot be properly removed from the area of the wind-shield in front of the front camera by
the windshield wipers, replace the wiper insert or wiper blade.
●Do not attach window tint to the windshield.
●Replace the windshield if it is dam-aged or cracked.After replacing the windshield, the
front camera must be recalibrated. Contact any authorized Toyota retailer or Toyota authorized
repairer, or any reliable repairer for details.
●Do not allow liquids to contact the front camera.
●Do not allow bright lights to shine into the front camera.
●Do not dirty or damage the front camera.When cleaning the inside of the
windshield, do not allow glass cleaner to contact the lens of the front camera. Also, do not touch the
lens. If the lens is dirty or damaged, con-tact any authorized Toyota retailer
or Toyota authorized repairer, or any reliable repairer.
●Do not subject the front camera to a strong impact.
●Do not change the installation posi-tion or direction of the front camera or remove it.
●Do not disassemble the front cam-era.
●Do not modify any components of the vehicle around the front camera
(inside rear view mirror, etc.) or ceil- ing.
●Do not attach any accessories to the hood, front grille or front bumper that may obstruct the front camera.
Contact any authorized Toyota retailer or Toyota authorized repairer, or any reliable repairer for
details.
●If a surfboard or other long object is
to be mounted on the roof, make sure that it will not obstruct the front camera.
●Do not modify the headlights or other lights.
Page 242 of 698
240
Owners Manual_Europe_M52N75_en
4-5. Using the driving support systems
• When there are many things which
can reflect the radio waves of the radar in the vicinity (tunnels, truss bridges, gravel roads, snow covered
road that have tracks, etc.) • When there is an effect on the radio waves to the radar that is installed on
another vehicle • When multiple detectable objects are close together
• If the sun or other light is shining directly on a detectable object• When a detectable object is a shade
of white and looks extremely bright • When a detectable object appears to be nearly the same color or brightness
as its surroundings • If a detectable object cuts or suddenly emerges in front of your vehicle
• When the front of your vehicle is hit by water, snow, dust, etc.• When a very bright light ahead, such
as the sun or the headlights of oncom- ing traffic, shines directly into the front camera
• When approaching the side or front of a vehicle ahead• If a vehicle ahead is a motorcycle or
bicycle (for region C) • If a vehicle ahead is narrow, such as a personal mobility vehicle
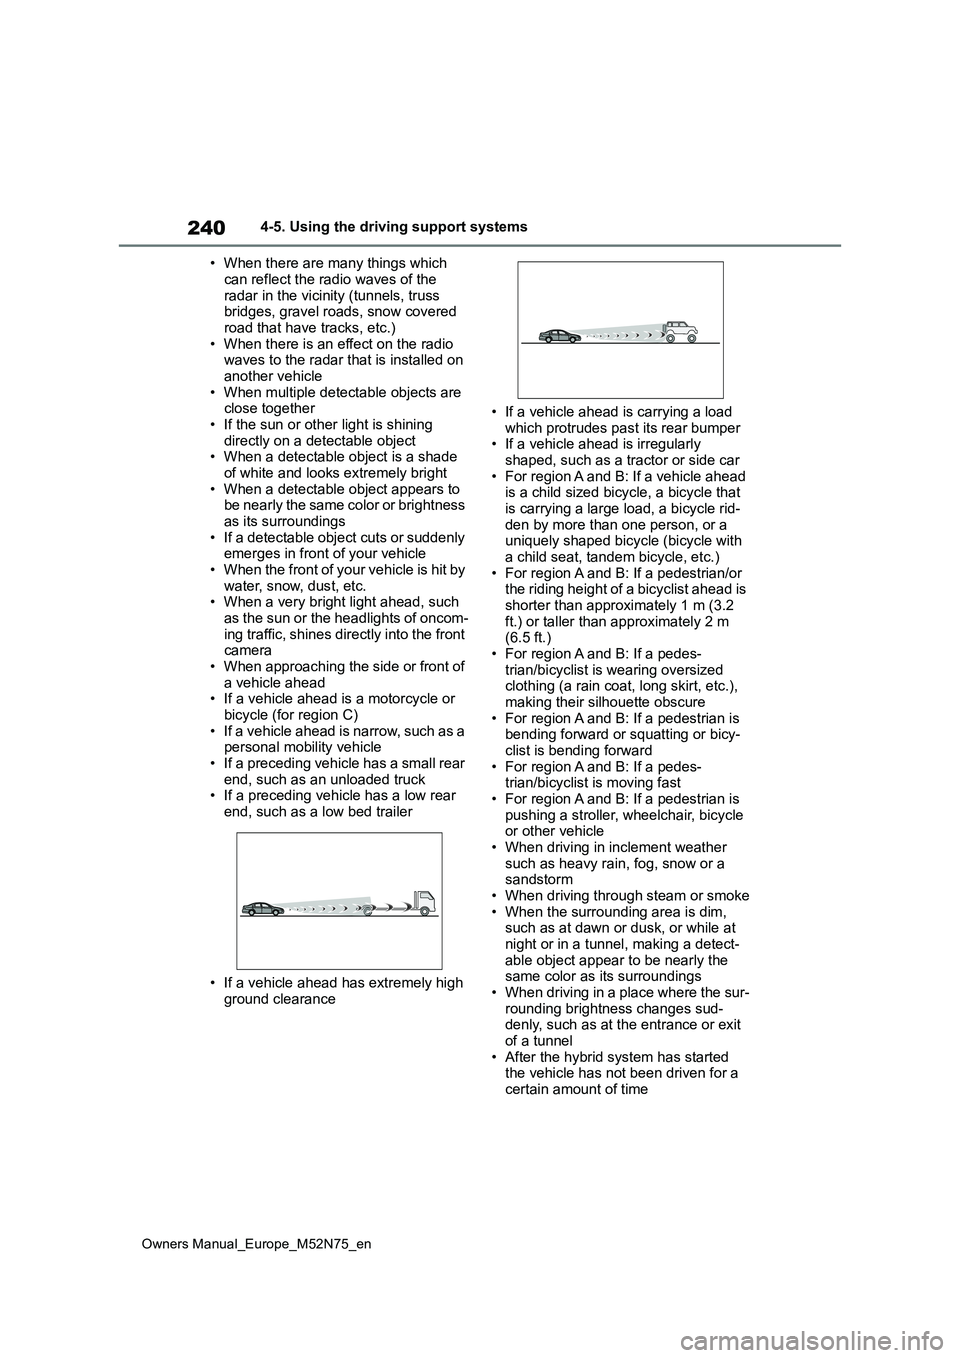
• If a preceding vehicle has a small rear end, such as an unloaded truck• If a preceding vehicle has a low rear
end, such as a low bed trailer
• If a vehicle ahead has extremely high
ground clearance
• If a vehicle ahead is carrying a load
which protrudes past its rear bumper • If a vehicle ahead is irregularly shaped, such as a tractor or side car
• For region A and B: If a vehicle ahead is a child sized bicycle, a bicycle that is carrying a large load, a bicycle rid-
den by more than one person, or a uniquely shaped bicycle (bicycle with a child seat, tandem bicycle, etc.)
• For region A and B: If a pedestrian/or the riding height of a bicyclist ahead is shorter than approximately 1 m (3.2
ft.) or taller than approximately 2 m (6.5 ft.)• For region A and B: If a pedes-
trian/bicyclist is wearing oversized clothing (a rain coat, long skirt, etc.), making their silhouette obscure
• For region A and B: If a pedestrian is bending forward or squatting or bicy-clist is bending forward
• For region A and B: If a pedes- trian/bicyclist is moving fast• For region A and B: If a pedestrian is
pushing a stroller, wheelchair, bicycle or other vehicle• When driving in inclement weather
such as heavy rain, fog, snow or a sandstorm• When driving through steam or smoke
• When the surrounding area is dim, such as at dawn or dusk, or while at night or in a tunnel, making a detect-
able object appear to be nearly the same color as its surroundings• When driving in a place where the sur-
rounding brightness changes sud- denly, such as at the entrance or exit of a tunnel
• After the hybrid system has started the vehicle has not been driven for a certain amount of time
Page 245 of 698
243
4
Owners Manual_Europe_M52N75_en
4-5. Using the driving support systems
Driving
WARNING
■Before using LTA system
●Do not rely solely upon the LTA sys-
tem. The LTA system does not automatically drive the vehicle or reduce the amount of attention that
must be paid to the area in front of the vehicle. The driver must always assume full responsibility for driving
safely by paying careful attention to the surrounding conditions and operating the steering wheel to cor-
rect the path of the vehicle. Also, the driver must take adequate breaks when fatigued, such as from
driving for a long period of time.
●Failure to perform appropriate driv-
ing operations and pay careful attention may lead to an accident, resulting in death or serious injury.
■Situations unsuitable for LTA system
In the following situations, use the LTA switch to turn the system off. Fail-ure to do so may lead to an accident,
resulting in death or serious injury.
●Vehicle is driven on a road surface
which is slippery due to rainy weather, fallen snow, freezing, etc.
●Vehicle is driven on a snow-cov-ered road.
●White (yellow) lines are difficult to see due to rain, snow, fog, dust, etc.
●Vehicle is driven in a temporary lane or restricted lane due to con-
struction work.
●Vehicle is driven in a construction
zone.
●A spare tire, tire chains, etc., are
equipped.
●When the tires have been exces-
sively worn, or when the tire infla- tion pressure is low.
●When your vehicle is towing a trailer or during emergency towing.
■Preventing LTA system malfunc-tions and operations performed by mistake
●Do not modify the headlights or place stickers, etc., on the surface of the lights.
●Do not modify the suspension, etc. If the suspension, etc., needs to be
replaced, contact any authorized Toyota retailer or Toyota authorized repairer, or any reliable repairer.
●Do not install or place anything on the hood or grille. Also, do not
install a grille guard (bull bars, kan- garoo bar, etc.).
●If your windshield needs repairs, contact any authorized Toyota retailer or Toyota authorized
repairer, or any reliable repairer.
■Conditions in which functions
may not operate properly
In the following situations, the func- tions may not operate properly and
the vehicle may depart from its lane. Drive safely by always paying careful attention to your surroundings and
operate the steering wheel to correct the path of the vehicle without relying solely on the functions.
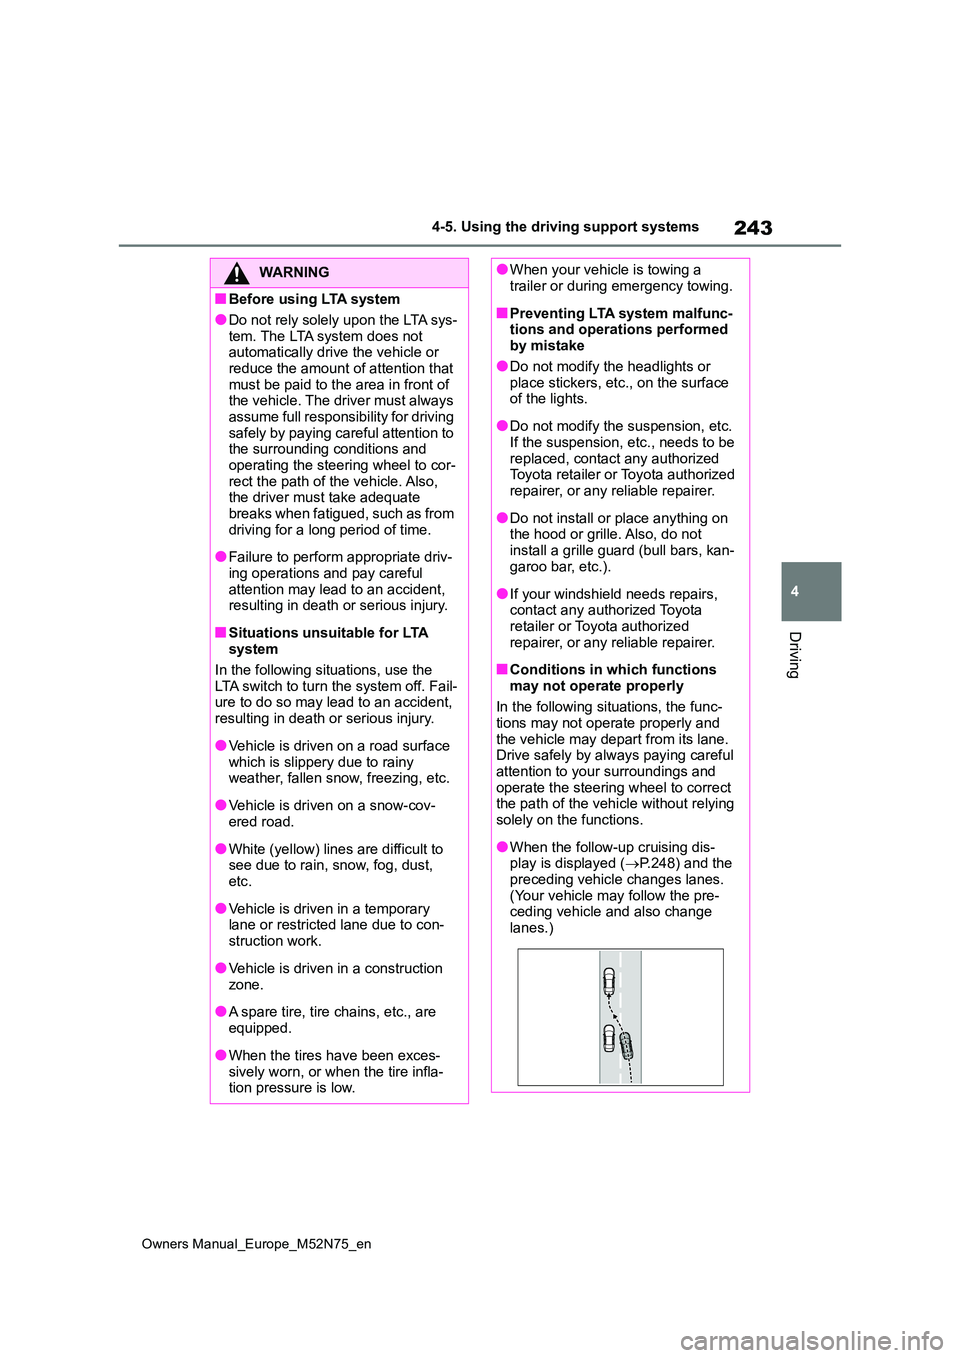
●When the follow-up cruising dis-play is displayed ( P.248) and the
preceding vehicle changes lanes. (Your vehicle may follow the pre-ceding vehicle and also change
lanes.)
Page 247 of 698
245
4
Owners Manual_Europe_M52N75_en
4-5. Using the driving support systems
Driving
■Lane departure alert function
When the system determines that
the vehicle might depart from its
lane*, a warning is displayed on the
multi-information display, and either
a warning buzzer will sound or the
steering wheel will vibrate to alert
the driver.
When the warning buzzer sounds or
the steering wheel vibrates, check the
area around your vehicle and carefully
operate the steering wheel to move the
vehicle back to the center of the lane.
Vehicle with BSM: When the system
determines that the vehicle might
depart from its lane and that the possi-
bility of a collision with an overtaking
vehicle in the adjacent lane is high, the
lane departure alert will operate even if
the turn signals are operating.
*: May recognize the boundaries
between the asphalt and the side of
the road, such as grass, soil, or the
curb, to be road lanes.
WARNING
●The traffic lines are yellow (which may be more difficult to recognize
than lines that are white).
●The white (yellow) lines cross over
a curb, etc.
●The vehicle is driven on a bright
surface, such as concrete.
●The vehicle is driven on a surface
that is bright due to reflected light, etc.
●The vehicle is driven in an area where the brightness changes sud-denly, such as at the entrances and
exits of tunnels, etc.
●Light from the headlights of an
oncoming vehicle, the sun, etc., enters the camera.
●The vehicle is driven on a slope.
●The vehicle is driven on a road
which tilts left or right, or a winding road.
●The vehicle is driven on an unpaved or rough road.
●The traffic lane is excessively nar-row or wide.
●The vehicle is extremely tilted due to carrying heavy luggage or having improper tire pressure.
●The distance to the preceding vehi-cle is extremely short.
●The vehicle is moving up and down a large amount due to road condi-
tions during driving (poor roads or road seams).
●When driving in a tunnel or at night with the headlights off or when a headlight is dim due to its lens
being dirty or it being misaligned.
●The vehicle is struck by a cross-
wind.
●The vehicle is affected by wind from a vehicle driven in a nearby lane.
●The vehicle has just changed lanes or crossed an intersection.
●Tires which differ by structure, man-ufacturer, brand or tread pattern are used.
●When tires of a size other than specified are installed.
●Snow tires, etc., are equipped.
●The vehicle is being driven at extremely high speeds.
Functions included in LTA
system
Page 419 of 698
417
6
Owners Manual_Europe_M52N75_en
6-3. Do-it-yourself maintenance
Maintenance and care
Check the wattage of the light bulb
to be replaced. ( P.492)
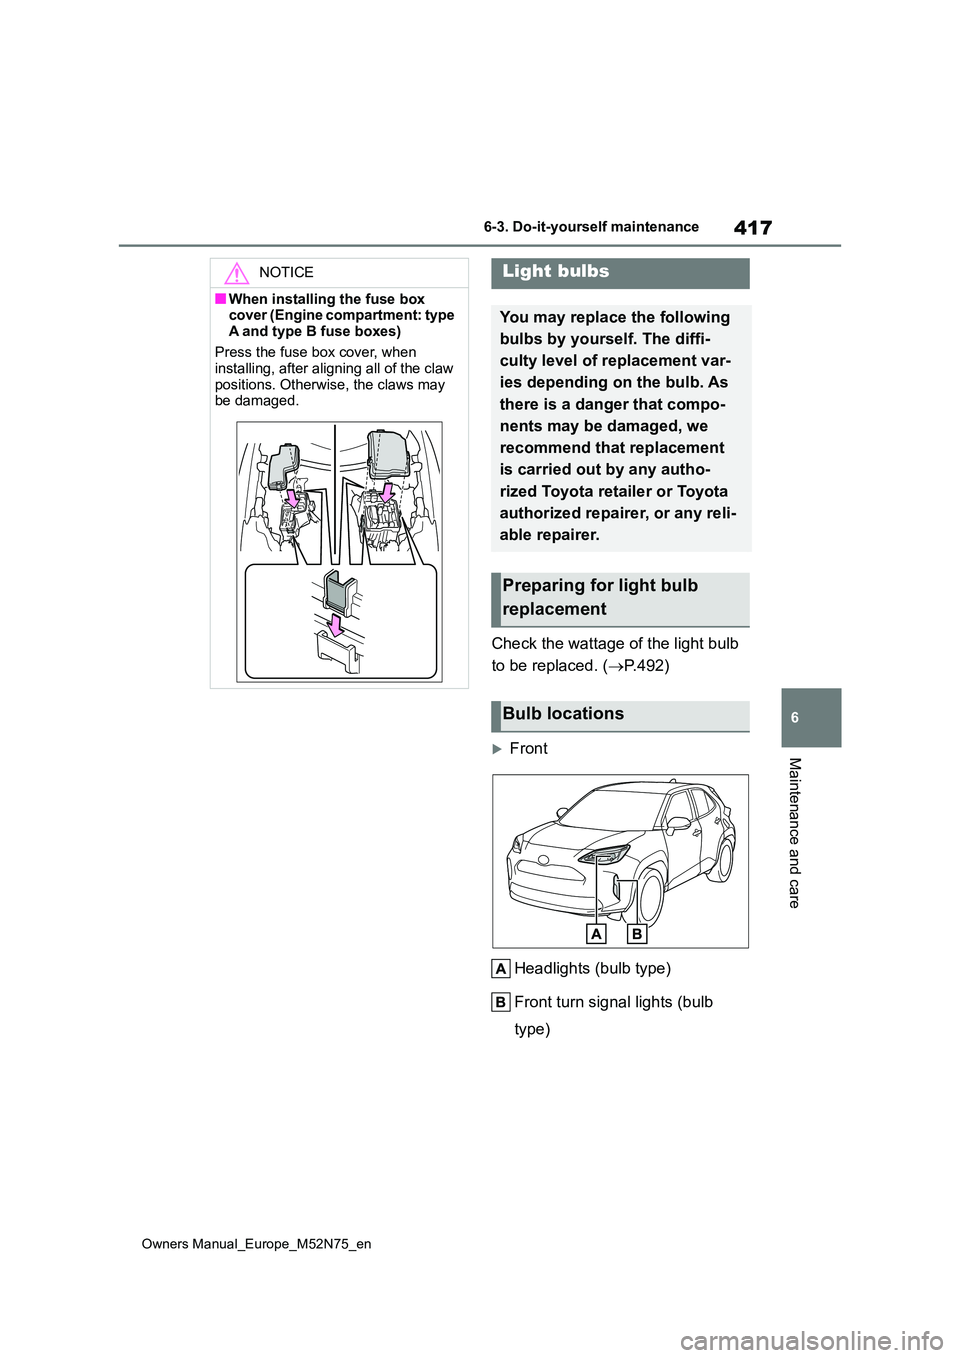
Front
Headlights (bulb type)
Front turn signal lights (bulb
type)
NOTICE
■When installing the fuse box cover (Engine compartment: type
A and type B fuse boxes)
Press the fuse box cover, when installing, after aligning all of the claw
positions. Otherwise, the claws may be damaged.
Light bulbs
You may replace the following
bulbs by yourself. The diffi-
culty level of replacement var-
ies depending on the bulb. As
there is a danger that compo-
nents may be damaged, we
recommend that replacement
is carried out by any autho-
rized Toyota retailer or Toyota
authorized repairer, or any reli-
able repairer.
Preparing for light bulb
replacement
Bulb locations
Page 420 of 698
418
Owners Manual_Europe_M52N75_en
6-3. Do-it-yourself maintenance
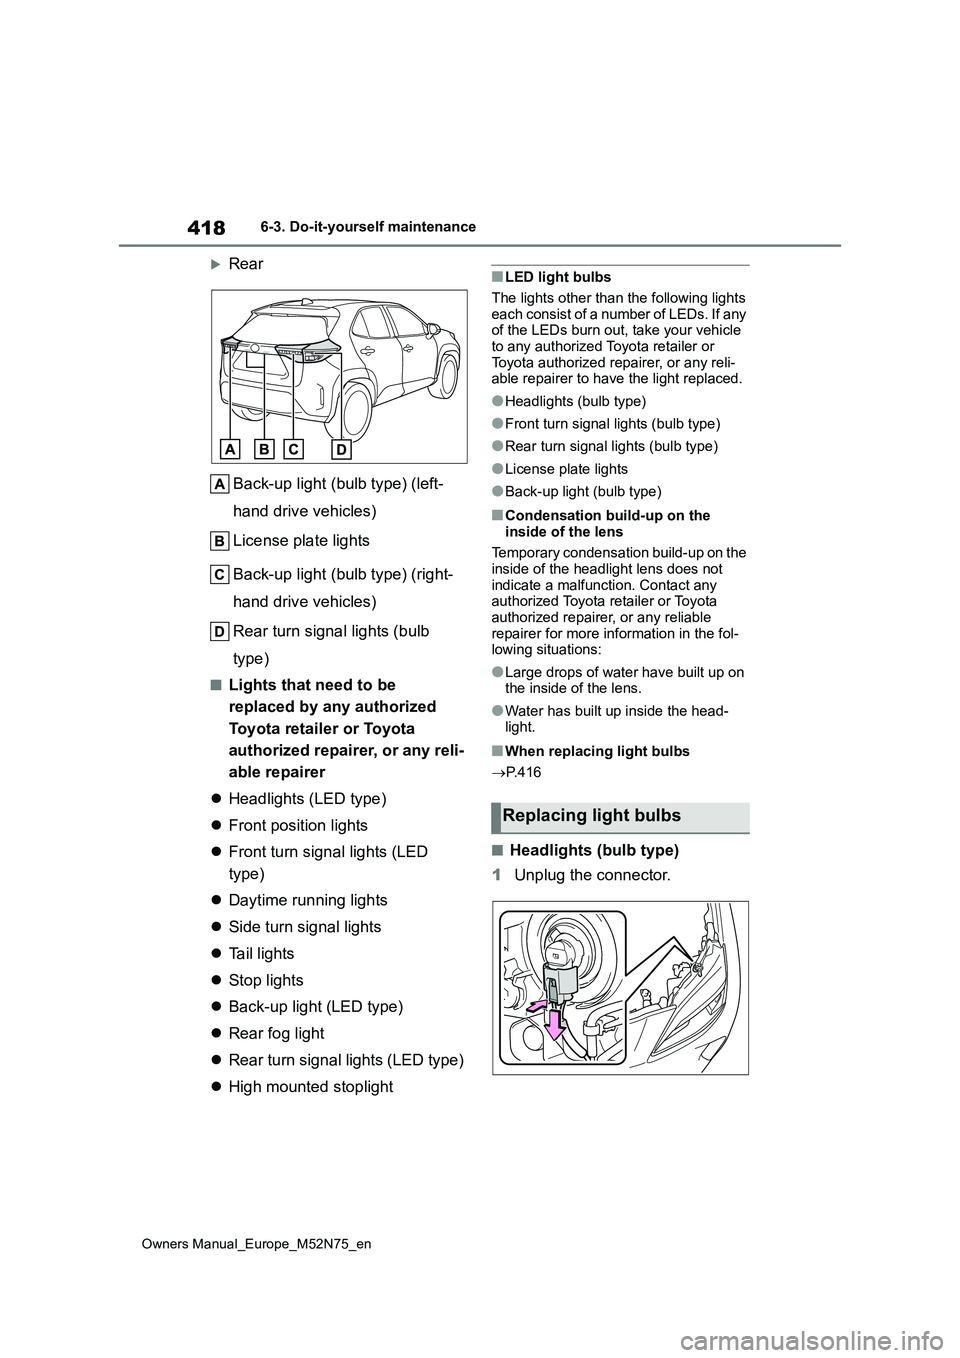
Rear
Back-up light (bulb type) (left-
hand drive vehicles)
License plate lights
Back-up light (bulb type) (right-
hand drive vehicles)
Rear turn signal lights (bulb
type)
■Lights that need to be
replaced by any authorized
Toyota retailer or Toyota
authorized repairer, or any reli-
able repairer
Headlights (LED type)
Front position lights
Front turn signal lights (LED
type)
Daytime running lights
Side turn signal lights
Tail lights
Stop lights
Back-up light (LED type)
Rear fog light
Rear turn signal lights (LED type)
High mounted stoplight
■LED light bulbs
The lights other than the following lights
each consist of a number of LEDs. If any of the LEDs burn out, take your vehicle to any authorized Toyota retailer or
Toyota authorized repairer, or any reli- able repairer to have the light replaced.
●Headlights (bulb type)
●Front turn signal lights (bulb type)
●Rear turn signal lights (bulb type)
●License plate lights
●Back-up light (bulb type)
■Condensation build-up on the
inside of the lens
Temporary condensation build-up on the inside of the headlight lens does not
indicate a malfunction. Contact any authorized Toyota retailer or Toyota authorized repairer, or any reliable
repairer for more information in the fol- lowing situations:
●Large drops of water have built up on the inside of the lens.
●Water has built up inside the head-light.
■When replacing light bulbs
P. 4 1 6
■Headlights (bulb type)
1 Unplug the connector.
Replacing light bulbs
Page 421 of 698
419
6
Owners Manual_Europe_M52N75_en
6-3. Do-it-yourself maintenance
Maintenance and care
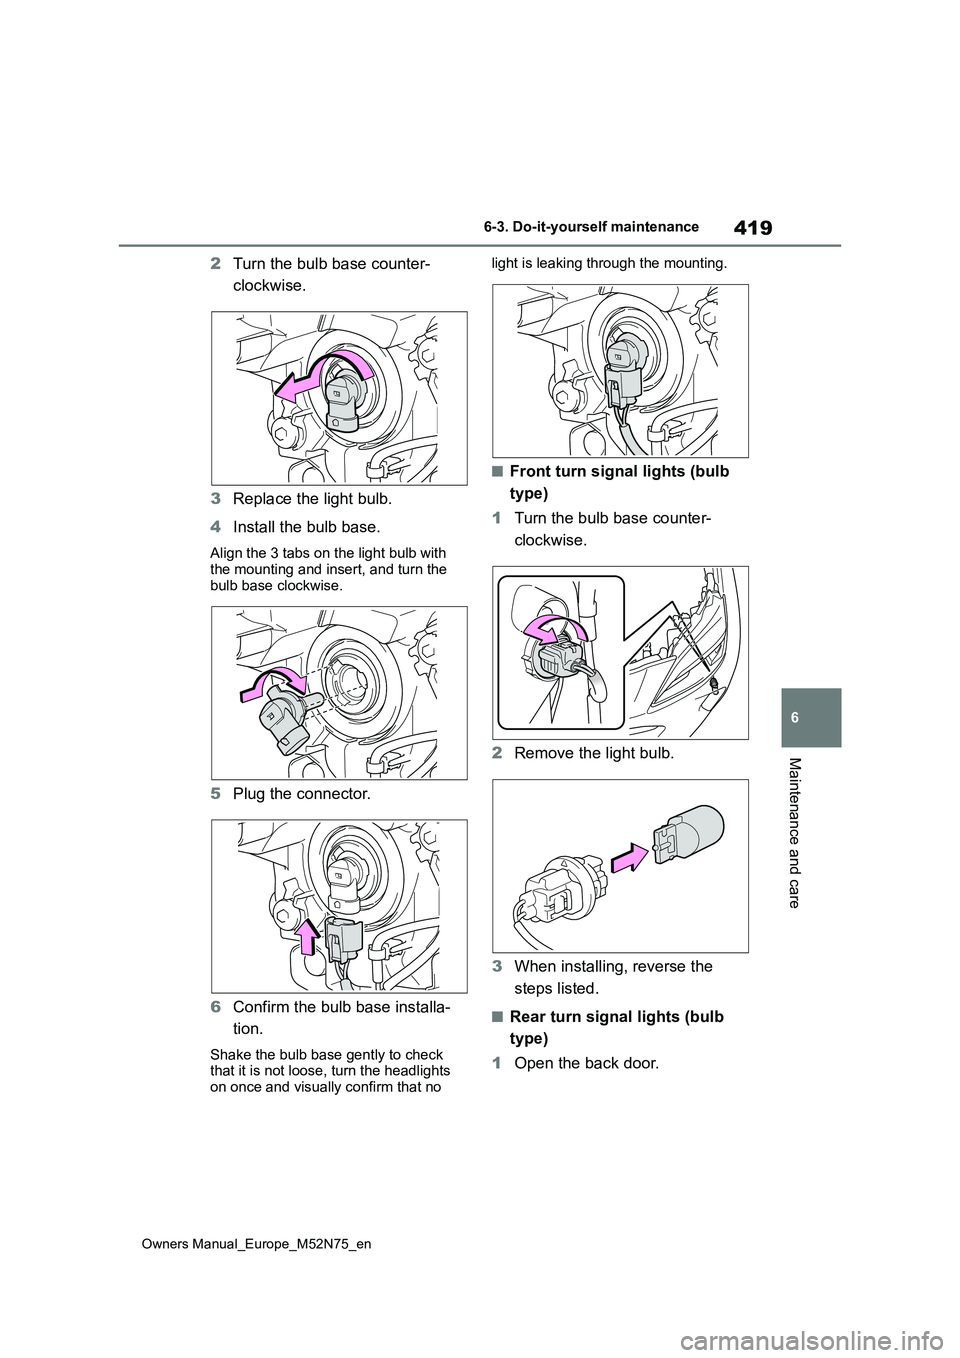
2Turn the bulb base counter-
clockwise.
3 Replace the light bulb.
4 Install the bulb base.
Align the 3 tabs on the light bulb with the mounting and insert, and turn the
bulb base clockwise.
5 Plug the connector.
6 Confirm the bulb base installa-
tion.
Shake the bulb base gently to check that it is not loose, turn the headlights
on once and visually confirm that no
light is leaking through the mounting.
■Front turn signal lights (bulb
type)
1 Turn the bulb base counter-
clockwise.
2 Remove the light bulb.
3 When installing, reverse the
steps listed.
■Rear turn signal lights (bulb
type)
1 Open the back door.
Page 476 of 698
474
Owners Manual_Europe_M52N75_en
7-2. Steps to take in an emergency
authorized repairer, or any reliable
repairer as soon as possible.
■Starting the hybrid system when the 12-volt battery is discharged
The hybrid system cannot be started by
push-starting.
■To prevent 12-volt battery dis- charge
●Turn off the headlights and the audio system while the hybrid system is off.
●Turn off any unnecessary electrical components when the vehicle is run-ning at a low speed for an extended
period, such as in heavy traffic.
■When the 12-volt battery is removed or discharged
●Information stored in the ECU is cleared. When the 12-volt battery is depleted, have the vehicle inspected
at any authorized Toyota retailer or Toyota authorized repairer, or any reli-able repairer.
●Some systems may require initializa-tion. ( P.505)
■When removing the 12-volt battery
terminals
When the 12-volt battery terminals are removed, the information stored in the
ECU is cleared. Before removing the 12- volt battery terminals, contact any
authorized Toyota retailer or Toyota authorized repairer, or any reliable repairer.
■Charging the 12-volt battery
The electricity stored in the 12-volt bat- tery will discharge gradually even when the vehicle is not in use, due to natural
discharge and the draining effects of certain electrical appliances. If the vehi-cle is left for a long time, the 12-volt bat-
tery may discharge, and the hybrid system may be unable to start. (The 12-volt battery recharges automatically
while the hybrid system is operating.)
■When recharging or replacing the
12-volt battery (vehicles with a smart entry & start system)
●In some cases, it may not be possible to unlock the doors using the smart entry & start system when the 12-volt
battery is discharged. Use the wire- less remote control or the mechanical key to lock or unlock the doors.
●The hybrid system may not start on the first attempt after the 12-volt bat-
tery has recharged but will start nor- mally after the second attempt. This is not a malfunction.
●The power switch mode is memorized by the vehicle. When the 12-volt bat-
tery is reconnected, the system will return to the mode it was in before the 12-volt battery was discharged.
Before disconnecting the 12-volt bat- tery, turn the power switch off.If you are unsure what mode the
power switch was in before the 12-volt battery discharged, be especially careful when reconnecting the 12-volt
battery.
■When replacing the 12-volt battery
●Use a Central Degassing type 12-volt
battery (European Regulations).
●Use a battery that the case size is
same as the previous one, 20 hour rate capacity (20HR) is equivalent or greater, and performance rating
(CCA) is equivalent or greater. Check the label on top of the battery for the battery size and specifications (ex.
LN0, 35Ah, 264A). • If the sizes differ, the 12-volt battery cannot be properly secured.
• If the 20 hour rate capacity is low, even if the time period where the vehi-cle is not used is a short time, the 12-
volt battery may discharge and the hybrid system may not be able to start.
●Use a ventilation type calcium battery
●Use a 12-volt battery with a handle. If a 12-volt battery without a handle is used, removal is more difficult.