roof TOYOTA YARIS CROSS 2023 User Guide
[x] Cancel search | Manufacturer: TOYOTA, Model Year: 2023, Model line: YARIS CROSS, Model: TOYOTA YARIS CROSS 2023Pages: 698, PDF Size: 147.65 MB
Page 340 of 698
338
Owners Manual_Europe_M52N75_en
4-6. Driving tips
the driving conditions:
Do not try to forcibly open a win-
dow or move a wiper that is fro-
zen. Pour warm water over the
frozen area to melt the ice. Wipe
away the water immediately to
prevent it from freezing.
To ensure proper operation of
the climate control system fan,
remove any snow that has accu-
mulated on the air inlet vents in
front of the windshield.
Check for and remove any
excess ice or snow that may
have accumulated on the exte-
rior lights, vehicle’s roof, chassis,
around the tires or on the brakes.
Remove any snow or mud from
the bottom of your shoes before
getting in the vehicle.
Accelerate the vehicle slowly, keep
a safe distance between you and
the vehicle ahead, and drive at a
reduced speed suitable to road
conditions.
Turn automatic mode of the park-
ing brake off. Otherwise, the
parking brake may freeze and
not be able to be released auto-
matically.
Also, avoid using the following as the
parking brake may operate automati-
cally, even if automatic mode is off.
• Brake hold system
Park the vehicle and shift the shift lever
to P without setting the parking brake.
The parking brake may freeze up, pre-
venting it from being released. If the
vehicle is parked without setting the
parking brake, make sure to block the
wheels. Failure to do so may be dan-
gerous because it may cause the vehi-
cle to move unexpectedly, possibly
leading to an accident.
When the parking brake is in automatic
mode, release the parking brake after
shifting the shift lever to P. ( P.201)
If the vehicle is parked without
setting the parking brake, con-
firm that the shift lever cannot be
moved out of P.
If the vehicle is left parked with
the brakes damp in cold tem-
peratures, there is a possibility of
the brakes freezing.
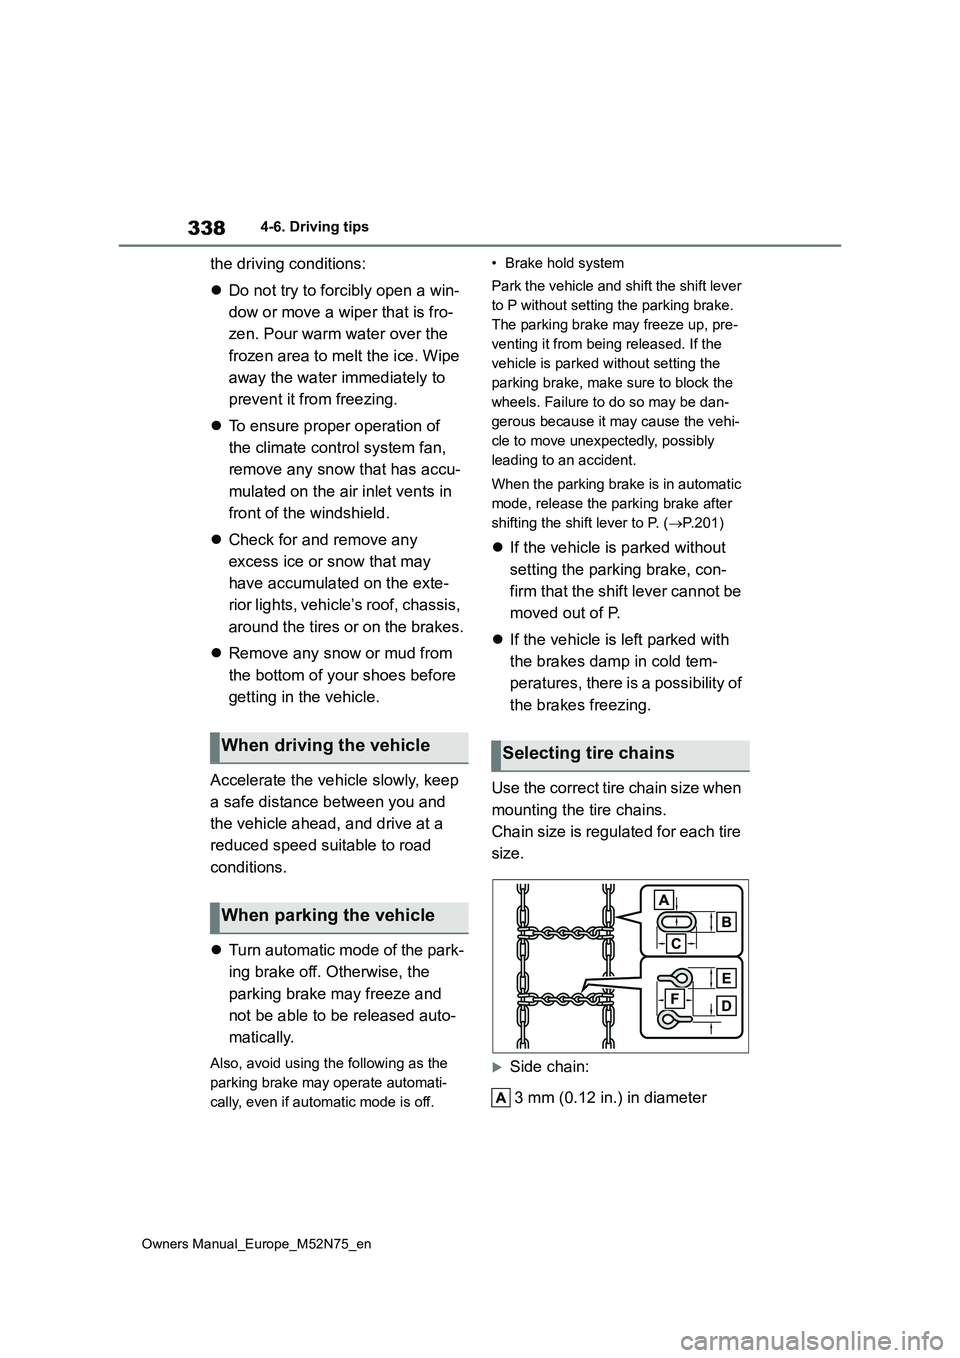
Use the correct tire chain size when
mounting the tire chains.
Chain size is regulated for each tire
size.
Side chain:
3 mm (0.12 in.) in diameter
When driving the vehicle
When parking the vehicle
Selecting tire chains
Page 367 of 698
365
5
Owners Manual_Europe_M52N75_en
5-4. Other interior features
Interior features
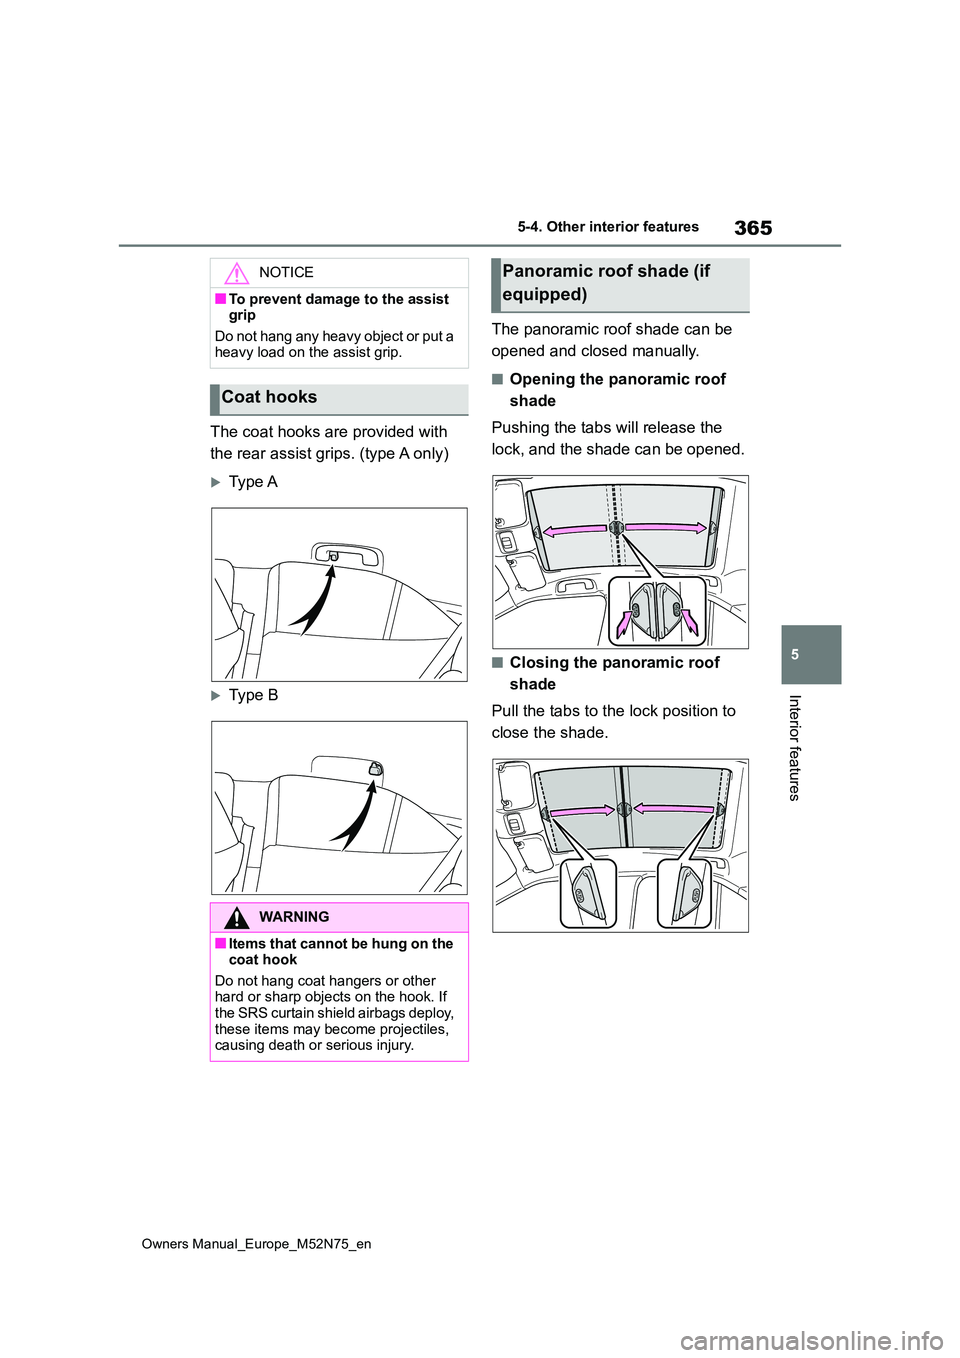
The coat hooks are provided with
the rear assist grips. (type A only)
Type A
Type B
The panoramic roof shade can be
opened and closed manually.
■Opening the panoramic roof
shade
Pushing the tabs will release the
lock, and the shade can be opened.
■Closing the panoramic roof
shade
Pull the tabs to the lock position to
close the shade.
NOTICE
■To prevent damage to the assist grip
Do not hang any heavy object or put a heavy load on the assist grip.
Coat hooks
WARNING
■Items that cannot be hung on the coat hook
Do not hang coat hangers or other hard or sharp objects on the hook. If
the SRS curtain shield airbags deploy, these items may become projectiles, causing death or serious injury.
Panoramic roof shade (if
equipped)
Page 370 of 698
368
Owners Manual_Europe_M52N75_en
6-1. Maintenance and care
6-1.Mainte nance a nd care
Working from top to bottom, lib-
erally apply water to the vehicle
body, wheel wells and underside
of the vehicle to remove any dirt
and dust.
Wash the vehicle body using a
sponge or soft cloth, such as a
chamois.
For hard-to-remove marks, use
car wash soap and rinse thor-
oughly with water.
Wipe away any water.
Wax the vehicle when the water-
proof coating deteriorates.
If water does not bead on a clean sur-
face, apply wax when the vehicle body
is cool.
■Automatic car washes
●Before washing the vehicle: • Fold the mirrors.
Start washing from the front of the vehi-
cle. Extend the mirrors before driving.
●Turn off the power back door (if equipped).
●Brushes used in automatic car washes may scratch the vehicle sur-
face, parts (wheel, etc.) and harm your vehicle’s paint.
●In certain automatic car washes, the
rear spoiler may interfere with
machine operation. This may prevent the vehicle from being cleaned prop-erly or result in damage to the rear
spoiler.
●When needed to keep the parking
brake off, do not open the driver door. If you open the door, the parking brake automatically locked.
■High pressure car washes
As water may enter the cabin, do not bring the nozzle tip near the gaps around the doors or perimeter of the
windows, or spray these areas continu- ously.
■When using a car wash (vehicles with a smart entry & start system)
If the door handle becomes wet while the electronic key is within the effective range, the door may lock and unlock
repeatedly. In that case, follow the fol- lowing correction procedures to wash the vehicle:
●Place the key in a position 2 m (6 ft.) or more separate from the vehicle
while the vehicle is being washed. (Take care to ensure that the key is not stolen.)
●Set the electronic key to battery-sav-ing mode to disable the smart entry &
start system. ( P.153)
■Wheels and wheel ornaments (if equipped)
●Remove any dirt immediately by using a neutral detergent.
●Wash detergent off with water immedi-ately after use.
●To protect the paint from damage, make sure to observe the following precautions.
• Do not use acidic, alkaline or abrasive detergent• Do not use hard brushes
• Do not use detergent on the wheels when they are hot, such as after driv-ing or parking in hot weather
Cleaning and protecting
the vehicle exterior
Perform cleaning in a manner
appropriate to each compo-
nent and its material.
Cleaning instructions
Page 460 of 698
458
Owners Manual_Europe_M52N75_en
7-2. Steps to take in an emergency
WARNING
●Keep back from the tire while it is
being repaired, as there is a chance
of it bursting while the repair opera-
tion is being performed. If you
notice any cracks or deformation of
the tire, turn (off) the compres-
sor switch and stop the repair oper-
ation immediately.
●The repair kit may overheat if oper- ated for a long period of time. Do
not operate the repair kit continu- ously for more than 40 minutes.
●Parts of the repair kit become hot during operation. Be careful when handling the repair kit during and
after operation. Do not touch the metal part around the connecting area between the bottle and com-
pressor. It will be extremely hot.
●Do not attach the vehicle speed
warning sticker to an area other than the one indicated. If the sticker is attached to an area where an
SRS airbag is located, such as the pad of the steering wheel, it may prevent the SRS airbag from oper-
ating properly.
●To avoid risk of burst or severe
leakage, do not drop or damage the bottle. Visually inspect the bottle before use. Do not use a bottle with
shock, crack, scratch, leakage or any other damage. In such case, immediately replace.
■Driving to spread the liquid seal-
ant evenly
Observe the following precautions to reduce the risk of accidents.
Failing to do so may result in a loss of vehicle control and cause death or serious injury.
●Drive the vehicle carefully at a low speed. Be especially careful when
turning and cornering.
●If the vehicle does not drive straight or you feel a pull through the steer-ing wheel, stop the vehicle and
check the following.
• Tire condition. The tire may have
separated from the wheel.
• Tire inflation pressure. If the tire
inflation pressure is 130 kPa (1.3
kgf/cm2 or bar, 19 psi) or less, the tire may be severely damaged.
NOTICE
■When performing an emergency repair
●A tire should only be repaired with
the emergency tire puncture repair kit if the damage is caused by a sharp object such as nail or screw
passing through the tire tread. Do not remove the sharp object from the tire. Removing the object
may widen the opening and disena- ble emergency repair with the repair kit.
●The repair kit is not waterproof. Make sure that the repair kit is not
exposed to water, such as when it is being used in the rain.
●Do not put the repair kit directly onto dusty ground such as sand at the side of the road. If the repair kit
vacuums up dust etc., a malfunc- tion may occur.
●Do not turn the bottle upside down when using it, as doing so may cause damage to the compressor.
■Precautions for the emergency tire puncture repair kit
●The repair kit power source should be 12 V DC suitable for vehicle use. Do not connect the repair kit to any
other source.
Page 520 of 698
518
Owners Manual_Europe_M52N75_en
Alphabetical Index
Dynamic radar cruise control with
full-speed range ....................... 252
ECO Accelerator Guidance 108, 114
Eco score ........................... 108, 114
Energy monitor........................... 123
Fuel economy .................... 107, 114
LTA (Lane-Tracing Assist) .......... 248
Menu icons......................... 106, 113
Meter control switches ....... 107, 113
Navigation system-linked display
......................................... 109, 116
Settings .............................. 110, 117
Tire pressure .............................. 392
Toyota parking assist-sensor ..... 275
Vehicle information display 110, 116
Warning message ...................... 445
N
nanoe™ X ...................................... 345
Navigation system-linked display
..................................... 109, 116, 119
O
Odometer ................................ 97, 104
Odometer and trip meter display
Display change button ......... 97, 104
Display items........................ 98, 104
Oil
Engine oil ................................... 486
Opener
Back door ........................... 141, 143
Fuel filler door ............................ 224
Hood .......................................... 380
Outside rear view mirrors
Adjustment ................................. 166
BSM (Blind Spot Monitor) .......... 270
Folding ....................................... 167
Outside rear view mirror defoggers
................................................. 344
RCTA (Rear Crossing Traffic Alert)
................................................. 285
Outside temperature....... 95, 100, 122
Overheating ...................................477
P
Panoramic roof shade ..................365
Parking assist ............................... 301
Parking assist sensors (Toyota park-
ing assist-sensor) .......................275
Parking brake ................................ 200
Operation ...................................200
Parking brake engaged warning
buzzer ...................................... 202
Warning light .............................. 442
Warning message ...................... 202
Parking Support Brake (PKSB) ... 291
Enabling/disabling the Parking Sup-
port Brake ................................ 292
Parking Support Brake function
(rear-crossing vehicles)............299
Parking Support Brake function
(static objects) .......................... 296
Warning lights.............................441
Warning message ...................... 295
PCS (Pre-Collision System) ......... 231
Enabling/disabling the pre-collision
system...................................... 235
Function ..................................... 231
Warning light .............................. 441
Personal lights .............................. 350
Wattage ...................................... 492
PKSB (Parking Support Brake) ... 291
Enabling/disabling the Parking Sup-
port Brake ................................ 292
Parking Support Brake function
(rear-crossing vehicles)............299