door lock TOYOTA YARIS CROSS 2023 Service Manual
[x] Cancel search | Manufacturer: TOYOTA, Model Year: 2023, Model line: YARIS CROSS, Model: TOYOTA YARIS CROSS 2023Pages: 698, PDF Size: 147.65 MB
Page 195 of 698
193
4
Owners Manual_Europe_M52N75_en
4-2. Driving procedures
Driving
1Stop the vehicle completely.
2 Set the parking brake (P.200),
and shift the shift lever to P.
Check the parking brake indicator is illuminated.
3 Press the power switch.
The hybrid system will stop, and the meter display will be extinguished.
4 Release the brake pedal and
check that “ACCESSORY” or
“IGNITION ON” is not shown on
the multi-information display.
Modes can be changed by pressing
the power switch with brake pedal
released. (The mode changes each
time the switch is pressed.)
WARNING
■When starting the hybrid system
Always start the hybrid system while
sitting in the driver’s seat. Do not depress the accelerator pedal while starting the hybrid system under any
circumstances. Doing so may cause an accident resulting in death or serious injury.
■Caution while driving (vehicles with steering lock function)
If hybrid system failure occurs while the vehicle is moving, do not lock or open the doors until the vehicle
reaches a safe and complete stop. Activation of the steering lock in this circumstance may lead to an acci-
dent, resulting in death or serious injury.
NOTICE
■When starting the hybrid system
If the hybrid system becomes difficult to start, have your vehicle checked by
any authorized Toyota retailer or Toyota authorized repairer, or any reli-
able repairer immediately.
■Symptoms indicating a malfunc-
tion with the power switch
If the power switch seems to be oper- ating somewhat differently than usual,
such as the switch sticking slightly, there may be a malfunction. Contact any authorized Toyota retailer or
Toyota authorized repairer, or any reli- able repairer immediately.
Stopping the hybrid system
WARNING
■Stopping the hybrid system in an emergency
●If you want to stop the hybrid sys-tem in an emergency while driving the vehicle, press and hold the
power switch for more than 2 sec- onds, or press it briefly 3 times or more in succession. ( P.426)
However, do not touch the power switch while driving except in an emergency. Turning the hybrid sys-
tem off while driving will not cause loss of steering or braking control, however, power assist to the steer-
ing will be lost. This will make it more difficult to steer smoothly, so you should pull over and stop the
vehicle as soon as it is safe to do so.
●If the power switch is operated while the vehicle is running, a warn-ing message will be shown on the
multi-information display and a buzzer sounds.
●To restart the hybrid system after performing an emergency shut-down, shift the shift lever to N and
then press the power switch.
Changing power switch
modes
Page 204 of 698
202
Owners Manual_Europe_M52N75_en
4-2. Driving procedures
●The driver’s door is closed
●The driver is wearing the seat belt
●The shift lever is a forward or reverse position.
●The malfunction indicator lamp or brake system warning light is not illu-minated.
If the automatic release function does not operate, manually release the park-ing brake.
■Parking brake automatic lock func-
tion
The parking brake will be set automati- cally under the following conditions:
●The driver does not operate the brake pedal.
●The driver’s door is not closed.
●The driver is not wearing the seat belt.
●The malfunction indicator lamp or
brake system warning light is not illu- minated.
■If “Parking Brake Temporarily Unavailable” is displayed on the
multi-information display
If the parking brake is operated repeat- edly over a short period of time, the sys-
tem may restrict operation to prevent overheating. If this happens, refrain from operating the parking brake. Normal
operation will return after about 1 min- ute.
■If “Parking Brake Unavailable” is displayed on the multi-information
display
Operate the parking brake switch. If the message does not disappear after oper-
ating the switch several times, the sys- tem may be malfunctioning. Have the vehicle inspected by any authorized
Toyota retailer or Toyota authorized repairer, or any reliable repairer.
■Parking brake operation sound
When the parking brake operates, a
motor sound (whirring sound) may be heard. This does not indicate a malfunc-tion.
■Parking brake operation
●Depending on the power switch mode, the parking brake indicator and park-
ing brake light will turn on and stay on as described below:ON: Comes on until the parking brake
is released. Not in ON: Stays on for approximately 15 seconds.
●When the power switch is turned off with the parking brake set, the parking
brake indicator and parking brake light will stay on for about 15 seconds. This does not indicate a malfunction.
■When the parking brake switch
malfunctions
Automatic mode (automatic brake set- ting and releasing) will be turned on
automatically.
■Parking the vehicle
P. 1 7 5
■Parking brake engaged warning buzzer
A buzzer will sound if the vehicle is driven with the parking brake engaged. “Parking Brake ON” is displayed on the
multi-information display. (with the vehi- cle reached a speed of 5 km/h [3 mph])
■If the brake system warning light comes on
P. 4 3 5
■Usage in winter time
P. 3 3 8
■When getting out of the vehicle with N range and parking brake
released
Turn auto mode OFF( P.201) and turn the engine OFF( P.189, 191).
Shift the shift lever from P to N ( P.197).
Page 209 of 698
207
4
Owners Manual_Europe_M52N75_en
4-3. Operating the lights and wipers
Driving
the headlight switch in the or
position. Daytime running lights are not
designed for use at night.
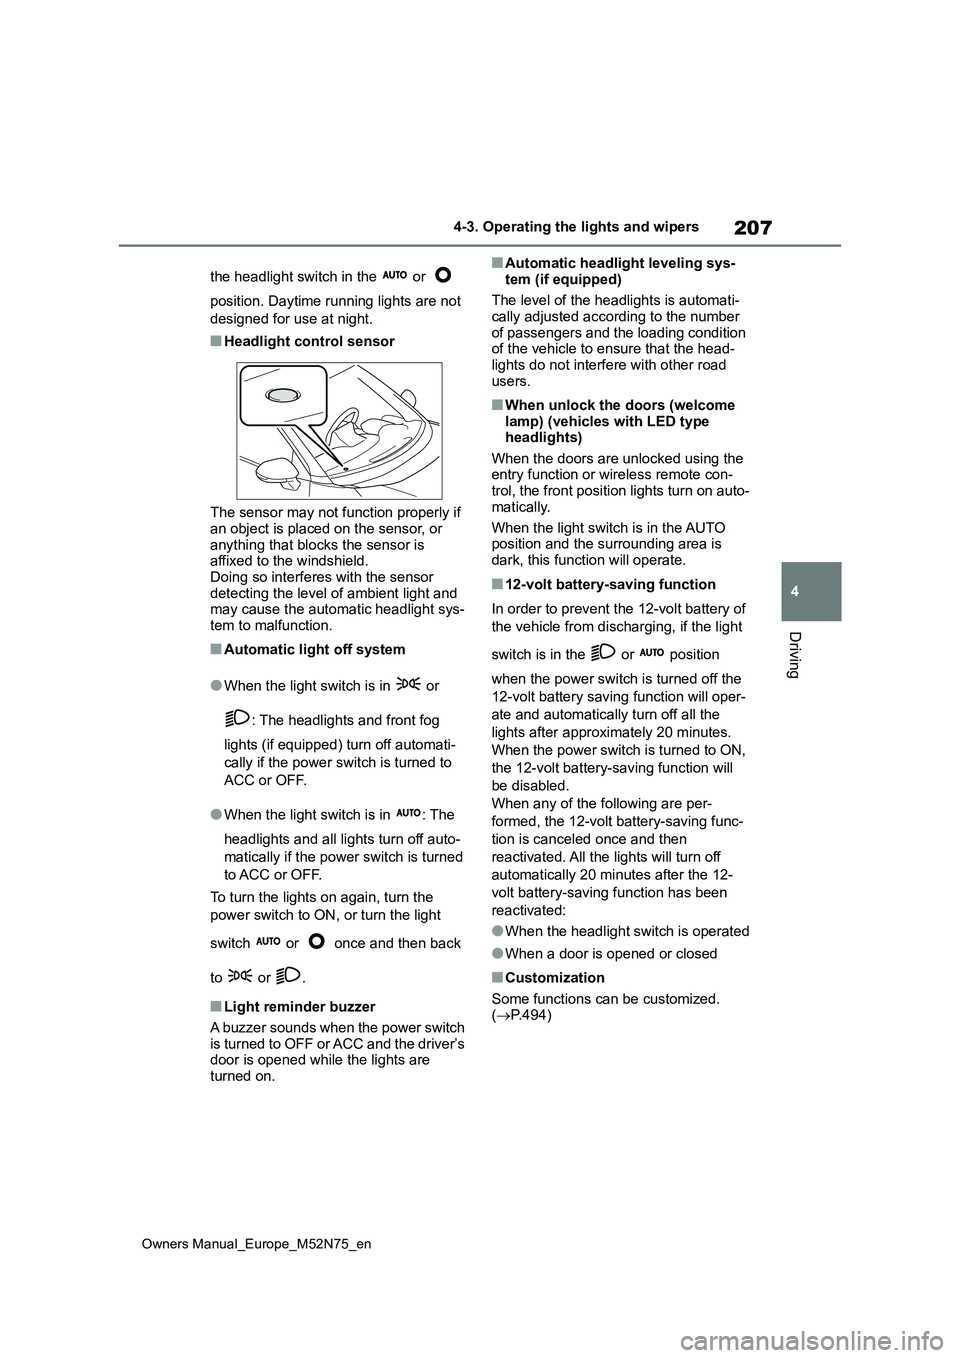
■Headlight control sensor
The sensor may not function properly if an object is placed on the sensor, or
anything that blocks the sensor is affixed to the windshield.Doing so interferes with the sensor
detecting the level of ambient light and may cause the automatic headlight sys-tem to malfunction.
■Automatic light off system
●When the light switch is in or
: The headlights and front fog
lights (if equipped) turn off automati-
cally if the power switch is turned to
ACC or OFF.
●When the light switch is in : The
headlights and all lights turn off auto-
matically if the power switch is turned
to ACC or OFF.
To turn the lights on again, turn the
power switch to ON, or turn the light
switch or once and then back
to or .
■Light reminder buzzer
A buzzer sounds when the power switch
is turned to OFF or ACC and the driver’s door is opened while the lights are turned on.
■Automatic headlight leveling sys-
tem (if equipped)
The level of the headlights is automati- cally adjusted according to the number
of passengers and the loading condition of the vehicle to ensure that the head-lights do not interfere with other road
users.
■When unlock the doors (welcome lamp) (vehicles with LED type headlights)
When the doors are unlocked using the entry function or wireless remote con-trol, the front position lights turn on auto-
matically.
When the light switch is in the AUTO position and the surrounding area is
dark, this function will operate.
■12-volt battery-saving function
In order to prevent the 12-volt battery of
the vehicle from discharging, if the light
switch is in the or position
when the power switch is turned off the
12-volt battery saving function will oper-
ate and automatically turn off all the
lights after approximately 20 minutes.
When the power switch is turned to ON,
the 12-volt battery-saving function will
be disabled.
When any of the following are per-
formed, the 12-volt battery-saving func-
tion is canceled once and then
reactivated. All the lights will turn off
automatically 20 minutes after the 12-
volt battery-saving function has been
reactivated:
●When the headlight switch is operated
●When a door is opened or closed
■Customization
Some functions can be customized. ( P.494)
Page 225 of 698
223
4
Owners Manual_Europe_M52N75_en
4-3. Operating the lights and wipers
Driving
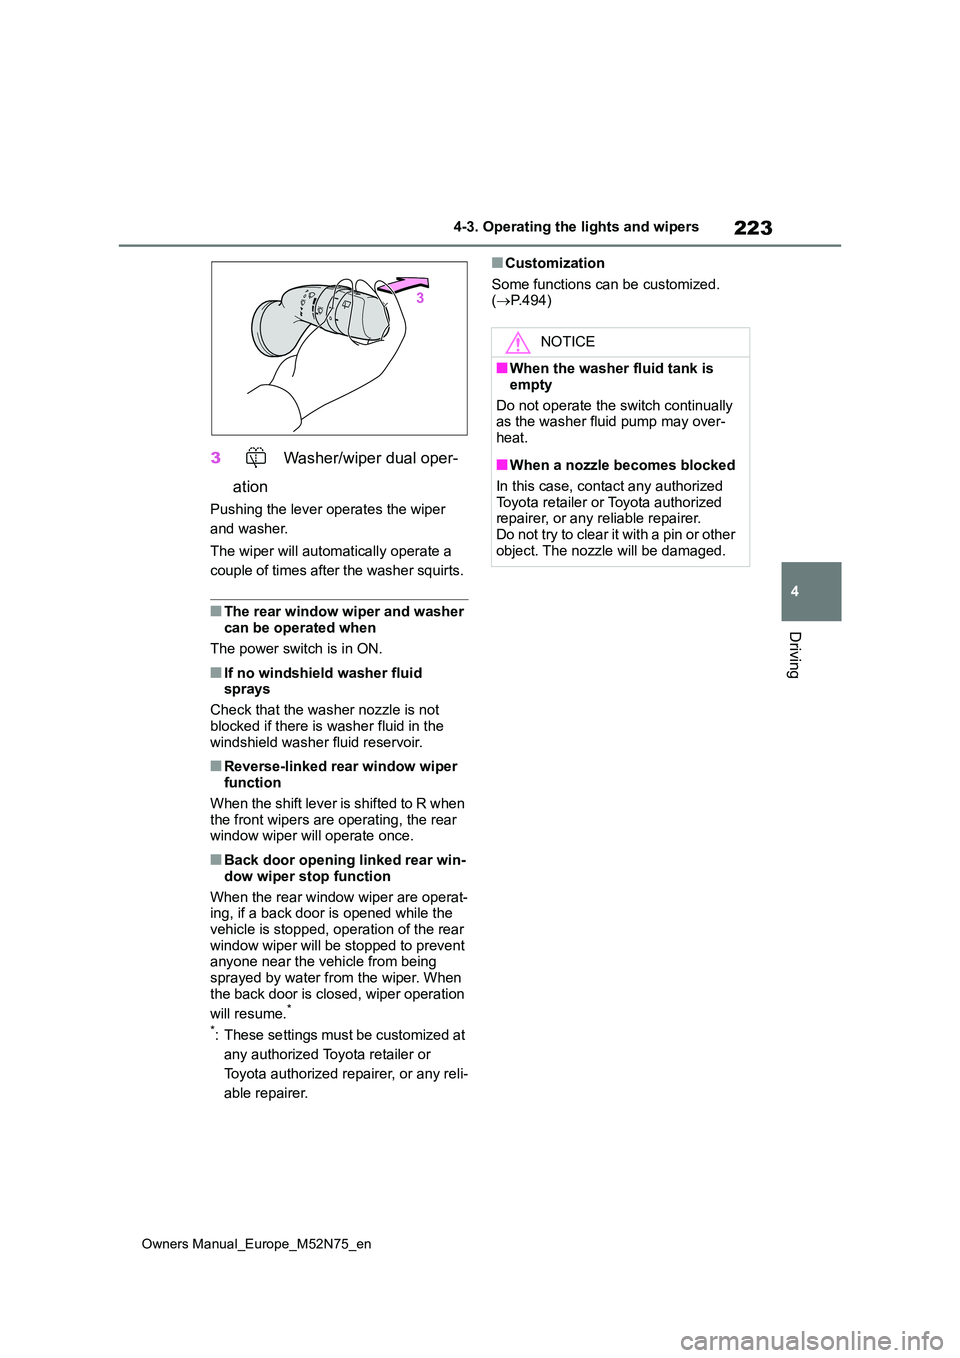
3 Washer/wiper dual oper-
ation
Pushing the lever operates the wiper
and washer.
The wiper will automatically operate a
couple of times after the washer squirts.
■The rear window wiper and washer can be operated when
The power switch is in ON.
■If no windshield washer fluid sprays
Check that the washer nozzle is not
blocked if there is washer fluid in the windshield washer fluid reservoir.
■Reverse-linked rear window wiper function
When the shift lever is shifted to R when the front wipers are operating, the rear window wiper will operate once.
■Back door opening linked rear win-
dow wiper stop function
When the rear window wiper are operat- ing, if a back door is opened while the
vehicle is stopped, operation of the rear window wiper will be stopped to prevent anyone near the vehicle from being
sprayed by water from the wiper. When the back door is closed, wiper operation
will resume.*
*: These settings must be customized at
any authorized Toyota retailer or
Toyota authorized repairer, or any reli-
able repairer.
■Customization
Some functions can be customized. ( P.494)
NOTICE
■When the washer fluid tank is
empty
Do not operate the switch continually as the washer fluid pump may over-
heat.
■When a nozzle becomes blocked
In this case, contact any authorized Toyota retailer or Toyota authorized repairer, or any reliable repairer.
Do not try to clear it with a pin or other object. The nozzle will be damaged.
Page 353 of 698
351
5
Owners Manual_Europe_M52N75_en
5-2. Using the interior lights
Interior features
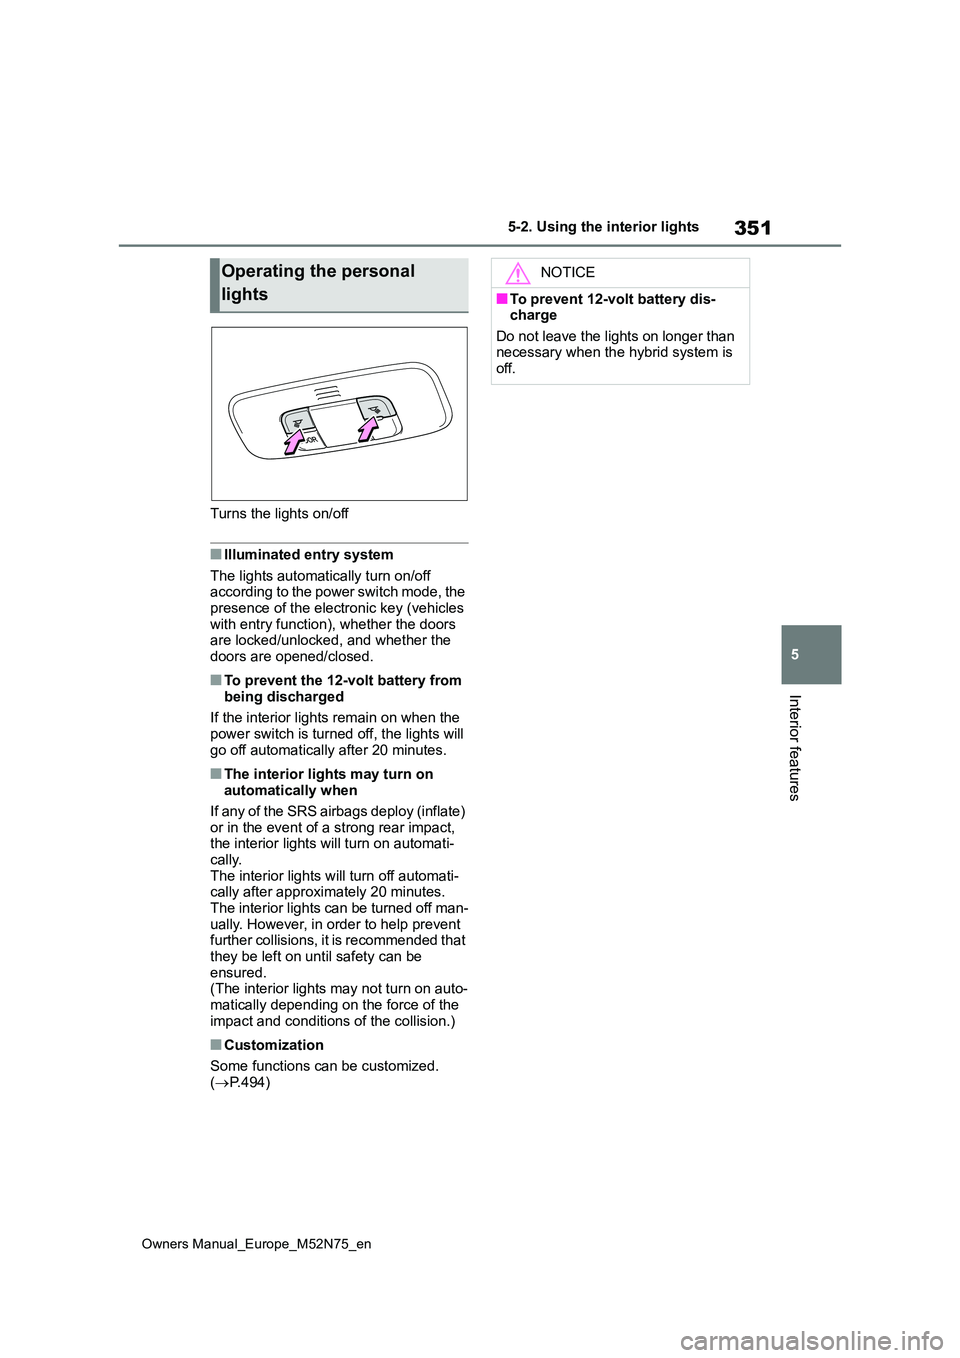
Turns the lights on/off
■Illuminated entry system
The lights automatically turn on/off according to the power switch mode, the presence of the electronic key (vehicles
with entry function), whether the doors are locked/unlocked, and whether the doors are opened/closed.
■To prevent the 12-volt battery from
being discharged
If the interior lights remain on when the power switch is turned off, the lights will
go off automatically after 20 minutes.
■The interior lights may turn on automatically when
If any of the SRS airbags deploy (inflate)
or in the event of a strong rear impact, the interior lights will turn on automati-cally.
The interior lights will turn off automati- cally after approximately 20 minutes.The interior lights can be turned off man-
ually. However, in order to help prevent further collisions, it is recommended that they be left on until safety can be
ensured. (The interior lights may not turn on auto-matically depending on the force of the
impact and conditions of the collision.)
■Customization
Some functions can be customized. ( P.494)
Operating the personal
lights
NOTICE
■To prevent 12-volt battery dis- charge
Do not leave the lights on longer than necessary when the hybrid system is off.
Page 370 of 698
368
Owners Manual_Europe_M52N75_en
6-1. Maintenance and care
6-1.Mainte nance a nd care
Working from top to bottom, lib-
erally apply water to the vehicle
body, wheel wells and underside
of the vehicle to remove any dirt
and dust.
Wash the vehicle body using a
sponge or soft cloth, such as a
chamois.
For hard-to-remove marks, use
car wash soap and rinse thor-
oughly with water.
Wipe away any water.
Wax the vehicle when the water-
proof coating deteriorates.
If water does not bead on a clean sur-
face, apply wax when the vehicle body
is cool.
■Automatic car washes
●Before washing the vehicle: • Fold the mirrors.
Start washing from the front of the vehi-
cle. Extend the mirrors before driving.
●Turn off the power back door (if equipped).
●Brushes used in automatic car washes may scratch the vehicle sur-
face, parts (wheel, etc.) and harm your vehicle’s paint.
●In certain automatic car washes, the
rear spoiler may interfere with
machine operation. This may prevent the vehicle from being cleaned prop-erly or result in damage to the rear
spoiler.
●When needed to keep the parking
brake off, do not open the driver door. If you open the door, the parking brake automatically locked.
■High pressure car washes
As water may enter the cabin, do not bring the nozzle tip near the gaps around the doors or perimeter of the
windows, or spray these areas continu- ously.
■When using a car wash (vehicles with a smart entry & start system)
If the door handle becomes wet while the electronic key is within the effective range, the door may lock and unlock
repeatedly. In that case, follow the fol- lowing correction procedures to wash the vehicle:
●Place the key in a position 2 m (6 ft.) or more separate from the vehicle
while the vehicle is being washed. (Take care to ensure that the key is not stolen.)
●Set the electronic key to battery-sav-ing mode to disable the smart entry &
start system. ( P.153)
■Wheels and wheel ornaments (if equipped)
●Remove any dirt immediately by using a neutral detergent.
●Wash detergent off with water immedi-ately after use.
●To protect the paint from damage, make sure to observe the following precautions.
• Do not use acidic, alkaline or abrasive detergent• Do not use hard brushes
• Do not use detergent on the wheels when they are hot, such as after driv-ing or parking in hot weather
Cleaning and protecting
the vehicle exterior
Perform cleaning in a manner
appropriate to each compo-
nent and its material.
Cleaning instructions
Page 390 of 698
388
Owners Manual_Europe_M52N75_en
6-3. Do-it-yourself maintenance
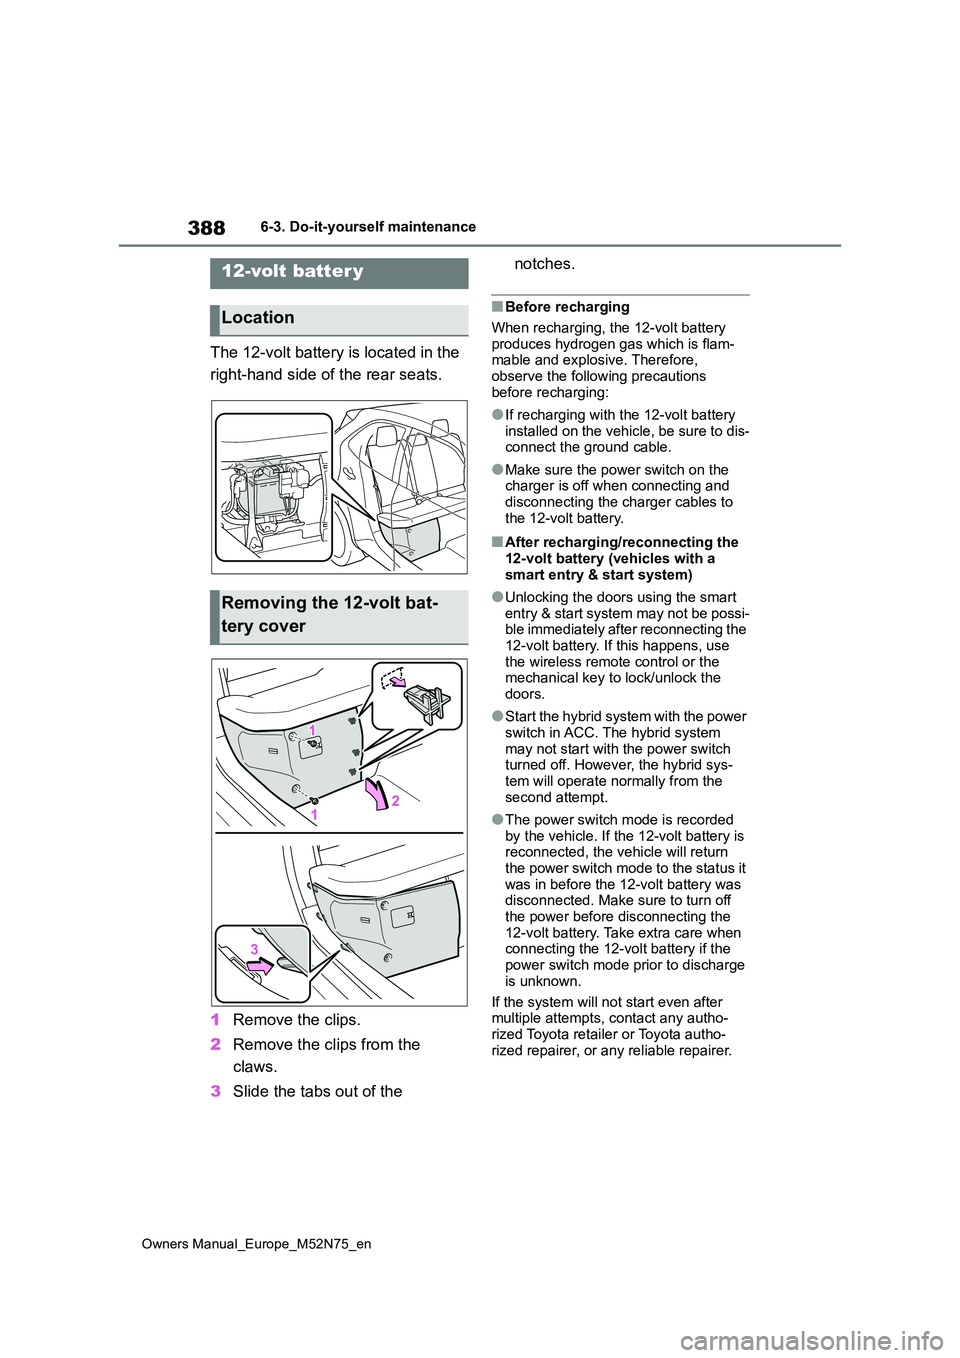
The 12-volt battery is located in the
right-hand side of the rear seats.
1 Remove the clips.
2 Remove the clips from the
claws.
3 Slide the tabs out of the
notches.
■Before recharging
When recharging, the 12-volt battery produces hydrogen gas which is flam-mable and explosive. Therefore,
observe the following precautions before recharging:
●If recharging with the 12-volt battery installed on the vehicle, be sure to dis-connect the ground cable.
●Make sure the power switch on the charger is off when connecting and
disconnecting the charger cables to the 12-volt battery.
■After recharging/reconnecting the 12-volt battery (vehicles with a
smart entry & start system)
●Unlocking the doors using the smart
entry & start system may not be possi- ble immediately after reconnecting the 12-volt battery. If this happens, use
the wireless remote control or the mechanical key to lock/unlock the doors.
●Start the hybrid system with the power switch in ACC. The hybrid system
may not start with the power switch turned off. However, the hybrid sys-tem will operate normally from the
second attempt.
●The power switch mode is recorded
by the vehicle. If the 12-volt battery is reconnected, the vehicle will return the power switch mode to the status it
was in before the 12-volt battery was disconnected. Make sure to turn off the power before disconnecting the
12-volt battery. Take extra care when connecting the 12-volt battery if the power switch mode prior to discharge
is unknown.
If the system will not start even after multiple attempts, contact any autho-
rized Toyota retailer or Toyota autho- rized repairer, or any reliable repairer.
12-volt batter y
Location
Removing the 12-volt bat-
tery cover
Page 413 of 698
411
6
Owners Manual_Europe_M52N75_en
6-3. Do-it-yourself maintenance
Maintenance and care
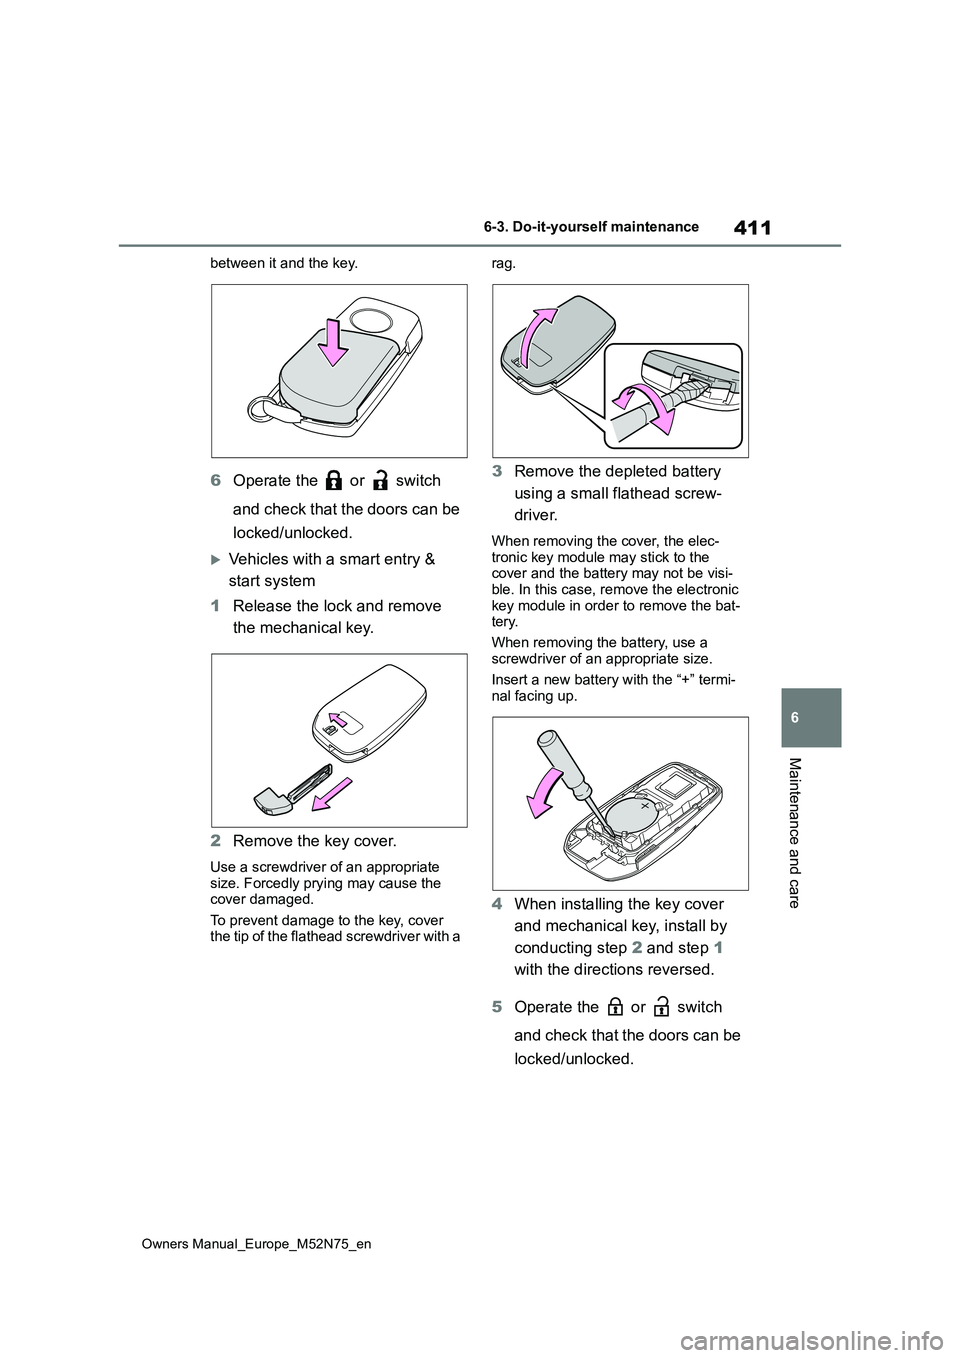
between it and the key.
6Operate the or switch
and check that the doors can be
locked/unlocked.
Vehicles with a smart entry &
start system
1 Release the lock and remove
the mechanical key.
2 Remove the key cover.
Use a screwdriver of an appropriate size. Forcedly prying may cause the cover damaged.
To prevent damage to the key, cover the tip of the flathead screwdriver with a
rag.
3 Remove the depleted battery
using a small flathead screw-
driver.
When removing the cover, the elec-
tronic key module may stick to the cover and the battery may not be visi-ble. In this case, remove the electronic
key module in order to remove the bat- tery.
When removing the battery, use a
screwdriver of an appropriate size.
Insert a new battery with the “+” termi- nal facing up.
4 When installing the key cover
and mechanical key, install by
conducting step 2 and step 1
with the directions reversed.
5 Operate the or switch
and check that the doors can be
locked/unlocked.
Page 421 of 698
419
6
Owners Manual_Europe_M52N75_en
6-3. Do-it-yourself maintenance
Maintenance and care
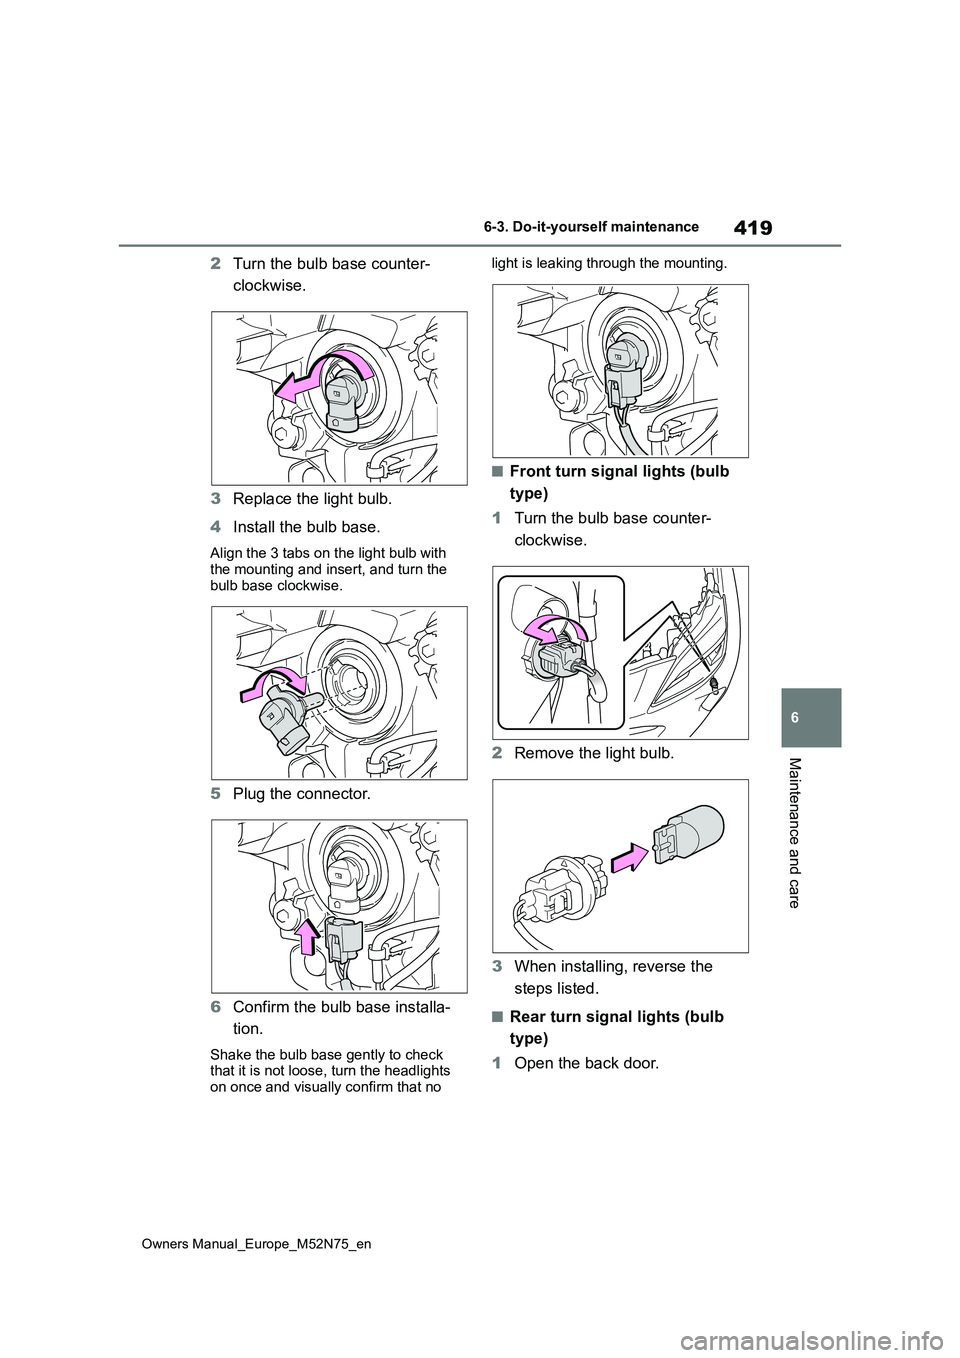
2Turn the bulb base counter-
clockwise.
3 Replace the light bulb.
4 Install the bulb base.
Align the 3 tabs on the light bulb with the mounting and insert, and turn the
bulb base clockwise.
5 Plug the connector.
6 Confirm the bulb base installa-
tion.
Shake the bulb base gently to check that it is not loose, turn the headlights
on once and visually confirm that no
light is leaking through the mounting.
■Front turn signal lights (bulb
type)
1 Turn the bulb base counter-
clockwise.
2 Remove the light bulb.
3 When installing, reverse the
steps listed.
■Rear turn signal lights (bulb
type)
1 Open the back door.
Page 424 of 698
422
Owners Manual_Europe_M52N75_en
6-3. Do-it-yourself maintenance
2Push the lens into place.
After installation, confirm that the lens is
properly installed by gently pulling it.
Fitting portion
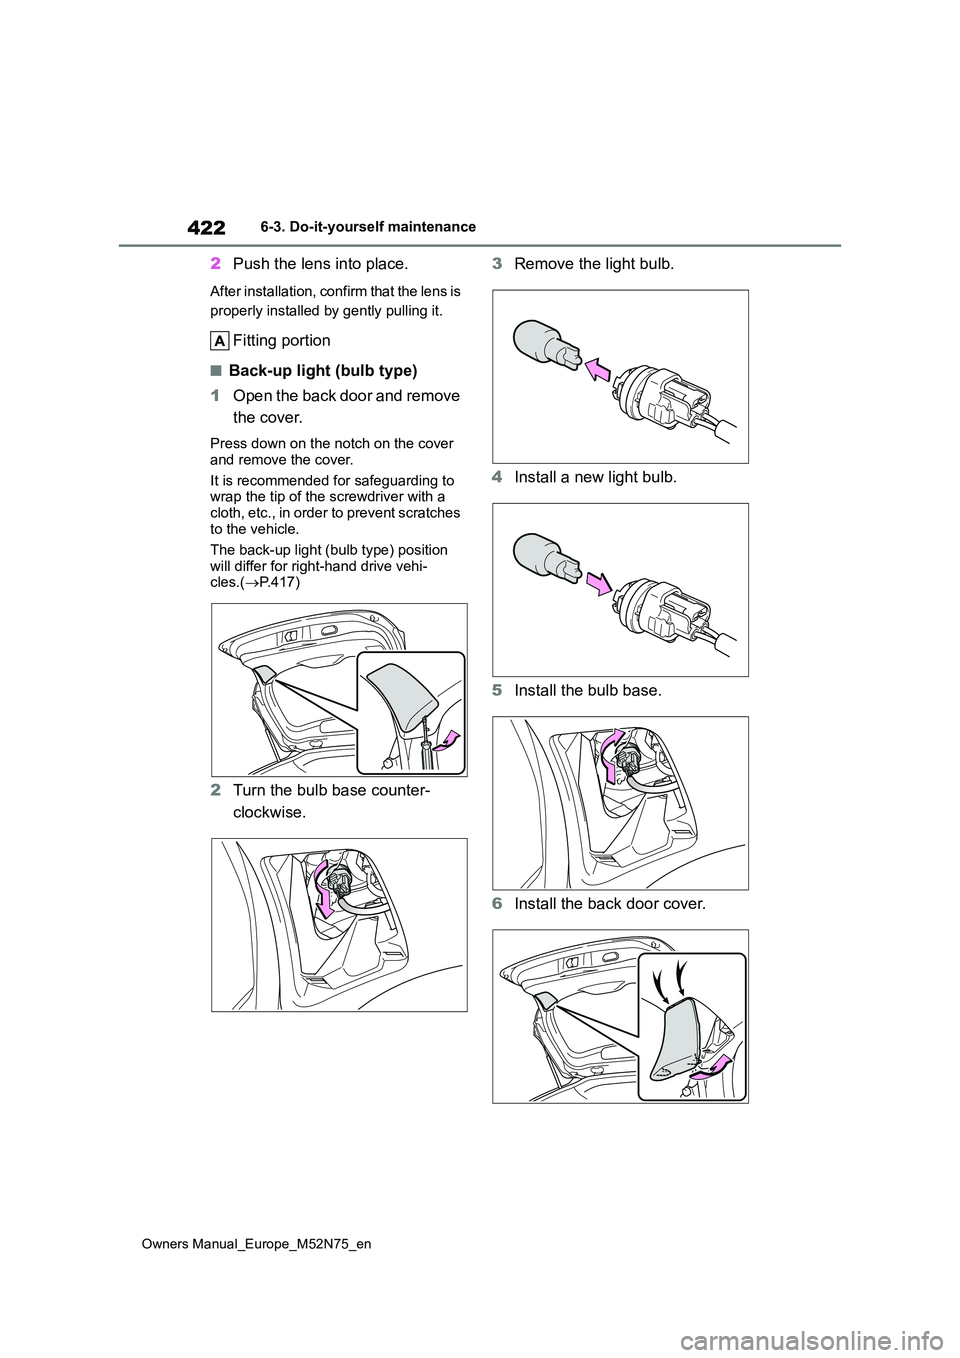
■Back-up light (bulb type)
1 Open the back door and remove
the cover.
Press down on the notch on the cover
and remove the cover.
It is recommended for safeguarding to wrap the tip of the screwdriver with a
cloth, etc., in order to prevent scratches to the vehicle.
The back-up light (bulb type) position
will differ for right-hand drive vehi- cles.( P.417)
2Turn the bulb base counter-
clockwise.
3 Remove the light bulb.
4 Install a new light bulb.
5 Install the bulb base.
6 Install the back door cover.