ECO mode TOYOTA YARIS GRMN 2017 Owners Manual
[x] Cancel search | Manufacturer: TOYOTA, Model Year: 2017, Model line: YARIS GRMN, Model: TOYOTA YARIS GRMN 2017Pages: 404, PDF Size: 54.2 MB
Page 6 of 404
6
YARIS_GRMN_OM_Europe_OM52J40E
For your information
Please note that this manual applies to all models and explains all equipment,
including options. Therefore, you may find some explanations for equipment
not installed on your vehicle.
All specifications provided in this manual are current at the time of printing.
However, because of the Toyota policy of continual product improvement, we
reserve the right to make changes at any time without notice.
Depending on specifications, the vehicle shown in the illustrations may differ
from your vehicle in terms of equipment.
Both genuine Toyota and a wide variety of other spare parts and accessories
for Toyota vehicles are currently avai lable in the market. Should it be deter-
mined that any of the genuine Toyota parts or accessories supplied with the
vehicle need to be replaced, Toyota recommends that genuine Toyota parts
or accessories, be used to replace them. Other parts or accessories of
matching quality can also be used. Toyota cannot accept any liability or guar-
antee spare parts and accessories which are not genuine Toyota products,
nor for replacement or installation involving such parts. In addition, damage
or performance problems resulting from the use of non-genuine Toyota spare
parts or accessories may not be covered under warranty.
The installation of an RF-transmitter system in your vehicle could affect elec-
tronic systems such as:
● Multiport fuel injection system/sequential multiport fuel injection system
● Anti-lock brake system
● SRS airbag system
● Seat belt pretensioner system
Be sure to check with any authorized Toyota retailer or Toyota authorized
repairer, or any reliable repairer for precautionary measures or special
instructions regarding installation of an RF-transmitter system.
Further information regarding frequency bands, power levels, antenna posi-
tions and installation provisions for the installation of RF-transmitters, is avail-
able on request at any authorized Toyota retailer or Toyota authorized
repairer, or any reliable repairer.
Main Owner’s Manual
Accessories, spare parts and modification of your Toyota
Installation of an RF-transmitter system
Page 27 of 404
271-1. For safe use
1
For safety and security
YARIS_GRMN_OM_Europe_OM52J40E
WARNING
Observe the following precautions.
Failure to do so may cause the driver’s floor mat to slip, possibly interfering
with the pedals while driving. An unexpectedly high speed may result or it may
become difficult to stop the vehicle. This could lead to an accident, resulting in
death or serious injury.
■ When installing the driver’s floor mat
● Do not use floor mats designed for other models or different model year
vehicles, even if they are Toyota Genuine floor mats.
● Only use floor mats designed for the driver’s seat.
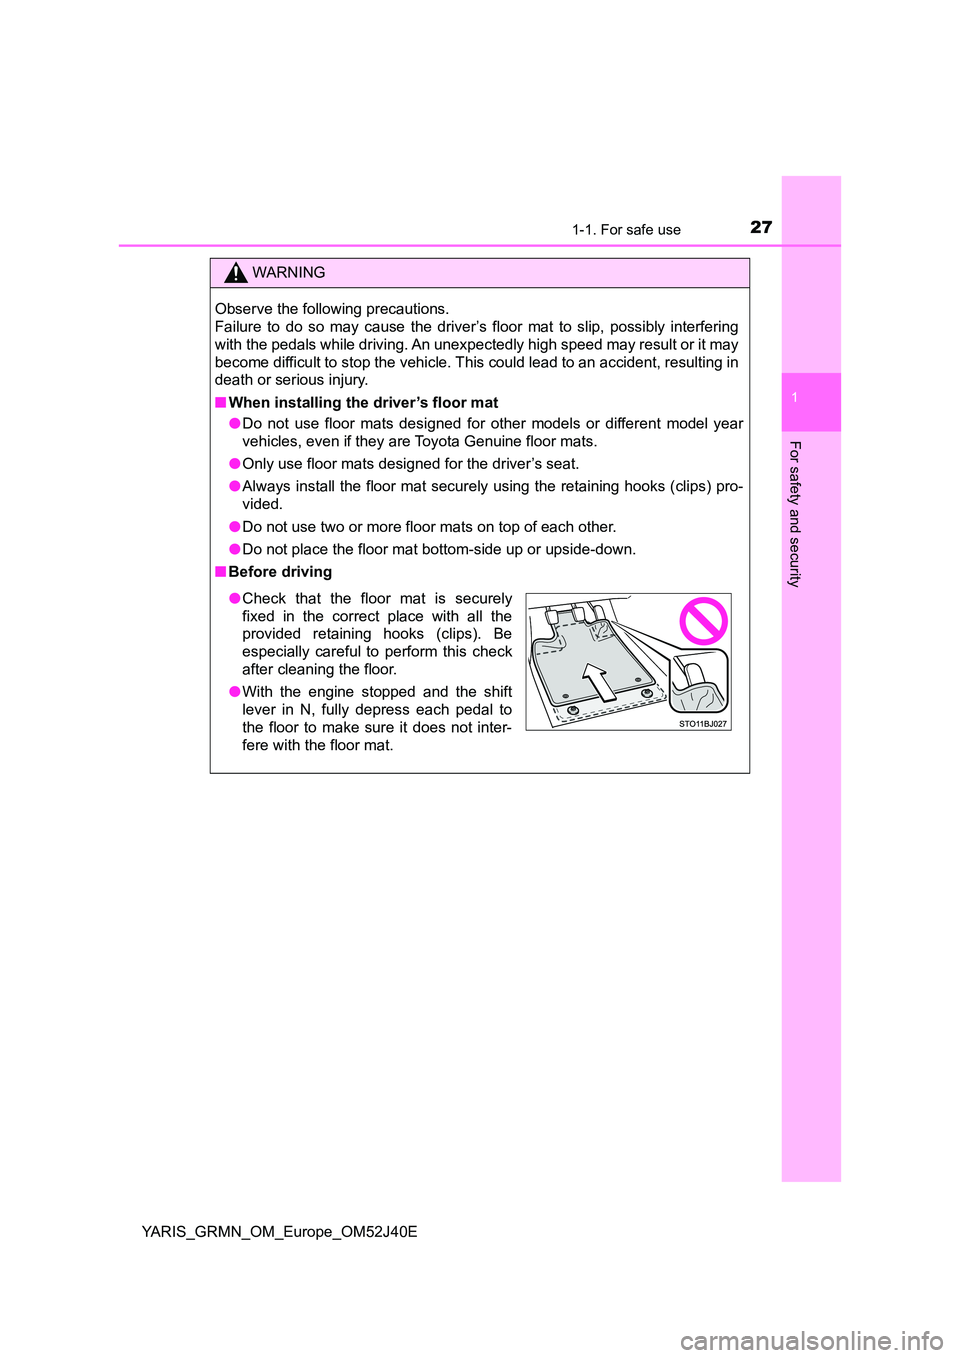
● Always install the floor mat securely using the retaining hooks (clips) pro-
vided.
● Do not use two or more floor mats on top of each other.
● Do not place the floor mat bottom-side up or upside-down.
■ Before driving
●Check that the floor mat is securely
fixed in the correct place with all the
provided retaining hooks (clips). Be
especially careful to perform this check
after cleaning the floor.
● With the engine stopped and the shift
lever in N, fully depress each pedal to
the floor to make sure it does not inter-
fere with the floor mat.
Page 93 of 404
932. Instrument cluster
2
Instrument cluster
YARIS_GRMN_OM_Europe_OM52J40E
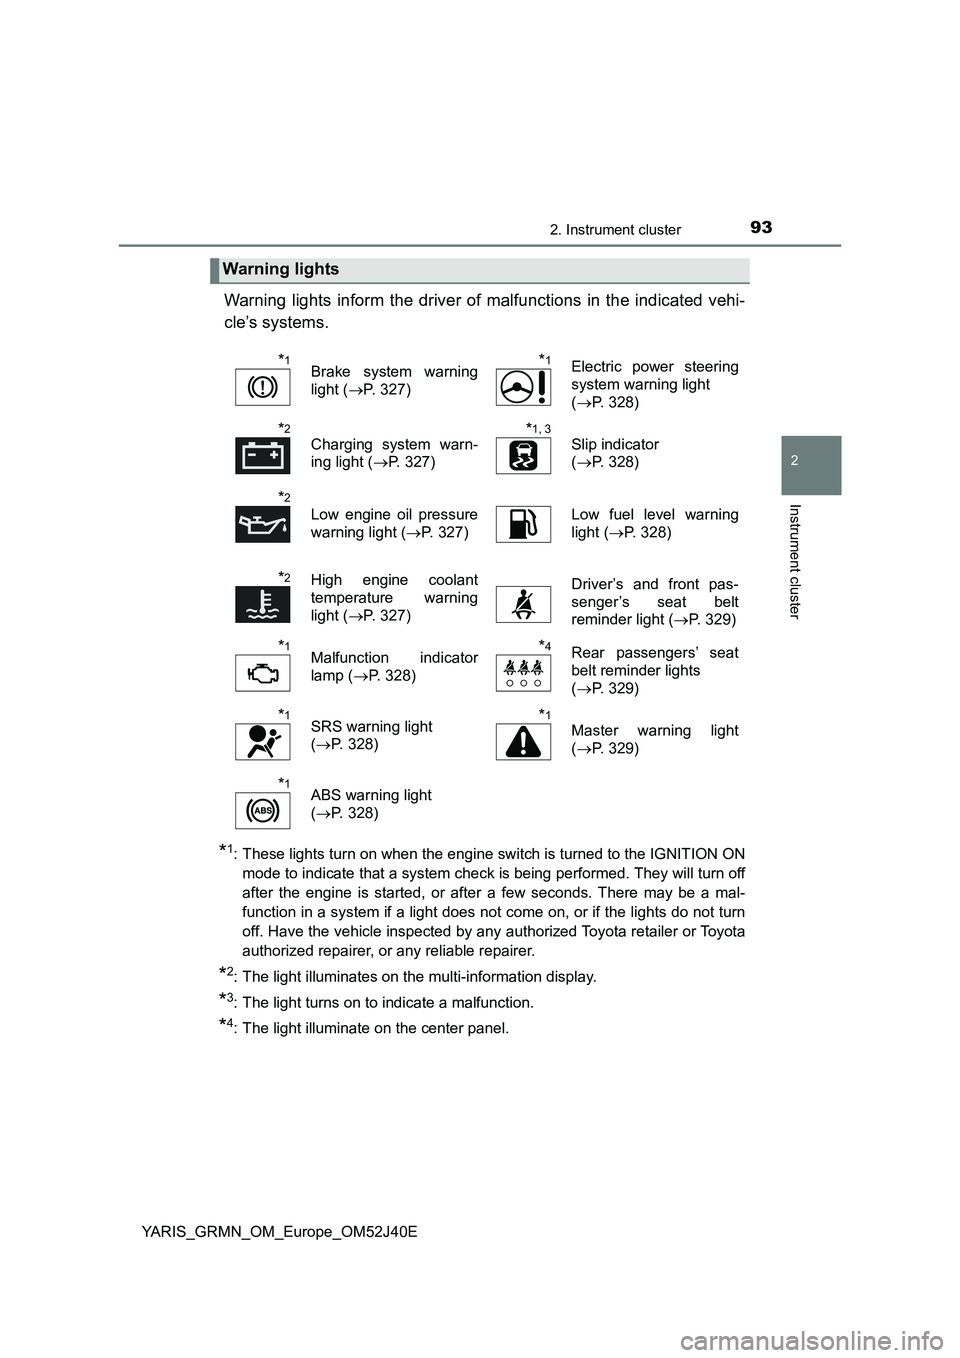
Warning lights inform the driver of malfunctions in the indicated vehi-
cle’s systems.
*1: These lights turn on when the engine switch is turned to the IGNITION ON
mode to indicate that a system check is being performed. They will turn off
after the engine is started, or after a few seconds. There may be a mal-
function in a system if a light does not come on, or if the lights do not turn
off. Have the vehicle inspected by any authorized Toyota retailer or Toyota
authorized repairer, or any reliable repairer.
*2: The light illuminates on the multi-information display.
*3: The light turns on to indicate a malfunction.
*4: The light illuminate on the center panel.
Warning lights
*1Brake system warning
light ( P. 327)
*1Electric power steering
system warning light
( P. 328)
*2
Charging system warn-
ing light ( P. 327)
*1, 3
Slip indicator
( P. 328)
*2
Low engine oil pressure
warning light ( P. 327)
Low fuel level warning
light ( P. 328)
*2High engine coolant
temperature warning
light ( P. 327)
Driver’s and front pas-
senger’s seat belt
reminder light ( P. 329)
*1Malfunction indicator
lamp ( P. 328)
*4Rear passengers’ seat
belt reminder lights
( P. 329)
*1SRS warning light
( P. 328)
*1
Master warning light
( P. 329)
*1ABS warning light
( P. 328)
Page 94 of 404
942. Instrument cluster
YARIS_GRMN_OM_Europe_OM52J40E
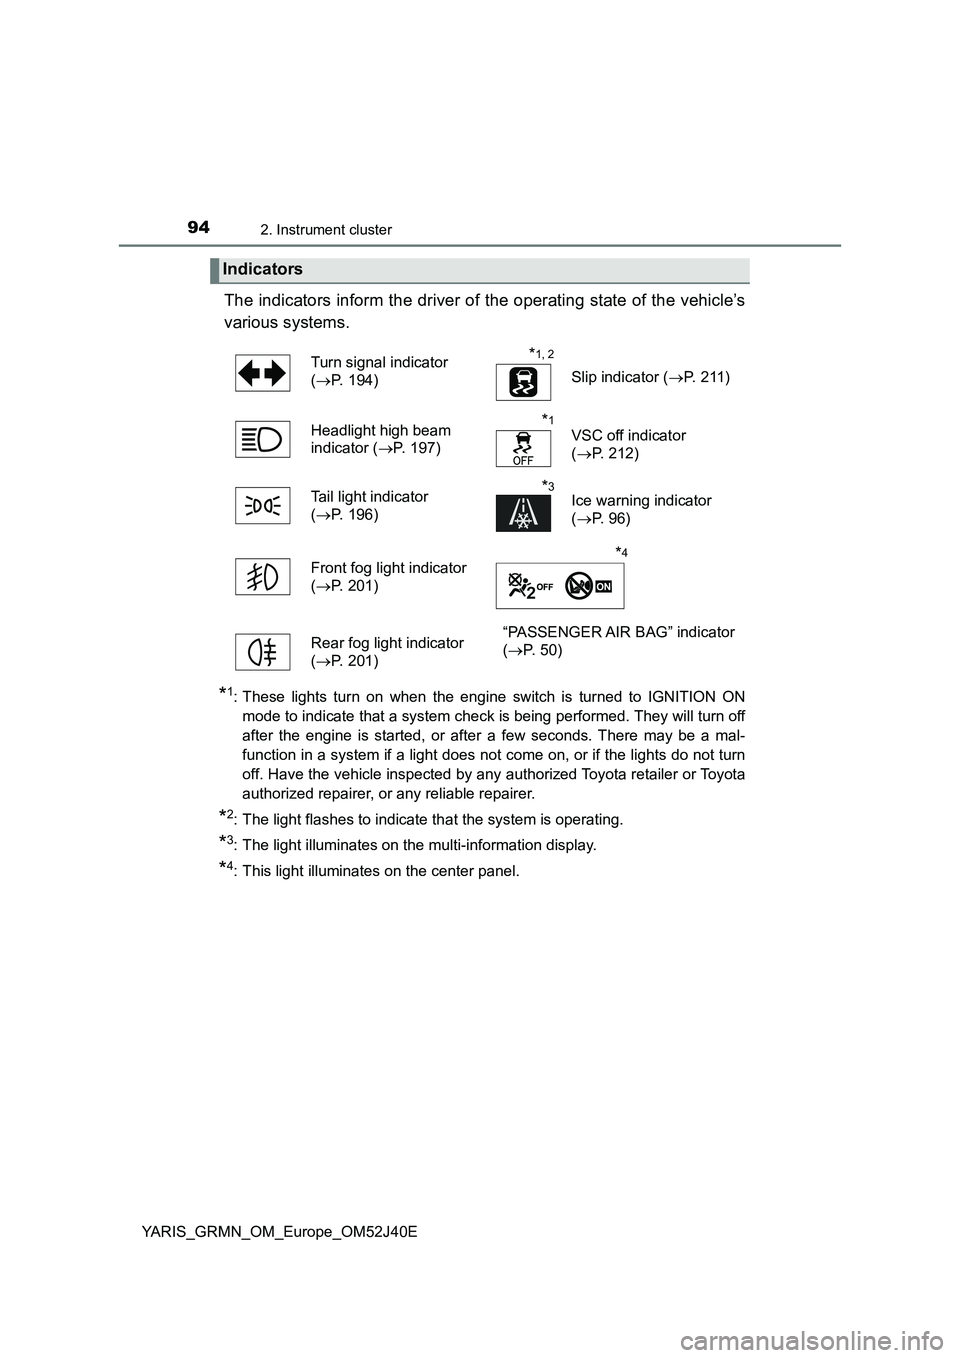
The indicators inform the driver of the operating state of the vehicle’s
various systems.
*1: These lights turn on when the engine switch is turned to IGNITION ON
mode to indicate that a system check is being performed. They will turn off
after the engine is started, or after a few seconds. There may be a mal-
function in a system if a light does not come on, or if the lights do not turn
off. Have the vehicle inspected by any authorized Toyota retailer or Toyota
authorized repairer, or any reliable repairer.
*2: The light flashes to indicate that the system is operating.
*3: The light illuminates on the multi-information display.
*4: This light illuminates on the center panel.
Indicators
Turn signal indicator
( P. 194)
*1, 2
Slip indicator (P. 2 11 )
Headlight high beam
indicator ( P. 197)
*1
VSC off indicator
( P. 212)
Tail light indicator
( P. 196)
*3Ice warning indicator
( P. 96)
Front fog light indicator
( P. 201)
*4
Rear fog light indicator
( P. 201)
“PASSENGER AIR BAG” indicator
( P. 5 0 )
Page 126 of 404
1263-2. Opening, closing and locking the doors
YARIS_GRMN_OM_Europe_OM52J40E
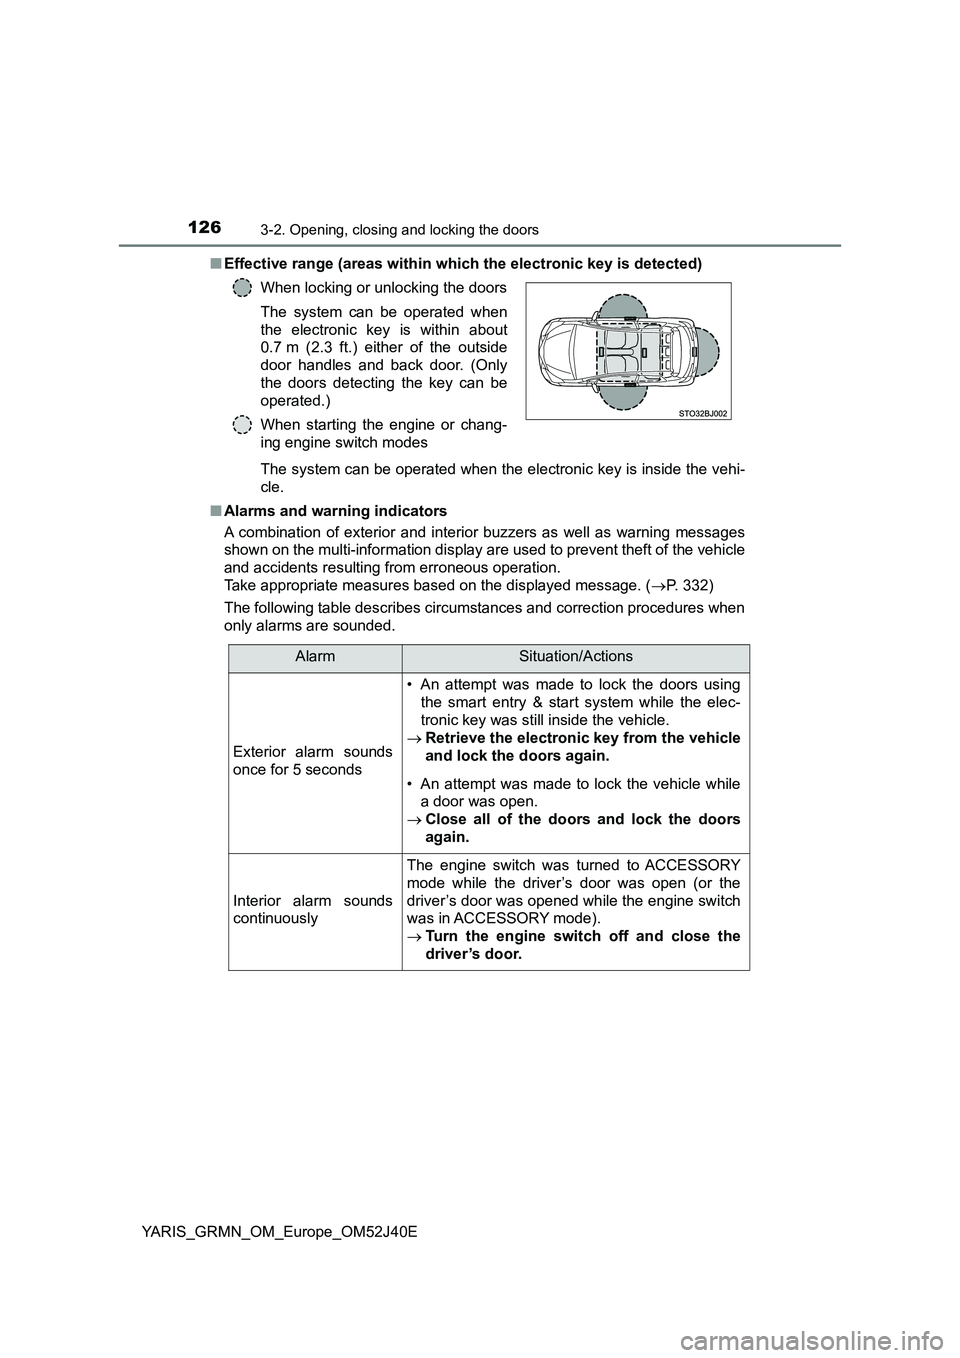
■ Effective range (areas within which the electronic key is detected)
The system can be operated when the electronic key is inside the vehi-
cle.
■ Alarms and warning indicators
A combination of exterior and interior buzzers as well as warning messages
shown on the multi-information display are used to prevent theft of the vehicle
and accidents resulting from erroneous operation.
Take appropriate measures based on the displayed message. ( P. 332)
The following table describes circumstances and correction procedures when
only alarms are sounded.
When locking or unlocking the doors
The system can be operated when
the electronic key is within about
0.7 m (2.3 ft.) either of the outside
door handles and back door. (Only
the doors detecting the key can be
operated.)
When starting the engine or chang-
ing engine switch modes
AlarmSituation/Actions
Exterior alarm sounds
once for 5 seconds
• An attempt was made to lock the doors using
the smart entry & start system while the elec-
tronic key was still inside the vehicle.
Retrieve the electronic key from the vehicle
and lock the doors again.
• An attempt was made to lock the vehicle while
a door was open.
Close all of the doors and lock the doors
again.
Interior alarm sounds
continuously
The engine switch was turned to ACCESSORY
mode while the driver’s door was open (or the
driver’s door was opened while the engine switch
was in ACCESSORY mode).
Turn the engine switch off and close the
driver’s door.
Page 129 of 404
1293-2. Opening, closing and locking the doors
3
Operation of each component
YARIS_GRMN_OM_Europe_OM52J40E
■ Notes for the entry function
● Even when the electronic key is within the effective range (detection areas),
the system may not operate properly in the following cases:
• The electronic key is too close to the window or outside door handle, near
the ground, or in a high place w hen the doors are locked or unlocked.
• The electronic key is near the ground or in a high place, or too close to
the rear bumper center when the back door is opened.
• The electronic key is on the instrument panel, luggage cover or floor, or in
the door pockets, glove box, accessory box of the instrument panel, or in/
near the front cup holder when the engine is started or engine switch
modes are changed.
● Do not leave the electronic key on top of the instrument panel or near the
door pockets when exiting the vehicle. Depending on the radio wave recep-
tion conditions, it may be detected by the antenna outside the cabin and the
door will become lockable from the out side, possibly trapping the electronic
key inside the vehicle.
● As long as the electronic key is within the effective range, the doors may be
locked or unlocked by anyone.
● Even if the electronic key is not inside the vehicle, it may be possible to start
the engine if the electronic key is near the window.
● The doors may unlock if a large amount of water splashes on the door han-
dle, such as in the rain or in a car wash when the electronic key is within the
effective range. (The door will automatically be locked after approximately
30 seconds if the doors are not opened and closed.)
● If the wireless remote control is used to lock the doors when the electronic
key is near the vehicle, there is a possibility that the door may not be
unlocked by the entry function. (Use the wireless remote control to unlock
the doors.)
Page 130 of 404
1303-2. Opening, closing and locking the doors
YARIS_GRMN_OM_Europe_OM52J40E
● Touching the door lock or unlock sensor while wearing gloves may prevent
lock or unlock operation.
● When the lock operation is performed using the lock sensor, recognition sig-
nals will be shown up to two consecutive times. After this, no recognition
signals will be given.
● If the door handle becomes wet while the electronic key is within the effec-
tive range, the door may lock and unlock repeatedly. In that case, follow the
following correction procedures to wash the vehicle:
• Place the electronic key in a location 2 m (6 ft.) or more away from the
vehicle. (Take care to ensure that the key is not stolen.)
• Set the electronic key to battery-saving mode to disable the smart entry &
start system. ( P. 127)
● If the electronic key is inside the vehicle and a door handle becomes wet
during a car wash, a message may be shown on the multi-information dis-
play and a buzzer will sound outside the vehicle. To turn off the alarm, lock
all the doors.
● The lock sensor may not work properly if it comes into contact with ice,
snow, mud, etc. Clean the lock sensor and attempt to operate it again.
● A sudden handle operation or a handle operation immediately after entering
the effective range may prevent the doors from being unlocked. Touch the
door unlock sensor and check that the doors are unlocked before pulling the
door handle again.
● If there is another electronic key in the detection area, it may take slightly
longer to unlock the doors after the door handle is gripped.
Page 169 of 404
1693-4. Adjusting the steering wheel and mirrors
3
Operation of each component
YARIS_GRMN_OM_Europe_OM52J40E
■Mirror angle can be adjusted when
The engine switch is in ACCESSORY or IGNITION ON mode.
■ When the mirrors are fogged up
The outside rear view mirrors can be cleared using the mirror defoggers. Turn
on the rear window defogger to turn on the outside rear view mirror defog-
gers. ( P. 222)
■ Using automatic mode in cold weather
When automatic mode is used in cold weather, the door mirror could freeze
up and automatic stowing and return may not be possible. In this event,
remove any ice and snow from the door mirror, then either operate the mirror
using manual mode or move the mirror by hand.
■ When disconnecting and reconnecting battery terminals
The automatic folding/extending mirror function will return to on as default. To
turn the function off, press the switch again to select off.
Page 172 of 404
1723-5. Opening and closing the windows
YARIS_GRMN_OM_Europe_OM52J40E
■The power windows can be operated when
The engine switch is in IGNITION ON mode.
■ Operating the power windows after turning the engine off
The power windows can be operated for approximately 45 seconds even
after the engine switch is turned to ACCESSORY mode or turned off. They
cannot, however, be operated once either side door is opened.
■ Jam protection function (driver’s window only)
If an object becomes caught between the window and the window frame, win-
dow travel is stopped and the window is opened slightly.
■ When the power window does not close normally (driver’s window only)
If the jam protection function is operating abnormally and a window cannot be
closed, perform the following operations using the power window switch on
the driver’s door.
● After stopping the vehicle, the window can be closed by holding the power
window switch in the one-touch closing position while the engine switch is
turned to the IGNITION ON mode.
● If the window still cannot be closed even by carrying out the operation as
explained above, initialize the function by performing the following proce-
dure.
Hold the power window switch in the one-touch closing position. Continue
holding the switch for a further 6 seconds after the window has closed.
Hold the power window switch in the one-touch opening position. Con-
tinue holding the switch for a further 2 seconds after the window has
opened completely.
Hold the power window switch in the one-touch closing position once
again. Continue holding the switch for a further 2 seconds after the win-
dow has closed.
If you release the switch while the window is moving, start again from the
beginning.
If the window continues to close but then re-open slightly even after perform-
ing the above procedure correctly, have the vehicle inspected by any autho-
rized Toyota retailer or Toyota authorized repairer, or any reliable repairer.
Page 187 of 404
187
4
4-2. Driving procedures
Driving
YARIS_GRMN_OM_Europe_OM52J40E
Engine (ignition) switch
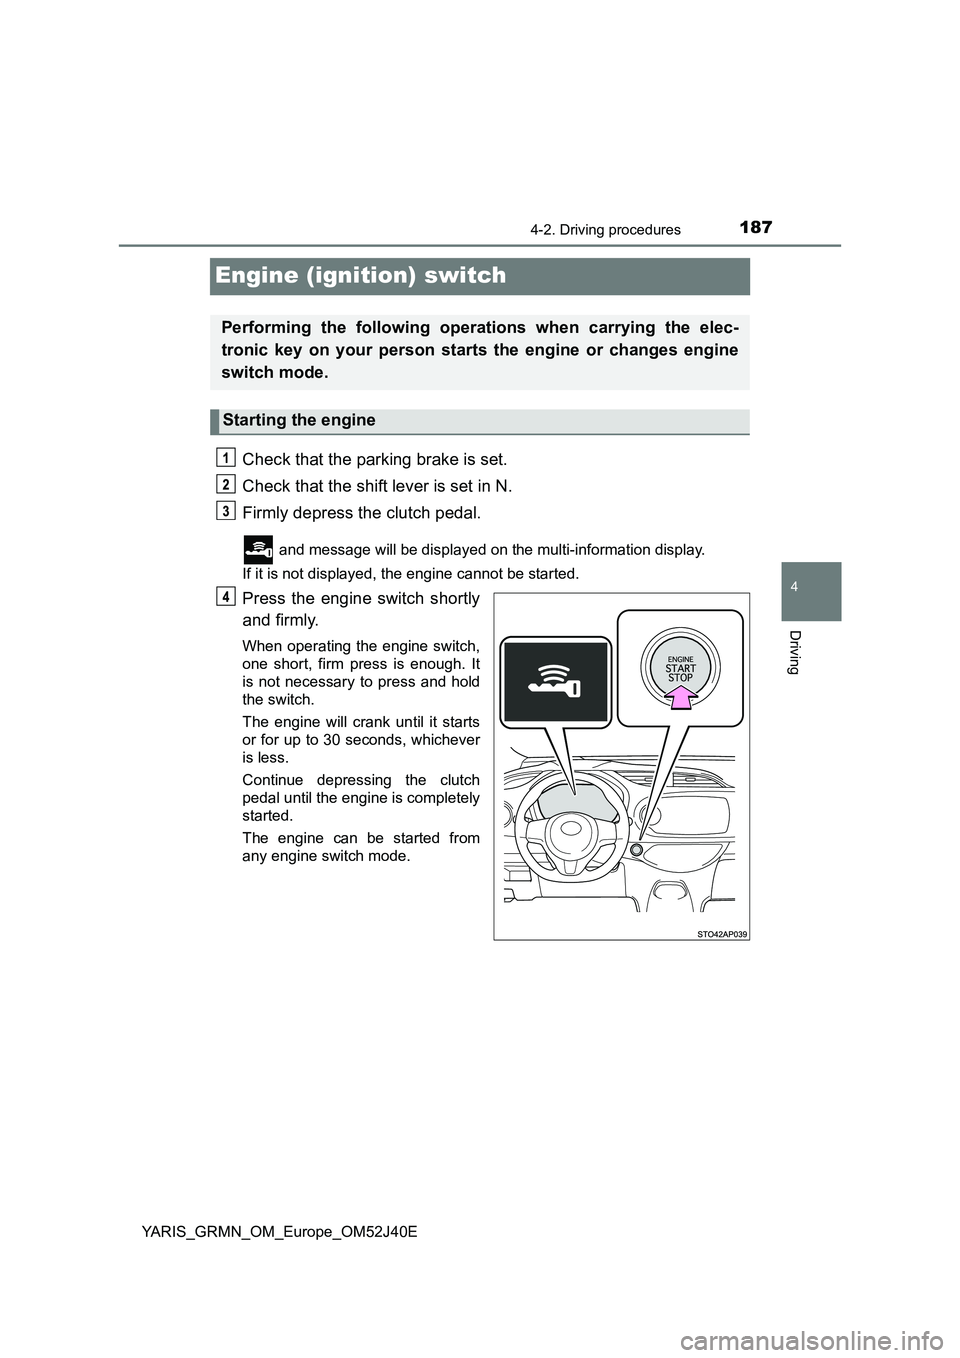
Check that the parking brake is set.
Check that the shift lever is set in N.
Firmly depress the clutch pedal.
and message will be displayed on the multi-information display.
If it is not displayed, the engine cannot be started.
Press the engine switch shortly
and firmly.
When operating the engine switch,
one short, firm press is enough. It
is not necessary to press and hold
the switch.
The engine will crank until it starts
or for up to 30 seconds, whichever
is less.
Continue depressing the clutch
pedal until the engine is completely
started.
The engine can be started from
any engine switch mode.
Performing the following operations when carrying the elec-
tronic key on your person starts the engine or changes engine
switch mode.
Starting the engine