VAUXHALL GRANDLAND X 2020 Owner's Manual
Manufacturer: VAUXHALL, Model Year: 2020, Model line: GRANDLAND X, Model: VAUXHALL GRANDLAND X 2020Pages: 283, PDF Size: 21.87 MB
Page 191 of 283
Driving and operating1899Warning
The rear view camera does not
replace driver vision. Note that
objects that are outside the
camera's field of view and the
parking assist sensors, e.g. below
the bumper or underneath the
vehicle, are not displayed.
Do not reverse or park the vehicle
using only the rear view camera.
Always check the surrounding of
the vehicle before driving.
Switching on
Rear view camera is automatically
activated when reverse gear is
engaged.
Functionality
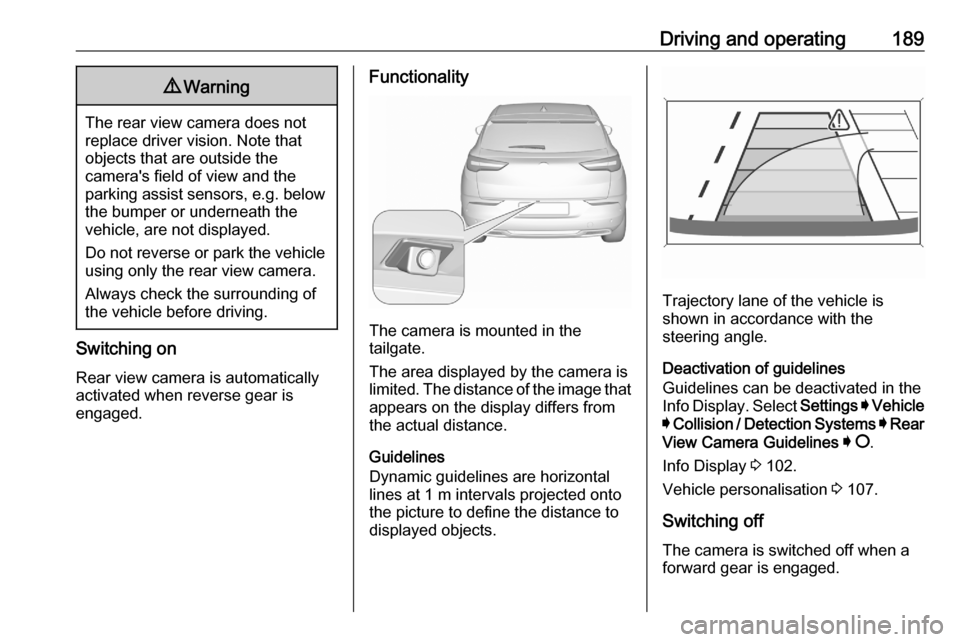
The camera is mounted in the
tailgate.
The area displayed by the camera is
limited. The distance of the image that
appears on the display differs from
the actual distance.
Guidelines
Dynamic guidelines are horizontal
lines at 1 m intervals projected onto
the picture to define the distance to displayed objects.
Trajectory lane of the vehicle is
shown in accordance with the
steering angle.
Deactivation of guidelines
Guidelines can be deactivated in the
Info Display. Select Settings I Vehicle
I Collision / Detection Systems I Rear
View Camera Guidelines I § .
Info Display 3 102.
Vehicle personalisation 3 107.
Switching off
The camera is switched off when a
forward gear is engaged.
Page 192 of 283
190Driving and operatingSystem limitations
The rear view camera may not
operate properly when:
● the surrounding is dark
● the beam of headlights is shining
directly into the camera lenses
● weather limits visibility, such as fog, rain, or snow
● the camera lenses are blocked by snow, ice, slush, mud, dirt.Clean the lense, rinse with water,
and wipe with a soft cloth
● the tailgate will be opened
● the vehicle is towing an electrically connected trailer,
bicycle carrier, etc.
● the vehicle had a rear end accident
● there are extreme temperature changes
Lane departure warning
The lane departure warning system
observes the lane markings between
which the vehicle is driving via a front camera located at the top of thewindscreen. The system warns the
driver in the event of an unintendend
lane departure via visual and acoustic signals.
There is no lane departure warning
when the turn lights are operated and during 20 seconds after turn lights
have been switched off.9 Warning
This system is a driving aid that
cannot, in any circumstances,
replace the need for vigilance on
the part of the driver.
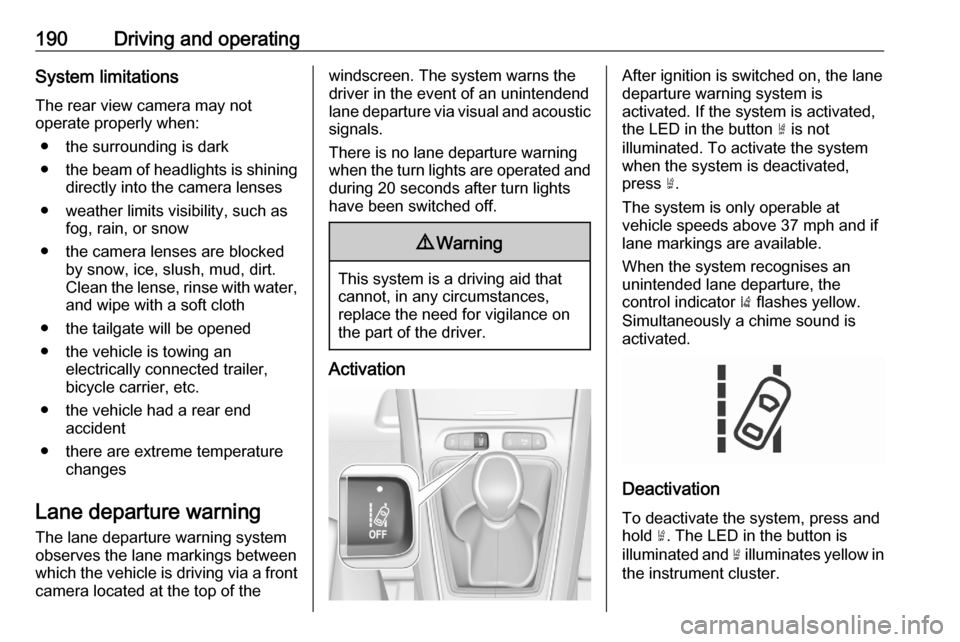
Activation
After ignition is switched on, the lane
departure warning system is
activated. If the system is activated,
the LED in the button ½ is not
illuminated. To activate the system
when the system is deactivated,
press ½.
The system is only operable at
vehicle speeds above 37 mph and if
lane markings are available.
When the system recognises an
unintended lane departure, the
control indicator ) flashes yellow.
Simultaneously a chime sound is
activated.
Deactivation
To deactivate the system, press andhold ½. The LED in the button is
illuminated and ½ illuminates yellow in
the instrument cluster.
Page 193 of 283

Driving and operating191At speeds below 37 mph the system
is inoperable.
Fault
In the event of a fault, C appears in
the instrument panel, accompanied
by a display message and a warning
chime. Contact a dealer or a qualified
workshop to have the system
checked.
System limitations The system performance may notoperate properly when:
● Vehicle speed is below 37 mph.
● Windscreen is not clean or affected by foreign objects, e.g.
stickers.
● Driving on winding or hilly roads. ● During nighttime driving.
● Adverse environmental conditions like heavy rain, snow,
direct sunlight or shadows.
● The sensor in the windscreen is blocked by snow, ice, slush, mud,dirt, windscreen damage or
affected by foreign objects, e.g.
stickers.● The sun is shining directly into the camera lens.
● Close vehicles ahead.
● Driving on banked roads.
● Driving on road edges.
● Driving on roads with poor lane markings.
● Sudden lighting changes.
The system can not operate when no
lane marking is detected.
Lane keep assist
Lane keep assist helps to avoid
crashes due to unintentional lane
departures. The front camera
observes the lane markings between
which the vehicle is driving. If the
vehicle approaches a lane marking, the steering wheel is gently turned to
position the vehicle back into the lane. The driver will then notice a turning
movement of the steering wheel. Turn steering wheel in same direction, if
system steers not sufficient. Turn
steering wheel gently into opposite
direction, if lane change is intended.When the system steers to correct the
trajectory of the vehicle, a flashes
yellow in the instrument cluster.
A warning message in the Driver
Information Centre accompanied by a warning chime alerts the driver when
immediate driver´s action is required.
Unintended lane departure is not
assumed by the system when the turn lights are operated and during
20 seconds after turn lights have
been switched off.
Notice
The system may be switched off if it
detects lanes which are too narrow,
too wide or too curved.
Following preconditions have to be
fullfilled:
● vehicle speed must be between 40 mph and 112 mph
● the driver must hold the steering wheel with both hands
● the change of trajectory is not accompanied by operation of theturn lights
● the Electronic Stability Control is activated and not in operation
Page 194 of 283
192Driving and operating● the vehicle is not connected to atrailer or an electric bicycle carrier
● normal driving behaviour (system
detects dynamic driving style, i.e. pressure on the brake or
accelerator pedal)
● roads with poor lane markings
● no spare wheel is used
● the driver needs to be active during the correction
● the vehicle is not driven in a tight
corner
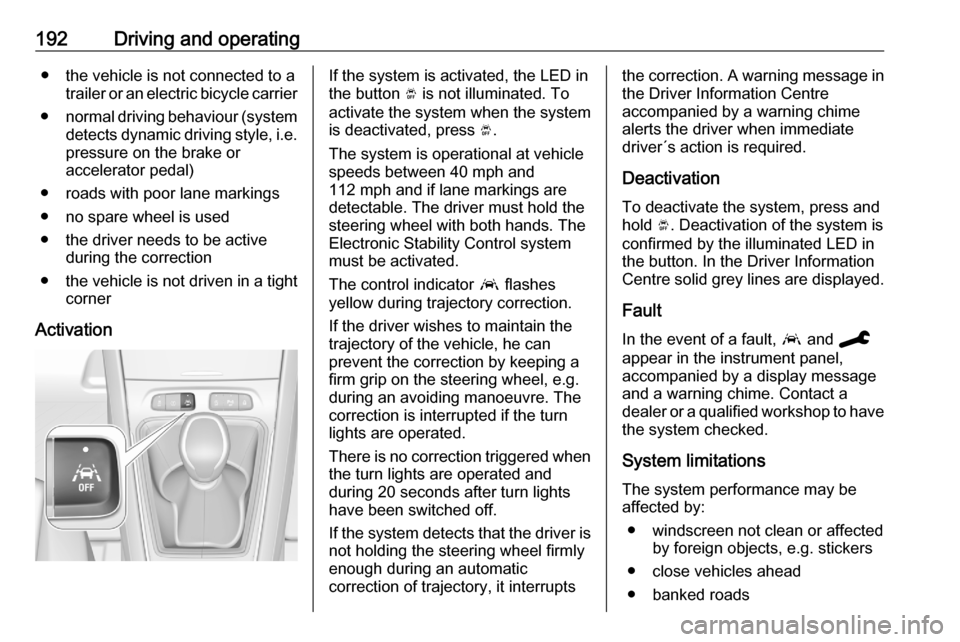
ActivationIf the system is activated, the LED in
the button Ó is not illuminated. To
activate the system when the system
is deactivated, press Ó.
The system is operational at vehicle
speeds between 40 mph and
112 mph and if lane markings are
detectable. The driver must hold the
steering wheel with both hands. The Electronic Stability Control system
must be activated.
The control indicator a flashes
yellow during trajectory correction.
If the driver wishes to maintain the
trajectory of the vehicle, he can
prevent the correction by keeping a
firm grip on the steering wheel, e.g.
during an avoiding manoeuvre. The correction is interrupted if the turn
lights are operated.
There is no correction triggered when
the turn lights are operated and
during 20 seconds after turn lights
have been switched off.
If the system detects that the driver is not holding the steering wheel firmly
enough during an automatic
correction of trajectory, it interruptsthe correction. A warning message in
the Driver Information Centre
accompanied by a warning chime
alerts the driver when immediate
driver´s action is required.
Deactivation
To deactivate the system, press and
hold Ó. Deactivation of the system is
confirmed by the illuminated LED in
the button. In the Driver Information
Centre solid grey lines are displayed.
Fault
In the event of a fault, a and C
appear in the instrument panel,
accompanied by a display message
and a warning chime. Contact a
dealer or a qualified workshop to have
the system checked.
System limitations
The system performance may be affected by:
● windscreen not clean or affected by foreign objects, e.g. stickers
● close vehicles ahead
● banked roads
Page 195 of 283

Driving and operating193● winding or hilly roads
● road edges
● sudden lighting changes
● adverse environmental conditions, e.g. heavy rain or
snow
● vehicle modifications, e.g. tyres
Switch off the system if the system is
disturbed by tar marks, shadows,
road cracks, temporary or
construction lane markings, or other
road imperfections.9 Warning
Always keep your attention on the
road and maintain proper vehicle
position within the lane, otherwise
vehicle damage, injury or death
could occur.
Lane keep assist does not
continuously steer the vehicle.
The system may not keep the
vehicle in the lane or give an alert,
even if a lane marking is detected.
The steering of the lane keep
assist may not be sufficient to
avoid a lane departure.
The system may not detect hands-
off driving due to external
influences like road condition and
surface and weather. The driver has full responsibility to control the vehicle and is always required to
keep the hands on the steering
wheel while driving.
Using the system while towing a
trailer or on slippery roads could
cause loss of control of the vehicle
and a crash. Switch the system off.
Driver alert
The driver alert system monitores the driving time and the vigilance of the
driver. Monitoring the vigilance of the
driver is based on the trajectory
variations of the vehicle compared to
the lane markings.
9 Warning
The system cannot replace the
need for vigilance on the part of
the driver. Taking a break is
recommended as soon as feeling tired or at least every two hours.
Do not take the steering wheel
when feeling tired.
Activation or Deactivation
The system can be activated or
deactivated in the vehicle
personalisation 3 107.
The state of the system stays in
memory when the ignition is switched
off.
Driving time alert The driver gets notified by a pop-up
reminder symbol € in the Driver
Information Centre simultaneously with an acoustic alert if the driver has
not taken a break after 2 hours of
driving at a speed above 40 mph. The alert is repeated hourly until the
vehicle is stopped, no matter how
vehicle speed evolves.
Page 196 of 283

194Driving and operatingThe counting of driving time alert is
reset when the ignition has been
switched off for a few minutes.
Driver drowsiness detection
The system monitors the driver's level
of vigilance. A camera at the top of the windscreen detects variations in
trajectory compared to the lane
markings. This system is particularly
suited to fast roads (speed higher
than 40 mph).
If the trajectory of the vehicle
suggests a certain level of
drowsiness or inattention by the
driver, the system triggers the first
level of alert. The driver is notified by
a message and an audible signal is
given.
After three first level alerts, the
system triggers a new alert with a message, accompanied by a more
pronounced audible signal.
In certain driving conditions (poor
road surface or strong winds), the
system may give alerts independent of the driver's level of vigilance.The driver drowsiness detection is
reinitialised when the ignition has been switched off for a few minutes or the speed remains below 40 mph for
a few minutes.
System limitations
In the following situations, the system
may not operate properly or even not operate at all:
● poor visibility caused by inadequate lighting of the
roadway, falling snow, heavy
rain, dense fog etc.
● dazzle caused by headlamps of an oncoming vehicles, low sun,
reflections on damp roads,
leaving a tunnel, alternating
shade and light etc.
● windscreen area in front of the camera covered by dirt, snow,
stickers etc.
● no lane markings detected or multiple lane markings due to
roadworks
● close vehicles ahead
● winding roads or narrow roadsCharging9 Warning
Persons with a pacemaker should
consult a doctor for possible
precautions.
This section explains the process of
charging the vehicle's high voltage
battery.
While the charge cord is plugged into
the vehicle, the vehicle cannot be
driven.
Page 197 of 283
Driving and operating195Charging at domestic electricaloutlets
Start charging9 Warning
Only use a domestic electrical
outlet which is properly grounded and protected by a 30 mA
differential switch.
Only use a domestic electrical
outlet protected by a circuit
breaker adapted to the amperage
of the electrical circuit.
Have a qualified electrician check
the electrical installation to be
used. The installation has to be in
compliance with national
standards and compatible with the vehicle.
When using a dedicated domestic electrical outlet, have it installed
by a qualified electrician.
Make sure that the electrical
outlet, the plug and the cable do
not support the weight of the
control box.
9 Warning
Do not carry out any works in the
engine compartment during
charging.
The vehicle can be charged at
domestic electrical outlets. Charging
an empty high voltage battery at a
domestic electrical outlet takes
approx. 7 hours.
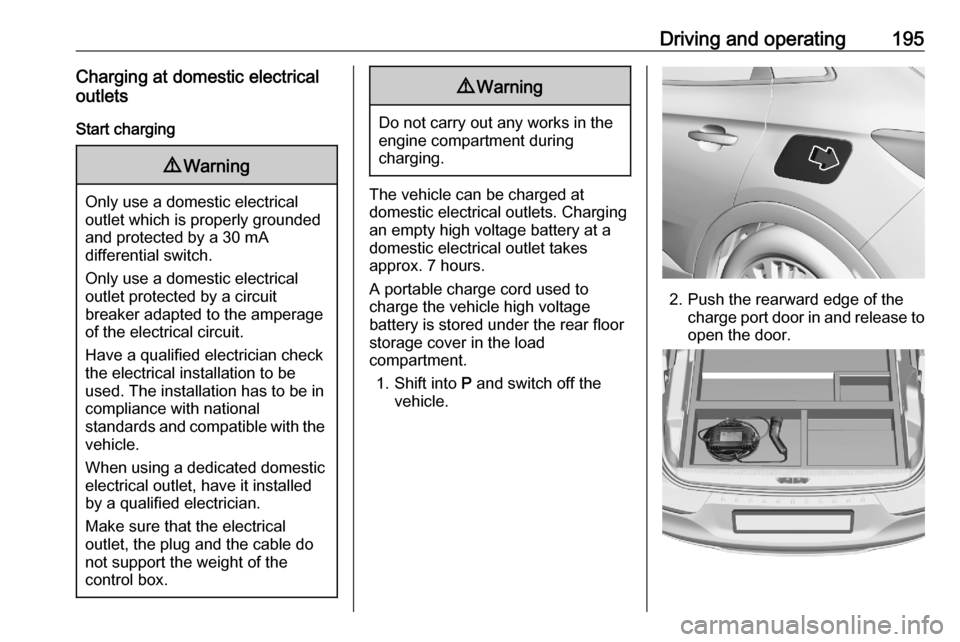
A portable charge cord used to charge the vehicle high voltage
battery is stored under the rear floor
storage cover in the load
compartment.
1. Shift into P and switch off the
vehicle.
2. Push the rearward edge of the charge port door in and release to
open the door.
Page 198 of 283
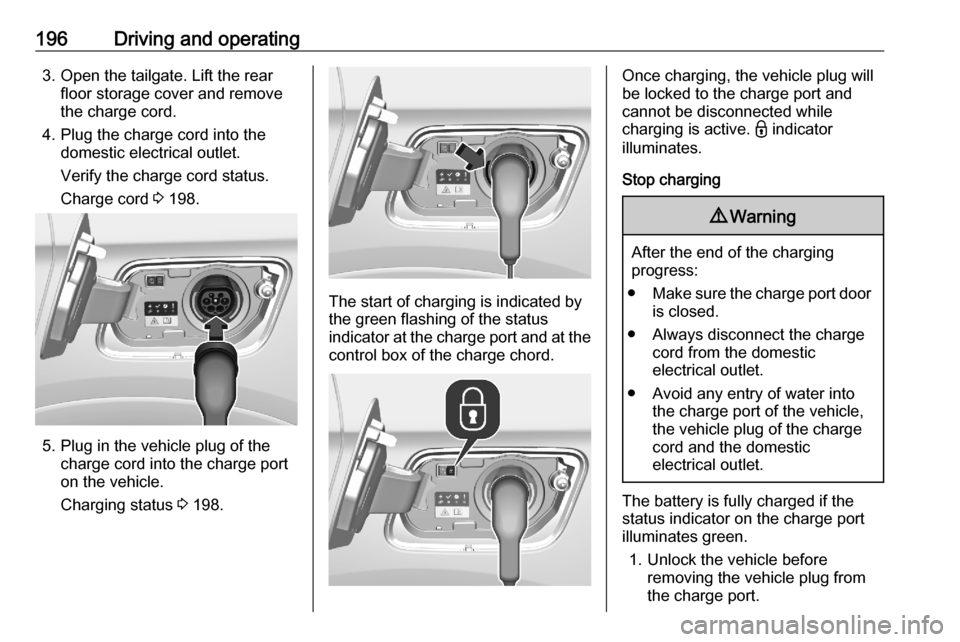
196Driving and operating3. Open the tailgate. Lift the rearfloor storage cover and remove
the charge cord.
4. Plug the charge cord into the domestic electrical outlet.
Verify the charge cord status.
Charge cord 3 198.
5. Plug in the vehicle plug of the
charge cord into the charge port
on the vehicle.
Charging status 3 198.
The start of charging is indicated by
the green flashing of the status
indicator at the charge port and at the
control box of the charge chord.
Once charging, the vehicle plug will
be locked to the charge port and cannot be disconnected while
charging is active. - indicator
illuminates.
Stop charging9 Warning
After the end of the charging
progress:
● Make sure the charge port door
is closed.
● Always disconnect the charge cord from the domestic
electrical outlet.
● Avoid any entry of water into the charge port of the vehicle,the vehicle plug of the charge
cord and the domestic
electrical outlet.
The battery is fully charged if the status indicator on the charge port
illuminates green.
1. Unlock the vehicle before removing the vehicle plug from
the charge port.
Page 199 of 283

Driving and operating197If the vehicle is already unlocked,
lock the vehicle and unlock it
again.
2. Disconnect the vehicle plug from the charge port within 30 seconds.
3. Close the charge port door by pressing firmly in the centre to
latch properly.
4. Disconnect the charging cord from the domestic electrical
outlet.
Charging at wallboxes and public
charging stations
When charging at a wallbox / public
charging station, follow the
instructions for the use of the wallbox / public charging station.
Programmable charging
By default, charging starts as soon as the vehicle plug of the charge cord is
plugged into the charge port of the
vehicle. It is also possible to schedule charging using the Colour Info
Display.
1. Press m.
2. Select Charge.
3. Press /.
4. Enter a start time for loading.
5. Press OK.
6. Plug in the vehicle. Charging 3 194.
7. Within 1 minute, press b to
activate programmable charging.
Page 200 of 283

198Driving and operating
The status indicator illuminates blue
indicating that programmable
charging is active.
Charging status
If the vehicle is plugged in and the
ignition is switched off, the charging status indicator indicates the
following:
● Illuminates white: welcome lighting when charge port door isopened
● Illuminates green: charging complete
● Flashes green: high voltage battery charging
● Illuminates red: charging fault ● Illuminates blue: programmable charging active
Programmable charging 3 197.
A charging fault has occured if the
vehicle is plugged in and the charging status indicator is off.
Further charging status indicators are located on the control box of the
charge cord. 3 198.
Charge cord9 Danger
There is a risk of electric shock
that may cause personal injury or
death.
Do not use the charge cord if any part of the charge cord is
damaged.
Do not open or remove the charge cord cover.
Service by qualified personnel
only. Connect the charge cord to a
properly grounded outlet with
cords that are not damaged.