VAUXHALL GRANDLAND X 2020 Owner's Manual
Manufacturer: VAUXHALL, Model Year: 2020, Model line: GRANDLAND X, Model: VAUXHALL GRANDLAND X 2020Pages: 283, PDF Size: 21.87 MB
Page 221 of 283
Vehicle care219Within one minute after switching off
ignition, operate the wiper lever to
position the wiper blades vertically on
the windscreen.
Lift the wiper arm until it stays in the
raised position, press button to
disengage the wiper blade and
remove.
Attach the wiper blade slightly angled
to the wiper arm and push until it
engages.
Lower wiper arm carefully.
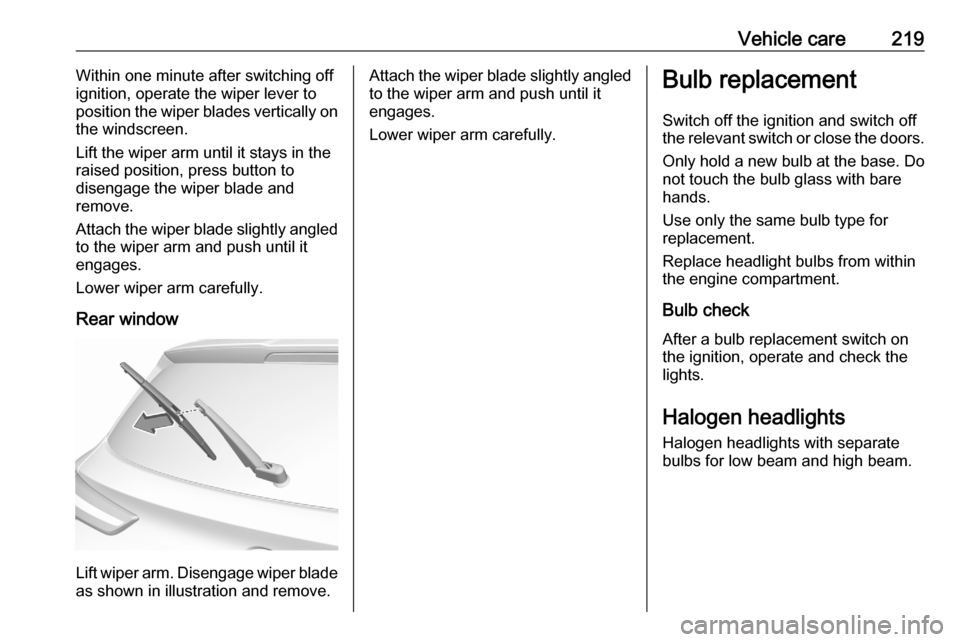
Rear window
Lift wiper arm. Disengage wiper blade as shown in illustration and remove.
Attach the wiper blade slightly angled
to the wiper arm and push until it
engages.
Lower wiper arm carefully.Bulb replacement
Switch off the ignition and switch off
the relevant switch or close the doors.
Only hold a new bulb at the base. Do not touch the bulb glass with bare
hands.
Use only the same bulb type for
replacement.
Replace headlight bulbs from within
the engine compartment.
Bulb check
After a bulb replacement switch on
the ignition, operate and check the
lights.
Halogen headlights Halogen headlights with separate
bulbs for low beam and high beam.
Page 222 of 283
220Vehicle care
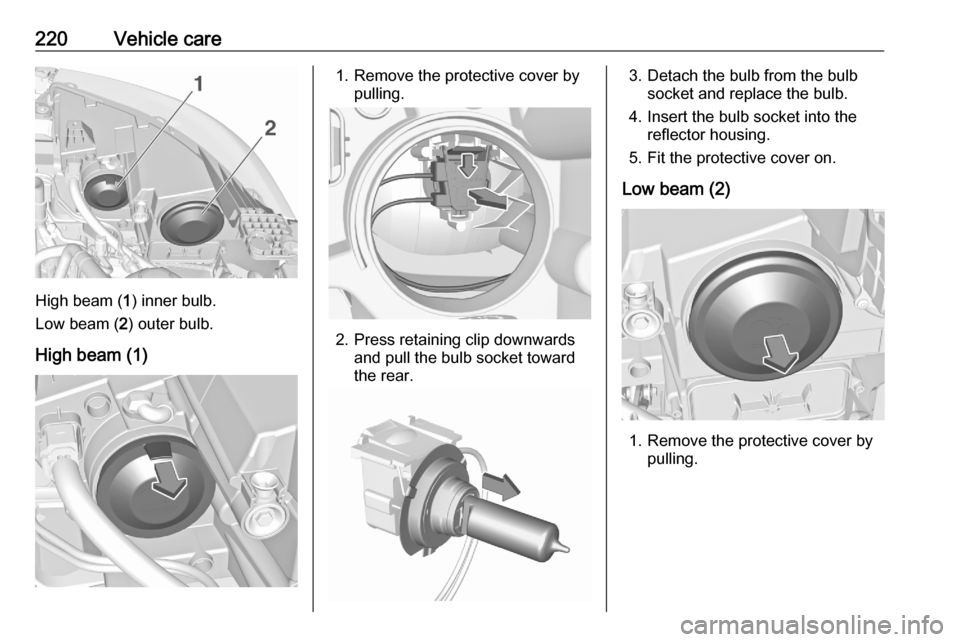
High beam (1) inner bulb.
Low beam ( 2) outer bulb.
High beam (1)
1. Remove the protective cover by pulling.
2. Press retaining clip downwardsand pull the bulb socket toward
the rear.
3. Detach the bulb from the bulb socket and replace the bulb.
4. Insert the bulb socket into the reflector housing.
5. Fit the protective cover on.
Low beam (2)
1. Remove the protective cover by pulling.
Page 223 of 283
Vehicle care221
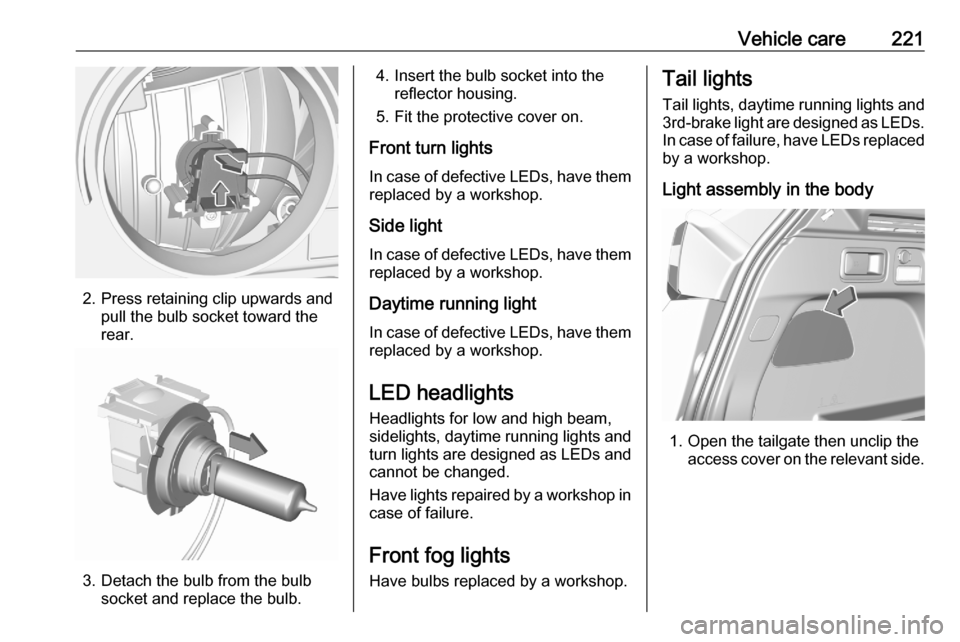
2. Press retaining clip upwards andpull the bulb socket toward the
rear.
3. Detach the bulb from the bulb socket and replace the bulb.
4. Insert the bulb socket into the reflector housing.
5. Fit the protective cover on.
Front turn lights
In case of defective LEDs, have them
replaced by a workshop.
Side light
In case of defective LEDs, have them replaced by a workshop.
Daytime running light
In case of defective LEDs, have them
replaced by a workshop.
LED headlights
Headlights for low and high beam,
sidelights, daytime running lights and turn lights are designed as LEDs and
cannot be changed.
Have lights repaired by a workshop in
case of failure.
Front fog lights
Have bulbs replaced by a workshop.Tail lights
Tail lights, daytime running lights and
3rd-brake light are designed as LEDs.
In case of failure, have LEDs replaced by a workshop.
Light assembly in the body
1. Open the tailgate then unclip the access cover on the relevant side.
Page 224 of 283
222Vehicle care
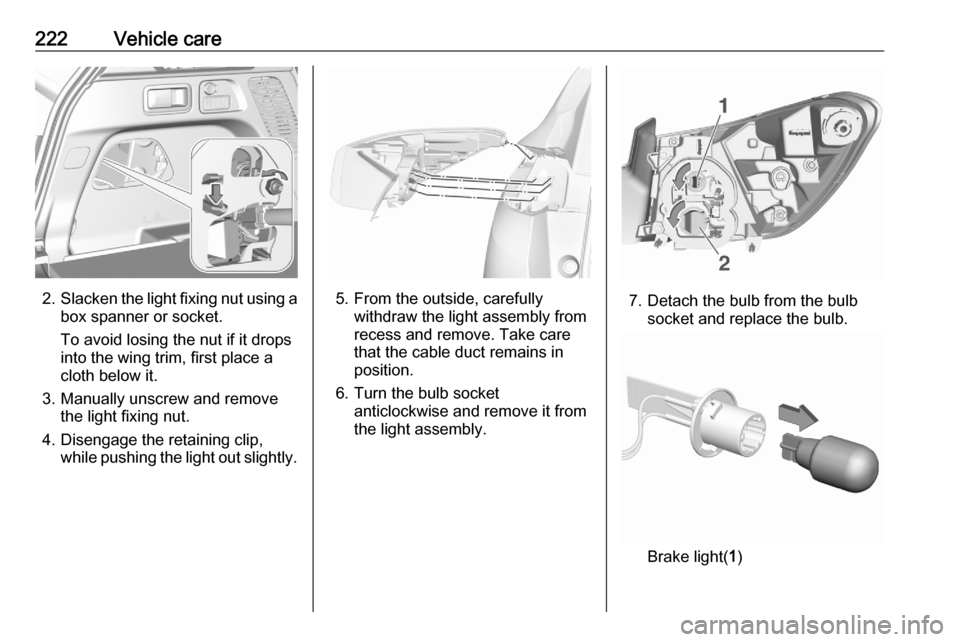
2.Slacken the light fixing nut using a
box spanner or socket.
To avoid losing the nut if it drops
into the wing trim, first place a
cloth below it.
3. Manually unscrew and remove the light fixing nut.
4. Disengage the retaining clip, while pushing the light out slightly.5. From the outside, carefullywithdraw the light assembly from
recess and remove. Take care
that the cable duct remains in
position.
6. Turn the bulb socket anticlockwise and remove it from
the light assembly.7. Detach the bulb from the bulb socket and replace the bulb.
Brake light( 1)
Page 225 of 283
Vehicle care223
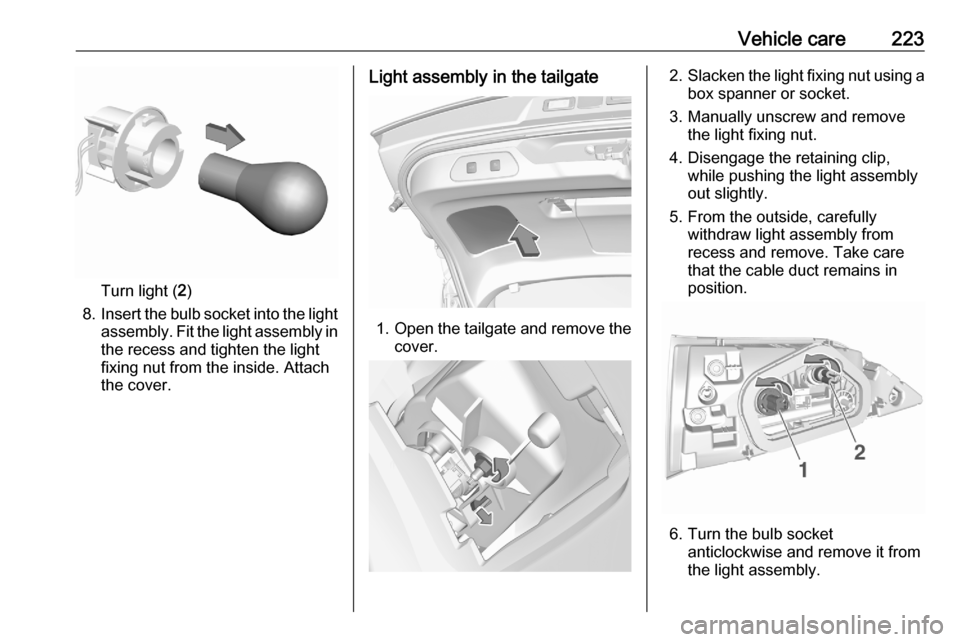
Turn light (2)
8. Insert the bulb socket into the light
assembly. Fit the light assembly in the recess and tighten the light
fixing nut from the inside. Attach
the cover.
Light assembly in the tailgate
1. Open the tailgate and remove the
cover.
2. Slacken the light fixing nut using a
box spanner or socket.
3. Manually unscrew and remove the light fixing nut.
4. Disengage the retaining clip, while pushing the light assembly
out slightly.
5. From the outside, carefully withdraw light assembly from
recess and remove. Take care
that the cable duct remains in
position.
6. Turn the bulb socket anticlockwise and remove it from
the light assembly.
Page 226 of 283
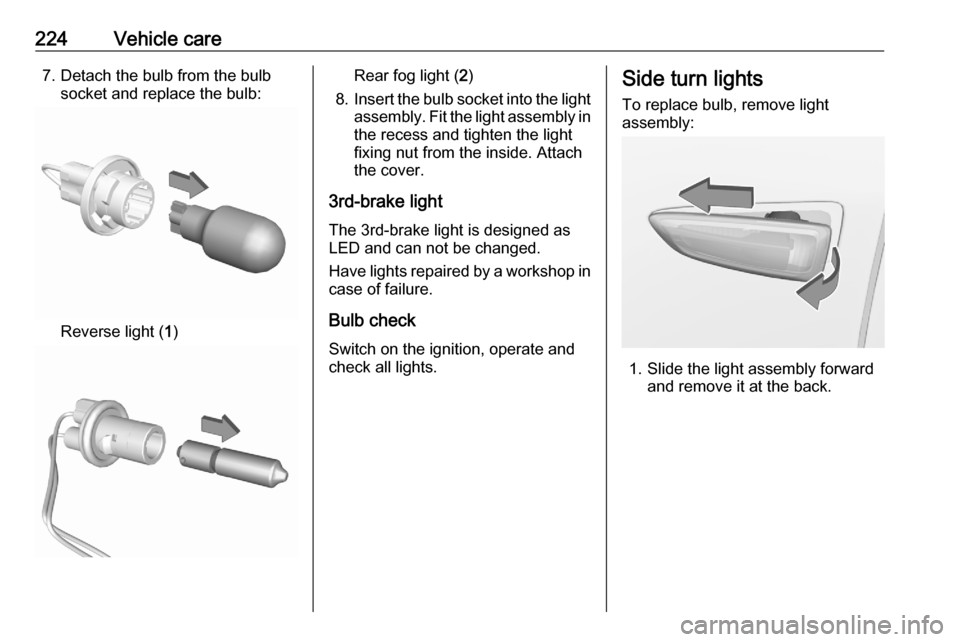
224Vehicle care7. Detach the bulb from the bulbsocket and replace the bulb:
Reverse light ( 1)
Rear fog light ( 2)
8. Insert the bulb socket into the light
assembly. Fit the light assembly in the recess and tighten the light
fixing nut from the inside. Attach
the cover.
3rd-brake light The 3rd-brake light is designed as
LED and can not be changed.
Have lights repaired by a workshop in
case of failure.
Bulb check
Switch on the ignition, operate and
check all lights.Side turn lights
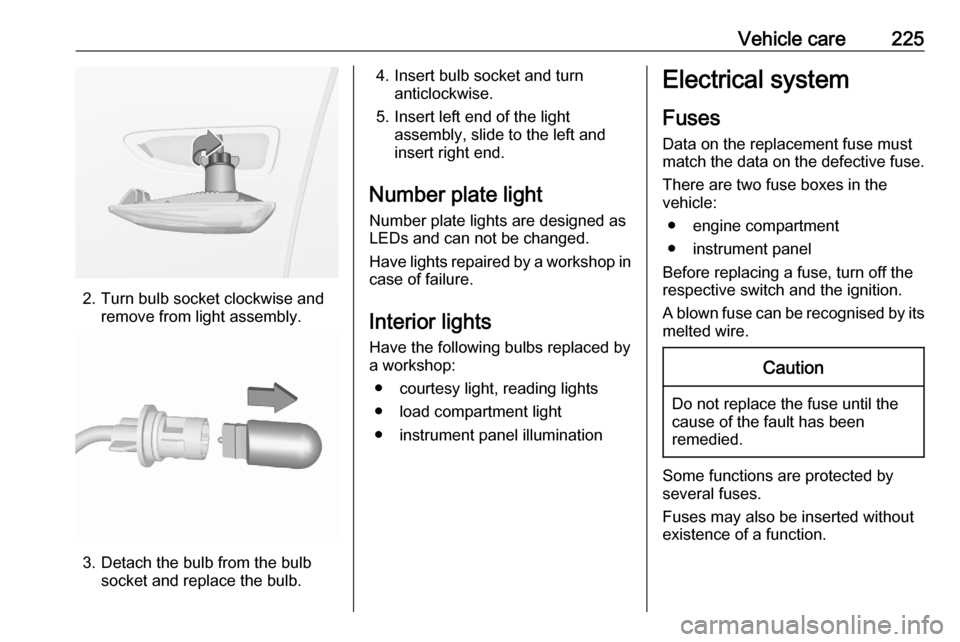
To replace bulb, remove light
assembly:
1. Slide the light assembly forward and remove it at the back.
Page 227 of 283
Vehicle care225
2. Turn bulb socket clockwise andremove from light assembly.
3. Detach the bulb from the bulbsocket and replace the bulb.
4. Insert bulb socket and turnanticlockwise.
5. Insert left end of the light assembly, slide to the left and
insert right end.
Number plate light
Number plate lights are designed as LEDs and can not be changed.
Have lights repaired by a workshop in
case of failure.
Interior lights
Have the following bulbs replaced by
a workshop:
● courtesy light, reading lights
● load compartment light
● instrument panel illuminationElectrical system
Fuses Data on the replacement fuse mustmatch the data on the defective fuse.
There are two fuse boxes in the
vehicle:
● engine compartment
● instrument panel
Before replacing a fuse, turn off the
respective switch and the ignition.
A blown fuse can be recognised by its melted wire.Caution
Do not replace the fuse until the
cause of the fault has been
remedied.
Some functions are protected by
several fuses.
Fuses may also be inserted without
existence of a function.
Page 228 of 283
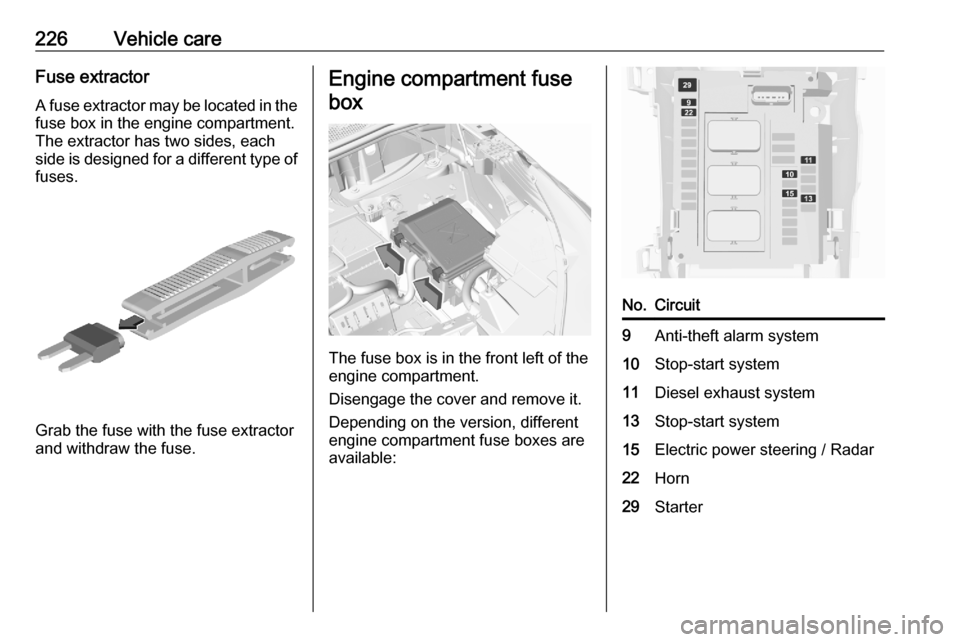
226Vehicle careFuse extractorA fuse extractor may be located in the
fuse box in the engine compartment.
The extractor has two sides, each
side is designed for a different type of fuses.
Grab the fuse with the fuse extractor
and withdraw the fuse.
Engine compartment fuse
box
The fuse box is in the front left of the
engine compartment.
Disengage the cover and remove it. Depending on the version, different
engine compartment fuse boxes are
available:
No.Circuit9Anti-theft alarm system10Stop-start system11Diesel exhaust system13Stop-start system15Electric power steering / Radar22Horn29Starter
Page 229 of 283
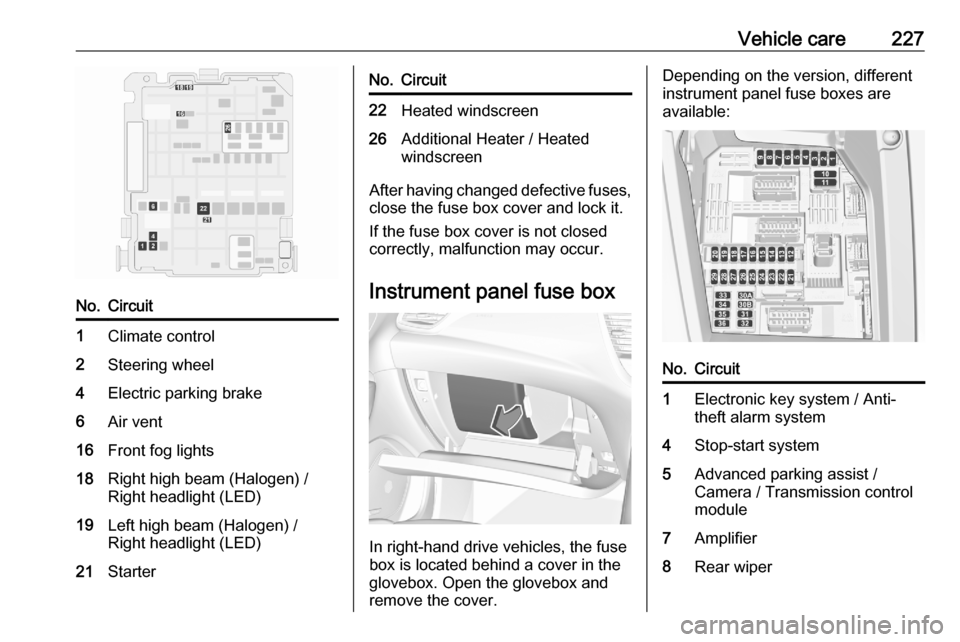
Vehicle care227No.Circuit1Climate control2Steering wheel4Electric parking brake6Air vent16Front fog lights18Right high beam (Halogen) /
Right headlight (LED)19Left high beam (Halogen) /
Right headlight (LED)21StarterNo.Circuit22Heated windscreen26Additional Heater / Heated
windscreen
After having changed defective fuses,
close the fuse box cover and lock it.
If the fuse box cover is not closed
correctly, malfunction may occur.
Instrument panel fuse box
In right-hand drive vehicles, the fuse
box is located behind a cover in the
glovebox. Open the glovebox and
remove the cover.
Depending on the version, different
instrument panel fuse boxes are
available:No.Circuit1Electronic key system / Anti-
theft alarm system4Stop-start system5Advanced parking assist /
Camera / Transmission control
module7Amplifier8Rear wiper
Page 230 of 283
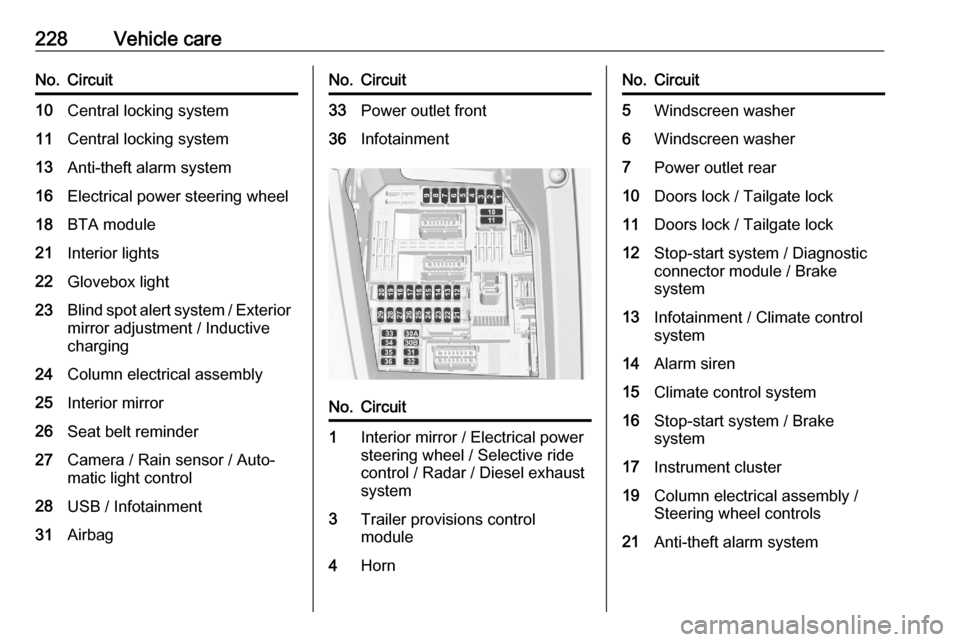
228Vehicle careNo.Circuit10Central locking system11Central locking system13Anti-theft alarm system16Electrical power steering wheel18BTA module21Interior lights22Glovebox light23Blind spot alert system / Exteriormirror adjustment / Inductive
charging24Column electrical assembly25Interior mirror26Seat belt reminder27Camera / Rain sensor / Auto‐
matic light control28USB / Infotainment31AirbagNo.Circuit33Power outlet front36InfotainmentNo.Circuit1Interior mirror / Electrical power
steering wheel / Selective ride
control / Radar / Diesel exhaust
system3Trailer provisions control
module4HornNo.Circuit5Windscreen washer6Windscreen washer7Power outlet rear10Doors lock / Tailgate lock11Doors lock / Tailgate lock12Stop-start system / Diagnostic
connector module / Brake
system13Infotainment / Climate control
system14Alarm siren15Climate control system16Stop-start system / Brake
system17Instrument cluster19Column electrical assembly /
Steering wheel controls21Anti-theft alarm system