ECU VOLKSWAGEN CORRADO 1990 User Guide
[x] Cancel search | Manufacturer: VOLKSWAGEN, Model Year: 1990, Model line: CORRADO, Model: VOLKSWAGEN CORRADO 1990Pages: 906, PDF Size: 6.56 MB
Page 377 of 906
AA - USING THIS SECTION (GENERAL HELP INFORMATION)
Article Text (p. 6)
1990 Volkswagen Corrado
For Volkswagen Technical Site: http://vw.belcom.ru
Copyright © 1998 Mitchell Repair Information Company, LLC
Thursday, March 23, 2000 09:41PM
1) If no self-diagnostics available, or no trouble codes
present, identify symptom.
2) See trouble shooting procedure to repair complaint. See H
- TESTS W/O CODES
TEST SYSTEM
1) Perform necessary systems and component tests. See I -
SYS/COMP TESTS.
2) Verify that complaint is repaired.
SAFETY PRECAUTIONS
* Always refer to Engine Tune-Up Decal in engine compartment before
performing tune-up. If manual and decal differ, always use decal
specifications.
* DO NOT allow or create a condition of misfire in more than one
cylinder for an extended period of time. Damage to converter may
occur due to loading converter with unburned air/fuel mixture.
* Always turn ignition off and disconnect negative battery cable
BEFORE disconnecting or connecting computer or other electrical
components.
* DO NOT drop or shock electrical components such as computer,
airflow meter, etc.
* DO NOT use fuel system cleaning compounds that are not
recommended by the manufacturer. Damage to gaskets, diaphragm
materials and catalytic converter may result.
* Before performing a compression test or cranking engine using a
remote starter switch, disconnect coil wire from distributor and
secure it to a good engine ground, or disable ignition.
* Before disconnecting any fuel system component, ensure fuel
system pressure is released.
* Use a shop towel to absorb any spilled fuel to prevent fire.
* DO NOT create sparks or have an open flame near battery.
* If any EFI components such as hoses or clamps are replaces,
ensure they are replaced with components designed for EFI use.
* Always reassemble throttle body components with new gaskets, "O"
rings and seals.
* If equipped with an inertia switch, DO NOT reset switch until
fuel system has been inspected for leaks.
* Wear safety goggles when drilling or grinding.
* Wear proper clothing which protects against chemicals and other
hazards.
END OF ARTICLE
Page 381 of 906

ABBREVIATIONS
Article Text (p. 4)
1990 Volkswagen Corrado
For Volkswagen Technical Site: http://vw.belcom.ru
Copyright © 1998 Mitchell Repair Information Company, LLC
Thursday, March 23, 2000 09:42PM³DERM ³Diagnostic Energy Reserve Module ³
³DFI
³Digital Fuel Injection ³
³DIC
³Driver Information Center ³
³DIS
³Direct Ignition System ³
³DIS
³Distributorless Ignition System ³
³DIST
³Distribution ³
³DISTR
³Distributor ³
³DK BLU
³Dark Blue ³
³DK GRN
³Dark Green ³
³DME
³Digital Motor Electronics (Motronic System) ³
³DOHC
³Double Overhead Cam ³
³DOT
³Department of Transportation ³
³DP
³Dashpot ³
³DRB-II
³Diagnostic Readout Box ³
³DVOM
³Digital Volt/Ohm Meter (see VOM) ³
³Def.
³Defogger or Defroster ³
³Def.
³Defrost ³
³Defog.
³Defogger ³
³Diag.
³Diagnostic ³
³Dist.
³Distributor or Distribution ³
³Dr.
³Door ³
ÀÄÄÄÄÄÄÄÄÄÄÄÄÄÄÄÄÄÁÄÄÄÄÄÄÄÄÄÄÄÄÄÄÄÄÄÄÄÄÄÄÄÄÄÄÄÄÄÄÄÄÄÄÄÄÄÄÄÄÄÄÄÄÄÄÄÄÄÄÙ "E" ABBREVIATION TABLE
"E" ABBREVIATION TABLE
ÚÄÄÄÄÄÄÄÄÄÄÄÄÄÄÄÄÄÂÄÄÄÄÄÄÄÄÄÄÄÄÄÄÄÄÄÄÄÄÄÄÄÄÄÄÄÄÄÄÄÄÄÄÄÄÄÄÄÄÄÄÄÄÄÄÄÄÄÄ¿
³ABBREVIATION
³DEFINITION ³
ÃÄÄÄÄÄÄÄÄÄÄÄÄÄÄÄÄÄÅÄÄÄÄÄÄÄÄÄÄÄÄÄÄÄÄÄÄÄÄÄÄÄÄÄÄÄÄÄÄÄÄÄÄÄÄÄÄÄÄÄÄÄÄÄÄÄÄÄÄ´
³EAC
³Electric Assist Choke ³
³EACV
³Electric Air Control Valve ³
³EBCM
³Electronic Brake Control Module ³
³ECA
³Electronic Control Assembly ³
³ECAT
³Electronically Controlled Automatic Transaxle ³
³ECM
³Electronic Control Module ³
³ECT
³Engine Coolant Temperature Sensor ³
³ECU
³Electronic Control Unit or Engine Control Unit ³
³EDF
³Electric Drive Fan relay assembly ³
³EDIS
³Electronic Distributorless Ignition System ³
³EEC
³Electronic Engine Control ³
³EECS
³Evaporative Emission Control System ³
³EEPROM
³Electronically Erasable PROM ³
³EFE
³Early Fuel Evaporation ³
³EFI
³Electronic Fuel Injection ³
³EGO
³Exhaust Gas Oxygen sensor (see HEGO) ³
³EGR
³Exhaust Gas Recirculation system ³
³EGRC
³EGR Control solenoid or system ³
³EGRV
³EGR Vent solenoid or system ³
³EMR
³Emission Maintenance Reminder Module ³
³ESA
³Electronic Spark Advance ³
³ESC
³Electronic Spark Control ³
³EST
³Electronic Spark Timing ³
Page 393 of 906

ABBREVIATIONS
Article Text (p. 4)
1990 Volkswagen Corrado
For Volkswagen Technical Site: http://vw.belcom.ru
Copyright © 1998 Mitchell Repair Information Company, LLC
Thursday, March 23, 2000 09:42PM³DDD ³Dual Diaphragm Distributor ³
³DERM
³Diagnostic Energy Reserve Module ³
³DFI
³Digital Fuel Injection ³
³DIC
³Driver Information Center ³
³DIS
³Direct Ignition System ³
³DIS
³Distributorless Ignition System ³
³DIST
³Distribution ³
³DISTR
³Distributor ³
³DK BLU
³Dark Blue ³
³DK GRN
³Dark Green ³
³DME
³Digital Motor Electronics (Motronic System) ³
³DOHC
³Double Overhead Cam ³
³DOT
³Department of Transportation ³
³DP
³Dashpot ³
³DRB-II
³Diagnostic Readout Box ³
³DVOM
³Digital Volt/Ohm Meter (see VOM) ³
³Def.
³Defogger or Defroster ³
³Def.
³Defrost ³
³Defog.
³Defogger ³
³Diag.
³Diagnostic ³
³Dist.
³Distributor or Distribution ³
³Dr.
³Door ³
ÀÄÄÄÄÄÄÄÄÄÄÄÄÄÄÄÄÄÁÄÄÄÄÄÄÄÄÄÄÄÄÄÄÄÄÄÄÄÄÄÄÄÄÄÄÄÄÄÄÄÄÄÄÄÄÄÄÄÄÄÄÄÄÄÄÄÄÄÄÙ "E" ABBREVIATION TABLE
"E" ABBREVIATION TABLE
ÚÄÄÄÄÄÄÄÄÄÄÄÄÄÄÄÄÄÂÄÄÄÄÄÄÄÄÄÄÄÄÄÄÄÄÄÄÄÄÄÄÄÄÄÄÄÄÄÄÄÄÄÄÄÄÄÄÄÄÄÄÄÄÄÄÄÄÄÄ¿
³ABBREVIATION
³DEFINITION ³
ÃÄÄÄÄÄÄÄÄÄÄÄÄÄÄÄÄÄÅÄÄÄÄÄÄÄÄÄÄÄÄÄÄÄÄÄÄÄÄÄÄÄÄÄÄÄÄÄÄÄÄÄÄÄÄÄÄÄÄÄÄÄÄÄÄÄÄÄÄ´
³EAC
³Electric Assist Choke ³
³EACV
³Electric Air Control Valve ³
³EBCM
³Electronic Brake Control Module ³
³ECA
³Electronic Control Assembly ³
³ECAT
³Electronically Controlled Automatic Transaxle ³
³ECM
³Electronic Control Module ³
³ECT
³Engine Coolant Temperature Sensor ³
³ECU
³Electronic Control Unit or Engine Control Unit ³
³EDF
³Electric Drive Fan relay assembly ³
³EDIS
³Electronic Distributorless Ignition System ³
³EEC
³Electronic Engine Control ³
³EECS
³Evaporative Emission Control System ³
³EEPROM
³Electronically Erasable PROM ³
³EFE
³Early Fuel Evaporation ³
³EFI
³Electronic Fuel Injection ³
³EGO
³Exhaust Gas Oxygen sensor (see HEGO) ³
³EGR
³Exhaust Gas Recirculation system ³
³EGRC
³EGR Control solenoid or system ³
³EGRV
³EGR Vent solenoid or system ³
³EMR
³Emission Maintenance Reminder Module ³
³ESA
³Electronic Spark Advance ³
³ESC
³Electronic Spark Control ³
Page 409 of 906
ANTI-LOCK BRAKE SYSTEM
Article Text
1990 Volkswagen Corrado
For Volkswagen Technical Site: http://vw.belcom.ru
Copyright © 1998 Mitchell Repair Information Company, LLC
Thursday, March 23, 2000 09:42PM
ARTICLE BEGINNING
1990-92 BRAKES
Volkswagen Anti-Lock Brake System
Corrado, Jetta, Passat
DESCRIPTION
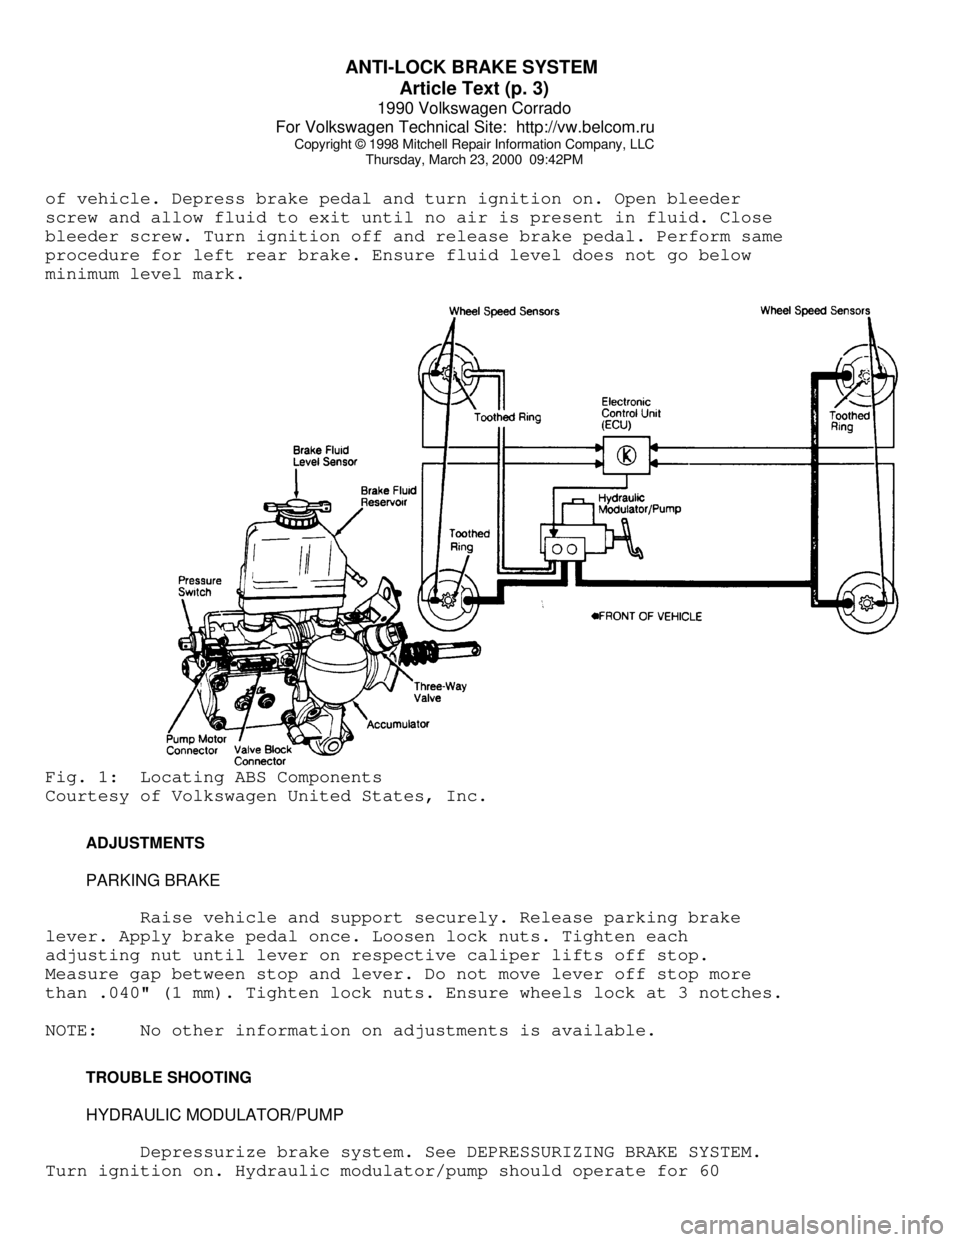
All models use a Teves Anti-Lock Brake System (ABS). See
Fig. 1. This system reduces the chance of wheel lock-up during heavy
braking. The system consists of 4 wheel speed sensors, Electronic
Control Unit (ECU), hydraulic modulator/pump and solenoid valves,
ANTI-LOCK warning light and BRAKE warning light. There are 2 relays
located at fuse/relay panel, to protect the hydraulic modulator and
ECU.
NOTE: For more information on brake system, see appropriate BRAKE
SYSTEM article.
OPERATION
When pressure is applied to brake pedal, the ECU monitors
input signals from each wheel speed sensor. If ECU measures a rate of
reduction greater than what is programmed in ECU, the ECU will output
a signal to appropriate solenoid valve. Each solenoid valve allows
hydraulic pressure to increase or decrease to the appropriate wheel
cylinder.
If a system failure occurs, the ANTI-LOCK warning light,
located on instrument panel, will come on. System will be deactivated,
but conventional brake system will still operate. If brake fluid level
drops too low, BRAKE warning light, located on instrument panel, will
come on.
ANTI-LOCK BRAKE SAFETY PRECAUTIONS
* NEVER open a bleeder valve or loosen a hydraulic line while
ABS is pressurized,
* NEVER disconnect or reconnect any electrical connectors while
ignition is on. Damage to ABS control unit may result.
* Only use specially designed brake hoses/lines on ABS equipped
vehicles.
* DO NOT tap on speed sensor components (sensor, sensor rings).
Speed rings must be pressed, NOT hammered into hubs. Striking
these components can cause demagnetization or a loss of
polarization, affecting the accuracy of the speed signal
returning to the ABS control unit.
* DO NOT mix tire sizes. Increasing the width, as long as tires
remain close to the original diameter, is acceptable. Rolling
diameter must be identical for all 4 tires (and spare tire
also). Some manufacturers recommend tires of the same brand,
Page 411 of 906
ANTI-LOCK BRAKE SYSTEM
Article Text (p. 3)
1990 Volkswagen Corrado
For Volkswagen Technical Site: http://vw.belcom.ru
Copyright © 1998 Mitchell Repair Information Company, LLC
Thursday, March 23, 2000 09:42PM
of vehicle. Depress brake pedal and turn ignition on. Open bleeder
screw and allow fluid to exit until no air is present in fluid. Close
bleeder screw. Turn ignition off and release brake pedal. Perform same
procedure for left rear brake. Ensure fluid level does not go below
minimum level mark.Fig. 1: Locating ABS Components
Courtesy of Volkswagen United States, Inc.
ADJUSTMENTS
PARKING BRAKE
Raise vehicle and support securely. Release parking brake
lever. Apply brake pedal once. Loosen lock nuts. Tighten each
adjusting nut until lever on respective caliper lifts off stop.
Measure gap between stop and lever. Do not move lever off stop more
than .040" (1 mm). Tighten lock nuts. Ensure wheels lock at 3 notches.
NOTE: No other information on adjustments is available.
TROUBLE SHOOTING
HYDRAULIC MODULATOR/PUMP
Depressurize brake system. See DEPRESSURIZING BRAKE SYSTEM.
Turn ignition on. Hydraulic modulator/pump should operate for 60
Page 412 of 906
ANTI-LOCK BRAKE SYSTEM
Article Text (p. 4)
1990 Volkswagen Corrado
For Volkswagen Technical Site: http://vw.belcom.ru
Copyright © 1998 Mitchell Repair Information Company, LLC
Thursday, March 23, 2000 09:42PM
seconds maximum and then stop. Depress brake pedal a few times; pump
should operate again for a few seconds. If pump motor does not
operate, check electrical system. If pump motor operates for more than
60 seconds, internal or external hydraulic leak may be indicated.
Check for external leaks. If external leak is not found, further
testing may be needed to check for internal leaks.
ANTI-LOCK WARNING LIGHT
Start engine. ANTI-LOCK warning light should come on, then
turn off after a few seconds. If light does not come on when engine is
started, check electrical system. If light comes on and stays on,
fault has been detected by the ECU and testing will be needed. See
SYSTEM TESTING under DIAGNOSIS & TESTING.
DIAGNOSIS & TESTING
SYSTEM TESTING
NOTE: Check battery condition, brake fluid level, electrical
connections and wiring for damage. If fluid level is
incorrect or battery and/or electrical connections are
faulty, correct problem before preceding. Perform each step,
in sequence, to test entire system, except for ECU. If
faulty ECU is suspected, replace with a known good one, and
retest system. Unplug ECU connector for all test steps.
Power Voltage-To-ECU Test
Turn ignition off. Unplug ECU connector. Turn ignition on.
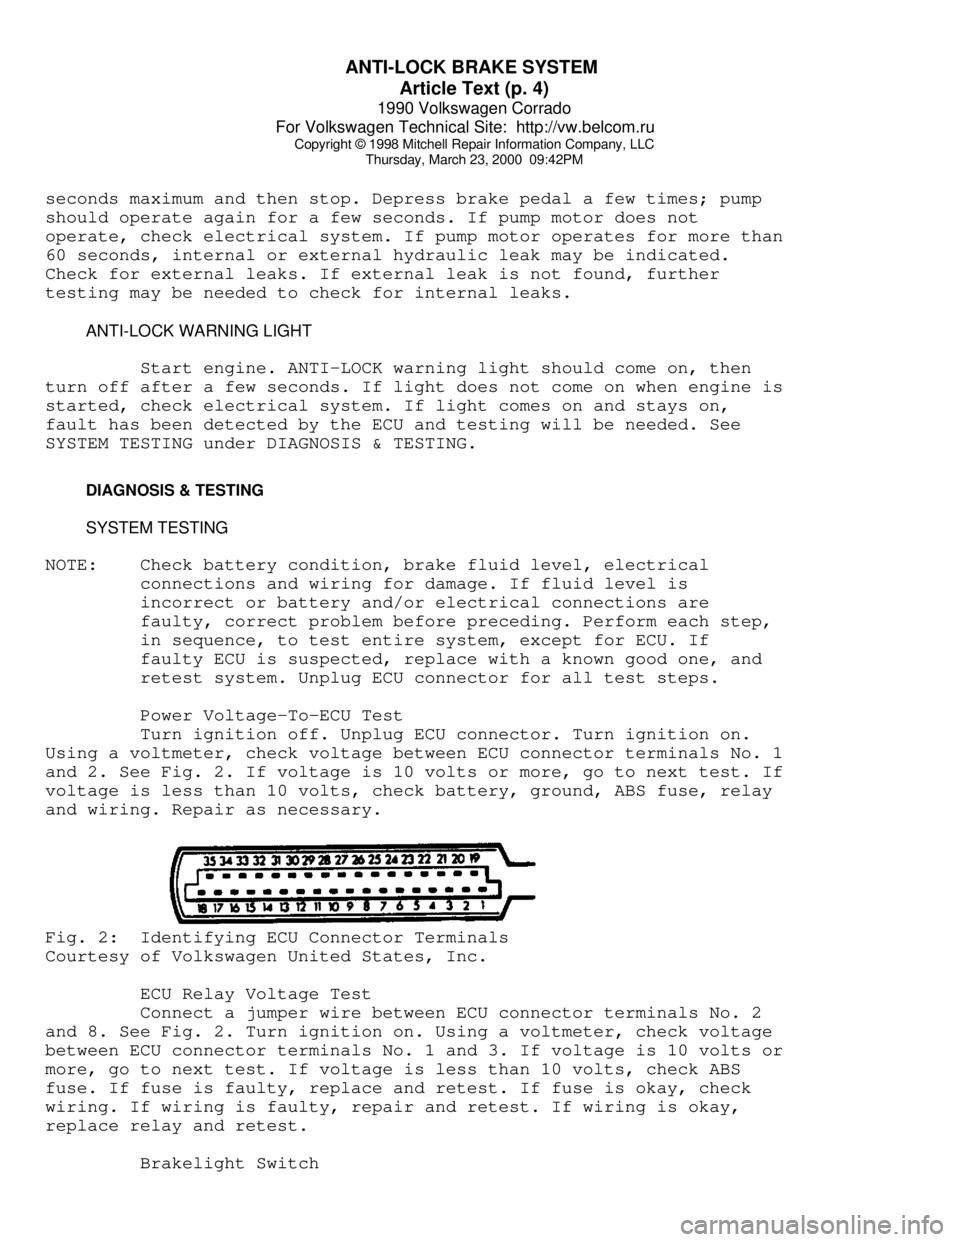
Using a voltmeter, check voltage between ECU connector terminals No. 1
and 2. See Fig. 2. If voltage is 10 volts or more, go to next test. If
voltage is less than 10 volts, check battery, ground, ABS fuse, relay
and wiring. Repair as necessary.Fig. 2: Identifying ECU Connector Terminals
Courtesy of Volkswagen United States, Inc.
ECU Relay Voltage Test
Connect a jumper wire between ECU connector terminals No. 2
and 8. See Fig. 2. Turn ignition on. Using a voltmeter, check voltage
between ECU connector terminals No. 1 and 3. If voltage is 10 volts or
more, go to next test. If voltage is less than 10 volts, check ABS
fuse. If fuse is faulty, replace and retest. If fuse is okay, check
wiring. If wiring is faulty, repair and retest. If wiring is okay,
replace relay and retest.
Brakelight Switch
Page 413 of 906
ANTI-LOCK BRAKE SYSTEM
Article Text (p. 5)
1990 Volkswagen Corrado
For Volkswagen Technical Site: http://vw.belcom.ru
Copyright © 1998 Mitchell Repair Information Company, LLC
Thursday, March 23, 2000 09:42PM
Turn ignition on. Apply brakes. Check for 12 volts between
terminals No. 12 and 1. If 12 volts are present, brakelight switch is
okay. If 12 volts are not present, check fuse, brakelight switch and
Black/Red wire from brakelight switch to ECU.
Hydraulic Modulator/Pump Relay Voltage Test
1) Turn ignition off. Unplug hydraulic modulator/pump
connector. Depress brake pedal 25 times. Turn ignition on. Using a
voltmeter, measure voltage between ECU connector terminals No. 1 and
32. See Fig. 2. If voltage is 10 volts or more, go to RIGHT REAR WHEEL
SPEED SENSOR VOLTAGE TEST under SYSTEM TESTING.
2) If voltage is less than 10 volts, check hydraulic
modulator/pump fuse. If fuse is okay, check wiring between ECU
connector terminal No. 32 and hydraulic modulator/pump connector
terminal No. 1 (large gauge Red/Black wire). See Figs. 2 and 4-9. If
wiring is not okay, repair wiring, and retest. If wiring is okay,
replace relay, and retest.
Right Rear Wheel Speed Sensor Voltage Test
Connect an AC voltmeter between ECU connector terminals No. 4
and 22. See Fig. 2. Rotate right rear wheel at one revolution per
second. Measure voltage with wheel rotating. If voltage is 0.075 volt
or more, go to next test. If voltage is less than 0.075 volt, check
wheel speed sensor and/or toothed ring for damage, wear and proper
installation. If damage or wear is found, replace faulty component and
retest. If not properly installed, reposition and retest. If
components are okay, replace wheel speed sensor and retest.
Left Rear Wheel Speed Sensor Voltage Test
Connect an AC voltmeter between ECU connector terminals No. 6
and 24. See Fig. 2. Rotate left rear wheel at one revolution per
second. Measure voltage with wheel rotating. If voltage is 0.075 volt
or more, go to next test. If voltage is less than 0.075 volt, check
wheel speed sensor and/or toothed ring for damage, wear and proper
installation. If damage or wear is found, replace faulty component and
retest. If not properly installed, reposition and retest. If
components are okay, replace wheel speed sensor and retest.
Right Front Wheel Speed Sensor Voltage Test
Connect an AC voltmeter between ECU connector terminals No. 7
and 25. See Fig. 2. Rotate right front wheel at one revolution per
second. Measure voltage with wheel rotating. If voltage is 0.075 volt
or more, go to next test. If voltage is less than 0.075 volt, check
wheel speed sensor and/or toothed ring for damage, wear and improper
installation. If damage or wear is found, replace faulty component,
and retest. If component is improperly installed, reposition
component, and retest. If components are okay, replace wheel speed
sensor, and retest.
Left Front Wheel Speed Sensor Voltage Test
Connect an AC voltmeter between ECU connector terminals No. 5
and 23. See Fig. 2. Rotate left front wheel at one revolution per
Page 414 of 906

ANTI-LOCK BRAKE SYSTEM
Article Text (p. 6)
1990 Volkswagen Corrado
For Volkswagen Technical Site: http://vw.belcom.ru
Copyright © 1998 Mitchell Repair Information Company, LLC
Thursday, March 23, 2000 09:42PM
second. Measure voltage with wheel rotating. If voltage is 0.075 volt
or more, go to next test. If voltage is less than 0.075 volt, check
wheel speed sensor and/or toothed ring for damage, wear and proper
installation. If damage or wear is found, replace faulty component and
retest. If not properly installed, reposition and retest. If
components are okay, replace wheel speed sensor and retest.
ECU Relay Continuity Test
Turn ignition off. Using an ohmmeter, check for continuity
between ECU connector terminals No. 1 and 3, and between terminals No.
1 and 20. See Fig. 2. If there is continuity at both test points, go
to next test. If there is no continuity at either or both test points,
check wiring. If wiring is faulty, repair and retest. If wiring is
okay, replace relay and retest.
Solenoid Valves Ground Circuit Continuity Test
1) Turn ignition off. Remove jumper wire from previous test.
Using an ohmmeter, check for continuity between ECU connector
terminals No. 1 and 11. See Fig. 2. If there is continuity, go to next
step.
2) If continuity does not exist, check for continuity between
ECU connector terminal No. 1 and valve block housing and between
hydraulic modulator and valve block housing. If continuity does not
exist between ECU connector terminal No. 1 and valve block housing,
repair wiring, and retest. If continuity does not exist between
housings, repair as necessary.
3) Reconnect jumper wire between ECU connector terminals No.
1 and 11. Check for continuity between ECU connector terminal No. 11
and valve block connector terminal No. 1 (Brown wire). See Figs. 2, 4-
9. If there is no continuity, repair wiring and retest.
Hydraulic Modulator/Pump Relay Ground Circuit Test
Turn ignition off. Reconnect pressure switch connector.
Depress brake pedal 20 times. Using an ohmmeter, check for continuity
between ECU connector terminals No. 1 and 14. If continuity exists, go
to next test. If continuity does not exist, check for continuity
between pressure switch terminals No. 1 (Brown wire) and 4 (Red/Yellow
or White wire). See Figs. 1 and 4-9. If continuity does not exist,
replace pressure switch, and retest. If continuity exists, check
wiring between ECU terminal No. 14 and pressure switch terminal No. 4.
Repair wiring, and retest.
Low Pressure Warning Switch Test
Turn ignition off. Ensure brake fluid level is okay and fluid
level sensor switch float is in correct position (switch is in closed
position). Ensure accumulator is fully charged and pump is not
operating. Using an ohmmeter, check for continuity between ECU
connector terminals No. 9 and 10. See Fig. 2. If there is continuity,
switch is okay. If contiuity does not exist, check wiring. If wiring
is okay, replace switch, and retest.
Right Rear Wheel Speed Sensor Resistance Test
Page 415 of 906

ANTI-LOCK BRAKE SYSTEM
Article Text (p. 7)
1990 Volkswagen Corrado
For Volkswagen Technical Site: http://vw.belcom.ru
Copyright © 1998 Mitchell Repair Information Company, LLC
Thursday, March 23, 2000 09:42PM
Turn ignition off. Using an ohmmeter, measure resistance
between ECU connector terminals No. 4 and 22. See Fig. 2. If
resistance is 800-1400 ohms, go to next test. If resistance is not as
specified, check resistance at right rear wheel speed sensor. If
resistance is correct, repair wiring and retest. If resistance is not
correct, replace wheel speed sensor and retest.
Left Rear Wheel Speed Sensor Resistance Test
Using an ohmmeter, measure resistance between ECU connector
terminals No. 6 and 24. See Fig. 2. If resistance is 800-1400 ohms, go
to next test. If resistance is not as specified, check resistance at
left rear wheel speed sensor. If resistance is correct, repair wiring
and retest. If resistance is not correct, replace wheel speed sensor,
and retest.
Right Front Wheel Speed Sensor Resistance Test
Using an ohmmeter, measure resistance between ECU connector
terminals No. 7 and 25. See Fig. 2. If resistance is 800-1400 ohms, go
to next test. If resistance is not as specified, check resistance at
right front wheel speed sensor. If resistance is correct, repair
wiring and retest. If resistance is not correct, replace wheel speed
sensor and retest.
Left Front Wheel Speed Sensor Resistance Test
Using an ohmmeter, measure resistance between ECU connector
terminals No. 5 and 23. See Fig. 2. If resistance is 800-1400 ohms, go
to next test. If resistance is not as specified, check resistance at
left front wheel speed sensor. If resistance is correct, repair
wiring, and retest. If resistance is not correct, replace wheel speed
sensor, and retest.
Right Rear Wheel Speed Sensor Shielding Resistance Test
Using an ohmmeter, measure resistance between ECU connector
terminals No. 4 and 1. See Fig. 2. If resistance is 20,000 ohms or
more, go to next test. If resistance is less than 20,000 ohms, check
shielding wire for damage. Replace harness if damage is found and
retest.
Left Rear Wheel Speed Sensor Shielding Resistance Test
Using an ohmmeter, measure resistance between ECU connector
terminals No. 6 and 1. See Fig. 2. If resistance is 20,000 ohms or
more, go to next test. If resistance is less than 20,000 ohms, check
shielding wire for damage. Replace harness if damage is found and
retest.
Right Front Wheel Speed Sensor Shielding Resistance Test
Using an ohmmeter, measure resistance between ECU connector
terminals No. 7 and 1. See Fig. 2. If resistance is 20,000 ohms or
more, go to next test. If resistance is less than 20,000 ohms, check
shielding wire for damage. Replace harness if damaged, and retest.
Left Front Wheel Speed Sensor Shielding Resistance Test
Page 416 of 906

ANTI-LOCK BRAKE SYSTEM
Article Text (p. 8)
1990 Volkswagen Corrado
For Volkswagen Technical Site: http://vw.belcom.ru
Copyright © 1998 Mitchell Repair Information Company, LLC
Thursday, March 23, 2000 09:42PM
Using an ohmmeter, measure resistance between ECU connector
terminals No. 5 and 1. See Fig. 2. If resistance is 20,000 ohms or
more, go to next test. If resistance is less than 20,000 ohms, check
shielding wire for damage. Replace harness if damaged, and retest.
ECU Relay Resistance Test
Using an ohmmeter, measure resistance between ECU connector
terminals No. 1 and 8. See Fig. 2. If resistance is 50-100 ohms, go to
next test. If resistance is not as specified, check wiring. If wiring
is faulty, repair and retest. If wiring is okay, replace relay and
retest. See Fig. 3.Fig. 3: Locating Relays
Courtesy of Volkswagen United States, Inc.
ABS Main Valve Resistance Test
Using an ohmmeter, measure resistance between terminals at
ABS main valve terminals. See Figs. 1 and 4-9. If resistance is 2-5
ohms, ABS main valve is okay. If resistance is not 2-5 ohms, replace
hydraulic modulator.
ABS Main Valve Continuity Test
Using an ohmmeter, check for continuity between ABS main
valve terminal No. 1 (Black wire) and ECU connector terminal No. 18,
and between ABS main valve terminal No. 2 (Brown wire) and ground. See