transmission VOLKSWAGEN CORRADO 1990 Owner's Guide
[x] Cancel search | Manufacturer: VOLKSWAGEN, Model Year: 1990, Model line: CORRADO, Model: VOLKSWAGEN CORRADO 1990Pages: 906, PDF Size: 6.56 MB
Page 715 of 906

SCHEDULED SERVICES
Article Text (p. 32)
1990 Volkswagen Corrado
For Volkswagen Technical Site: http://vw.belcom.ru
Copyright © 1998 Mitchell Repair Information Company, LLC
Thursday, March 23, 2000 09:50PM³ Coolant ........................ 50/50 Mix Ethylene Glycol/Water ³
³ Engine Oil
³
³ Ambient Temperatures
³
³ Greater Than 50
ø F (10øC) .............. SAE 20W-50 API SG/CD ³
³ 14
ø-50øF (-10ø To +10øC) ............... SAE 10W-40 API SG/CD ³
³ Less Than 14
øF (-10øC) .................. SAE 5W-30 API SG/CD ³
³ Wheel Bearings ..................... NLGI Grade 2 Category GC-LB
³
³ Steering Linkage (1)(2) ............ NLGI Grade 2 Category GC-LB
³
³ Ball Joints (1)(3) ................. NLGI Grade 2 Category GC-LB
³
³ Manual Transaxle ................ SAE 80W API GL-4 Or SAE 75W-90
³
³ Synthetic Transmission Oil G 50
³
³ Power Steering Fluid ................ VW Hydraulic Oil G-002-000
³
³ Weatherstrip ........................ Dielectric Silicone Grease
³
³ Final Drive (Differential) ...... Synthetic Transmission Oil G 50
³
³ SAE 75W-90
³
³
³
³ (1) - Use low pressure grease gun to prevent seal damage.
³
³ (2) - Fill until lubricant squeezes out from the base of seals.
³
³ (3) - Fill ball joint until seal starts to swell.
³
ÃÄÄÄÄÄÄÄÄÄÄÄÄÄÄÄÄÄÄÄÄÄÄÄÄÄÄÄÄÄÄÄÄÄÄÄÄÄÄÄÄÄÄÄÄÄÄÄÄÄÄÄÄÄÄÄÄÄÄÄÄÄÄÄÄÄÄÄÄ´
³ Fluid Capacities
³
ÃÄÄÄÄÄÄÄÄÄÄÄÄÄÄÄÄÄÄÄÄÄÄÄÄÄÄÄÄÄÄÄÄÄÄÄÄÄÄÄÄÄÄÄÄÄÄÄÄÄÄÄÄÄÄÄÄÄÄÄÄÄÄÄÄÄÄÄÄ´
³ Application (1) Quantity
³
³
³
³ Automatic Transmission ......................... 3.2 Qts. (3.0L)
³
³ Cooling System
³
³ 1.8L ......................................... 6.8 Qts. (6.5L)
³
³ 2.8L V6 ...................................... 9.1 Qts. (8.6L)
³
³ Engine Oil (2)
³
³ 1.8L ......................................... 4.3 Qts. (4.0L)
³
³ 2.8L V6 ...................................... 6.3 Qts. (6.0L)
³
³
³
³ (1) - Capacities are recommended or calculated levels. Always use
³
³ dipstick (if available) to measure level.
³
³ (2) - Includes filter change.
³
ÀÄÄÄÄÄÄÄÄÄÄÄÄÄÄÄÄÄÄÄÄÄÄÄÄÄÄÄÄÄÄÄÄÄÄÄÄÄÄÄÄÄÄÄÄÄÄÄÄÄÄÄÄÄÄÄÄÄÄÄÄÄÄÄÄÄÄÄÄÙ 97,500 MILE (156,000 KM) SERVICE
97,500 MILE (156,000 KM) SERVICE
ÚÄÄÄÄÄÄÄÄÄÄÄÄÄÄÄÄÄÄÄÄÄÄÄÄÄÄÄÄÄÄÄÄÄÄÄÄÄÄÄÄÄÄÄÄÄÄÄÄÄÄÄÄÄÄÄÄÄÄÄÄÄÄÄÄÄÄÄÄ¿
³ Service Or Inspect
³
ÃÄÄÄÂÄÄÄÄÄÄÄÄÄÄÄÄÄÄÄÄÄÄÄÄÄÄÄÄÄÄÄÄÄÄÄÄÄÄÄÄÄÄÄÄÄÄÄÄÄÄÄÄÄÄÄÄÄÄÄÄÄÄÄÄÄÄÄÄ´
³
³ Verify Last Major Service Was Performed ³
ÃÄÄÄÅÄÄÄÄÄÄÄÄÄÄÄÄÄÄÄÄÄÄÄÄÄÄÄÄÄÄÄÄÄÄÄÄÄÄÄÄÄÄÄÄÄÄÄÄÄÄÄÄÄÄÄÄÄÄÄÄÄÄÄÄÄÄÄÄ´
³
³ Check Fluid Levels ³
ÃÄÄÄÅÄÄÄÄÄÄÄÄÄÄÄÄÄÄÄÄÄÄÄÄÄÄÄÄÄÄÄÄÄÄÄÄÄÄÄÄÄÄÄÄÄÄÄÄÄÄÄÄÄÄÄÄÄÄÄÄÄÄÄÄÄÄÄÄ´
³
³ Inspect Coolant Hoses and Clamps ³
ÃÄÄÄÅÄÄÄÄÄÄÄÄÄÄÄÄÄÄÄÄÄÄÄÄÄÄÄÄÄÄÄÄÄÄÄÄÄÄÄÄÄÄÄÄÄÄÄÄÄÄÄÄÄÄÄÄÄÄÄÄÄÄÄÄÄÄÄÄ´
³
³ Inspect Brake System ³
ÃÄÄÄÅÄÄÄÄÄÄÄÄÄÄÄÄÄÄÄÄÄÄÄÄÄÄÄÄÄÄÄÄÄÄÄÄÄÄÄÄÄÄÄÄÄÄÄÄÄÄÄÄÄÄÄÄÄÄÄÄÄÄÄÄÄÄÄÄ´
³
³ Inspect Exhaust System ³
Page 718 of 906

SCHEDULED SERVICES
Article Text (p. 35)
1990 Volkswagen Corrado
For Volkswagen Technical Site: http://vw.belcom.ru
Copyright © 1998 Mitchell Repair Information Company, LLC
Thursday, March 23, 2000 09:50PM³ ³ Inspect Brake Pads, Rotors and Calipers ³
ÃÄÄÄÅÄÄÄÄÄÄÄÄÄÄÄÄÄÄÄÄÄÄÄÄÄÄÄÄÄÄÄÄÄÄÄÄÄÄÄÄÄÄÄÄÄÄÄÄÄÄÄÄÄÄÄÄÄÄÄÄÄÄÄÄÄÄÄÄ´
³
³ Inspect Brake System Hoses & Lines ³
ÃÄÄÄÅÄÄÄÄÄÄÄÄÄÄÄÄÄÄÄÄÄÄÄÄÄÄÄÄÄÄÄÄÄÄÄÄÄÄÄÄÄÄÄÄÄÄÄÄÄÄÄÄÄÄÄÄÄÄÄÄÄÄÄÄÄÄÄÄ´
³
³ Inspect Shocks/Struts for Leakage ³
ÃÄÄÄÅÄÄÄÄÄÄÄÄÄÄÄÄÄÄÄÄÄÄÄÄÄÄÄÄÄÄÄÄÄÄÄÄÄÄÄÄÄÄÄÄÄÄÄÄÄÄÄÄÄÄÄÄÄÄÄÄÄÄÄÄÄÄÄÄ´
³
³ Inspect Tire Wear and Condition ³
ÃÄÄÄÅÄÄÄÄÄÄÄÄÄÄÄÄÄÄÄÄÄÄÄÄÄÄÄÄÄÄÄÄÄÄÄÄÄÄÄÄÄÄÄÄÄÄÄÄÄÄÄÄÄÄÄÄÄÄÄÄÄÄÄÄÄÄÄÄ´
³
³ Rotate Tires and Adjust Air Pressure (Including Spare) ³
ÃÄÄÄÅÄÄÄÄÄÄÄÄÄÄÄÄÄÄÄÄÄÄÄÄÄÄÄÄÄÄÄÄÄÄÄÄÄÄÄÄÄÄÄÄÄÄÄÄÄÄÄÄÄÄÄÄÄÄÄÄÄÄÄÄÄÄÄÄ´
³
³ Road Test ³
ÃÄÄÄÁÄÄÄÄÄÄÄÄÄÄÄÄÄÄÄÄÄÄÄÄÄÄÄÄÄÄÄÄÄÄÄÄÄÄÄÄÄÄÄÄÄÄÄÄÄÄÄÄÄÄÄÄÄÄÄÄÄÄÄÄÄÄÄÄ´
³ Replace
³
ÃÄÄÄÂÄÄÄÄÄÄÄÄÄÄÄÄÄÄÄÄÄÄÄÄÄÄÄÄÄÄÄÄÄÄÄÄÄÄÄÄÄÄÄÄÄÄÄÄÄÄÄÄÄÄÄÄÄÄÄÄÄÄÄÄÄÄÄÄ´
³
³ Engine Oil ³
ÃÄÄÄÅÄÄÄÄÄÄÄÄÄÄÄÄÄÄÄÄÄÄÄÄÄÄÄÄÄÄÄÄÄÄÄÄÄÄÄÄÄÄÄÄÄÄÄÄÄÄÄÄÄÄÄÄÄÄÄÄÄÄÄÄÄÄÄÄ´
³
³ Oil Filter ³
ÃÄÄÄÁÄÄÄÄÄÄÄÄÄÄÄÄÄÄÄÄÄÄÄÄÄÄÄÄÄÄÄÄÄÄÄÄÄÄÄÄÄÄÄÄÄÄÄÄÄÄÄÄÄÄÄÄÄÄÄÄÄÄÄÄÄÄÄÄ´
³ Lubrication Specifications
³
ÃÄÄÄÄÄÄÄÄÄÄÄÄÄÄÄÄÄÄÄÄÄÄÄÄÄÄÄÄÄÄÄÄÄÄÄÄÄÄÄÄÄÄÄÄÄÄÄÄÄÄÄÄÄÄÄÄÄÄÄÄÄÄÄÄÄÄÄÄ´
³ Application Specification
³
³
³
³ Automatic Transaxle ............................. Dexron-IIE ATF
³
³ Brake Fluid ..................... SAE J1703 Or DOT 4 Brake Fluid
³
³ Coolant ........................ 50/50 Mix Ethylene Glycol/Water
³
³ Engine Oil
³
³ Ambient Temperatures
³
³ Greater Than 50
ø F (10øC) .............. SAE 20W-50 API SG/CD ³
³ 14
ø-50øF (-10ø To +10øC) ............... SAE 10W-40 API SG/CD ³
³ Less Than 14
øF (-10øC) .................. SAE 5W-30 API SG/CD ³
³ Wheel Bearings ..................... NLGI Grade 2 Category GC-LB
³
³ Steering Linkage (1)(2) ............ NLGI Grade 2 Category GC-LB
³
³ Ball Joints (1)(3) ................. NLGI Grade 2 Category GC-LB
³
³ Manual Transaxle ................ SAE 80W API GL-4 Or SAE 75W-90
³
³ Synthetic Transmission Oil G 50
³
³ Power Steering Fluid ................ VW Hydraulic Oil G-002-000
³
³ Weatherstrip ........................ Dielectric Silicone Grease
³
³ Final Drive (Differential) ...... Synthetic Transmission Oil G 50
³
³ SAE 75W-90
³
³
³
³ (1) - Use low pressure grease gun to prevent seal damage.
³
³ (2) - Fill until lubricant squeezes out from the base of seals.
³
³ (3) - Fill ball joint until seal starts to swell.
³
ÃÄÄÄÄÄÄÄÄÄÄÄÄÄÄÄÄÄÄÄÄÄÄÄÄÄÄÄÄÄÄÄÄÄÄÄÄÄÄÄÄÄÄÄÄÄÄÄÄÄÄÄÄÄÄÄÄÄÄÄÄÄÄÄÄÄÄÄÄ´
³ Fluid Capacities
³
ÃÄÄÄÄÄÄÄÄÄÄÄÄÄÄÄÄÄÄÄÄÄÄÄÄÄÄÄÄÄÄÄÄÄÄÄÄÄÄÄÄÄÄÄÄÄÄÄÄÄÄÄÄÄÄÄÄÄÄÄÄÄÄÄÄÄÄÄÄ´
³ Application (1) Quantity
³
³
³
³ Automatic Transmission ......................... 3.2 Qts. (3.0L)
³
³ Cooling System
³
³ 1.8L ......................................... 6.8 Qts. (6.5L)
³
³ 2.8L V6 ...................................... 9.1 Qts. (8.6L)
³
Page 721 of 906

SCHEDULED SERVICES
Article Text (p. 38)
1990 Volkswagen Corrado
For Volkswagen Technical Site: http://vw.belcom.ru
Copyright © 1998 Mitchell Repair Information Company, LLC
Thursday, March 23, 2000 09:50PM³ ³ Door/Hood/Trunk Stops, Hinges & Locks ³
ÃÄÄÄÅÄÄÄÄÄÄÄÄÄÄÄÄÄÄÄÄÄÄÄÄÄÄÄÄÄÄÄÄÄÄÄÄÄÄÄÄÄÄÄÄÄÄÄÄÄÄÄÄÄÄÄÄÄÄÄÄÄÄÄÄÄÄÄÄ´
³
³ Check Body Drain Holes ³
ÃÄÄÄÅÄÄÄÄÄÄÄÄÄÄÄÄÄÄÄÄÄÄÄÄÄÄÄÄÄÄÄÄÄÄÄÄÄÄÄÄÄÄÄÄÄÄÄÄÄÄÄÄÄÄÄÄÄÄÄÄÄÄÄÄÄÄÄÄ´
³
³ Check Automatic Seat Belt Operation (1990-94) ³
ÃÄÄÄÅÄÄÄÄÄÄÄÄÄÄÄÄÄÄÄÄÄÄÄÄÄÄÄÄÄÄÄÄÄÄÄÄÄÄÄÄÄÄÄÄÄÄÄÄÄÄÄÄÄÄÄÄÄÄÄÄÄÄÄÄÄÄÄÄ´
³
³ Check Seat Belt Webbing and Release Mechanisms ³
ÃÄÄÄÅÄÄÄÄÄÄÄÄÄÄÄÄÄÄÄÄÄÄÄÄÄÄÄÄÄÄÄÄÄÄÄÄÄÄÄÄÄÄÄÄÄÄÄÄÄÄÄÄÄÄÄÄÄÄÄÄÄÄÄÄÄÄÄÄ´
³
³ Windshield Washer System ³
ÃÄÄÄÅÄÄÄÄÄÄÄÄÄÄÄÄÄÄÄÄÄÄÄÄÄÄÄÄÄÄÄÄÄÄÄÄÄÄÄÄÄÄÄÄÄÄÄÄÄÄÄÄÄÄÄÄÄÄÄÄÄÄÄÄÄÄÄÄ´
³
³ Parking Brake Adjustment ³
ÃÄÄÄÅÄÄÄÄÄÄÄÄÄÄÄÄÄÄÄÄÄÄÄÄÄÄÄÄÄÄÄÄÄÄÄÄÄÄÄÄÄÄÄÄÄÄÄÄÄÄÄÄÄÄÄÄÄÄÄÄÄÄÄÄÄÄÄÄ´
³
³ Check Clutch Adjustment ³
ÃÄÄÄÅÄÄÄÄÄÄÄÄÄÄÄÄÄÄÄÄÄÄÄÄÄÄÄÄÄÄÄÄÄÄÄÄÄÄÄÄÄÄÄÄÄÄÄÄÄÄÄÄÄÄÄÄÄÄÄÄÄÄÄÄÄÄÄÄ´
³
³ Suspension & Wheel Bearings ³
ÃÄÄÄÅÄÄÄÄÄÄÄÄÄÄÄÄÄÄÄÄÄÄÄÄÄÄÄÄÄÄÄÄÄÄÄÄÄÄÄÄÄÄÄÄÄÄÄÄÄÄÄÄÄÄÄÄÄÄÄÄÄÄÄÄÄÄÄÄ´
³
³ Check Shift Interlock Operation ³
ÃÄÄÄÅÄÄÄÄÄÄÄÄÄÄÄÄÄÄÄÄÄÄÄÄÄÄÄÄÄÄÄÄÄÄÄÄÄÄÄÄÄÄÄÄÄÄÄÄÄÄÄÄÄÄÄÄÄÄÄÄÄÄÄÄÄÄÄÄ´
³
³ Inspect Steering Linkage/Front Suspension ³
ÃÄÄÄÅÄÄÄÄÄÄÄÄÄÄÄÄÄÄÄÄÄÄÄÄÄÄÄÄÄÄÄÄÄÄÄÄÄÄÄÄÄÄÄÄÄÄÄÄÄÄÄÄÄÄÄÄÄÄÄÄÄÄÄÄÄÄÄÄ´
³
³ Lubricate Chassis ³
ÃÄÄÄÅÄÄÄÄÄÄÄÄÄÄÄÄÄÄÄÄÄÄÄÄÄÄÄÄÄÄÄÄÄÄÄÄÄÄÄÄÄÄÄÄÄÄÄÄÄÄÄÄÄÄÄÄÄÄÄÄÄÄÄÄÄÄÄÄ´
³
³ Inspect Brake Pads, Rotors and Calipers ³
ÃÄÄÄÅÄÄÄÄÄÄÄÄÄÄÄÄÄÄÄÄÄÄÄÄÄÄÄÄÄÄÄÄÄÄÄÄÄÄÄÄÄÄÄÄÄÄÄÄÄÄÄÄÄÄÄÄÄÄÄÄÄÄÄÄÄÄÄÄ´
³
³ Inspect Brake System Hoses & Lines ³
ÃÄÄÄÅÄÄÄÄÄÄÄÄÄÄÄÄÄÄÄÄÄÄÄÄÄÄÄÄÄÄÄÄÄÄÄÄÄÄÄÄÄÄÄÄÄÄÄÄÄÄÄÄÄÄÄÄÄÄÄÄÄÄÄÄÄÄÄÄ´
³
³ Inspect Shocks/Struts for Leakage ³
ÃÄÄÄÅÄÄÄÄÄÄÄÄÄÄÄÄÄÄÄÄÄÄÄÄÄÄÄÄÄÄÄÄÄÄÄÄÄÄÄÄÄÄÄÄÄÄÄÄÄÄÄÄÄÄÄÄÄÄÄÄÄÄÄÄÄÄÄÄ´
³
³ Inspect Tire Wear and Condition ³
ÃÄÄÄÅÄÄÄÄÄÄÄÄÄÄÄÄÄÄÄÄÄÄÄÄÄÄÄÄÄÄÄÄÄÄÄÄÄÄÄÄÄÄÄÄÄÄÄÄÄÄÄÄÄÄÄÄÄÄÄÄÄÄÄÄÄÄÄÄ´
³
³ Rotate Tires and Adjust Air Pressure (Including Spare) ³
ÃÄÄÄÅÄÄÄÄÄÄÄÄÄÄÄÄÄÄÄÄÄÄÄÄÄÄÄÄÄÄÄÄÄÄÄÄÄÄÄÄÄÄÄÄÄÄÄÄÄÄÄÄÄÄÄÄÄÄÄÄÄÄÄÄÄÄÄÄ´
³
³ Road Test ³
ÃÄÄÄÁÄÄÄÄÄÄÄÄÄÄÄÄÄÄÄÄÄÄÄÄÄÄÄÄÄÄÄÄÄÄÄÄÄÄÄÄÄÄÄÄÄÄÄÄÄÄÄÄÄÄÄÄÄÄÄÄÄÄÄÄÄÄÄÄ´
³ Replace
³
ÃÄÄÄÂÄÄÄÄÄÄÄÄÄÄÄÄÄÄÄÄÄÄÄÄÄÄÄÄÄÄÄÄÄÄÄÄÄÄÄÄÄÄÄÄÄÄÄÄÄÄÄÄÄÄÄÄÄÄÄÄÄÄÄÄÄÄÄÄ´
³
³ Engine Oil ³
ÃÄÄÄÅÄÄÄÄÄÄÄÄÄÄÄÄÄÄÄÄÄÄÄÄÄÄÄÄÄÄÄÄÄÄÄÄÄÄÄÄÄÄÄÄÄÄÄÄÄÄÄÄÄÄÄÄÄÄÄÄÄÄÄÄÄÄÄÄ´
³
³ Oil Filter ³
ÃÄÄÄÅÄÄÄÄÄÄÄÄÄÄÄÄÄÄÄÄÄÄÄÄÄÄÄÄÄÄÄÄÄÄÄÄÄÄÄÄÄÄÄÄÄÄÄÄÄÄÄÄÄÄÄÄÄÄÄÄÄÄÄÄÄÄÄÄ´
³
³ Spark Plugs ³
ÃÄÄÄÅÄÄÄÄÄÄÄÄÄÄÄÄÄÄÄÄÄÄÄÄÄÄÄÄÄÄÄÄÄÄÄÄÄÄÄÄÄÄÄÄÄÄÄÄÄÄÄÄÄÄÄÄÄÄÄÄÄÄÄÄÄÄÄÄ´
³
³ Air Filter Element ³
ÃÄÄÄÅÄÄÄÄÄÄÄÄÄÄÄÄÄÄÄÄÄÄÄÄÄÄÄÄÄÄÄÄÄÄÄÄÄÄÄÄÄÄÄÄÄÄÄÄÄÄÄÄÄÄÄÄÄÄÄÄÄÄÄÄÄÄÄÄ´
³
³ Replace Passenger HVAC Air Filter (1995) ³
ÃÄÄÄÅÄÄÄÄÄÄÄÄÄÄÄÄÄÄÄÄÄÄÄÄÄÄÄÄÄÄÄÄÄÄÄÄÄÄÄÄÄÄÄÄÄÄÄÄÄÄÄÄÄÄÄÄÄÄÄÄÄÄÄÄÄÄÄÄ´
³
³ Replace Automatic Transmission Fluid and Clean ATF Strainer ³
ÃÄÄÄÅÄÄÄÄÄÄÄÄÄÄÄÄÄÄÄÄÄÄÄÄÄÄÄÄÄÄÄÄÄÄÄÄÄÄÄÄÄÄÄÄÄÄÄÄÄÄÄÄÄÄÄÄÄÄÄÄÄÄÄÄÄÄÄÄ´
³
³ Camshaft Timing Belt (2.0L Only) ³
ÃÄÄÄÅÄÄÄÄÄÄÄÄÄÄÄÄÄÄÄÄÄÄÄÄÄÄÄÄÄÄÄÄÄÄÄÄÄÄÄÄÄÄÄÄÄÄÄÄÄÄÄÄÄÄÄÄÄÄÄÄÄÄÄÄÄÄÄÄ´
³
³ Oxygen Sensor ³
ÃÄÄÄÅÄÄÄÄÄÄÄÄÄÄÄÄÄÄÄÄÄÄÄÄÄÄÄÄÄÄÄÄÄÄÄÄÄÄÄÄÄÄÄÄÄÄÄÄÄÄÄÄÄÄÄÄÄÄÄÄÄÄÄÄÄÄÄÄ´
Page 722 of 906

SCHEDULED SERVICES
Article Text (p. 39)
1990 Volkswagen Corrado
For Volkswagen Technical Site: http://vw.belcom.ru
Copyright © 1998 Mitchell Repair Information Company, LLC
Thursday, March 23, 2000 09:50PM³ ³ Drain, Refill and Bleed Brake System Fluid ³
ÃÄÄÄÅÄÄÄÄÄÄÄÄÄÄÄÄÄÄÄÄÄÄÄÄÄÄÄÄÄÄÄÄÄÄÄÄÄÄÄÄÄÄÄÄÄÄÄÄÄÄÄÄÄÄÄÄÄÄÄÄÄÄÄÄÄÄÄÄ´
³
³ Drain, Flush and Refill Engine Coolant ³
ÃÄÄÄÁÄÄÄÄÄÄÄÄÄÄÄÄÄÄÄÄÄÄÄÄÄÄÄÄÄÄÄÄÄÄÄÄÄÄÄÄÄÄÄÄÄÄÄÄÄÄÄÄÄÄÄÄÄÄÄÄÄÄÄÄÄÄÄÄ´
³ Lubrication Specifications
³
ÃÄÄÄÄÄÄÄÄÄÄÄÄÄÄÄÄÄÄÄÄÄÄÄÄÄÄÄÄÄÄÄÄÄÄÄÄÄÄÄÄÄÄÄÄÄÄÄÄÄÄÄÄÄÄÄÄÄÄÄÄÄÄÄÄÄÄÄÄ´
³ Application Specification
³
³
³
³ Automatic Transaxle ............................. Dexron-IIE ATF
³
³ Brake Fluid ..................... SAE J1703 Or DOT 4 Brake Fluid
³
³ Coolant ........................ 50/50 Mix Ethylene Glycol/Water
³
³ Engine Oil
³
³ Ambient Temperatures
³
³ Greater Than 50
ø F (10øC) .............. SAE 20W-50 API SG/CD ³
³ 14
ø-50øF (-10ø To +10øC) ............... SAE 10W-40 API SG/CD ³
³ Less Than 14
øF (-10øC) .................. SAE 5W-30 API SG/CD ³
³ Wheel Bearings ..................... NLGI Grade 2 Category GC-LB
³
³ Steering Linkage (1)(2) ............ NLGI Grade 2 Category GC-LB
³
³ Ball Joints (1)(3) ................. NLGI Grade 2 Category GC-LB
³
³ Manual Transaxle ................ SAE 80W API GL-4 Or SAE 75W-90
³
³ Synthetic Transmission Oil G 50
³
³ Power Steering Fluid ................ VW Hydraulic Oil G-002-000
³
³ Weatherstrip ........................ Dielectric Silicone Grease
³
³ Final Drive (Differential) ...... Synthetic Transmission Oil G 50
³
³ SAE 75W-90
³
³
³
³ (1) - Use low pressure grease gun to prevent seal damage.
³
³ (2) - Fill until lubricant squeezes out from the base of seals.
³
³ (3) - Fill ball joint until seal starts to swell.
³
ÃÄÄÄÄÄÄÄÄÄÄÄÄÄÄÄÄÄÄÄÄÄÄÄÄÄÄÄÄÄÄÄÄÄÄÄÄÄÄÄÄÄÄÄÄÄÄÄÄÄÄÄÄÄÄÄÄÄÄÄÄÄÄÄÄÄÄÄÄ´
³ Fluid Capacities
³
ÃÄÄÄÄÄÄÄÄÄÄÄÄÄÄÄÄÄÄÄÄÄÄÄÄÄÄÄÄÄÄÄÄÄÄÄÄÄÄÄÄÄÄÄÄÄÄÄÄÄÄÄÄÄÄÄÄÄÄÄÄÄÄÄÄÄÄÄÄ´
³ Application (1) Quantity
³
³
³
³ Automatic Transmission ......................... 3.2 Qts. (3.0L)
³
³ Cooling System
³
³ 1.8L ......................................... 6.8 Qts. (6.5L)
³
³ 2.8L V6 ...................................... 9.1 Qts. (8.6L)
³
³ Engine Oil (2)
³
³ 1.8L ......................................... 4.3 Qts. (4.0L)
³
³ 2.8L V6 ...................................... 6.3 Qts. (6.0L)
³
³
³
³ (1) - Capacities are recommended or calculated levels. Always use
³
³ dipstick (if available) to measure level.
³
³ (2) - Includes filter change.
³
ÀÄÄÄÄÄÄÄÄÄÄÄÄÄÄÄÄÄÄÄÄÄÄÄÄÄÄÄÄÄÄÄÄÄÄÄÄÄÄÄÄÄÄÄÄÄÄÄÄÄÄÄÄÄÄÄÄÄÄÄÄÄÄÄÄÄÄÄÄÙ LUBRICATION SPECIFICATIONS
LUBRICATION SPECIFICATIONS TABLE
ÄÄÄÄÄÄÄÄÄÄÄÄÄÄÄÄÄÄÄÄÄÄÄÄÄÄÄÄÄÄÄÄÄÄÄÄÄÄÄÄÄÄÄÄÄÄÄÄÄÄÄÄÄÄÄÄÄÄÄÄÄÄÄÄÄApplication Fluid Specifications
Page 723 of 906

SCHEDULED SERVICES
Article Text (p. 40)
1990 Volkswagen Corrado
For Volkswagen Technical Site: http://vw.belcom.ru
Copyright © 1998 Mitchell Repair Information Company, LLC
Thursday, March 23, 2000 09:50PM
Engine Oil (1)
Ambient Temperatures
Greater Than 50øF (10øC) .............. SAE 20W-50 API SF/CD
14
øF To 50øF (-10øC To +10øC) ......... SAE 10W-40 API SF/CD
Less Than 14
øF (-10ø C) ................ SAE 5W-30 API SF/CD
Brake Fluid ........................ SAE J1703 (DOT 3 Or DOT 4)
Power Steering Fluid ......................... VW Hydraulic Oil
(G 002000) Or Equivalent
Automatic Transmission ........... Dexron-IIE ATF Or Equivalent
Manual Transaxle .......................... SAE 80W API GL-4 Or
SAE 75W-90 (G50 Synthetic Gear Oil)
Final Drive (A/T & M/T)
(Differential) .......... SAE 75W-90 (G50 Synthetic Gear Oil)
Wheel Bearings .................... NLGI Grade 2 Category GC-LB
Drive Shaft U-Joints .............. NLGI Grade 2 Category GC-LB
Steering Linkage (2)(3) ........... NLGI Grade 2 Category GC-LB
Ball Joints (2)(4) ................ NLGI Grade 2 Category GC-LB
Weatherstrip ....................... Dielectric Silicone Grease
(1) - SAE 15W-40 or 20W-40 engine oil is recommended for extreme
conditions or extended highway operation.
(2) - Use low pressure grease gun to prevent seal damage.
(3) - Fill until lubricant squeezes out from the base of seals.
(4) - Fill ball joint until seal starts to swell.
ÄÄÄÄÄÄÄÄÄÄÄÄÄÄÄÄÄÄÄÄÄÄÄÄÄÄÄÄÄÄÄÄÄÄÄÄÄÄÄÄÄÄÄÄÄÄÄÄÄÄÄÄÄÄÄÄÄÄÄÄÄÄÄÄÄ FLUID CAPACITIES
FLUID CAPACITIES TABLE
ÄÄÄÄÄÄÄÄÄÄÄÄÄÄÄÄÄÄÄÄÄÄÄÄÄÄÄÄÄÄÄÄÄÄÄÄÄÄÄÄÄÄÄÄÄÄÄÄÄÄÄÄÄÄÄÄÄÄÄÄÄÄÄÄÄApplication Quantity (1)
A/C System R-12 Refrigerant
1990-92 (up to 7/92) ............................. 37-40 Ozs.
A/C System R-134a Refrigerant (2)
1993-94 (from 7/92) ........................... 28.2-31.8 Ozs.
Cooling System
4-Cyl. ...................................... 6.8 Qts. (6.5L)
V6 .......................................... 9.1 Qts. (8.6L)
Engine Oil (3)
4-Cyl. ...................................... 4.3 Qts. (4.0L)
V6 .......................................... 6.3 Qts. (6.0L)
Fuel Tank
4-Cyl. ..................................... 14.5 Gals. (55L)
V6 ......................................... 18.5 Gals. (55L)
Automatic Transmission
Fluid Change ................................ 3.2 Qts. (3.0L)
Overhaul .................................... 5.9 Qts. (5.6L)
Manual Transmission ........................... 2.1 Qts. (2.0L)
Final Drive
Differential (A/T) (4) ....................... 0.8 Qt. (.75L)
Page 729 of 906

STARTER - BOSCH
Article Text (p. 2)
1990 Volkswagen Corrado
For Volkswagen Technical Site: http://vw.belcom.ru
Copyright © 1998 Mitchell Repair Information Company, LLC
Thursday, March 23, 2000 09:51PM
Faulty Ammeter ........................... Test/Replace Ammeter
NOISY Defective Battery ....................... Replace Battery
Defective Alternator ................... Test/Repair Alternator
Defective Regulator ..................... Test/Repair RegulatorÄÄÄÄÄÄÄÄÄÄÄÄÄÄÄÄÄÄÄÄÄÄÄÄÄÄÄÄÄÄÄÄÄÄÄÄÄÄÄÄÄÄÄÄÄÄÄÄÄÄÄÄÄÄÄÄÄÄÄÄÄÄÄÄÄ ON-VEHICLE TESTING
STARTER DOES NOT CRANK ENGINE
1) Ensure battery is fully charged. Make sure electrical and
ground connections are clean and tight. With ignition switch in START
position, measure voltage at spade terminal of starter solenoid.
Reading should be at least 8 volts (9.5 volts on Fox). If so, check
engine for mechanical problems. If voltage is not as specified, go to
next step.
2) Measure voltage at ignition switch. If reading is at least
8 volts (9.5 volts on Fox), check wiring between ignition switch and
starter solenoid. If voltage is not as specified, replace ignition
switch.
3) Measure voltage at field (starter) terminal of starter
solenoid. If reading is 8 volts or more, repair or replace starter. If
reading is less than 8 volts, replace starter solenoid.
NOTE: On vehicles with automatic transmission, also check
park/neutral switch.
STARTER CRANKS TOO SLOWLY
Ensure engine crankcase is filled with recommended viscosity
oil. Check charging system to ensure battery is fully charged. Make
sure electrical and ground connections are clean and tight. If starter
still turns slowly, repair or replace starter.
VOLTAGE DROP TEST
Starter Main Terminal
Connect a voltmeter between starter main terminal and starter
body. Disconnect ignition coil positive terminal and operate starter.
Voltage reading should not be more than 1.0 volt less than battery
voltage. If a larger voltage drop is indicated, circuit between
battery and starter terminal may be defective.
Main Starter Case
Connect a voltmeter between positive battery terminal and
starter motor "M" terminal. With ignition off, operate starter for 2-3
seconds. Battery voltage should be present, then drop to less than one
volt. If voltage is greater than specification, high resistance may be
present in circuit. Go to ACROSS SOLENOID SWITCH test.
Across Solenoid Switch
Connect a voltmeter between 2 starter solenoid terminal stud
Page 731 of 906
STARTER - BOSCH
Article Text (p. 4)
1990 Volkswagen Corrado
For Volkswagen Technical Site: http://vw.belcom.ru
Copyright © 1998 Mitchell Repair Information Company, LLC
Thursday, March 23, 2000 09:51PM
remove upper starter mounting bolt. Release handbrake (to allow axle
rotation) and raise vehicle on hoist.
2) Disconnect right rear axle from transmission and wire
aside. Cover exposed CV joint with plastic bag to prevent entry of
dirt or other foreign material.
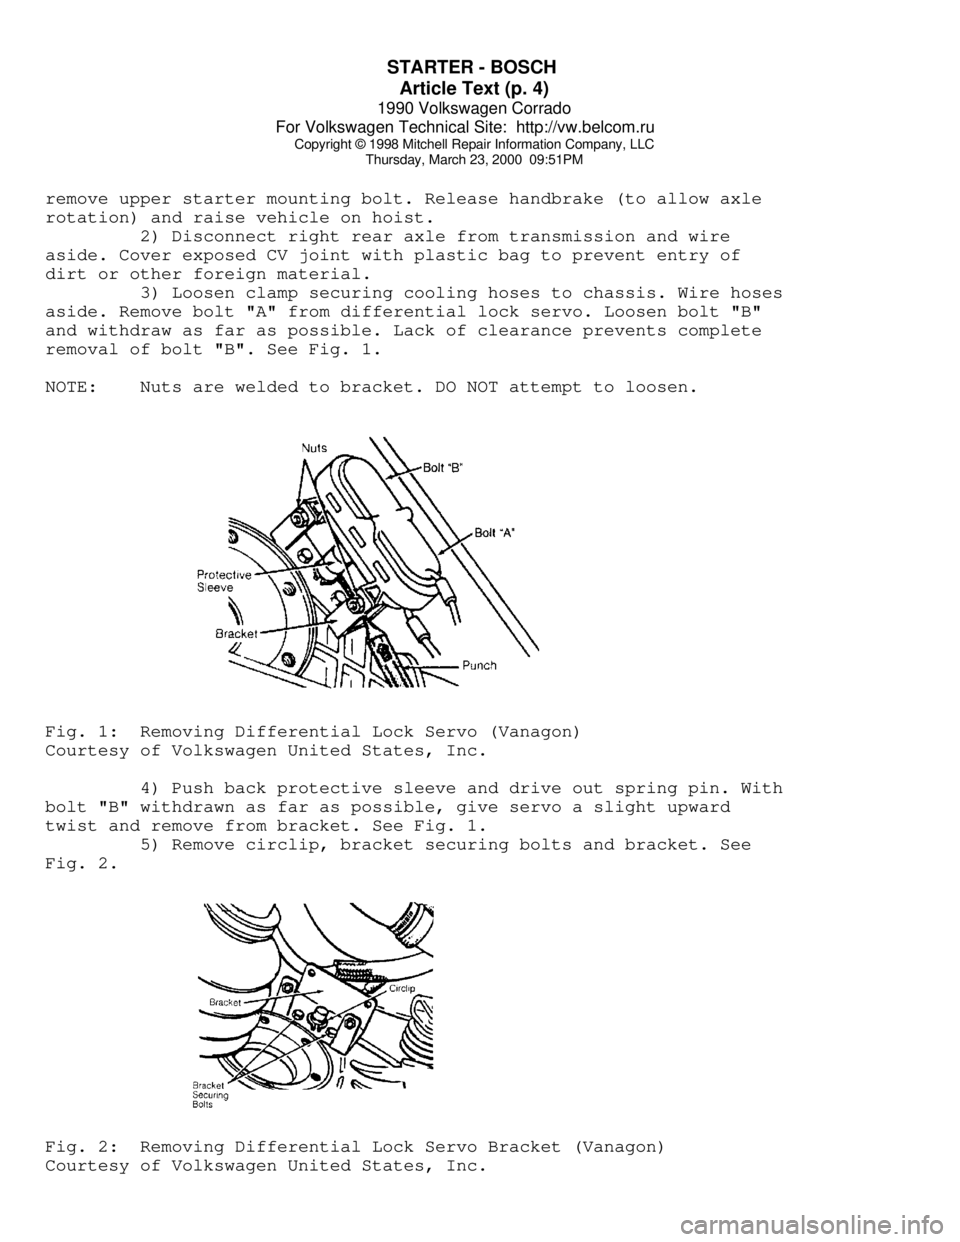
3) Loosen clamp securing cooling hoses to chassis. Wire hoses
aside. Remove bolt "A" from differential lock servo. Loosen bolt "B"
and withdraw as far as possible. Lack of clearance prevents complete
removal of bolt "B". See Fig. 1.
NOTE: Nuts are welded to bracket. DO NOT attempt to loosen.Fig. 1: Removing Differential Lock Servo (Vanagon)
Courtesy of Volkswagen United States, Inc.
4) Push back protective sleeve and drive out spring pin. With
bolt "B" withdrawn as far as possible, give servo a slight upward
twist and remove from bracket. See Fig. 1.
5) Remove circlip, bracket securing bolts and bracket. See
Fig. 2.Fig. 2: Removing Differential Lock Servo Bracket (Vanagon)
Courtesy of Volkswagen United States, Inc.
Page 732 of 906
STARTER - BOSCH
Article Text (p. 5)
1990 Volkswagen Corrado
For Volkswagen Technical Site: http://vw.belcom.ru
Copyright © 1998 Mitchell Repair Information Company, LLC
Thursday, March 23, 2000 09:51PM
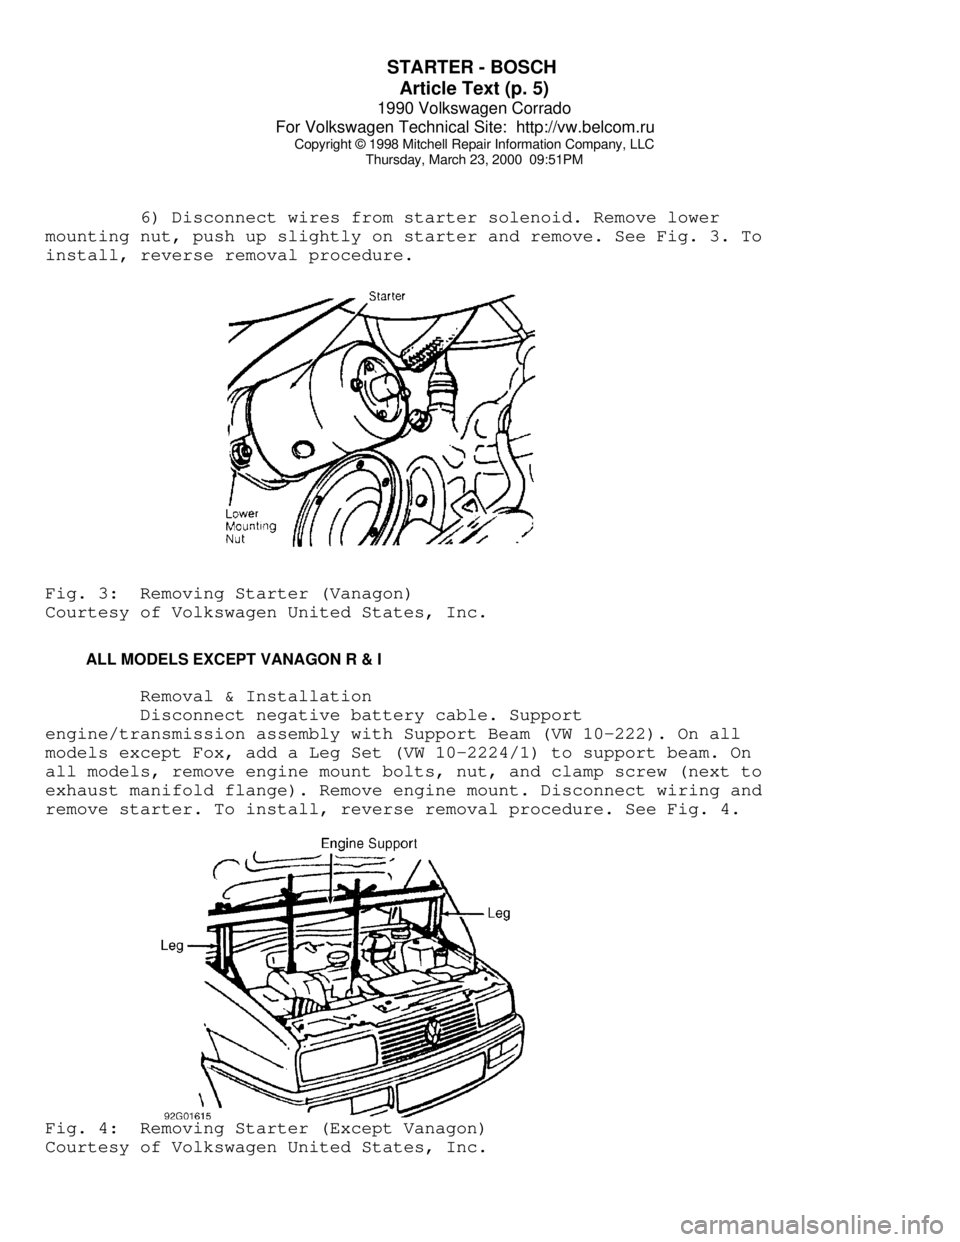
6) Disconnect wires from starter solenoid. Remove lower
mounting nut, push up slightly on starter and remove. See Fig. 3. To
install, reverse removal procedure.Fig. 3: Removing Starter (Vanagon)
Courtesy of Volkswagen United States, Inc.
ALL MODELS EXCEPT VANAGON R & I
Removal & Installation
Disconnect negative battery cable. Support
engine/transmission assembly with Support Beam (VW 10-222). On all
models except Fox, add a Leg Set (VW 10-2224/1) to support beam. On
all models, remove engine mount bolts, nut, and clamp screw (next to
exhaust manifold flange). Remove engine mount. Disconnect wiring and
remove starter. To install, reverse removal procedure. See Fig. 4.Fig. 4: Removing Starter (Except Vanagon)
Courtesy of Volkswagen United States, Inc.
Page 751 of 906

STEERING SYSTEM - POWER
Article Text (p. 4)
1990 Volkswagen Corrado
For Volkswagen Technical Site: http://vw.belcom.ru
Copyright © 1998 Mitchell Repair Information Company, LLC
Thursday, March 23, 2000 09:51PM
pinion components. See Fig. 1.
Removal (Cabriolet)
1) Remove pressure line from pump. Drain fluid from pump and
line. Disconnect tie rod ends from steering knuckles. Remove
transmission mount and bracket. Remove exhaust manifold.
2) Remove hydraulic lines from steering gear. Plug openings.
Remove shift linkage from steering gear (if equipped). Remove ground
wire. Disconnect pinion shaft at "U" joint. Remove retaining bolts and
steering gear.
Removal (Corrado)
1) Disconnect return line from pump. Drain fluid from pump
and line. Disconnect tie rod ends from steering knuckles.
2) Remove lock bolt at "U" joint. Remove steering gear
retaining bolts. Disconnect hydraulic lines at steering gear. Plug
openings.
3) Support engine and transmission. Remove subframe bolts.
Remove steering gear.
Removal (Golf, GTI & Jetta)
1) Disconnect return line from pump. Drain fluid from pump
and line. Disconnect tie rod ends from steering knuckles.
2) Remove shift linkage from steering gear (if equipped).
Disconnect pinion shaft at "U" joint. Disconnect hydraulic lines from
steering gear. Plug openings. Remove retaining bolts.
3) Support engine and transmission with Engine Support (10-
222A). Remove left transmission mount bolts. Loosen right transmission
mount bolts. Remove steering gear.
Removal (Passat)
1) Disconnect return line from pump. Drain fluid from pump
and line. Disconnect tie rod ends from steering knuckles.
2) Support engine and transmission with Engine Support (10-
222A and 10-222A/1). Remove steering gear boot. Remove transmission
mount bolts. Lower engine/transmission sufficiently to separate
steering shaft halves.
3) Disconnect hydraulic lines from steering gear. Plug
openings. Remove retaining nuts and steering gear.
Removal (Vanagon)
1) Removal and installation information is not available from
manufacturer.
Installation (All Models)
Reverse removal procedure to install. Tighten nuts and bolts
to specification. See TORQUE SPECIFICATIONS table at end of article.
Fill and bleed hydraulic system. See HYDRAULIC SYSTEM BLEEDING. Check
wheel alignment. See appropriate WHEEL ALIGNMENT SPECIFICATIONS &
PROCEDURES article in the WHEEL ALIGNMENT section:
* WHEEL ALIGNMENT SPECIFICATIONS & PROCEDURES - (1990 - All
Page 755 of 906
SUSPENSION - FRONT
Article Text (p. 3)
1990 Volkswagen Corrado
For Volkswagen Technical Site: http://vw.belcom.ru
Copyright © 1998 Mitchell Repair Information Company, LLC
Thursday, March 23, 2000 09:51PM
REMOVAL & INSTALLATION
HUB & KNUCKLE ASSEMBLY
Use exploded view illustration when removing or installing
hub and knuckle assembly. See Fig. 1 or 2.
LOWER CONTROL ARM & BALL JOINT
Removal
1) Raise and support vehicle. Remove bolt retaining ball
joint at wheel bearing housing. Force ball joint from of housing.
Leave control arm hanging in mounts at subframe.
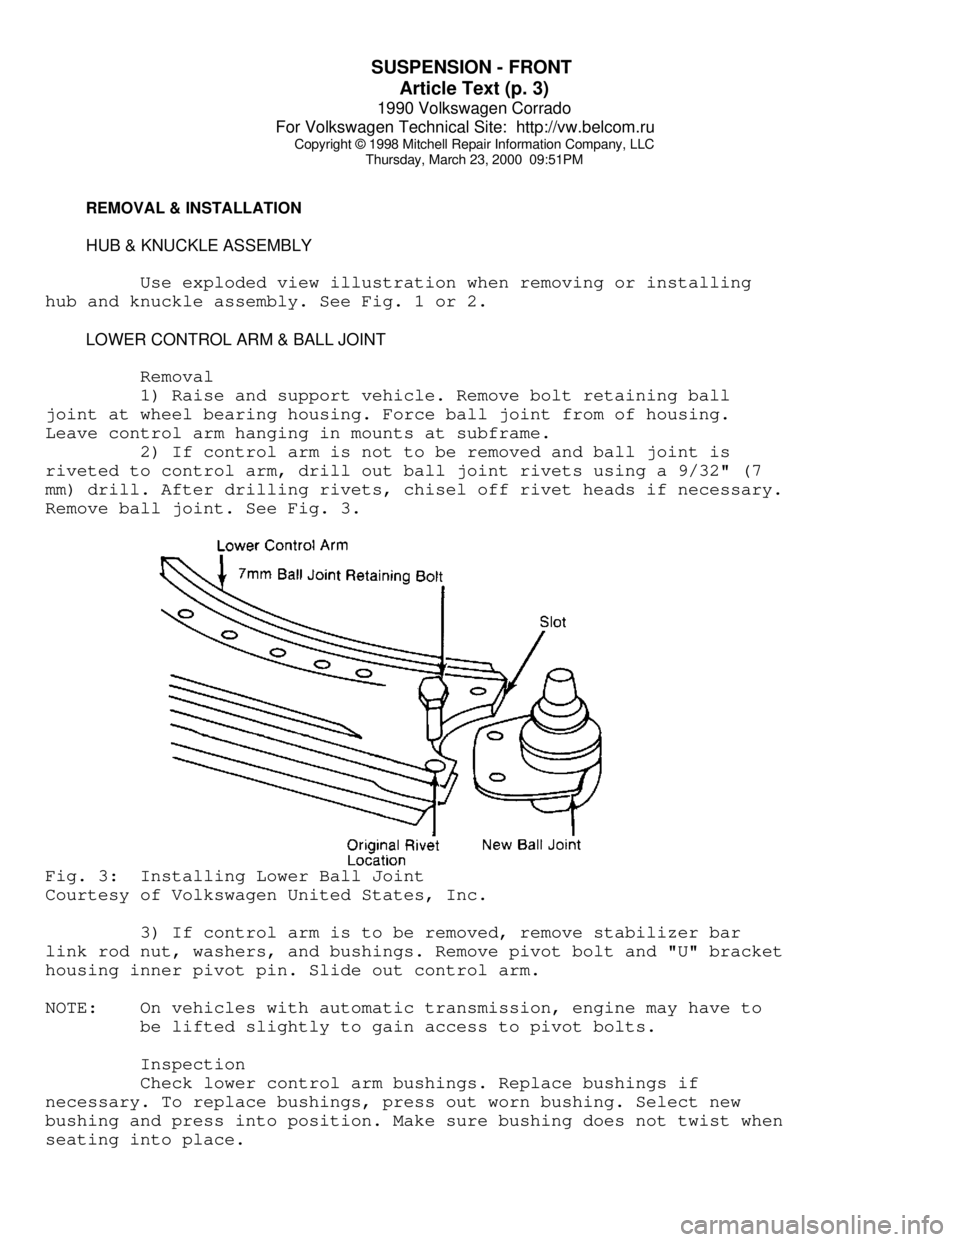
2) If control arm is not to be removed and ball joint is
riveted to control arm, drill out ball joint rivets using a 9/32" (7
mm) drill. After drilling rivets, chisel off rivet heads if necessary.
Remove ball joint. See Fig. 3.Fig. 3: Installing Lower Ball Joint
Courtesy of Volkswagen United States, Inc.
3) If control arm is to be removed, remove stabilizer bar
link rod nut, washers, and bushings. Remove pivot bolt and "U" bracket
housing inner pivot pin. Slide out control arm.
NOTE: On vehicles with automatic transmission, engine may have to
be lifted slightly to gain access to pivot bolts.
Inspection
Check lower control arm bushings. Replace bushings if
necessary. To replace bushings, press out worn bushing. Select new
bushing and press into position. Make sure bushing does not twist when
seating into place.