VOLKSWAGEN PASSAT 1995 B3, B4 / 3.G Service Workshop Manual
PASSAT 1995 B3, B4 / 3.G
VOLKSWAGEN
VOLKSWAGEN
https://www.carmanualsonline.info/img/18/7419/w960_7419-0.png
VOLKSWAGEN PASSAT 1995 B3, B4 / 3.G Service Workshop Manual
Trending: Compartment, clock setting, drain bolt, weight, gas type, wiring, fuel pressure
Page 121 of 369
Downloaded from www.Manualslib.com manuals search engine 42-25
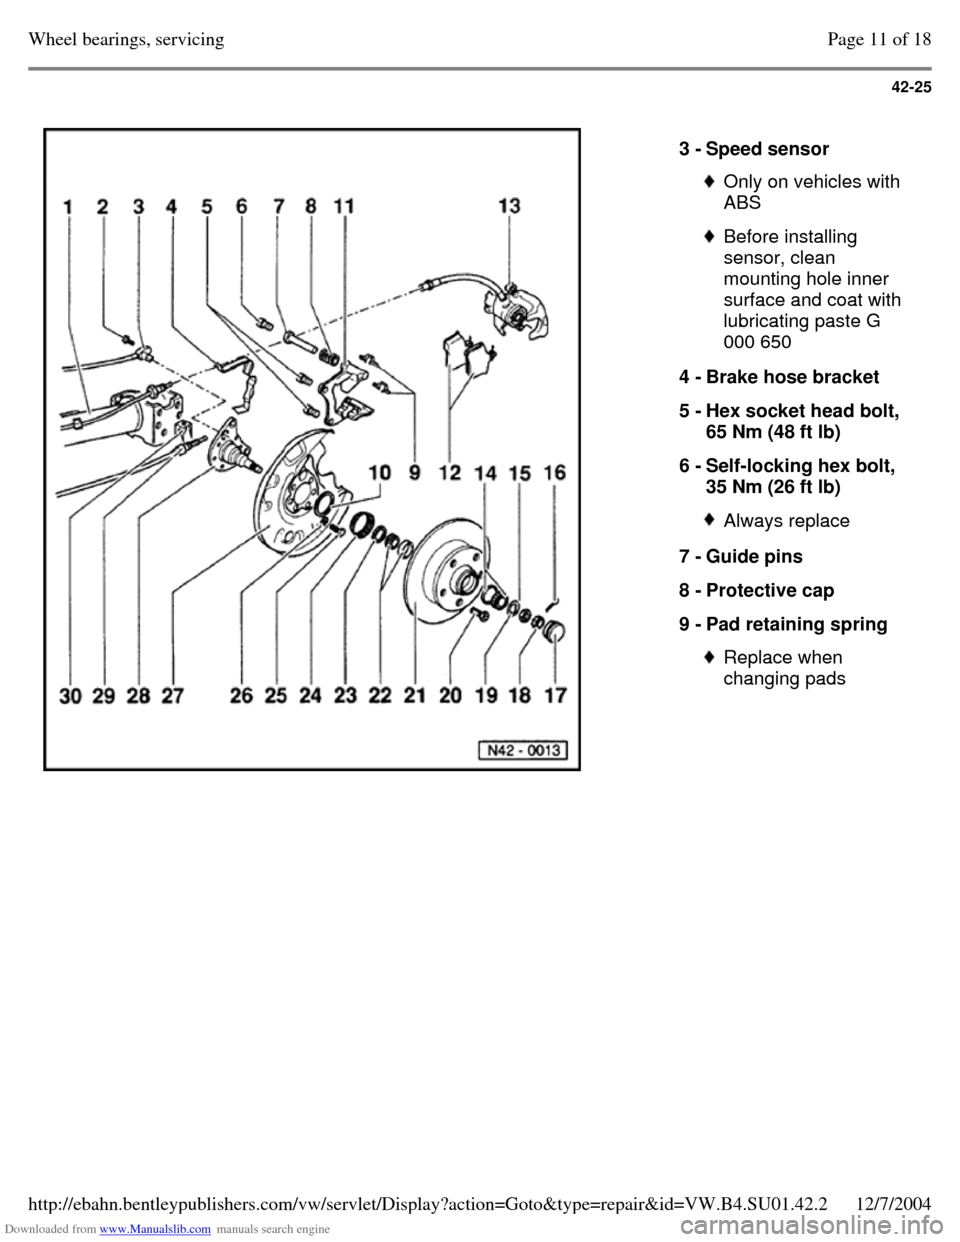
3 - Speed sensor Only on vehicles with
ABS Before installing
sensor, clean
mounting hole inner
surface and coat with
lubricating paste G
000 650
4 - Brake hose bracket
5 - Hex socket head bolt,
65 Nm (48 ft lb)
6 - Self-locking hex bolt,
35 Nm (26 ft lb) Always replace 7 - Guide pins
8 - Protective cap
9 - Pad retaining spring Replace when
changing pads Page 11 of 18Wheel bearings, servicing12/7/2004http://ebahn.bentleypublishers.com/vw/servlet/Display?action=Goto&type=repair&id=VW.B4.SU01.42.2
Page 122 of 369
Downloaded from www.Manualslib.com manuals search engine 42-26
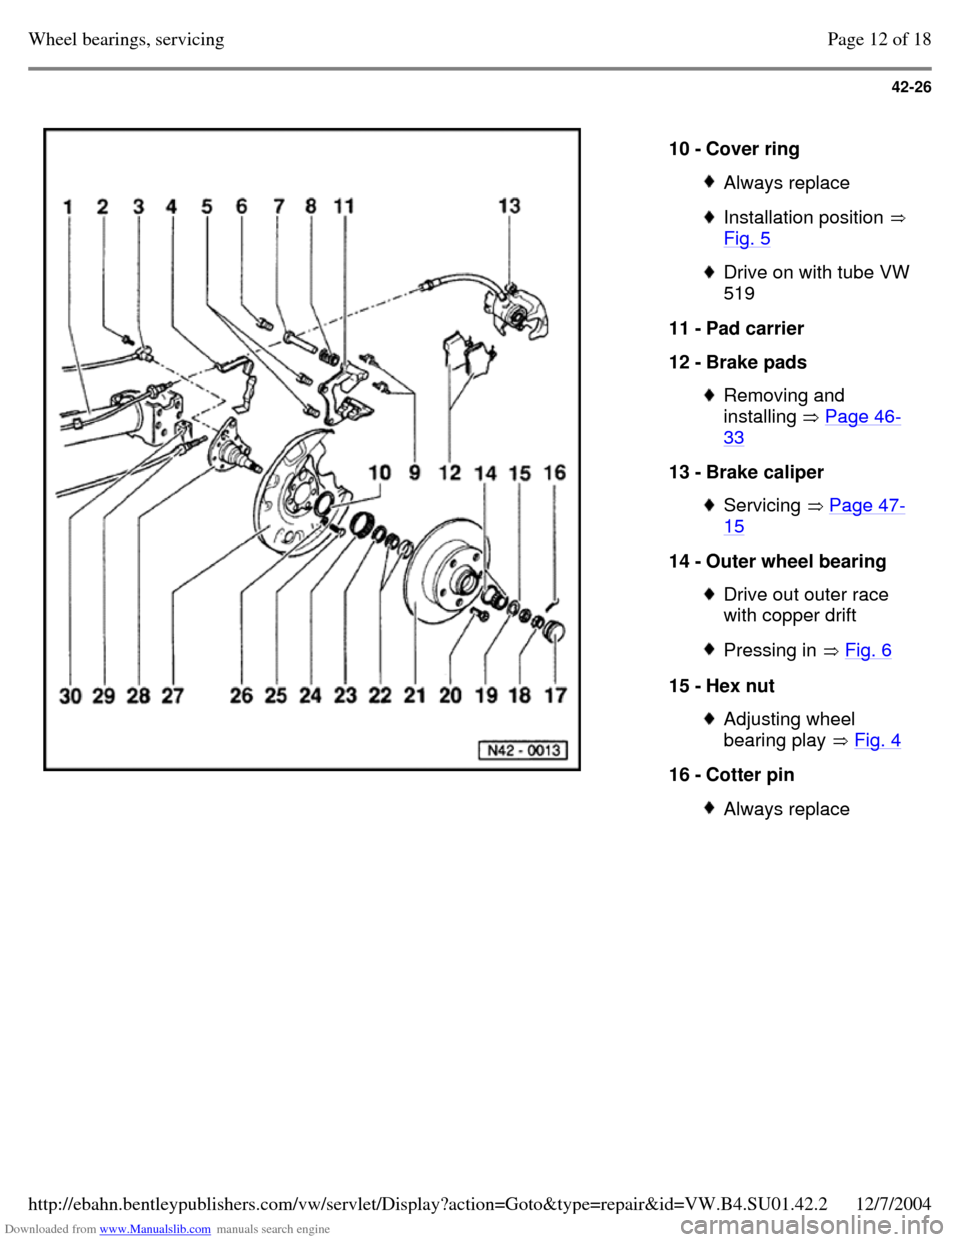
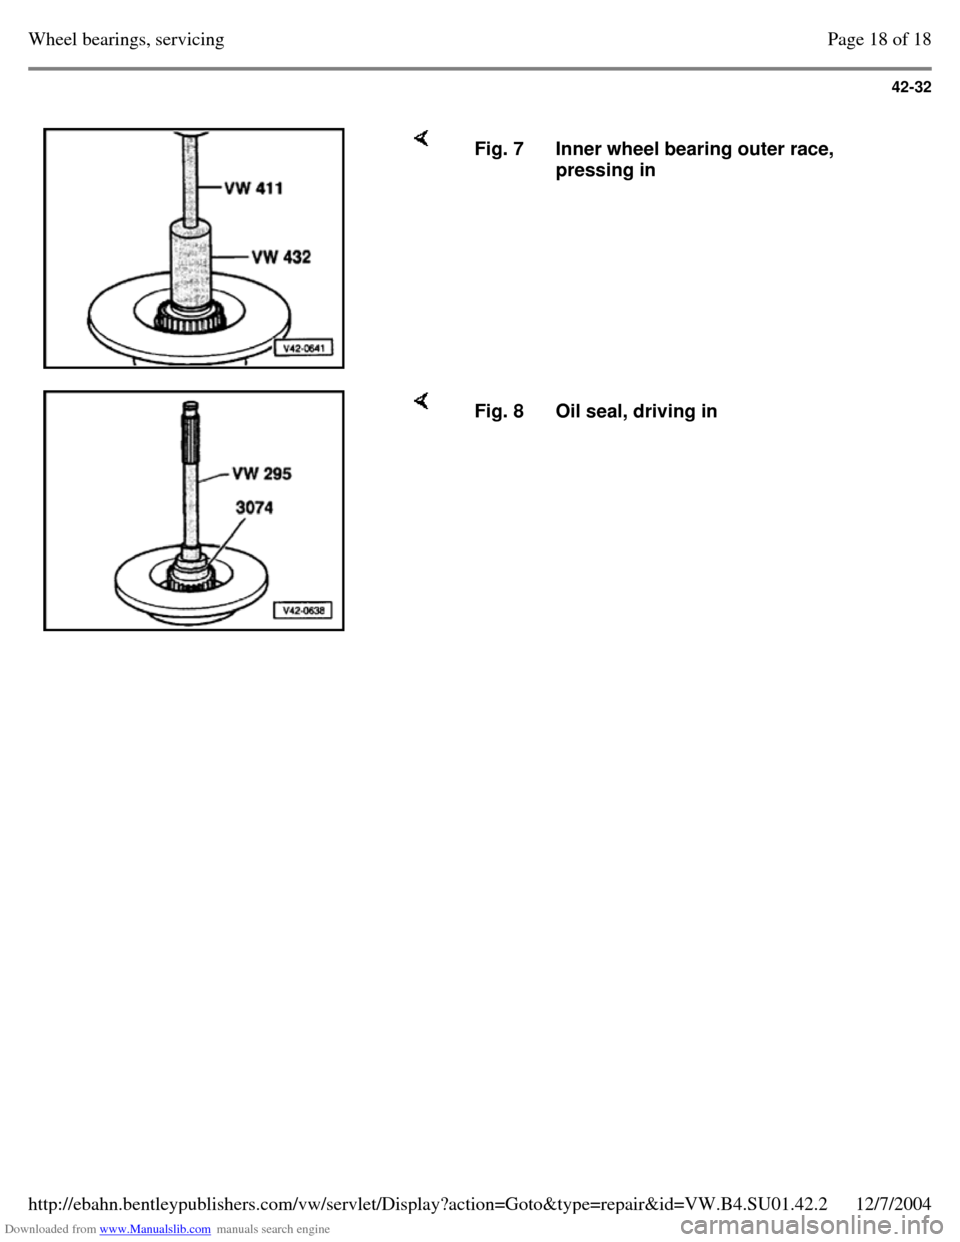
10 - Cover ring Always replace Installation position
Fig. 5 Drive on with tube VW
519
11 - Pad carrier
12 - Brake pads Removing and
installing Page 46-33 13 - Brake caliper Servicing Page 47-15 14 - Outer wheel bearing Drive out outer race
with copper drift Pressing in Fig. 6 15 - Hex nut Adjusting wheel
bearing play Fig. 4 16 - Cotter pin Always replace Page 12 of 18Wheel bearings, servicing12/7/2004http://ebahn.bentleypublishers.com/vw/servlet/Display?action=Goto&type=repair&id=VW.B4.SU01.42.2
Page 123 of 369
Downloaded from www.Manualslib.com manuals search engine 42-27
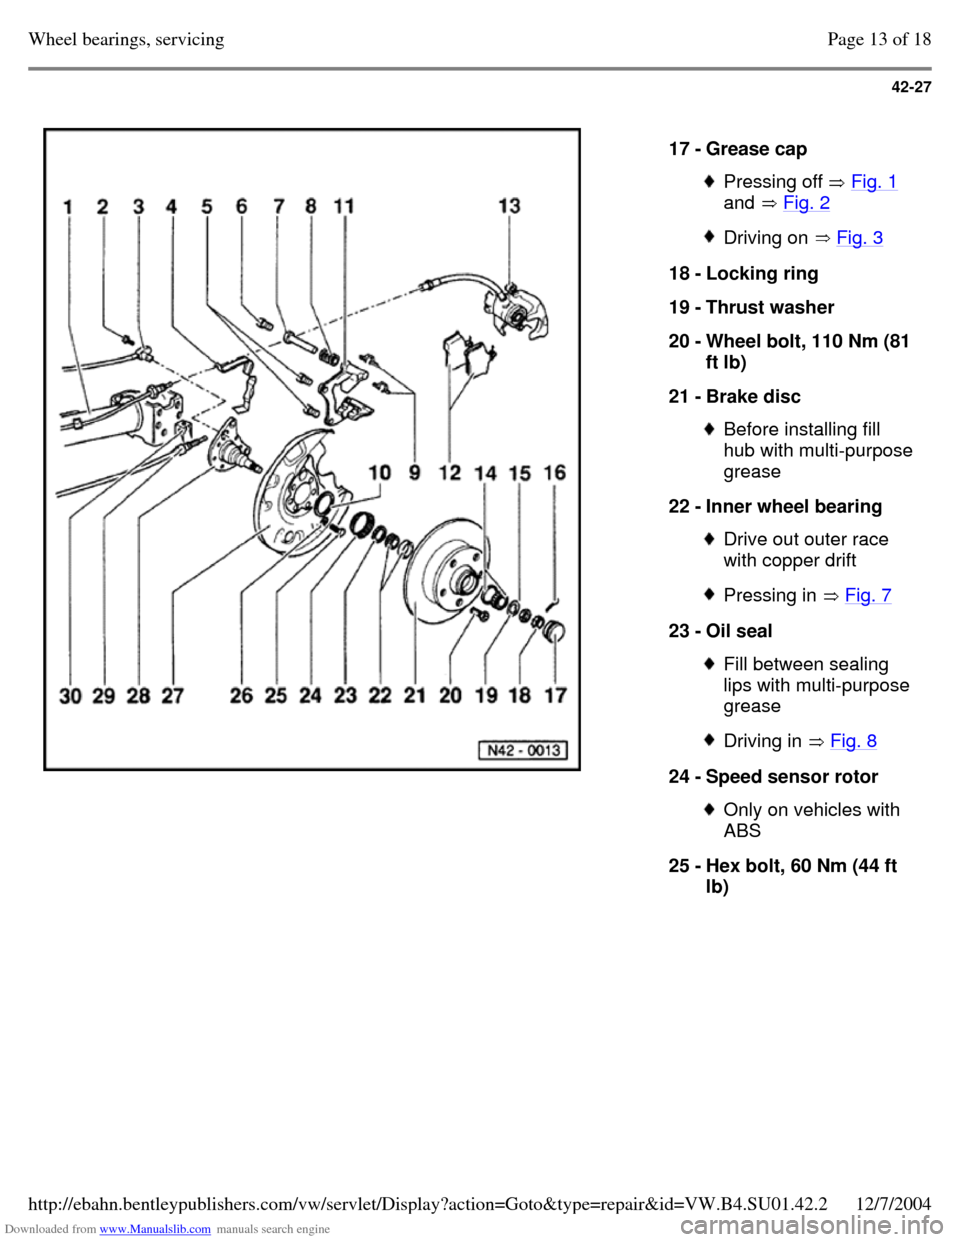
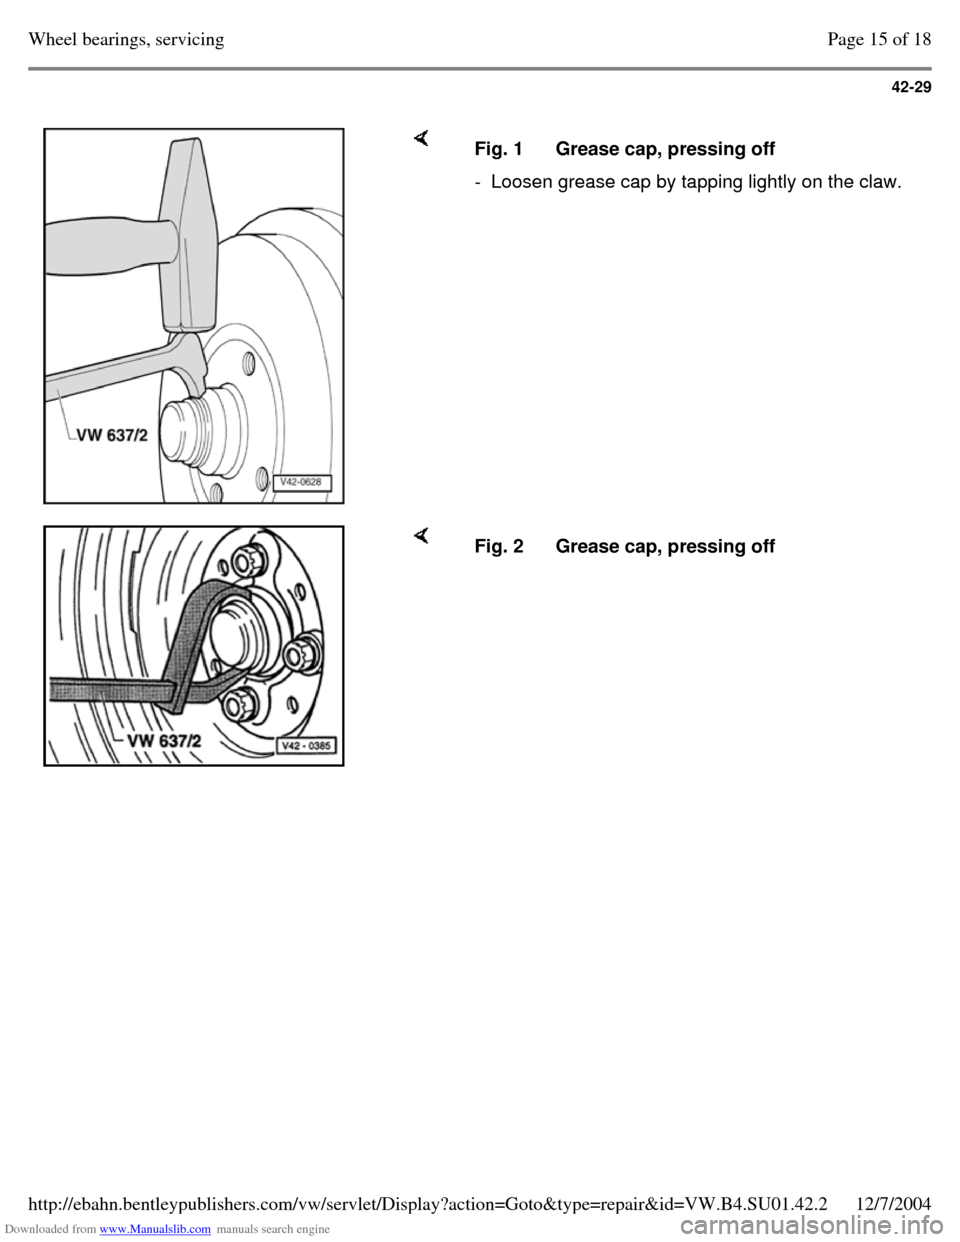
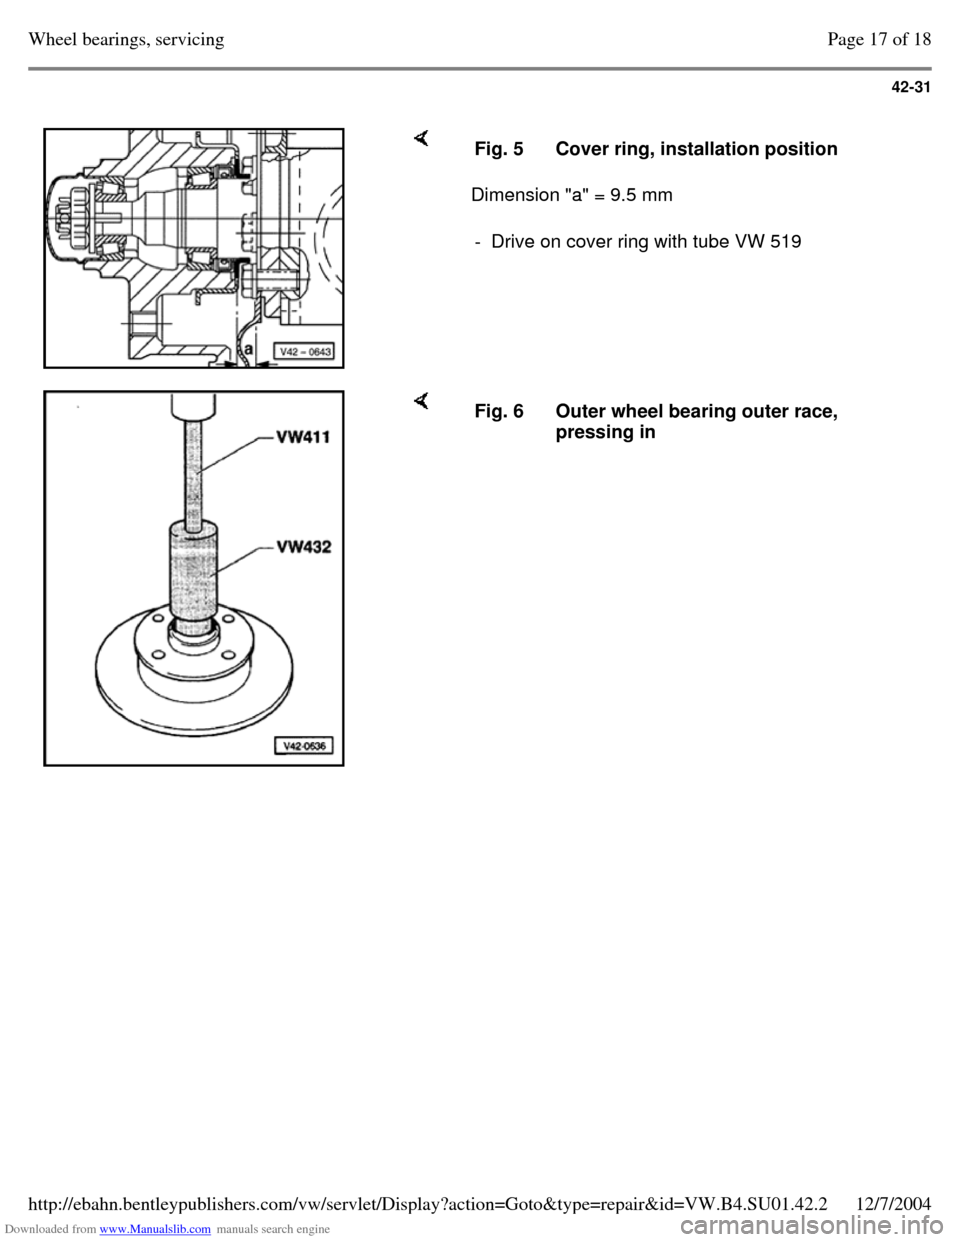
17 - Grease cap Pressing off Fig. 1
and Fig. 2 Driving on Fig. 3 18 - Locking ring
19 - Thrust washer
20 - Wheel bolt, 110 Nm (81
ft lb)
21 - Brake disc Before installing fill
hub with multi-purpose grease
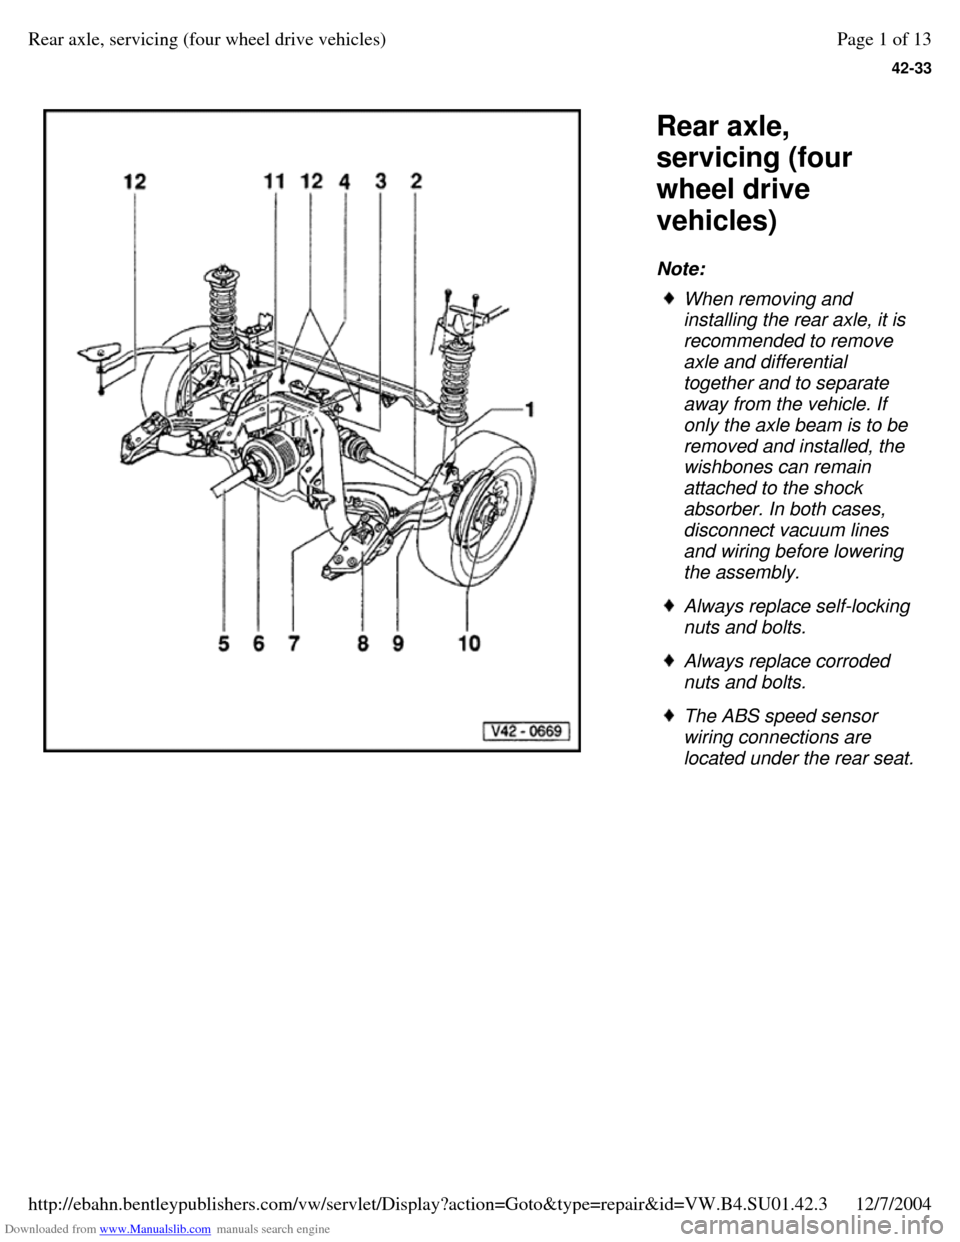
22 - Inner wheel bearing Drive out outer race
with copper drift Pressing in Fig. 7 23 - Oil seal Fill between sealing
lips with multi-purpose
grease Driving in Fig. 8 24 - Speed sensor rotor Only on vehicles with
ABS
25 - Hex bolt, 60 Nm (44 ft
lb) Page 13 of 18Wheel bearings, servicing12/7/2004http://ebahn.bentleypublishers.com/vw/servlet/Display?action=Goto&type=repair&id=VW.B4.SU01.42.2
Page 124 of 369
Downloaded from www.Manualslib.com manuals search engine 42-28
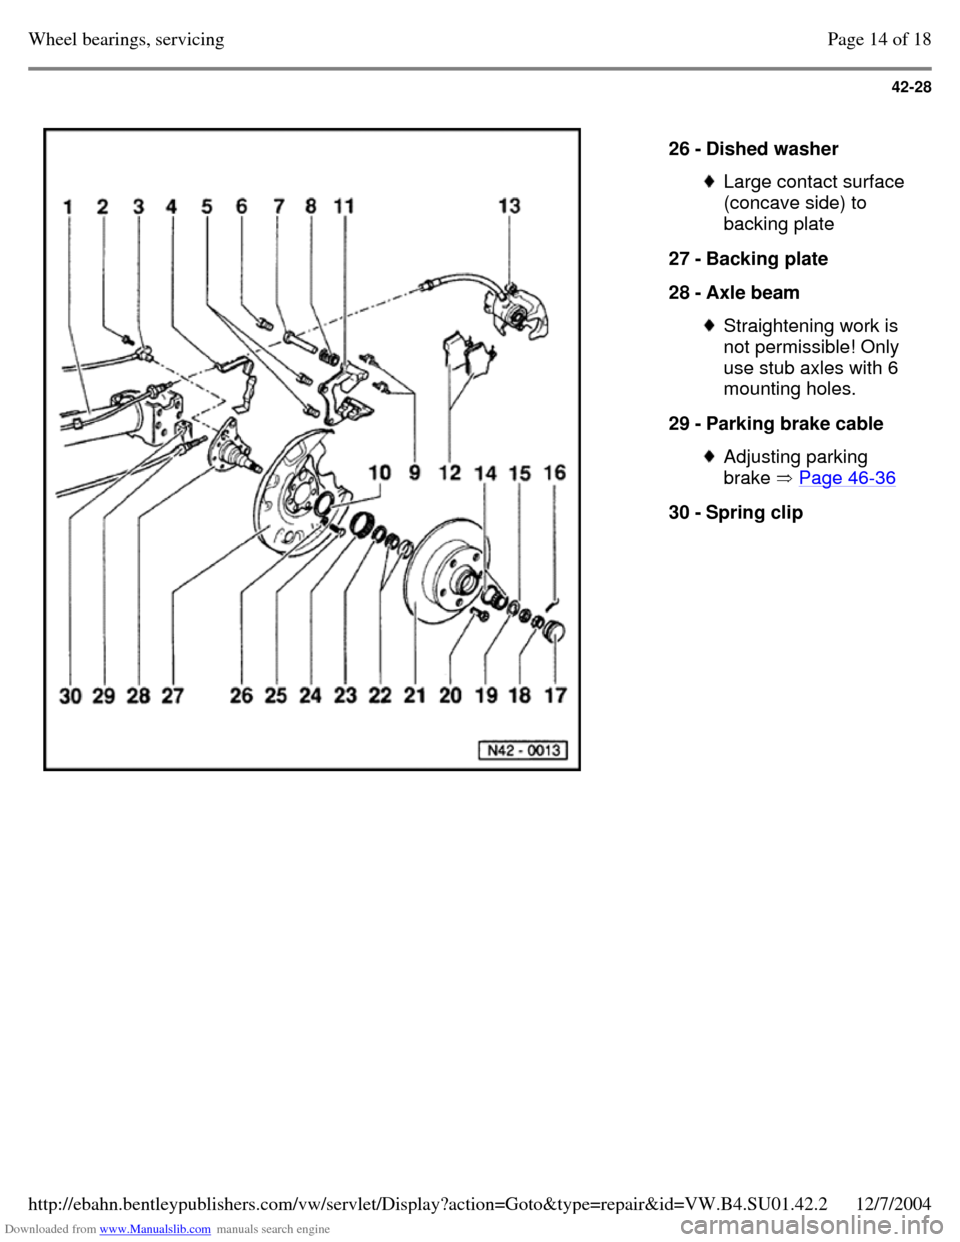
26 - Dished washer Large contact surface
(concave side) to
backing plate
27 - Backing plate
28 - Axle beam Straightening work is
not permissible! Only
use stub axles with 6
mounting holes.
29 - Parking brake cable Adjusting parking
brake Page 46-36 30 - Spring clip Page 14 of 18Wheel bearings, servicing12/7/2004http://ebahn.bentleypublishers.com/vw/servlet/Display?action=Goto&type=repair&id=VW.B4.SU01.42.2
Page 125 of 369
Downloaded from www.Manualslib.com manuals search engine 42-29
Fig. 1 Grease cap, pressing off - Loosen grease cap by tapping lightly on the claw. Fig. 2 Grease cap, pressing off Page 15 of 18Wheel bearings, servicing12/7/2004http://ebahn.bentleypublishers.com/vw/servlet/Display?action=Goto&type=repair&id=VW.B4.SU01.42.2
Page 126 of 369
Downloaded from www.Manualslib.com manuals search engine 42-30
Note: Fig. 3 Grease cap, driving on Always replace damaged (dented) grease caps. Damaged (dented) grease caps allow ingress of
moisture, therefore always use the illustrated tool. Note:
Using a screwdriver it must be possible to move the
thrust washer by finger pressure (without prying). Fig. 4 Wheel bearing play, adjusting - Secure with locking ring and new cotter pin. Page 16 of 18Wheel bearings, servicing12/7/2004http://ebahn.bentleypublishers.com/vw/servlet/Display?action=Goto&type=repair&id=VW.B4.SU01.42.2
Page 127 of 369
Downloaded from www.Manualslib.com manuals search engine 42-31
Dimension "a" = 9.5 mm Fig. 5 Cover ring, installation position - Drive on cover ring with tube VW 519 Fig. 6 Outer wheel bearing outer race,
pressing in Page 17 of 18Wheel bearings, servicing12/7/2004http://ebahn.bentleypublishers.com/vw/servlet/Display?action=Goto&type=repair&id=VW.B4.SU01.42.2
Page 128 of 369
Downloaded from www.Manualslib.com manuals search engine 42-32
Fig. 7 Inner wheel bearing outer race,
pressing in Fig. 8 Oil seal, driving in Page 18 of 18Wheel bearings, servicing12/7/2004http://ebahn.bentleypublishers.com/vw/servlet/Display?action=Goto&type=repair&id=VW.B4.SU01.42.2
Page 129 of 369
Downloaded from www.Manualslib.com manuals search engine 42-33
Rear axle,
servicing (four
wheel drive
vehicles)
Note: When removing and
installing the rear axle, it is
recommended to remove
axle and differential
together and to separate
away from the vehicle. If
only the axle beam is to be
removed and installed, the
wishbones can remain
attached to the shock
absorber. In both cases,
disconnect vacuum lines
and wiring before lowering
the assembly. Always replace self-locking
nuts and bolts. Always replace corroded
nuts and bolts. The ABS speed sensor
wiring connections are
located under the rear seat. Page 1 of 13Rear axle, servicing (four wheel drive vehicles)12/7/2004http://ebahn.bentleypublishers.com/vw/servlet/Display?action=Goto&type=repair&id=VW.B4.SU01.42.3
Page 130 of 369
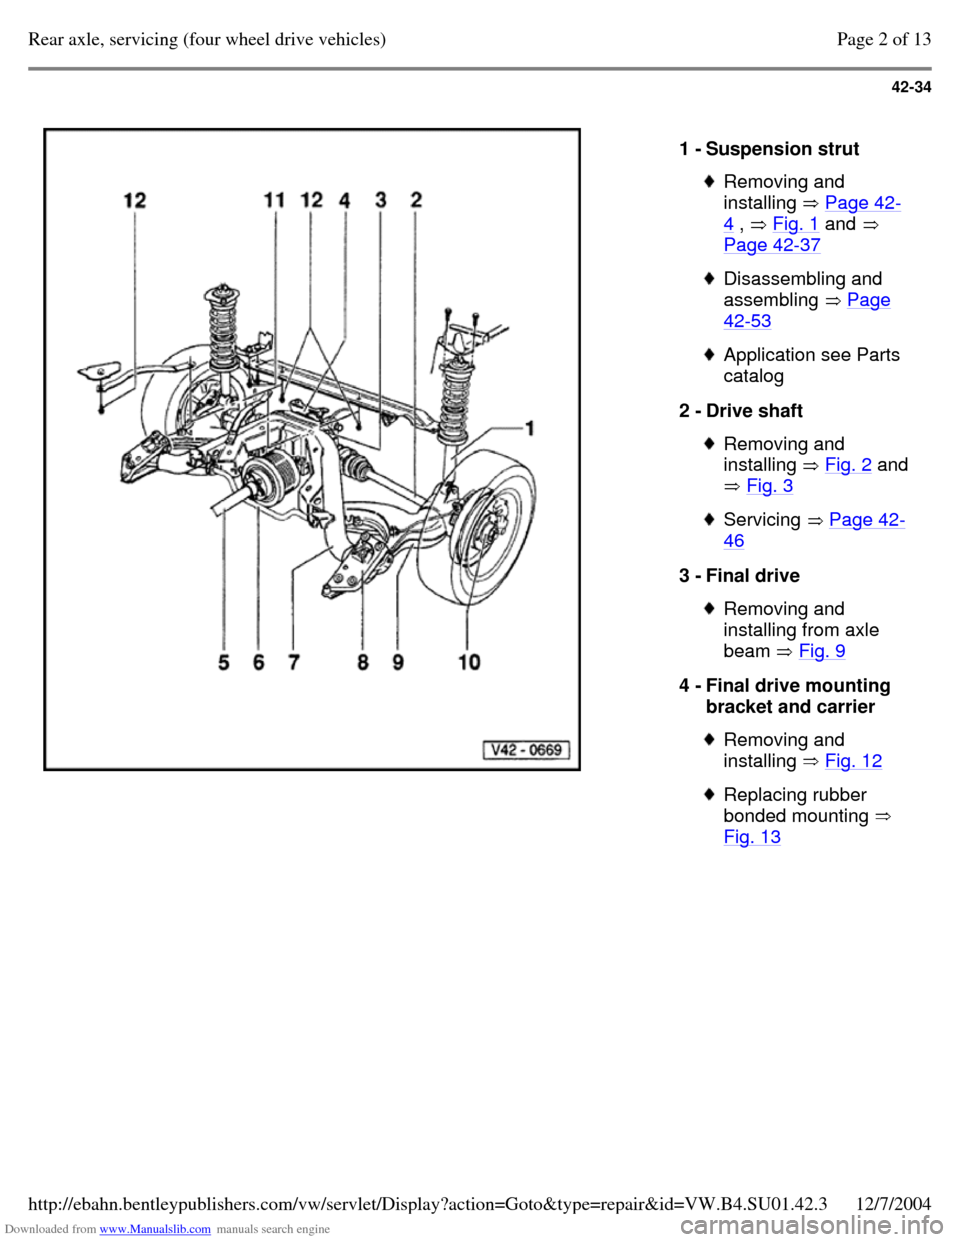
Downloaded from www.Manualslib.com manuals search engine 42-34
1 - Suspension strut Removing and
installing Page 42-4 , Fig. 1 and
Page 42-37 Disassembling and
assembling Page 42-53 Application see Parts
catalog
2 - Drive shaft Removing and
installing Fig. 2 and
Fig. 3 Servicing Page 42-46 3 - Final drive Removing and
installing from axle
beam Fig. 9 4 - Final drive mounting
bracket and carrier Removing and
installing Fig. 12 Replacing rubber
bonded mounting
Fig. 13 Page 2 of 13Rear axle, servicing (four wheel drive vehicles)12/7/2004http://ebahn.bentleypublishers.com/vw/servlet/Display?action=Goto&type=repair&id=VW.B4.SU01.42.3
Trending: steering wheel, length, light, Compartment, transmission oil, set clock, brakes
