VOLKSWAGEN PASSAT 1996 B3, B4 / 3.G Service Workshop Manual
PASSAT 1996 B3, B4 / 3.G
VOLKSWAGEN
VOLKSWAGEN
https://www.carmanualsonline.info/img/18/7419/w960_7419-0.png
VOLKSWAGEN PASSAT 1996 B3, B4 / 3.G Service Workshop Manual
Trending: clock, horn, air suspension, locking, Power, sensor, drain bolt
Page 331 of 369
Downloaded from www.Manualslib.com manuals search engine 48-61
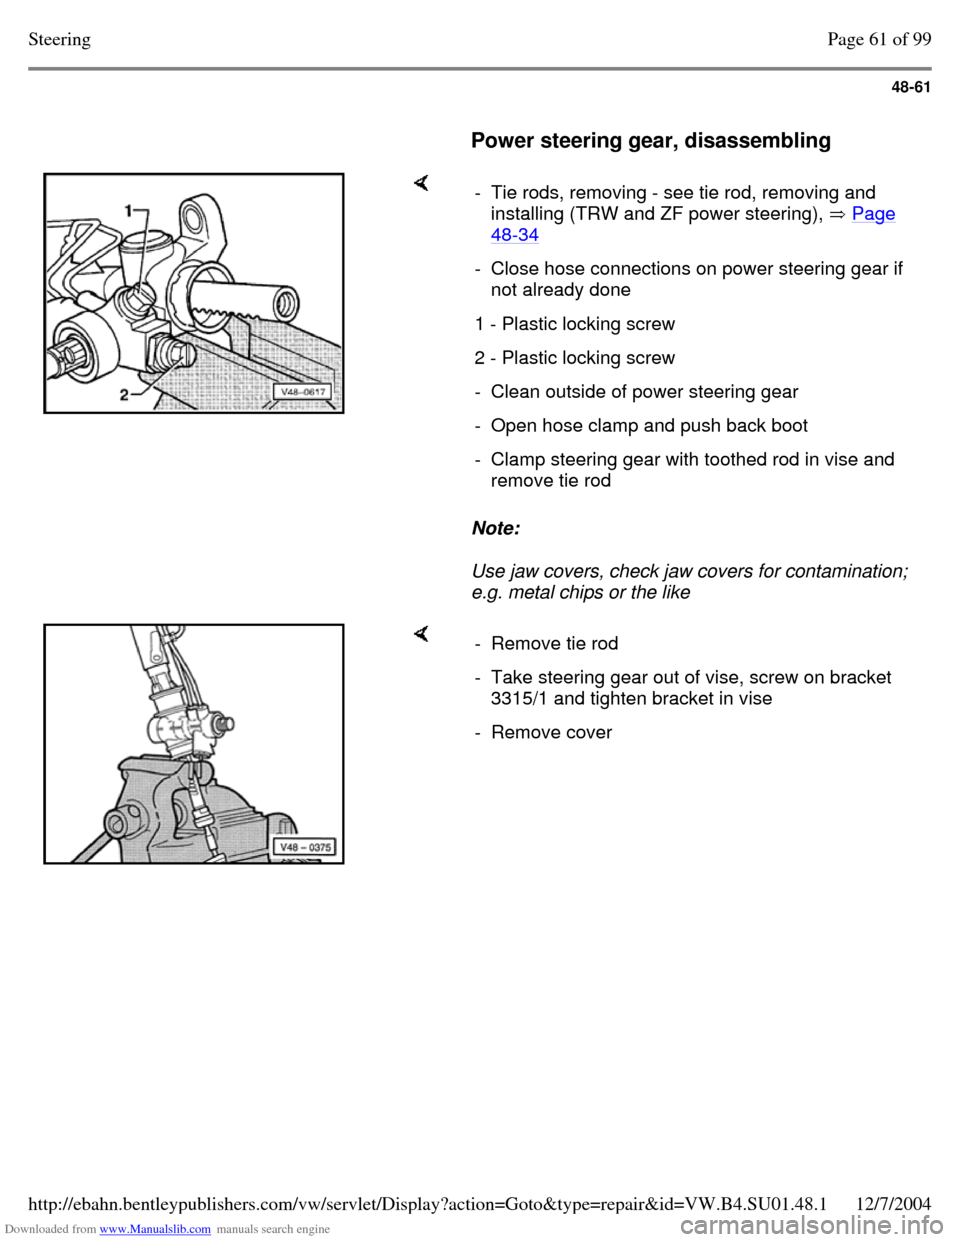
Power steering gear, disassembling Note:
Use jaw covers, check jaw covers for contamination;
e.g. metal chips or the like - Tie rods, removing - see tie rod, removing and
installing (TRW and ZF power steering), Page 48-34 - Close hose connections on power steering gear if
not already done
1 - Plastic locking screw 2 - Plastic locking screw - Clean outside of power steering gear - Open hose clamp and push back boot - Clamp steering gear with toothed rod in vise and
remove tie rod - Remove tie rod - Take steering gear out of vise, screw on bracket
3315/1 and tighten bracket in vise
- Remove cover Page 61 of 99Steering12/7/2004http://ebahn.bentleypublishers.com/vw/servlet/Display?action=Goto&type=repair&id=VW.B4.SU01.48.1
Page 332 of 369
Downloaded from www.Manualslib.com manuals search engine 48-62
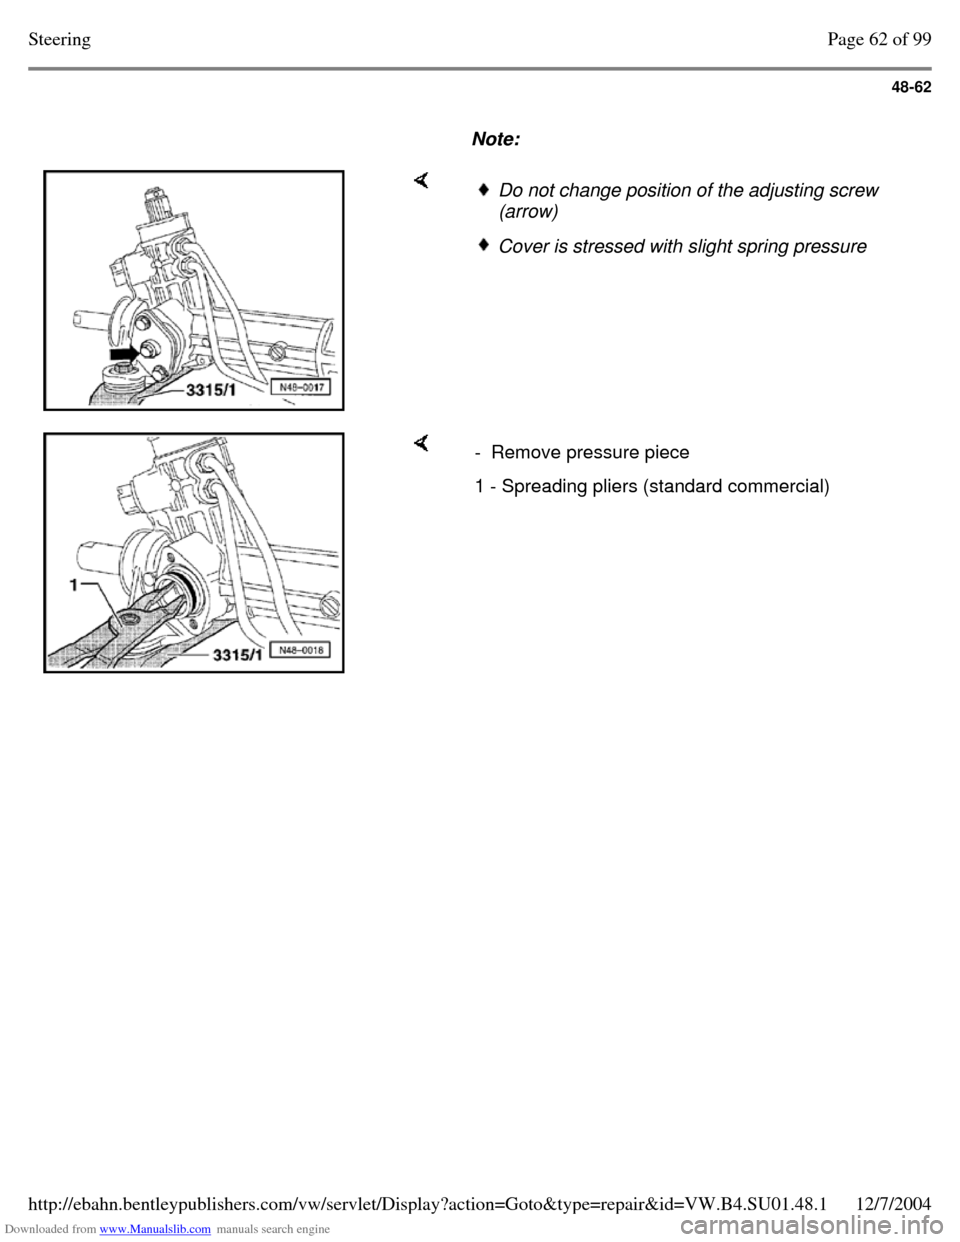
Note: Do not change position of the adjusting screw
(arrow) Cover is stressed with slight spring pressure - Remove pressure piece 1 - Spreading pliers (standard commercial) Page 62 of 99Steering12/7/2004http://ebahn.bentleypublishers.com/vw/servlet/Display?action=Goto&type=repair&id=VW.B4.SU01.48.1
Page 333 of 369
Downloaded from www.Manualslib.com manuals search engine 48-63
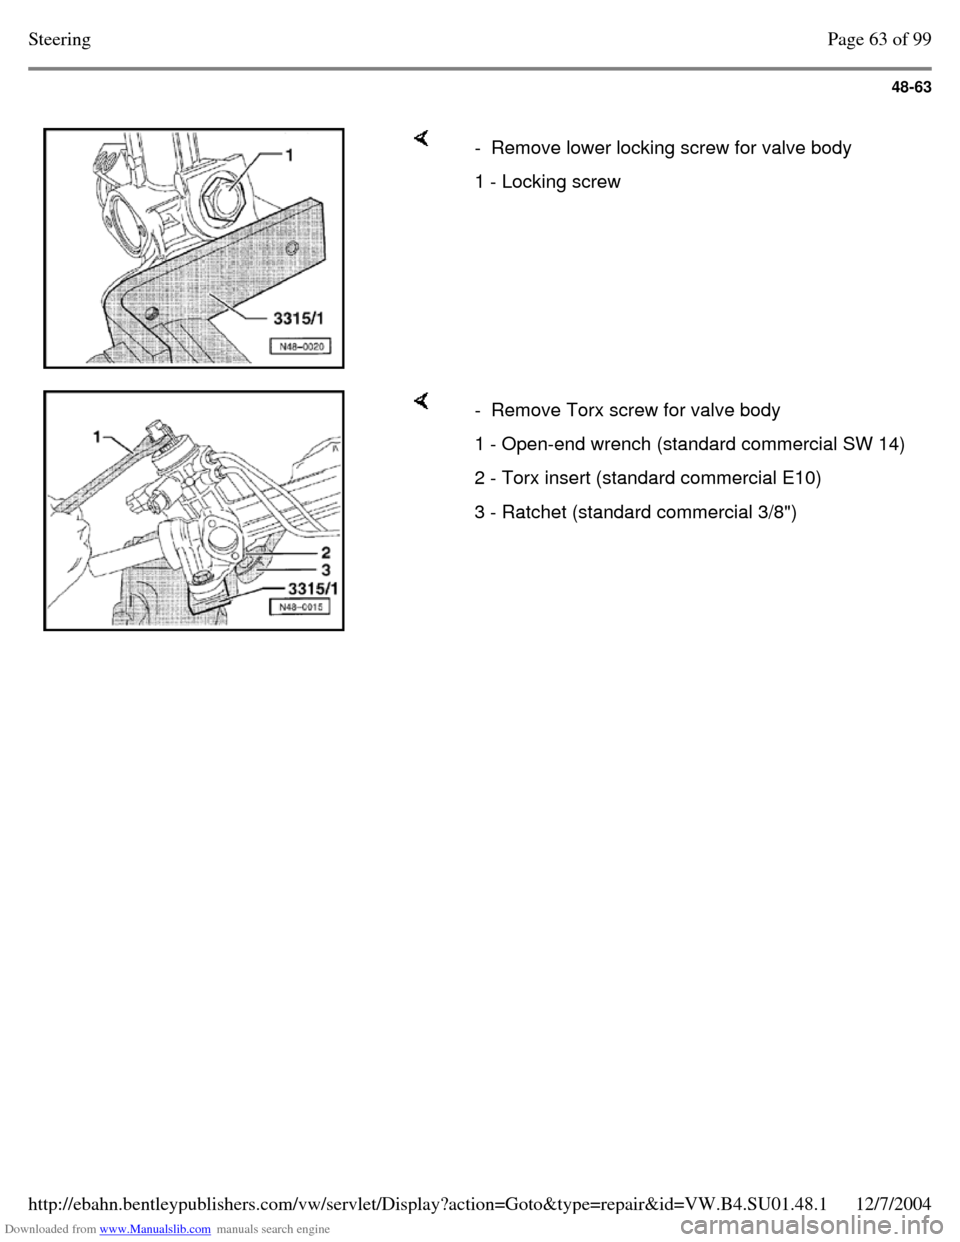
- Remove lower locking screw for valve body 1 - Locking screw - Remove Torx screw for valve body 1 - Open-end wrench (standard commercial SW 14) 2 - Torx insert (standard commercial E10) 3 - Ratchet (standard commercial 3/8") Page 63 of 99Steering12/7/2004http://ebahn.bentleypublishers.com/vw/servlet/Display?action=Goto&type=repair&id=VW.B4.SU01.48.1
Page 334 of 369
Downloaded from www.Manualslib.com manuals search engine 48-64
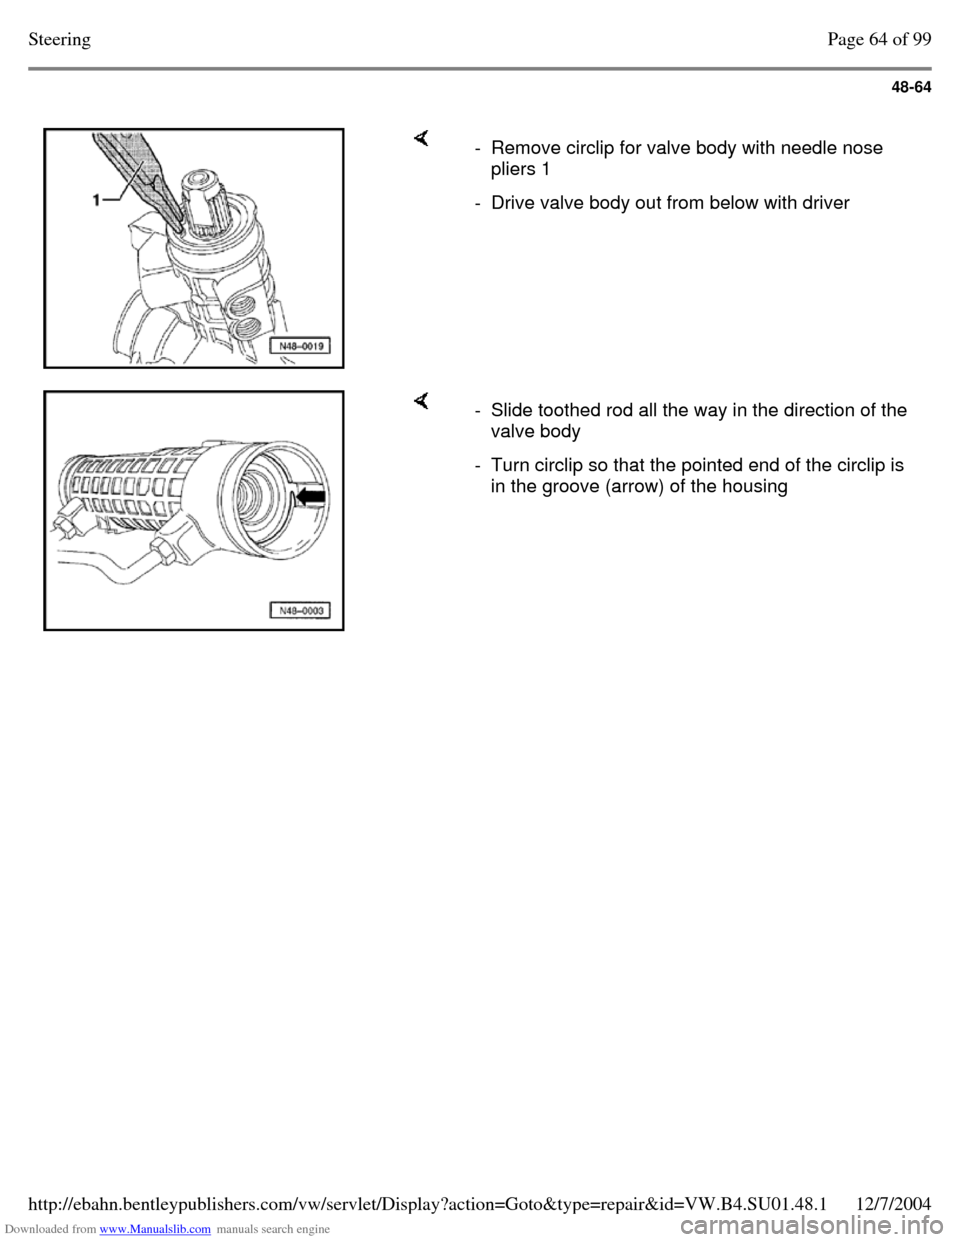
- Remove circlip for valve body with needle nose
pliers 1
- Drive valve body out from below with driver - Slide toothed rod all the way in the direction of the
valve body
- Turn circlip so that the pointed end of the circlip is
in the groove (arrow) of the housing Page 64 of 99Steering12/7/2004http://ebahn.bentleypublishers.com/vw/servlet/Display?action=Goto&type=repair&id=VW.B4.SU01.48.1
Page 335 of 369
Downloaded from www.Manualslib.com manuals search engine 48-65
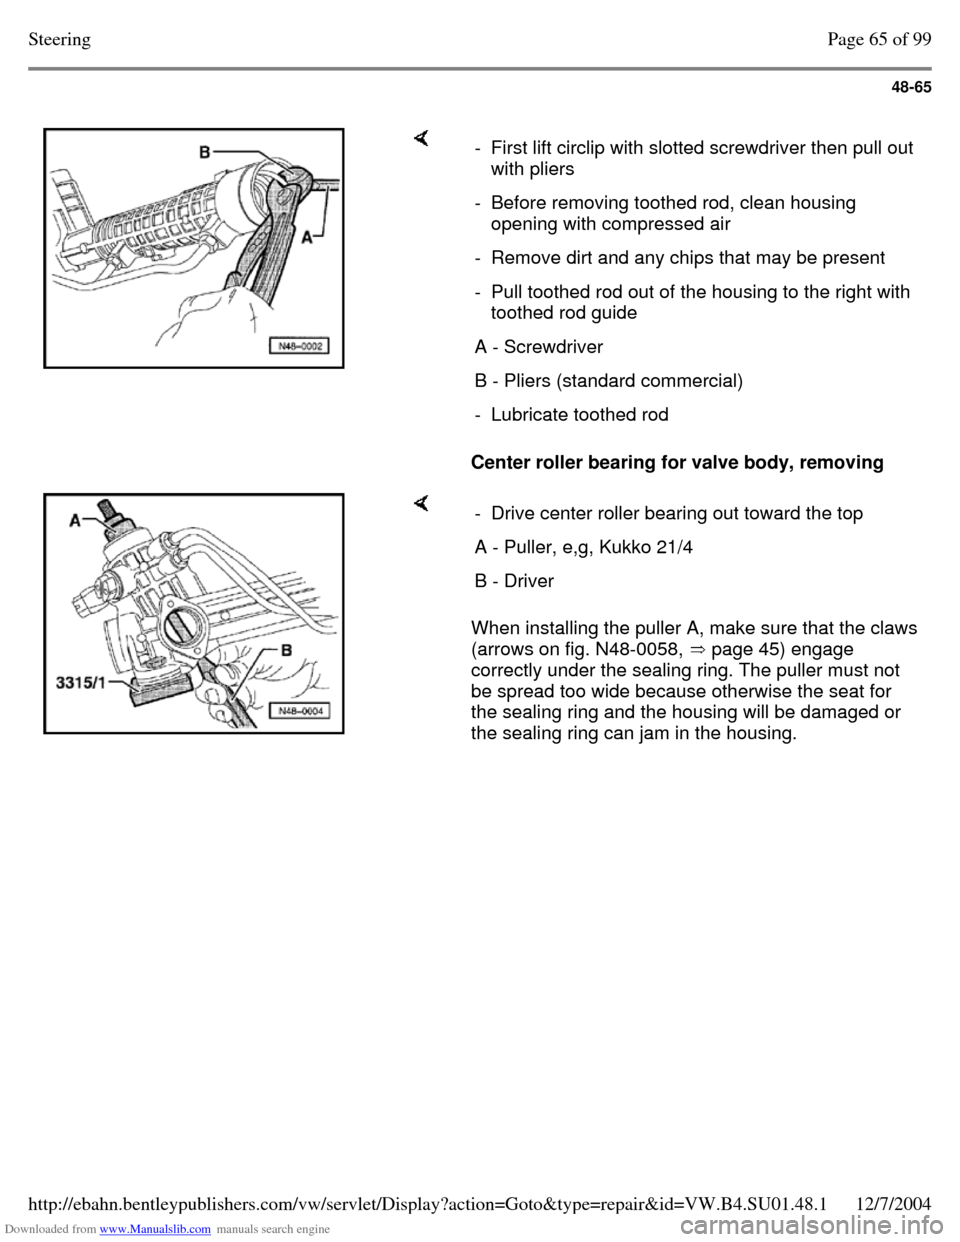
Center roller bearing for valve body, removing - First lift circlip with slotted screwdriver then pull out with pliers
- Before removing toothed rod, clean housing
opening with compressed air
- Remove dirt and any chips that may be present - Pull toothed rod out of the housing to the right with
toothed rod guide
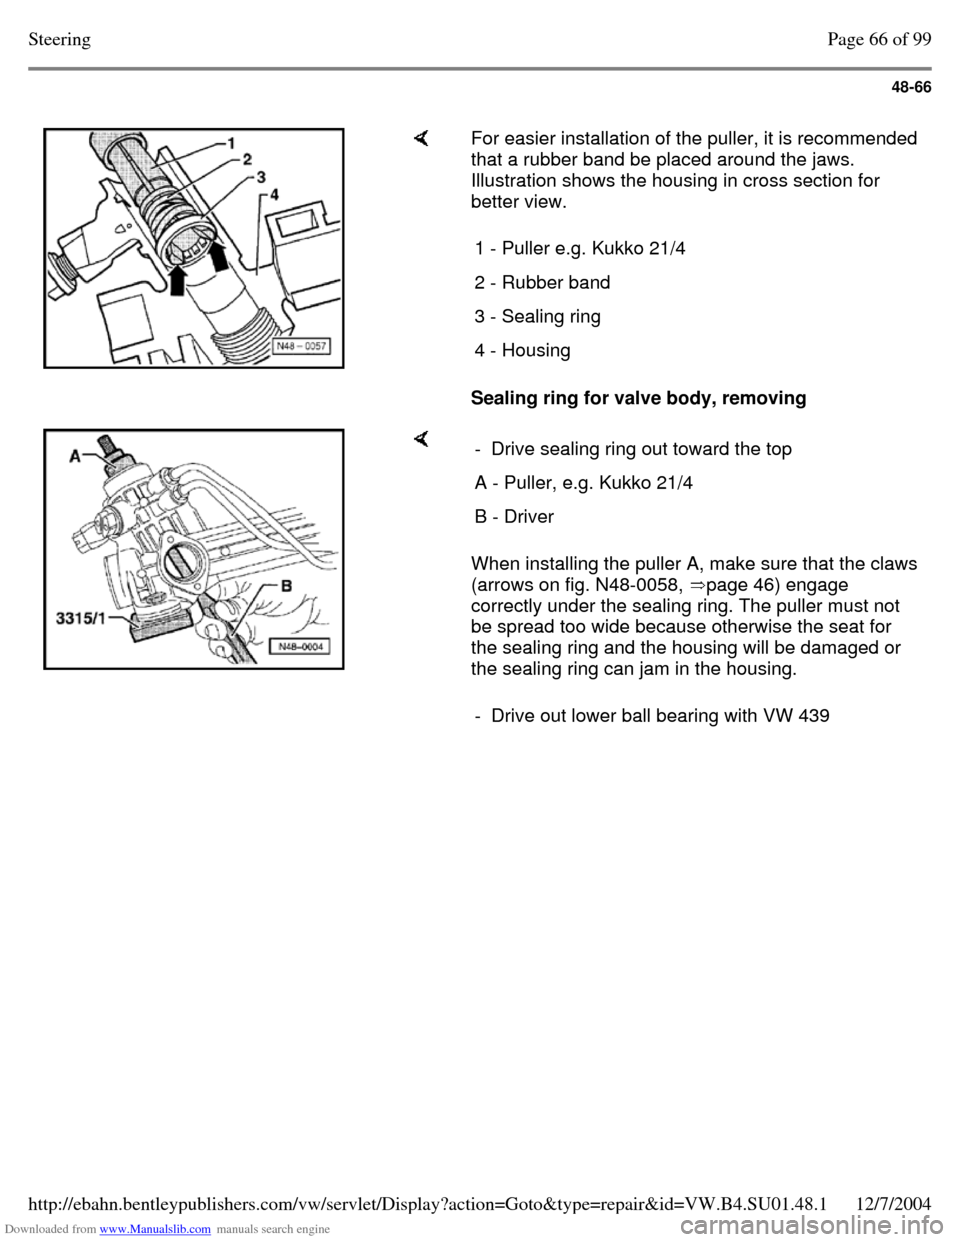
A - Screwdriver B - Pliers (standard commercial) - Lubricate toothed rod When installing the puller A, make sure that the claws
(arrows on fig. N48-0058, page 45) engage
correctly under the sealing ring. The puller must not
be spread too wide because otherwise the seat for
the sealing ring and the housing will be damaged or
the sealing ring can jam in the housing. - Drive center roller bearing out toward the top A - Puller, e,g, Kukko 21/4 B - Driver Page 65 of 99Steering12/7/2004http://ebahn.bentleypublishers.com/vw/servlet/Display?action=Goto&type=repair&id=VW.B4.SU01.48.1
Page 336 of 369
Downloaded from www.Manualslib.com manuals search engine 48-66
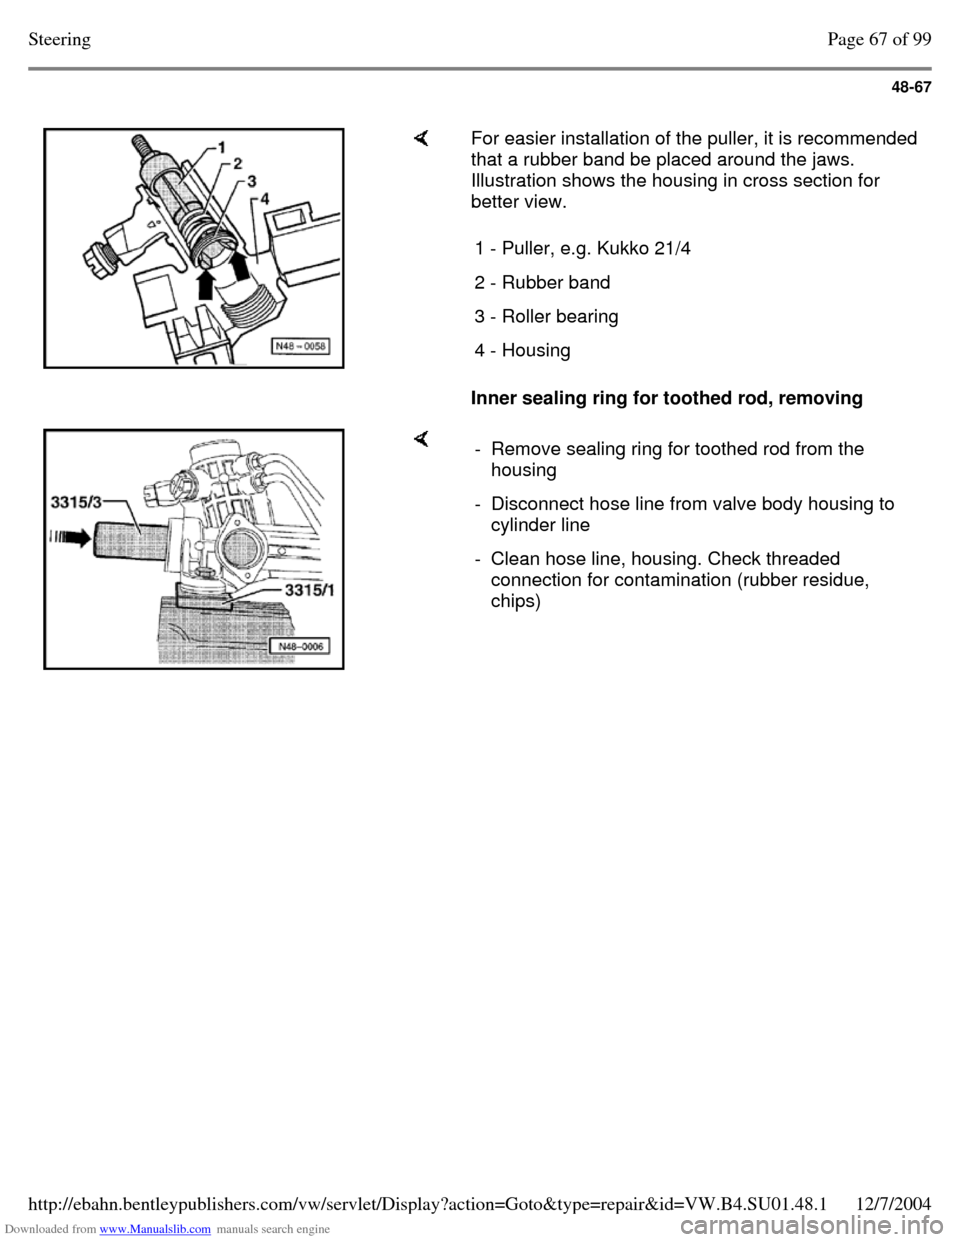
For easier installation of the puller, it is recommended
that a rubber band be placed around the jaws.
Illustration shows the housing in cross section for
better view.
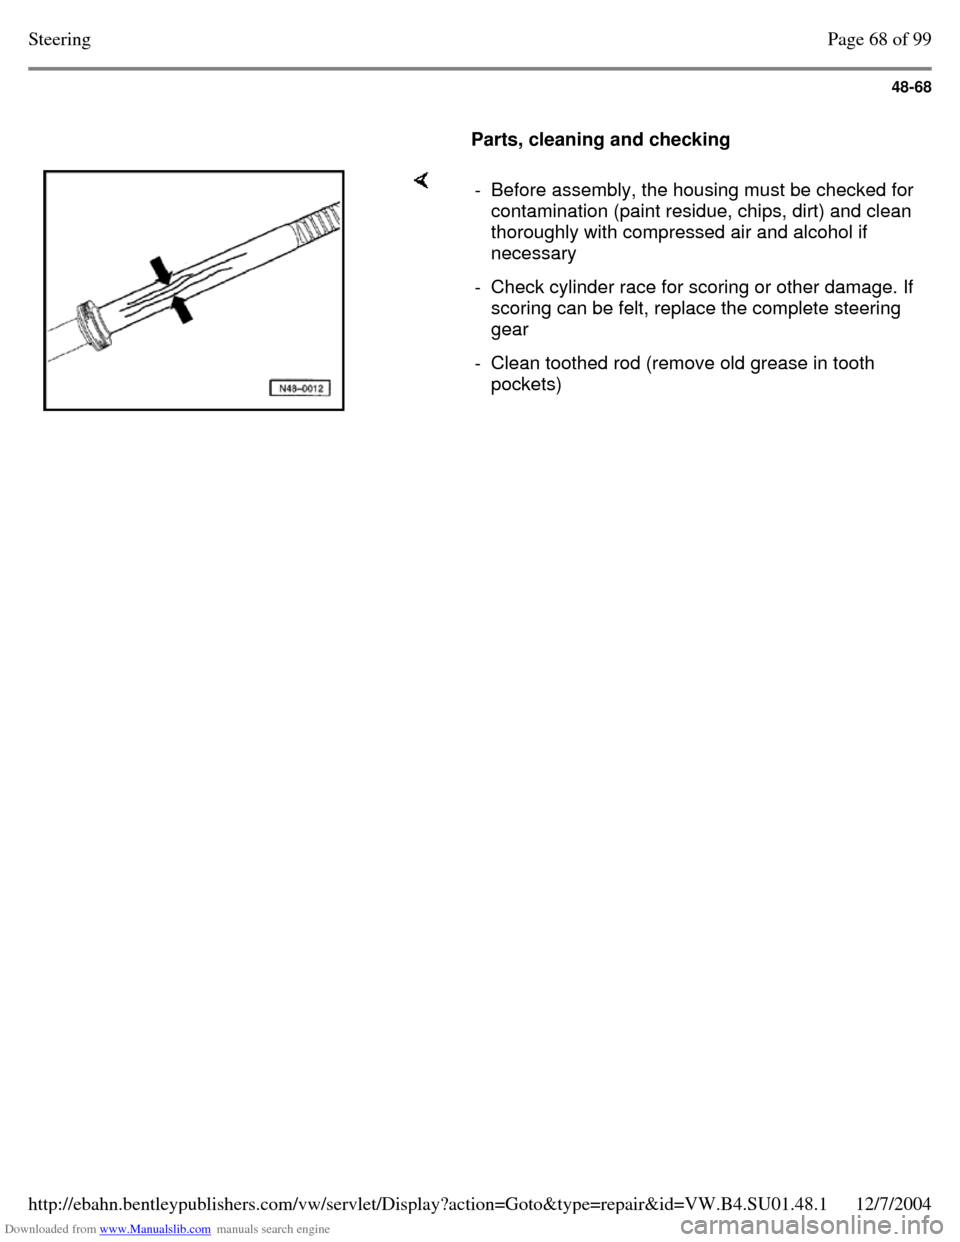
Sealing ring for valve body, removing 1 - Puller e.g. Kukko 21/4 2 - Rubber band 3 - Sealing ring 4 - Housing When installing the puller A, make sure that the claws
(arrows on fig. N48-0058, page 46) engage
correctly under the sealing ring. The puller must not
be spread too wide because otherwise the seat for
the sealing ring and the housing will be damaged or
the sealing ring can jam in the housing. - Drive sealing ring out toward the top A - Puller, e.g. Kukko 21/4 B - Driver - Drive out lower ball bearing with VW 439 Page 66 of 99Steering12/7/2004http://ebahn.bentleypublishers.com/vw/servlet/Display?action=Goto&type=repair&id=VW.B4.SU01.48.1
Page 337 of 369
Downloaded from www.Manualslib.com manuals search engine 48-67
For easier installation of the puller, it is recommended
that a rubber band be placed around the jaws.
Illustration shows the housing in cross section for
better view.
Inner sealing ring for toothed rod, removing 1 - Puller, e.g. Kukko 21/4 2 - Rubber band 3 - Roller bearing 4 - Housing - Remove sealing ring for toothed rod from the
housing
- Disconnect hose line from valve body housing to
cylinder line
- Clean hose line, housing. Check threaded
connection for contamination (rubber residue,
chips) Page 67 of 99Steering12/7/2004http://ebahn.bentleypublishers.com/vw/servlet/Display?action=Goto&type=repair&id=VW.B4.SU01.48.1
Page 338 of 369
Downloaded from www.Manualslib.com manuals search engine 48-68
Parts, cleaning and checking - Before assembly, the housing must be checked for contamination (paint residue, chips, dirt) and clean
thoroughly with compressed air and alcohol if
necessary
- Check cylinder race for scoring or other damage. If scoring can be felt, replace the complete steering
gear
- Clean toothed rod (remove old grease in tooth
pockets) Page 68 of 99Steering12/7/2004http://ebahn.bentleypublishers.com/vw/servlet/Display?action=Goto&type=repair&id=VW.B4.SU01.48.1
Page 339 of 369
Downloaded from www.Manualslib.com manuals search engine 48-69
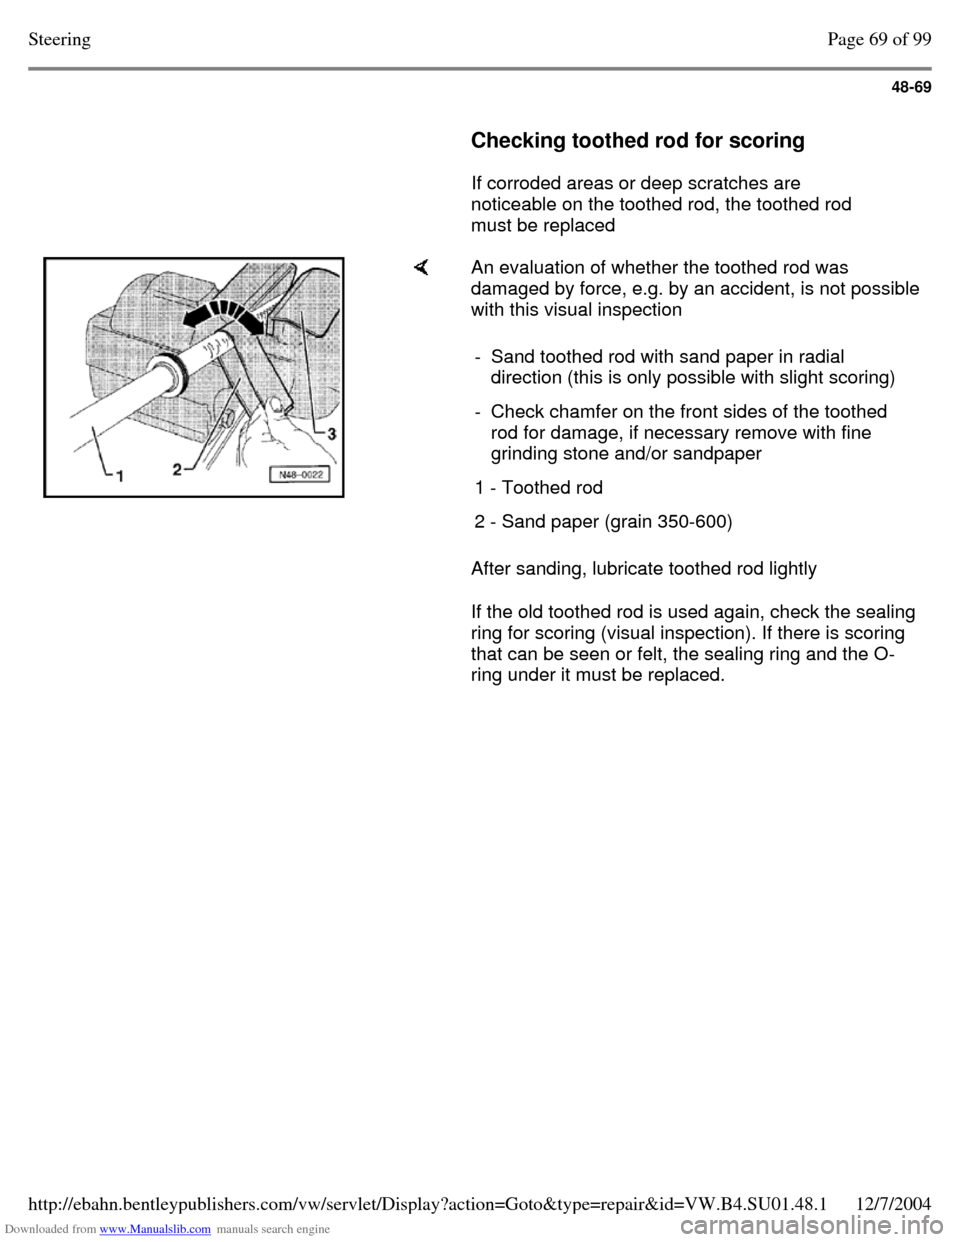
Checking toothed rod for scoring
If corroded areas or deep scratches are
noticeable on the toothed rod, the toothed rod
must be replaced An evaluation of whether the toothed rod was
damaged by force, e.g. by an accident, is not possible
with this visual inspection
After sanding, lubricate toothed rod lightly
If the old toothed rod is used again, check the sealing
ring for scoring (visual inspection). If there is scoring
that can be seen or felt, the sealing ring and the O-
ring under it must be replaced. - Sand toothed rod with sand paper in radial
direction (this is only possible with slight scoring)
- Check chamfer on the front sides of the toothed
rod for damage, if necessary remove with fine
grinding stone and/or sandpaper
1 - Toothed rod 2 - Sand paper (grain 350-600) Page 69 of 99Steering12/7/2004http://ebahn.bentleypublishers.com/vw/servlet/Display?action=Goto&type=repair&id=VW.B4.SU01.48.1
Page 340 of 369
Downloaded from www.Manualslib.com manuals search engine 48-70
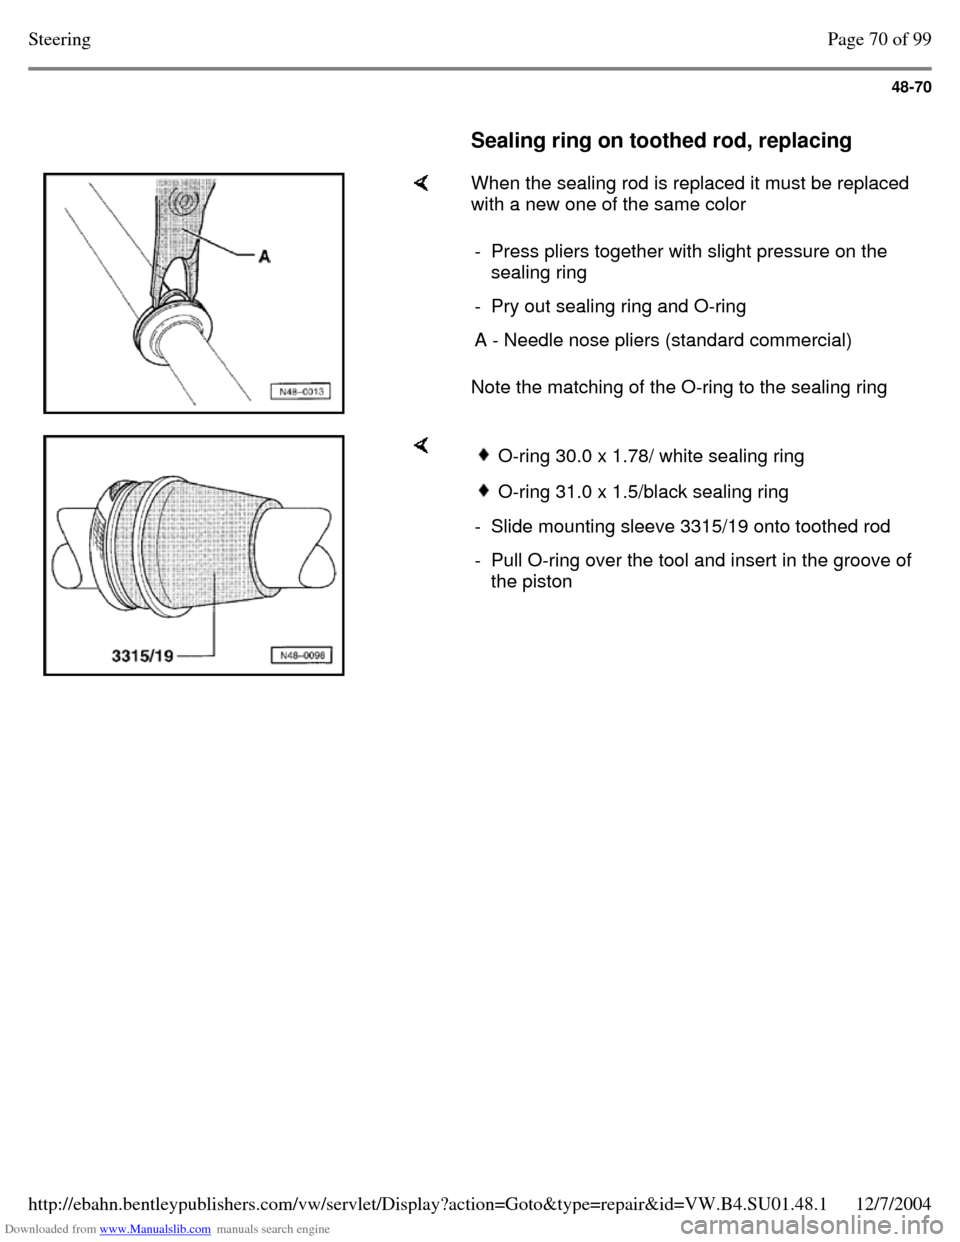
Sealing ring on toothed rod, replacing When the sealing rod is replaced it must be replaced
with a new one of the same color
Note the matching of the O-ring to the sealing ring - Press pliers together with slight pressure on the
sealing ring
- Pry out sealing ring and O-ring A - Needle nose pliers (standard commercial) O-ring 30.0 x 1.78/ white sealing ring O-ring 31.0 x 1.5/black sealing ring - Slide mounting sleeve 3315/19 onto toothed rod - Pull O-ring over the tool and insert in the groove of
the piston Page 70 of 99Steering12/7/2004http://ebahn.bentleypublishers.com/vw/servlet/Display?action=Goto&type=repair&id=VW.B4.SU01.48.1
Trending: wheelbase, brake rotor, light, traction control, warning, parking brake, automatic transmission
