buttons VOLKSWAGEN T-ROC 2021 Owner´s Manual
[x] Cancel search | Manufacturer: VOLKSWAGEN, Model Year: 2021, Model line: T-ROC, Model: VOLKSWAGEN T-ROC 2021Pages: 502, PDF Size: 9.42 MB
Page 4 of 502

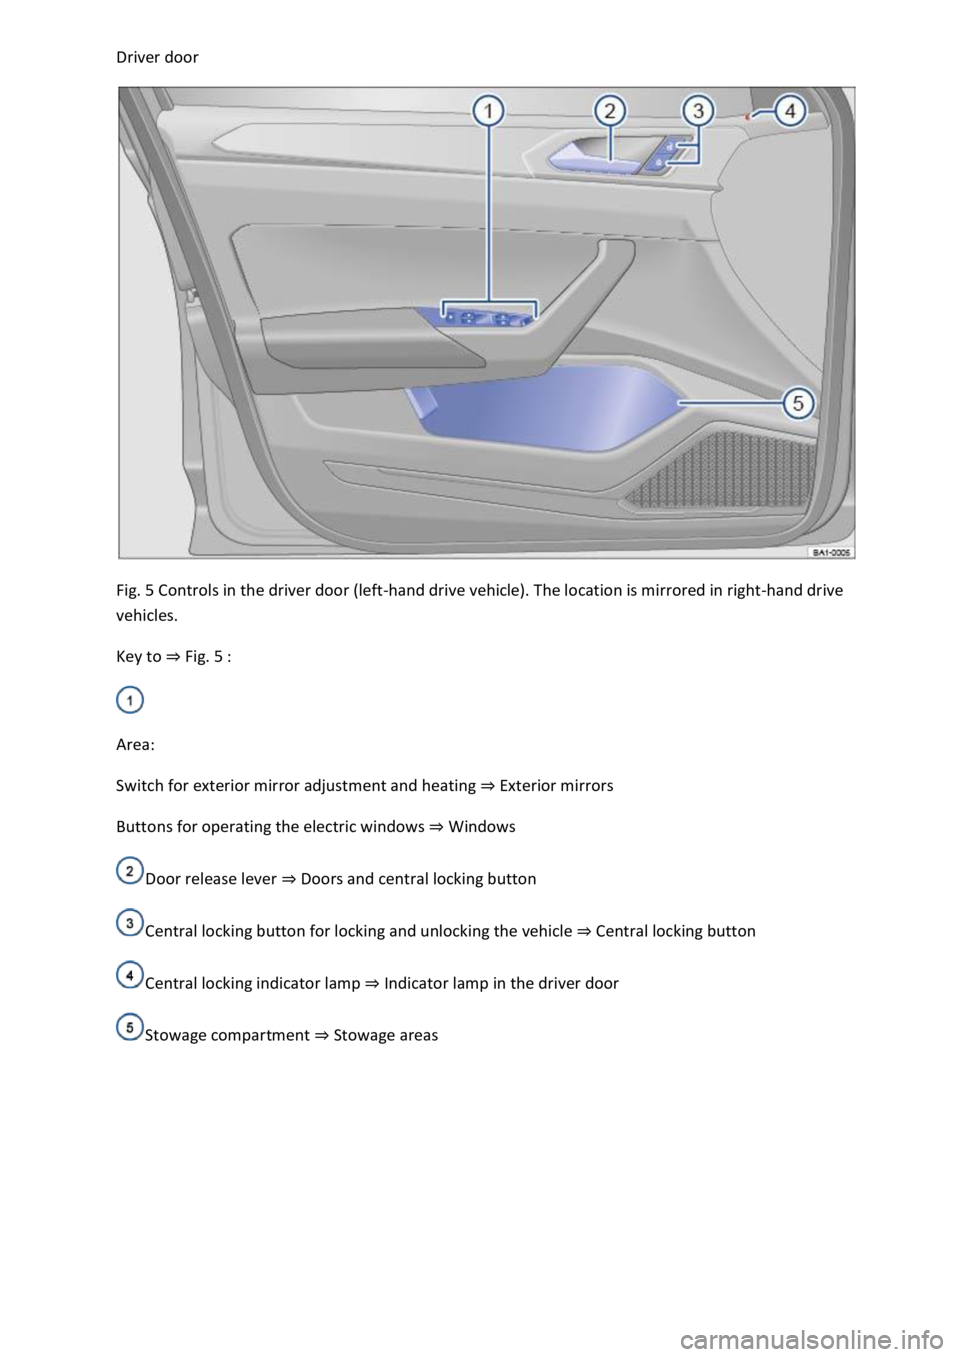
Driver door
Fig. 5 Controls in the driver door (left-hand drive vehicle). The location is mirrored in right-hand drive
vehicles.
Key to ⇒ Fig. 5 :
Area:
Switch for exterior mirror adjustment and heating ⇒ Exterior mirrors
Buttons for operating the electric windows ⇒ Windows
Door release lever ⇒ Doors and central locking button
Central locking button for locking and unlocking the vehicle ⇒ Central locking button
Central locking indicator lamp ⇒ Indicator lamp in the driver door
Stowage compartment ⇒ Stowage areas
Page 6 of 502

Bonnet release lever ⇒ In the engine compartment
Fuse box cover ⇒ Changing fuses
Lever for adjusting the steering column position ⇒ Steering wheel
Light switch ⇒ Vehicle lighting
Turn signal and main beam lever ⇒ Vehicle lighting
With switches and buttons for the driver assist systems ⇒ Button for driver assist systems ⇒ Driver
assist systems
Vents ⇒ Heating and air conditioning system
Instrument cluster ⇒ Instrument cluster
With warning and indicator lamps ⇒ Symbols in instrument cluster
Lever for wipers and washers ⇒ Wipers
With buttons for operating the menus ⇒ Instrument cluster
Controls on the multifunction steering wheel:
Operating driver assist systems ⇒ Operating using the multifunction steering wheel ⇒ Driver assist
systems
Audio, navigation
Opening the telephone menu or accepting telephone calls
Volume adjustment
Activating voice control (no function in some models)
Horn
Location of the driver front airbag ⇒ Airbag system
Ignition lock ⇒ Starting and stopping the engine
Pedals ⇒ Pedals
Page 7 of 502

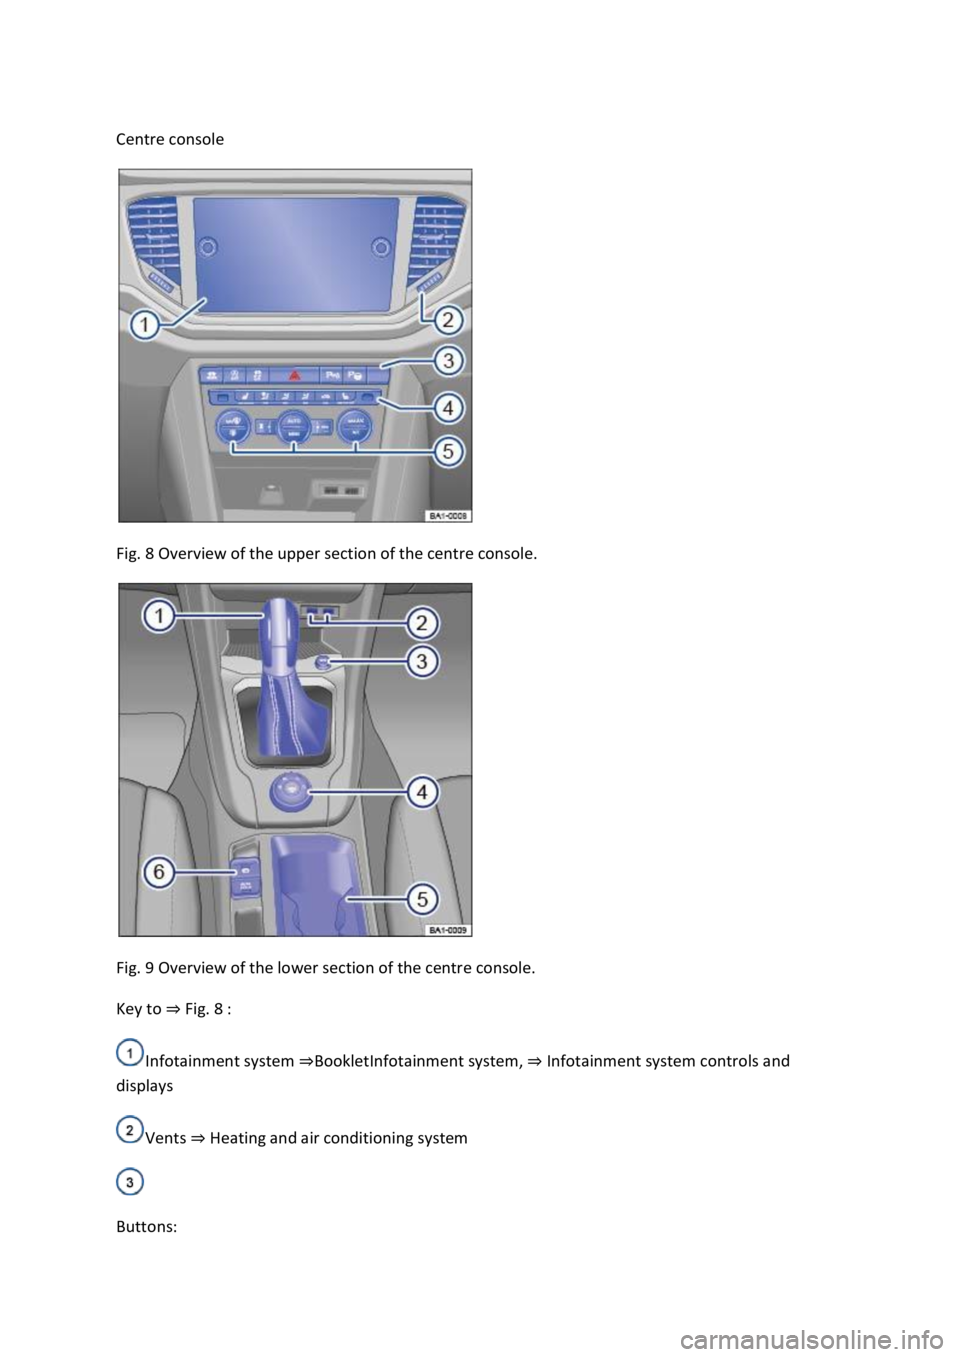
Centre console
Fig. 8 Overview of the upper section of the centre console.
Fig. 9 Overview of the lower section of the centre console.
Key to ⇒ Fig. 8 :
Infotainment system ⇒BookletInfotainment system, ⇒ Infotainment system controls and
displays
Vents ⇒ Heating and air conditioning system
Buttons:
Page 8 of 502

Hazard warning lights ⇒ In an emergency
Indicator lamp for the front passenger front airbag switch-off function ⇒ Airbag system
Driver assist systems ⇒ Driver assist systems
Controls for the air conditioning system, heating and fresh air system ⇒ Heating, ventilating,
cooling
Controls for the air conditioning system, heating and fresh air system ⇒ Heating, ventilating,
cooling
Key to ⇒ Fig. 9 :
Lever:
DSG® dual clutch gearbox ⇒ DSG® dual clutch gearbox
Manual gearbox ⇒ Manual gearbox: selecting a gear
Multimedia connections ⇒BookletInfotainment system,.
Cigarette lighter or 12-volt socket ⇒ Ashtray and cigarette lighter ⇒ Electrical sockets
Control for the 4MOTION Active Control ⇒ Driving profile selection and 4MOTION Active
Control
Stowage compartment with drink holder ⇒ Stowage areas
Buttons:
Electronic parking brake ⇒ Electronic parking brake
Auto Hold function ⇒ Auto Hold function
Page 9 of 502

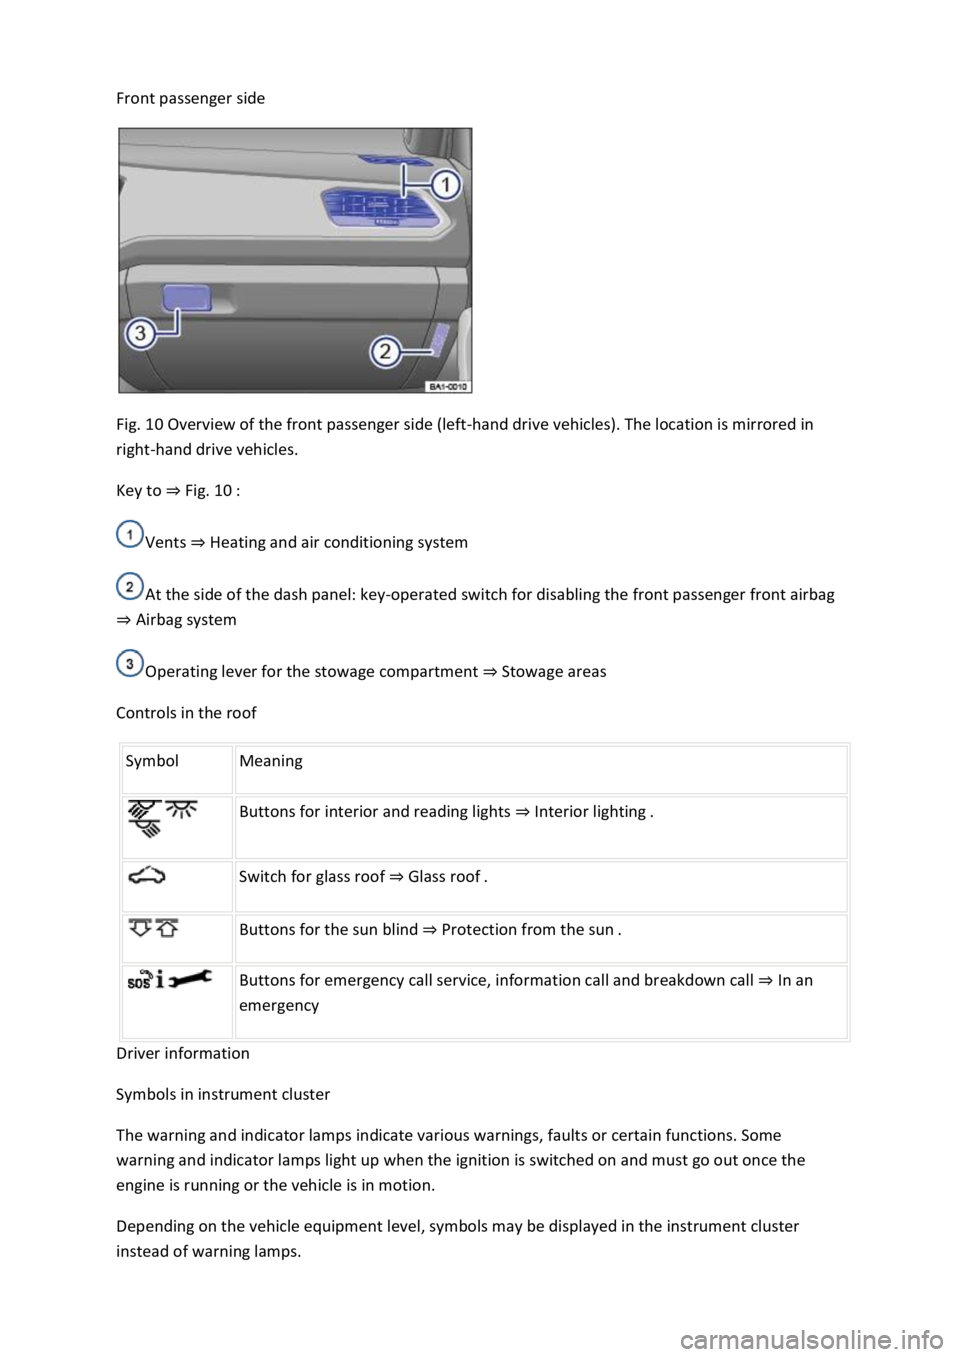
Front passenger side
Fig. 10 Overview of the front passenger side (left-hand drive vehicles). The location is mirrored in
right-hand drive vehicles.
Key to ⇒ Fig. 10 :
Vents ⇒ Heating and air conditioning system
At the side of the dash panel: key-operated switch for disabling the front passenger front airbag
⇒ Airbag system
Operating lever for the stowage compartment ⇒ Stowage areas
Controls in the roof
Symbol Meaning
Buttons for interior and reading lights ⇒ Interior lighting .
Switch for glass roof ⇒ Glass roof .
Buttons for the sun blind ⇒ Protection from the sun .
Buttons for emergency call service, information call and breakdown call ⇒ In an
emergency
Driver information
Symbols in instrument cluster
The warning and indicator lamps indicate various warnings, faults or certain functions. Some
warning and indicator lamps light up when the ignition is switched on and must go out once the
engine is running or the vehicle is in motion.
Depending on the vehicle equipment level, symbols may be displayed in the instrument cluster
instead of warning lamps.
Page 14 of 502

Instrument cluster
Introduction
This chapter contains information on the followingsubjects:
⇒ Analogue instrument cluster
⇒ Rev counter
⇒ Digital instrument cluster (Active Info Display)
⇒ Displays
⇒ Instrument cluster menus
⇒ Service menu
⇒ Driving data display (multifunction display)
⇒ Warning and information messages
⇒ Driver Alert System (recommendation for rest breaks)
⇒ Dynamic Road Sign Display (Sign Assist)
⇒ Time
⇒ Lap timer
⇒ Fuel gauge
⇒ Coolant temperature display
⇒ Service interval display
The vehicle is equipped either with an analogue or a digital instrument cluster (Active Info Display).
When you start the engine after the 12-volt battery has been totally discharged or changed, you may
find that system settings (time, date, personal convenience settings and programming) have been
changed or deleted. Check and correct the settings as necessary once the 12-volt vehicle battery has
been sufficiently charged.
WARNING
Accidents and injuries can occur if the driver is distracted.
Never press the buttons on the instrument cluster while the vehicle is in motion.
Any settings for the instrument cluster display and displays in the Infotainment system should be
made only when the vehicle is stationary in order to reduce the risk of accidents and serious injuries.
Page 22 of 502

First read and observe the introductoryinformation and safety warnings⇒Introduction
Settings can be made in the Service menu1) depending on the vehicle equipment.
Opening the Service menu
To open the Service menu, select the Range information profile and press and hold the OK button on
the multifunction steering wheel for around four seconds. You can now navigate in the menu in the
usual way using the buttons on the multifunction steering wheel.
Resetting the service interval display
Select the Service menu and follow the instructions on the instrument cluster display.
Resetting oil change service
Select the Reset oil service menu and follow the instructions on the instrument cluster display.
Resetting driving data
Select the Reset trip menu and follow the instructions on the instrument cluster display to reset the
desired value.
Engine code
Select the Engine code menu. The engine codes are now shown on the instrument cluster display.
Setting the time
Select the Time menu and set the correct time with the arrow buttons or .
1) Only in vehicles with an Active Info Display.
Driving data display (multifunction display)
First read and observe the introductoryinformation and safety warnings⇒Introduction
The driving data display (multifunction display) shows a variety of travel and fuel consumption data.
Switching between displays
Vehicles without multifunction steering wheel:
Press the rocker switch on the wiper lever ⇒ Operating using the wiper lever .
Vehicles with multifunction steering wheel:
Press the or button ⇒ Operating using the multifunction steering wheel .
Switching between memories
Press the button on the wiper lever, or press the button on the multifunction
steering wheel.
Since start memory
Page 24 of 502

Within around five seconds, set the speed with the rocker switch on the wiper lever or the
or buttons on the multifunction steering wheel. Then press the or button or
wait a few seconds. The speed is now saved and the warning is activated.
To deactivate, press the or button again. The stored speed will be deleted.
The speed warning can be adjusted within a range of 30 km/h (18 mph) to 250 km/h (155 mph).
Some settings can be saved in the user accounts for personalisation and therefore change
automatically when the user account is changed ⇒ Personalisation .
1) Varies depending on the instrument cluster version.
2) Not available in all countries.
Warning and information messages
First read and observe the introductoryinformation and safety warnings⇒Introduction
The system runs a check on certain components and functions in the vehicle when the ignition is
switched on or while the vehicle is in motion. Malfunctions are indicated by red and yellow warning
symbols with information messages on the instrument cluster display ⇒ Symbols in instrument
cluster . An acoustic warning is also given in certain cases. The appearance of the information
messages and symbols can vary depending on the version of the instrument cluster.
In addition, a list of current malfunctions can be opened manually. To open the list, select the
Vehicle status or Vehicle menu ⇒ Instrument cluster menus .
Priority 1 warning (red)The symbol flashes or lights up (sometimes together with a signal tone).
Do not drive on! Danger. Check the fault and correct the cause. Seek expert assistance if
necessary.Priority 2 warning (yellow)The symbol flashes or lights up (sometimes together with a
signal tone). Malfunctions and insufficient service fluids can damage the vehicle and cause it to
break down. Check the fault as soon as possible. Seek expert assistance if necessary.Information
messageInformation about various vehicle procedures and conditions.
With some equipment levels, some settings and displays may also appear in the Infotainment
system.
If several warnings are present, the symbols will appear for several seconds, one after another. The
symbols will continue to appear until the faults are rectified.
If warning messages about malfunctions are displayed when the ignition is switched on, it may not
be possible to adjust some settings as described, or the information display may appear differently.
If this is the case, take the vehicle to a qualified workshop to have the malfunctions rectified.
Page 30 of 502

Time
First read and observe the introductory information and safety warnings⇒Introduction
Press the button or function button.
Press the Vehicle and function buttons.
Select the Time and date menu option to set the time ⇒ Vehicle settings menu .
To set the time (on all vehicle clocks), press and hold the button in the instrument cluster until
the word Time appears in the display ⇒ Analogue instrument cluster .
Release the button. The time is shown in the instrument cluster display and the hour setting is
marked.
Then press the button repeatedly until the required hour value is displayed. Press and hold the
button to scroll through quickly.
Once you have set the hour, wait until the minutes display is marked in the instrument cluster
display.
Then press the button repeatedly until the required minute value is displayed. Press and hold the
button to scroll through quickly.
Release the button to finish setting the clock.
Select the Range information profile.
Press and hold the button on the multifunction steering wheel until the Service menu is available
on the instrument cluster display ⇒ Service menu .
Select the Time menu.
Set the correct time with the arrow buttons or .
Lap timer
First read and observe the introductory information and safety warnings⇒Introduction
With the appropriate equipment the lap timer can be shown on the instrument cluster display
⇒ Instrument cluster menus .
The lap timer has the option of timing your own laps manually in the vehicle on a race track, to store
the times and to compare them with best times.
Page 35 of 502

In vehicles with flexible oil change service, the service intervals are calculated on an individual basis.
Technical progress has made it possible to considerably reduce servicing requirements. An oil change
service must only be carried out when required by the vehicle. The individual conditions in which the
vehicle is used and the driver's personal driving style are taken into account. The service reminder is
displayed 30 days before the service is due. The distance is rounded to the nearest 100 km and the
remaining time is rounded to full days.
Service alert
If a service or inspection is due soon, a service alert will appear the next time the ignition is switched
on.
The number of kilometres or amount of time shown correspond to the maximum number of
kilometres or maximum time that can still be driven before the next service.
Service event
In the event of a due service or a due inspection, a signal tone will be given when the ignition is
switched on and the spanner symbol will be displayed for several seconds on the instrument
cluster display. One of the following displays will also appear ⇒ Fig. 19 :
Inspection now!
Oil service now!
Oil service and inspection now!
Checking service schedules
You can access the current scheduled service information when the ignition is switched on, the
engine is not running, and the vehicle is stationary:
Accessing the service schedule in the Infotainment system.
Press the button or function button.
Press the Vehicle and function buttons ⇒ Infotainment system controls and displays .
Select the Service menu option to display the service information.
Vehicles with analogue instrument cluster.
Press and hold the button in the instrument cluster ⇒ Instrument cluster until the text Service
appears in the display.
Release the button. The current scheduled service will be shown in the display.
Vehicles with digital instrument cluster.
Information on the scheduled service can be accessed only via the Service menu ⇒ Service menu .
Resetting the service interval display