VOLKSWAGEN TIGUAN 2017 Owner´s Manual
Manufacturer: VOLKSWAGEN, Model Year: 2017, Model line: TIGUAN, Model: VOLKSWAGEN TIGUAN 2017Pages: 341, PDF Size: 9.14 MB
Page 21 of 341
Country availability
At the time that this owner's manual went to print, Dynamic Road Sign Display was available in the
following countries:
Andorra, Austria, Belgium, Bulgaria, Croatia, Cyprus, Czech Republic, Denmark, Estonia, Finland,
France, Germany, Greece, Hungary, Iceland, Ireland, Italy, Japan, Latvia, Liechtenstein, Lithuania,
Luxembourg, Malta, Monaco, Netherlands, Norway, Poland, Portugal, Romania, San Marino,
Slovakia, Slovenia, Spain, Sweden, Switzerland, United Kingdom, Vatican City.
Displays
in addition to speed limits and overtaking restrictions, Dynamic Road Sign Display also detects the
sign which indicates that all restrictions have been lifted on motorways and main roads in Germany.
In all other countries, the current speed limit is displayed instead.
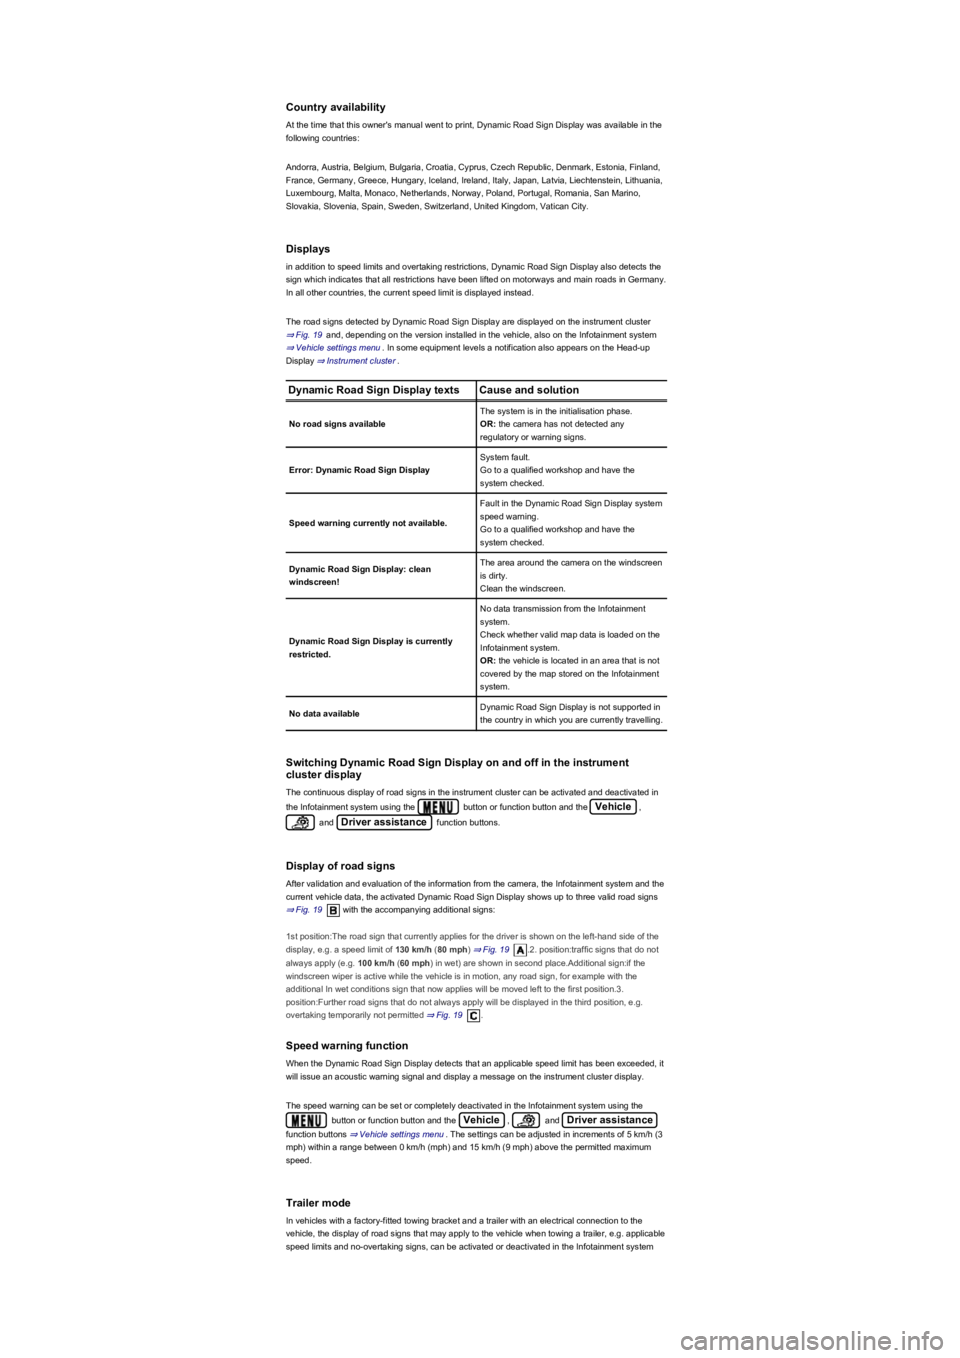
The road signs detected by Dynamic Road Sign Display are displayed on the instrument cluster
⇒ Fig. 19 and, depending on the version installed in the vehicle, also on the Infotainment system
⇒ Vehicle settings menu. In some equipment levels a notification also appears on the Head-up
Display ⇒ Instrument cluster.
Dynamic Road Sign Display textsCause and solution
No road signs available
The system is in the initialisation phase.
OR: the camera has not detected any
regulatory or warning signs.
Error: Dynamic Road Sign Display
System fault.
Go to a qualified workshop and have the
system checked.
Speed warning currently not available.
Fault in the Dynamic Road Sign Display system
speed warning.
Go to a qualified workshop and have the
system checked.
Dynamic Road Sign Display: clean
windscreen!
The area around the camera on the windscreen
is dirty.
Clean the windscreen.
Dynamic Road Sign Display is currently
restricted.
No data transmission from the Infotainment
system.
Check whether valid map data is loaded on the
Infotainment system.
OR: the vehicle is located in an area that is not
covered by the map stored on the Infotainment
system.
No data availableDynamic Road Sign Display is not supported in
the country in which you are currently travelling.
Switching Dynamic Road Sign Display on and off in the instrument
cluster display
The continuous display of road signs in the instrument cluster can be activated and deactivated in
the Infotainment system using the button or function button and the Vehicle,
and Driver assistance function buttons.
Display of road signs
After validation and evaluation of the information from the camera, the Infotainment system and the
current vehicle data, the activated Dynamic Road Sign Display shows up to three valid road signs
⇒ Fig. 19 with the accompanying additional signs:
1st position:The road sign that currently applies for the driver is shown on the left-hand side of the
display, e.g. a speed limit of 130 km/h (80 mph) ⇒ Fig. 19.2. position:traffic signs that do not
always apply (e.g. 100 km/h (60 mph) in wet) are shown in second place.Additional sign:if the
windscreen wiper is active while the vehicle is in motion, any road sign, for example with the
additional In wet conditions sign that now applies will be moved left to the first position.3.
position:Further road signs that do not always apply will be displayed in the third position, e.g.
overtaking temporarily not permitted ⇒ Fig. 19.
Speed warning function
When the Dynamic Road Sign Display detects that an applicable speed limit has been exceeded, it
will issue an acoustic warning signal and display a message on the instrument cluster display.
The speed warning can be set or completely deactivated in the Infotainment system using the
button or function button and the Vehicle, and Driver assistance
function buttons ⇒ Vehicle settings menu. The settings can be adjusted in increments of 5 km/h (3
mph) within a range between 0 km/h (mph) and 15 km/h (9 mph) above the permitted maximum
speed.
Trailer mode
In vehicles with a factory-fitted towing bracket and a trailer with an electrical connection to the
vehicle, the display of road signs that may apply to the vehicle when towing a trailer, e.g. applicable
speed limits and no-overtaking signs, can be activated or deactivated in the Infotainment system
Page 22 of 341
using the button or function button and the Vehicle, and
Driver assistance function buttons ⇒ Vehicle settings menu.
In trailer mode, the speed warning function display can be adjusted to the type of trailer or to legal
requirements. The settings can be adjusted in increments of 10 km/h (5 mph) within a range
between 60 km/h (40 mph) and 130 km/h (80 mph). If a higher speed is set than is permitted for
driving with a trailer in the country in which you are currently travelling, Dynamic Road Sign Display
automatically issues a warning at the usual speed limit, e.g. at 80 km/h (50 mph) in Germany.
If the speed warning for the trailer is deactivated, Dynamic Road Sign Display issues warnings as if
the vehicle was being driven without a trailer.
Functional limitations
Dynamic Road Sign Display is subject to system-related limitations. The following conditions can
restrict the function of Dynamic Road Sign Display, or prevent it from working altogether:
•Poor visibility, e.g. snow, rain, fog or heavy spray.
•Dazzling, e.g. from oncoming traffic or sunlight.
•High speeds.
•Covered or dirty camera.
•Traffic signs located outside of the camera's field of view.
•Partially or fully hidden traffic signs, e.g. by trees, snow, dirt or other vehicles.
•Non-standard traffic signs.
•Damaged or bent traffic signs.
•Variable traffic signs on gantries (changeable traffic sign display using LEDs or other light
sources).
•Out-of-date map material in the Infotainment system.
•Vehicles with traffic sign stickers, e.g. speed restrictions on trucks.
Some settings can be saved in the user accounts of the personalisation function and can
therefore change automatically when the user account is changed ⇒ Personalisation.
Time
First read and observe the introductoryinformation and safety warnings⇒
Introduction
•To set the time (on all vehicle clocks), press and hold the button in the instrument
cluster while the doors are closed until the word Time appears in the instrument cluster display
⇒ Analogue instrument cluster or ⇒ Digital instrument cluster (Active Info Display).
•Release the button. The time is shown in the instrument cluster display and the hour
setting is marked.
•Then press the button repeatedly until the required hour is displayed. Press and hold
the button to scroll through quickly.
The intelligent Dynamic Road Sign Display technology cannot overcome the laws of
physics, and functions only within the limits of the system. Do not let the extra
convenience afforded by Dynamic Road Sign Display tempt you into taking any risks when
driving, as this can cause accidents. The system is not a substitute for the full
concentration of the driver.
•Always adapt your speed and driving style to suit visibility, weather, road and traffic
conditions.
•Poor visibility, darkness, snow, rain and fog can cause road signs to be not displayed
or be incorrectly displayed by the system.
•If the camera's field of view is dirty, covered or damaged, the function of the Dynamic
Road Sign Display system may be impaired.
WARNING
Driving recommendations and traffic symbols displayed by the Dynamic Road Sign
Display system may differ from the current traffic situation.
•Not all road signs can be recognised by the system and displayed correctly.
•Road signs and traffic regulations have priority over the recommendations and
displays provided by the Dynamic Road Sign Display system.
WARNING
Availability of the Dynamic Road Sign Display system is restricted in
waypoint navigation mode (waypoint navigation) of the Infotainment system.
NOTICE
Page 23 of 341
•Once you have set the hour, wait until the minutes display in the instrument cluster is marked.
•Then press the button repeatedly until the required minute is displayed. Press and hold
the button to scroll through quickly.
•Release the button to finish setting the clock.
The analogue clock adjusts itself a few seconds after ignition is switched on.
You can also use the Infotainment system to adjust the time ⇒ Vehicle settings menu.
Fuel gauge
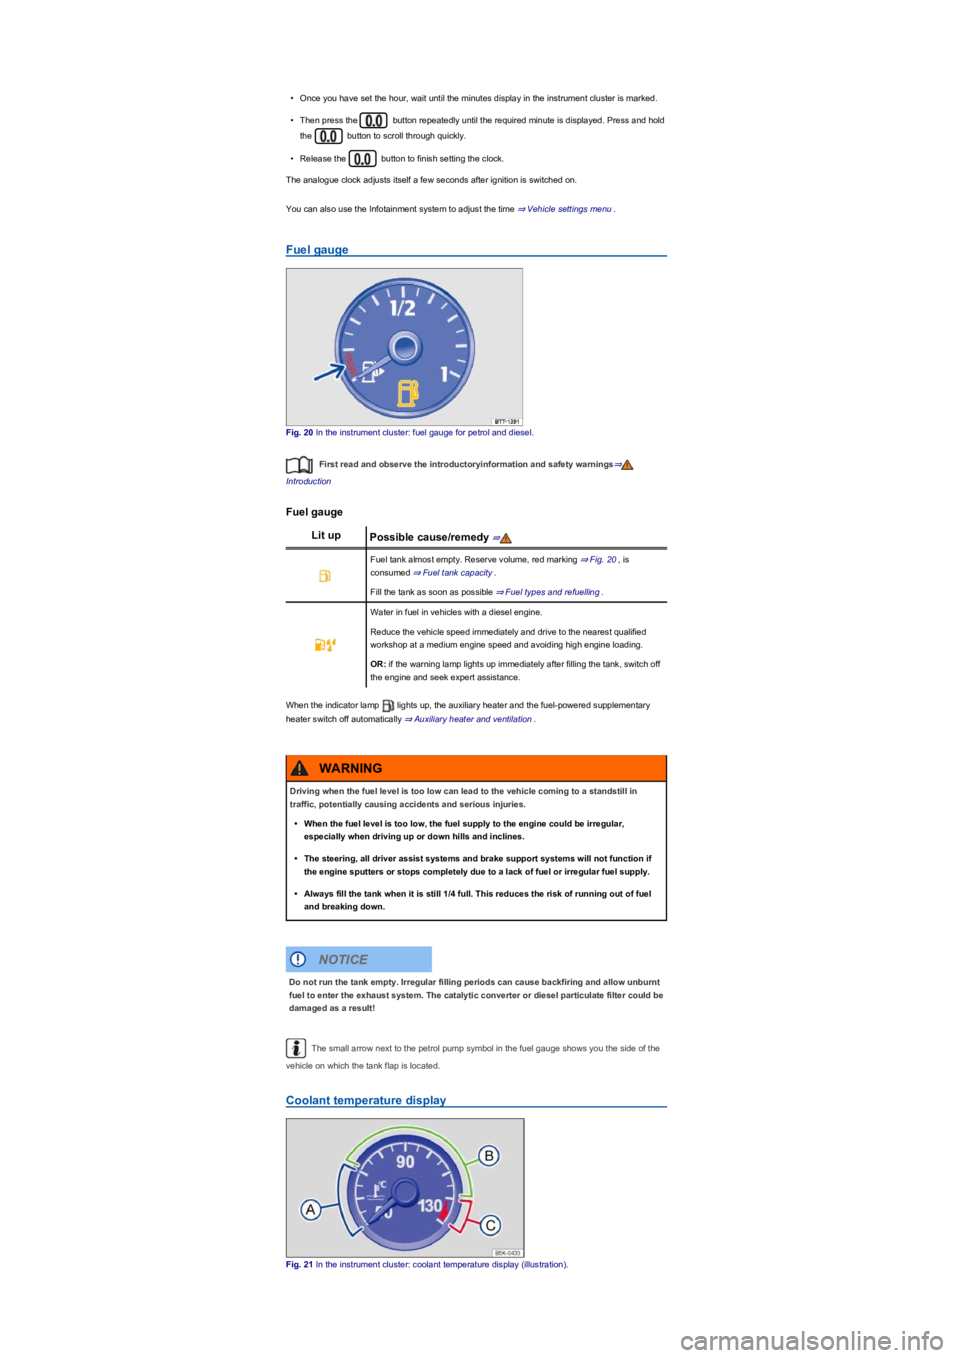
Fig. 20 In the instrument cluster: fuel gauge for petrol and diesel.
First read and observe the introductoryinformation and safety warnings⇒
Introduction
Fuel gauge
Lit upPossible cause/remedy ⇒
Fuel tank almost empty. Reserve volume, red marking ⇒ Fig. 20, is
consumed ⇒ Fuel tank capacity.
Fill the tank as soon as possible ⇒ Fuel types and refuelling.
Water in fuel in vehicles with a diesel engine.
Reduce the vehicle speed immediately and drive to the nearest qualified
workshop at a medium engine speed and avoiding high engine loading.
OR: if the warning lamp lights up immediately after filling the tank, switch off
the engine and seek expert assistance.
When the indicator lamp lights up, the auxiliary heater and the fuel-powered supplementary
heater switch off automatically ⇒ Auxiliary heater and ventilation.
The small arrow next to the petrol pump symbol in the fuel gauge shows you the side of the
vehicle on which the tank flap is located.
Coolant temperature display
Fig. 21 In the instrument cluster: coolant temperature display (illustration).
Driving when the fuel level is too low can lead to the vehicle coming to a standstill in
traffic, potentially causing accidents and serious injuries.
•When the fuel level is too low, the fuel supply to the engine could be irregular,
especially when driving up or down hills and inclines.
•The steering, all driver assist systems and brake support systems will not function if
the engine sputters or stops completely due to a lack of fuel or irregular fuel supply.
•Always fill the tank when it is still 1/4 full. This reduces the risk of running out of fuel
and breaking down.
WARNING
Do not run the tank empty. Irregular filling periods can cause backfiring and allow unburnt
fuel to enter the exhaust system. The catalytic converter or diesel particulate filter could be
damaged as a result!
NOTICE
Page 24 of 341
First read and observe the introductoryinformation and safety warnings⇒
Introduction
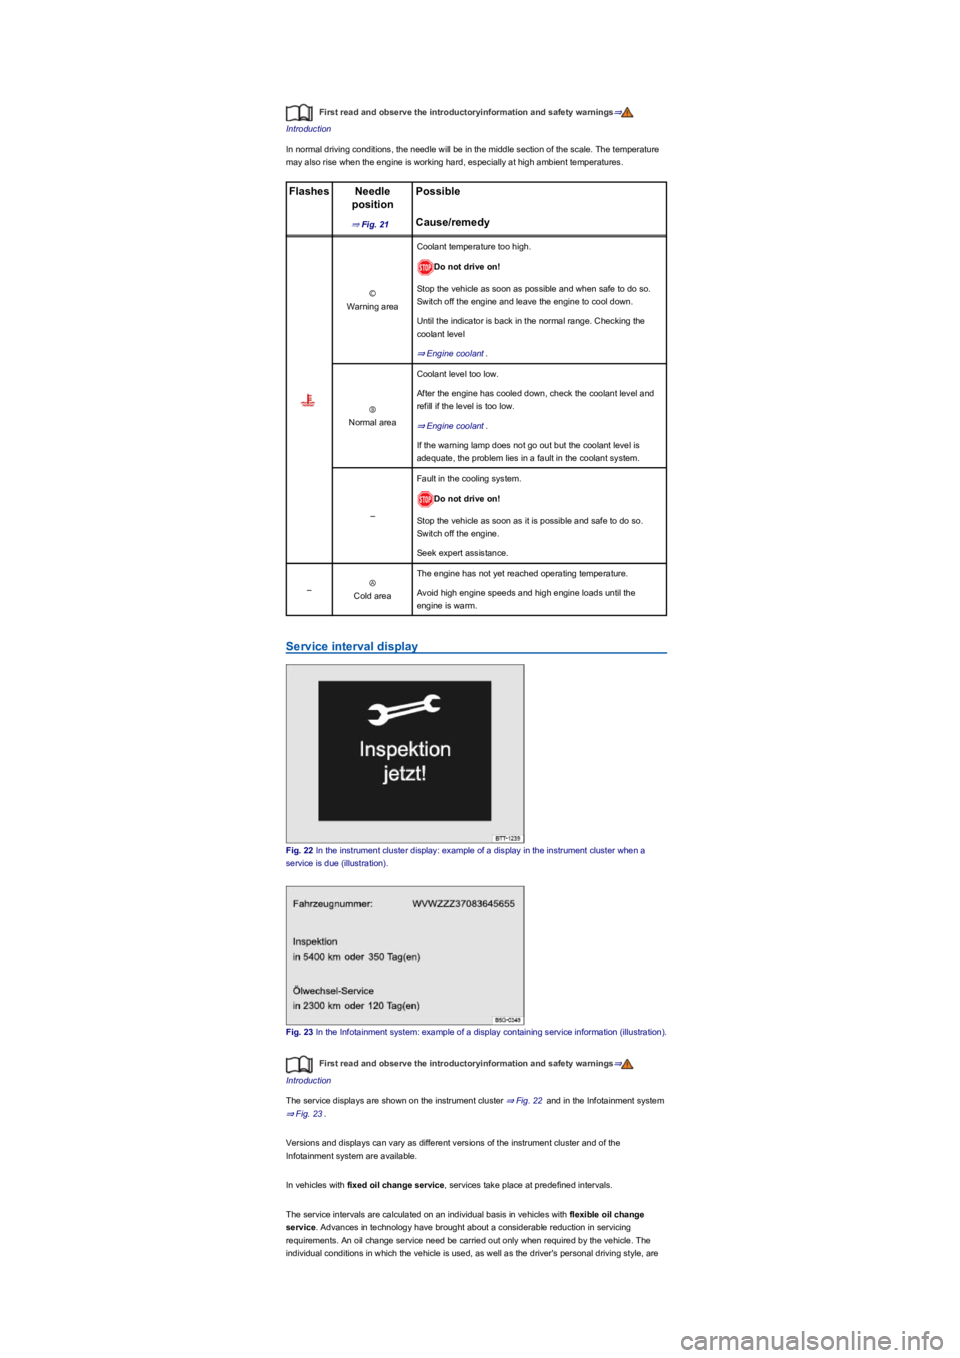
In normal driving conditions, the needle will be in the middle section of the scale. The temperature
may also rise when the engine is working hard, especially at high ambient temperatures.
FlashesNeedle
position
Possible
⇒ Fig. 21Cause/remedy
Ⓒ
Warning area
Coolant temperature too high.
Do not drive on!
Stop the vehicle as soon as possible and when safe to do so.
Switch off the engine and leave the engine to cool down.
Until the indicator is back in the normal range. Checking the
coolant level
⇒ Engine coolant.
Ⓑ
Normal area
Coolant level too low.
After the engine has cooled down, check the coolant level and
refill if the level is too low.
⇒ Engine coolant.
If the warning lamp does not go out but the coolant level is
adequate, the problem lies in a fault in the coolant system.
–
Fault in the cooling system.
Do not drive on!
Stop the vehicle as soon as it is possible and safe to do so.
Switch off the engine.
Seek expert assistance.
–Ⓐ
Cold area
The engine has not yet reached operating temperature.
Avoid high engine speeds and high engine loads until the
engine is warm.
Service interval display
Fig. 22 In the instrument cluster display: example of a display in the instrument cluster when a
service is due (illustration).
Fig. 23 In the Infotainment system: example of a display containing service information (illustration).
First read and observe the introductoryinformation and safety warnings⇒
Introduction
The service displays are shown on the instrument cluster ⇒ Fig. 22 and in the Infotainment system
⇒ Fig. 23.
Versions and displays can vary as different versions of the instrument cluster and of the
Infotainment system are available.
In vehicles with fixed oil change service, services take place at predefined intervals.
The service intervals are calculated on an individual basis in vehicles with flexible oil change
service. Advances in technology have brought about a considerable reduction in servicing
requirements. An oil change service need be carried out only when required by the vehicle. The
individual conditions in which the vehicle is used, as well as the driver's personal driving style, are
Page 25 of 341
taken into account. The service reminder is displayed 30 days before the service is due. The
distance is rounded to the nearest 100 km; the remaining time is rounded to full days.
Service alert
If a service or inspection is due soon, a service alert will appear when the ignition is switched on.
The number of kilometres or amount of time shown correspond to the maximum number of
kilometres or maximum time that can still be driven before the next service.
Service event
For a scheduled service or a scheduled inspection, a signal tone will be given when the ignition
is switched on and the spanner symbol will be displayed for several seconds on the
instrument cluster display. One of the following displays will also appear ⇒ Fig. 22:
Inspection now!
Oil service now!
Oil service and inspection now!
Viewing service appointments
You can access the current service schedule when the ignition is switched on, the engine is not
running, and the vehicle is stationary:
•Press and hold button in the instrument cluster ⇒ Instrument cluster until the text
Service appears in the display.
•Release the button. Information on the current scheduled service will be shown in the
display.
Service information ⇒ Fig. 23 can also be displayed in the Infotainment system by pressing the
button or function button and the Vehicle, and Service function
buttons ⇒ Operation and display in the Infotainment system.
Resetting the service interval display
If the service or the inspection was not performed by a Volkswagen dealership, the display can be
reset as follows:
•Switch off the ignition.
•Press and hold the button in the instrument cluster ⇒ Instrument cluster.
•Restart the ignition.
•Release button if one of the following messages appears on the instrument cluster
display:
Reset oil change service?
Reset inspection service?
•Press the button on the instrument cluster ⇒ Instrument cluster to confirm.
Do not reset the service interval display between service intervals otherwise incorrect data may be
shown.
If the oil change service was manually reset, the service interval display then also changes to a
fixed service interval in vehicles with flexible oil change service.
The service message will disappear after a few seconds, when the engine is running, or
when the button on the windscreen wiper lever or the button on the
multifunction steering wheel is pressed ⇒ Instrument cluster operation.
If the 12-volt vehicle battery was disconnected for long periods in vehicles with flexible
service, the system cannot calculate the time at which the next service is due. The information
shown in the service interval display may therefore be incorrect. If this is the case, please observe
the maximum permissible service intervals ⇒ Service.
Instrument cluster operation
Introduction
This chapter contains information on the followingsubjects:
⇒ Operating using the wiper lever
⇒ Operating using the multifunction steering wheel
⇒ Button for driver assist systems
⇒ Additional displays and display options
Some menu options can only be opened when the vehicle is stationary.
There are no buttons on the wiper lever in vehicles equipped with a multifunction steering wheel
⇒ Operating using the wiper lever.
Page 26 of 341
Check the system settings after charging or replacing the 12-volt vehicle battery. System
settings may be adjusted or deleted if the power supply is interrupted.
Operating using the wiper lever
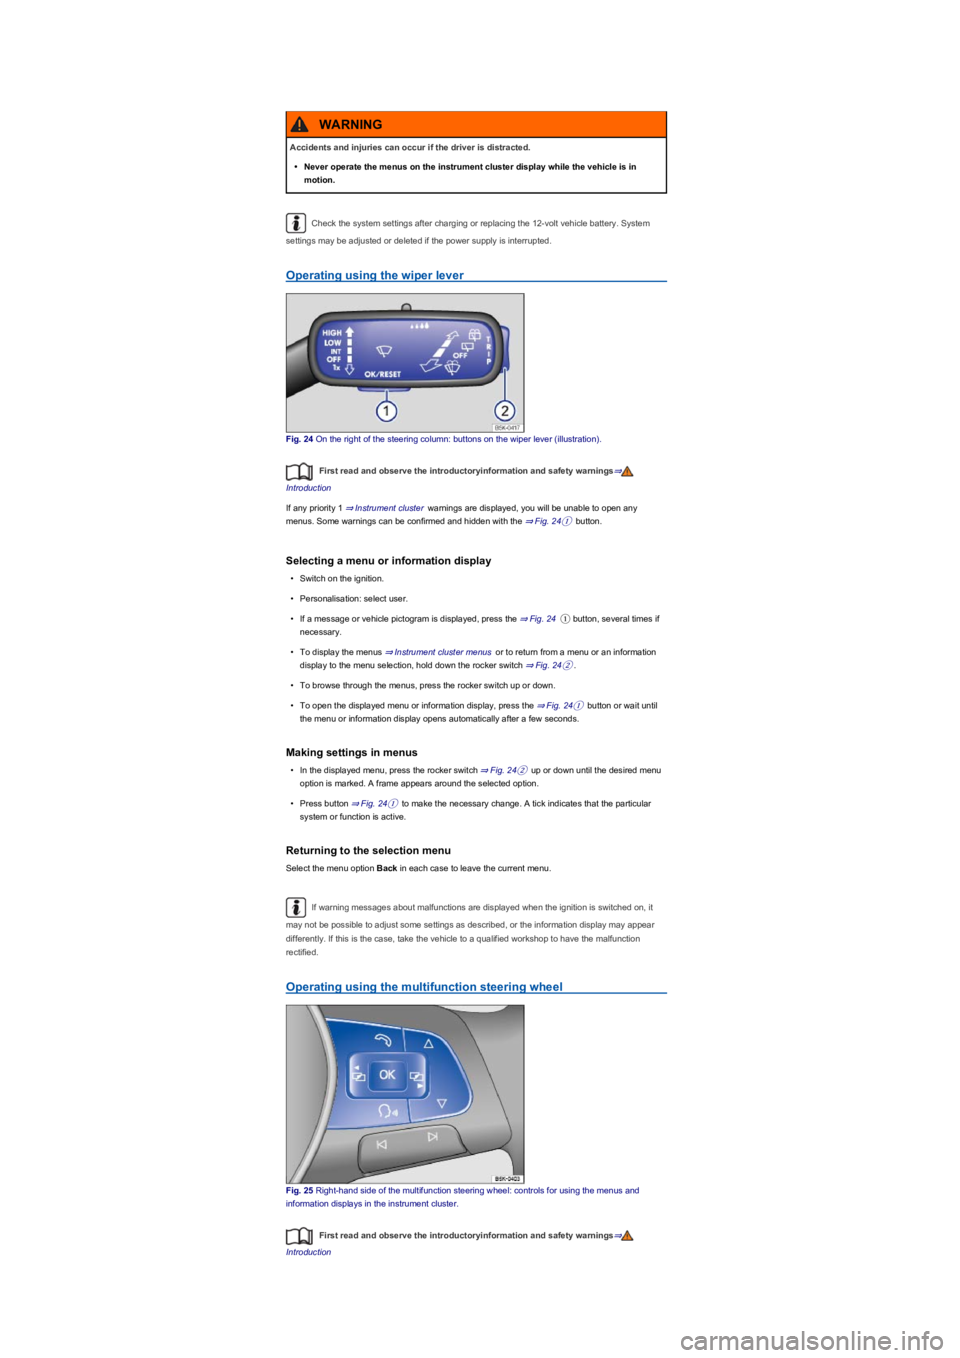
Fig. 24 On the right of the steering column: buttons on the wiper lever (illustration).
First read and observe the introductoryinformation and safety warnings⇒
Introduction
If any priority 1 ⇒ Instrument cluster warnings are displayed, you will be unable to open any
menus. Some warnings can be confirmed and hidden with the ⇒ Fig. 24① button.
Selecting a menu or information display
•Switch on the ignition.
•Personalisation: select user.
•If a message or vehicle pictogram is displayed, press the ⇒ Fig. 24① button, several times if
necessary.
•To display the menus ⇒ Instrument cluster menus or to return from a menu or an information
display to the menu selection, hold down the rocker switch ⇒ Fig. 24②.
•To browse through the menus, press the rocker switch up or down.
•To open the displayed menu or information display, press the ⇒ Fig. 24① button or wait until
the menu or information display opens automatically after a few seconds.
Making settings in menus
•In the displayed menu, press the rocker switch ⇒ Fig. 24② up or down until the desired menu
option is marked. A frame appears around the selected option.
•Press button ⇒ Fig. 24① to make the necessary change. A tick indicates that the particular
system or function is active.
Returning to the selection menu
Select the menu option Back in each case to leave the current menu.
If warning messages about malfunctions are displayed when the ignition is switched on, it
may not be possible to adjust some settings as described, or the information display may appear
differently. If this is the case, take the vehicle to a qualified workshop to have the malfunction
rectified.
Operating using the multifunction steering wheel
Fig. 25 Right-hand side of the multifunction steering wheel: controls for using the menus and
information displays in the instrument cluster.
First read and observe the introductoryinformation and safety warnings⇒
Introduction
Accidents and injuries can occur if the driver is distracted.
•Never operate the menus on the instrument cluster display while the vehicle is in
motion.
WARNING
Page 27 of 341
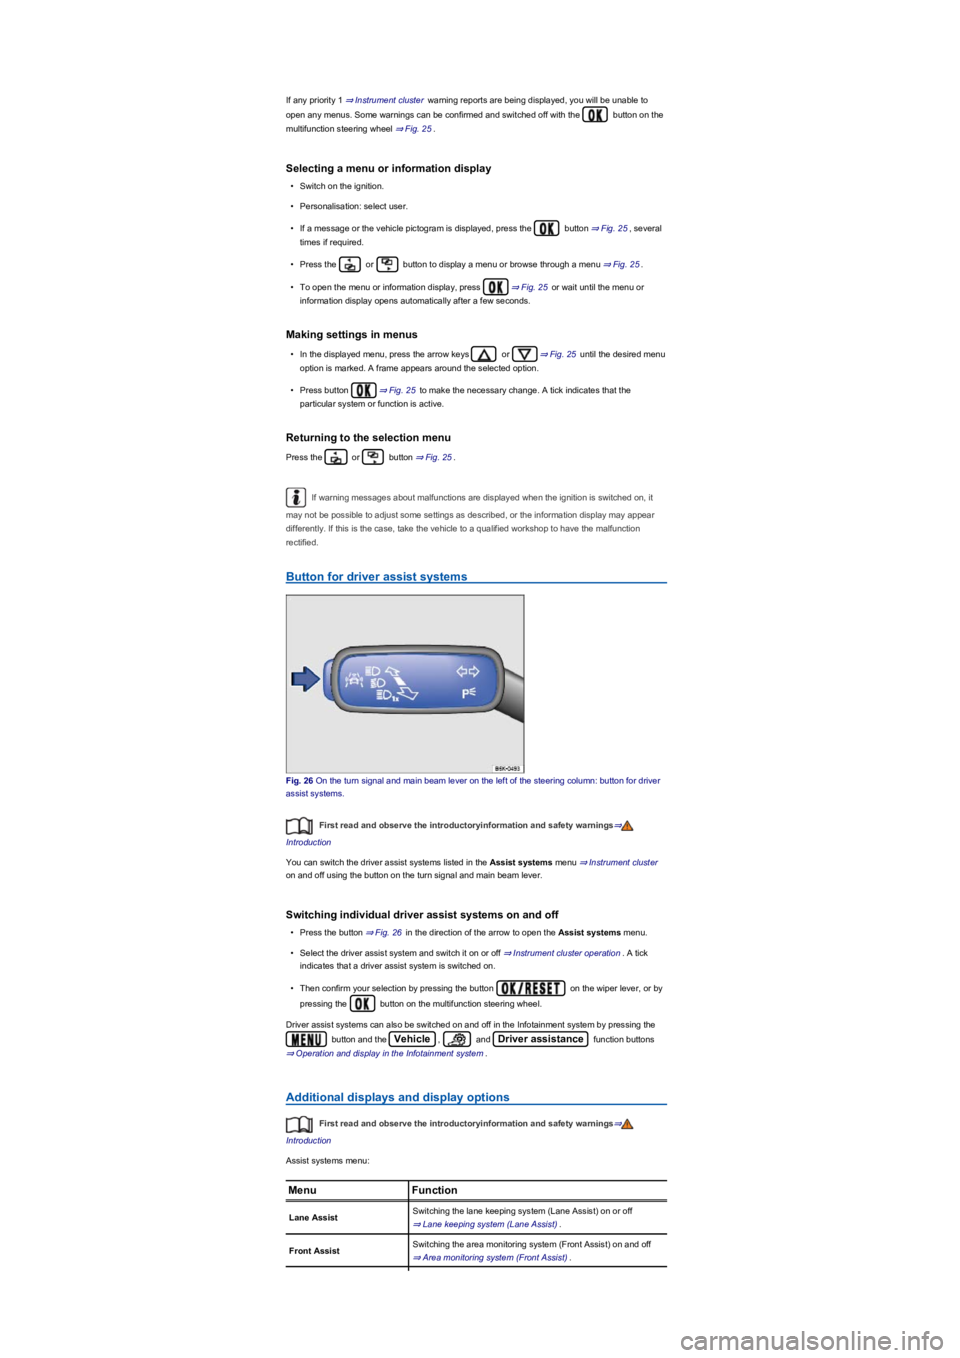
If any priority 1 ⇒ Instrument cluster warning reports are being displayed, you will be unable to
open any menus. Some warnings can be confirmed and switched off with the button on the
multifunction steering wheel ⇒ Fig. 25.
Selecting a menu or information display
•Switch on the ignition.
•Personalisation: select user.
•If a message or the vehicle pictogram is displayed, press the button ⇒ Fig. 25, several
times if required.
•Press the or button to display a menu or browse through a menu ⇒ Fig. 25.
•To open the menu or information display, press ⇒ Fig. 25 or wait until the menu or
information display opens automatically after a few seconds.
Making settings in menus
•In the displayed menu, press the arrow keys or ⇒ Fig. 25 until the desired menu
option is marked. A frame appears around the selected option.
•Press button ⇒ Fig. 25 to make the necessary change. A tick indicates that the
particular system or function is active.
Returning to the selection menu
Press the or button ⇒ Fig. 25.
If warning messages about malfunctions are displayed when the ignition is switched on, it
may not be possible to adjust some settings as described, or the information display may appear
differently. If this is the case, take the vehicle to a qualified workshop to have the malfunction
rectified.
Button for driver assist systems
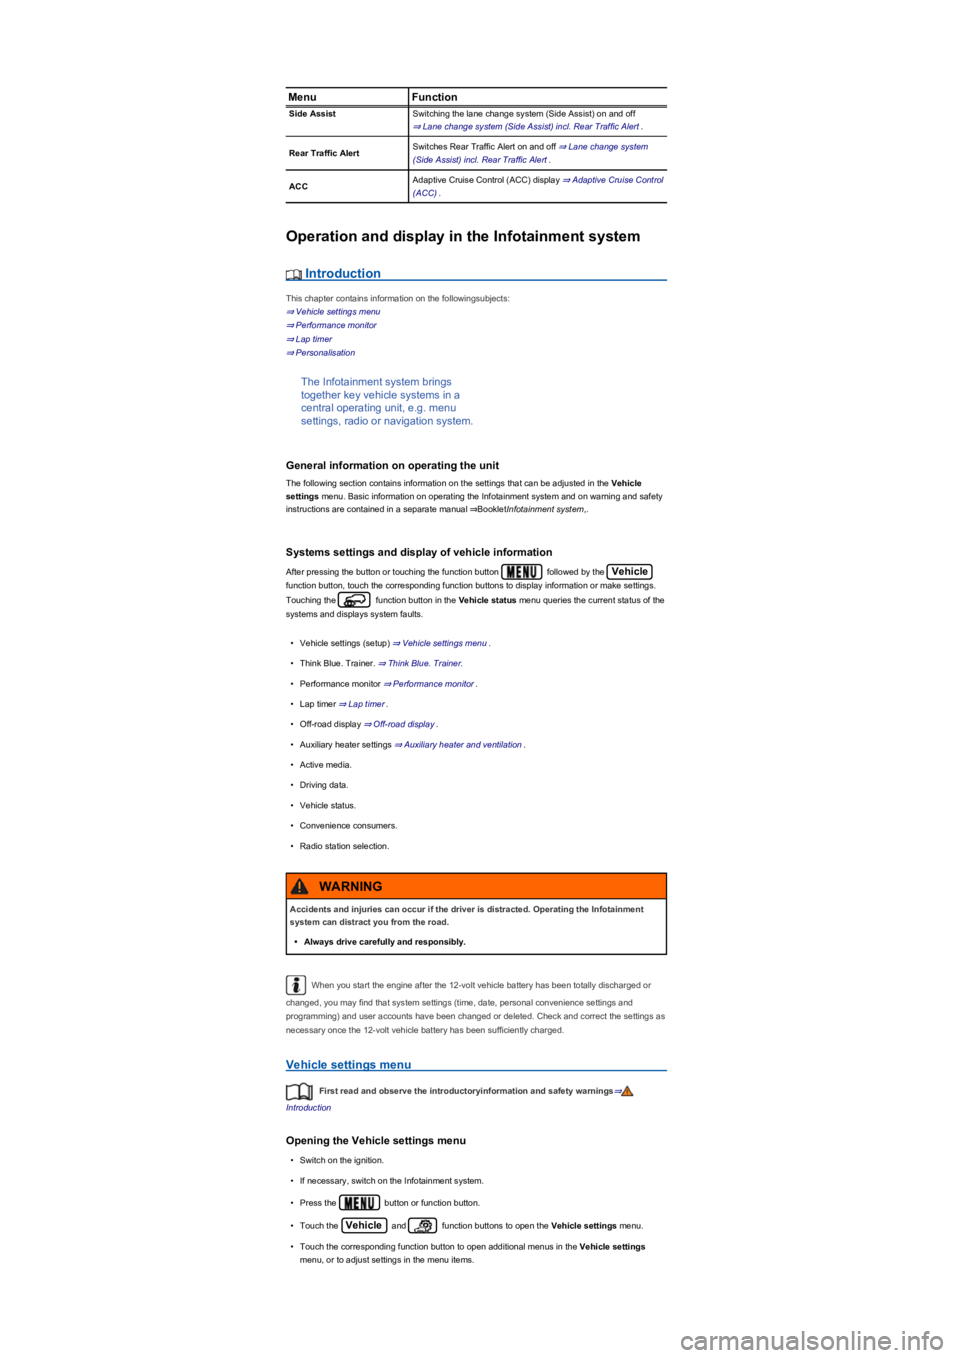
Fig. 26 On the turn signal and main beam lever on the left of the steering column: button for driver
assist systems.
First read and observe the introductoryinformation and safety warnings⇒
Introduction
You can switch the driver assist systems listed in the Assist systems menu ⇒ Instrument cluster
on and off using the button on the turn signal and main beam lever.
Switching individual driver assist systems on and off
•Press the button ⇒ Fig. 26 in the direction of the arrow to open the Assist systems menu.
•Select the driver assist system and switch it on or off ⇒ Instrument cluster operation. A tick
indicates that a driver assist system is switched on.
•Then confirm your selection by pressing the button on the wiper lever, or by
pressing the button on the multifunction steering wheel.
Driver assist systems can also be switched on and off in the Infotainment system by pressing the
button and the Vehicle, and Driver assistance function buttons
⇒ Operation and display in the Infotainment system.
Additional displays and display options
First read and observe the introductoryinformation and safety warnings⇒
Introduction
Assist systems menu:
MenuFunction
Lane AssistSwitching the lane keeping system (Lane Assist) on or off
⇒ Lane keeping system (Lane Assist).
Front AssistSwitching the area monitoring system (Front Assist) on and off
⇒ Area monitoring system (Front Assist).
Page 28 of 341
MenuFunction
Side AssistSwitching the lane change system (Side Assist) on and off
⇒ Lane change system (Side Assist) incl. Rear Traffic Alert.
Rear Traffic AlertSwitches Rear Traffic Alert on and off ⇒ Lane change system
(Side Assist) incl. Rear Traffic Alert.
ACCAdaptive Cruise Control (ACC) display ⇒ Adaptive Cruise Control
(ACC).
Operation and display in the Infotainment system
Introduction
This chapter contains information on the followingsubjects:
⇒ Vehicle settings menu
⇒ Performance monitor
⇒ Lap timer
⇒ Personalisation
The Infotainment system brings
together key vehicle systems in a
central operating unit, e.g. menu
settings, radio or navigation system.
General information on operating the unit
The following section contains information on the settings that can be adjusted in the Vehicle
settings menu. Basic information on operating the Infotainment system and on warning and safety
instructions are contained in a separate manual ⇒BookletInfotainment system,.
Systems settings and display of vehicle information
After pressing the button or touching the function button followed by the Vehicle
function button, touch the corresponding function buttons to display information or make settings.
Touching the function button in the Vehicle status menu queries the current status of the
systems and displays system faults.
•Vehicle settings (setup) ⇒ Vehicle settings menu.
•Think Blue. Trainer. ⇒ Think Blue. Trainer.
•Performance monitor ⇒ Performance monitor.
•Lap timer ⇒ Lap timer.
•Off-road display ⇒ Off-road display.
•Auxiliary heater settings ⇒ Auxiliary heater and ventilation.
•Active media.
•Driving data.
•Vehicle status.
•Convenience consumers.
•Radio station selection.
When you start the engine after the 12-volt vehicle battery has been totally discharged or
changed, you may find that system settings (time, date, personal convenience settings and
programming) and user accounts have been changed or deleted. Check and correct the settings as
necessary once the 12-volt vehicle battery has been sufficiently charged.
Vehicle settings menu
First read and observe the introductoryinformation and safety warnings⇒
Introduction
Opening the Vehicle settings menu
•Switch on the ignition.
•If necessary, switch on the Infotainment system.
•Press the button or function button.
•Touch the Vehicle and function buttons to open the Vehicle settings menu.
•Touch the corresponding function button to open additional menus in the Vehicle settings
menu, or to adjust settings in the menu items.
Accidents and injuries can occur if the driver is distracted. Operating the Infotainment
system can distract you from the road.
•Always drive carefully and responsibly.
WARNING
Page 29 of 341
If the checkbox in the function button is ticked , the respective function is switched on.
Press the function button to return to the previous menu.
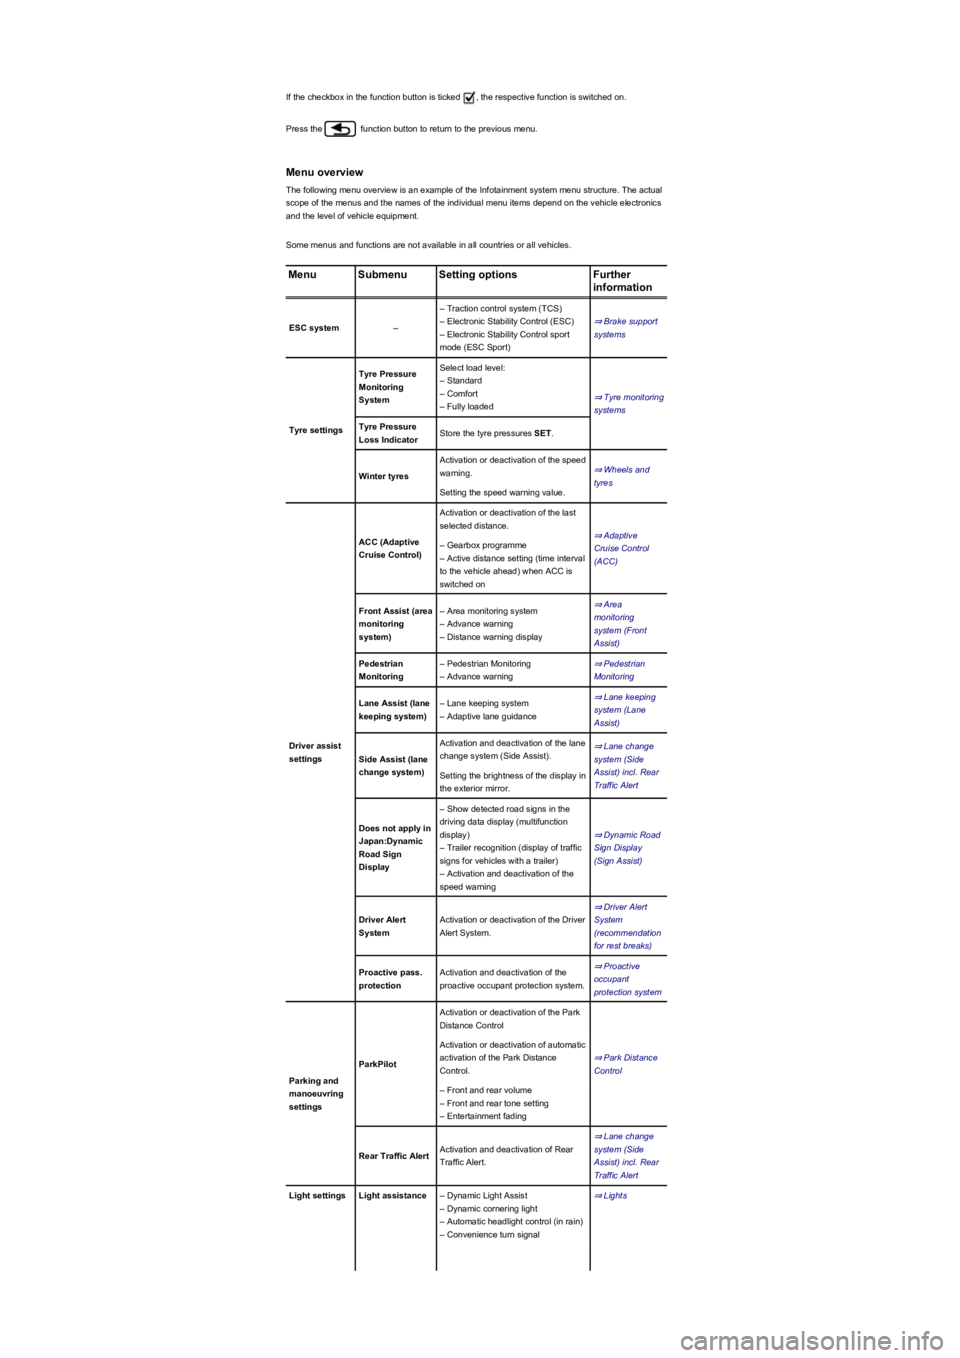
Menu overview
The following menu overview is an example of the Infotainment system menu structure. The actual
scope of the menus and the names of the individual menu items depend on the vehicle electronics
and the level of vehicle equipment.
Some menus and functions are not available in all countries or all vehicles.
MenuSubmenuSetting optionsFurther
information
ESC system–
– Traction control system (TCS)
– Electronic Stability Control (ESC)
– Electronic Stability Control sport
mode (ESC Sport)
⇒ Brake support
systems
Tyre settings
Tyre Pressure
Monitoring
System
Select load level:
– Standard
– Comfort
– Fully loaded
⇒ Tyre monitoring
systems
Tyre Pressure
Loss IndicatorStore the tyre pressures SET.
Winter tyres
Activation or deactivation of the speed
warning.⇒ Wheels and
tyres
Setting the speed warning value.
Driver assist
settings
ACC (Adaptive
Cruise Control)
Activation or deactivation of the last
selected distance.
⇒ Adaptive
Cruise Control
(ACC)
– Gearbox programme
– Active distance setting (time interval
to the vehicle ahead) when ACC is
switched on
Front Assist (area
monitoring
system)
– Area monitoring system
– Advance warning
– Distance warning display
⇒ Area
monitoring
system (Front
Assist)
Pedestrian
Monitoring
– Pedestrian Monitoring
– Advance warning
⇒ Pedestrian
Monitoring
Lane Assist (lane
keeping system)
– Lane keeping system
– Adaptive lane guidance
⇒ Lane keeping
system (Lane
Assist)
Side Assist (lane
change system)
Activation and deactivation of the lane
change system (Side Assist).
⇒ Lane change
system (Side
Assist) incl. Rear
Traffic Alert
Setting the brightness of the display in
the exterior mirror.
Does not apply in
Japan:Dynamic
Road Sign
Display
– Show detected road signs in the
driving data display (multifunction
display)
– Trailer recognition (display of traffic
signs for vehicles with a trailer)
– Activation and deactivation of the
speed warning
⇒ Dynamic Road
Sign Display
(Sign Assist)
Driver Alert
System
Activation or deactivation of the Driver
Alert System.
⇒ Driver Alert
System
(recommendation
for rest breaks)
Proactive pass.
protection
Activation and deactivation of the
proactive occupant protection system.
⇒ Proactive
occupant
protection system
Parking and
manoeuvring
settings
ParkPilot
Activation or deactivation of the Park
Distance Control
⇒ Park Distance
Control
Activation or deactivation of automatic
activation of the Park Distance
Control.
– Front and rear volume
– Front and rear tone setting
– Entertainment fading
Rear Traffic AlertActivation and deactivation of Rear
Traffic Alert.
⇒ Lane change
system (Side
Assist) incl. Rear
Traffic Alert
Light settingsLight assistance– Dynamic Light Assist
– Dynamic cornering light
– Automatic headlight control (in rain)
– Convenience turn signal
⇒ Lights
Page 30 of 341
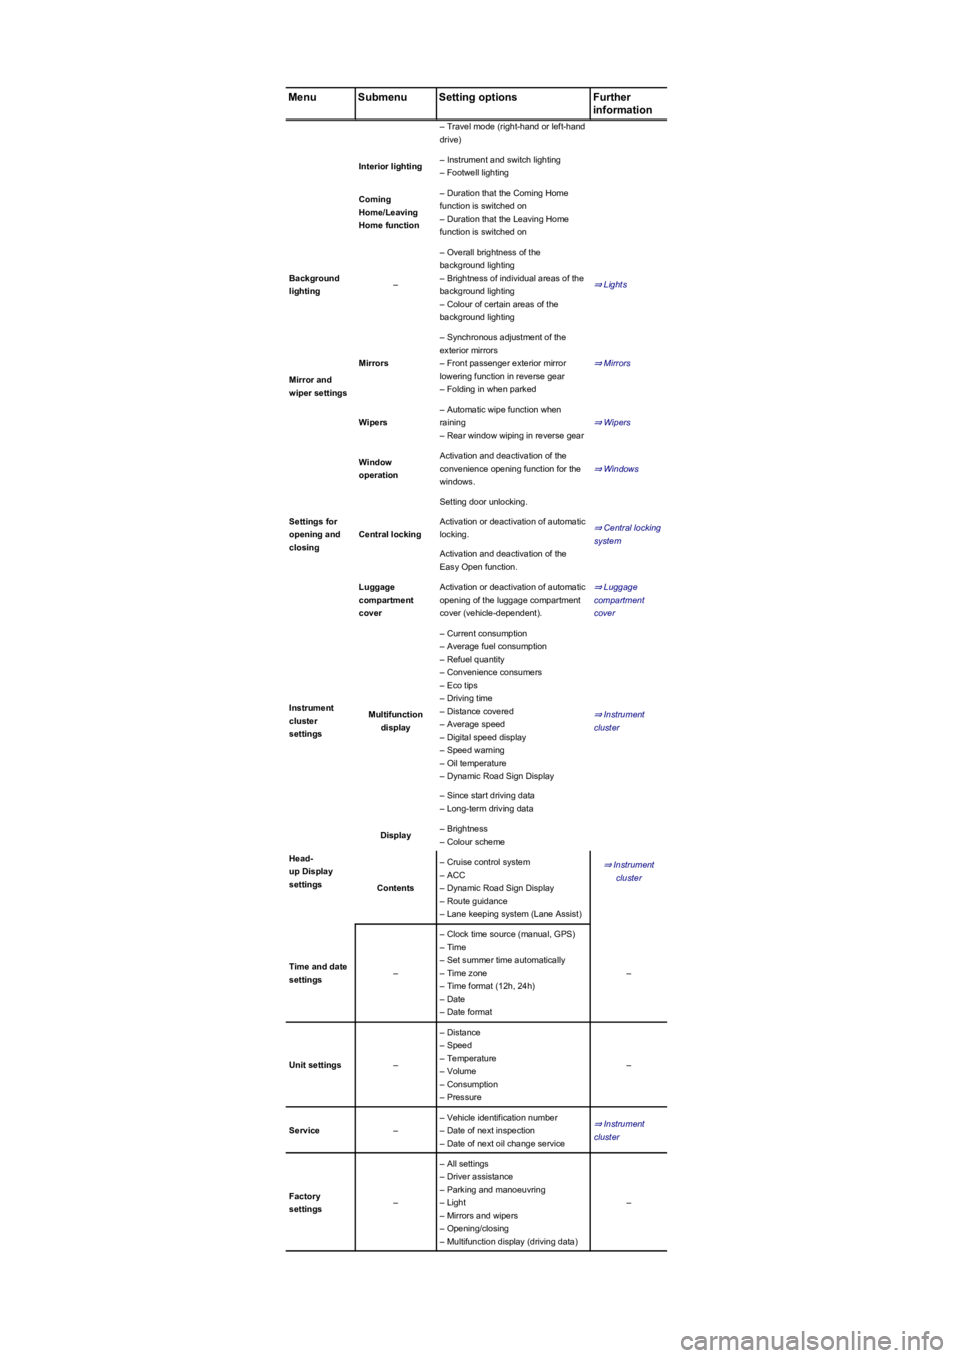
MenuSubmenuSetting optionsFurther
information
– Travel mode (right-hand or left-hand
drive)
Interior lighting– Instrument and switch lighting
– Footwell lighting
Coming
Home/Leaving
Home function
– Duration that the Coming Home
function is switched on
– Duration that the Leaving Home
function is switched on
Background
lighting–
– Overall brightness of the
background lighting
– Brightness of individual areas of the
background lighting
– Colour of certain areas of the
background lighting
⇒ Lights
Mirror and
wiper settings
Mirrors
– Synchronous adjustment of the
exterior mirrors
– Front passenger exterior mirror
lowering function in reverse gear
– Folding in when parked
⇒ Mirrors
Wipers
– Automatic wipe function when
raining
– Rear window wiping in reverse gear
⇒ Wipers
Settings for
opening and
closing
Window
operation
Activation and deactivation of the
convenience opening function for the
windows.
⇒ Windows
Central locking
Setting door unlocking.
⇒ Central locking
system
Activation or deactivation of automatic
locking.
Activation and deactivation of the
Easy Open function.
Luggage
compartment
cover
Activation or deactivation of automatic
opening of the luggage compartment
cover (vehicle-dependent).
⇒ Luggage
compartment
cover
Instrument
cluster
settings
Multifunction
display
– Current consumption
– Average fuel consumption
– Refuel quantity
– Convenience consumers
– Eco tips
– Driving time
– Distance covered
– Average speed
– Digital speed display
– Speed warning
– Oil temperature
– Dynamic Road Sign Display
⇒ Instrument
cluster
– Since start driving data
– Long-term driving data
Head-
up Display
settings
Display– Brightness
– Colour scheme
⇒ Instrument
cluster
Contents
– Cruise control system
– ACC
– Dynamic Road Sign Display
– Route guidance
– Lane keeping system (Lane Assist)
Time and date
settings–
– Clock time source (manual, GPS)
– Time
– Set summer time automatically
– Time zone
– Time format (12h, 24h)
– Date
– Date format
–
Unit settings–
– Distance
– Speed
– Temperature
– Volume
– Consumption
– Pressure
–
Service–
– Vehicle identification number
– Date of next inspection
– Date of next oil change service
⇒ Instrument
cluster
Factory
settings–
– All settings
– Driver assistance
– Parking and manoeuvring
– Light
– Mirrors and wipers
– Opening/closing
– Multifunction display (driving data)
–