VOLVO 240 1990 Owners Manual
Manufacturer: VOLVO, Model Year: 1990, Model line: 240, Model: VOLVO 240 1990Pages: 143, PDF Size: 2.32 MB
Page 101 of 143
Volvo 1990 240 Model
4 Never disconnect the battery circuit (for example, to change the batt\
ery) while the engine is running,
as this will immediately ruin the alternator. Always make sure that all \
the battery connections are
cleaned and properly tightened.
5 If any electrical welding work is performed on the vehicle, the ground\
lead and all the connecting
cables of the alternator must be disconnected and the welder wires place\
d as near the welding point as
possible.
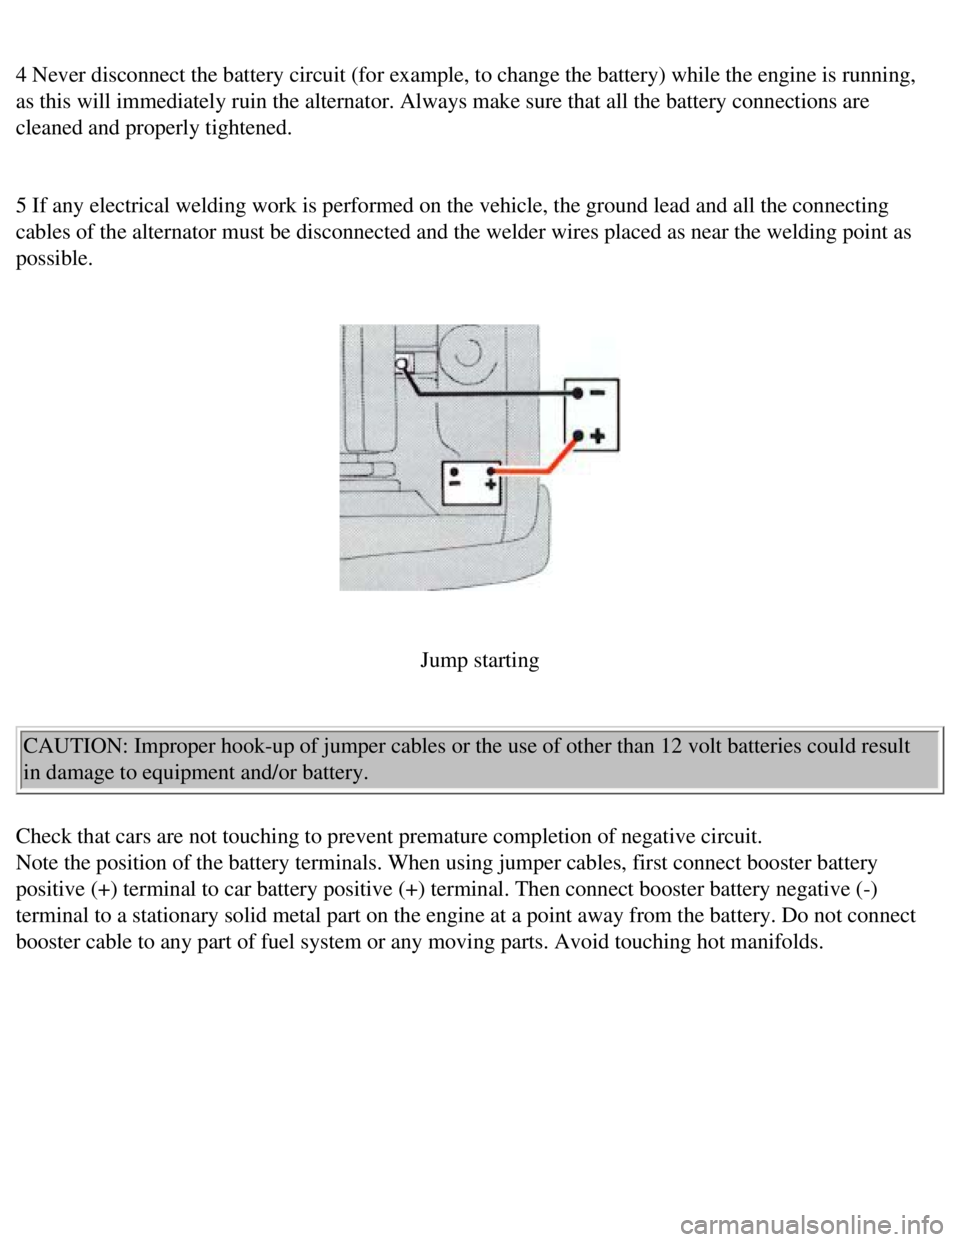
Jump starting
CAUTION: Improper hook-up of jumper cables or the use of other than 12 v\
olt batteries could result
in damage to equipment and/or battery.
Check that cars are not touching to prevent premature completion of nega\
tive circuit.
Note the position of the battery terminals. When using jumper cables, fi\
rst connect booster battery
positive (+) terminal to car battery positive (+) terminal. Then con\
nect booster battery negative (-)
terminal to a stationary solid metal part on the engine at a point away \
from the battery. Do not connect
booster cable to any part of fuel system or any moving parts. Avoid touc\
hing hot manifolds.
file:///K|/ownersdocs/1990/1990_240/90240_15.htm (9 of 10)12/30/2006 8\
:25:09 AM
Page 102 of 143
Volvo 1990 240 Model
WARNING!
To prevent possible explosion, never expose battery to open flame or ele\
ctric spark. Do not smoke
near battery. Batteries generate hydrogen gas which is flammable and exp\
losive.
Battery fluid contains sulfuric acid which can cause serious injury.
Do not allow battery acid to contact eyes, skin, fabrics or painted surf\
aces. If contact occurs,
thoroughly flush affected area immediately with water.
Obtain medical attention immediately if eyes are affected.
After engine has started first remove negative (-) jumper cable, then \
positive (+) terminal jumper cable.
Contents | Top of Page
file:///K|/ownersdocs/1990/1990_240/90240_15.htm (10 of 10)12/30/2006 \
8:25:09 AM
Page 103 of 143
Volvo 1990 240 Model
pg. 76 Replacing bulbs
Replacing bulbs
The replacement of bulbs in the various lighting units is shown on the f\
ollowing pages. Make sure when
installing bulbs, that the guide pin on the socket fits into its corresp\
onding recess.
When installing bulbs, do not touch the glass with your fingers. The rea\
son for this is that grease, oil or
any other impurities can be carbonized onto the bulb and damage the refl\
ector.
Use bulbs of correct type and voltage. Failure to do so could activate t\
he bulb failure warning light.
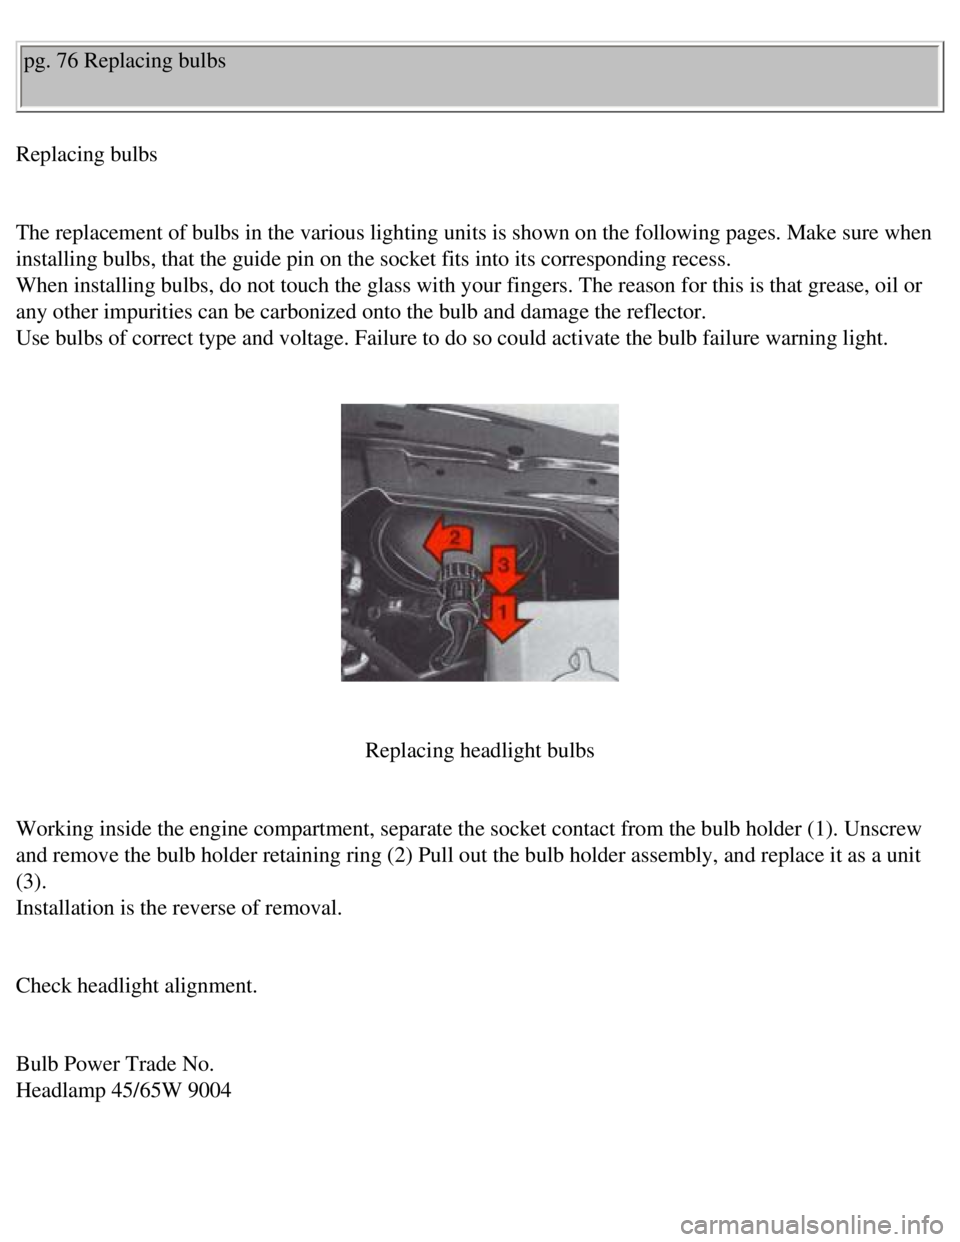
Replacing headlight bulbs
Working inside the engine compartment, separate the socket contact from \
the bulb holder (1). Unscrew
and remove the bulb holder retaining ring (2) Pull out the bulb holder\
assembly, and replace it as a unit
(3).
Installation is the reverse of removal.
Check headlight alignment.
Bulb Power Trade No.
Headlamp 45/65W 9004
file:///K|/ownersdocs/1990/1990_240/90240_16.htm (1 of 10)12/30/2006 8\
:25:10 AM
Page 104 of 143
Volvo 1990 240 Model
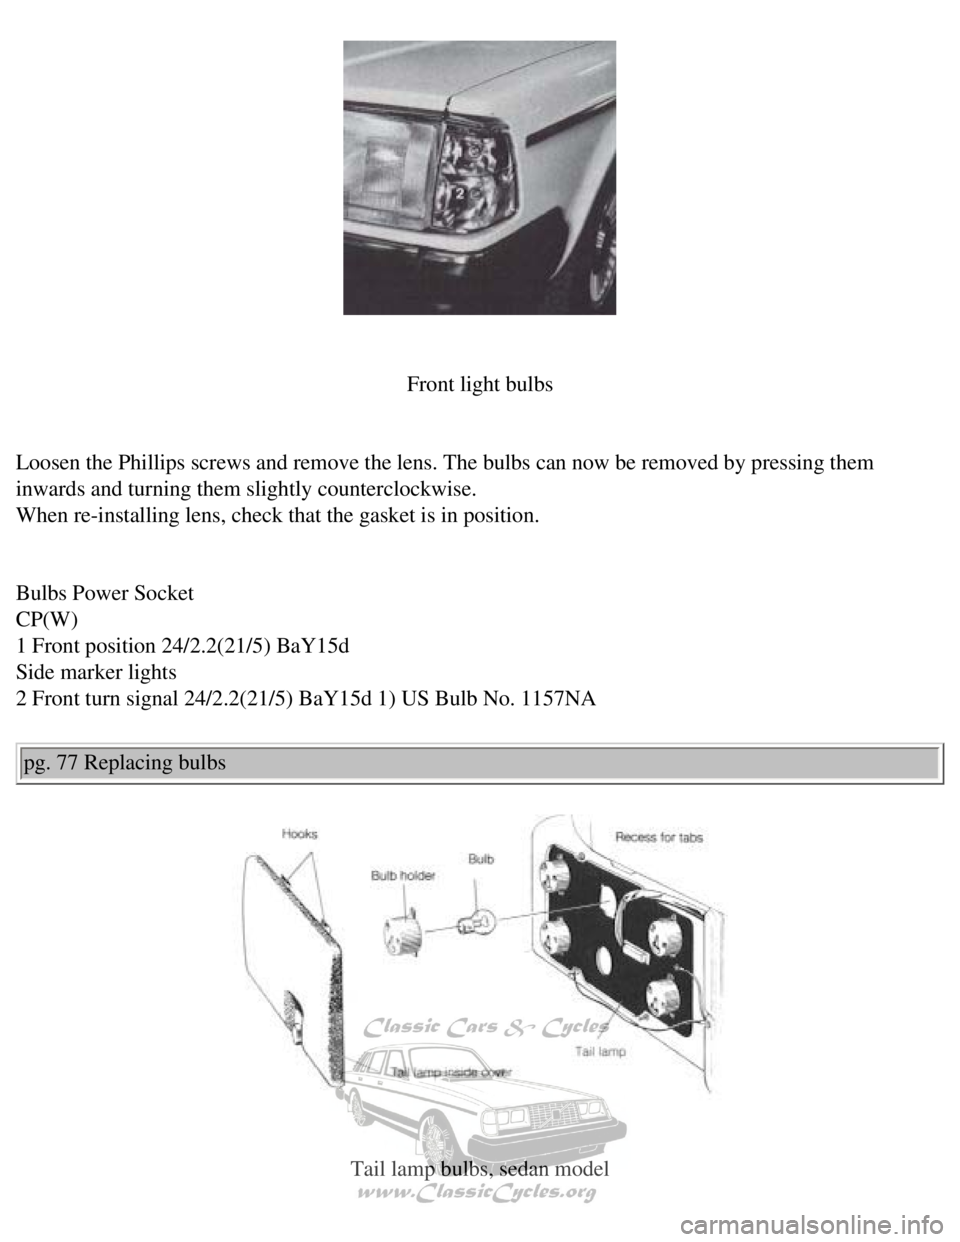
Front light bulbs
Loosen the Phillips screws and remove the lens. The bulbs can now be rem\
oved by pressing them
inwards and turning them slightly counterclockwise.
When re-installing lens, check that the gasket is in position.
Bulbs Power Socket
CP(W)
1 Front position 24/2.2(21/5) BaY15d
Side marker lights
2 Front turn signal 24/2.2(21/5) BaY15d 1) US Bulb No. 1157NA
pg. 77 Replacing bulbs
Tail lamp bulbs, sedan model
file:///K|/ownersdocs/1990/1990_240/90240_16.htm (2 of 10)12/30/2006 8\
:25:10 AM
Page 105 of 143
Volvo 1990 240 Model
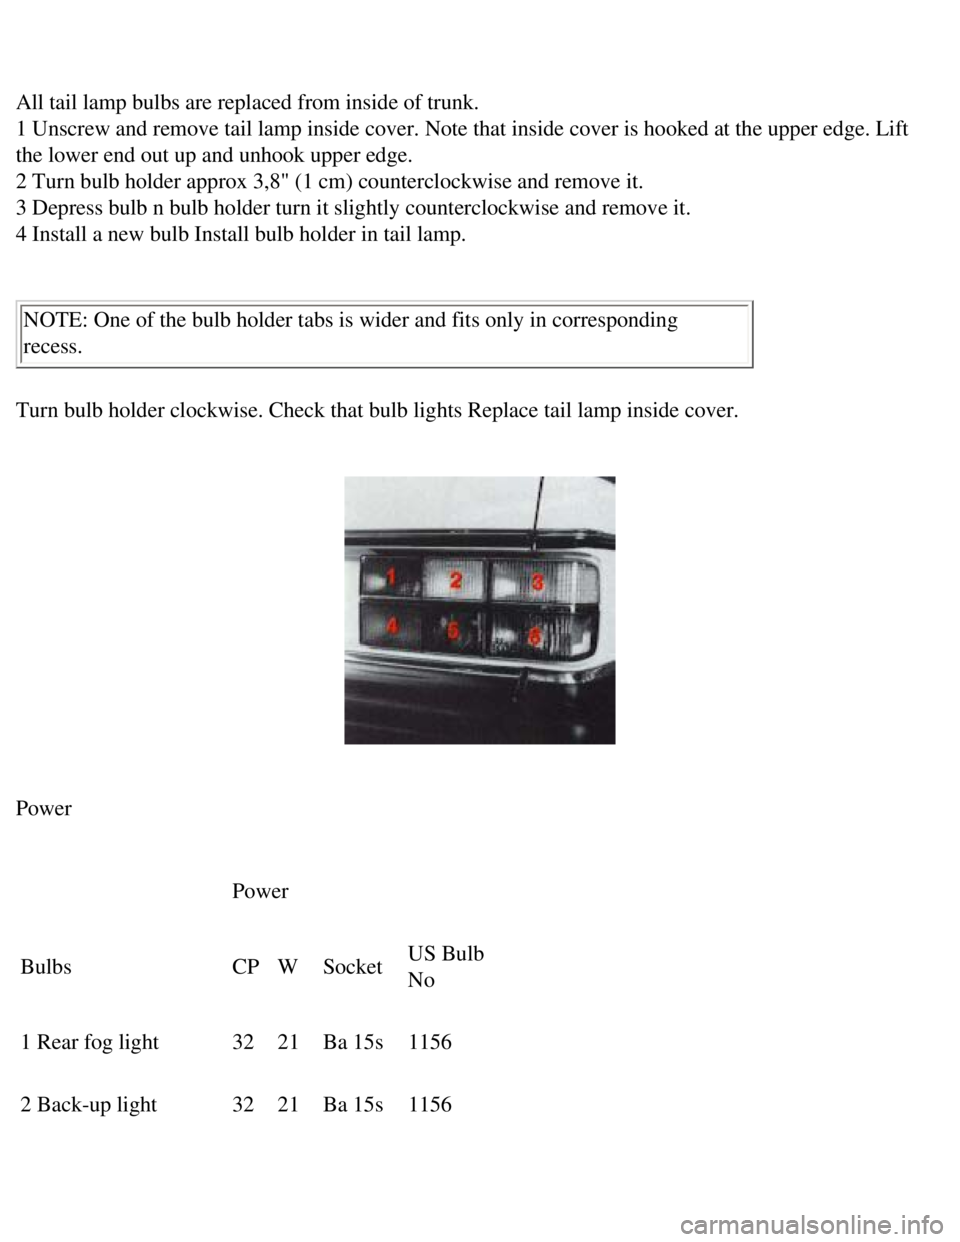
All tail lamp bulbs are replaced from inside of trunk.
1 Unscrew and remove tail lamp inside cover. Note that inside cover is h\
ooked at the upper edge. Lift
the lower end out up and unhook upper edge.
2 Turn bulb holder approx 3,8" (1 cm) counterclockwise and remove it. \
3 Depress bulb n bulb holder turn it slightly counterclockwise and remov\
e it.
4 Install a new bulb Install bulb holder in tail lamp.
NOTE: One of the bulb holder tabs is wider and fits only in correspondin\
g
recess.
Turn bulb holder clockwise. Check that bulb lights Replace tail lamp ins\
ide cover.
Power
Power
Bulbs CP W Socket US Bulb
No
1 Rear fog light 32 21 Ba 15s 1156
2 Back-up light 32 21 Ba 15s 1156
file:///K|/ownersdocs/1990/1990_240/90240_16.htm (3 of 10)12/30/2006 8\
:25:10 AM
Page 106 of 143
Volvo 1990 240 Model
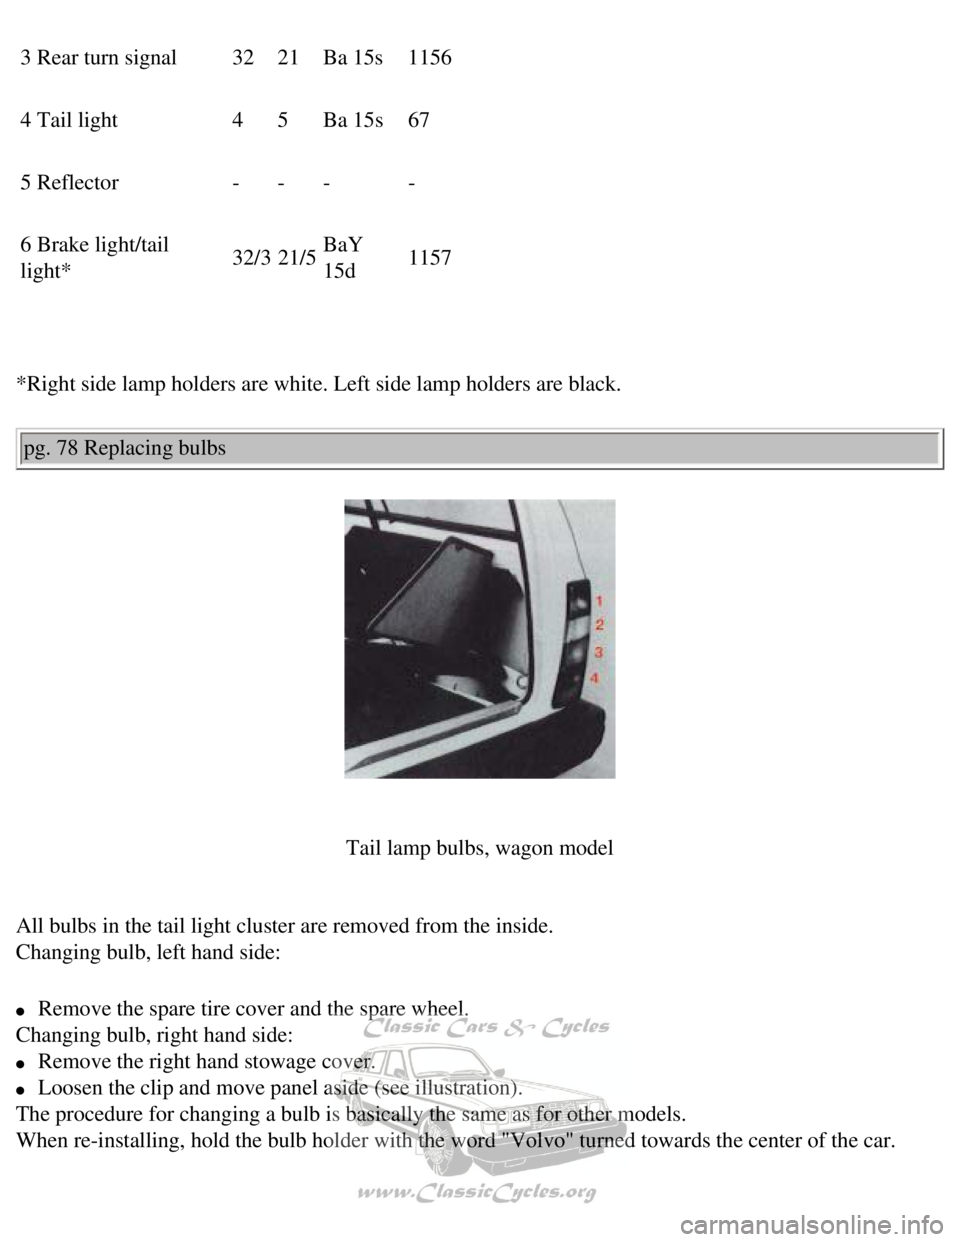
3 Rear turn signal 32 21 Ba 15s 1156
4 Tail light 4 5 Ba 15s 67
5 Reflector - - - -
6 Brake light/tail
light* 32/3
21/5 BaY
15d 1157
*Right side lamp holders are white. Left side lamp holders are black. pg. 78 Replacing bulbs
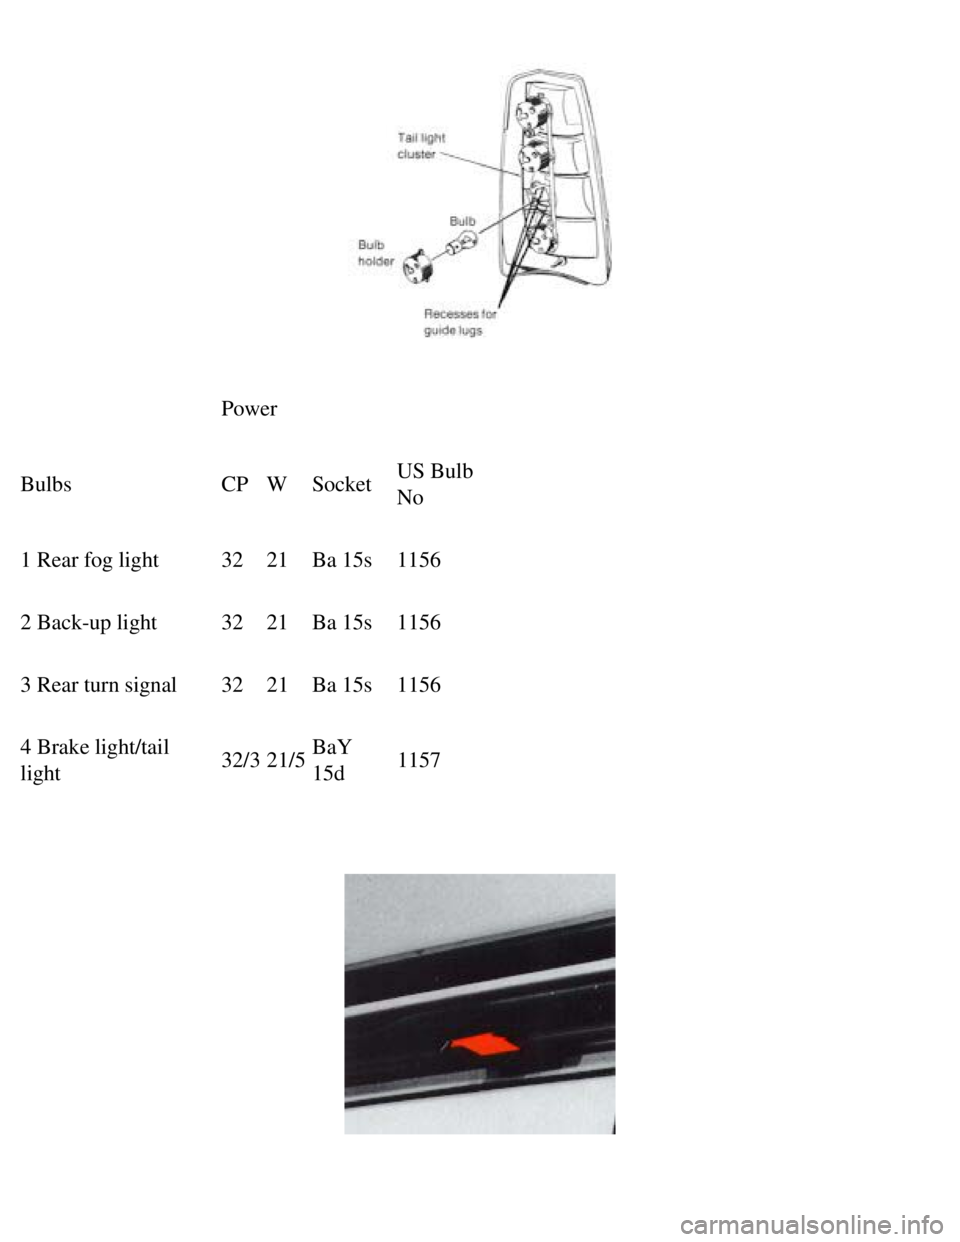
Tail lamp bulbs, wagon model
All bulbs in the tail light cluster are removed from the inside.
Changing bulb, left hand side:
l Remove the spare tire cover and the spare wheel.
Changing bulb, right hand side:
l Remove the right hand stowage cover.
l Loosen the clip and move panel aside (see illustration).
The procedure for changing a bulb is basically the same as for other mod\
els.
When re-installing, hold the bulb holder with the word "Volvo" turned to\
wards the center of the car.
file:///K|/ownersdocs/1990/1990_240/90240_16.htm (4 of 10)12/30/2006 8\
:25:10 AM
Page 107 of 143
Volvo 1990 240 Model
Power
Bulbs CP W Socket US Bulb
No
1 Rear fog light 32 21 Ba 15s 1156
2 Back-up light 32 21 Ba 15s 1156
3 Rear turn signal 32 21 Ba 15s 1156
4 Brake light/tail
light 32/3
21/5 BaY
15d 1157
file:///K|/ownersdocs/1990/1990_240/90240_16.htm (5 of 10)12/30/2006 8\
:25:10 AM
Page 108 of 143
Volvo 1990 240 Model
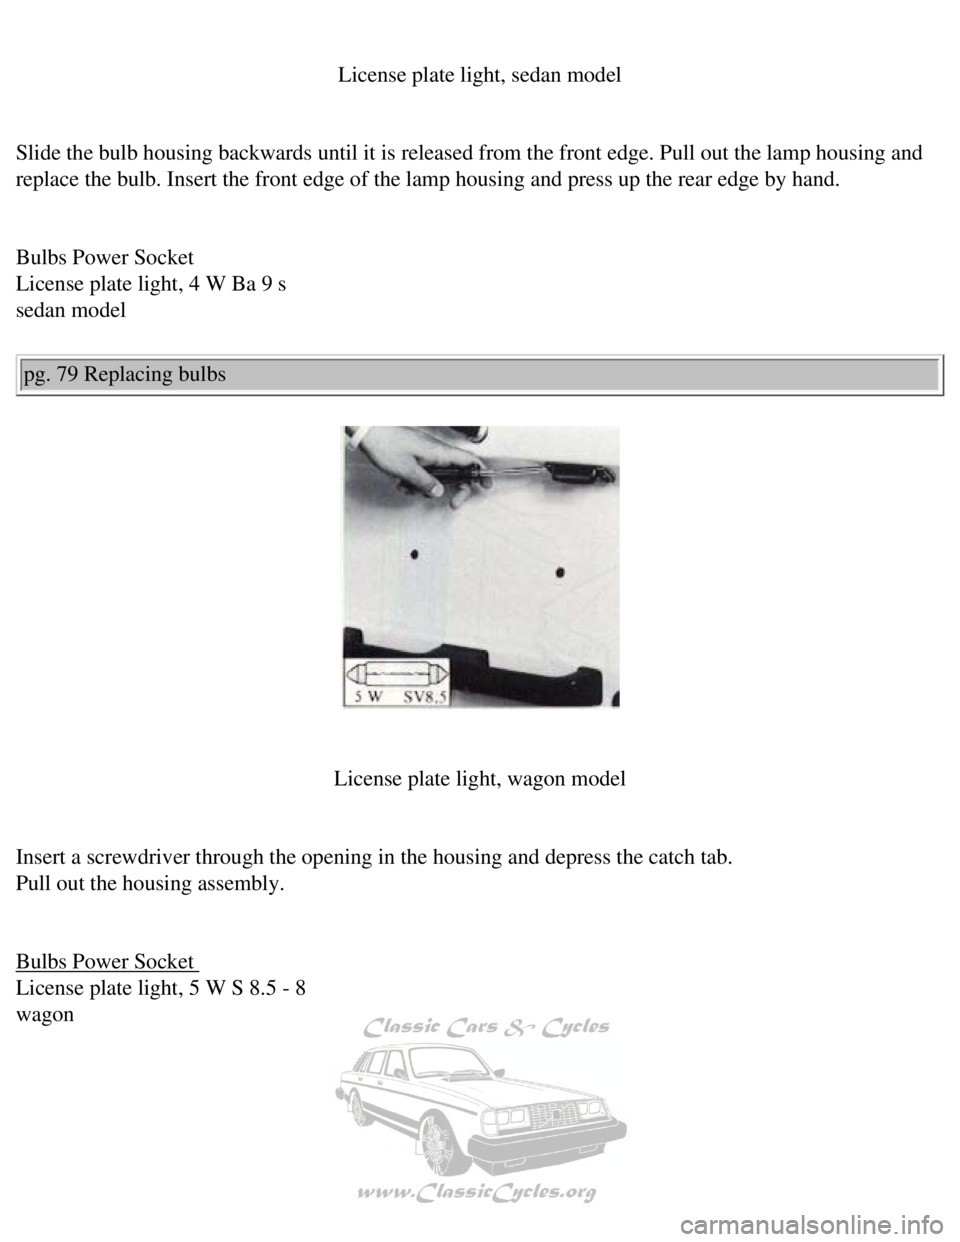
License plate light, sedan model
Slide the bulb housing backwards until it is released from the front edg\
e. Pull out the lamp housing and
replace the bulb. Insert the front edge of the lamp housing and press up\
the rear edge by hand.
Bulbs Power Socket
License plate light, 4 W Ba 9 s
sedan model
pg. 79 Replacing bulbs
License plate light, wagon model
Insert a screwdriver through the opening in the housing and depress the \
catch tab.
Pull out the housing assembly.
Bulbs Power Socket
License plate light, 5 W S 8.5 - 8
wagon
file:///K|/ownersdocs/1990/1990_240/90240_16.htm (6 of 10)12/30/2006 8\
:25:10 AM
Page 109 of 143
Volvo 1990 240 Model
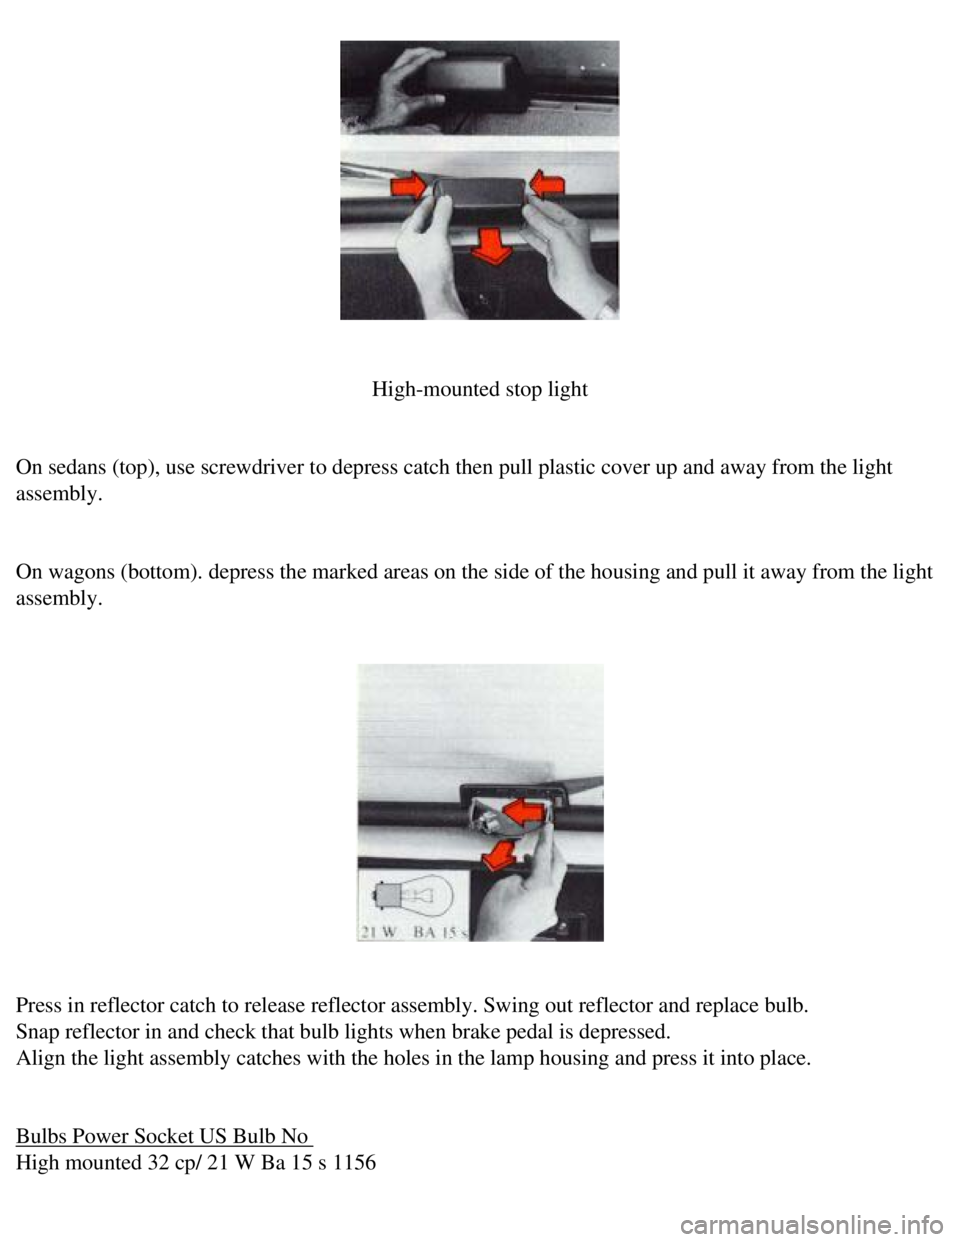
High-mounted stop light
On sedans (top), use screwdriver to depress catch then pull plastic co\
ver up and away from the light
assembly.
On wagons (bottom). depress the marked areas on the side of the housin\
g and pull it away from the light
assembly.
Press in reflector catch to release reflector assembly. Swing out reflec\
tor and replace bulb.
Snap reflector in and check that bulb lights when brake pedal is depress\
ed.
Align the light assembly catches with the holes in the lamp housing and \
press it into place.
Bulbs Power Socket US Bulb No
High mounted 32 cp/ 21 W Ba 15 s 1156
file:///K|/ownersdocs/1990/1990_240/90240_16.htm (7 of 10)12/30/2006 8\
:25:10 AM
Page 110 of 143
Volvo 1990 240 Model
stop light pg. 80 Replacing bulbs
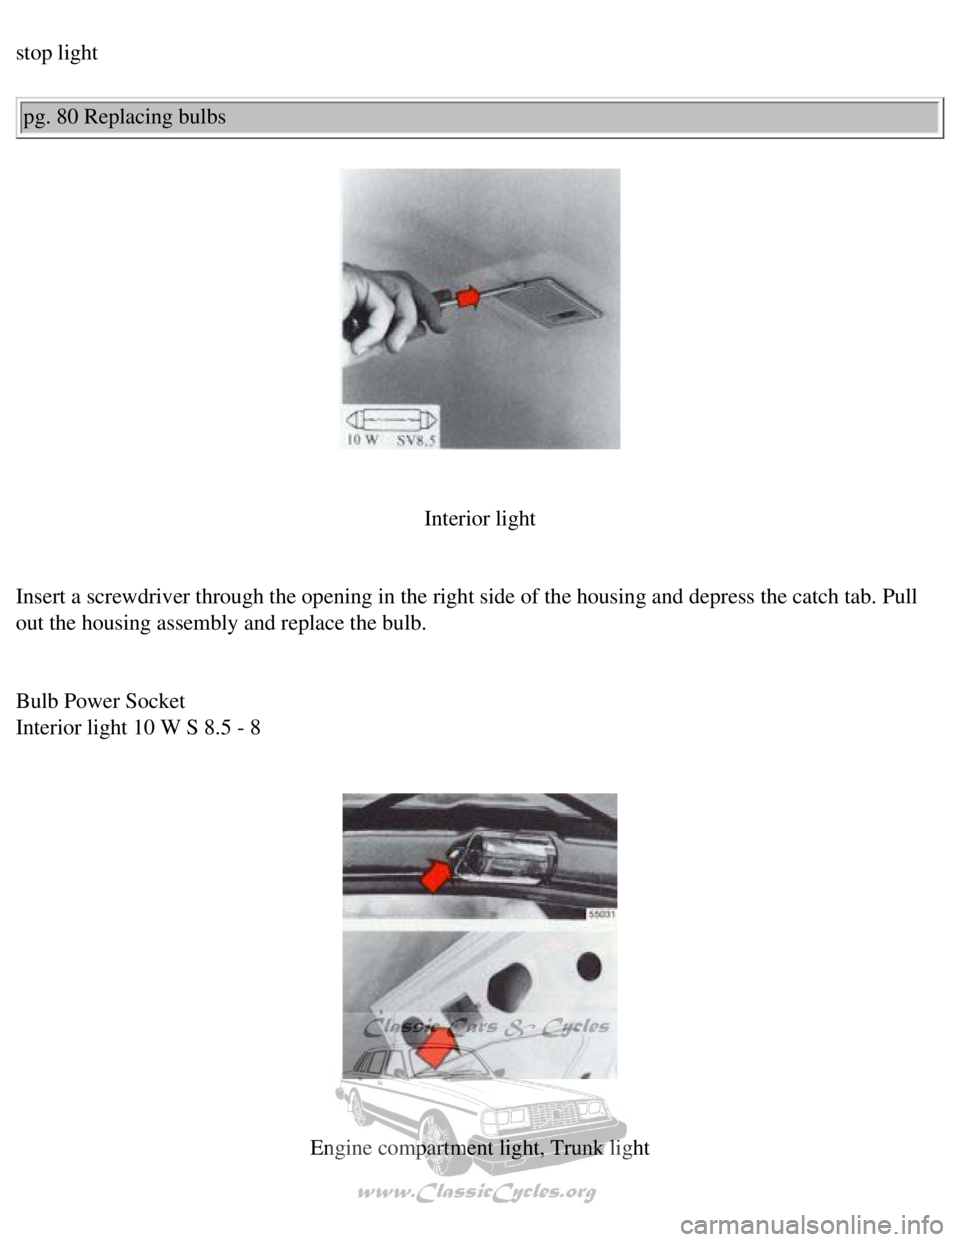
Interior light
Insert a screwdriver through the opening in the right side of the housin\
g and depress the catch tab. Pull
out the housing assembly and replace the bulb.
Bulb Power Socket
Interior light 10 W S 8.5 - 8
Engine compartment light, Trunk light
file:///K|/ownersdocs/1990/1990_240/90240_16.htm (8 of 10)12/30/2006 8\
:25:10 AM