mirror VOLVO S60 INSCRIPTION 2016 Owner´s Manual
[x] Cancel search | Manufacturer: VOLVO, Model Year: 2016, Model line: S60 INSCRIPTION, Model: VOLVO S60 INSCRIPTION 2016Pages: 344, PDF Size: 7.24 MB
Page 5 of 344
Contents
* Option/accessory, for more information, see Introduction.3
03
03 Instruments and controls
Instrument overview ................................. 58
Information displays – introduction........... 58
Eco Guide* and Power Meter*.................. 61
Information displays – indicator symbols. 62
Information displays – warning symbols... 64
My Car – introduction............................... 66Information displays – ambient tempera-
ture sensor................................................ 67 Information displays – trip odometer and
clock......................................................... 67
Inserting/removing remote key................. 68
Ignition modes.......................................... 69
Front seats................................................ 70
Front seats – folding backrest*................. 70
Front seats – power seat.......................... 71Key memory – power driver's seat* and
door mirrors.............................................. 72
Rear seats – head restraints..................... 74
Rear seats – folding backrest................... 74
Steering wheel.......................................... 75
Electrically heated* steering wheel........... 75
Lighting panel........................................... 76
High/low beam headlights........................ 77
Active high beams (AHB)*......................... 77
03
Tunnel detection (models with the rain
sensor* only)............................................. 78
Active Bending Lights (ABL)*.................... 79
Auxiliary lights*.......................................... 79
Instrument and "theater" lighting.............. 80
Parking lights............................................ 80
Rear fog lights........................................... 80
Hazard warning flashers........................... 81
Turn signals............................................... 81
Front interior lighting................................. 82
Rear interior lighting.................................. 83
Home safe lighting.................................... 83
Approach lighting...................................... 83
Windshield wipers..................................... 84
Rain sensor*.............................................. 84
Windshield washer.................................... 85
Tailgate wiper/washer............................... 86
Power windows......................................... 86
Power door mirrors................................... 87Power door mirrors – automatic tilting/
retraction................................................... 88 Heated windshield*, rear window and
door mirror defrosters............................... 89
Interior rearview mirror.............................. 90
03
Digital compass*....................................... 90 HomeLink ®
Wireless Control System* –
introduction............................................... 91HomeLink ®
Wireless Control System* –
programming............................................. 92
Volvo Sensus............................................ 95
Information display – menu controls......... 96
Information display – menu overview....... 96
Information display – messages............... 97
Trip computer – introduction ................... 98Trip computer – functions, analog instru-
ment panel................................................ 99 Trip computer – functions, digital instru-
ment panel.............................................. 102 Trip computer – Supplementary informa-
tion.......................................................... 104
Trip computer – Trip statistics................ 105
Page 6 of 344
Contents
4* Option/accessory, for more information, see Introduction.
04
04 Climate
Climate – general information................. 107
Climate – sensors................................... 107
Air quality................................................ 108
Interior Air Quality System (IAQS)*.......... 108
Climate – menu settings......................... 109
Air distribution – general......................... 109
Electronic climate control (ECC)............. 110
Heated seats........................................... 110
Temperature and blower control............ 111
Automatic climate control....................... 112
Air conditioning....................................... 112Max. defroster and electrically heated
windshield*.............................................. 112
Air distribution – function........................ 114
Air distribution – recirculation................. 114
Air distribution – table............................. 116
05
05 Loading and storage
Storage spaces....................................... 119
Tunnel console........................................ 119
Tunnel console – 12-volt sockets........... 119
Glove compartment................................ 120
Vanity mirror............................................ 120
Loading – general................................... 120
Loading – roof load carriers.................... 121
Load anchoring eyelets........................... 121
Grocery bag holder................................. 122
06
06 Locks and alarm
Remote key and key blade..................... 124
Remote key – loss................................... 124
Key memory............................................ 125
Locking/unlocking confirmation.............. 125
Immobilizer (start inhibitor)...................... 126
Remote key – functions.......................... 127
Remote key – range................................ 128Detachable key blade – general informa-
tion.......................................................... 128 Detachable key blade – detaching/rein-
serting..................................................... 128
Detachable key blade – unlocking.......... 129
Remote key – replacing the battery........ 129
Keyless drive*– locking/unlocking.......... 131Keyless drive* – unlocking with key
blade....................................................... 131
Keyless drive* – key memory.................. 132
Keyless drive* – messages..................... 133
Keyless drive* – antenna locations......... 134
Locking/unlocking – from the outside..... 134
Manual locking........................................ 134
Locking/unlocking – from inside............. 135
Locking/unlocking – glove compartment 136
Alarm – general information.................... 136
Page 10 of 344
Contents
8
10
10 Maintenance and servicing
Maintenance – introduction.................... 281
Maintenance – owner maintenance........ 282
Maintenance – hoisting........................... 282
Onboard Diagnostic System................... 283
Booking service and repairs .................. 283
Maintenance – opening/closing hood..... 285
Engine compartment – overview............ 285
Engine compartment – engine oil........... 286
Engine compartment – coolant............... 288
Engine compartment – brake fluid.......... 289Engine compartment – power steering
fluid......................................................... 289
Bulbs – introduction................................ 290
Bulbs – headlight housing....................... 290
Bulbs – cover.......................................... 291
Bulbs – low beam, Halogen.................... 291
Bulbs – high beam, Halogen................... 291
Bulbs – extra high beam......................... 292
Bulbs – front turn signals........................ 292
Bulbs – license plate lighting.................. 292
Bulbs – vanity mirror lighting.................. 293
Bulbs – specifications............................. 293
Wiper blades – service position.............. 293
Wiper blades – windshield...................... 294
10
Engine compartment – washer fluid....... 295
Battery – symbols................................... 295
Battery – handling................................... 296
Battery – maintenance............................ 297
Battery – changing.................................. 298
Fuses – introduction............................... 299
Fuses – engine compartment................. 299
Fuses – glove compartment................... 302
Fuses – cargo area/trunk........................ 305Fuses – engine compartment cold zone
(Start/Stop only)...................................... 306
Washing the car...................................... 308
Automatic car wash................................ 309
Polishing and waxing.............................. 309
Cleaning the interior................................ 310
Touching up paintwork........................... 312
11
11 Specifications
Label information.................................... 315
Dimensions............................................. 318
Weights................................................... 320
Engine specifications.............................. 322
Oil specifications..................................... 323
Oil volume............................................... 323
Coolant – specification and volume........ 324Transmission oil – specification and vol-
umes....................................................... 324
Brake fluid – specification and volume... 324
Power steering – specification................ 325Fuel tank volume – specification and vol-
ume......................................................... 325 Air conditioning – specification and vol-
ume......................................................... 325
Battery specifications............................. 326
Symbols – general information............... 327
Warning symbols.................................... 327
Indicator symbols.................................... 328
Information symbols............................... 329
Information symbols – ceiling console.... 330
Information symbols – center console.... 330
Page 38 of 344
02 Safety
02
36
Occupant Weight Sensor
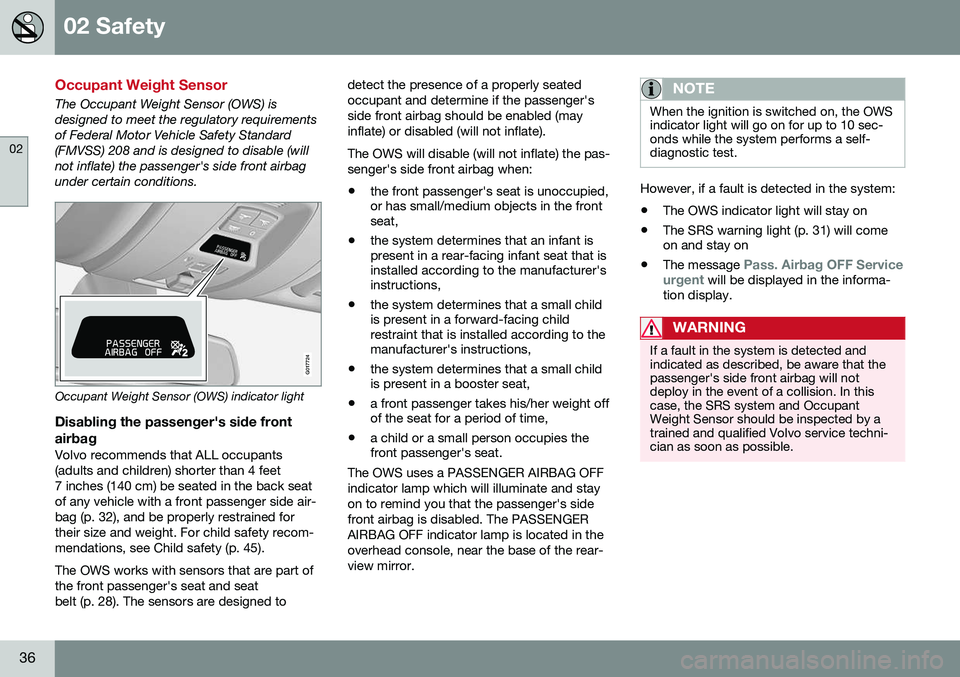
The Occupant Weight Sensor (OWS) is designed to meet the regulatory requirementsof Federal Motor Vehicle Safety Standard(FMVSS) 208 and is designed to disable (willnot inflate) the passenger's side front airbagunder certain conditions.
2
2
G017724
Occupant Weight Sensor (OWS) indicator light
Disabling the passenger's side frontairbag
Volvo recommends that ALL occupants (adults and children) shorter than 4 feet7 inches (140 cm) be seated in the back seatof any vehicle with a front passenger side air-bag (p. 32), and be properly restrained fortheir size and weight. For child safety recom-mendations, see Child safety (p. 45). The OWS works with sensors that are part of the front passenger's seat and seatbelt (p. 28). The sensors are designed to detect the presence of a properly seatedoccupant and determine if the passenger'sside front airbag should be enabled (mayinflate) or disabled (will not inflate). The OWS will disable (will not inflate) the pas- senger's side front airbag when:
• the front passenger's seat is unoccupied, or has small/medium objects in the frontseat,
• the system determines that an infant ispresent in a rear-facing infant seat that isinstalled according to the manufacturer'sinstructions,
• the system determines that a small childis present in a forward-facing childrestraint that is installed according to themanufacturer's instructions,
• the system determines that a small childis present in a booster seat,
• a front passenger takes his/her weight offof the seat for a period of time,
• a child or a small person occupies thefront passenger's seat.
The OWS uses a PASSENGER AIRBAG OFF indicator lamp which will illuminate and stayon to remind you that the passenger's sidefront airbag is disabled. The PASSENGERAIRBAG OFF indicator lamp is located in theoverhead console, near the base of the rear-view mirror.
NOTE
When the ignition is switched on, the OWS indicator light will go on for up to 10 sec-onds while the system performs a self-diagnostic test.
However, if a fault is detected in the system:
• The OWS indicator light will stay on
• The SRS warning light (p. 31) will come on and stay on
• The message
Pass. Airbag OFF Service
urgent will be displayed in the informa-
tion display.
WARNING
If a fault in the system is detected and indicated as described, be aware that thepassenger's side front airbag will notdeploy in the event of a collision. In thiscase, the SRS system and OccupantWeight Sensor should be inspected by atrained and qualified Volvo service techni-cian as soon as possible.
Page 49 of 344
02 Safety
02
}}
47
Child restraints
Suitable child restraints should always be used when children travel in the vehicle.
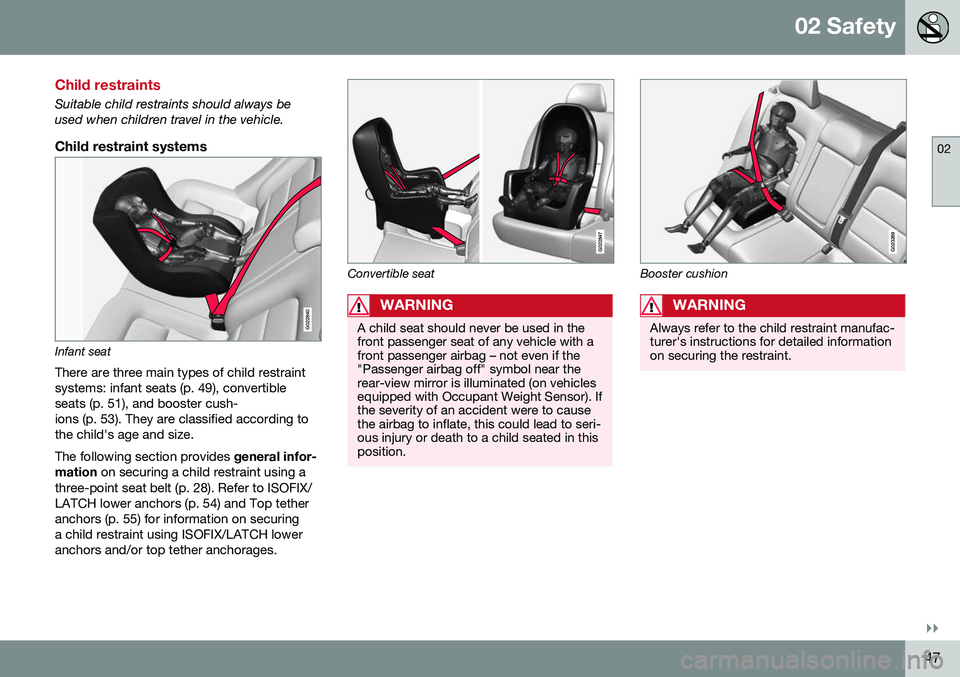
Child restraint systems
G022840
Infant seat
There are three main types of child restraint systems: infant seats (p. 49), convertibleseats (p. 51), and booster cush-ions (p. 53). They are classified according tothe child's age and size. The following section provides general infor-
mation on securing a child restraint using a
three-point seat belt (p. 28). Refer to ISOFIX/ LATCH lower anchors (p. 54) and Top tetheranchors (p. 55) for information on securinga child restraint using ISOFIX/LATCH loweranchors and/or top tether anchorages.
G022847
Convertible seat
WARNING
A child seat should never be used in the front passenger seat of any vehicle with afront passenger airbag – not even if the"Passenger airbag off" symbol near therear-view mirror is illuminated (on vehiclesequipped with Occupant Weight Sensor). Ifthe severity of an accident were to causethe airbag to inflate, this could lead to seri-ous injury or death to a child seated in thisposition.
G023269
Booster cushion
WARNING
Always refer to the child restraint manufac- turer's instructions for detailed informationon securing the restraint.
Page 51 of 344
02 Safety
02
}}
49
Infant seats
Suitable child restraints should always be used when children (depending on their age/size) are seated in the vehicle.
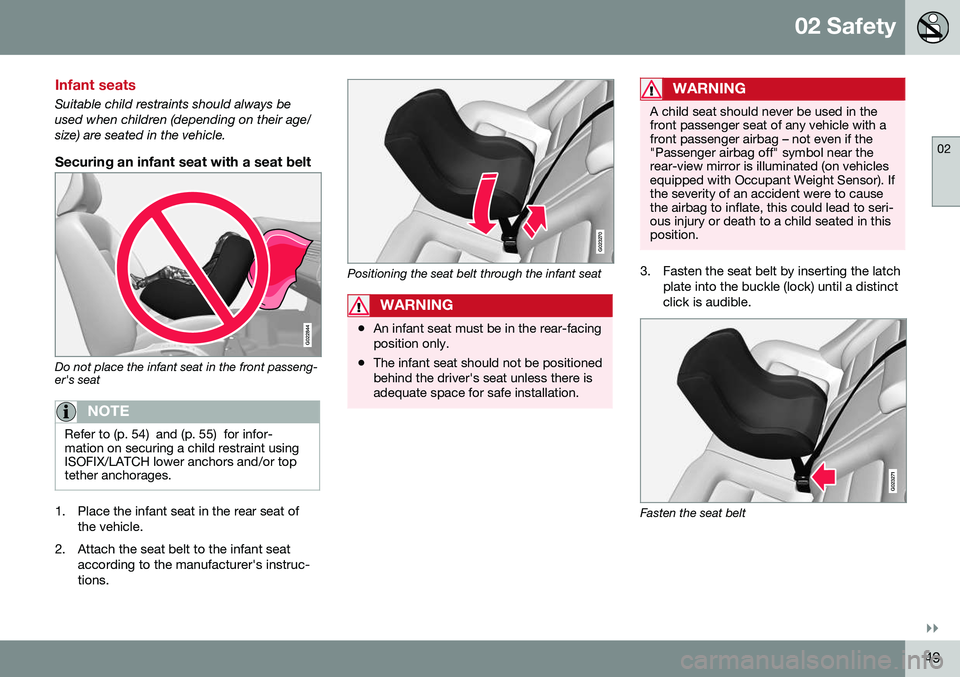
Securing an infant seat with a seat belt
G022844
Do not place the infant seat in the front passeng- er's seat
NOTE
Refer to (p. 54) and (p. 55) for infor- mation on securing a child restraint usingISOFIX/LATCH lower anchors and/or toptether anchorages.
1. Place the infant seat in the rear seat ofthe vehicle.
2. Attach the seat belt to the infant seat according to the manufacturer's instruc- tions.
G023270
Positioning the seat belt through the infant seat
WARNING
•An infant seat must be in the rear-facing position only.
• The infant seat should not be positionedbehind the driver's seat unless there isadequate space for safe installation.
WARNING
A child seat should never be used in the front passenger seat of any vehicle with afront passenger airbag – not even if the"Passenger airbag off" symbol near therear-view mirror is illuminated (on vehiclesequipped with Occupant Weight Sensor). Ifthe severity of an accident were to causethe airbag to inflate, this could lead to seri-ous injury or death to a child seated in thisposition.
3. Fasten the seat belt by inserting the latch
plate into the buckle (lock) until a distinct click is audible.
G023271
Fasten the seat belt
Page 54 of 344
||
02 Safety
02
52
G022848
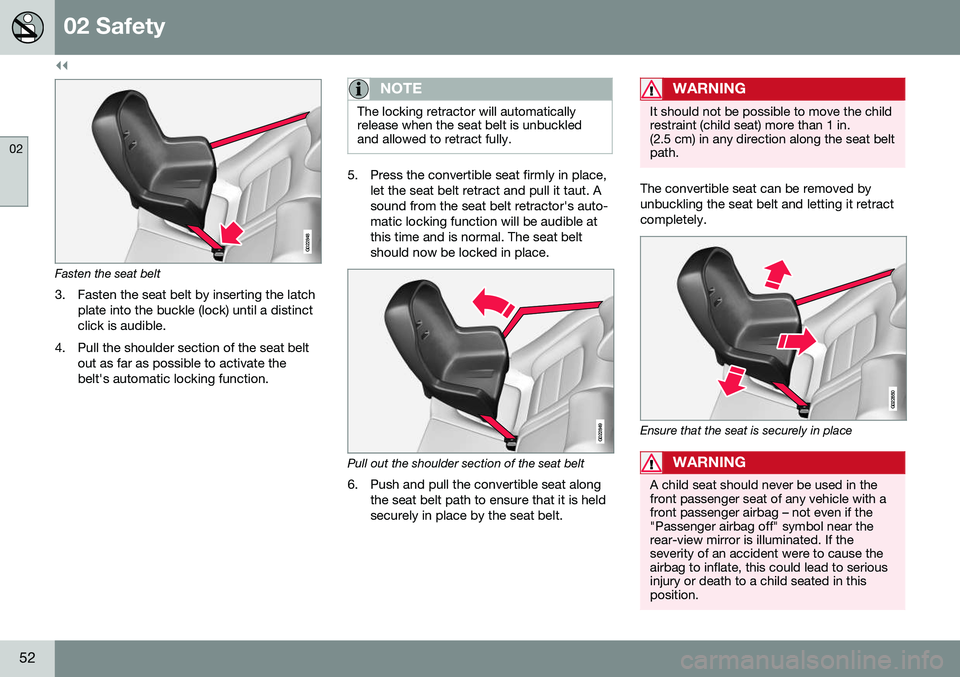
Fasten the seat belt
3. Fasten the seat belt by inserting the latch plate into the buckle (lock) until a distinct click is audible.
4. Pull the shoulder section of the seat belt out as far as possible to activate thebelt's automatic locking function.
NOTE
The locking retractor will automatically release when the seat belt is unbuckledand allowed to retract fully.
5. Press the convertible seat firmly in place,let the seat belt retract and pull it taut. A sound from the seat belt retractor's auto-matic locking function will be audible atthis time and is normal. The seat beltshould now be locked in place.
G022849
Pull out the shoulder section of the seat belt
6. Push and pull the convertible seat along the seat belt path to ensure that it is held securely in place by the seat belt.
WARNING
It should not be possible to move the child restraint (child seat) more than 1 in.(2.5 cm) in any direction along the seat beltpath.
The convertible seat can be removed by unbuckling the seat belt and letting it retractcompletely.
G022850
Ensure that the seat is securely in place
WARNING
A child seat should never be used in the front passenger seat of any vehicle with afront passenger airbag – not even if the"Passenger airbag off" symbol near therear-view mirror is illuminated. If theseverity of an accident were to cause theairbag to inflate, this could lead to seriousinjury or death to a child seated in thisposition.
Page 74 of 344
||
03 Instruments and controls
03
72* Option/accessory, for more information, see Introduction.
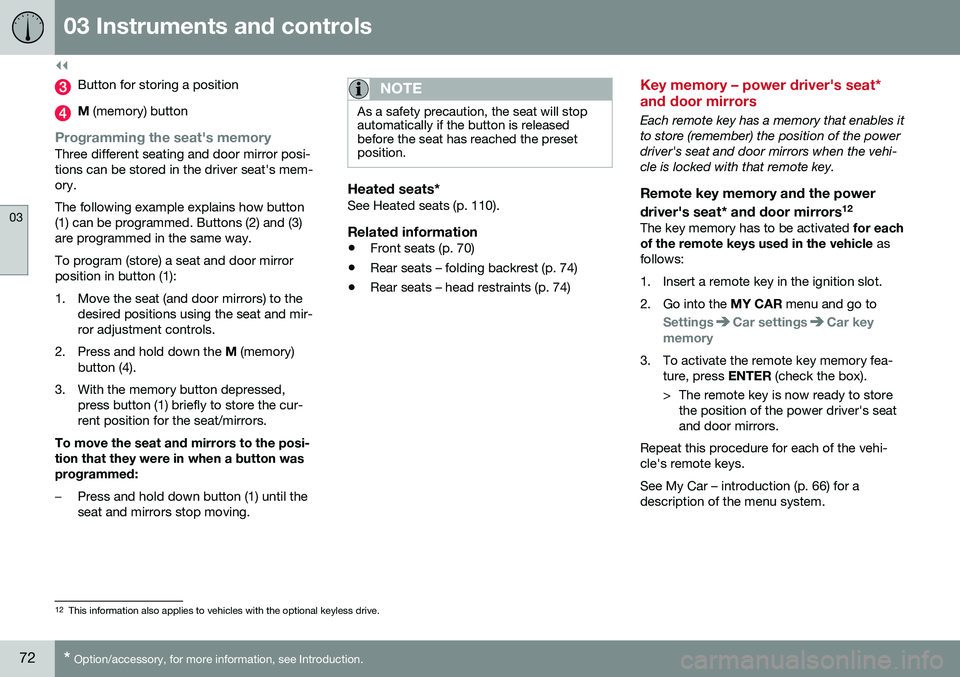
Button for storing a position
M (memory) button
Programming the seat's memoryThree different seating and door mirror posi- tions can be stored in the driver seat's mem-ory. The following example explains how button (1) can be programmed. Buttons (2) and (3)are programmed in the same way. To program (store) a seat and door mirror position in button (1):
1. Move the seat (and door mirrors) to the
desired positions using the seat and mir- ror adjustment controls.
2. Press and hold down the M (memory)
button (4).
3. With the memory button depressed, press button (1) briefly to store the cur-rent position for the seat/mirrors.
To move the seat and mirrors to the posi-tion that they were in when a button wasprogrammed:
–Press and hold down button (1) until the seat and mirrors stop moving.
NOTE
As a safety precaution, the seat will stop automatically if the button is releasedbefore the seat has reached the presetposition.
Heated seats*See Heated seats (p. 110).
Related information
• Front seats (p. 70)
• Rear seats – folding backrest (p. 74)
• Rear seats – head restraints (p. 74)
Key memory – power driver's seat* and door mirrors
Each remote key has a memory that enables it to store (remember) the position of the powerdriver's seat and door mirrors when the vehi-cle is locked with that remote key.
Remote key memory and the power
driver's seat* and door mirrors 12
The key memory has to be activated
for each
of the remote keys used in the vehicle as
follows:
1. Insert a remote key in the ignition slot.
2. Go into the MY CAR menu and go to
SettingsCar settingsCar key
memory
3. To activate the remote key memory fea- ture, press ENTER (check the box).
> The remote key is now ready to store the position of the power driver's seat and door mirrors.
Repeat this procedure for each of the vehi-cle's remote keys. See My Car – introduction (p. 66) for a description of the menu system.
12 This information also applies to vehicles with the optional keyless drive.
Page 75 of 344
03 Instruments and controls
03
73
Storing the positions of the power driver's seat/mirrors in the remote key
1. Move the seat and door mirrors to thedesired position using the seat and mirror adjustment controls.
2. Exit the vehicle and lock the doors with the remote key (or close the driver's doorand press the lock button on the doorhandle with the remote key in your pos-session on vehicles with the optional key-less drive).
> The positions of the power driver'sseat and door mirrors are now stored in the remote key's memory.
NOTE
The remote key's memory feature and the power driver's seat memory function (thesettings made using the buttons on theside of the seat, see the section "Powerseat memory function" in Front seats –power seat (p. 71)) work independently ofeach other.
Returning the seat/mirrors to the stored positions
To move the seat and door mirrors to the position stored in the remote key: 1. Unlock the driver's door with the
same
remote key (the one used to lock thedoors). For models equipped with theoptional keyless drive, you must have thesame remote key in your possession.
2. Open the driver's door within 2 minutes. The driver's seat and door mirrors will auto- matically move to the position in which youleft them (if the vehicle has been unlockedwith one of the other keys and new seat/mirror adjustments have been made).
NOTE
• The seat will move to this position even if someone else has moved it to adifferent position and locked the vehi-cle with a
different remote key.
• This feature will work in the same waywith all of the remote keys that youuse with your vehicle.
Emergency stop
WARNING
•
Because the driver's seat can be adjusted with the ignition off, childrenshould never be left unattended in thevehicle.
• Movement of the seat can be STOP-PED at any time by pressing any but-ton on the power seat control panel.
• Do not adjust the seat while driving.The seat should be adjusted so thatthe brake pedal can be depressedfully. In addition, position the seat asfar rearward as comfort and controlallow.
• The seat rails on the floor must not beobstructed in any way when the seat isin motion.
Related information
•
Remote key – functions (p. 127)
Page 85 of 344
03 Instruments and controls
03
83
Rear interior lighting
The lights are switched on or off by pressing each respective button.
Related information
•Front interior lighting (p. 82)
Home safe lighting
When you leave your vehicle at night, you can make use of the home safe lighting functionto illuminate the area in front of the vehicle. This function illuminates the headlights, park- ing lights, lights in the door mirrors, licenseplate lights, front ceiling lighting and footwell lighting. These lights will remain on for 30 17
,
60 or 90 seconds. The time interval can be set in MY CAR under
SettingsCar
settings
Light settingsHome safe
light duration. See My Car – introduction
(p. 66) for a description of the menu system.
1. Remove the key from the ignition slot to put the ignition in mode 0 (see Ignition
modes (p. 69) for information about the ignition modes).
2. Pull the turn signal lever as far as possible towards the steering wheel and release it.
3. Exit the vehicle and lock the doors.
Related information
• Approach lighting (p. 83)
Approach lighting
Approach lighting activates the parking lights, door mirror lights, license plate lighting, domelighting and door step lighting when youapproach the vehicle. This function is activated by pressing the approach light button on the remote key (see
the illustration in Remote key – functions(p. 127)). The time interval for this lighting can be set by pressing
MY CAR and going to
Car
settings
Light settingsApproach light
duration. See My Car – introduction (p. 66)
for a description of the menu system.
Related information
• Home safe lighting (p. 83)
17
Factory setting