reset VOLVO S60 TWIN ENGINE 2019 Owners Manual
[x] Cancel search | Manufacturer: VOLVO, Model Year: 2019, Model line: S60 TWIN ENGINE, Model: VOLVO S60 TWIN ENGINE 2019Pages: 645, PDF Size: 13.96 MB
Page 4 of 645

2
OWNER'S INFORMATION
Owner's information16
Owner's Manual in the center display17
Navigate in the Owner's Manual inthe center display18
Owner's manual in mobile devices20
Volvo Cars support site21
Using the Owner's Manual21
The Owner's Manual and the envi-ronment23
YOUR VOLVO
Contacting Volvo26
Volvo ID26
Creating and registering a Volvo ID27
Drive-E ‒ purer driving pleasure27
IntelliSafe – driver support and safety28
Sensus - connection and entertainment30
Software Updates33
Data recording33
Terms & Conditions for Services35
Customer Privacy Policy35
Important information on accessoriesand extra equipment35
Accessory installation36
Connecting equipment to the vehi-cle's data link connector37
Technician certification38
Viewing the Vehicle IdentificationNumber (VIN)38
Volvo Structural Parts Statement39
Driver distraction39
SAFETY
Safety42
Safety during pregnancy43
Occupant safety43
Reporting safety defects44
Recall information45
Whiplash Protection System46
Seat belts47
Buckling and unbuckling seat belts48
Seat belt tensioners50
Resetting the electric seat belt ten-sioners*51
Door and seat belt reminders51
Airbags52
Driver/passenger-side airbags53
Occupant weight sensor56
Side airbags60
Inflatable curtain60
Safety mode61
Starting and moving the vehiclewhen it is in safety mode62
Child safety63
Child restraints65
Infant seats67
Convertible seats69
Booster cushions71
TABLE OF CONTENTS
Page 5 of 645
3
Top tether anchors72
Lower child seat attachment points74
ISOFIX/LATCH lower anchors74
Detailed information for child seatmanufacturers76
DISPLAYS AND VOICE CONTROL
Instruments and controls in left-handdrive vehicles80
Instrument panel82
Instrument panel settings84
Fuel gauge85
Hybrid gauge85
Hybrid battery gauge86
Trip computer87
Displaying trip data in the instrumentpanel89
Resetting the trip odometer90
Displaying trip statistics in the centerdisplay90
Trip statistics settings91
Date and time91
Ambient temperature sensor92
Indicator symbols in the instrument panel92
Warning symbols in the instrument panel95
Instrument panel licenses96
App menu in instrument panel101
Handling the App menu in the instru-ment panel102
Messages in the instrument panel103
Handling messages in the instru-ment panel104
Handling messages saved from theinstrument panel105
Center display overview107
Handling the center display110
Activating and deactivating the cen-ter display113
Navigating in the center display's views113
Handling tiles in the center display117
Function view in the center display120
Moving apps and buttons in the cen-ter display122
Symbols in the center display status bar122
Using the center display keyboard124
Changing keyboard language in thecenter display127
Entering characters, letters andwords by hand in the center display127
Changing the appearance of thecenter display129
Turning off and adjusting the volumeof the center display system sounds129
Changing system units of measurement130
Changing system language130
Changing settings in the center dis-play's Top view130
Opening contextual setting in thecenter display131
Page 6 of 645
4
Resetting user data when the vehiclechanges owners132
Resetting center display settings132
Table of settings in the center display133
Driver profiles134
Selecting a driver profile135
Changing a driver profile's name135
Protecting a driver profile136
Linking a remote key to a driver profile136
Resetting driver profile settings137
Messages in the center display138
Handling messages in the center display138
Handling messages saved from thecenter display139
Head-up display*140
Activating and deactivating the head-up display*141
Head-up display settings*142
Voice control143
Using voice commands144
Voice control for cellular phones145
Voice control for radio and media146
Voice control settings147
LIGHTING
Lighting control and panel150
Adjusting light functions via the cen-ter display151
Adjusting the headlight pattern152
Parking lights152
Daytime running lights153
Low beams154
Using high beam154
Active high beam155
Using turn signals156
Active Bending Lights*157
Front fog lights/cornering illumination*157
Rear fog light158
Brake lights159
Emergency brake lights159
Hazard warning flashers159
Using home safe lighting160
Welcome Light160
Interior Lighting160
Adjusting interior lighting162
WINDOWS, GLASS AND MIRRORS
Windows, glass and mirrors164
Pinch protection for windows andsun curtains164
Reset procedure for pinch protection165
Power windows165
Operating the power windows166
Using sun curtains*167
Rearview/door mirrors168
Adjusting the rearview mirror dim-ming function168
Adjusting the door mirrors169
Panoramic roof*170
Operating the panoramic roof*171
Auto closing the panoramic roof* suncurtain174
Wiper blades and washer fluid174
Using the windshield wipers175
Using the rain sensor175
Using the rain sensor's memory function176
Using the windshield and headlightwashers177
Page 42 of 645
||
YOUR VOLVO
40
WARNING
Never use a hand-held cellular telephonewhile driving. Some jurisdictions prohibitcellular telephone use by a driver whilethe vehicle is moving.
If your vehicle is equipped with a naviga-tion system, set and make changes toyour travel itinerary only with the vehicleparked.
Never program your audio system whilethe vehicle is moving. Program radio pre-sets with the vehicle parked, and use yourprogrammed presets to make radio usequicker and simpler.
Never use portable computers or per-sonal digital assistants while the vehicleis moving.
Related information
Audio, media and Internet (p. 448)
Page 53 of 645
SAFETY
}}
* Option/accessory.51
When a critical situation has passed, the seat beltand the electric seat belt tensioner are resetautomatically. However, they can also be resetmanually.
WARNING
Never attempt to alter or repair the seat belton your own. Volvo recommends contactingan authorized Volvo workshop.
If the seat belt has been exposed to extremeforces, e.g. in conjunction with a collision, theentire seat belt must be replaced. Even if theseat belt appears undamaged, some of itsprotective properties may have been lost. Alsoreplace the seat belt if it is worn or damaged.The new seat belt must be type approved andintended for the same seating position as thereplaced seat belt.
Related information
Seat belts (p. 47)
Buckling and unbuckling seat belts (p. 48)
Resetting the electric seat belt tensioners*(p. 51)
City Safety™ (p. 305)
Rear Collision Warning (p. 320)
Resetting the electric seat belt
tensioners*
The electric seat belt tensioners are designed tobe reset automatically, but if the seat beltremains taut it can be reset manually.
1. Stop the vehicle in a safe location.
2.Unbuckle the seat belt and then rebuckle it.
> The seat belt and the electric seat belttensioner will be reset.
WARNING
Never attempt to alter or repair the seat belton your own. Volvo recommends contactingan authorized Volvo workshop.
If the seat belt has been exposed to extremeforces, e.g. in conjunction with a collision, theentire seat belt must be replaced. Even if theseat belt appears undamaged, some of itsprotective properties may have been lost. Alsoreplace the seat belt if it is worn or damaged.The new seat belt must be type approved andintended for the same seating position as thereplaced seat belt.
Related information
Seat belt tensioners (p. 50)
Seat belts (p. 47)
Door and seat belt reminders
This system is intended to remind occupants tobuckle their seat belts and to alert the driver if adoor, hood or other opening (trunk, sunroof,etc.) is open.
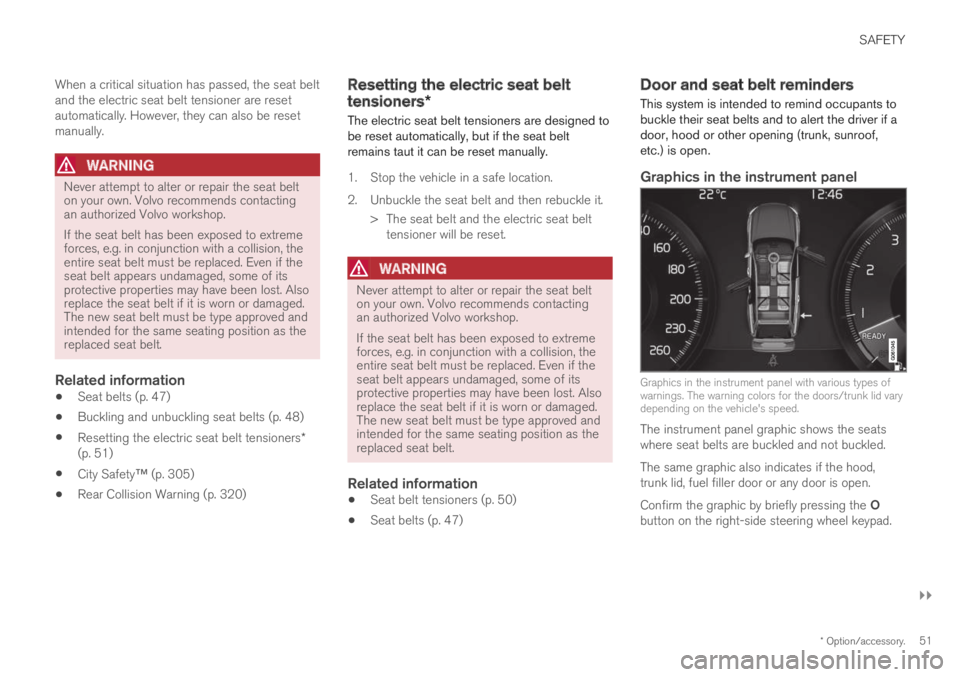
Graphics in the instrument panel
Graphics in the instrument panel with various types ofwarnings. The warning colors for the doors/trunk lid varydepending on the vehicle's speed.
The instrument panel graphic shows the seatswhere seat belts are buckled and not buckled.
The same graphic also indicates if the hood,trunk lid, fuel filler door or any door is open.
Confirm the graphic by briefly pressing the Obutton on the right-side steering wheel keypad.
Page 63 of 645

SAFETY
}}
61
WARNING
Volvo recommends contacting an authorizedVolvo workshop for repair. Incorrectly per-formed repairs to the inflatable curtain systemcould impair function and lead to seriousinjury.
WARNING
Never hang or attach heavy objects in thehandle in the ceiling. The hooks are onlyintended for lightweight garments (not forhard objects such as umbrellas).
Never screw or mount anything to the vehi-cle's headlining, door pillars or side panels.This could impair the intended protectiveproperties. Volvo recommends only usingVolvo original parts that are approved forplacement in these areas.
WARNING
If objects are loaded higher than the upperedge of the side windows, leave a 10 cm(4 in.) space between the objects and thewindow. Objects placed closer to this couldimpede the function of the inflatable curtainconcealed inside the headlining.
WARNING
The inflatable curtain is a supplement to theseat belt. Always wear your seat belt.
Related information
Airbags (p. 52)Safety mode
Safety mode is a feature that is triggered after acollision if there is potential damage to an impor-tant function in the vehicle, such as the fuellines, sensors for one of the safety systems, thebrake system, etc.
If the vehicle has been involved in a collision, thetext Safety mode See Owner's manual mayappear in the instrument panel along with thewarning symbol if the panel is undamaged andthe vehicle's electrical system is intact. The mes-sage indicates that one or more of the vehicle'sfunctions may be reduced.
WARNING
Never attempt to restart the vehicle if yousmell fuel fumes when the message Safetymode See Owner's manual is displayed inthe instrument panel. Leave the vehicle imme-diately.
If safety mode has been set, it may be possible toreset the system in order to start and move thevehicle a short distance, for example, if it is block-ing traffic.
Page 64 of 645

||
SAFETY
62
WARNING
Never attempt to perform repairs or resetelectrical components on your own after thevehicle has been in safety mode. This couldresult in injury or prevent the vehicle fromfunctioning properly. Volvo recommends hav-ing the vehicle inspected and reset to normaloperating status by an authorized Volvo work-shop after Safety mode See Owner'smanual has been displayed.
WARNING
When the vehicle is in safety mode, it shouldnot be towed behind another vehicle. It shouldbe towed from the site on a tow truck. Volvorecommends towing the vehicle directly to anauthorized Volvo workshop.
Related information
Safety (p. 42)
Starting and moving the vehicle when it is insafety mode (p. 62)
Recovery (p. 440)
Starting and moving the vehiclewhen it is in safety mode
If safety mode has been set, it may be possibleto reset the system in order to start and movethe vehicle a short distance, for example, if it isblocking traffic.
Starting the vehicle when it is in safety
mode
1. Check the vehicle for damage, particularly forfuel leakage. Make sure you do not detectany gasoline fumes.
If the damage to the vehicle is minor andthere is no fuel leakage/fumes, you mayattempt to start the engine.
WARNING
Never attempt to restart the vehicle if yousmell fuel fumes when the message Safetymode See Owner's manual is displayed inthe instrument panel. Leave the vehicle imme-diately.
2.Switch off the ignition.
3. Then try to start the vehicle.
> The vehicle's electrical system will per-form a system check and then attempt toreset to normal operating mode. The mes-sage Vehicle start System check, waitwill be displayed on the instrument panelduring the check. This may take up to aminute.
4.When Vehicle start System check, wait isno longer displayed in the instrument panel,try again to start the vehicle.
CAUTION
If the message Safety mode See Owner'smanual is still displayed, the vehicle shouldnot be driven or towed behind another vehi-cle. If the vehicle needs to be moved, it mustbe towed on a tow truck. Even if no damageis apparent, there may be hidden damage thatcould make the vehicle impossible to control.
Moving the vehicle when it is in safety
mode
1.If the message Normal mode The vehicleis now in normal mode is displayed afterattempting to start the engine, the vehiclemay be moved carefully from its presentposition if, for example, it is blocking traffic.
Page 82 of 645
DISPLAYS AND VOICE CONTROL
* Option/accessory.80
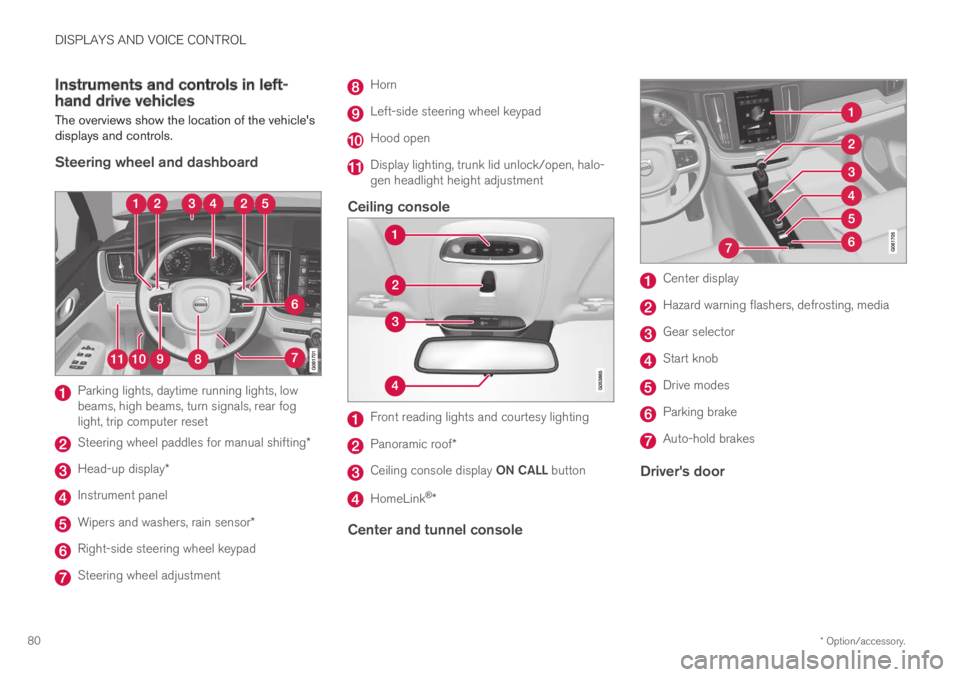
Instruments and controls in left-hand drive vehicles
The overviews show the location of the vehicle'sdisplays and controls.
Steering wheel and dashboard
Parking lights, daytime running lights, lowbeams, high beams, turn signals, rear foglight, trip computer reset
Steering wheel paddles for manual shifting*
Head-up display*
Instrument panel
Wipers and washers, rain sensor*
Right-side steering wheel keypad
Steering wheel adjustment
Horn
Left-side steering wheel keypad
Hood open
Display lighting, trunk lid unlock/open, halo-gen headlight height adjustment
Ceiling console
Front reading lights and courtesy lighting
Panoramic roof*
Ceiling console display ON CALL button
HomeLink®*
Center and tunnel console
Center display
Hazard warning flashers, defrosting, media
Gear selector
Start knob
Drive modes
Parking brake
Auto-hold brakes
Driver's door
Page 89 of 645
DISPLAYS AND VOICE CONTROL
}}
87
Symbols in the hybrid battery gauge
The symbol in the hybrid battery gauge indi-cates that the Hold function is activated. The
symbol indicates that the Charge functionis activated.
Related information
Instrument panel (p. 82)
Charging the hybrid battery (p. 375)
Hold and Charge functions (p. 423)
Trip computer
The vehicle's trip computer registers data whiledriving such as mileage, fuel consumption andaverage speed.
To help promote fuel-efficient driving, data isrecorded on both current and average fuel con-sumption. Data from the trip computer can bedisplayed in the instrument panel.
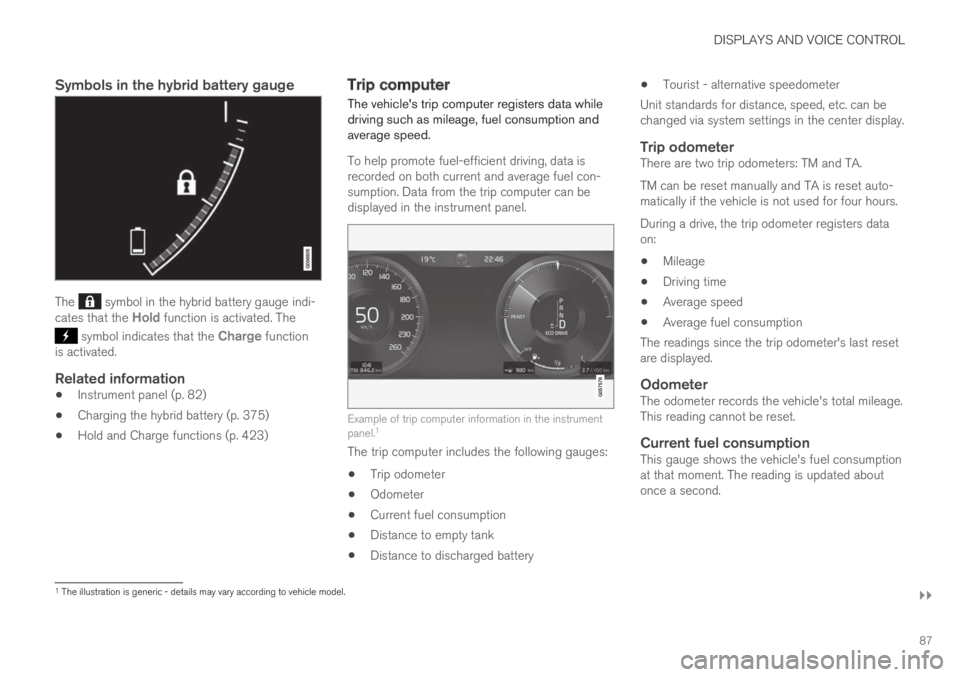
Example of trip computer information in the instrumentpanel.1
The trip computer includes the following gauges:
Trip odometer
Odometer
Current fuel consumption
Distance to empty tank
Distance to discharged battery
Tourist - alternative speedometer
Unit standards for distance, speed, etc. can bechanged via system settings in the center display.
Trip odometer
There are two trip odometers: TM and TA.
TM can be reset manually and TA is reset auto-matically if the vehicle is not used for four hours.
During a drive, the trip odometer registers dataon:
Mileage
Driving time
Average speed
Average fuel consumption
The readings since the trip odometer's last resetare displayed.
Odometer
The odometer records the vehicle's total mileage.This reading cannot be reset.
Current fuel consumption
This gauge shows the vehicle's fuel consumptionat that moment. The reading is updated aboutonce a second.
1The illustration is generic - details may vary according to vehicle model.
Page 90 of 645
||
DISPLAYS AND VOICE CONTROL
88
Distance to empty tank
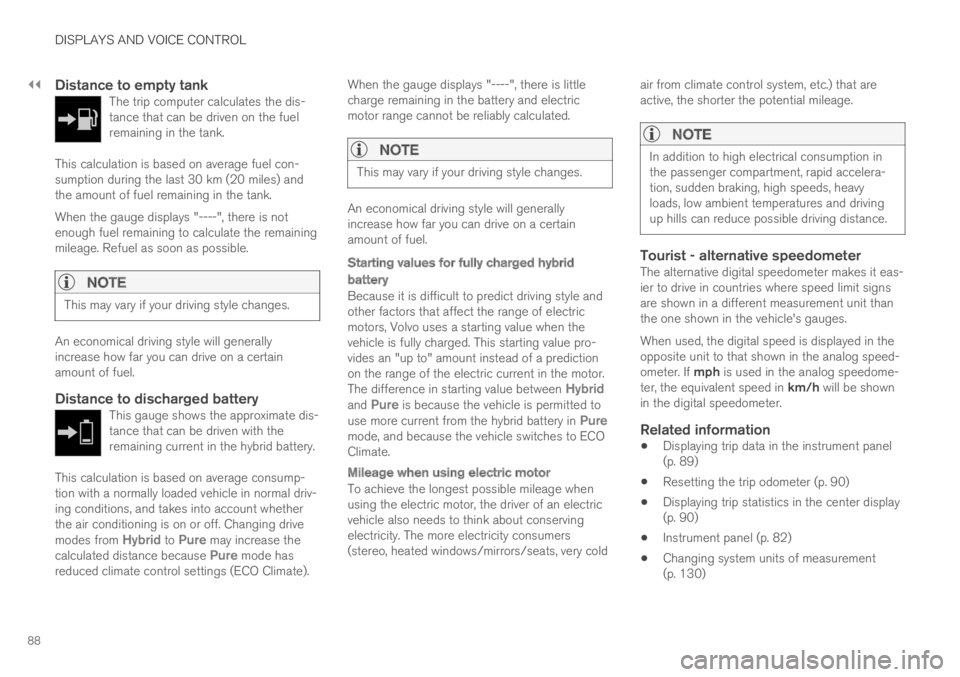
The trip computer calculates the dis-tance that can be driven on the fuelremaining in the tank.
This calculation is based on average fuel con-sumption during the last 30 km (20 miles) andthe amount of fuel remaining in the tank.
When the gauge displays "----", there is notenough fuel remaining to calculate the remainingmileage. Refuel as soon as possible.
NOTE
This may vary if your driving style changes.
An economical driving style will generallyincrease how far you can drive on a certainamount of fuel.
Distance to discharged battery
This gauge shows the approximate dis-tance that can be driven with theremaining current in the hybrid battery.
This calculation is based on average consump-tion with a normally loaded vehicle in normal driv-ing conditions, and takes into account whetherthe air conditioning is on or off. Changing drivemodes from Hybrid to Pure may increase thecalculated distance because Pure mode hasreduced climate control settings (ECO Climate).
When the gauge displays "----", there is littlecharge remaining in the battery and electricmotor range cannot be reliably calculated.
NOTE
This may vary if your driving style changes.
An economical driving style will generallyincrease how far you can drive on a certainamount of fuel.
Starting values for fully charged hybrid
battery
Because it is difficult to predict driving style andother factors that affect the range of electricmotors, Volvo uses a starting value when thevehicle is fully charged. This starting value pro-vides an "up to" amount instead of a predictionon the range of the electric current in the motor.The difference in starting value between Hybridand Pure is because the vehicle is permitted touse more current from the hybrid battery in Puremode, and because the vehicle switches to ECOClimate.
Mileage when using electric motor
To achieve the longest possible mileage whenusing the electric motor, the driver of an electricvehicle also needs to think about conservingelectricity. The more electricity consumers(stereo, heated windows/mirrors/seats, very cold
air from climate control system, etc.) that areactive, the shorter the potential mileage.
NOTE
In addition to high electrical consumption inthe passenger compartment, rapid accelera-tion, sudden braking, high speeds, heavyloads, low ambient temperatures and drivingup hills can reduce possible driving distance.
Tourist - alternative speedometer
The alternative digital speedometer makes it eas-ier to drive in countries where speed limit signsare shown in a different measurement unit thanthe one shown in the vehicle's gauges.
When used, the digital speed is displayed in theopposite unit to that shown in the analog speed-ometer. If mph is used in the analog speedome-ter, the equivalent speed in km/h will be shownin the digital speedometer.
Related information
Displaying trip data in the instrument panel(p. 89)
Resetting the trip odometer (p. 90)
Displaying trip statistics in the center display(p. 90)
Instrument panel (p. 82)
Changing system units of measurement(p. 130)