VOLVO S90 2017 Owner´s Manual
Manufacturer: VOLVO, Model Year: 2017, Model line: S90, Model: VOLVO S90 2017Pages: 548, PDF Size: 11.42 MB
Page 491 of 548
MAINTENANCE AND SERVICING
* Option/accessory.489
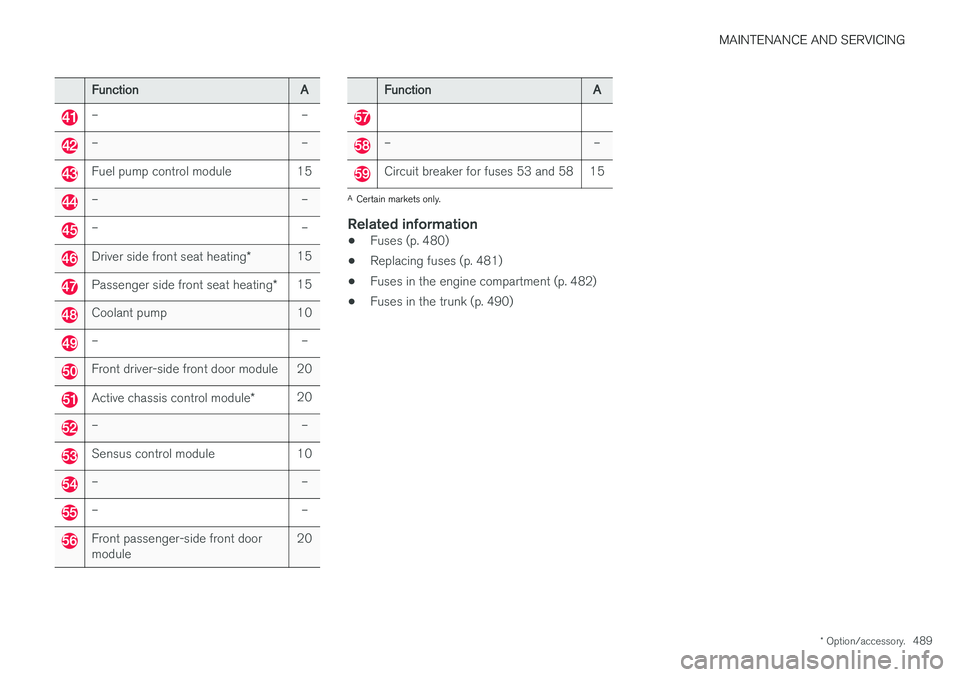
Function A
– –
– –
Fuel pump control module 15
– –
– –
Driver side front seat heating*15
Passenger side front seat heating
*15
Coolant pump 10
– –
Front driver-side front door module 20
Active chassis control module
*20
– –
Sensus control module 10
– –
– –
Front passenger-side front door module 20
Function
A
– –
Circuit breaker for fuses 53 and 58 15
A
Certain markets only.
Related information
• Fuses (p. 480)
• Replacing fuses (p. 481)
• Fuses in the engine compartment (p. 482)
• Fuses in the trunk (p. 490)
Page 492 of 548
MAINTENANCE AND SERVICING
* Option/accessory.
490
Fuses in the trunk The fuses in the trunk help protect electrical components such as power seats *, airbags and
seat belt tensioners.
Page 493 of 548
MAINTENANCE AND SERVICING
}}
491
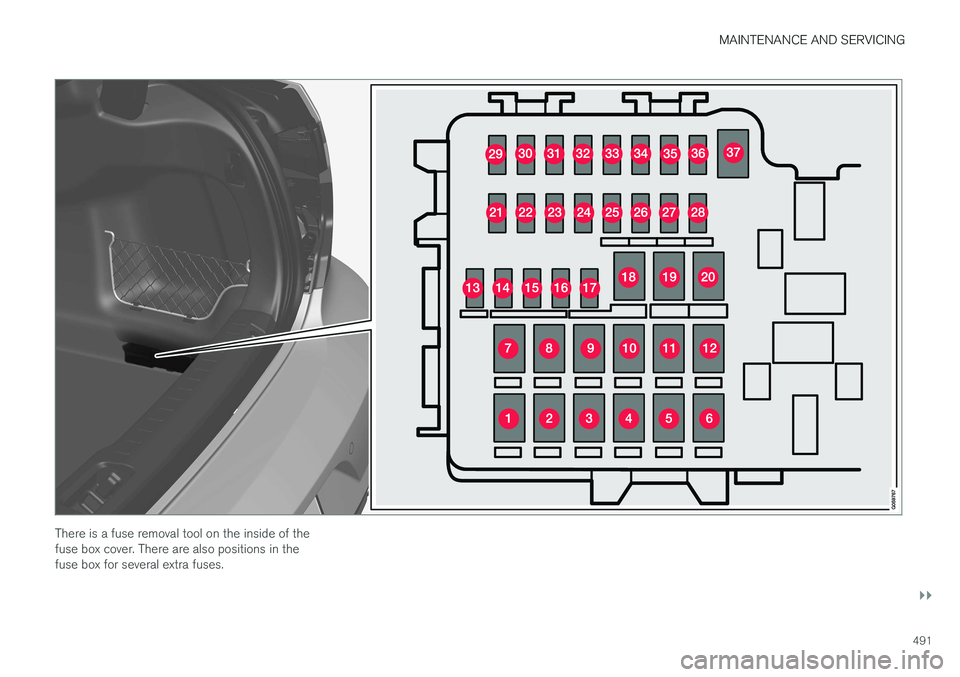
There is a fuse removal tool on the inside of the fuse box cover. There are also positions in thefuse box for several extra fuses.
Page 494 of 548

||
MAINTENANCE AND SERVICING
* Option/accessory.
492
Positions
• Fuses 13–17 and 21–36 are called "Micro".
• Fuses 1–12, 18–20 and 37 are called "MCase" and should only be replaced by atrained and qualified Volvo service technician.
Function
A
Heated rear window 30
– –
Pneumatic suspension* compressor 40
Lock motor, rear seat backrest - passenger's side 15
– –
Lock motor, rear seat backrest - driver's side30
– –
– –
Power trunk release
*25
Power front seat (passenger side)
*
module 20
Trailer hitch
* control module 40
Seat belt tensioner module (pas- senger side) 40
Function
A
Internal relay windings 5
– –
Foot movement detection module for opening the power trunk release* 5
– –
– –
Trailer hitch
* control module 25
Power front seat (driver seat
* mod-
ule 20
Seat belt tensioner module (driver side)
40
Parking camera
* 5
– –
– –
– –
– –
Airbag and seat belt tensioner modules 5
– –
Function
A
Heated rear seat (driver side)*15
– –
Blind Spot Information (BLIS)
*5
– –
Seat belt tensioner modules 5
Emission system actuator 5
– –
All Wheel Drive control module
*15
Heated rear seat (passenger side)
*15
– –
Related information
•Replacing fuses (p. 481)
• Fuses (p. 480)
• Fuses in the engine compartment (p. 482)
• Fuses in the passenger compartment (p. 486)
Page 495 of 548
MAINTENANCE AND SERVICING
}}
493
Replacing bulbs
The halogen headlight and rear fog light bulbs 3
can be replaced by the owner.
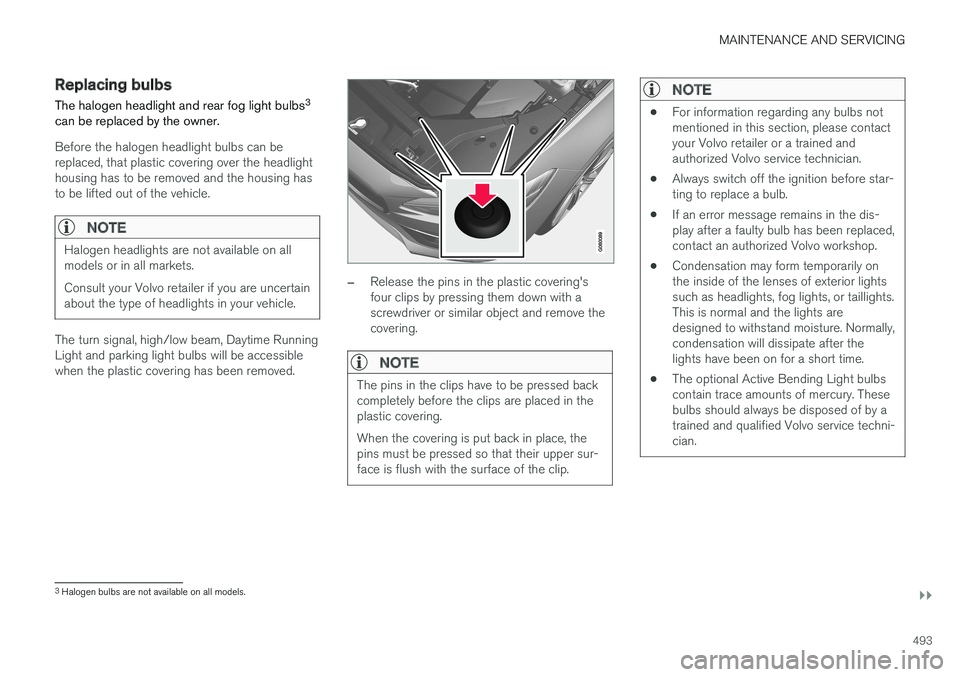
Before the halogen headlight bulbs can be replaced, that plastic covering over the headlighthousing has to be removed and the housing hasto be lifted out of the vehicle.
NOTE
Halogen headlights are not available on all models or in all markets. Consult your Volvo retailer if you are uncertain about the type of headlights in your vehicle.
The turn signal, high/low beam, Daytime Running Light and parking light bulbs will be accessiblewhen the plastic covering has been removed.
–Release the pins in the plastic covering's four clips by pressing them down with ascrewdriver or similar object and remove thecovering.
NOTE
The pins in the clips have to be pressed back completely before the clips are placed in theplastic covering. When the covering is put back in place, the pins must be pressed so that their upper sur-face is flush with the surface of the clip.
NOTE
• For information regarding any bulbs not mentioned in this section, please contactyour Volvo retailer or a trained andauthorized Volvo service technician.
• Always switch off the ignition before star-ting to replace a bulb.
• If an error message remains in the dis-play after a faulty bulb has been replaced,contact an authorized Volvo workshop.
• Condensation may form temporarily onthe inside of the lenses of exterior lightssuch as headlights, fog lights, or taillights.This is normal and the lights aredesigned to withstand moisture. Normally,condensation will dissipate after thelights have been on for a short time.
• The optional Active Bending Light bulbscontain trace amounts of mercury. Thesebulbs should always be disposed of by atrained and qualified Volvo service techni-cian.
3
Halogen bulbs are not available on all models.
Page 496 of 548
||
MAINTENANCE AND SERVICING
* Option/accessory.
494
CAUTION
Never touch the glass of bulbs with your fin- gers. Grease and oils from your fingers vapor-ize in the heat and will leave a deposit on thereflector, which will damage it.
WARNING
• The ignition should be switched off com- pletely (be in ignition mode
0) when
replacing bulbs.
• If the engine has been running just prior to replacing bulbs in the headlight hous-ing, please keep in mind that componentsin the engine compartment will be hot.
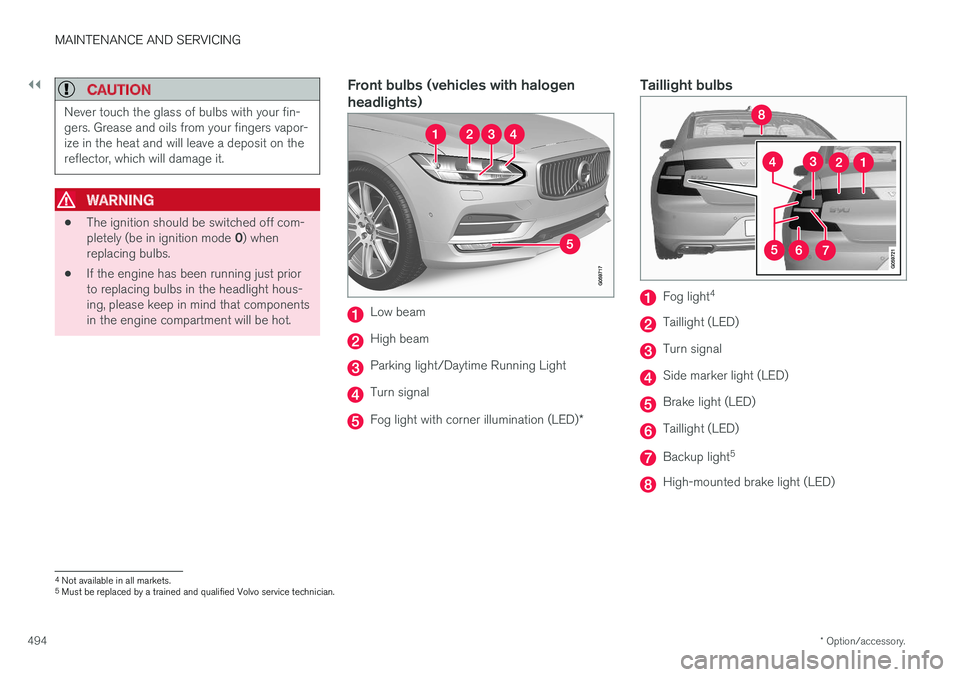
Front bulbs (vehicles with halogen headlights)
Low beam
High beam
Parking light/Daytime Running Light
Turn signal
Fog light with corner illumination (LED)
*
Taillight bulbs
Fog light4
Taillight (LED)
Turn signal
Side marker light (LED)
Brake light (LED)
Taillight (LED)
Backup light
5
High-mounted brake light (LED)
4
Not available in all markets.
5 Must be replaced by a trained and qualified Volvo service technician.
Page 497 of 548
MAINTENANCE AND SERVICING
495
Related information
•Bulb specifications (p. 500)
• Replacing front parking light bulbs (p. 497)
• Replacing front turn signal bulbs (p. 496)
• Replacing High Beam headlight bulbs (p. 496)
• Replacing low beam headlight bulbs (p. 495)
• Ignition modes (p. 370)
Replacing low beam headlight bulbs
On models with halogen headlights, the low beam headlight bulb can be replaced by theowner.
Before the bulb can be replaced, the plastic cov- ering over the headlight housing has to be removed, see the article "Replacing bulbs."
CAUTION
Never touch the glass of bulbs with your fin- gers. Grease and oils from your fingers vapor-ize in the heat and will leave a deposit on thereflector, which will damage it.
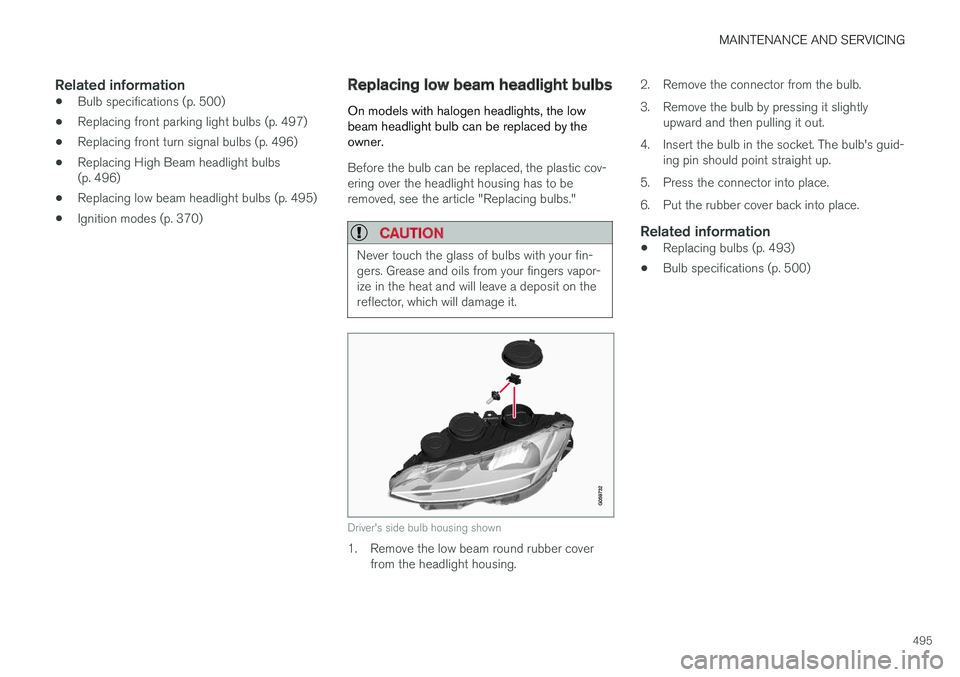
Driver's side bulb housing shown
1. Remove the low beam round rubber cover from the headlight housing. 2. Remove the connector from the bulb.
3. Remove the bulb by pressing it slightly
upward and then pulling it out.
4. Insert the bulb in the socket. The bulb's guid- ing pin should point straight up.
5. Press the connector into place.
6. Put the rubber cover back into place.
Related information
• Replacing bulbs (p. 493)
• Bulb specifications (p. 500)
Page 498 of 548
MAINTENANCE AND SERVICING
496
Replacing High Beam headlight bulbs
On models with halogen headlights, the High Beam headlight bulb can be replaced by theowner.
Before the bulb can be accessed, the headlight housing's cover must be removed, see the article"Replacing bulbs."
CAUTION
Never touch the glass of bulbs with your fin- gers. Grease and oils from your fingers vapor-ize in the heat and will leave a deposit on thereflector, which will damage it.
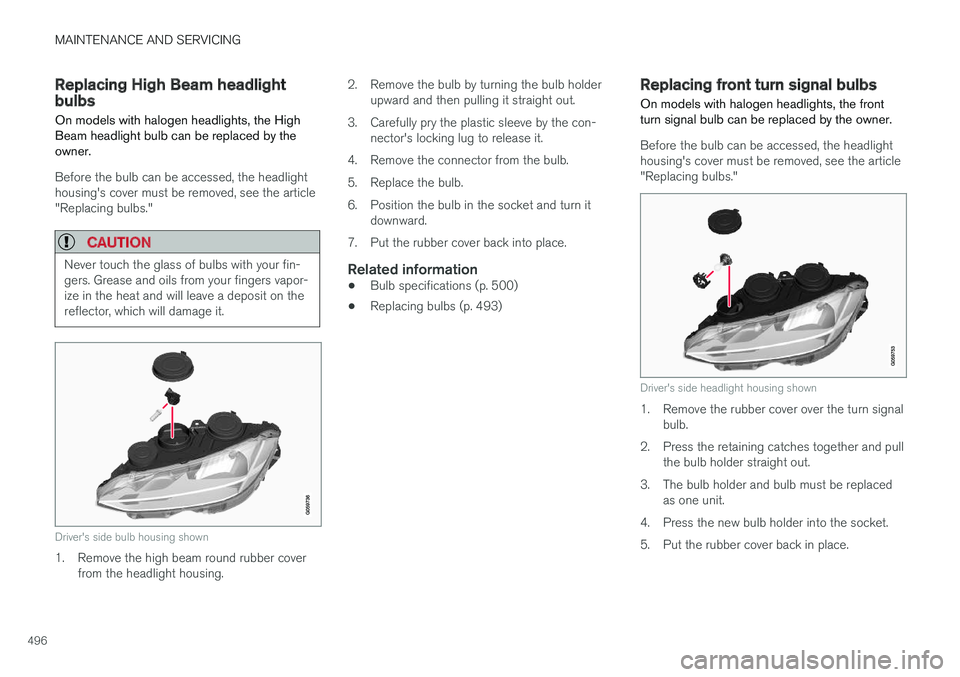
Driver's side bulb housing shown
1. Remove the high beam round rubber cover from the headlight housing. 2. Remove the bulb by turning the bulb holder
upward and then pulling it straight out.
3. Carefully pry the plastic sleeve by the con- nector's locking lug to release it.
4. Remove the connector from the bulb.
5. Replace the bulb.
6. Position the bulb in the socket and turn it downward.
7. Put the rubber cover back into place.
Related information
• Bulb specifications (p. 500)
• Replacing bulbs (p. 493)
Replacing front turn signal bulbs On models with halogen headlights, the front turn signal bulb can be replaced by the owner.
Before the bulb can be accessed, the headlight housing's cover must be removed, see the article"Replacing bulbs."
Driver's side headlight housing shown
1. Remove the rubber cover over the turn signal
bulb.
2. Press the retaining catches together and pull the bulb holder straight out.
3. The bulb holder and bulb must be replaced as one unit.
4. Press the new bulb holder into the socket.
5. Put the rubber cover back in place.
Page 499 of 548
MAINTENANCE AND SERVICING
497
Related information
•Replacing bulbs (p. 493)
• Bulb specifications (p. 500)
Replacing front parking light bulbs
On models with halogen headlights, the front parking light bulb can be replaced by the owner.
Before the bulb can be accessed, the headlight housing's cover must be removed, see the article"Replacing bulbs." Remove the high beam bulb first by turning the bulb holder upward and then pulling it straightout. This makes it easier to access the parkinglight bulb.
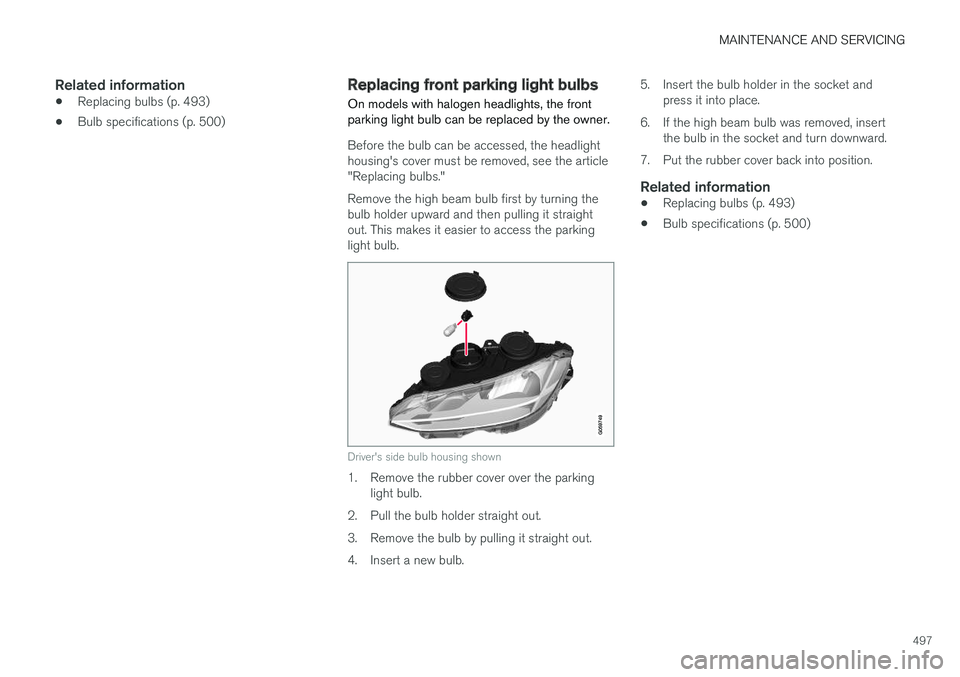
Driver's side bulb housing shown
1. Remove the rubber cover over the parking light bulb.
2. Pull the bulb holder straight out.
3. Remove the bulb by pulling it straight out.
4. Insert a new bulb. 5. Insert the bulb holder in the socket and
press it into place.
6. If the high beam bulb was removed, insert the bulb in the socket and turn downward.
7. Put the rubber cover back into position.
Related information
• Replacing bulbs (p. 493)
• Bulb specifications (p. 500)
Page 500 of 548
MAINTENANCE AND SERVICING
498
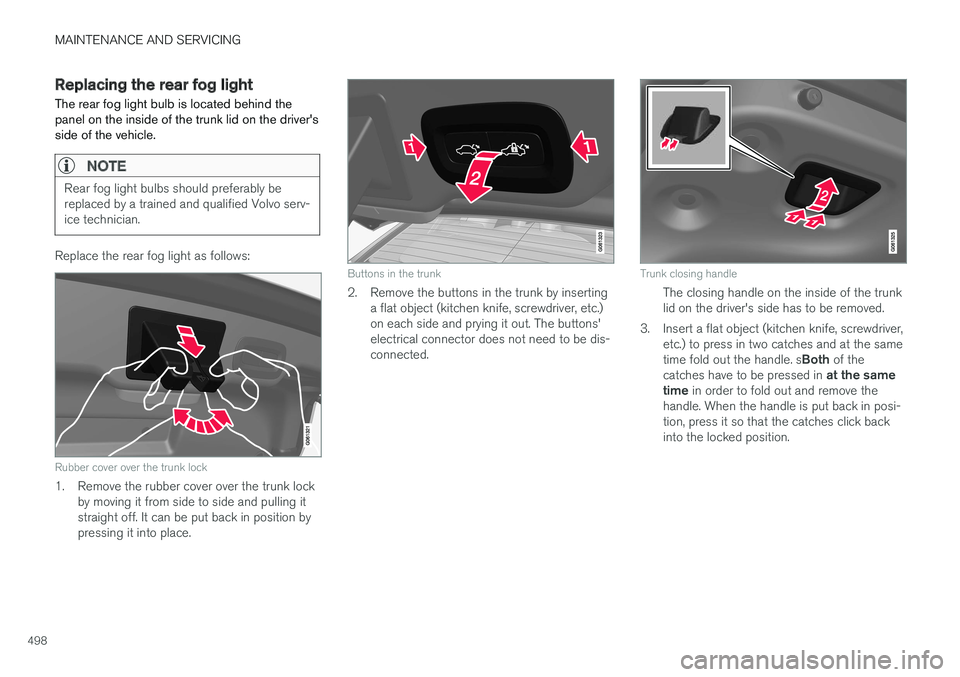
Replacing the rear fog light The rear fog light bulb is located behind the panel on the inside of the trunk lid on the driver'sside of the vehicle.
NOTE
Rear fog light bulbs should preferably be replaced by a trained and qualified Volvo serv-ice technician.
Replace the rear fog light as follows:
Rubber cover over the trunk lock
1. Remove the rubber cover over the trunk lockby moving it from side to side and pulling it straight off. It can be put back in position bypressing it into place.
Buttons in the trunk
2. Remove the buttons in the trunk by insertinga flat object (kitchen knife, screwdriver, etc.) on each side and prying it out. The buttons'electrical connector does not need to be dis-connected.
Trunk closing handle
The closing handle on the inside of the trunk lid on the driver's side has to be removed.
3. Insert a flat object (kitchen knife, screwdriver, etc.) to press in two catches and at the same time fold out the handle. s Both of the
catches have to be pressed in at the same
time in order to fold out and remove the
handle. When the handle is put back in posi- tion, press it so that the catches click backinto the locked position.