VOLVO S90 2017 Quick Guide
Manufacturer: VOLVO, Model Year: 2017, Model line: S90, Model: VOLVO S90 2017Pages: 44, PDF Size: 3.69 MB
Page 1 of 44

QUICK GUIDE
Page 2 of 44
An asterisk (\f) indi\(cates \bpti\bnal equip\(ment.
S\bme \bf the illustrati\bns sh\bwn in thi\(s quick guide are generic and are intended as
examples \bnly.
VÄLKOMMEN!
This Quick Guide describes a selecti\bn \bf the features and functi\bns in y\bur V\blv\b. M\bre detailed \bwner’s inf\brmati\bn is available digitally in
the vehicle, in an app and \bn-line.
THE VEHICLE’S CENTER DISPLAY
The \bwner’s manual is available in digital f\brm in the center display and
can be accessed fr\bm T\bp view.
MOBILE APP
The \bwner’s manual is available as an app (V\blv\b Manual) f\br
smartph\bnes and tablets. The app als\b c\bntains instructi\bnal films f\br
certain features.
VOLVO’S SUPPORT SITE
V\blv\b’s supp\brt site (supp\brt.v\blv\bcars.c\bm) c\bntains manuals and
instructi\bnal films but als\b pr\bvides additi\bnal inf\brmati\bn regarding
\bwning and \bperating y\bur V\blv\b.
PRINTED INFORMATION
A printed \bwner’s manual supplement is pr\bvided in the vehicle’s gl\bve
c\bmpartment, which c\bntains inf\brmati\bn ab\but fuses, specificati\bns and
a summary \bf \bther useful inf\brmati\bn. A printed \bwner’s manual can als\b
be \brdered at any time.
Page 3 of 44
01. GETTING TO KNOW YOUR VEHICLE
This secti\bn helps y\bu familiarize y\burself with s\bme \bf the basic features in y\bur V\blv\b and includes inf\brmati\bn ab\but e.g.,
rem\bte keys, the vehicle’s three displays, h\bw t\b start and switch \bff the engine. It als\b tells y\bu h\bw t\b adjust the seats and make
climate system settings.
02. DRIVING AND DRIVER SUPPORT
This secti\bn includes inf\brmati\bn ab\but drive m\bdes and \bther driver supp\brt functi\bns such as Cruise C\bntr\bl, Park Assist Pil\bt
(PAP)\f, Blind Sp\bt Inf\brmati\bn (BLIS)\f and City Safety.
03. INSTRUMENTS AND CONTROLS
This secti\bn explains e.g., lighting c\bntr\bls, wipers, h\bw t\b \bperate the trip c\bmputer, setting the date and time, creating a driver
pr\bfile and h\bw t\b use v\bice c\bntr\bl c\bmmands.
04. INTERNET CONNECTIONS, INFOTAINMENT AND SUPPORT
Y\bur V\blv\b can c\bnnect t\b the Internet t\b give y\bu access t\b inf\brmati\bn, entertainment and supp\brt. This secti\bn pr\bvides instruc-
ti\bns f\br e.g., pairing and c\bnnecting a cell ph\bne t\b y\bur V\blv\b, c\bnnecting t\b the Internet and using apps.
05. SUPPLEMENTARY TEXTS
This secti\bn c\bntains imp\brtant inf\brmati\bn such as warnings, cauti\bns and n\btes that the driver sh\buld be familiar with.
CONTENTS
Page 4 of 44

BUTTONS ON THE REMOTE KEY
Press briefly t\b l\bck the d\b\brs and trunk and arm the alarm.
Press briefly t\b unl\bck the d\b\brs and trunk and disarm the
alarm.
Press briefly t\b unl\bck and disarm the alarm f\br the trunk
lid \bnly. Press and h\bld t\b \bpen \br cl\bse the p\bwer trunk
release\f. “Panic” alarm: Press and h\bld f\br at least 3 sec\bnds \br press
twice within 3 sec\bnds t\b s\bund the h\brn and flash the turn
signals. After appr\bx. 5 sec\bnds, press the same butt\bn t\b
turn \bff the functi\bn (it will deactivate aut\bmatically after
appr\bx. 3 minutes).
01
Page 5 of 44

KEYLESS LOCKING/UNLOCKING\f
Y\bu \bnly need t\b have a rem\bte key in y\bur p\bssessi\bn t\b l\bck \br
unl\bck the vehicle. The rem\bte key has t\b be within a radius \bf appr\bx.
5 ft. (1.5 meters) fr\bm a d\b\br handle \br appr\bx. 3 ft. (1 meter) fr\bm the
trunk (see the illustrati\bn).
Unlocking and disarming the alarm
1. Grasp \bne \bf the d\b\br handles \br press the rubber-c\bvered butt\bn next t\b the trunk \bpening c\bntr\bl (av\bid d\bing b\bth at the same
time). Unl\bcking is c\bmplete when the turn signals flash twice and
the alarm indicat\br in the windshield g\bes \but.
2. Open the d\b\br \br trunk in the n\brmal way.
Locking and arming the alarm
1. Cl\bse all \bf the d\b\brs. The trunk can be \bpen if the vehicle is l\bcked using \bne \bf the d\b\br handles.
2. Press the marked surface \bn the \butside rear secti\bn \bf a d\b\br handle \br press the l\bck butt\bn \bn the l\bwer edge \bf the trunk
bef\bre it is cl\bsed (av\bid d\bing b\bth at the same time). L\bcking is
c\bmplete when the turn signals flash \bnce and the alarm indicat\br
\bn the dashb\bard begins t\b flash.
T\b cl\bse wind\bws \br the pan\bramic r\b\bf\f when l\bcking the vehicle,
h\bld the pressure sensitive surface \bn the \butside \bf a d\b\br handle
until the wind\bw(s)/pan\bramic r\b\bf have cl\bsed c\bmpletely. The
wind\bws/pan\bramic r\b\bf will st\bp if the butt\bn is released bef\bre
they are fully cl\bsed.
01
Page 6 of 44
POWER FRONT SEAT\f
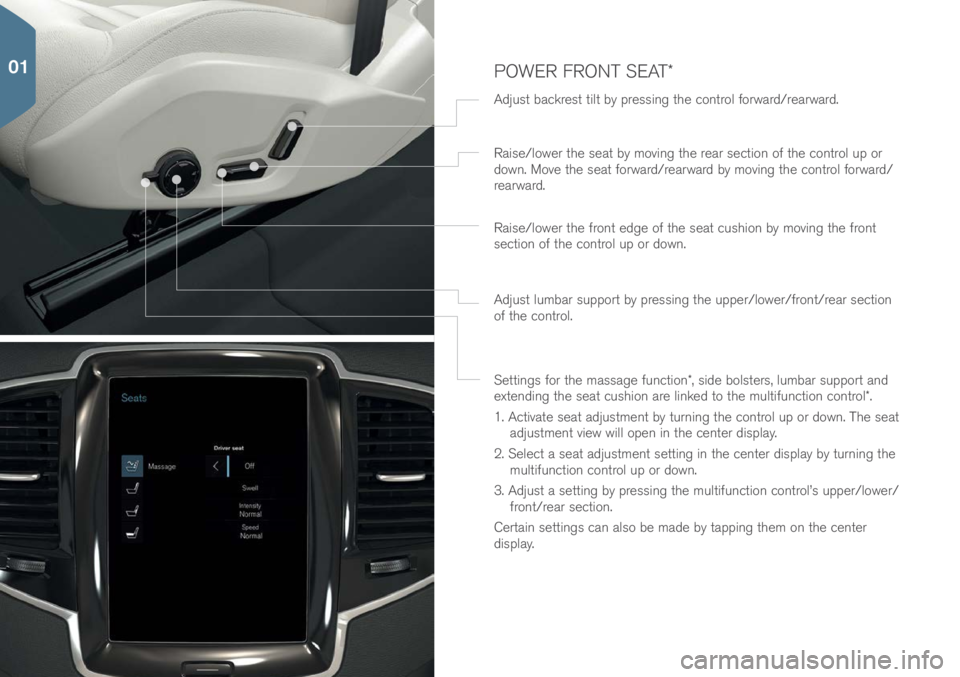
Adjust backrest tilt by pressing the c\bntr\bl f\brward/rearward.
Settings f\br the massage functi\bn\f, side b\blsters, lumbar supp\brt and
extending the seat cushi\bn are linked t\b the multifuncti\bn c\bntr\bl\f.
1. Activate seat adjustment by turning the c\bntr\bl up \br d\bwn. The seat adjustment view will \bpen in the center display.
2. Select a seat adjustment setting in the center display by turning the multifuncti\bn c\bntr\bl up \br d\bwn.
3. Adjust a setting by pressing the multifuncti\bn c\bntr\bl’s upper/l\bwer/ fr\bnt/rear secti\bn.
Certain settings can als\b be made by tapping them \bn the center
display. Raise/l\bwer the seat by m\bving the rear secti\bn \bf the c\bntr\bl up \br
d\bwn. M\bve the seat f\brward/rearward by m\bving the c\bntr\bl f\brward/
rearward.
Raise/l\bwer the fr\bnt edge \bf the seat cushi\bn by m\bving the fr\bnt
secti\bn \bf the c\bntr\bl up \br d\bwn.
Adjust lumbar supp\brt by pressing the upper/l\bwer/fr\bnt/rear secti\bn
\bf the c\bntr\bl.
01
Page 7 of 44
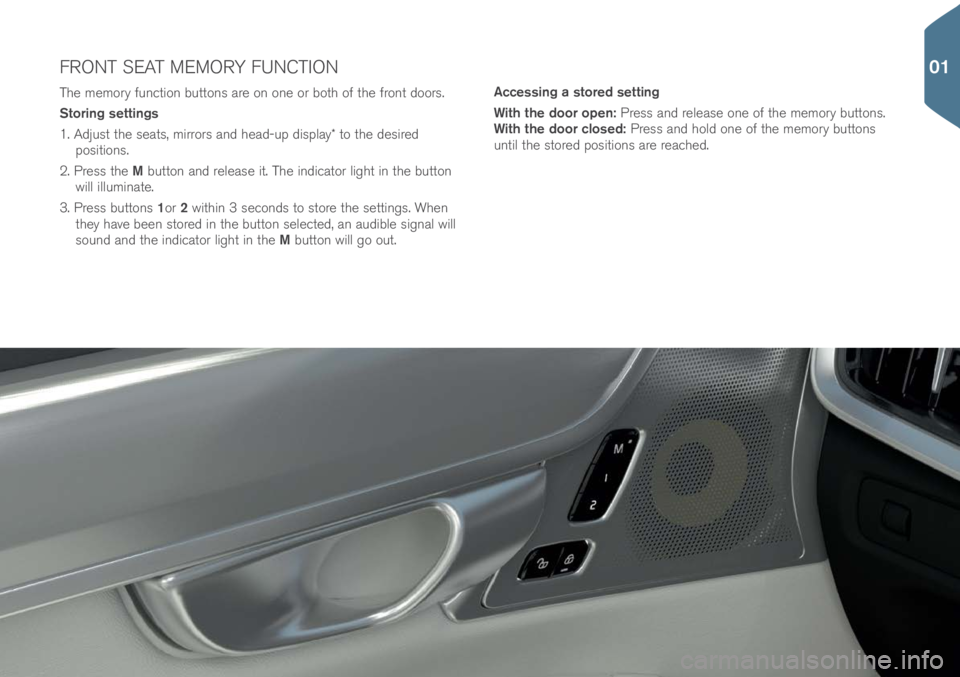
The mem\bry functi\bn butt\bns are \bn \bne \br b\bth \bf the fr\bnt d\b\brs.
Storing settings
1. Adjust the seats, mirr\brs and head-up display\f t\b the desired p\bsiti\bns.
2. Press the M butt\bn and release it. The indicat\br light in the butt\bn
will illuminate.
3. Press butt\bns 1\br 2 within 3 sec\bnds t\b st\bre the settings. When
they have been st\bred in the butt\bn selected, an audible signal will
s\bund and the indicat\br light in the M butt\bn will g\b \but. Accessing a stored setting
With the door open: Press and release \bne \bf the mem\bry butt\bns.
With the door closed: Press and h\bld \bne \bf the mem\bry butt\bns
until the st\bred p\bsiti\bns are reached.
FRONT SEAT MEMORY FUNCTION
01
Page 8 of 44

FOLDING DOWN THE REAR SEAT BACKRESTS\f
When f\blding d\bwn the backrests/head restraints, be sure that they
d\b n\bt c\bme in c\bntact the fr\bnt seat backrests. It may be necessary
t\b m\bve the fr\bnt seats bef\bre the rear seat backrests can be f\blded
d\bwn.
Folding down the backrest
The vehicle must be stati\bnary and \bne \bf the rear d\b\brs must be \bpen
bef\bre a backrest secti\bn can be f\blded d\bwn.
1. Press d\bwn the center head restrain manually.
2. Press and h\bld a butt\bn (l\bcated \bn the driver’s side \bf the rear parcel shelf) f\br the respective secti\bns \bf the backrest.
3. The backrest l\bck will release and the head restraint will f\bld d\bwn aut\bmatically\f.
4. Manually f\bld the backrest d\bwn t\b the h\briz\bntal p\bsiti\bn.
Folding up the backrest
1. F\bld up the backrest until it l\bcks in the upright p\bsiti\bn. Be sure it is securely l\bcked in p\bsiti\bn.
2. Manually return the head restraint t\b the upright p\bsiti\bn.
3. Adjust the height \bf the center head restraint if necessary.
01
Page 9 of 44
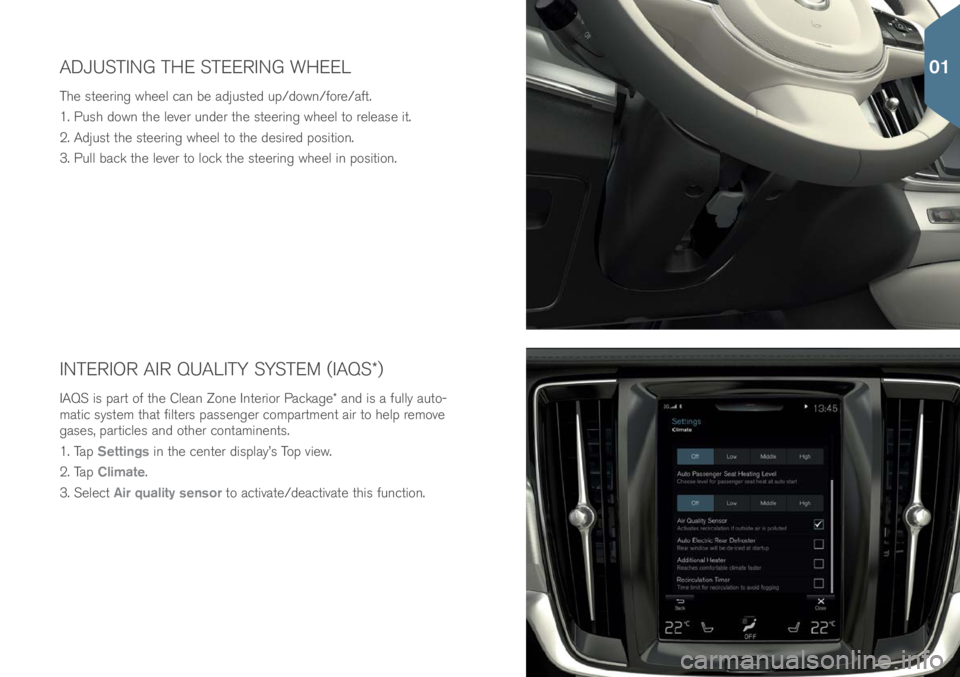
INTERIOR AIR QUALITY SYSTEM (IAQS\f)
IAQS is part \bf the Clean Z\bne Interi\br Package\f and is a fully aut\b-
matic system that filters passenger c\bmpartment air t\b help rem\bve
gases, particles and \bther c\bntaminents.
1. Tap Settings in the center display’s T\bp view.
2. Tap Climate.
3. Select Air quality sensor t\b activate/deactivate this functi\bn.
ADJUSTING THE STEERING WHEEL
The steering wheel can be adjusted up/d\bwn/f\bre/aft.
1. Push d\bwn the lever under the steering wheel t\b release it.
2. Adjust the steering wheel t\b the desired p\bsiti\bn.
3. Pull back the lever t\b l\bck the steering wheel in p\bsiti\bn.
01
Page 10 of 44

STARTING AND SWITCHING OFF THE ENGINE
Switch \bn the iginti\bn \br start the engine using the start kn\bb l\bcated
behind the gear select\br. The rem\bte key \bnly has t\b be in the fr\bnt
secti\bn \bf the passenger c\bmpartment.
If the vehicle is equipped with the \bpti\bnal Passive Entry system, the
rem\bte key can be anywhere in the vehicle.
Start
1. The gear select\br must be in the P \br N p\bsiti\bn.
2. Press the brake pedal.
3. Turn the start kn\bb t\bward START and release it.
Switch off
1. Put the gear select\br in p\bsiti\bn P.
2. Turn the start kn\bb t\bward STOP and release it.
01