reset VOLVO S90 2020 Quick Guide
[x] Cancel search | Manufacturer: VOLVO, Model Year: 2020, Model line: S90, Model: VOLVO S90 2020Pages: 643, PDF Size: 13.68 MB
Page 4 of 643
2
OWNER'S INFORMATION
Owner's information16
Owner's Manual in the center display 17
Navigate in the Owner's Manual in the center display 18
Owner's manual in mobile devices 20
Volvo Cars support site 21
Using the Owner's Manual 21
YOUR VOLVO
Contacting Volvo26
Volvo ID 26
Creating and registering a Volvo ID 27
Drive-E ‒ purer driving pleasure
28
IntelliSafe – driver support and safety 29
Sensus - connection and enter- tainment 30
Software Updates 33
Data recording 33
Terms & Conditions for Services 35
Customer Privacy Policy 35
Important information on acces-sories and extra equipment 35
Accessory installation 36
Connecting equipment to thevehicle's data link connector 37
Technician certification 38
Viewing the Vehicle IdentificationNumber (VIN) 38
Volvo Structural Parts Statement 39
Driver distraction 39
SAFETY
Safety 42
Safety during pregnancy 43
Occupant safety 43
Reporting safety defects 44
Recall information 45
Whiplash Protection System 46
Seat belts 47
Buckling and unbuckling seat belts 48
Seat belt tensioners 50
Resetting the electric seat belt tensioners 51
Door and seat belt reminders 51
Airbags 52
Driver/passenger-side airbags 53
Occupant weight sensor 56
Side airbags 60
Inflatable curtain 60
Safety mode 61
Starting and moving the vehiclewhen it is in safety mode 62
Child safety 63
Child restraints 65
Infant seats 67
Convertible seats 69
Booster cushions 72
TABLE OF CONTENTS
Page 5 of 643
3
Top tether anchors73
Lower child seat attachment points 74
ISOFIX/LATCH lower anchors 75
DISPLAYS AND VOICE CONTROL
Instruments and controls in left- hand drive vehicles78
Instrument panel 80
Instrument panel settings 84
Fuel gauge 85
Trip computer 85
Displaying trip data in the instru-ment panel 87
Resetting the trip odometer 88
Displaying trip statistics in thecenter display 88
Trip statistics settings 89
Date and time 90
Ambient temperature sensor 90
Indicator symbols in the instru-ment panel 91
Warning symbols in the instru-ment panel 93
Instrument panel licenses 95
App menu in instrument panel 101
Handling the App menu in theinstrument panel 102
Messages in the instrument panel 103
Handling messages in the instru-ment panel 104
Handling messages saved from the instrument panel 105
Center display overview 107
Handling the center display 109
Activating and deactivating thecenter display 112
Navigating in the center display'sviews 112
Handling tiles in the center display 116
Function view in the center display 119
Moving apps and buttons in thecenter display 121
Symbols in the center display sta-tus bar 121
Using the center display keyboard 123
Changing keyboard language inthe center display 126
Entering characters, letters andwords by hand in the center display 126
Changing the appearance of thecenter display 128
Turning off and adjusting the vol-ume of the center display systemsounds 128
Changing system units of meas-urement 129
Changing system language 129
Changing settings in the centerdisplay's Top view 129
Page 6 of 643
4
Opening contextual setting in the center display130
Resetting user data when thevehicle changes owners 131
Resetting center display settings 131
Table of settings in the center display 132
Driver profiles 133
Selecting a driver profile 134
Changing a driver profile's name 134
Protecting a driver profile 135
Linking a remote key to a driver profile 135
Resetting driver profile settings 136
Messages in the center display 137
Handling messages in the centerdisplay 137
Handling messages saved fromthe center display 138
Head-up display *
139
Activating and deactivating the head-up display * 140
Head-up display settings *
141
Voice Control 142
Use voice recognition 143
Voice control for cellular phones 145
Voice control for radio and media 145
Voice control settings 146
LIGHTING
Lighting control and panel148
Adjusting light functions via the center display 149
Parking lights 150
Daytime running lights 150
Low beams 151
Using high beam 152
Active high beam 153
Using turn signals 154
Active Bending Lights *
154
Front fog lights/corner illumination *
155
Rear fog light 156
Brake lights 157
Emergency brake lights 157
Hazard warning flashers 157
Using home safe lighting 158
Welcome Light 158
Interior Lighting 158
Adjusting interior lighting 160
WINDOWS, GLASS AND MIRRORS
Windows, glass and mirrors 162
Pinch protection for windows and sun curtains 162
Reset procedure for pinch protection 163
Power windows 164
Operating the power windows 165
Using sun curtains *
166
Rearview/door mirrors 168
Adjusting the rearview mirror dim-ming function 168
Adjusting the door mirrors 169
Panoramic roof 170
Operating the panoramic roof 172
Auto closing the panoramic roofsun curtain 175
Wiper blades and washer fluid 176
Using the windshield wipers 176
Using the rain sensor 177
Using the rain sensor's memoryfunction 178
Using the windshield and head-light washers 178
Page 42 of 643

||
YOUR VOLVO
40
WARNING
Never use a hand-held cellular tele- phone while driving. Some jurisdictionsprohibit cellular telephone use by adriver while the vehicle is moving.
If your vehicle is equipped with a navi-gation system, set and make changesto your travel itinerary only with thevehicle parked.
Never program your audio systemwhile the vehicle is moving. Programradio presets with the vehicle parked,and use your programmed presets tomake radio use quicker and simpler.
Never use portable computers or per-sonal digital assistants while the vehi-cle is moving.
Related information
Audio, media and Internet (p. 434)
Page 53 of 643
SAFETY
}}
* Option/accessory.51
and improves the effect of other safety sys- tems such as the airbags. When a critical situation has passed, the seat belt and the electric seat belt tensioner arereset automatically. However, they can also bereset manually.
WARNING
Never attempt to alter or repair the seat belt on your own. Volvo recommends con-tacting an authorized Volvo workshop. If the seat belt has been exposed to extreme forces, e.g. in conjunction with acollision, the entire seat belt must bereplaced. Even if the seat belt appearsundamaged, some of its protective proper-ties may have been lost. Also replace theseat belt if it is worn or damaged. The newseat belt must be type approved andintended for the same seating position asthe replaced seat belt.
Related information
Seat belts (p. 47)
Buckling and unbuckling seat belts (p. 48)
Resetting the electric seat belt tensioners (p. 51)
City Safety
™ (p. 312)
Rear Collision Warning
* (p. 326)
Resetting the electric seat belt tensioners
The electric seat belt tensioners are designed to be reset automatically, but if the seat beltremains taut it can be reset manually.
1. Stop the vehicle in a safe location.
2. Unbuckle the seat belt and then rebuckle it.
> The seat belt and the electric seat belttensioner will be reset.
WARNING
Never attempt to alter or repair the seat belt on your own. Volvo recommends con-tacting an authorized Volvo workshop. If the seat belt has been exposed to extreme forces, e.g. in conjunction with acollision, the entire seat belt must bereplaced. Even if the seat belt appearsundamaged, some of its protective proper-ties may have been lost. Also replace theseat belt if it is worn or damaged. The newseat belt must be type approved andintended for the same seating position asthe replaced seat belt.
Related information
Seat belt tensioners (p. 50)
Seat belts (p. 47)
Door and seat belt reminders
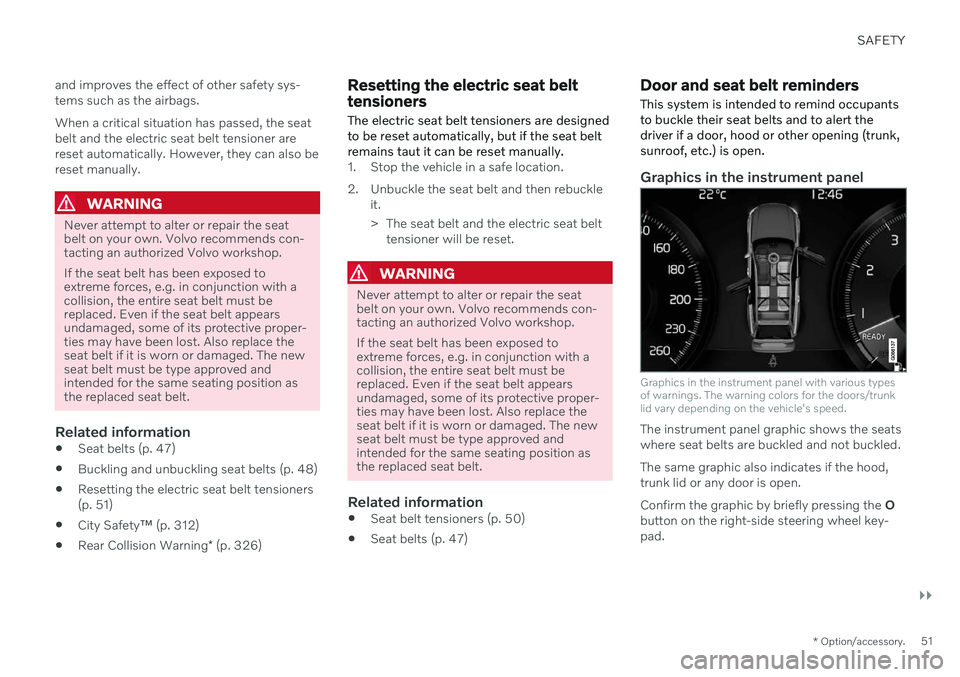
This system is intended to remind occupants to buckle their seat belts and to alert thedriver if a door, hood or other opening (trunk,sunroof, etc.) is open.
Graphics in the instrument panel
Graphics in the instrument panel with various types of warnings. The warning colors for the doors/trunklid vary depending on the vehicle's speed.
The instrument panel graphic shows the seats where seat belts are buckled and not buckled. The same graphic also indicates if the hood, trunk lid or any door is open. Confirm the graphic by briefly pressing the O
button on the right-side steering wheel key- pad.
Page 63 of 643
SAFETY
}}
61
WARNING
Volvo recommends contacting an author- ized Volvo workshop for repair. Incorrectlyperformed repairs to the inflatable curtainsystem could impair function and lead toserious injury.
WARNING
Never hang or attach heavy objects in the handle in the ceiling. The hooks are onlyintended for lightweight garments (not forhard objects such as umbrellas). Never screw or mount anything to the vehi- cle's headlining, door pillars or side panels.This could impair the intended protectiveproperties. Volvo recommends only usingVolvo original parts that are approved forplacement in these areas.
WARNING
If objects are loaded higher than the upper edge of the side windows, leave a 10 cm(4 in.) space between the objects and thewindow. Objects placed closer to thiscould impede the function of the inflatablecurtain concealed inside the headlining.
WARNING
The inflatable curtain is a supplement to the seat belt. Always wear your seat belt.
Related information
Airbags (p. 52)
Safety mode Safety mode is a feature that is triggered after a collision if there is potential damage toan important function in the vehicle, such asthe fuel lines, sensors for one of the safetysystems, the brake system, etc.
If the vehicle has been involved in a collision, the text Safety mode See Owner's manualmay appear in the instrument panel along with the warning symbol if the panel is undamagedand the vehicle's electrical system is intact.The message indicates that one or more of thevehicle's functions may be reduced.
WARNING
Never attempt to restart the vehicle if you smell fuel fumes when the message Safety
mode See Owner's manual is displayed
in the instrument panel. Leave the vehicle immediately.
If safety mode has been set, it may be possi- ble to reset the system in order to start andmove the vehicle a short distance, for exam-ple, if it is blocking traffic.
Page 64 of 643
||
SAFETY
62
WARNING
Never attempt to perform repairs or reset electrical components on your own afterthe vehicle has been in safety mode. Thiscould result in injury or prevent the vehiclefrom functioning properly. Volvo recom-mends having the vehicle inspected andreset to normal operating status by an authorized Volvo workshop after
Safety
mode See Owner's manual has been dis-
played.
WARNING
When the vehicle is in safety mode, it should not be towed behind another vehi-cle. It should be towed from the site on atow truck. Volvo recommends towing thevehicle directly to an authorized Volvoworkshop.
Related information
Safety (p. 42)
Starting and moving the vehicle when it is in safety mode (p. 62)
Recovery (p. 425)
Starting and moving the vehicle when it is in safety mode If safety mode has been set, it may be possi- ble to reset the system in order to start andmove the vehicle a short distance, for exam-ple, if it is blocking traffic.
Starting the vehicle when it is in safety mode
1. Check the vehicle for damage, particularly
for fuel leakage. Make sure you do not detect any gasoline fumes. If the damage to the vehicle is minor and there is no fuel leakage/fumes, you mayattempt to start the engine.
WARNING
Never attempt to restart the vehicle if you smell fuel fumes when the message Safety
mode See Owner's manual is displayed
in the instrument panel. Leave the vehicle immediately.
2. Switch off the ignition. 3. Then try to start the vehicle.
> The vehicle's electrical system will per-form a system check and then attempt to reset to normal operating mode.
CAUTION
If the message Safety mode See
Owner's manual is still displayed, the
vehicle should not be driven or towed behind another vehicle. If the vehicle needsto be moved, it must be towed on a towtruck. Even if no damage is apparent, theremay be hidden damage that could makethe vehicle impossible to control.
Moving the vehicle when it is in safety mode
1. If the message Normal mode The
vehicle is now in normal mode is dis-
played after attempting to start the engine, the vehicle may be moved care-fully from its present position if, for exam-ple, it is blocking traffic.
2. Do not move the vehicle farther than abso- lutely necessary.
Page 80 of 643
DISPLAYS AND VOICE CONTROL
* Option/accessory.
78
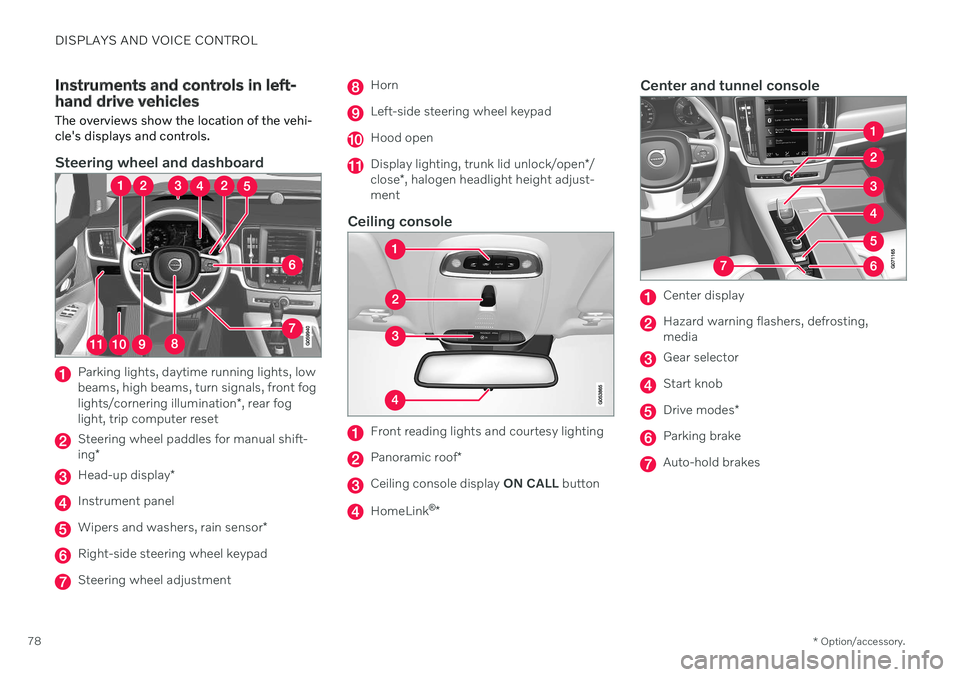
Instruments and controls in left- hand drive vehicles The overviews show the location of the vehi- cle's displays and controls.
Steering wheel and dashboard
Parking lights, daytime running lights, low beams, high beams, turn signals, front fog lights/cornering illumination *, rear fog
light, trip computer reset
Steering wheel paddles for manual shift- ing *
Head-up display *
Instrument panel
Wipers and washers, rain sensor *
Right-side steering wheel keypad
Steering wheel adjustment
Horn
Left-side steering wheel keypad
Hood open
Display lighting, trunk lid unlock/open */
close *, halogen headlight height adjust-
ment
Ceiling console
Front reading lights and courtesy lighting
Panoramic roof *
Ceiling console display ON CALL button
HomeLink ®
*
Center and tunnel console
Center display
Hazard warning flashers, defrosting, media
Gear selector
Start knob
Drive modes *
Parking brake
Auto-hold brakes
Page 88 of 643
||
DISPLAYS AND VOICE CONTROL
* Option/accessory.
86
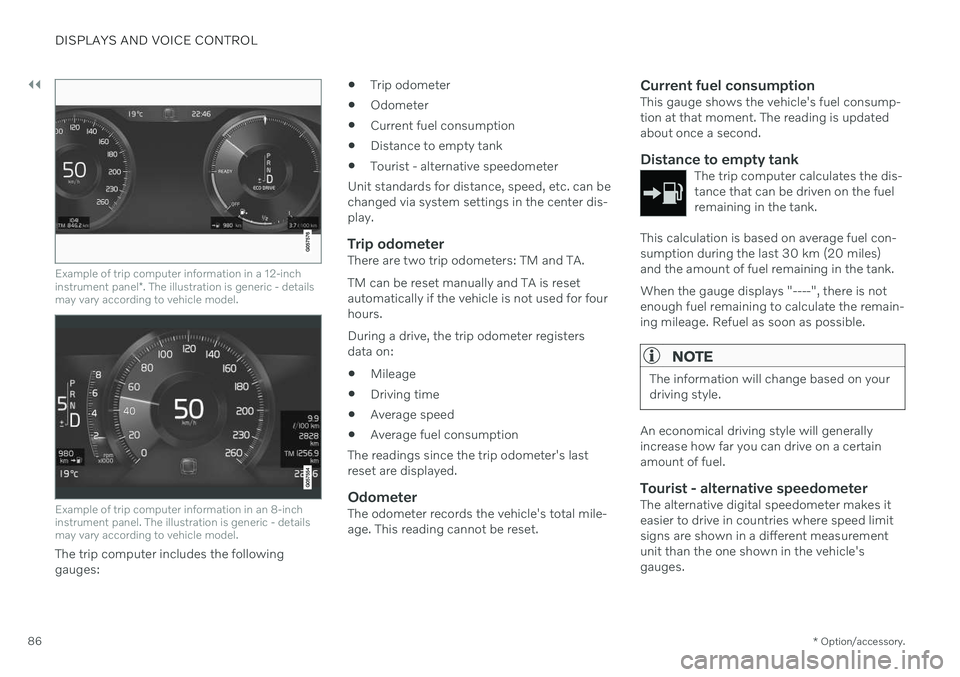
Example of trip computer information in a 12-inch instrument panel *. The illustration is generic - details
may vary according to vehicle model.
Example of trip computer information in an 8-inch instrument panel. The illustration is generic - detailsmay vary according to vehicle model.
The trip computer includes the following gauges:
Trip odometer
Odometer
Current fuel consumption
Distance to empty tank
Tourist - alternative speedometer
Unit standards for distance, speed, etc. can bechanged via system settings in the center dis-play.
Trip odometerThere are two trip odometers: TM and TA. TM can be reset manually and TA is reset automatically if the vehicle is not used for fourhours. During a drive, the trip odometer registers data on:
Mileage
Driving time
Average speed
Average fuel consumption
The readings since the trip odometer's lastreset are displayed.
OdometerThe odometer records the vehicle's total mile-age. This reading cannot be reset.
Current fuel consumptionThis gauge shows the vehicle's fuel consump-tion at that moment. The reading is updatedabout once a second.
Distance to empty tankThe trip computer calculates the dis-tance that can be driven on the fuelremaining in the tank.
This calculation is based on average fuel con- sumption during the last 30 km (20 miles)and the amount of fuel remaining in the tank. When the gauge displays "----", there is not enough fuel remaining to calculate the remain-ing mileage. Refuel as soon as possible.
NOTE
The information will change based on your driving style.
An economical driving style will generally increase how far you can drive on a certainamount of fuel.
Tourist - alternative speedometerThe alternative digital speedometer makes iteasier to drive in countries where speed limitsigns are shown in a different measurementunit than the one shown in the vehicle'sgauges.
Page 89 of 643
DISPLAYS AND VOICE CONTROL
}}
87
When used, the digital speed is displayed in the opposite unit to that shown in the analogspeedometer. If
mph is used in the analog
speedometer, the equivalent speed in km/h
will be shown in the digital speedometer.
Related information
Displaying trip data in the instrumentpanel (p. 87)
Resetting the trip odometer (p. 88)
Displaying trip statistics in the center dis-play (p. 88)
Instrument panel (p. 80)
Changing system units of measurement(p. 129)
Displaying trip data in the instrument panel
Data recorded and calculated by the trip computer can be displayed on the instrumentpanel.
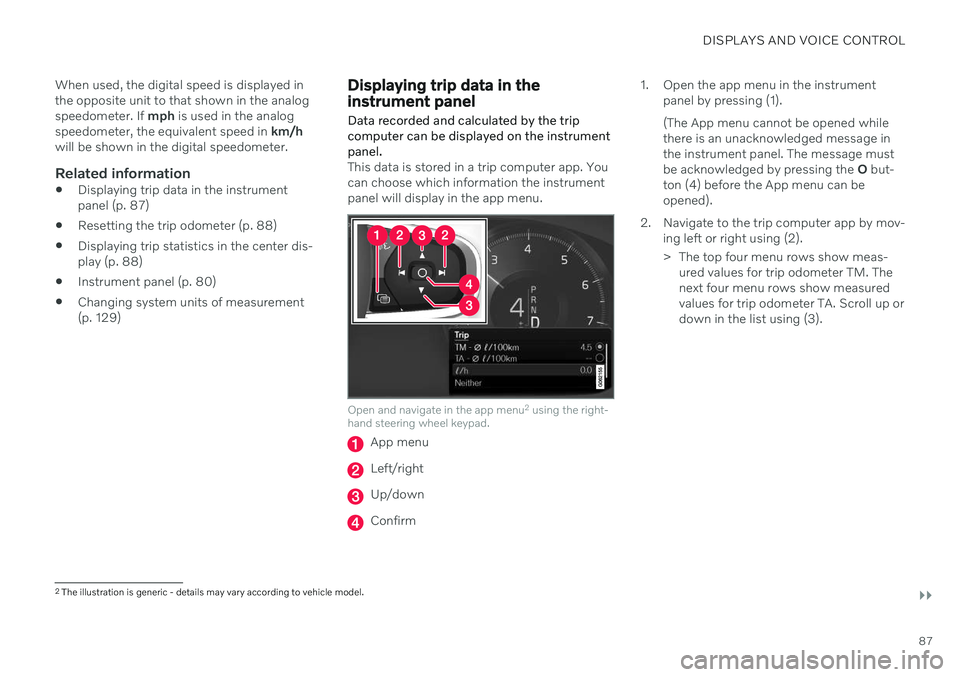
This data is stored in a trip computer app. You can choose which information the instrumentpanel will display in the app menu.
Open and navigate in the app menu 2
using the right-
hand steering wheel keypad.
App menu
Left/right
Up/down
Confirm 1. Open the app menu in the instrument
panel by pressing (1). (The App menu cannot be opened while there is an unacknowledged message inthe instrument panel. The message mustbe acknowledged by pressing the O but-
ton (4) before the App menu can beopened).
2. Navigate to the trip computer app by mov- ing left or right using (2).
> The top four menu rows show meas-ured values for trip odometer TM. The next four menu rows show measuredvalues for trip odometer TA. Scroll up ordown in the list using (3).
2The illustration is generic - details may vary according to vehicle model.