reset VOLVO S90 2020 Quick Guide
[x] Cancel search | Manufacturer: VOLVO, Model Year: 2020, Model line: S90, Model: VOLVO S90 2020Pages: 643, PDF Size: 13.68 MB
Page 310 of 643

||
DRIVER SUPPORT
308
CauseAction
Water or snow is spraying/swirling up and blocking the radar signals or the camera's range of visibility. No action. Very wet or snow-covered roads may sometimes prevent the cam-era/radar sensor from functioning.
There is dirt between the inside of the windshield and the cam-era/radar sensor. Consult a workshop to have the area of the windshield on the inside of the cam-era's casing cleaned. An authorized Volvo workshop is recommended.
Bright sunlight. No action. The camera/radar sensor will reset automatically when lighting con-ditions improve.
High temperatures
If the temperature in the passenger compart- ment is very high, the camera/radar sensorwill switch off temporarily forapprox. 15 minutes after the engine is startedto protect its electronic components. Whenthe temperature has cooled sufficiently, thecamera/radar sensor will automatically restart.
Damaged windshield
NOTE
Failure to take action could result in reduced performance for the driver supportsystems that use the camera and radarunit. It could cause functions to bereduced, deactivated completely or to pro-duce an incorrect function response.
To avoid the risk of malfunction of the driver support systems that use the radar sensor, thefollowing also apply:
If there are cracks, scratches or stonechips on the windshield in front of any ofthe camera and radar sensor "windows"and this covers an area ofabout 0.5 × 3.0 mm (0.02 × 0.12 in.) ormore, contact a workshop to have the windshield replaced 50
.
Volvo advises
against repairing cracks,
scratches or stone chips in the area in front of the camera and radar sensor – theentire windshield should instead bereplaced.
Before replacing the windshield, contact a workshop 50
to verify that the right wind-
shield has been ordered and installed.
The same type of windshield wipers or wipers approved by Volvo should be usedfor replacement.
If the windshield is replaced, the cameraand radar sensor must be recalibrated by a workshop 50
to help ensure proper func-
tioning of all of the vehicle's camera and radar-based systems.
Radar
Vehicle speed
The radar sensor's ability to detect a vehicle ahead is significantly reduced if the speed ofthe vehicle ahead differs greatly from yourvehicle's speed.
50 An authorized Volvo workshop is recommended.
Page 339 of 643
DRIVER SUPPORT
}}
* Option/accessory.337
Road Sign Information and Sensus Navigation*
If the vehicle is equipped with Sensus Navigation*, speed-related information will be
provided in the following situations:
In cases where the speed limit is given indirectly, e.g. signs for highways or othermajor roads.
If a previously detected speed sign isdeemed to be no longer valid and no newsign has been passed.
NOTE
In certain markets, the Road Sign Informa- tion
* function is only available in combina-
tion with Sensus Navigation *.
NOTE
If a downloaded third-party app is used for navigation, there is no support for speed-related information.
Related information
Road Sign Information
* (p. 335)
Speed limit and speed camera warnings from Road Sign Information *
There are sub-functions for Road Sign Infor- mation (RSI 78
) that can alert the driver if the
speed limit has been exceeded or if there are speed cameras nearby.
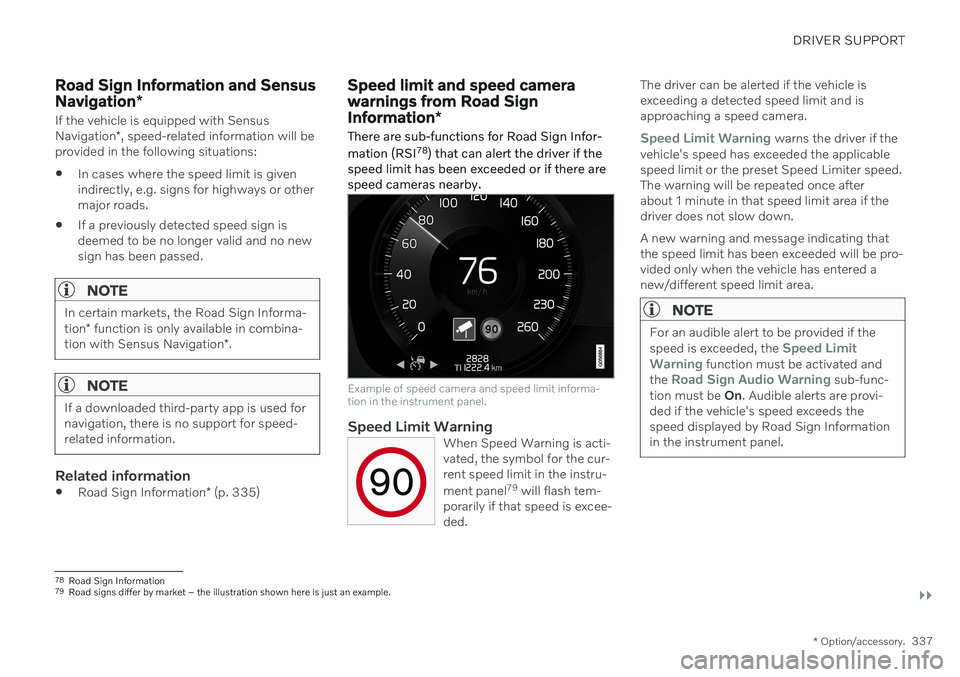
Example of speed camera and speed limit informa- tion in the instrument panel.
Speed Limit WarningWhen Speed Warning is acti- vated, the symbol for the cur-rent speed limit in the instru- ment panel 79
will flash tem-
porarily if that speed is excee- ded.
The driver can be alerted if the vehicle is exceeding a detected speed limit and isapproaching a speed camera.
Speed Limit Warning warns the driver if the
vehicle's speed has exceeded the applicable speed limit or the preset Speed Limiter speed.The warning will be repeated once afterabout 1 minute in that speed limit area if thedriver does not slow down. A new warning and message indicating that the speed limit has been exceeded will be pro-vided only when the vehicle has entered anew/different speed limit area.
NOTE
For an audible alert to be provided if the speed is exceeded, the Speed Limit
Warning function must be activated and
the Road Sign Audio Warning sub-func-
tion must be On. Audible alerts are provi-
ded if the vehicle's speed exceeds the speed displayed by Road Sign Informationin the instrument panel.
78 Road Sign Information
79 Road signs differ by market – the illustration shown here is just an example.
Page 402 of 643

||
STARTING AND DRIVING
* Option/accessory.
400
Dynamic
Dynamic mode is designed to help pro-
vide sportier driving characteristics and a faster acceleration response.
Gear shifting will be faster and more distinctand the transmission will prioritize gears witha higher traction force. Steering response is faster and suspension is stiffer 10
to help reduce body roll when corner-
ing. The Start/Stop function is deactivated.
Dynamic mode is also available in a Polestar
Engineered* version.
Individual
Customizes drive mode to personal prefer- ences.
Select one of the drive modes as a basis andadjust the settings to achieve your preferreddriving characteristics. These settings will bestored in the active driver profile and will beavailable every time the vehicle is unlockedwith that remote key. Individual drive mode is only available if it has been activated in the center display.
Settings view 11
for Individual drive mode.
1. Tap Settings in the Top view.
2. Tap
My CarIndividual Drive Modeand select Individual Drive Mode. 3.
Under
Presets, select one of the following
drive modes as a basis: Eco, Comfort,Dynamic or Polestar Engineered* .
The following settings can be modified:
Driver Display
Steering Force
Powertrain Characteristics
Brake Characteristics
Suspension Control
ECO Climate
Start/Stop.
Related information
Changing drive mode
* (p. 401)
Eco drive mode (p. 401)
Economical driving (p. 411)
Start/Stop function (p. 404)
All Wheel Drive (AWD)
* (p. 399)
Driver profiles (p. 133)
10
Vehicles with Four-C.
11 The illustration is generic - details may vary according to vehicle model.
Page 405 of 643

STARTING AND DRIVING
* Option/accessory.403
ECO gauge in the instrument panel
Eco gauge in 12" instrument panel *.
Eco gauge in 8" instrument panel.
The ECO gauge indicates how economical current driving is:
A low reading in the green area of thegauge indicates economical driving.
A high reading is shown when driving isnot economical, e.g. heavy braking orrapid acceleration.
The ECO gauge also has an indicator showinghow a reference driver would drive in the samedriving situation. This is shown by the shortpointer in the gauge.
ECO ClimateIn Eco mode, ECO climate is automatically
activated in the passenger compartment to help reduce energy consumption.
NOTE
When the Eco drive mode is activated, set-
tings for certain climate system and elec- tricity consuming functions are reduced.Some of these settings can be reset man-ually, but full functionality will only be restored by switching off
Eco mode or
adapting the Individual* drive mode to full
climate system functionality.
If condensation forms on the windows, tap the max defroster button, which will function nor-mally.
Related information
Changing drive mode
* (p. 401)
Activating and deactivating Eco drivemode using the function button (p. 404)
Drive modes
* (p. 399)
Economical driving (p. 411)
Start/Stop function (p. 404)
Page 428 of 643
||
STARTING AND DRIVING
* Option/accessory.
426 HomeLink
®
is delivered integrated in the rear-
view mirror. The HomeLink ®
panel consists of
three programmable buttons and an indicator light in the mirror. For more information about HomeLink ®
,
please visit: www.HomeLink.com or call 1-800-355-3515. Save the original remote controls for future programming (e.g. for use in another vehicle).It is also advisable to delete the button pro-gramming if the vehicle is sold.
Related information
Using HomeLink ®
* (p. 428)
Programming HomeLink ®
* (p. 426)
Type approval for HomeLink ®
* (p. 429)
Programming HomeLink ®
*19
Follow these instructions to program HomeLink ®
, reset all programming, or pro-
gram individual buttons.
NOTE
In some vehicles, the ignition must be on or in the "accessory position" before HomeLink ®
can be programmed or used. It
can be a good idea to put new batteries in the remote control being replaced by HomeLink ®
for faster programming and
better radio signal transmission. TheHomeLink ®
buttons should be reset before
programming.
WARNING
While HomeLink ®
is being programmed,
the garage door or gate being programmed may be activated. Make sure that no one isnear the door or gate during programming.When programming a garage door opener,it is advised to park outside of the garage. 1. Point the remote control at the
HomeLink ®
button to be programmed and
hold it about 2-8 cm (1-3 inches) from the button. Do not obstruct the HomeLink ®
indicator light. Note: Some remote controls are more
effective at programming HomeLink ®
from
a distance of about 15-20 cm (6-12 inches). Keep this in mind if you experi-ence any programming difficulties.
2. Press and hold both the remote control button and the HomeLink ®
button to be
programmed.
19 Certain markets only.
Page 429 of 643
STARTING AND DRIVING
}}
427
3. Do not release the buttons until the indica-
tor light has stopped flashing slowly (about once a second) and either flashesquickly (about 10 times a second) orglows steadily. >If the indicator light glows steadily: Indication that programming is com-plete. Press the programmed buttontwice to activate. If the indicator light flashes quickly: The device being programmed with HomeLink ®
may have a security func-
tion that requires an extra step. Try pressing the programmed button twiceto see whether the programmingworks. Otherwise, continue with thefollowing steps.
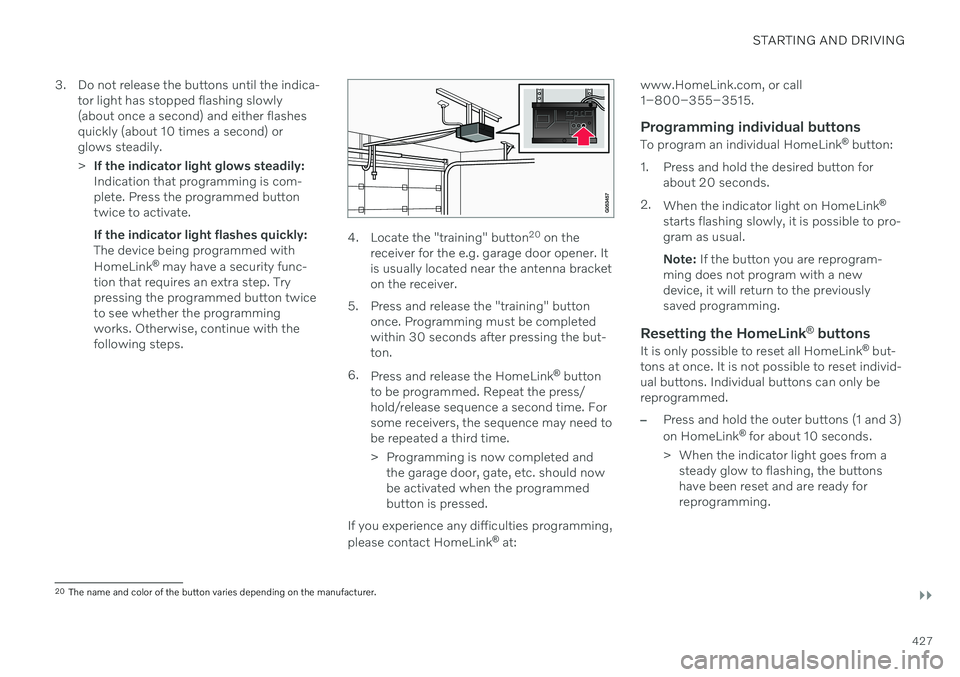
4. Locate the "training" button 20
on the
receiver for the e.g. garage door opener. It is usually located near the antenna bracketon the receiver.
5. Press and release the "training" button once. Programming must be completedwithin 30 seconds after pressing the but-ton.
6. Press and release the HomeLink ®
button
to be programmed. Repeat the press/hold/release sequence a second time. Forsome receivers, the sequence may need tobe repeated a third time.
> Programming is now completed and the garage door, gate, etc. should now be activated when the programmedbutton is pressed.
If you experience any difficulties programming, please contact HomeLink ®
at: www.HomeLink.com, or call 1–800–355–3515.
Programming individual buttons
To program an individual HomeLink
®
button:
1. Press and hold the desired button for about 20 seconds.
2. When the indicator light on HomeLink ®
starts flashing slowly, it is possible to pro-gram as usual. Note: If the button you are reprogram-
ming does not program with a new device, it will return to the previouslysaved programming.
Resetting the HomeLink ®
buttons
It is only possible to reset all HomeLink ®
but-
tons at once. It is not possible to reset individ-ual buttons. Individual buttons can only bereprogrammed.
–Press and hold the outer buttons (1 and 3) on HomeLink ®
for about 10 seconds.
> When the indicator light goes from a steady glow to flashing, the buttons have been reset and are ready forreprogramming.
20The name and color of the button varies depending on the manufacturer.
Page 436 of 643
AUDIO, MEDIA AND INTERNET
* Option/accessory.
434
Audio, media and Internet
The audio and media system consists of a media player and a radio. A cellular phone canalso be connected through Bluetooth to usehands-free functions or play music in thevehicle. When the vehicle is connected to theInternet, it is also possible to use apps to playmedia.
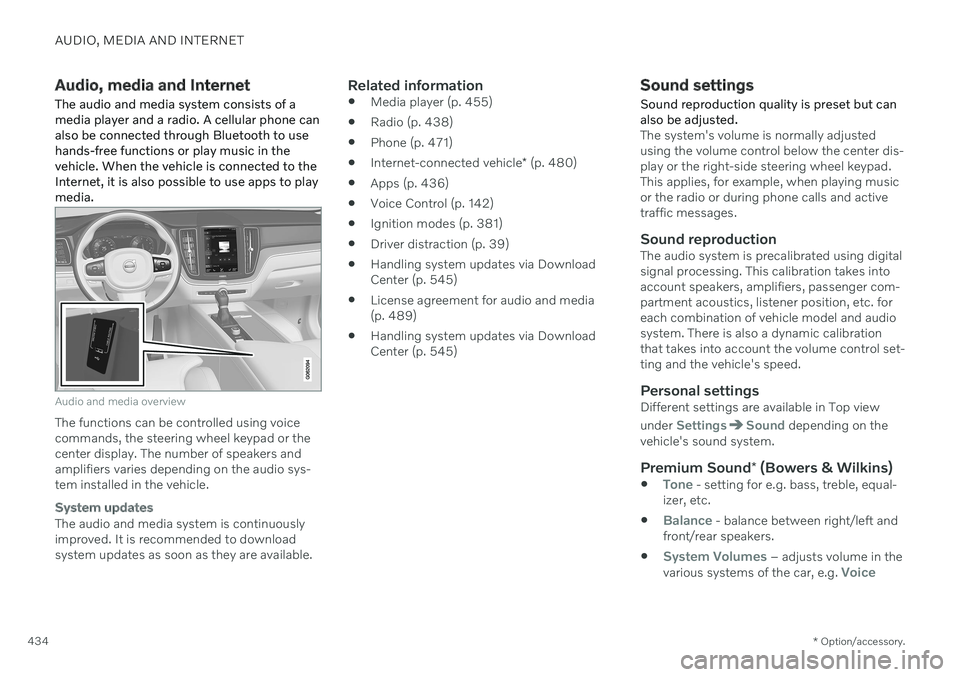
Audio and media overview
The functions can be controlled using voice commands, the steering wheel keypad or thecenter display. The number of speakers andamplifiers varies depending on the audio sys-tem installed in the vehicle.
System updates
The audio and media system is continuously improved. It is recommended to download system updates as soon as they are available.
Related information
Media player (p. 455)
Radio (p. 438)
Phone (p. 471)
Internet-connected vehicle
* (p. 480)
Apps (p. 436)
Voice Control (p. 142)
Ignition modes (p. 381)
Driver distraction (p. 39)
Handling system updates via DownloadCenter (p. 545)
License agreement for audio and media(p. 489)
Handling system updates via DownloadCenter (p. 545)
Sound settings
Sound reproduction quality is preset but can also be adjusted.
The system's volume is normally adjusted using the volume control below the center dis-play or the right-side steering wheel keypad.This applies, for example, when playing musicor the radio or during phone calls and activetraffic messages.
Sound reproductionThe audio system is precalibrated using digitalsignal processing. This calibration takes intoaccount speakers, amplifiers, passenger com-partment acoustics, listener position, etc. foreach combination of vehicle model and audiosystem. There is also a dynamic calibrationthat takes into account the volume control set-ting and the vehicle's speed.
Personal settingsDifferent settings are available in Top view under
SettingsSound depending on the
vehicle's sound system.
Premium Sound * (Bowers & Wilkins)
Tone - setting for e.g. bass, treble, equal-
izer, etc.
Balance - balance between right/left and
front/rear speakers.
System Volumes – adjusts volume in the
various systems of the car, e.g. Voice
Page 469 of 643
AUDIO, MEDIA AND INTERNET
}}
* Option/accessory.467
Settings for Apple ®
CarPlay ®
*
Settings for an iOS device connected through CarPlay 9
.
Automatic start1. Tap Settings in the Top view.
2. Tap
CommunicationApple CarPlayand select the desired setting: Check the box - CarPlay will start auto- matically when the USB cable is con-nected.
Uncheck the box - CarPlay will not startautomatically when the USB cable isconnected.
A maximum of 20 iOS devices can be storedin the list, which may be worth noting if manypeople share the vehicle, e.g. in a car pool.When the list is full and a new device is con-nected, the oldest one will be deleted. To delete the list, the settings must be rest in the center display (factory reset).
System Volumes1. Tap Settings in the Top view. 2. Tap
SoundSystem Volumes to
change the settings for the following:
Voice Control
Navi Voice Guidance
Phone Ringtone
Related information
Apple ®
CarPlay ®
* (p. 464)
Using Apple ®
CarPlay ®
* (p. 465)
Resetting center display settings (p. 131)
Tips for using Apple ®
CarPlay ®
*
Here are some useful tips for when you use CarPlay ®
.
Update your iOS device with the latest version of the iOS operating system andensure that the apps have been updated.
In the event of a problem with CarPlay,unplug the iOS device from the USB portand then plug it in again. Otherwise, try toclose the app on the device that is not working and then restart the app, or try closing all apps and restart your device.
If the apps do not appear when CarPlaystarts (black screen), try minimizing andexpanding the tile for CarPlay.
Using apps that are not compatible withCarPlay may sometimes cause the con-nection between the iOS device and thevehicle to be broken. Information aboutsupported apps and compatible devicescan be found on Apple's website. You canalso search for CarPlay in the App Store tofind information about apps that are com-patible with CarPlay in your market.
You can use Siri to write or dictate mes-sages or have them read aloud. Messagesare read aloud and dictated in the lan-guage selected in the Siri settings. Whenyou write/dictate messages, no text willbe shown in the vehicle's center display,
9
Apple and CarPlay are registered trademarks of Apple Inc.
Page 472 of 643
AUDIO, MEDIA AND INTERNET
* Option/accessory.
470
Settings for Android Auto *
Settings for Android devices initially con- nected with Android Auto.
Automatic start1. Tap Settings in the Top view.
2. Tap
CommunicationAndroid Autoand select setting: Check the box - Android Auto will start automatically when the USB cable isconnected.
Uncheck the box - Android Auto will notstart automatically when the USB cableis connected.
A maximum of 20 Android devices can bestored in the list. When the list is full and anew device is connected, the oldest one willbe deleted. A factory reset must be performed to delete the list.
System Volumes1. Tap Settings in the Top view.
2. Tap
SoundSystem Volumes to
change the settings for the following:
Voice Control
Navi Voice Guidance
Phone Ringtone
Related information
Android Auto
* (p. 468)
Using Android Auto
* (p. 469)
Resetting center display settings (p. 131)
Tips for using Android Auto
*
Here are some useful tips for when you use Android Auto.
Ensure that your apps are updated.
When starting the vehicle, wait until the center display has started, connect thedevice and then open Android Auto fromthe app view.
In the event of problems with AndroidAuto, unplug your Android device from theUSB port and then plug it in again. Other-wise, try closing the app on the device andthen restarting the app.
When a device is connected to AndroidAuto it is still possible to play media viaBluetooth to another media player. TheBluetooth function is on when AndroidAuto is used.
If the Android Auto icon is grayed out, itmeans that a device is no longer con-nected. When you connect your device,the icon will light up. If there is no icon atall, the vehicle does not support connect-ing a device for this purpose.
If the device is connected to the vehiclethrough Bluetooth, the connection will bebroken when Android Auto is used.Resume Internet connection in the vehicle
Page 473 of 643
AUDIO, MEDIA AND INTERNET
}}
* Option/accessory.471
by tethering using the device's Wi-Fi hot- spot.
A maximum of 20 Android devices can bestored at the same time, which may beworth noting if many people share thevehicle, e.g. in a car pool. When the list isfull and a new device is connected, theoldest one will be deleted. A factory resetmust be performed to delete the list.
Related information
Android Auto
* (p. 468)
Connecting the vehicle to the Internet viaa phone (Wi-Fi) (p. 481)
Phone
A phone equipped with Bluetooth can be wirelessly connected to the vehicle's inte-grated hands-free system.
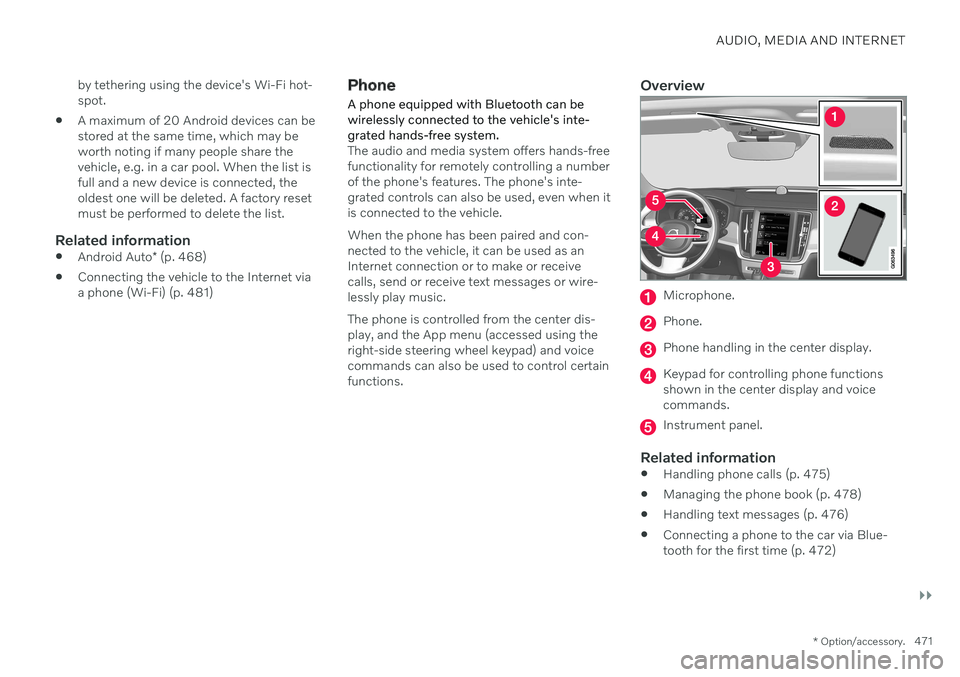
The audio and media system offers hands-free functionality for remotely controlling a numberof the phone's features. The phone's inte-grated controls can also be used, even when itis connected to the vehicle. When the phone has been paired and con- nected to the vehicle, it can be used as anInternet connection or to make or receivecalls, send or receive text messages or wire-lessly play music. The phone is controlled from the center dis- play, and the App menu (accessed using theright-side steering wheel keypad) and voicecommands can also be used to control certainfunctions.
Overview
Microphone.
Phone.
Phone handling in the center display.
Keypad for controlling phone functions shown in the center display and voicecommands.
Instrument panel.
Related information
Handling phone calls (p. 475)
Managing the phone book (p. 478)
Handling text messages (p. 476)
Connecting a phone to the car via Blue- tooth for the first time (p. 472)