lock VOLVO V60 2021 Owners Manual
[x] Cancel search | Manufacturer: VOLVO, Model Year: 2021, Model line: V60, Model: VOLVO V60 2021Pages: 661, PDF Size: 12.68 MB
Page 579 of 661
MAINTENANCE AND SERVICE
577
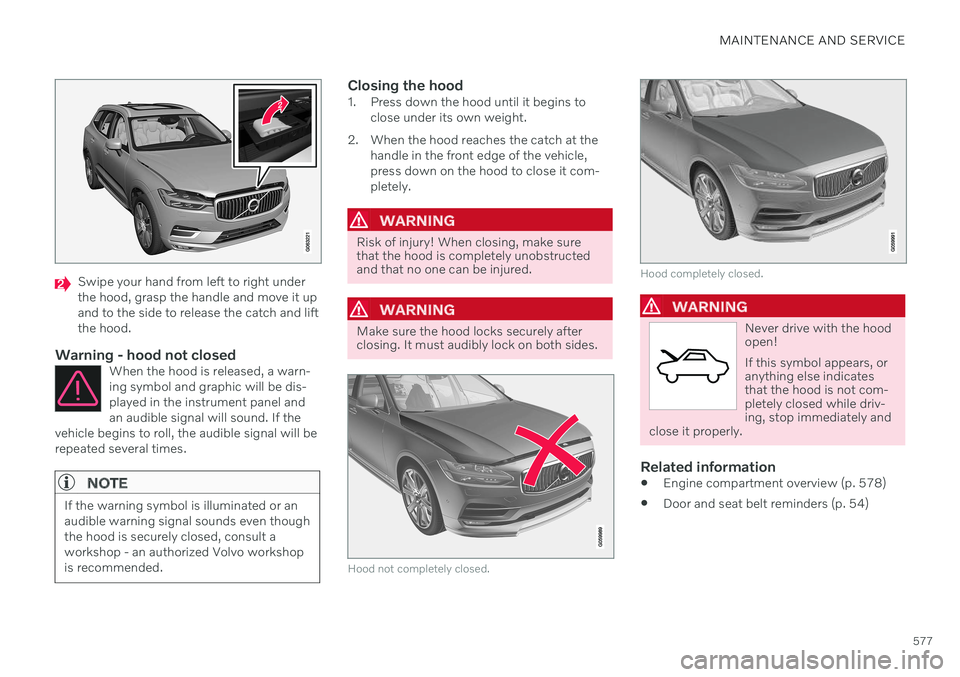
Swipe your hand from left to right under the hood, grasp the handle and move it upand to the side to release the catch and liftthe hood.
Warning - hood not closedWhen the hood is released, a warn-ing symbol and graphic will be dis-played in the instrument panel andan audible signal will sound. If the
vehicle begins to roll, the audible signal will berepeated several times.
NOTE
If the warning symbol is illuminated or an audible warning signal sounds even thoughthe hood is securely closed, consult aworkshop - an authorized Volvo workshopis recommended.
Closing the hood1. Press down the hood until it begins to close under its own weight.
2. When the hood reaches the catch at the handle in the front edge of the vehicle, press down on the hood to close it com-pletely.
WARNING
Risk of injury! When closing, make sure that the hood is completely unobstructedand that no one can be injured.
WARNING
Make sure the hood locks securely after closing. It must audibly lock on both sides.
Hood not completely closed.
Hood completely closed.
WARNING
Never drive with the hood open! If this symbol appears, or anything else indicatesthat the hood is not com-pletely closed while driv-ing, stop immediately and
close it properly.
Related information
Engine compartment overview (p. 578)
Door and seat belt reminders (p. 54)
Page 617 of 661
MAINTENANCE AND SERVICE
}}
* Option/accessory.615
Hand washing
The vehicle should be washed as soon as it becomes dirty. This makes the vehicle easierto clean because dirt does not attach asstrongly. It also reduces the risk of scratchesand keeps the vehicle looking new. Wash thevehicle in a car wash or garage with an oilseparator and use car washing detergent.Use cleaning agents and car care productsrecommended by Volvo.
Important to keep in mind when handwashing your vehicle
Avoid washing the vehicle in direct sun- light. This could cause the detergent orwax to dry out and become abrasive.
Remove bird droppings from paintwork assoon as possible. It contains chemicalsthat affect and discolor paintwork veryquickly. Use e.g. soft paper or a spongesoaked in lots of water. Consult an author-ized Volvo workshop for assistanceremoving discoloration.
Hose down the underbody, including thewheel housings and bumper.
Hose down the entire vehicle and removeany loose dirt, droppings etc. to reducethe risk of scratches from washing. Do notspray directly onto locks.
If necessary, use cold degreaser on heavilysoiled surfaces. Note that in such casesthe surfaces must not be hot from the sun.
Wash using a sponge, car washing deter-gent and plenty of lukewarm water. Makesure that the sponge is clean. A dirtysponge can scratch the paint.
Clean the wiper blades with lukewarmsoap solution or car washing detergent.
Dry the vehicle using a clean, soft chamoisor a squeegee. Try not to let drops ofwater dry in strong sunlight. This couldcause water drying stains that may needto be polished out.
In areas with heavy industrial emissions,more frequent washing of the vehicle'sexterior is recommended.
Tar spots from asphalt may remain evenafter washing. Use a Volvo-recommendedtar remover to remove these spots afterwashing the vehicle.
WARNING
Always entrust engine washing to a work- shop. If the engine is hot, there is a risk offire.
CAUTION
Dirty headlights do not work as well. Clean them regularly, e.g. when refueling. Do not use corrosive cleaners. Use water and a non-abrasive sponge.
NOTE
Exterior lighting such as headlights and taillights may develop temporary conden-sation on the inside of the lens. This is nor-mal. All exterior lighting is designed toresist this. Condensation is normally ven-ted out of the lamp housing once the lighthas been lit for some period of time.
CAUTION
Make sure that the panoramic roof
*
and sun shade are closed before wash- ing the vehicle.
Never use abrasive polishing agents onthe panoramic roof.
Never use wax on the rubber sealsaround the panoramic roof.
Page 618 of 661
||
MAINTENANCE AND SERVICE
616
CAUTION
Remember to remove dirt from the drain holes in the doors and sills after washingthe vehicle.
Related information
Cleaning the exterior (p. 613)
Polishing and waxing (p. 614)
Automatic car washes (p. 616)
High-pressure washing (p. 617)
Cleaning the wiper blades (p. 618)
Cleaning exterior plastic, rubber and trim components (p. 618)
Cleaning rims (p. 619)
Corrosion protection (p. 620)
Settings for automatically activating theparking brake (p. 402)
Automatic car washes
The vehicle should be washed as soon as it becomes dirty. The longer the dirt remains,the more difficult it will be to keep the vehicleclean. It could also lead to paint damage.
Washing your vehicle in an automatic car wash is a fast and easy way to keep your vehi-cle clean, but it does not reach all areas of thevehicle. Volvo recommends washing yourvehicle by hand or supplementing automaticcar washes with a hand wash.
NOTE
Volvo recommends not washing the vehi- cle in an automatic car wash during thefirst few months; the paintwork on newvehicles takes some time to fully harden.
CAUTION
Before driving the vehicle into a car wash, deactivate the Automatic Braking whenStationary and Automatic Parking BrakeApplication functions. If the functions arenot deactivated, the brake system willseize when the vehicle is stationary and thevehicle will not be able to roll.
CAUTION
For automatic car washes in which the vehicle is pulled forward on rolling wheels:
1. Before washing the vehicle, make sure that the automatic rain sensor is deac- tivated. If it is not deactivated andinadvertently starts, the wiper armscould be damaged.
2. To help prevent damage from the auto- matic car wash machinery, make surethat the door mirrors are folded in,antennas retracted or removed, andany auxiliary lights secured.
3. Drive into the automatic car wash.
4. Turn off the "Automatic Braking when Stationary" function using the
but-
ton in the tunnel console.
5. Turn off the "Automatic Parking Brake Application" function in the center dis- play's Top view.
6. Turn off the engine by turning the start knob in the tunnel console clockwise.Hold the knob in position for at least2 seconds.
The vehicle is now ready for the automaticcar wash.
Page 619 of 661
MAINTENANCE AND SERVICE
* Option/accessory.617
CAUTION
The system will automatically change to P
mode if the above steps are not followed. In P mode, the wheels are locked, which
they should not be when the vehicle isbeing washed in a car wash.
NOTE
Keep in mind that if the vehicle is equipped with the keyless locking and unlocking function *, the doors and tailgate/trunk lid
may open when washing the vehicle if the remote key is within range.
Testing the brakes
WARNING
Always test the brakes after washing the vehicle, including the parking brake, toensure moisture and corrosion do notattach the brake pads and impair brakefunctionality.
Lightly depress the brake pedal from time to time when driving long distances in rain orslush. The heat from the friction will helpwarm up and dry the brake pads. Do the sameafter starting the vehicle in very damp or coldweather.
Related information
Cleaning the exterior (p. 613)
Polishing and waxing (p. 614)
Hand washing (p. 615)
High-pressure washing (p. 617)
Cleaning the wiper blades (p. 618)
Cleaning exterior plastic, rubber and trimcomponents (p. 618)
Cleaning rims (p. 619)
Corrosion protection (p. 620)
Auto-hold brakes (p. 403)
Settings for automatically activating theparking brake (p. 402)
Keyless and touch-sensitive surfaces
*
(p. 254)
High-pressure washing The vehicle should be washed as soon as it becomes dirty. The longer the dirt remains,the more difficult it will be to keep the vehicleclean. It could also lead to paint damage.Wash the vehicle in a car wash or garagewith an oil separator. Use a car washingdetergent recommended by Volvo.
If washing the vehicle with a high-pressure wash, use sweeping movements and keep thenozzle at least 30 cm (13 in.) from the vehicle.Do not spray directly onto locks.
Related information
Cleaning the exterior (p. 613)
Polishing and waxing (p. 614)
Hand washing (p. 615)
Automatic car washes (p. 616)
Cleaning the wiper blades (p. 618)
Cleaning exterior plastic, rubber and trimcomponents (p. 618)
Cleaning rims (p. 619)
Corrosion protection (p. 620)
Page 625 of 661
MAINTENANCE AND SERVICE
623
Changing rear window wipers
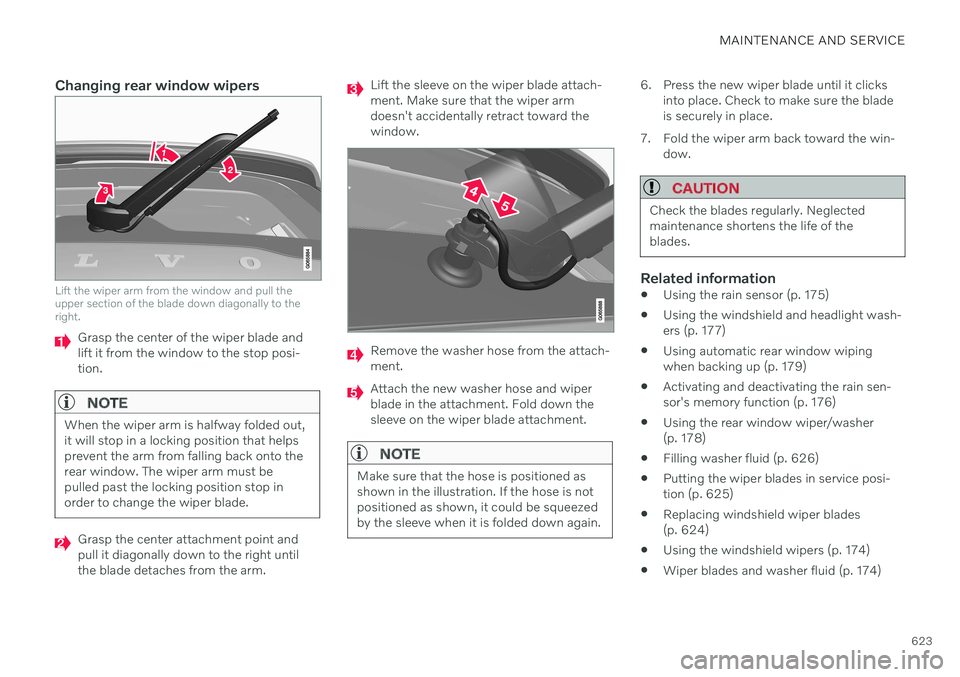
Lift the wiper arm from the window and pull the upper section of the blade down diagonally to theright.
Grasp the center of the wiper blade and lift it from the window to the stop posi-tion.
NOTE
When the wiper arm is halfway folded out, it will stop in a locking position that helpsprevent the arm from falling back onto therear window. The wiper arm must bepulled past the locking position stop inorder to change the wiper blade.
Grasp the center attachment point and pull it diagonally down to the right untilthe blade detaches from the arm.
Lift the sleeve on the wiper blade attach- ment. Make sure that the wiper armdoesn't accidentally retract toward thewindow.
Remove the washer hose from the attach- ment.
Attach the new washer hose and wiper blade in the attachment. Fold down thesleeve on the wiper blade attachment.
NOTE
Make sure that the hose is positioned as shown in the illustration. If the hose is notpositioned as shown, it could be squeezedby the sleeve when it is folded down again.
6. Press the new wiper blade until it clicksinto place. Check to make sure the blade is securely in place.
7. Fold the wiper arm back toward the win- dow.
CAUTION
Check the blades regularly. Neglected maintenance shortens the life of theblades.
Related information
Using the rain sensor (p. 175)
Using the windshield and headlight wash- ers (p. 177)
Using automatic rear window wipingwhen backing up (p. 179)
Activating and deactivating the rain sen-sor's memory function (p. 176)
Using the rear window wiper/washer(p. 178)
Filling washer fluid (p. 626)
Putting the wiper blades in service posi-tion (p. 625)
Replacing windshield wiper blades(p. 624)
Using the windshield wipers (p. 174)
Wiper blades and washer fluid (p. 174)
Page 626 of 661
MAINTENANCE AND SERVICE
624
Replacing windshield wiper bladesThe wiper blades help remove water from the windshield and rear window. Along with thewasher fluid, they are designed to clean theglass and help improve visibility while driving.The windshield and rear window wiperblades can be replaced.
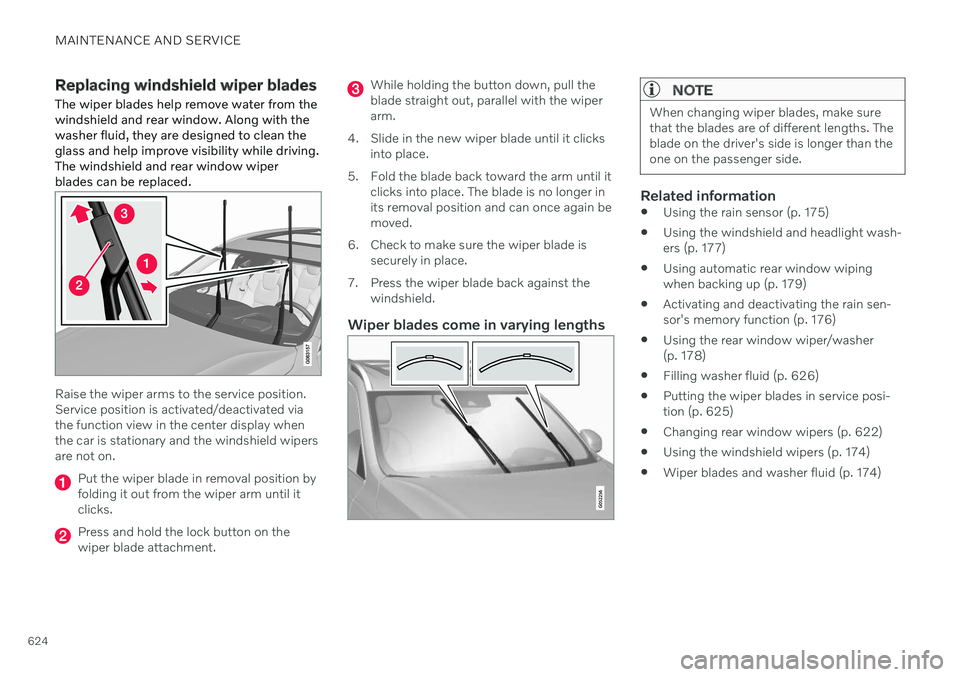
Raise the wiper arms to the service position. Service position is activated/deactivated viathe function view in the center display whenthe car is stationary and the windshield wipersare not on.
Put the wiper blade in removal position by folding it out from the wiper arm until itclicks.
Press and hold the lock button on the wiper blade attachment.
While holding the button down, pull the blade straight out, parallel with the wiperarm.
4. Slide in the new wiper blade until it clicks into place.
5. Fold the blade back toward the arm until it clicks into place. The blade is no longer inits removal position and can once again bemoved.
6. Check to make sure the wiper blade is securely in place.
7. Press the wiper blade back against the windshield.
Wiper blades come in varying lengths
NOTE
When changing wiper blades, make sure that the blades are of different lengths. Theblade on the driver's side is longer than theone on the passenger side.
Related information
Using the rain sensor (p. 175)
Using the windshield and headlight wash- ers (p. 177)
Using automatic rear window wipingwhen backing up (p. 179)
Activating and deactivating the rain sen-sor's memory function (p. 176)
Using the rear window wiper/washer(p. 178)
Filling washer fluid (p. 626)
Putting the wiper blades in service posi-tion (p. 625)
Changing rear window wipers (p. 622)
Using the windshield wipers (p. 174)
Wiper blades and washer fluid (p. 174)
Page 643 of 661

INDEX
641
1, 2, 3 ...
4WD 413
A
ABSanti-lock brakes 397
AC (Air conditioning) 225
Accessories and extra equipment 36 installation 37
Accessory installation warning 37
Active Bending Lights 156
Adapting driving characteristics 413
Adaptive Cruise Control 286 activating 289
auto-brake 315
change cruise control functionality 293
controls 288
deactivate 290
display 288
limitations 292
passing 310
set time interval 314
standby mode 291
stored speed 313
switching target vehicles 312
Symbols and messages 294
troubleshooting 292
WARNING 311
Adjusting the steering wheel 195
Advanced Air Cleaner 204
Airbag 55 activation/deactivation 59
driver's side 56
passenger side 56, 59
Air bag, see Airbag 55
Air conditioning 225 Air conditioning, fluid volume and grade 637
Air distribution 204 air vents 204, 206
changing 205
defrosting 218
recirculation 217
table showing options 207
Air quality 201, 203 Advanced Air Cleaner 204
allergy and asthma 202
passenger compartment filter 204
Air recirculation 217
Alarm 266 deactivating 267
Alarm about slippery road conditions 276
Alarm on hazard warning flashers 276Allergy and asthma-inducing sub-
stances 202
All Wheel Drive, AWD 413
All Wheel Drive (AWD) 413
All Wheel Drive (four-wheel drive) 413
Android Auto 482, 483, 484Antenna location 257
Apple CarPlay 478, 479, 481
Approach lighting 160
Apps 450
Assistance at risk of collision 337 activating/deactivating 338
at risk of run-off 338
during collision risks from behind 340 during collision risks from oncoming
traffic 339
limitations 341
Symbols and messages 342
Audio and media 448 Audio system HD digital radio 459 SiriusXM ®
Satellite radio 460, 461,
463
Auto-climate 216
Auto hold 403
INDEX
Page 644 of 661
INDEX
642Auto-hold brakes 403
activating/deactivating 404
after collision 405
driver support 270
Automatic car wash 616 Automatic engine stop auto-stop 418
Automatic high beam 155
Automatic locking 260
Automatic relocking 241, 255
Automatic transmission 406, 407 kickdown 412
oil 636
Trailer 434
B
Backrestfront seat, adjusting 182, 183, 186, 187 , 188, 189
rear seat, folding 192
Battery jump-start 431
Maintenance 584
recycling 588
starter battery 584
support 586
symbols on the battery 588
Blind Spot Information 344
BLIS 344 activating/deactivating 345
limitations 346
Symbols and messages 347
Blower adjusting 220, 221
air distribution 205
air vents 206
Bluetooth connect 475
connecting vehicle to Internet 501
phone 485
settings 493
Book service and repair 571
Booster cushions 74 Brake assist after collision 405
Brake fluid grade 637
Brake functions 397
Brakes 397 anti-lock brakes, ABS 397
auto-brake with Pilot Assist 315auto-braking with Adaptive Cruise
Control 315automatic when stationary 403
Brake Assist System, BAS 398
brake lights 159
brake system 397
emergency brake lights 159
Maintenance 399
on salted roads 399
on wet roads 399
parking brake 400
brake system fluid 637
C
Camera sensorsee Camera 383
Camera unit 383 limitations 383
maintenance and cleaning 386
Symbols and messages 388
Capacity weight 547, 633 Care Key restricted remote key 248
settings 249
Cargo compartment 555 attachment points 558
cargo net 563
Page 645 of 661
INDEX
643
electrical outlet 552, 553
Lighting 161
Cargo compartment cover 559, 560
cargo net 563
Cargo net 563
Car wash 613, 615, 616, 617, 618, 619
Catalytic converter 429 recovery 438
Cell phone, see Phone 486
Center console 551
Center display change appearance 129
cleaning 608
climate controls 210
Function view 120
handling 110, 113, 117, 122
keyboard 124
messages 138, 139
overview 108
settings 130, 131
switch off and change volume 129
symbols in status bar 122
views 113
Central locking 258
Certificate 496
Change of owner 132
Changing target vehicle 312
Checking engine oil level 580 Child lock activating/deactivating 259
Child restraints 66, 68 booster cushions 74
convertible seats 72
infant seats 70
ISOFIX/LATCH anchors 77
lower attachment points 77
recalls and registration 68
top tether anchors 75
Child safety 66
City Safety 323 braking for oncoming vehicles 332
crossing traffic 329
delayed evasive maneuver 331
detecting obstacles 327
evasive maneuver 330
limitations 333
limitations for evasive maneuvers 331
limitations in crossing traffic 330
setting warning distance 326
sub-functions 324
Symbols and messages 336
Cleaning 611, 612, 613 automatic car wash 616
car wash 613, 615, 616, 617, 618, 619
center display 608
Seat belts 610textile upholstery 607, 609, 611
upholstery 607, 609, 610, 611, 612, 613
wheels 619
Cleaning wheels 619
Cleaning wiper blades 618
CleanZone 202
Clean Zone Interior Package 202
Climate 198 auto-regulation 216
blower control 220, 221
parking 226
perceived temperature 200
Sensors 199
temperature control 222, 223, 224
voice control 200
zones 198
Climate controls 210 center display 210
rear seat 210
Climate system 198, 210 Refrigerant 637
repairs 576
Clock, setting 92
Collision 44, 49, 55, 64Collision warner crossing traffic rear 352
see City Safety 323
Page 646 of 661
INDEX
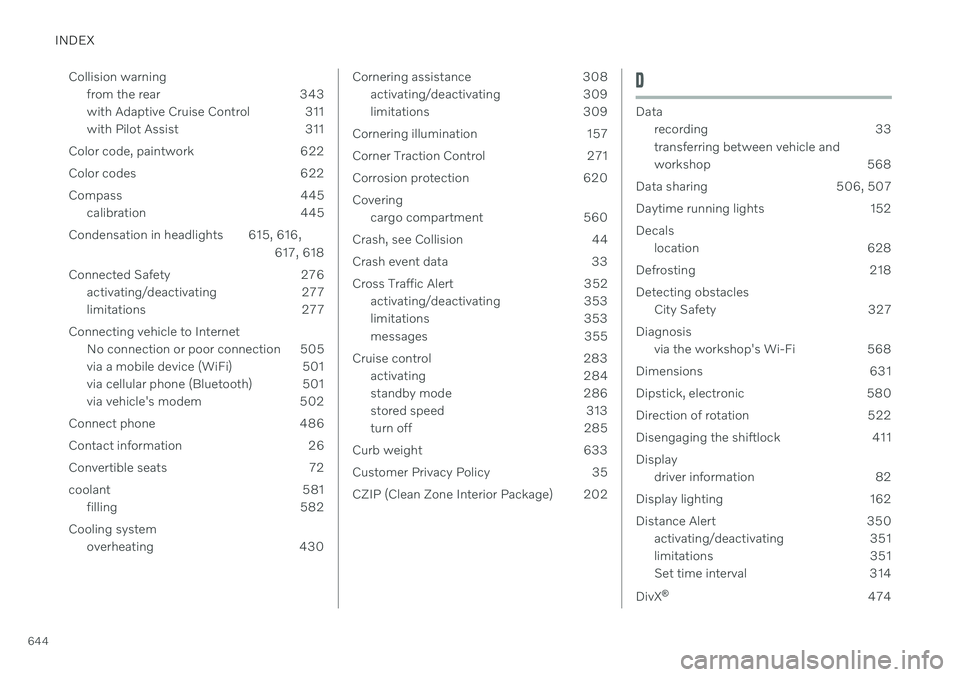
644Collision warning
from the rear 343
with Adaptive Cruise Control 311
with Pilot Assist 311
Color code, paintwork 622
Color codes 622
Compass 445 calibration 445
Condensation in headlights 615, 616, 617, 618
Connected Safety 276 activating/deactivating 277
limitations 277
Connecting vehicle to Internet No connection or poor connection 505
via a mobile device (WiFi) 501
via cellular phone (Bluetooth) 501
via vehicle's modem 502
Connect phone 486
Contact information 26
Convertible seats 72
coolant 581 filling 582
Cooling system overheating 430
Cornering assistance 308activating/deactivating 309
limitations 309
Cornering illumination 157
Corner Traction Control 271
Corrosion protection 620Covering cargo compartment 560
Crash, see Collision 44
Crash event data 33
Cross Traffic Alert 352 activating/deactivating 353
limitations 353
messages 355
Cruise control 283 activating 284
standby mode 286
stored speed 313
turn off 285
Curb weight 633
Customer Privacy Policy 35
CZIP (Clean Zone Interior Package) 202D
Data recording 33 transferring between vehicle and
workshop 568
Data sharing 506, 507
Daytime running lights 152Decals location 628
Defrosting 218Detecting obstacles City Safety 327
Diagnosis via the workshop's Wi-Fi 568
Dimensions 631
Dipstick, electronic 580
Direction of rotation 522
Disengaging the shiftlock 411 Display driver information 82
Display lighting 162
Distance Alert 350 activating/deactivating 351
limitations 351
Set time interval 314
DivX ®
474