Storage VOLVO XC60 TWIN ENGINE 2020 User Guide
[x] Cancel search | Manufacturer: VOLVO, Model Year: 2020, Model line: XC60 TWIN ENGINE, Model: VOLVO XC60 TWIN ENGINE 2020Pages: 687, PDF Size: 14.65 MB
Page 464 of 687
||
STARTING AND DRIVING
* Option/accessory.
462
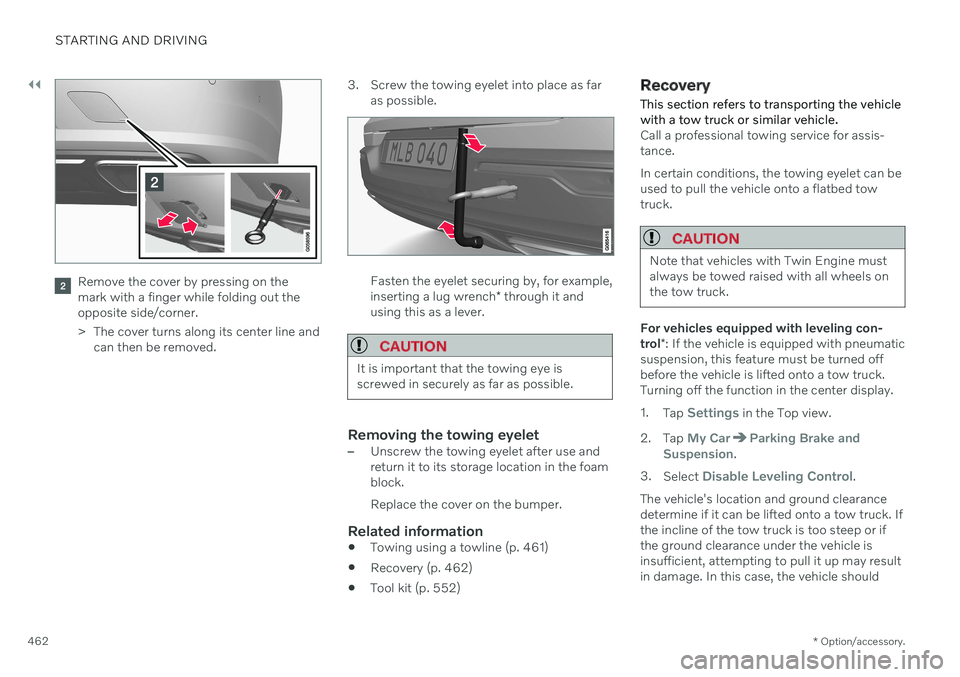
Remove the cover by pressing on the mark with a finger while folding out theopposite side/corner.
> The cover turns along its center line and
can then be removed. 3. Screw the towing eyelet into place as far
as possible.Fasten the eyelet securing by, for example, inserting a lug wrench * through it and
using this as a lever.
CAUTION
It is important that the towing eye is screwed in securely as far as possible.
Removing the towing eyelet–Unscrew the towing eyelet after use and return it to its storage location in the foamblock. Replace the cover on the bumper.
Related information
Towing using a towline (p. 461)
Recovery (p. 462)
Tool kit (p. 552)
Recovery
This section refers to transporting the vehicle with a tow truck or similar vehicle.
Call a professional towing service for assis- tance. In certain conditions, the towing eyelet can be used to pull the vehicle onto a flatbed towtruck.
CAUTION
Note that vehicles with Twin Engine must always be towed raised with all wheels onthe tow truck.
For vehicles equipped with leveling con- trol *: If the vehicle is equipped with pneumatic
suspension, this feature must be turned off before the vehicle is lifted onto a tow truck.Turning off the function in the center display. 1. Tap
Settings in the Top view.
2. Tap
My CarParking Brake and
Suspension.
3. Select
Disable Leveling Control.
The vehicle's location and ground clearance determine if it can be lifted onto a tow truck. Ifthe incline of the tow truck is too steep or ifthe ground clearance under the vehicle isinsufficient, attempting to pull it up may resultin damage. In this case, the vehicle should
Page 474 of 687

AUDIO, MEDIA AND INTERNET
* Option/accessory.
472
Apps
The App view contains applications (apps) that provide access to certain vehicle servi-ces.
Swipe the center display screen from right to left 1
to access the App view from the Home
view. This view displays downloaded apps (third-party apps) as well as apps for inte- grated functions, such as
FM radio.
App view. (generic illustration; basic apps vary depending on market and model)
Several basic apps are always available. More apps such as web radio and music servicescan be downloaded when the car is connectedto the Internet. Some apps can only be used when the vehicle is connected to the Internet. Start an app by pressing the app in the centerdisplay's app view. All apps used should be updated to the latest version.
Related information
Download apps (p. 473)
Updating apps (p. 473)
Deleting apps (p. 474)
Apple ®
CarPlay ®
* (p. 500)
Android Auto
* (p. 504)
Internet-connected vehicle
* (p. 516)
Hard disk storage space (p. 524)
Terms of use and data sharing (p. 522)
1
Applies for left-hand drive vehicles. For right-hand drive vehicles, swipe in the other direction.
Page 475 of 687
AUDIO, MEDIA AND INTERNET
}}
* Option/accessory.473
Download apps New apps can be downloaded when the vehi- cle is connected to the Internet.
NOTE
Data downloading can affect other services such as transfer data, e.g. web radio. If theaffect on other services is experienced asproblematic, the download can be interrup-ted. Alternatively, it may be appropriate toswitch off or cancel other services.
NOTE
When downloading using a phone, pay extra attention to the data traffic costs.
1.
Open the Download Center app in App
view.
2. Select New apps to open a list of apps
that are available but are not installed in the vehicle. 3. Tap on the row for an app in order to
expand in the list and get more informa-tion about the app.
4. Select
Install to start the download and
installation of the app.
> The current status of the download and installation will be shown. If a download cannot be started imme- diately, a message will be displayed.The app will remain in the list and it willbe possible to reattempt downloading.
Canceling a download
–Tap Abort to cancel a download in pro-
gress.
Note that only a download can be cancelled. An installation cannot be cancelled once it hasbegun.
Related information
Apps (p. 472)
Updating apps (p. 473)
Deleting apps (p. 474)
Internet-connected vehicle
* (p. 516)
Handling system updates via DownloadCenter (p. 594)
Hard disk storage space (p. 524)
Updating apps
Apps can be updated when the vehicle is connected to the Internet.
NOTE
Data downloading can affect other services such as transfer data, e.g. web radio. If theaffect on other services is experienced asproblematic, the download can be interrup-ted. Alternatively, it may be appropriate toswitch off or cancel other services.
NOTE
When downloading using a phone, pay extra attention to the data traffic costs.
If an app is being used while an update is in progress, it will be restarted to complete theupdate.
Update all
1. Open the Download Center app in App
view.
2. Select Install all.
> The update will begin.
Page 526 of 687
||
AUDIO, MEDIA AND INTERNET
5242. Accept data sharing for the service or can-
cel.
If you choose to accept, data sharing will be enabled and you can begin using the service.
Enabling data sharing when starting an app
To accept data sharing for an app that needsthe function, start the app and tap accept in
the pop-up window. You can disable data sharing for services and apps in the settings menu under
System
Privacy and dataData Sharing.
Hard disk storage space
It is possible to view how much space is remaining on the vehicle's hard disk.
Storage information for the vehicle's hard disk can be shown, including total capacity, availa-ble capacity and how much space is used forinstalled apps. The information is found under
SettingsSystemSystem Information
Storage.
Related information
Apps (p. 472)
Page 555 of 687

WHEELS AND TIRES
* Option/accessory.553
Jack*
The jack can be used to lift the vehicle to e.g. change a wheel.CAUTION
When not in use, the jack
* should be
kept in its storage compartment under the cargo compartment floor.
The jack provided with your vehicle isintended to be used only in temporarysituations such as changing wheels inthe event of a flat tire. Only the jackthat came with your particular modelshould be used to lift the vehicle. If thevehicle needs to be lifted more fre-quently or for a prolonged period, usinga garage jack or hoist is recommended.Always follow this device's instructionsfor use.
The jack needs to be cranked together to the correct position in order to fit. For vehicles with
Leveling Control*
: If the
vehicle is equipped with the optional pneu- matic suspension, it must be turned off beforethe vehicle is lifted on a jack.
Related information
Tool kit (p. 552)
Hoisting the vehicle (p. 597)
Wheel bolts
The wheel bolts hold the wheel in place on the wheel hub.
Only use rims that have been tested and approved by Volvo and are included in Volvo'soriginal product range. Use a torque wrench to check that the wheel bolts are tightened correctly. Do not grease the wheel bolt threads.
WARNING
The wheel bolts may need to be tightened again several days after a wheel change.Temperature fluctuations and vibrationscan cause them to loosen slightly.
CAUTION
The wheel bolts should be tightened to 140 Nm (103 ft. lbs.). Over-tightening orunder-tightening could damage the threa-ded joints.
Locking wheel bolts *A tool for removing the locking wheel bolts is located in the foam block under the cargocompartment floor.
Related information
Removing a wheel (p. 554)
Installing a wheel (p. 556)
Page 556 of 687

WHEELS AND TIRES
* Option/accessory.
554
Removing a wheel Wheel changes must always be carried out correctly. The following instructions showhow to remove a wheel and what is impor-tant to keep in mind.
CAUTION
When not in use, the jack
* should be
kept in its storage compartment under the cargo compartment floor.
The jack provided with your vehicle isintended to be used only in temporarysituations such as changing wheels inthe event of a flat tire. Only the jackthat came with your particular modelshould be used to lift the vehicle. If thevehicle needs to be lifted more fre-quently or for a prolonged period, usinga garage jack or hoist is recommended.Always follow this device's instructionsfor use.
WARNING
Apply the parking brake and put the gear selector in the Park (
P) position.
Block the wheels standing on theground, use rigid wooden blocks orlarge stones.
Check that the jack is not damaged,the threads are properly lubricated andit is free from dirt.
Be sure the jack is on a firm, level, non-slippery surface and that it is uprightand not leaning.
The jack must correctly engage in thejack attachment.
No objects should be placed betweenthe base of the jack and the ground, orbetween the jack and the attachmentbar on the vehicle.
Never let anyone remain in the vehiclewhen it is raised on a jack.
If a tire must be changed near passingtraffic, make sure all passengers moveto a safe location.
Use a jack intended for the vehiclewhen changing a tire. For any otherjob, use stands to support the vehicle.
Never crawl under or allow any part ofyour body to be extended under a vehi-cle supported by a jack. 1. Turn on the vehicle's hazard warning
flashers if a wheel change must be per-formed in an area with traffic.
2. Apply the parking brake and put the gear selector in P, or first gear if the vehicle has
a manual transmission. For vehicles with
Leveling Control* : If the
vehicle is equipped with pneumatic sus- pension, this must be switched off before the vehicle is lifted with the jack *.
3. Take out the jack *, lug wrench * and tool for
removing the plastic covers, which are stowed in the foam block.
Tool for removing the plastic covers on the wheel bolts.
4. Place chocks in front of and behind the wheels that are still on the ground. For example, use heavy wooden blocks orlarge stones.
Page 558 of 687
WHEELS AND TIRES
* Option/accessory.
556
Installing a wheel Wheel changes must always be carried out correctly. The following instructions showhow to install a wheel and what is importantto keep in mind.
CAUTION
When not in use, the jack
* should be
kept in its storage compartment under the cargo compartment floor.
The jack provided with your vehicle isintended to be used only in temporarysituations such as changing wheels inthe event of a flat tire. Only the jackthat came with your particular modelshould be used to lift the vehicle. If thevehicle needs to be lifted more fre-quently or for a prolonged period, usinga garage jack or hoist is recommended.Always follow this device's instructionsfor use.
WARNING
Apply the parking brake and put the gear selector in the Park (
P) position.
Block the wheels standing on theground, use rigid wooden blocks orlarge stones.
Check that the jack is not damaged,the threads are properly lubricated andit is free from dirt.
Be sure the jack is on a firm, level, non-slippery surface and that it is uprightand not leaning.
The jack must correctly engage in thejack attachment.
No objects should be placed betweenthe base of the jack and the ground, orbetween the jack and the attachmentbar on the vehicle.
Never let anyone remain in the vehiclewhen it is raised on a jack.
If a tire must be changed near passingtraffic, make sure all passengers moveto a safe location.
Use a jack intended for the vehiclewhen changing a tire. For any otherjob, use stands to support the vehicle.
Never crawl under or allow any part of your body to be extended under a vehi-cle supported by a jack.
The vehicle must be raised high enough sothat the wheel you are removing can turnfreely.
1. Clean the contact surfaces between the wheel and the wheel hub.
2. Lift the wheel into place. Tighten the wheel bolts securely.Do not grease the wheel bolt threads.
3. Lower the vehicle so that the wheel can- not rotate.
Page 572 of 687
LOADING, STORAGE AND PASSENGER COMPARTMENT
* Option/accessory.
570
Passenger compartment interior
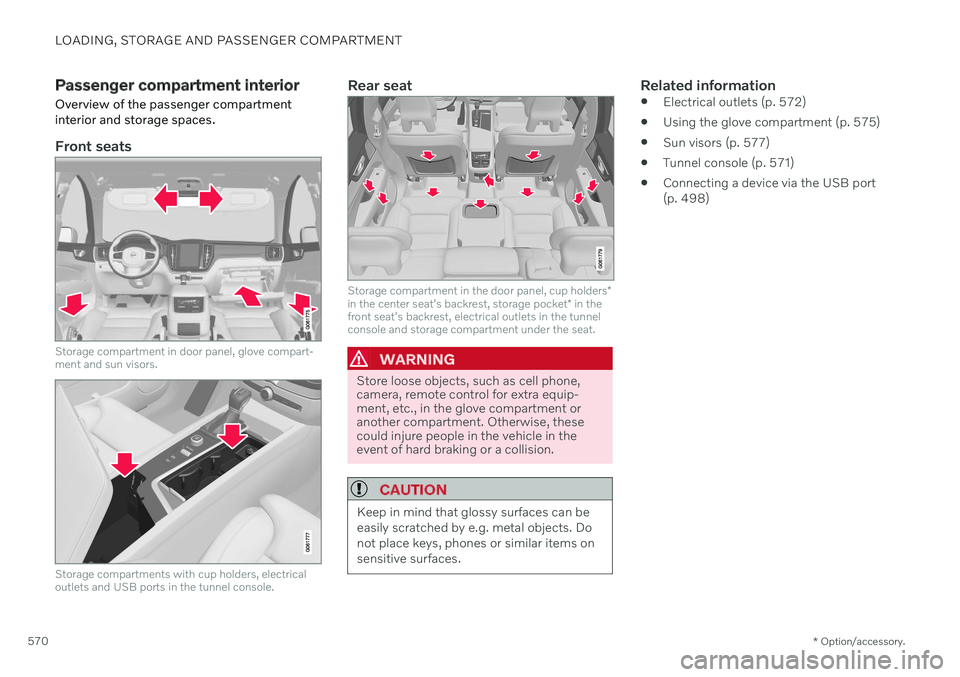
Overview of the passenger compartment interior and storage spaces.
Front seats
Storage compartment in door panel, glove compart- ment and sun visors.
Storage compartments with cup holders, electrical outlets and USB ports in the tunnel console.
Rear seat
Storage compartment in the door panel, cup holders *
in the center seat's backrest, storage pocket * in the
front seat's backrest, electrical outlets in the tunnel console and storage compartment under the seat.
WARNING
Store loose objects, such as cell phone, camera, remote control for extra equip-ment, etc., in the glove compartment oranother compartment. Otherwise, thesecould injure people in the vehicle in theevent of hard braking or a collision.
CAUTION
Keep in mind that glossy surfaces can be easily scratched by e.g. metal objects. Donot place keys, phones or similar items onsensitive surfaces.
Related information
Electrical outlets (p. 572)
Using the glove compartment (p. 575)
Sun visors (p. 577)
Tunnel console (p. 571)
Connecting a device via the USB port (p. 498)
Page 573 of 687
LOADING, STORAGE AND PASSENGER COMPARTMENT
* Option/accessory.571
Tunnel console
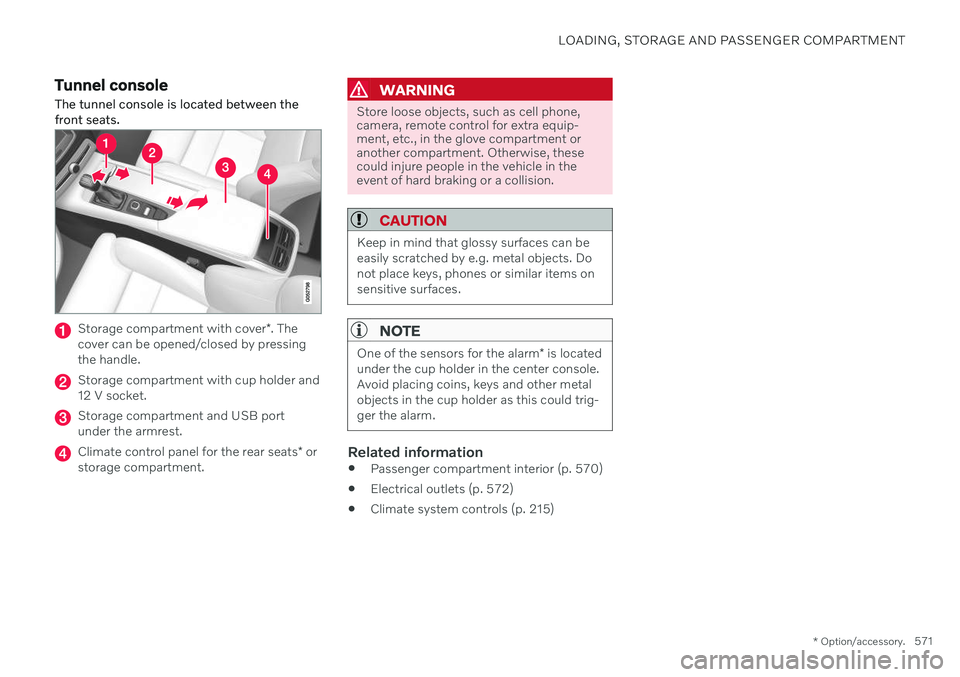
The tunnel console is located between the front seats.
Storage compartment with cover *. The
cover can be opened/closed by pressing the handle.
Storage compartment with cup holder and 12 V socket.
Storage compartment and USB port under the armrest.
Climate control panel for the rear seats * or
storage compartment.
WARNING
Store loose objects, such as cell phone, camera, remote control for extra equip-ment, etc., in the glove compartment oranother compartment. Otherwise, thesecould injure people in the vehicle in theevent of hard braking or a collision.
CAUTION
Keep in mind that glossy surfaces can be easily scratched by e.g. metal objects. Donot place keys, phones or similar items onsensitive surfaces.
NOTE
One of the sensors for the alarm * is located
under the cup holder in the center console. Avoid placing coins, keys and other metalobjects in the cup holder as this could trig-ger the alarm.
Related information
Passenger compartment interior (p. 570)
Electrical outlets (p. 572)
Climate system controls (p. 215)
Page 574 of 687

LOADING, STORAGE AND PASSENGER COMPARTMENT
* Option/accessory.
572
Electrical outlets
There are two 12 V electrical outlets and one 120 V electrical outlet * in the tunnel console,
and one 12 V electrical outlet * in the trunk/
cargo compartment. If a problem occurs with an electrical socket, contact a workshop - an authorized Volvoworkshop is recommended.
12 V outlets
12 V outlet in the tunnel console, front seat.
The 12 V outlets can be used for devices intended for this such as MP3 players, coolersand cellular phones.
12 V outlet in the tunnel console, rear seat.
12 V outlet in the cargo compartment *.
Electrical outlets in the tunnel console - rear seat *
Electrical outlets in the tunnel console, rear seat.
The high-voltage outlet * can be used for devi-
ces intended for this, such as chargers, lap- tops, etc.
High-voltage outlet status indicator
light
An LED 1
light on the outlet indicates its status:
1 LED (Light Emitting Diode)