Storage VOLVO XC60 TWIN ENGINE 2020 Owner's Guide
[x] Cancel search | Manufacturer: VOLVO, Model Year: 2020, Model line: XC60 TWIN ENGINE, Model: VOLVO XC60 TWIN ENGINE 2020Pages: 687, PDF Size: 14.65 MB
Page 585 of 687
LOADING, STORAGE AND PASSENGER COMPARTMENT
}}
* Option/accessory.583
Operating the cargo compartment cover*
The cover can be used in two positions: fully open to completely cover the cargo compart-ment or partially retracted to make it easier toreach further into the cargo compartment.
Fully open
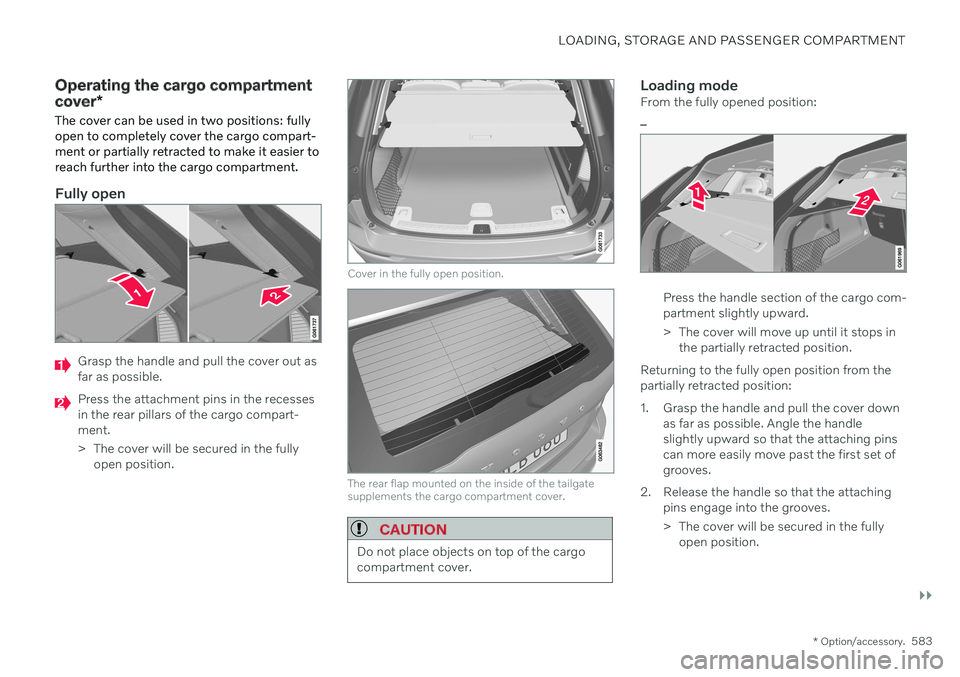
Grasp the handle and pull the cover out as far as possible.
Press the attachment pins in the recesses in the rear pillars of the cargo compart-ment.
> The cover will be secured in the fully open position.
Cover in the fully open position.
The rear flap mounted on the inside of the tailgate supplements the cargo compartment cover.
CAUTION
Do not place objects on top of the cargo compartment cover.
Loading modeFrom the fully opened position:
–
Press the handle section of the cargo com- partment slightly upward.
> The cover will move up until it stops in the partially retracted position.
Returning to the fully open position from the partially retracted position:
1. Grasp the handle and pull the cover down as far as possible. Angle the handle slightly upward so that the attaching pinscan more easily move past the first set ofgrooves.
2. Release the handle so that the attaching pins engage into the grooves.
> The cover will be secured in the fullyopen position.
Page 586 of 687
||
LOADING, STORAGE AND PASSENGER COMPARTMENT
* Option/accessory.
584
CAUTION
When in the loading position, the cargo compartment cover can obstruct visibilityto the rear. Make sure that the cargo com-partment cover is fully extended or fullyretracted during driving.
Retracting the cover
1. From the fully opened position:
Lift the cover's handle and pull it rearward to release the cover's attaching pins fromthe grooves. Let the cover retract. From the partially retracted position:Grasp the handle and pull the cover out of the groves to the fully open position. Liftthe handle and pull it rearward to releasethe cover's attaching pins from thegrooves. Let the cover retract.
2. Let the cover retract with its attaching pins above the side panels until it stops inthe fully retracted position.
Related information
Installing and removing the cargo com- partment cover
* (p. 581)
Installing and removing the steel cargo grid *
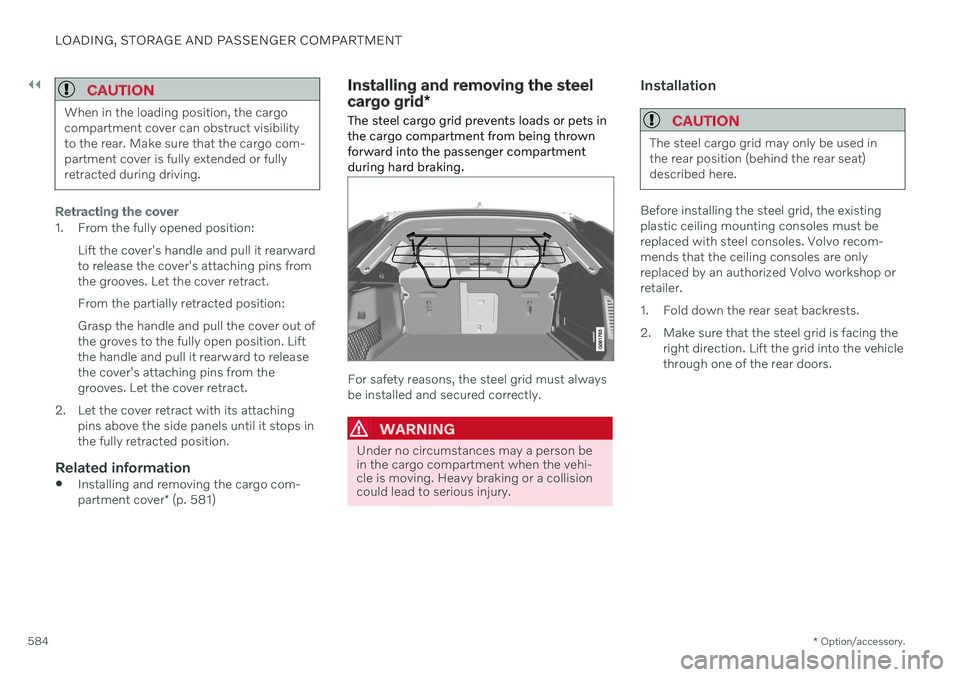
The steel cargo grid prevents loads or pets in the cargo compartment from being thrownforward into the passenger compartmentduring hard braking.
For safety reasons, the steel grid must always be installed and secured correctly.
WARNING
Under no circumstances may a person be in the cargo compartment when the vehi-cle is moving. Heavy braking or a collisioncould lead to serious injury.
Installation
CAUTION
The steel cargo grid may only be used in the rear position (behind the rear seat)described here.
Before installing the steel grid, the existing plastic ceiling mounting consoles must bereplaced with steel consoles. Volvo recom-mends that the ceiling consoles are onlyreplaced by an authorized Volvo workshop orretailer.
1. Fold down the rear seat backrests.
2. Make sure that the steel grid is facing the right direction. Lift the grid into the vehicle through one of the rear doors.
Page 587 of 687

LOADING, STORAGE AND PASSENGER COMPARTMENT
585
3.
Position the grid's attachment points in the ceiling consoles. The next step will be easier if two people hold the steel grid in the right position.
4.Screw the provided screw into place using the provided 6 mm Allen wrench. Repeaton the other side. Recommended torque:20 Nm (15 ft-lb).
> Check to make sure the steel grid is
securely in place.
5. Return the backrest to the upright posi- tion.
For more information on necessary tools and procedures for installing/removing, see theassembly instructions provided with the steelgrid.
CAUTION
The steel cargo grid cannot be folded up or down when a cargo compartment cover ismounted.
Related information
Loading recommendations (p. 577)
Load anchoring eyelets (p. 580)
Page 588 of 687
LOADING, STORAGE AND PASSENGER COMPARTMENT
* Option/accessory.
586
Installing and removing the cargo net *
The cargo net helps prevent objects in the cargo compartment from entering the pas-senger compartment in the event of a suddenstop or hard braking.
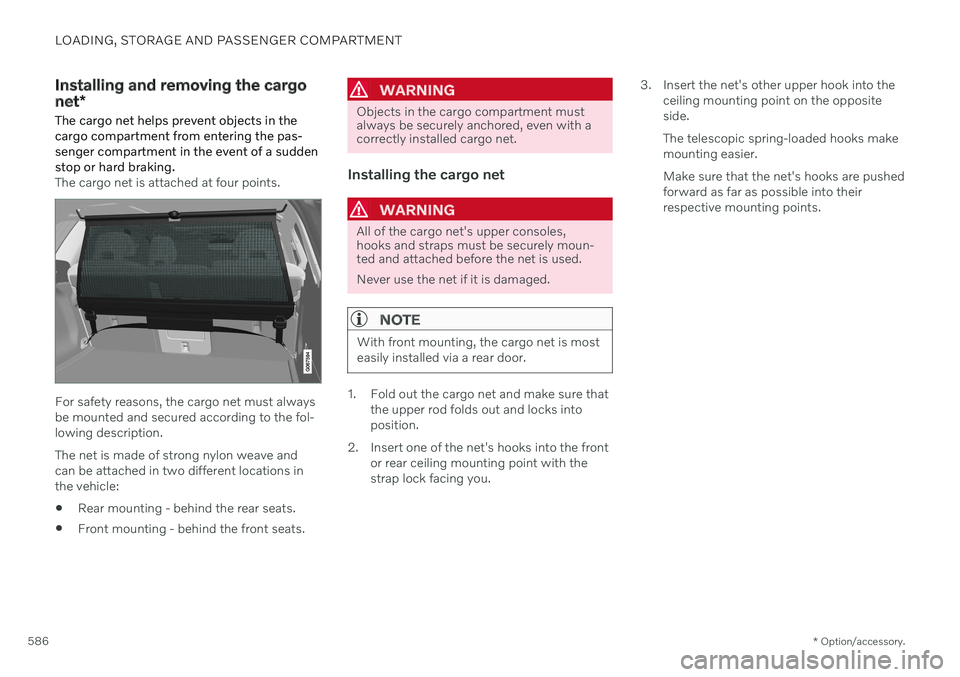
The cargo net is attached at four points.
For safety reasons, the cargo net must always be mounted and secured according to the fol-lowing description. The net is made of strong nylon weave and can be attached in two different locations inthe vehicle:
Rear mounting - behind the rear seats.
Front mounting - behind the front seats.
WARNING
Objects in the cargo compartment must always be securely anchored, even with acorrectly installed cargo net.
Installing the cargo net
WARNING
All of the cargo net's upper consoles, hooks and straps must be securely moun-ted and attached before the net is used. Never use the net if it is damaged.
NOTE
With front mounting, the cargo net is most easily installed via a rear door.
1. Fold out the cargo net and make sure that
the upper rod folds out and locks into position.
2. Insert one of the net's hooks into the front or rear ceiling mounting point with thestrap lock facing you. 3. Insert the net's other upper hook into the
ceiling mounting point on the oppositeside. The telescopic spring-loaded hooks make mounting easier. Make sure that the net's hooks are pushed forward as far as possible into theirrespective mounting points.
Page 589 of 687
LOADING, STORAGE AND PASSENGER COMPARTMENT
587
4.
Rear mounting.
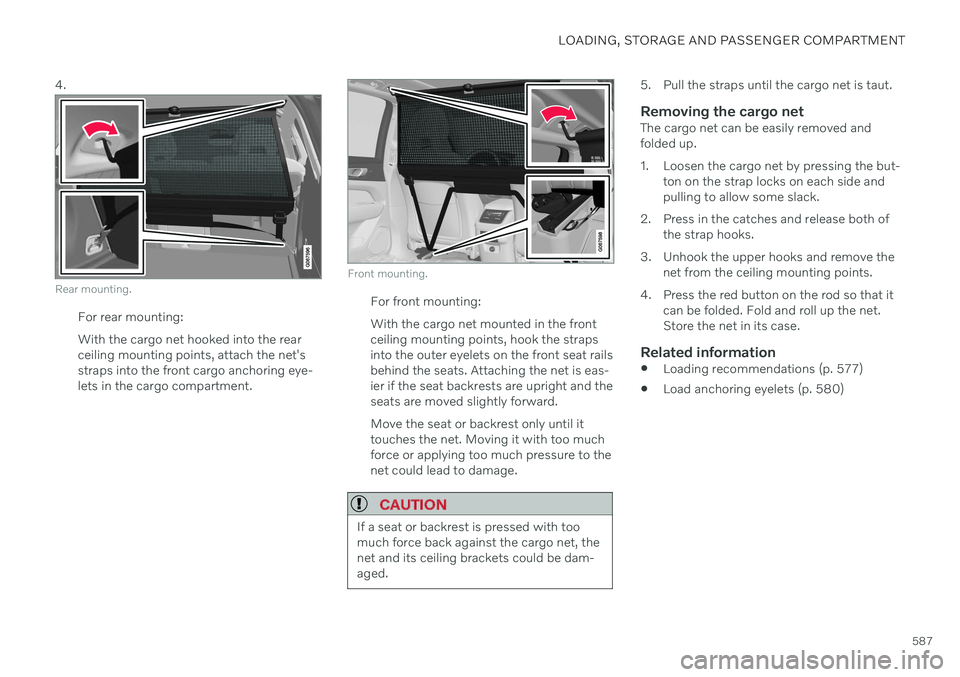
For rear mounting: With the cargo net hooked into the rear ceiling mounting points, attach the net'sstraps into the front cargo anchoring eye-lets in the cargo compartment.
Front mounting.
For front mounting: With the cargo net mounted in the front ceiling mounting points, hook the strapsinto the outer eyelets on the front seat railsbehind the seats. Attaching the net is eas-ier if the seat backrests are upright and theseats are moved slightly forward. Move the seat or backrest only until it touches the net. Moving it with too muchforce or applying too much pressure to thenet could lead to damage.
CAUTION
If a seat or backrest is pressed with too much force back against the cargo net, thenet and its ceiling brackets could be dam-aged.
5. Pull the straps until the cargo net is taut.
Removing the cargo netThe cargo net can be easily removed and folded up.
1. Loosen the cargo net by pressing the but-
ton on the strap locks on each side and pulling to allow some slack.
2. Press in the catches and release both of the strap hooks.
3. Unhook the upper hooks and remove the net from the ceiling mounting points.
4. Press the red button on the rod so that it can be folded. Fold and roll up the net.Store the net in its case.
Related information
Loading recommendations (p. 577)
Load anchoring eyelets (p. 580)
Page 676 of 687

INDEX
674
K
Key 238
Keyboard 129, 132change language 132
Keyless locking/unlocking 254
settings 255
touch-sensitive surfaces 253
Key tag 238
L
Labels location 654
Laminated glass 170 Lamps changing 606
Trailer 460
Lane Keeping Aid 348 activating/deactivating 350
display 354
limitations 351
see Lane Keeping Aid 348
select assistance option 350
Symbols and messages 352
Language 135
Large Animal Detection (LAD) 322 Leather upholstery, cleaning instruc-
tions 636
Leveling control 430 settings 433
License agreement 101, 525
Lifting tools 553Light bulbs changing 606
Light control 156, 167Lighting Active Bending Lights 162
approach lighting 165
automatic high beam 161
brake lights 164
control, instrument, display 167
controls 156, 165
daytime running lights 158
emergency brake lights 164
Hazard warning flashers 164
high beams 160, 161
home safe lighting 165
in passenger compartment 165
low beams 159
position lights 158
rear fog light 163
settings 157
Turn signals 162Lighting, replacing bulbs 606
Limp home 416Load anchoring eyeletscargo compartment 580
Load anchoring hooks 579
Load carriers 579
Load index 542Loading general 577
load anchoring eyelets 580
long load 578
Lock indication 236 setting 237
Locking/unlocking Tailgate 242, 256
Locking wheel bolts 553 Locks locking/unlocking 240
Long-term storage 399Low battery charge level start battery 451
Low beams 159
Lower the rear end 578
Low oil level 603
Low-speed driving 435 activate with function button 436
Page 681 of 687

INDEX
679
Start battery 451, 607
overload 451
Start engine 402 Starting the engine after a collision 64
Start the vehicle 402
Steel cargo grid 584
Steering assistance at risk of collision 355Steering power level, see Steering wheel
resistance 272
Steering wheel 201, 202 heating 218
keypad 201
paddle 201
steering wheel adjustment 202
Steering wheel keypad 201
Steering wheel paddles 419 Steering wheel resistance, speed-
dependent 272
Stone chips and scratches 645, 646
Storage compartments 570 center console 571
glove compartment 575
sun visor 577
Sunroof pinch protection 170
Sun shadepanoramic roof 176, 179
pinch protection 170
Sun visor 577 mirror lighting 166
Switching target vehicles with Adaptive Cruise Control 301
with Pilot Assist 301
Symbols dynamic 86
indicator symbols 97
warning symbols 100
Symbols and messages center display's status bar 127
hybrid-related 397
parking climate 232
system updates 594
T
Tailgate locking/unlocking 242, 256
open/close with foot movement 264
power 261
unlocking from inside 258
Technician certification 40
Temperature adjusting 223, 224
perceived 205
Temperature monitoring 390
Temporary Spare 557
Temporary tire sealing system 561 execution, checking 562
Inflating tires 565
Terms and conditions services 37
users 522
Tire dimensions 542 when changing wheels 552
Tires 538 direction of rotation 540
glossary of terms 541
inflation pressure table 665
mounting 556
pressure 665
removal 554
rotation when changing 538
specifications 542, 665
storage 538
tread wear indicator 541
winter tires 559
Tire sealing system Inflating tires 565
use 562