engine VOLVO XC70 2004 Owner's Guide
[x] Cancel search | Manufacturer: VOLVO, Model Year: 2004, Model line: XC70, Model: VOLVO XC70 2004Pages: 241, PDF Size: 5.78 MB
Page 132 of 241
2004 VOLVO XC70
1. If necessary, remove the cotter pin from the locking bolt and slide t\
he locking bolt out of the hitch
assembly.
2. Slide the ball holder into the hitch assembly.
3. Align the hole in the ball holder with the one in the hitch assembly.\
4. Slide the locking bolt through the hitch assembly/ball holder.
5. Insert the cotter pin in the hole at the end of the locking bolt.
Removing the ball holder
1. Remove the cotter pin from the locking bolt and slide the locking bol\
t out of the ball holder/hitch
assembly.
2. Pull the ball holder out of the hitch assembly.
NOTE: A cover for the hitch assembly can be purchased from your Volvo retaile\
r.
pg. 104 Jump starting
Jump starting
Follow these instructions to jump start your car's dead battery or to ju\
mp start another car's dead battery
using your car. Although your car's battery is located under the floor o\
f the cargo area, jumper cables
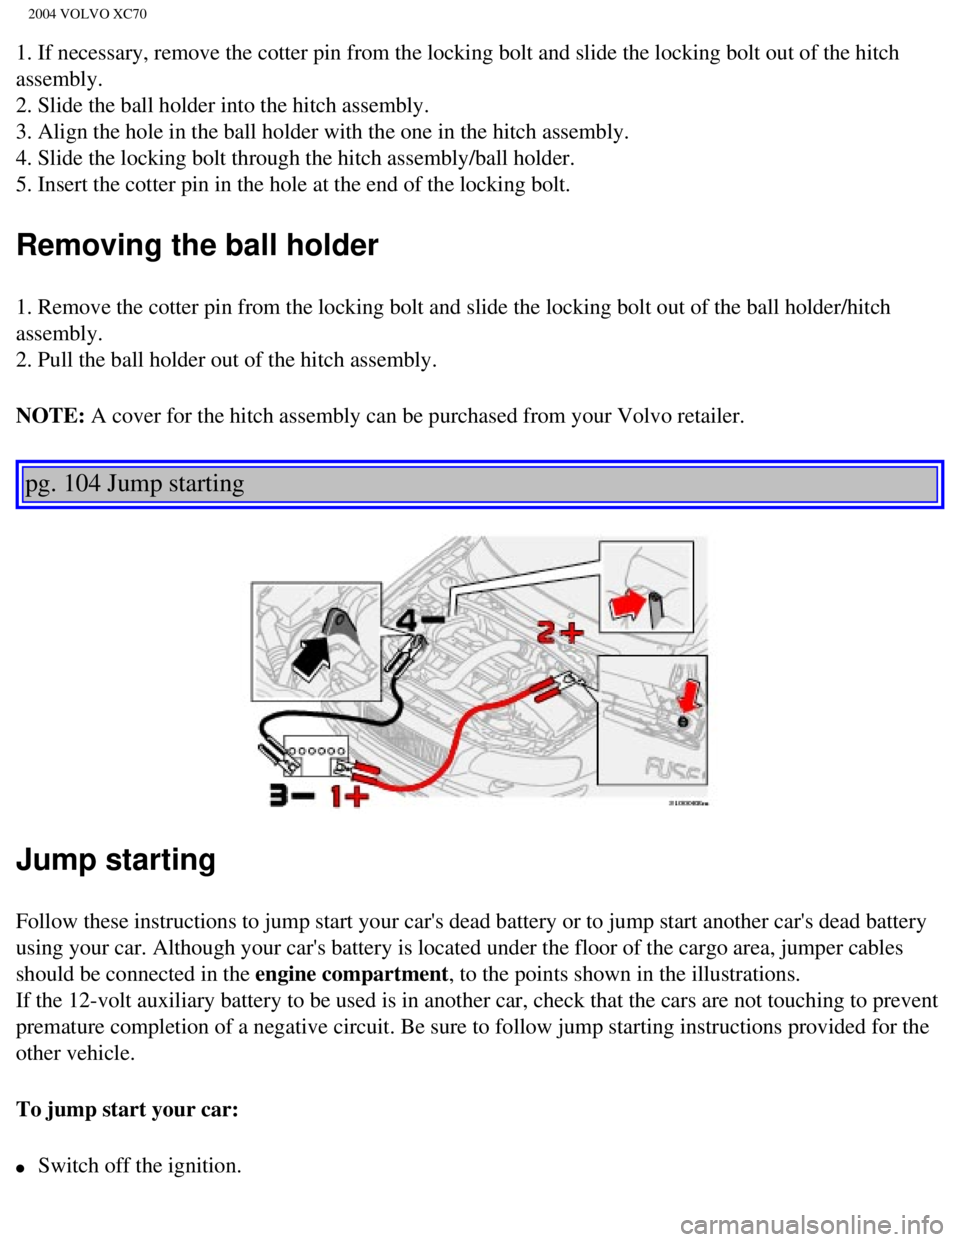
should be connected in the engine compartment, to the points shown in the illustrations.
If the 12-volt auxiliary battery to be used is in another car, check tha\
t the cars are not touching to prevent
premature completion of a negative circuit. Be sure to follow jump start\
ing instructions provided for the
other vehicle.
To jump start your car:
l Switch off the ignition.
file:///K|/ownersdocs/2004/2004_XC70/04xc70_06b.htm (6 of 10)12/30/200\
6 4:33:02 PM
Page 133 of 241

2004 VOLVO XC70
l First connect the auxiliary battery positive (+) terminal (1) to the\
positive (+) terminal in your car's
engine compartment (2), located under a small black plastic cover atta\
ched to the fuse box cover,
marked with a "+" sign. Remove the cover on the main fuse box if necessa\
ry to access this terminal. See
page 119.
l Then connect the auxiliary battery negative (-) terminal (3) to the \
ground point in your car's engine
compartment (4).
Start the engine in the assisting car, then start the engine in the car \
with the dead battery.
l After the engine has started, first remove the negative (-) terminal j\
umper cable. Then remove the
positive (+) terminal jumper cable.
CAUTION:
Improper hookup of jumper cables or use of other than 12-volt batteries \
could result in damage to
equipment and/or the battery.
WARNING!
l Do not connect the jumper cable to any part of the fuel system or to any\
moving parts. Avoid
touching hot manifolds.
l Never expose the battery to open flame or electric spark.
l Do not smoke near the battery.
l Batteries generate hydrogen gas which is flammable and explosive.
l Battery fluid contains sulfuric acid. Do not allow battery fluid to cont\
act eyes, skin, fabrics or
painted surfaces. If contact occurs, flush the affected area immediately\
with water. Obtain medical
help immediately if eyes are affected.
Failure to follow the instructions for jump starting can lead to persona\
l injury.
NOTE: Refer to
pages 140-141 for information on properly maintaining the battery.
PROPOSITION 65 WARNING!
Battery posts, terminals, and related accessories contain lead and lead \
compounds, chemicals known
to the state of California to cause cancer and reproductive harm. Wash h\
ands after handling.
pg. 105 Winter driving
file:///K|/ownersdocs/2004/2004_XC70/04xc70_06b.htm (7 of 10)12/30/200\
6 4:33:02 PM
Page 134 of 241

2004 VOLVO XC70
Cold weather precautions
If you wish to check your car before the approach of cold weather, the f\
ollowing advice is worth noting:
l Make sure that the engine coolant contains 50 percent antifreeze. Any ot\
her mixture will reduce
freeze protection. This gives protection against freezing down to -31°\
F (-35°C). See section "Coolant".
The use of "recycled" antifreeze is not approved by Volvo. Different typ\
es of antifreeze must not
be mixed.
l Volvo recommends using only genuine Volvo antifreeze in your car's radia\
tor. Your local Volvo
retailer stocks plenty of Volvo engine coolant to protect your car durin\
g cold weather.
l Try to keep the fuel tank well filled - this prevents the formation of condensation in the tank. \
In
addition, in extremely cold weather conditions it is worthwhile to add f\
uel line de-icer before refueling.
l The viscosity of the engine oil is important. Oil with low viscosity (thinner oil) improves cold-
weather starting as well as decreasing fuel consumption while the engine\
is warming up. For winter use,
5W-30 oil, particularly the synthetic type *, is recommended. Be sure to\
use good quality oil but do not
use this cold-weather oil for hard driving or in warm weather. See secti\
on "Engine oil" for more
information.
l The load placed on the battery is greater during the winter since the windshield wipers, lighting, etc\
.
are used more often. Moreover, the capacity of the battery decreases as \
the temperature drops. In very
cold weather, a poorly charged battery can freeze and be damaged. It is \
therefore advisable to check the
state of charge more frequently and spray an anti-rust oil on the batter\
y posts.
l Volvo recommends the use of snow tires on all four wheels for winter driving - see section "Wheels
and tires".
l To prevent the washer fluid reservoir from freezing, add washer solvents containing antifreeze (see
page 136 for the location of the washer fluid reservoir). This is important sin\
ce dirt is often splashed on
the windshield during winter driving, requiring the frequent use of the \
washers and wipers. The Volvo
Washer Solvent should be diluted as follows:
Down to 14° F (-10° C): 1 part washer solvent and 4 parts water \
Down to 5° F (-15° C): 1 part washer solvent and 3 parts water
Down to 0° F (-18° C): 1 part washer solvent and 2 parts water
Down to -18° F (-28° C): 1 part washer solvent and 1 part water \
l Use Volvo Teflon Lock Spray in the locks.
NOTE: Avoid the use of de-icing sprays as they can cause damage to the locks.
W Winter/Wet driving mode - enhanced vehicle traction
l Mode W will only function if the gear selector is in the (D)rive posit\
ion.
l Press the button at the base of the gear selector to engage/disengage th\
is driving mode.
l An LED in the button will light up to indicate that W is engaged and this will also be displayed in the
instrument panel (see
page 27).
l This mode may be selected for starting/moving off on slippery roads.
file:///K|/ownersdocs/2004/2004_XC70/04xc70_06b.htm (8 of 10)12/30/200\
6 4:33:02 PM
Page 135 of 241
2004 VOLVO XC70
*Synthetic oil is not used when the oil is changed at the normal mainten\
ance service intervals.
pg. 106 Long distance trips
Before a long distance trip
It is always worthwhile to have your car checked at a Volvo retailer bef\
ore driving long distances. Your
retailer will also be able to supply you with bulbs, fuses, spark plugs \
and wiper blades for your use in the
event that problems occur.
As a minimum, the following items should be checked before any long trip\
:
l Check that engine runs smoothly and that fuel consumption is normal.
l Check for fuel, oil, and fluid leakage.
l Check condition of accessory drive belts.
l Check transmission oil level*.
l Check state of the battery's charge.
l Examine tires carefully (the spare tire as well), and replace those th\
at are worn. Check tire pressures.
l The brakes, front wheel alignment, and steering gear should be checked b\
y your Volvo retailer only.
l Check all lights, including high beams.
l Reflective warning triangles are legal requirement in some countries.
l Have a word with your Volvo retailer if you intend to drive in countries\
where it may be difficult to
obtain the correct fuel.
l Consider your destination. If you will be driving through an area where \
snow or ice are likely to
occur, consider snow tires.
* To prevent injury from contact with hot surfaces, do not inspect your \
car's transmission fluid yourself.
Have your car's transmission fluid level inspected by a qualified Volvo \
service technician.
pg. 107 Three-way catalytic converters
file:///K|/ownersdocs/2004/2004_XC70/04xc70_06b.htm (9 of 10)12/30/200\
6 4:33:02 PM
Page 136 of 241

2004 VOLVO XC70
Three-way catalytic converter cautions
l Keep your engine properly tuned. Certain engine malfunctions, particular\
ly involving the electrical,
fuel or distributor ignition systems, may cause unusually high three-way\
catalytic converter
temperatures. Do not continue to operate your vehicle if you detect engine misfire, no\
ticeable loss of
power or other unusual operating conditions, such as engine overheating \
or backfiring. A properly
tuned engine will help avoid malfunctions that could damage the three-wa\
y catalytic converters.
l Do not park your car over combustible materials, such as grass or leaves\
, which can come into contact
with the hot exhaust system and cause such materials to ignite under cer\
tain wind and weather
conditions.
l Excessive starter cranking (in excess of one minute), with an intermit\
tently firing or flooded engine,
can cause three-way catalytic converter or exhaust system overheating.
l Remember that tampering or unauthorized modifications to the engine or t\
he vehicle may be illegal
and can cause three-way catalytic converter or exhaust system overheatin\
g. This includes:
- Altering fuel injection setting or components.
- Altering emission system components or location or removing components\
.
- Repeated use of leaded fuel.
NOTE: Unleaded fuel is required for cars with three-way catalytic converters \
Contents | Top of Page
file:///K|/ownersdocs/2004/2004_XC70/04xc70_06b.htm (10 of 10)12/30/20\
06 4:33:02 PM
Page 148 of 241
2004 VOLVO XC70
2 0 0 4
VOLVO XC70
Chapter 8 - Maintenance/Servicing
pg. 117 Maintenance/Servicing
Fuses 118
Replacing bulbs 122
Paint touch up 128
Washing the car 129
Cleaning the upholstery 130
Maintenance service, Warranty 131
Fuel/emissions systems 132
Drive belt, Coolant 133
Emissions maintenance 134
Washer fluid reservoir, Hoisting the
car 135
Opening the hood, Engine
compartment 136
Engine oil 137
Power steering/Brake fluid reservoirs 139
Battery maintenance 140
Replacing wiper blades 142
file:///K|/ownersdocs/2004/2004_XC70/04xc70_08a.htm (1 of 22)12/30/200\
6 4:33:05 PM
Page 149 of 241

2004 VOLVO XC70
pg. 118 Fuses
Replacing fuses
If an electrical component fails to function, it is possible that a fuse\
has blown due to a temporary circuit
overload.
Fuses are located in different places:
A - Relays/fuse box in the engine compartment
B - Fuse box in the passenger compartment
C - Relays/fuse box in the cargo area
A label on the inside of each cover indicates the amperage and the elect\
rical components that are
connected to each fuse.
The easiest way to see if a fuse is blown is to remove it. Pull the fuse\
straight out. If a fuse is difficult to
remove, you will find a special fuse removal tool in the passenger compa\
rtment fuse box. From the side,
examine the curved metal wire to see if it is broken. If so, put in a ne\
w fuse of the same color and
amperage (written on the fuse). Spare fuses are stored in the fuse box in the \
passenger compartment. If
fuses burn out repeatedly, have the electrical system inspected by an au\
thorized Volvo retailer.
WARNING!
Never use fuses with higher amperage that those stated on the following \
pages. Doing so could
overload the car's electrical system.
file:///K|/ownersdocs/2004/2004_XC70/04xc70_08a.htm (2 of 22)12/30/200\
6 4:33:05 PM
Page 150 of 241
2004 VOLVO XC70
pg. 119 Fuses in the engine compartment
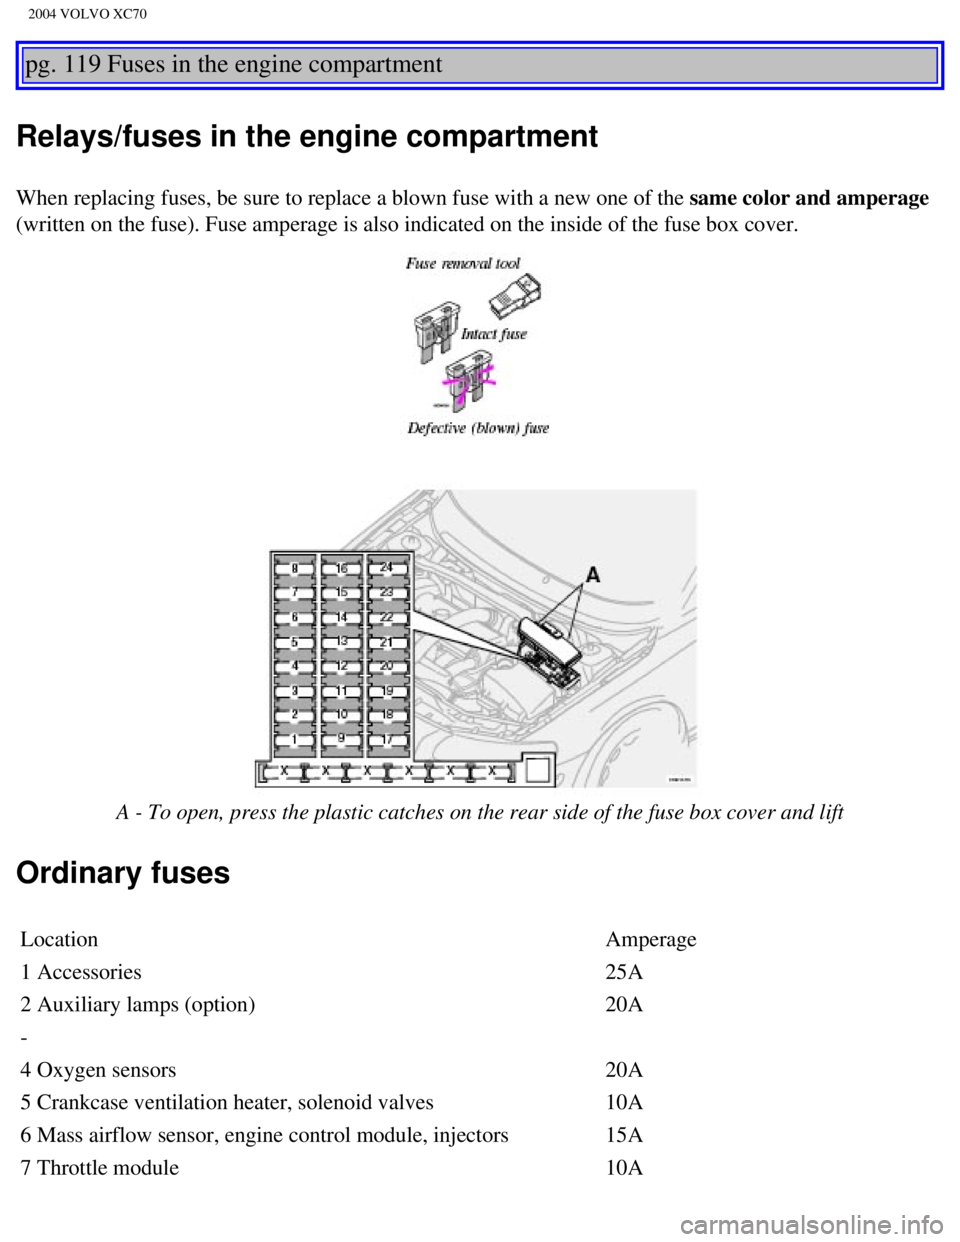
Relays/fuses in the engine compartment
When replacing fuses, be sure to replace a blown fuse with a new one of \
the same color and amperage
(written on the fuse). Fuse amperage is also indicated on the inside o\
f the fuse box cover.
A - To open, press the plastic catches on the rear side of the fuse box \
cover and lift
Ordinary fuses
Location Amperage
1 Accessories 25A
2 Auxiliary lamps (option) 20A
-
4 Oxygen sensors 20A
5 Crankcase ventilation heater, solenoid valves 10A
6 Mass airflow sensor, engine control module, injectors 15A
7 Throttle module 10A
file:///K|/ownersdocs/2004/2004_XC70/04xc70_08a.htm (3 of 22)12/30/200\
6 4:33:05 PM
Page 151 of 241

2004 VOLVO XC70
8 A/C compressor, accelerator pedal position sensor, E-box fan 10A
9 Horn 15A
10 Tailgate wiper 10A
11 Ignition coils 20A
12 Brake light switch 5A
13 Windshield wipers 25A
14 ABS/STC/DSTC 30A
15 -
16 Windshield washers, headlight wiper/washers (certain
models) 15A
17 Low beam, right 10A
18 Low beam, left 10A
19 ABS/STC/DSTC 30A
20 High beam, left 15A
21 High beam, right 15A
22 Starter motor 25A
23 Engine control module 5A
24 -
pg. 120 Fuses in the passenger compartment
Fuse box in the passenger compartment
This fuse box is located at the far left side of the instrument panel. E\
xtra fuses and the fuse removal tool
are also stored here. When replacing a blown fuse, be sure to replace it\
with a new one of the same color
and amperage (written on the fuse).
file:///K|/ownersdocs/2004/2004_XC70/04xc70_08a.htm (4 of 22)12/30/200\
6 4:33:05 PM
Page 153 of 241
2004 VOLVO XC70
24 Relay for extended D1 feed: climate control system, power driver's se\
at, driver's
info 10A
25 Ignition switch, relay starter motor, SRS, engine control module 10A
26 Climate control system blower 30A
27 -
28 Electronic module - courtesy lighting 10A
29 -
30 Left front/rear parking lights 7.5A
31 Right front/rear parking lights, license plate lights 7.5A
32 Central electrical module, vanity mirror lightings,
glove compartment light, interior courtesy lighting 10A
33 Fuel pump 15A
34 Power moonroof 15A
35 Central locking system, power windows - left door mirror 25A
36 Central locking system, power windows - right door mirror 25A
37 Rear power windows 30A
38 Alarm siren 5A
* Please be aware that if this fuse is not intact, or if it is removed, \
the alarm will sound.
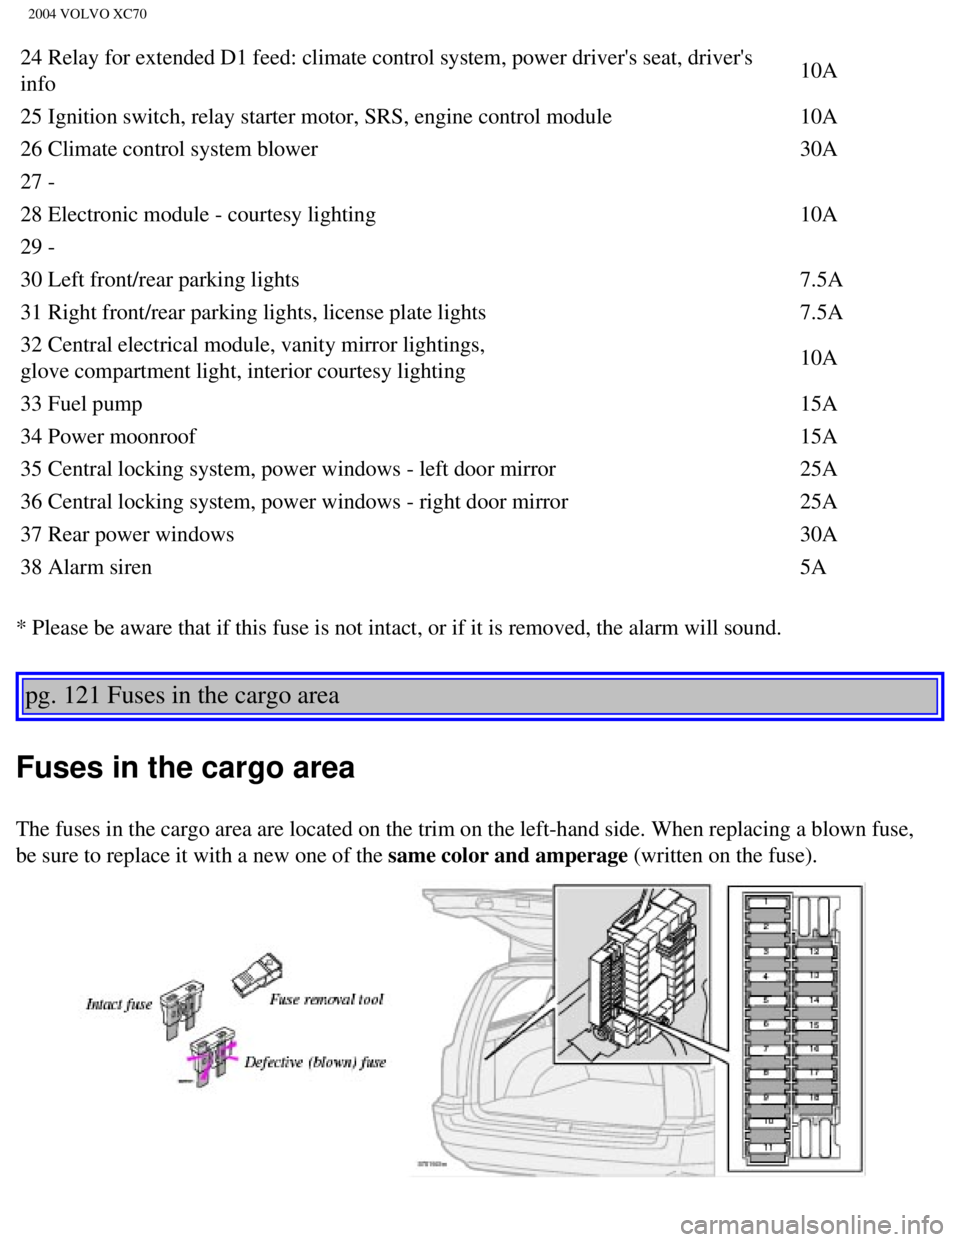
pg. 121 Fuses in the cargo area
Fuses in the cargo area
The fuses in the cargo area are located on the trim on the left-hand sid\
e. When replacing a blown fuse,
be sure to replace it with a new one of the same color and amperage (written on the fuse).
file:///K|/ownersdocs/2004/2004_XC70/04xc70_08a.htm (6 of 22)12/30/200\
6 4:33:05 PM