Socket VOLVO XC90 T8 2016 Owner´s Manual
[x] Cancel search | Manufacturer: VOLVO, Model Year: 2016, Model line: XC90 T8, Model: VOLVO XC90 T8 2016Pages: 546, PDF Size: 10.26 MB
Page 488 of 546
||
MAINTENANCE AND SERVICING
* Option/accessory, for more information, see Introduction.
486 •
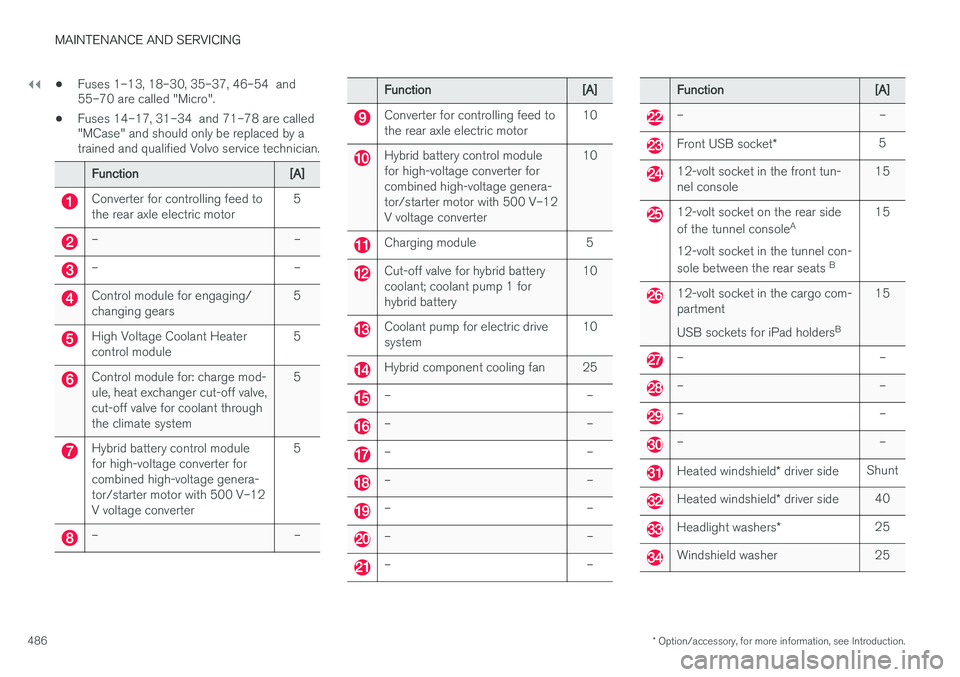
Fuses 1–13, 18–30, 35–37, 46–54 and 55–70 are called "Micro".
• Fuses 14–17, 31–34 and 71–78 are called"MCase" and should only be replaced by atrained and qualified Volvo service technician.
Function[A]
Converter for controlling feed to the rear axle electric motor5
––
––
Control module for engaging/ changing gears5
High Voltage Coolant Heater control module5
Control module for: charge mod- ule, heat exchanger cut-off valve,cut-off valve for coolant throughthe climate system5
Hybrid battery control module for high-voltage converter forcombined high-voltage genera-tor/starter motor with 500 V–12V voltage converter5
––
Function[A]
Converter for controlling feed to the rear axle electric motor10
Hybrid battery control module for high-voltage converter forcombined high-voltage genera-tor/starter motor with 500 V–12V voltage converter10
Charging module5
Cut-off valve for hybrid battery coolant; coolant pump 1 forhybrid battery10
Coolant pump for electric drive system10
Hybrid component cooling fan25
––
––
––
––
––
––
––
Function[A]
––
Front USB socket
*5
12-volt socket in the front tun- nel console15
12-volt socket on the rear side of the tunnel console A
12-volt socket in the tunnel con-sole between the rear seats B15
12-volt socket in the cargo com- partment USB sockets for iPad holders B15
––
––
––
––
Heated windshield
* driver sideShunt
Heated windshield * driver side40
Headlight washers *25
Windshield washer25
Page 491 of 546
MAINTENANCE AND SERVICING
}}
489
Fuses in the passenger compartment
The fuses in the passenger compartment help protect electrical components such as the 120-volt socket, displays and door modules.
Page 493 of 546
MAINTENANCE AND SERVICING
}}
* Option/accessory, for more information, see Introduction.491
Positions
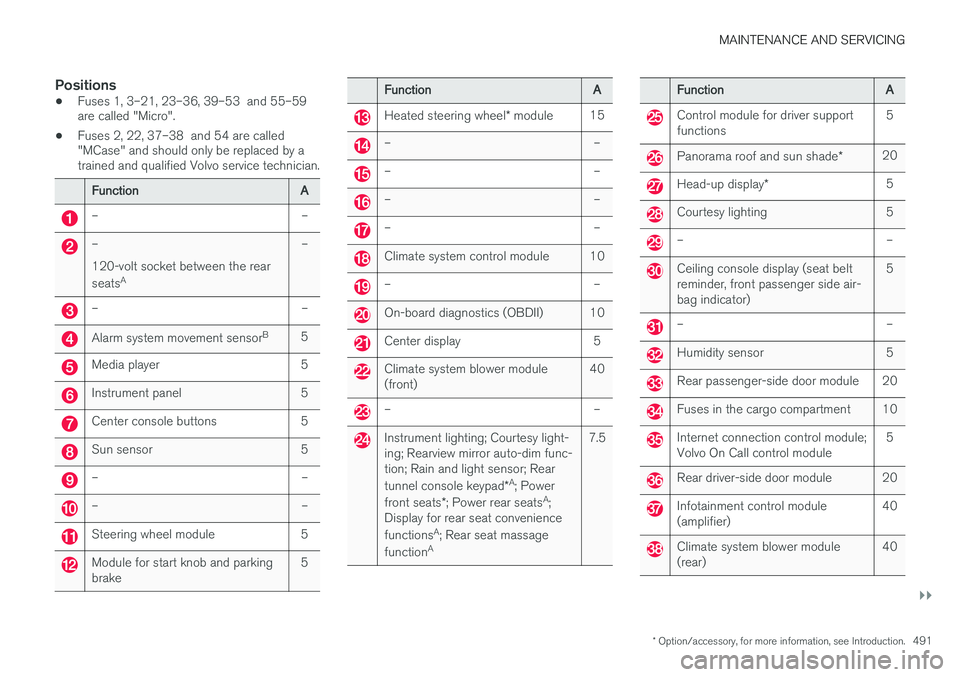
•Fuses 1, 3–21, 23–36, 39–53 and 55–59 are called "Micro".
• Fuses 2, 22, 37–38 and 54 are called"MCase" and should only be replaced by atrained and qualified Volvo service technician.
FunctionA
––
– 120-volt socket between the rear seats A–
––
Alarm system movement sensor B5
Media player5
Instrument panel5
Center console buttons5
Sun sensor5
––
––
Steering wheel module5
Module for start knob and parking brake5
FunctionA
Heated steering wheel
* module15
––
––
––
––
Climate system control module10
––
On-board diagnostics (OBDII)10
Center display5
Climate system blower module (front)40
––
Instrument lighting; Courtesy light- ing; Rearview mirror auto-dim func-tion; Rain and light sensor; Rear tunnel console keypad *A
; Power
front seats *; Power rear seats A
;
Display for rear seat conveniencefunctions A
; Rear seat massage
function A7.5
FunctionA
Control module for driver support functions5
Panorama roof and sun shade
*20
Head-up display*5
Courtesy lighting5
––
Ceiling console display (seat belt reminder, front passenger side air-bag indicator)5
––
Humidity sensor5
Rear passenger-side door module20
Fuses in the cargo compartment10
Internet connection control module; Volvo On Call control module5
Rear driver-side door module20
Infotainment control module (amplifier)40
Climate system blower module (rear)40
Page 501 of 546
MAINTENANCE AND SERVICING
499
6. Insert the bulb in the socket and turn down-
ward. It can only be inserted in one way.
7. Put the rubber cover back into place.
Related information
• Replacing bulbs (p. 496)
• Bulb specifications (p. 501)
Replacing High Beam headlight bulbs
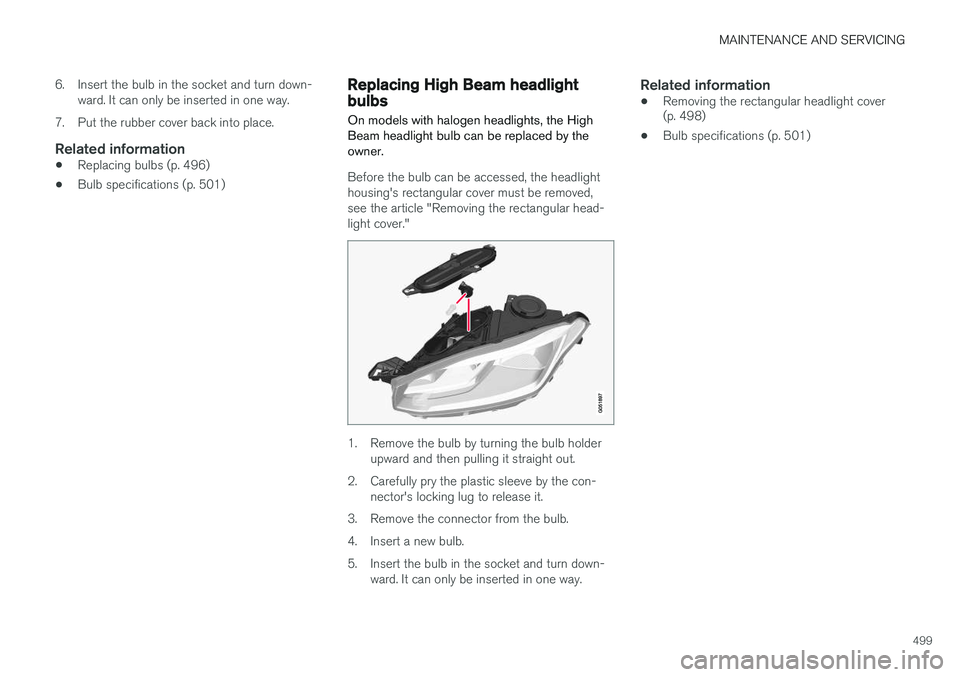
On models with halogen headlights, the High Beam headlight bulb can be replaced by theowner.
Before the bulb can be accessed, the headlight housing's rectangular cover must be removed,see the article "Removing the rectangular head-light cover."
1. Remove the bulb by turning the bulb holder upward and then pulling it straight out.
2. Carefully pry the plastic sleeve by the con- nector's locking lug to release it.
3. Remove the connector from the bulb.
4. Insert a new bulb.
5. Insert the bulb in the socket and turn down- ward. It can only be inserted in one way.
Related information
• Removing the rectangular headlight cover (p. 498)
• Bulb specifications (p. 501)
Page 502 of 546
MAINTENANCE AND SERVICING
500
Replacing parking light bulbsOn models with halogen headlights, the front parking light bulb can be replaced by the owner.
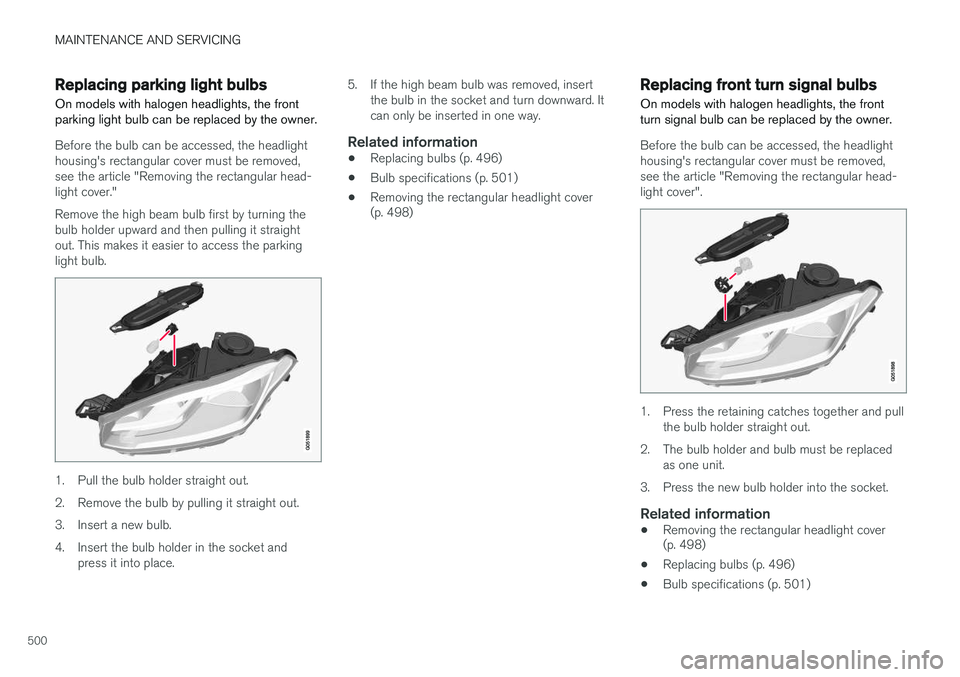
Before the bulb can be accessed, the headlight housing's rectangular cover must be removed,see the article "Removing the rectangular head-light cover." Remove the high beam bulb first by turning the bulb holder upward and then pulling it straightout. This makes it easier to access the parkinglight bulb.
1. Pull the bulb holder straight out.
2. Remove the bulb by pulling it straight out.
3. Insert a new bulb.
4. Insert the bulb holder in the socket and press it into place. 5. If the high beam bulb was removed, insert
the bulb in the socket and turn downward. It can only be inserted in one way.
Related information
• Replacing bulbs (p. 496)
• Bulb specifications (p. 501)
• Removing the rectangular headlight cover (p. 498)
Replacing front turn signal bulbs On models with halogen headlights, the front turn signal bulb can be replaced by the owner.
Before the bulb can be accessed, the headlight housing's rectangular cover must be removed,see the article "Removing the rectangular head-light cover".
1. Press the retaining catches together and pull
the bulb holder straight out.
2. The bulb holder and bulb must be replaced as one unit.
3. Press the new bulb holder into the socket.
Related information
• Removing the rectangular headlight cover (p. 498)
• Replacing bulbs (p. 496)
• Bulb specifications (p. 501)
Page 540 of 546
INDEX
538
L
Labelslist of 522
location of 521
Laminated panoramic roof 106, 107 Lane Departure Warning settings 340
Lane Departure Warning (LDW) 338, 342
Lane Keeping Aid 338, 340, 342 settings 340
LATCH anchors 78
Leather care 513
Lighting panel 140
Load anchoring eyelets 220
Loading the vehicle 208, 215, 449
Locking 242, 243
Locks and alarm 226
Low beam bulb, replacing 498
Low beams 142, 143
Low Speed Control 399
M
Maintenance 472 hoisting the vehicle 502
performed by the owner 472
Malfunction indicator light 125
Manual front seat adjustment 162
Media player 420, 421 compatible file formats 429
Media player (infotainment system) 424Menus instrument panel 151, 153, 154, 156
Mirrors defroster 195
power door 105
retractable 105
Mirrors, rearview mirror 110
Modem 437Motor oil checking 506, 507
MP3 files 429
Multifunctional front seats 165, 166
MY CAR 111, 112
N
Navigation system voice commands 124
Net cargo 217
O
Occupant safety 60
Occupant weight sensor 84
Octane recommendations 362
Odometer 96Oilchecking 506, 507
Oil quality 530
On-board diagnostics 472
On-board Diagnostic socket 26
On Call Roadside Assistance 14
Opening the hood 504
Options 26
Outside temperature sensor 116
Overhead courtesy lighting 148
Overheating, engine 357