display VOLVO XC90 T8 2016 Owner´s Manual
[x] Cancel search | Manufacturer: VOLVO, Model Year: 2016, Model line: XC90 T8, Model: VOLVO XC90 T8 2016Pages: 546, PDF Size: 10.26 MB
Page 154 of 546

||
INSTRUMENTS AND CONTROLS
152The message may be displayed along with graph- ics, symbols or buttons for e.g., confirming themessage or accepting a request.
Service messages
The following table lists a selection of important service messages and the action that should betaken.
MessageAction
Stop safelyAStop and switch off the engine. There is a risk ofserious damage to the vehi- cle
B
.
Turn off engineAStop and switch off the engine. There is a risk ofserious damage to the vehi- cle B
.
Service urgent Drive to workshop
A
Contact a workshop B
to have
the vehicle inspected imme- diately.
Service requiredAContact a workshop B
to have
the vehicle inspected as soon as possible.
Book time for maintenance Time for maintenanceTime for the next scheduled service. Contact a work- shop B
.
MessageAction
Maintenance overdueTime for the next scheduled service. Contact a work- shop B
. If the service sched-
ule is not followed, this may void all or part of the vehi-cle's warranty and result indamage to vehicle compo-nents.
Temporarily offAA function has been tempo- rarily deactivated and will bereactivated automaticallywhile driving or after theengine is restarted.
A Part of the message is context-dependent.
B Contact a Volvo retailer or a trained and qualified Volvo service technician.
Center display
Message in the center display's status bar
Messages with lower priority for the driver are shown in the center display. Most of the messages are shown in the center display's status bar. The message times out aftera short period of time or disappears if it has beenconfirmed or if action has been taken. Messages that need to be stored are saved under
My car
messages in Top view.
Some messages in the center display contain one or more buttons for e.g., confirming the mes-sage or accepting a request. Messages' form can vary and they may be dis- played with graphics, symbols or buttons for e.g.,confirming a message or accepting a request.
Page 155 of 546

INSTRUMENTS AND CONTROLS
}}
153
Pop-up messages
Messages are sometimes displayed in pop-up windows. Messages of this type have higher pri-ority than ones in the status bar and must beconfirmed or action must be taken before theydisappear. Messages that need to be stored are saved under
My car messages in Top view.
Related information
•Instrument panel (p. 127)
• Center display overview (p. 32)
Handling messages in the instrument panel and center display
Instrument panel
Message in the instrument panel (12" version) and the right-side steering wheel keypad
Left/right arrow keys
Confirm
Some messages in the instrument panel contain one or more buttons for e.g., confirming a mes-sage or accepting a proposal.
Handling new messages
For messages with buttons:
1. Navigate among the buttons available by pressing the left/right arrow keys (1). 2. Confirm a choice by pressing (2).
> The message will disappear from theinstrument panel.
For messages without buttons:
–Close the message by pressing (2) or let the message time-out after a short period.
> The message will disappear from the instrument panel.
If a message needs to be saved, it will be stored in the
Car status app, which can be opened in
the center display's App view. Car message
stored in Car status application will be dis-
played at this time in the center display.
Center display
Message in the center display
Some buttons in the center display have a button (or several buttons in a pop-up) to make it possi-
Page 156 of 546

||
INSTRUMENTS AND CONTROLS
154ble to e.g., activate/deactivate a function related to the message.
Handling new messages
For messages with buttons:
–Tap the button to carry out the action or let the message time-out after a short period.
> The message will disappear from the cen-
ter display's status bar.
For messages without buttons:
–Close the message by tapping it or let the message time-out after a short period.
> The message will disappear from the cen- ter display's status bar.
If a message needs to be saved, it will be stored in the center display's Top view.
Related information
• Messages in the instrument panel and center display (p. 151)
• Using the instrument panel App menu(p. 156)
Handling messages stored from the instrument panel and center display
Messages saved from the instrument
panel
Saved messages and possible selections in the Car
status app
Messages that have been dis- played in the instrument paneland need to be saved are stored in the
Car status app,
which can be opened in the center display's App view.
Car
message stored in Car
status application
will be displayed at this time
in the center display.
Reading saved messages
Reading a saved message immediately:
–Tap the button to the right of the messageCar message stored in Car status application in the center display.
> The saved message will be displayed in the
Car status app.
Reading a saved message at a later time: 1. Open the
Car status app in the center dis-
play's App view.
> The app will open in Home view's lowest sub-view.
2. Select the
Messages tab in the app.
> A list of saved messages will be displayed.
3. Tap the arrow to the right to expand/mini- mize the message.
> More information about the message willappear in the list and the image to the left in the app will show information about themessage in graphic form.
Page 157 of 546

INSTRUMENTS AND CONTROLS
155
Handling a saved message
In expanded form, some messages have two but- tons for booking service or reading the owner'smanual. Booking service:
–With the message in expanded form, tapRequest appoint./Call to make
Appointment13 to book a service/repair
appointment. >
Request appoint.: the Appointmentstab will open in the app and create a request for a service/repair appointment.
Call to make Appointment: the phone
app will start and initiate a call to your pre- ferred retailer to make a service/repairappointment.
Reading the owner's manual:
–With the message in expanded form, tapOwner's manual to read the section of the
owner's manual related to the message.
> The owner's manual will open in the cen- ter display and provide information related to the message.
Messages stored in the app will be erased auto-matically each time the engine is started.
Messages saved from the center display
Saved messages and possible selections in Top view
Messages that have been shown in the center display and need to be saved are stored in thecenter display's Top view.
Reading a saved message
1. Open the center display's Top view. > A list of saved messages will be displayed.The ones with an arrow to the right can be expanded.
2. Tap the arrow to the right to expand/mini- mize the message.
Handling a saved message
Some messages have a button to e.g., activate/ deactivate a function related to the message.
–Tap the button to carry out the action.
Messages saved in Top view are erased automat- ically when the engine is switched off.
Related information
• Handling messages in the instrument panel and center display (p. 153)
13
Certain markets only.
Page 158 of 546
 menu in the instrument panel is controlled using the")
INSTRUMENTS AND CONTROLS
* Option/accessory, for more information, see Introduction.
156
Using the instrument panel App menu
The App (application) menu in the instrument panel is controlled using the right-side steeringwheel keypad.
App menu and right-side steering wheel keypad
App menu
Left/right
Up/down
Confirm
Opening/closing the App menu
–Press the App menu (1). The App menu cannot be opened if there are unread/unconfirmed messages in the instru-ment panel. The message must be confirmedbefore the App menu can be opened.
> The App menu opens/closes.
The App menu closes automatically after a period of inactivity or after certain selections are made.
Navigating and making selections in the App menu
1. Navigate between the various apps by press- ing left or right (3).
> Functions for the preceding/next app willbe displayed in the App menu.
2. Scroll through the current app's selections using up or down (4).
3. Confirm or select a function by pressing (2). > The function will be activated and in cer-tain cases, the App menu will close.
Related information
• Instrument panel App menu (p. 129)
Using the windshield wipers
Before using the wipers, ice and snow should be removed from the windshield. Be sure thewiper blades are not frozen in place.
Right-side steering wheel lever
Thumb wheel to set rain sensor * sensitivity/
interval wiper speed
Single sweepMove the lever down and release it for a single sweep.
Wipers offMove the lever to position 0 to turn off
the windshield wipers.
Interval wipersSet the wiper interval speed by moving the thumb wheel upward or downward.
Page 160 of 546

||
INSTRUMENTS AND CONTROLS
* Option/accessory, for more information, see Introduction.
158
Activating/deactivating the memory function
The rain sensor's memory function can be set to activate the rain sensor each time the engine isstarted: 1.
In the center display, select
SettingsMy
Car
Wipers
2. Activate by selecting the Rain Sensor
Memory box.
Deactivate by deselecting the
Rain Sensor
Memory box.
Related information
• Using the windshield wipers (p. 156)
• Windshield wipers in the service position (p. 508)
• Tailgate window wiper and washer (p. 159)
Windshield and headlight washers
Use the windshield/headlight washers to help improve visibility.
Starting the windshield and headlight washers
Washing function
–Move the right-side steering wheel lever toward the wheel to start the windshield andheadlight washers.
> After the lever is released the wipers make several extra sweeps.
CAUTION
• Use ample washer fluid when washing the windshield. The windshield should bethoroughly wet when the wipers are inoperation.
• Avoid using the washers if the fluid reser-voir is frozen or empty to help avoid dam-age to the pump.
When the washing system is used, the length of time that the windshield washers operatedepends on the ambient temperature. In coldweather, the amount of washer fluid used willalso be increased automatically to help improvecleaning.
Heated washer nozzles
*The washer nozzles are heated automatically incold weather to help prevent the washer fluidfrom freezing.
High-pressure headlight washing *High-pressure headlight washing consumes alarge quantity of washer fluid. To save fluid, theheadlights are washed once for every five timesthe windshield is washed.
Reduced washingWhen approx. 1 US quart (1 liter) of washer fluidremains in the reservoir, the headlights will nolonger be washed to conserve fluid.
Page 161 of 546

INSTRUMENTS AND CONTROLS
159
A text message and the
symbol will be dis-
played in the instrument panel to remind the driver to fill the washer fluid reservoir.
Related information
• Refilling the windshield washer fluid reservoir (p. 511)
• Using the windshield wipers (p. 156)
• Tailgate window wiper and washer (p. 159)
Tailgate window wiper and washer
Start the tailgate window wiper/washer with con- trols on the right-side steering wheel lever.
NOTE
The rear wiper is equipped with a cut-off function, which means that it will not operateif its electric motor overheats. The wiper willfunction again after a cool-down period(30 seconds or longer, depending on the heatof the motor and ambient temperature condi-tions).
Using the tailgate wiper/washer
Press for tailgate interval wiper
Press for tailgate continuous wiper
–Move the lever forward to wash/wipe the tail- gate window.
Tailgate wiper and reverse gear1. In the center display, select SettingsMy
Car
Wipers.
2. Activate/deactivate by selecting/deselecting the
Auto Rear Wiper box.
If the windshield wipers are on and the transmis- sion is put into reverse gear, the tailgate wiperwill start. This function is deactivated when a dif-ferent gear is selected.
Related information
• Using the windshield wipers (p. 156)
• Windshield and headlight washers (p. 158)
• Refilling the windshield washer fluid reservoir (p. 511)
• Activating/deactivating the rain sensor(p. 157)
Page 162 of 546

INSTRUMENTS AND CONTROLS
* Option/accessory, for more information, see Introduction.
160
Steering wheel The steering wheel has controls for the horn, certain optional driver support systems, menus/messages and paddles for manually shifting gears *.
Steering wheel keypads and paddles *
Driver support system controls14
Paddles for manually shifting gears
*
Keypad for voice controls, adjusting the head-up display*accessing menus and mes-
sages, and handling phone calls
Horn
The horn is located in the steering wheel hub.
Related information
• Adjusting the steering wheel (p. 161)
• Turning steering wheel heating
* on and off
(p. 197)
• Cruise Control (CC) (p. 261)
• Speed limiter (SL)
* (p. 298)
• Adaptive Cruise Control (ACC)
* (p. 266)
• Distance Alert
* (p. 329)
• Pilot Assist
* (p. 273)
• Steering wheel paddles
* (p. 398)
• Voice control (p. 120)
• Head-up display (HUD)
* (p. 117) •
Using the instrument panel App menu (p. 156)
• Phone (p. 414)
14
Cruise control *, Speed limiter *, Adaptive cruise control *, Distance alert * and Pilot Assist *.
Page 163 of 546

INSTRUMENTS AND CONTROLS
}}
* Option/accessory, for more information, see Introduction.161
Adjusting the steering wheel
The steering wheel can be adjusted to various positions.
Adjusting the steering wheel
Lever for releasing/locking the steering wheel
Possible positions
The steering wheel's height and reach can be adjusted. To do so:
1. Push the lever down to release the steering wheel.
2. Adjust the steering wheel to a suitable posi- tion.
3. Pull back the lever to lock the steering wheel in place. If the lever is difficult to pull into place, press the steering wheel lightly at thesame time as you pull the lever.
WARNING
Never adjust the steering wheel while driving.
If the vehicle is equipped with the optional speed-dependent power steering, the level ofsteering force can be adjusted. The force level isadjusted according to the vehicle's speed.
Related information
• Steering wheel (p. 160)
• Adjustable steering force
* (p. 323)
Seats
The vehicle is equipped with 7 seats. The front seats can be adjusted electroncially or manually.The second and third row seats are adjusted pri-marily manually.
The adjustment settings for the power front seats *, door mirrors and the head-up display can
be stored in memory buttons. Using the multi-function control *, comfort in the
front seats can be further enhance by e.g., adjust- ing the lumbar support or extending the length ofthe front seat cushion. The rear seats can be folded down and their head restraints can be adjusted. The second rowseats can be moved forward/rearward and theirbackrest tilt can also be changed.
Related information
• Adjusting power front seats
* (p. 163)
• Adjusting function settings in the multifunc- tional front seats
* (p. 166)
• Manually operated front seats (p. 162)
• Using the power seat memory function
*
(p. 164)
• Folding the second row backrests (p. 172)
• Getting into and out of the third row of seats (p. 174)
Page 166 of 546
INSTRUMENTS AND CONTROLS
* Option/accessory, for more information, see Introduction.
164
Adjusting the passenger's seat from the driver's seat *
Using the controls on the side of the driver's seat, the driver can adjust the position of thefront passenger's seat.
Activating the function in the center
display
From the center display, the function can be acti- vated in two ways. After activating the function, adjust the passeng- er's seat within 10 seconds . If no adjustments
are made in that time span, the function deacti- vates automatically.
Activating from Function view
1. Go to the center display's Function view. 2. Activate the function by tapping
Adjust
passenger seat.
Activating from Settings
–In the center display, select SettingsMy
Car
SeatsAdjust Passenger Seat
From Driver Position.
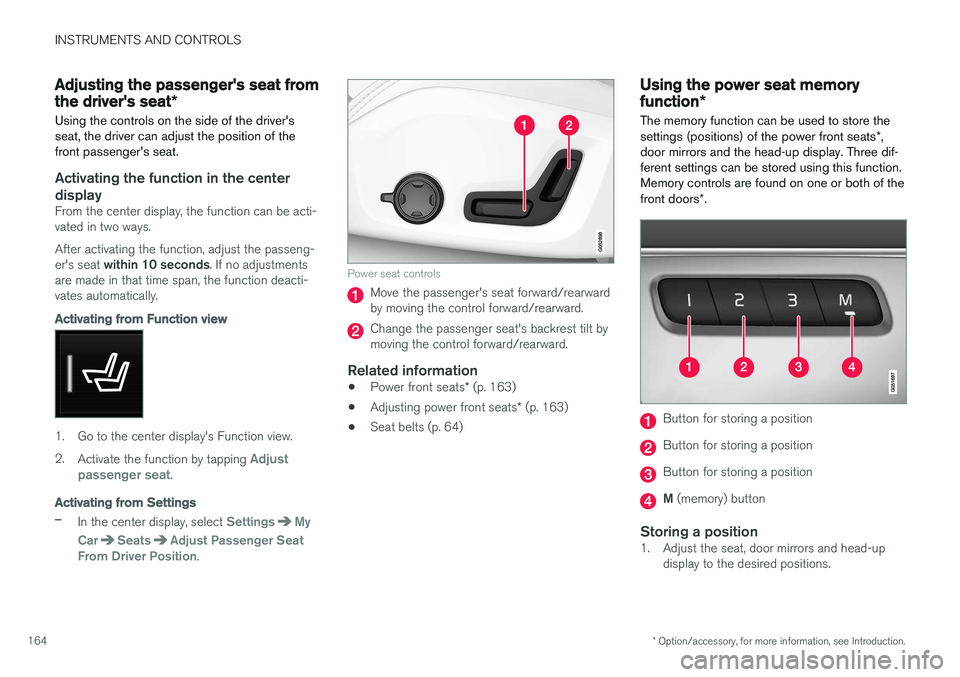
Power seat controls
Move the passenger's seat forward/rearward by moving the control forward/rearward.
Change the passenger seat's backrest tilt by moving the control forward/rearward.
Related information
• Power front seats
* (p. 163)
• Adjusting power front seats
* (p. 163)
• Seat belts (p. 64)
Using the power seat memory function
*
The memory function can be used to store the settings (positions) of the power front seats *,
door mirrors and the head-up display. Three dif- ferent settings can be stored using this function.Memory controls are found on one or both of the front doors *.
Button for storing a position
Button for storing a position
Button for storing a position
M (memory) button
Storing a position1. Adjust the seat, door mirrors and head-up
display to the desired positions.