mode VOLVO XC90 T8 2017 Owner´s Manual
[x] Cancel search | Manufacturer: VOLVO, Model Year: 2017, Model line: XC90 T8, Model: VOLVO XC90 T8 2017Pages: 580, PDF Size: 10.37 MB
Page 460 of 580
||
INFOTAINMENT
* Option/accessory.
458
Max. number
Tracks in a playlist 1,000
Subfolders No limit
USB socket
• Type A socket
• Version 2.0
• Voltage 5 V
• Max. current 2.1 A
Related information
•
CD (media) player
* (p. 451)
Internet connected vehicle
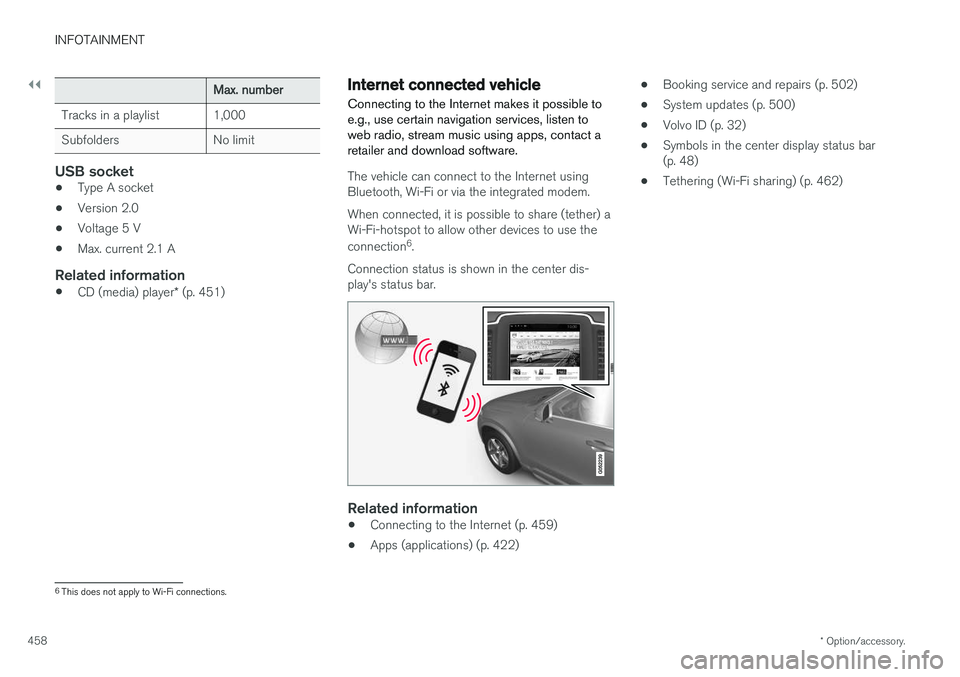
Connecting to the Internet makes it possible to e.g., use certain navigation services, listen toweb radio, stream music using apps, contact aretailer and download software.
The vehicle can connect to the Internet using Bluetooth, Wi-Fi or via the integrated modem. When connected, it is possible to share (tether) a Wi-Fi-hotspot to allow other devices to use the connection 6
.
Connection status is shown in the center dis- play's status bar.
Related information
• Connecting to the Internet (p. 459)
• Apps (applications) (p. 422) •
Booking service and repairs (p. 502)
• System updates (p. 500)
• Volvo ID (p. 32)
• Symbols in the center display status bar (p. 48)
• Tethering (Wi-Fi sharing) (p. 462)
6
This does not apply to Wi-Fi connections.
Page 461 of 580
INFOTAINMENT
}}
459
Connecting to the Internet
Connect the vehicle to the Internet using
Bluetooth, Wi-Fi or via the vehicle's integratedmodem.
The cell phone and the network service provider must support Internet sharing (tethering) and thesubscription must included data transfer. See the terms and confidentiality information at support.volvocars.com before connecting to theInternet.
NOTE
When using Apple CarPlay or Android Auto, an Internet connection can only be estab-lished by using Wi-Fi or the vehicle's inte-grated modem.
Connect using BluetoothSee the article "Pairing a cell phone."
Connect using Wi-Fi
1. Activate tethering/personal hotspot in the cell phone. 2.
Tap
Settings in the center display's Top
view.
3. Tap
CommunicationWi-Fi.
4. Tap Wi-Fi to activate/deactivate.
5. Tap the name of the network to be used.
6. Enter the network password.
7. If a different connection was used previously, confirm the connection change.
> The vehicle will connect to the network.
Please be aware that certain cell phones disable tethering when the connection to the vehicle hasbeen broken, e.g., when the phone has beenremoved from the vehicle. In such cases, thephone's tethering function will have to be reacti-vated the next time the phone is used to connectto the Internet. When a phone is connected to the vehicle, it is saved for future use. When a max. number of 50have been saved, the first one connected will bedeleted. To show the list of saved networks or to manually delete a network, tap
SettingsWi-Fi
Saved networks.
See the article "Wi-Fi technology and security" for network connection requirements.
Connect using the vehicle's integrated modem
When the vehicle is connected using the modem, Volvo On Call services will use the connection.
1. Insert a personal SIM card in the holder.
2. Tap Settings in the center display's Top
view.
3. Tap
CommunicationVehicle Modem
Internet.
4. Tap
Vehicle modem Internet to activate/
deactivate.
5. If a different connection was used previously, confirm the connection change.
6. Enter the SIM card's PIN code. > The vehicle will connect to the network.
Page 466 of 580
INFOTAINMENT
464
Vehicle modem settings
The vehicle is equipped with a modem that can be used to connect the vehicle to the Internet. Itis also possible to share (tether) this connectionvia Wi-Fi.
1. Tap Settings in the center display's Top
view.
2. Tap
CommunicationVehicle Modem
Internet and choose among the following
settings:
•
Vehicle modem Internet: select to use the
vehicle's modem to connect to the Internet.
•
Data usage: %s: Tap Reset to restart
(reset) the counter for the amount of data sent/received.
•
Network Select carrier
: select a service provider
automatically or manually.
Data roaming: select to allow the vehicle to
connect to another network if the standard network is not available (e.g., if you are driv-ing in another country). This could entailadditional charges, consult your service pro-vider.
•
SIM card PIN Change PIN
: enter max. 4 digits.
Disable PIN: Allow access to the SIM card
without requiring a PIN code. •
Send request code: this is used to down-
load the balance remaining on a SIM card. This is specific to your service provider.
Related information
• Internet connected vehicle (p. 458)
• Connecting to the Internet (p. 459)
Infotainment system license information
The following license information pertains to Vol- vo's agreements with certain manufacturers/developers.
Bowers & Wilkins
Bowers & Wilkins and B&W are trademarks of the B&W Group Ltd. Nautilus is a trademark ofB&W Group Ltd. Kevlar is a registered trademarkof DuPont.
Dirac Live
Page 474 of 580
WHEELS AND TIRES
472
Tires
Your vehicle is equipped with tires according to the vehicle's tire information placard on the B-pillar (the structural member at the side of thevehicle, at the rear of the driver's door opening).
CAUTION
Some Volvo models are equipped with an Ultra High Performance tire and wheel com-bination designed to provide maximum drypavement performance with consideration forhydroplaning resistance. They may be moresusceptible to road hazard damage and,depending on driving conditions, may achievea tread life of less than 20,000 miles (30,000km). Even if this vehicle is equipped with Vol-vo
Page 476 of 580
WHEELS AND TIRES
474
Tire sidewall designations
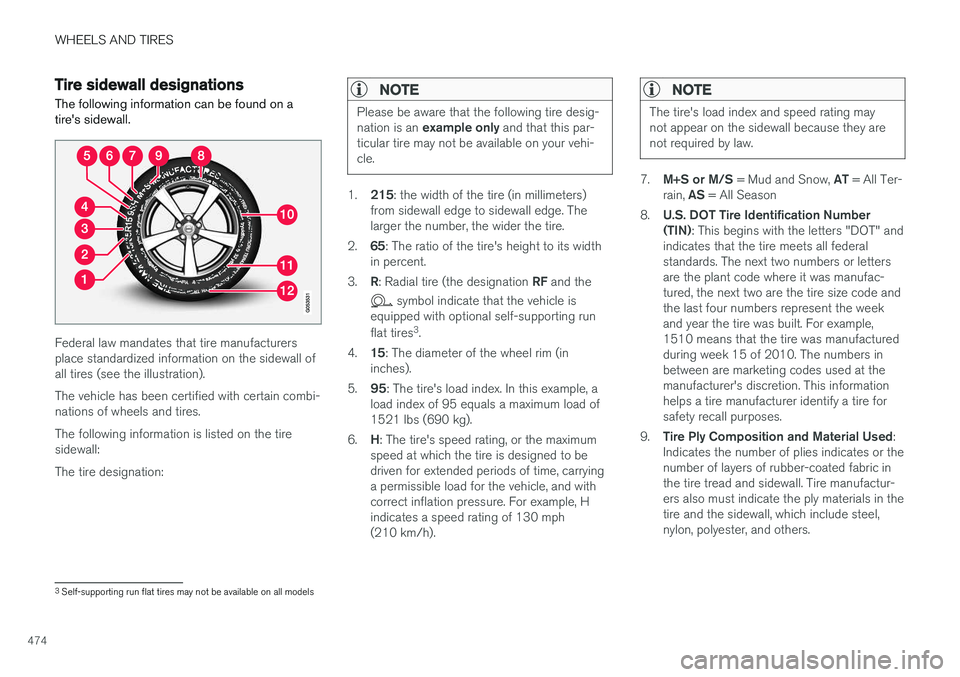
The following information can be found on a tire's sidewall.
Federal law mandates that tire manufacturers place standardized information on the sidewall ofall tires (see the illustration). The vehicle has been certified with certain combi- nations of wheels and tires. The following information is listed on the tire sidewall: The tire designation:
NOTE
Please be aware that the following tire desig- nation is an example only and that this par-
ticular tire may not be available on your vehi- cle.
1. 215 : the width of the tire (in millimeters)
from sidewall edge to sidewall edge. The larger the number, the wider the tire.
2. 65: The ratio of the tire's height to its width
in percent.
3. R: Radial tire (the designation RF and the
symbol indicate that the vehicle is
equipped with optional self-supporting run flat tires 3
.
4. 15: The diameter of the wheel rim (in
inches).
5. 95: The tire's load index. In this example, a
load index of 95 equals a maximum load of 1521 lbs (690 kg).
6. H: The tire's speed rating, or the maximum
speed at which the tire is designed to bedriven for extended periods of time, carryinga permissible load for the vehicle, and withcorrect inflation pressure. For example, Hindicates a speed rating of 130 mph(210 km/h).
NOTE
The tire's load index and speed rating may not appear on the sidewall because they arenot required by law.
7. M+S or M/S = Mud and Snow, AT = All Ter-
rain, AS = All Season
8. U.S. DOT Tire Identification Number (TIN) : This begins with the letters "DOT" and
indicates that the tire meets all federalstandards. The next two numbers or lettersare the plant code where it was manufac-tured, the next two are the tire size code andthe last four numbers represent the weekand year the tire was built. For example,1510 means that the tire was manufacturedduring week 15 of 2010. The numbers inbetween are marketing codes used at themanufacturer's discretion. This informationhelps a tire manufacturer identify a tire forsafety recall purposes.
9. Tire Ply Composition and Material Used :
Indicates the number of plies indicates or thenumber of layers of rubber-coated fabric inthe tire tread and sidewall. Tire manufactur-ers also must indicate the ply materials in thetire and the sidewall, which include steel,nylon, polyester, and others.
3 Self-supporting run flat tires may not be available on all models
Page 481 of 580
WHEELS AND TIRES
}}
479
Uniform Tire Quality Grading
ALL PASSENGER VEHICLE TIRES MUST CONFORM TO FEDERAL SAFETY REQUIRE-MENTS IN ADDITION TO THESE GRADES .
Quality grades can be found, where applica- ble, on the tire sidewall between the treadshoulder and maximum section width. Forexample: Treadwear 200 Traction AA Temperature A
TREADWEARThe treadwear grade is a comparative rating based on the wear rate of the tire when testedunder controlled conditions on a specified gov-ernment test course. For example, a tire graded150 would wear one and one half (1 ½) times aswell on the government course as a tire graded100. The relative performance of tires dependsupon the actual conditions of their use, however,and many depart significantly from the norm dueto variation in driving habits, maintenance practi-ces and differences in road characteristics andclimate.
TRACTIONThe traction grades, from highest to lowest, areAA, A, B, and C, as measured under controlledconditions on specified government test surfacesof asphalt and concrete. A tire marked C mayhave poor traction performance. The tractiongrade assigned to this tire is based on braking (straight-ahead) traction tests and is not a meas-ure of cornering (turning) traction.
WARNING
The traction grade assigned to this tire is based on braking (straight-ahead) tractiontests and is not a measure of cornering (turn-ing) traction.
TEMPERATUREThe temperature grades are A (the highest), B, and C, representing the tire's resistance to thegeneration of heat and its ability to dissipate heatwhen tested under controlled conditions on aspecified indoor laboratory test wheel. Sustainedhigh temperature can cause the material of thetire to degenerate and reduce tire life, and exces-sive temperature can lead to sudden tire failure.The grade C corresponds to a minimum level ofperformance that all passenger vehicle tires mustmeet under the Federal Motor Safety StandardNo. 109. Grades B and A represent higher levelsof performance on the laboratory test wheel thanthe minimum required by law.
WARNING
The temperature grade for this tire is estab- lished for a tire that is properly inflated andnot overloaded. Excessive speed, under-infla-tion, or excessive loading, either separately orin combination, can cause heat buildup andtire failure.
Snow tires and chains
The use of snow chains and/or winter tires can help improve traction in winter driving conditions.
Snow chains can be used on your Volvo with the following restrictions:
• Snow chains should be installed on frontwheels only. Use only Volvo approved snowchains.
• If accessory, aftermarket or "custom" tiresand wheels are installed and are of a size dif-ferent than the original tires and wheels,chains in some cases CANNOT be used.Sufficient clearances between chains andbrakes, suspension and body componentsmust be maintained.
• Some strap-on type chains will interfere withbrake components and therefore CANNOTbe used.
• All Wheel Drive models
: Snow chains
should only be installed on the front wheels.
• Certain size tires may not allow the assemblyof snow chains/traction devices.
Consult your Volvo retailer for additional snowchain information.
Page 483 of 580
WHEELS AND TIRES
481
of the factory-mounted tires on your vehicle, as well as load limits and inflation pressure.
NOTE
•
The placard shown indicates inflation pressure for the tires installed on thevehicle at the factory only.
• A certain amount of air seepage from thetires occurs naturally and tire pressurefluctuates with seasonal changes in tem-perature. Always check tire pressure reg-ularly.
• Use a tire gauge to check the tire inflation pressure, including the spare 4
, at least once
a month and before long trips. You are strongly urged to buy a reliable tire pressuregauge, as automatic service station gaugesmay be inaccurate.
• Use the recommended cold inflation pres-sure for optimum tire performance and wear.
• Under-inflation or over-inflation may causeuneven treadwear patterns.
Checking tire pressure1. Remove the cap from the valve on one tire,
then firmly press the tire gauge onto thevalve. 2. Add air to reach the recommended air pres-
sure.
3. Replace the valve cap.
CAUTION
• After inflating the tires, always reinstall the valve cap to help avoid damage to thevalve from dirt, gravel, etc.
• Use plastic valve caps only. Metal capscould corrode and become difficult toremove.
4. Visually inspect the tires to make sure there
are no nails or other objects embedded that could puncture the tire and cause an air leak.
5. Check the sidewalls to make sure there are no gouges, cuts, bulges or other irregulari-ties.
6. Repeat this procedure for each tire, including the spare.
NOTE
If you overfill the tire, release air by pushing on the metal stem in the center of the valve.Then recheck the pressure with your tiregauge.
Changing tires
When changing wheels to another dimension, always follow Volvo's instructions.
When changing to tires of another
dimension
If you mount tires with a dimension other thanthe factory-installed tires, contact an authorizedVolvo retailer to update the vehicle's software.This may also be necessary when changing fromsummer to winter tires, or vice versa.
Related information
• Snow tires and chains (p. 479)
• Installing a wheel (p. 485)
• Removing a wheel (p. 483)
4
Not available in all models.
Page 484 of 580
WHEELS AND TIRES
* Option/accessory.
482
Tools
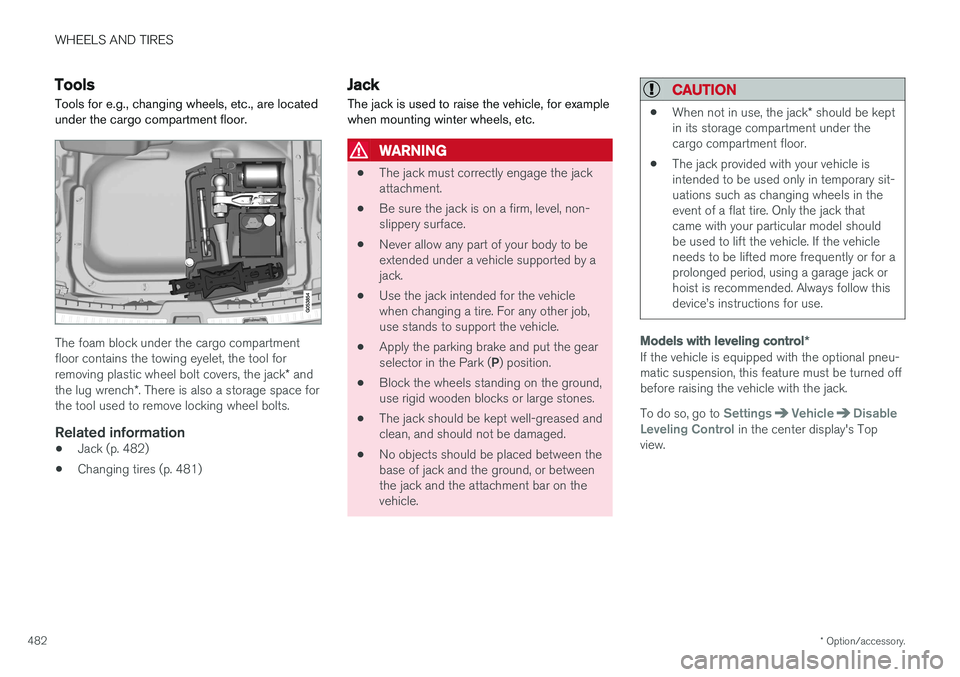
Tools for e.g., changing wheels, etc., are located under the cargo compartment floor.
The foam block under the cargo compartment floor contains the towing eyelet, the tool for removing plastic wheel bolt covers, the jack * and
the lug wrench *. There is also a storage space for
the tool used to remove locking wheel bolts.
Related information
• Jack (p. 482)
• Changing tires (p. 481)
Jack
The jack is used to raise the vehicle, for example when mounting winter wheels, etc.
WARNING
• The jack must correctly engage the jack attachment.
• Be sure the jack is on a firm, level, non-slippery surface.
• Never allow any part of your body to beextended under a vehicle supported by ajack.
• Use the jack intended for the vehiclewhen changing a tire. For any other job,use stands to support the vehicle.
• Apply the parking brake and put the gear selector in the Park (
P) position.
• Block the wheels standing on the ground, use rigid wooden blocks or large stones.
• The jack should be kept well-greased andclean, and should not be damaged.
• No objects should be placed between thebase of jack and the ground, or betweenthe jack and the attachment bar on thevehicle.
CAUTION
•
When not in use, the jack
* should be kept
in its storage compartment under the cargo compartment floor.
• The jack provided with your vehicle isintended to be used only in temporary sit-uations such as changing wheels in theevent of a flat tire. Only the jack thatcame with your particular model shouldbe used to lift the vehicle. If the vehicleneeds to be lifted more frequently or for aprolonged period, using a garage jack orhoist is recommended. Always follow thisdevice
Page 485 of 580
WHEELS AND TIRES
}}
* Option/accessory.483
Wheel bolts
The wheel bolts hold the wheel in place.
CAUTION
Wheel bolts should be tightened to 103 ft. lbs. (140 Nm). Over-tightening could damagethe threads.
Only use wheels/rims that have been tested and approved by Volvo and are included in Volvo'sproduct range. Use a torque wrench to check that the wheel bolts are tightened correctly. Never lubricate the wheel bolts' threads.
Locking wheel bolts *A tool for removing locking wheel bolts can be found in the foam block under the cargo com-partment floor.
Related information
•Changing tires (p. 481)
• Installing a wheel (p. 485)
Removing a wheel
Wheel changes should always be carried out correctly.
1. Turn on the hazard warning flashers if the wheel change has to be done near passing traffic.
2. Apply the parking brake and put the gear selector in P.
CAUTION
Models with suspension and level con- trol *:
Turn this function off before raising the vehi- cle. To do so, go to
SettingsVehicleDisable Leveling Control in the center dis-
play's Top view.
WARNING
• The jack must correctly engage the jack attachment.
• Be sure the jack is on a firm, level, non-slippery surface.
• Never allow any part of your body to beextended under a vehicle supported by ajack.
• Use the jack intended for the vehicle whenchanging a tire. For any other job, usestands to support the vehicle.
• Apply the parking brake and put the gear selector in the Park (
P) position.
• Block the wheels standing on the ground, use rigid wooden blocks or large stones.
• The jack should be kept well-greased andclean, and should not be damaged.
• No objects should be placed between thebase of jack and the ground, or betweenthe jack and the attachment bar on thevehicle.
Page 486 of 580
||
WHEELS AND TIRES
* Option/accessory.
484
NOTE
The jack provided with your vehicle is intended to be used only in temporary situa-tions such as changing wheels in the event ofa flat tire. Only the jack that came with yourparticular model should be used to lift thevehicle. If the vehicle needs to be lifted morefrequently or for a prolonged period, using agarage jack or hoist is recommended. Alwaysfollow this device