mode VOLVO XC90 T8 2017 Owner´s Manual
[x] Cancel search | Manufacturer: VOLVO, Model Year: 2017, Model line: XC90 T8, Model: VOLVO XC90 T8 2017Pages: 580, PDF Size: 10.37 MB
Page 110 of 580

INSTRUMENTS AND CONTROLS
* Option/accessory.
108
Laminated panoramic roof *
The laminated panoramic roof is divided into two sections and only the front section can beopened; it can be slid horizontally to the open orclosed positions or its rear edge can be raisedand lowered to allow ventilation.
The laminated panoramic roof also has a sun shade made of perforated fabric that is locatedbelow the sections of glass. This shade can beopened or closed, for example when driving inbright sunlight. The laminated panoramic roof also has a wind blocker that folds up when the roof is open.
CAUTION
The optional panoramic roof should not be opened while load carriers are installed onthe vehicle.
The laminated panoramic roof and the sun shade are operated using the controls in the ceilingconsole, near the rear-view mirror. The controlsare activated when the vehicle's ignition is in mode I or II.
CAUTION
• Remove ice and snow before opening the laminated panoramic roof.
• Do not operate the laminated panoramicroof if it is frozen closed.
• Never place heavy objects on the lamina-ted panoramic roof.
Wind blocker
The laminated panoramic roof is equipped with a wind blocker that folds up when the roof is open.
Related information
•
Operating the laminated panoramic roof
*
(p. 109)
Page 111 of 580
INSTRUMENTS AND CONTROLS
}}
* Option/accessory.109
Operating the laminated panoramic roof*
When opened automatically, the sun shade and roof open first to the "comfort" position thathelps reduce wind noise and then open com-pletely. In the tilt (ventilation) position, the rear edge of the front section of the roof is raised.
Operation
WARNING
• During manual closing, if the laminated panoramic roof is obstructed, immediatelyopen it again.
• Never open or close the laminated panor-amic roof if it is obstructed in any way.
• Never allow a child to operate the lamina-ted panoramic roof.
• Never leave a child alone in a vehicle.
• When leaving the vehicle, ensure that the ignition is in mode
0. Never leave a
remote key in the vehicle.
• Never extend any object or body part though the open laminated panoramicroof, even if the vehicle's ignition is com-pletely switched off.
CAUTION
The optional panoramic roof should not be opened while load carriers are installed onthe vehicle.
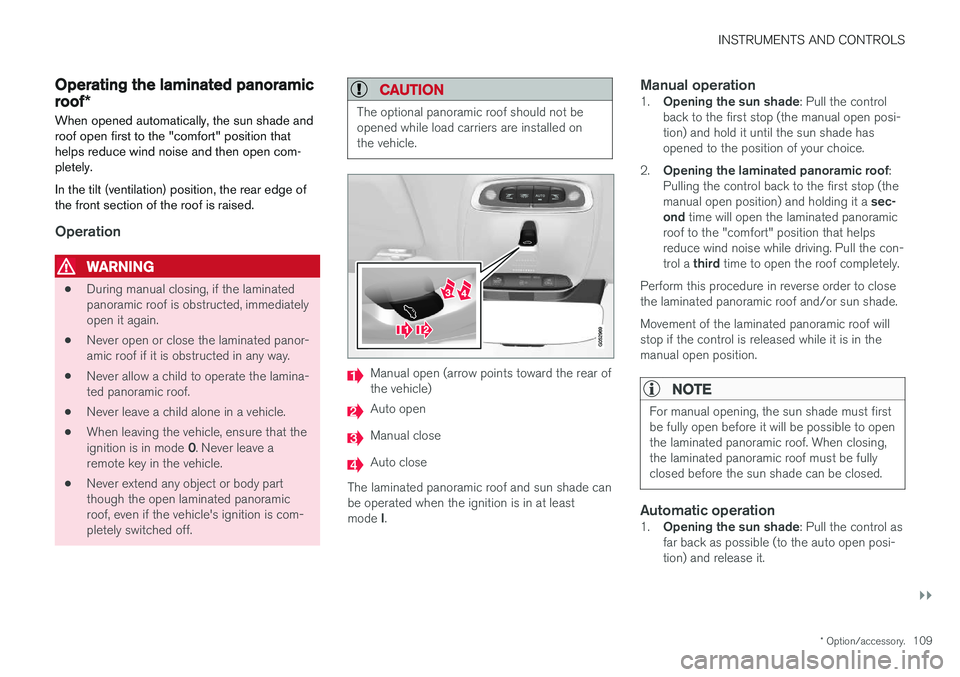
Manual open (arrow points toward the rear of the vehicle)
Auto open
Manual close
Auto close
The laminated panoramic roof and sun shade can be operated when the ignition is in at least mode I.
Manual operation1.
Opening the sun shade : Pull the control
back to the first stop (the manual open posi- tion) and hold it until the sun shade hasopened to the position of your choice.
2. Opening the laminated panoramic roof :
Pulling the control back to the first stop (the manual open position) and holding it a sec-
ond time will open the laminated panoramic
roof to the "comfort" position that helps reduce wind noise while driving. Pull the con- trol a third time to open the roof completely.
Perform this procedure in reverse order to close the laminated panoramic roof and/or sun shade. Movement of the laminated panoramic roof will stop if the control is released while it is in themanual open position.
NOTE
For manual opening, the sun shade must first be fully open before it will be possible to openthe laminated panoramic roof. When closing,the laminated panoramic roof must be fullyclosed before the sun shade can be closed.
Automatic operation1. Opening the sun shade : Pull the control as
far back as possible (to the auto open posi- tion) and release it.
Page 113 of 580
INSTRUMENTS AND CONTROLS
}}
* Option/accessory.111
Pinch protection (auto-stop)The laminated panoramic roof has a pinch pro- tection feature that is triggered if the glass sec-tion of the roof and/or the sun shade is blockedin any way when being closed. In this case, thelaminated panoramic roof and/or sun shade willstop and reverse automatically approximately 2 in.(5 cm) from the point at which it was blocked (orwill open fully to the tilt position). The pinch protection feature also functions when the laminated panoramic roof and/or sun shadeis being opened.
WARNING
If the pinch protection (auto-stop) feature has been triggered, the laminated panoramic roofand/or sun shade can still be operated once more within 10 seconds without pinch pro-
tection . Pinch protection can be overridden if
the closing procedure has been interrupted (e.g., due to ice around the laminated panor-amic roof) by pressing and holding the controlforward/downward until the laminated panor-amic roof and/or sun shade is closed.
Power windows
All power windows can be operated using the control panel in the driver's door. The controlpanels in the other doors only operate the win-dow in the respective doors.
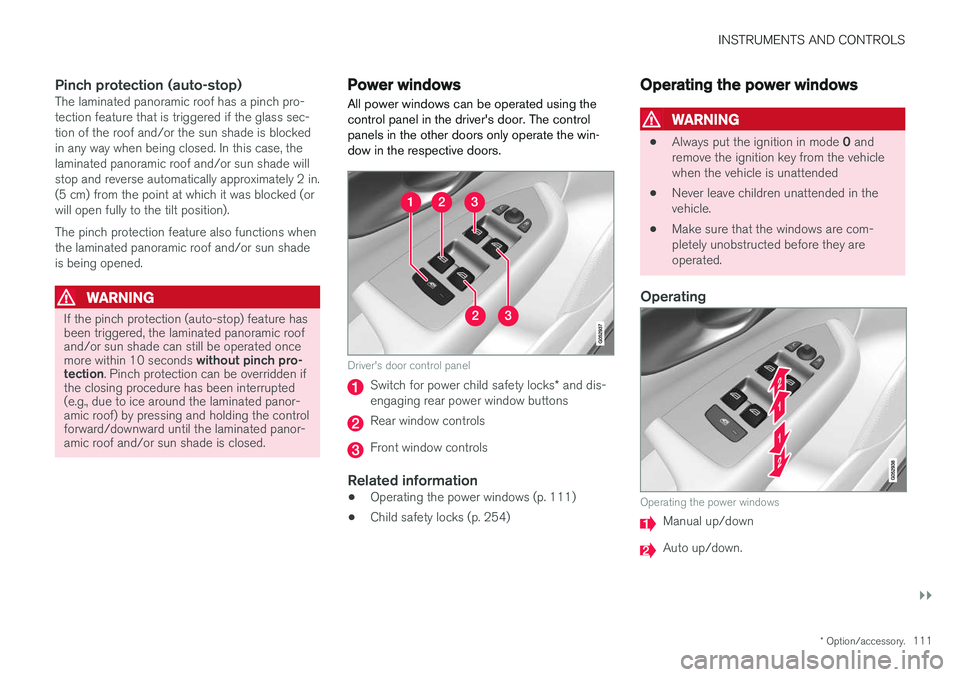
Driver's door control panel
Switch for power child safety locks * and dis-
engaging rear power window buttons
Rear window controls
Front window controls
Related information
• Operating the power windows (p. 111)
• Child safety locks (p. 254)
Operating the power windows
WARNING
•
Always put the ignition in mode
0 and
remove the ignition key from the vehicle when the vehicle is unattended
• Never leave children unattended in thevehicle.
• Make sure that the windows are com-pletely unobstructed before they areoperated.
Operating
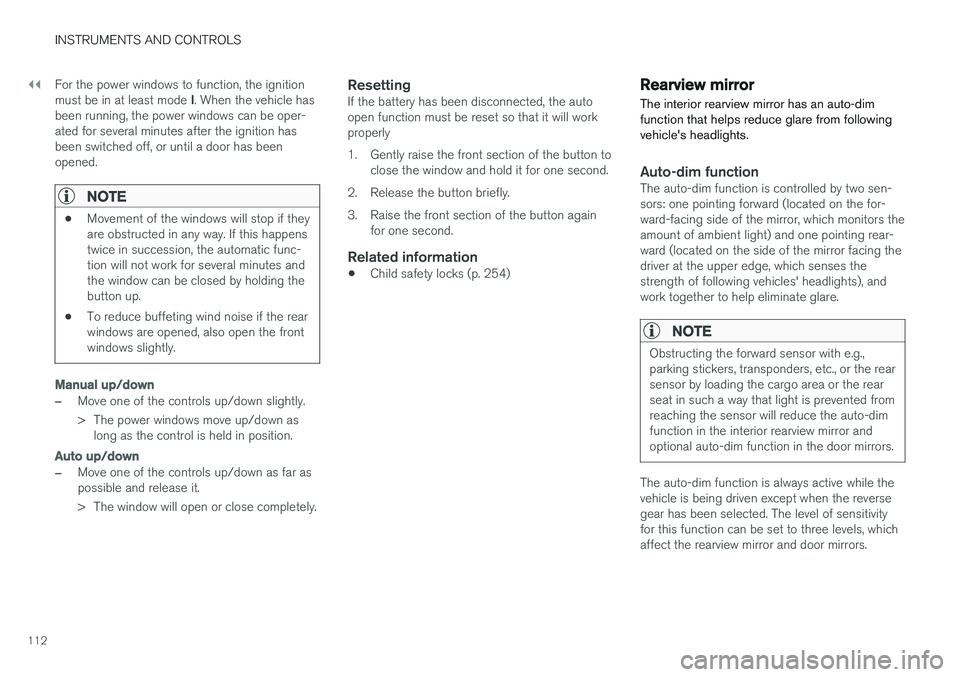
Operating the power windows
Manual up/down
Auto up/down.
Page 114 of 580
||
INSTRUMENTS AND CONTROLS
112For the power windows to function, the ignition must be in at least mode
I. When the vehicle has
been running, the power windows can be oper- ated for several minutes after the ignition hasbeen switched off, or until a door has beenopened.
NOTE
• Movement of the windows will stop if they are obstructed in any way. If this happenstwice in succession, the automatic func-tion will not work for several minutes andthe window can be closed by holding thebutton up.
• To reduce buffeting wind noise if the rearwindows are opened, also open the frontwindows slightly.
Manual up/down
–Move one of the controls up/down slightly.
> The power windows move up/down as
long as the control is held in position.
Auto up/down
–Move one of the controls up/down as far as possible and release it.
> The window will open or close completely.
ResettingIf the battery has been disconnected, the auto open function must be reset so that it will workproperly
1. Gently raise the front section of the button to close the window and hold it for one second.
2. Release the button briefly.
3. Raise the front section of the button again for one second.
Related information
• Child safety locks (p. 254)
Rearview mirror The interior rearview mirror has an auto-dim function that helps reduce glare from followingvehicle's headlights.
Auto-dim functionThe auto-dim function is controlled by two sen- sors: one pointing forward (located on the for-ward-facing side of the mirror, which monitors theamount of ambient light) and one pointing rear-ward (located on the side of the mirror facing thedriver at the upper edge, which senses thestrength of following vehicles' headlights), andwork together to help eliminate glare.
NOTE
Obstructing the forward sensor with e.g., parking stickers, transponders, etc., or the rearsensor by loading the cargo area or the rearseat in such a way that light is prevented fromreaching the sensor will reduce the auto-dimfunction in the interior rearview mirror andoptional auto-dim function in the door mirrors.
The auto-dim function is always active while the vehicle is being driven except when the reversegear has been selected. The level of sensitivityfor this function can be set to three levels, whichaffect the rearview mirror and door mirrors.
Page 115 of 580

INSTRUMENTS AND CONTROLS
}}
* Option/accessory.113
NOTE
When the level of sensitivity is changed, this change will not be noticeable immediately butwill take effect after a short period of time.
The level of sensitivity is set from the center dis- play: 1.
Tap
Settings in Top view.
2. Tap
My CarMirrors and Easy Entry.
3. Under
Rearview Mirror Auto Dimming,
select Normal, Dark or Light.
Related information
• Adjusting the power door mirrors (p. 106)
Using sun curtains
*
Both rear doors have integrated sun curtains.
Rear doors
Hook and locking mechanism
–Pull up the sun curtain and hook it to the upper section of the door frame.
The window can be opened/closed when the suncurtain is being used.
Related information
• Power windows (p. 111)
• Ignition modes (p. 389)
Settings view
The center display's Settings view is used to make many of the vehicle's function settings andto display vehicle-related information.
Opening Settings view
Top view with the Settings button
1. Pull down the tab on the upper edge of the
center display to open Top view.
2. Tap
Settings.
3. Tap one of the categories displayed and nav- igate to sub-categories and settings by tap- ping again.
4. Tap
Back to go back in Settings view.
Tap
Close to close Settings view.
Page 116 of 580
||
INSTRUMENTS AND CONTROLS
* Option/accessory.
114
Changing a setting
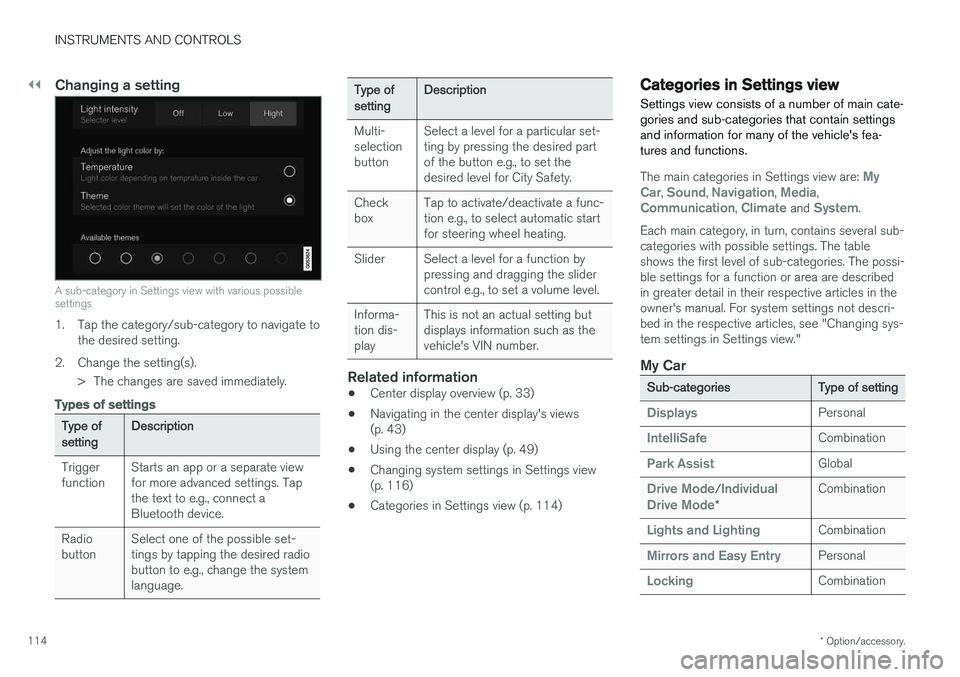
A sub-category in Settings view with various possible settings
1. Tap the category/sub-category to navigate to
the desired setting.
2. Change the setting(s). > The changes are saved immediately.
Types of settings
Type of setting Description
Trigger function Starts an app or a separate viewfor more advanced settings. Tapthe text to e.g., connect aBluetooth device.
Radiobutton Select one of the possible set-tings by tapping the desired radiobutton to e.g., change the systemlanguage.
Type of settingDescription
Multi- selectionbutton Select a level for a particular set-ting by pressing the desired partof the button e.g., to set thedesired level for City Safety.
Checkbox Tap to activate/deactivate a func-tion e.g., to select automatic startfor steering wheel heating.
Slider Select a level for a function by pressing and dragging the slidercontrol e.g., to set a volume level.
Informa-tion dis-play This is not an actual setting butdisplays information such as thevehicle's VIN number.
Related information
•
Center display overview (p. 33)
• Navigating in the center display's views (p. 43)
• Using the center display (p. 49)
• Changing system settings in Settings view(p. 116)
• Categories in Settings view (p. 114)
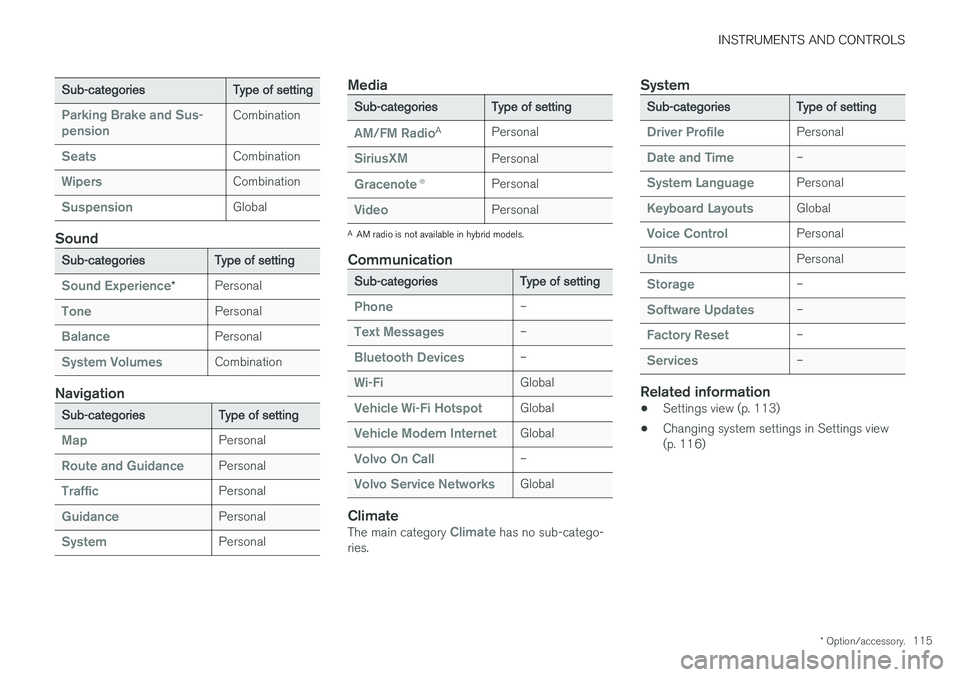
Categories in Settings view
Settings view consists of a number of main cate- gories and sub-categories that contain settingsand information for many of the vehicle's fea-tures and functions.
The main categories in Settings view are: My
Car, Sound, Navigation, Media,Communication, Climate and System.
Each main category, in turn, contains several sub- categories with possible settings. The tableshows the first level of sub-categories. The possi-ble settings for a function or area are describedin greater detail in their respective articles in theowner's manual. For system settings not descri-bed in the respective articles, see "Changing sys-tem settings in Settings view."
My Car
Sub-categories Type of setting
DisplaysPersonal
IntelliSafeCombination
Park AssistGlobal
Drive Mode/Individual
Drive Mode* Combination
Lights and LightingCombination
Mirrors and Easy EntryPersonal
LockingCombination
Page 117 of 580
INSTRUMENTS AND CONTROLS
* Option/accessory.115
Sub-categories Type of setting
Parking Brake and Sus- pensionCombination
SeatsCombination
WipersCombination
SuspensionGlobal
Sound
Sub-categoriesType of setting
Sound Experience*Personal
TonePersonal
BalancePersonal
System VolumesCombination
Navigation
Sub-categories
Type of setting
MapPersonal
Route and GuidancePersonal
TrafficPersonal
GuidancePersonal
SystemPersonal
Media
Sub-categoriesType of setting
AM/FM RadioA
Personal
SiriusXMPersonal
Gracenote ®Personal
VideoPersonal
A
AM radio is not available in hybrid models.
Communication
Sub-categories Type of setting
Phone–
Text Messages–
Bluetooth Devices–
Wi-FiGlobal
Vehicle Wi-Fi HotspotGlobal
Vehicle Modem InternetGlobal
Volvo On Call–
Volvo Service NetworksGlobal
ClimateThe main category Climate has no sub-catego-
ries.
System
Sub-categories Type of setting
Driver ProfilePersonal
Date and Time–
System LanguagePersonal
Keyboard LayoutsGlobal
Voice ControlPersonal
UnitsPersonal
Storage–
Software Updates–
Factory Reset–
Services–
Related information
•Settings view (p. 113)
• Changing system settings in Settings view (p. 116)
Page 131 of 580
INSTRUMENTS AND CONTROLS
129
Center
•Indicator and warning symbols
• Ambient temperature sensor
• Clock
• Messages (in certain cases also graphics)
• Door and seat belt status
• Hybrid battery charge information
• Media player
• Navigation system map
• Cell phone
• Voice control
• Compass
Right side
•Tachometer (depending on current driving mode)
• Hybrid gauge (depending on current drivingmode)
• Gear indicator
• Current driving mode (Hybrid, Off Road, Pure,Power and AWD)
• Fuel gauge
• Hybrid battery's charge level
• Driving distance to empty fuel tank
• Driving distance to discharged hybrid battery
• Current fuel consumption
• App menu (activated using the right-sidesteering wheel keypad)
Position for variable symbols
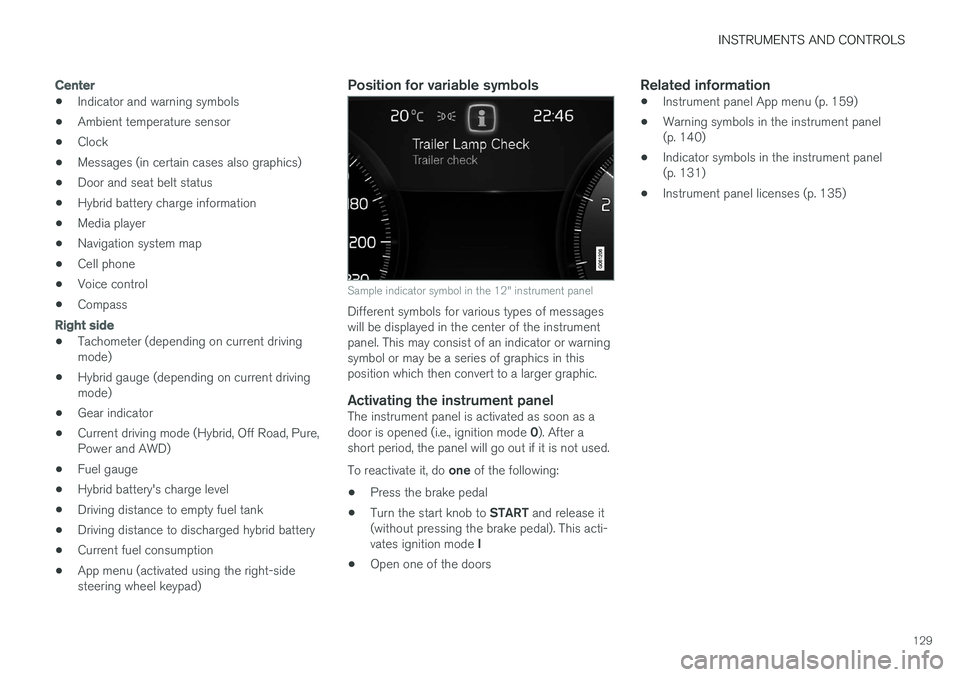
Sample indicator symbol in the 12" instrument panel
Different symbols for various types of messages will be displayed in the center of the instrumentpanel. This may consist of an indicator or warningsymbol or may be a series of graphics in thisposition which then convert to a larger graphic.
Activating the instrument panelThe instrument panel is activated as soon as a door is opened (i.e., ignition mode
0). After a
short period, the panel will go out if it is not used. To reactivate it, do one of the following:
• Press the brake pedal
• Turn the start knob to
START and release it
(without pressing the brake pedal). This acti- vates ignition mode I
• Open one of the doors
Related information
• Instrument panel App menu (p. 159)
• Warning symbols in the instrument panel (p. 140)
• Indicator symbols in the instrument panel(p. 131)
• Instrument panel licenses (p. 135)
Page 134 of 580
||
INSTRUMENTS AND CONTROLS
132
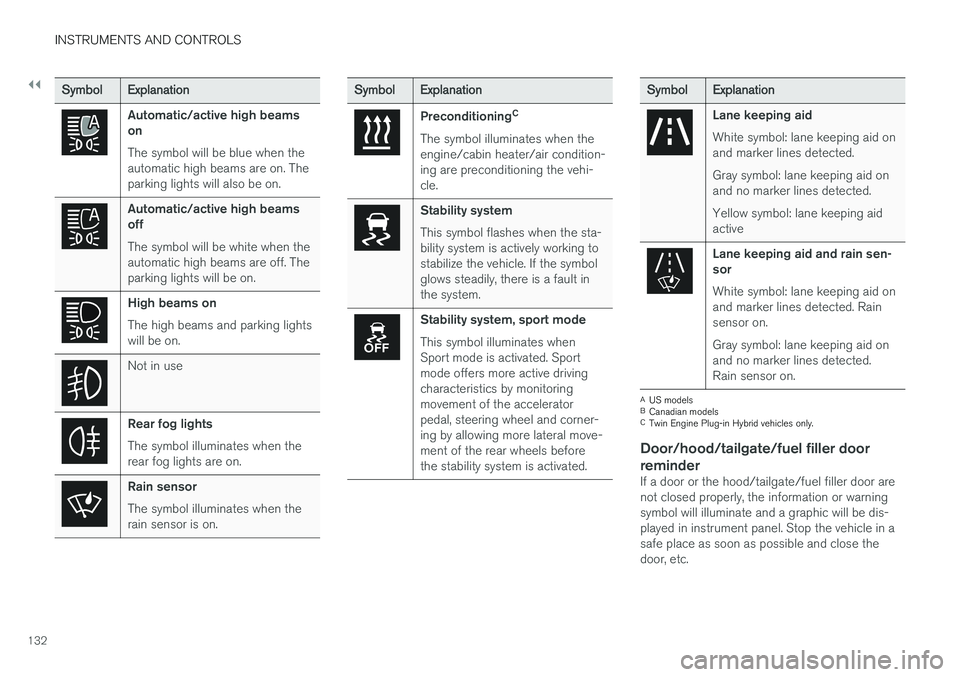
SymbolExplanation
Automatic/active high beams on The symbol will be blue when the automatic high beams are on. Theparking lights will also be on.
Automatic/active high beams off The symbol will be white when the automatic high beams are off. Theparking lights will be on.
High beams on The high beams and parking lights will be on.
Not in use
Rear fog lights The symbol illuminates when the rear fog lights are on.
Rain sensor The symbol illuminates when the rain sensor is on.
SymbolExplanation
Preconditioning C
The symbol illuminates when the engine/cabin heater/air condition-ing are preconditioning the vehi-cle.
Stability system This symbol flashes when the sta- bility system is actively working tostabilize the vehicle. If the symbolglows steadily, there is a fault inthe system.
Stability system, sport mode This symbol illuminates when Sport mode is activated. Sportmode offers more active drivingcharacteristics by monitoringmovement of the acceleratorpedal, steering wheel and corner-ing by allowing more lateral move-ment of the rear wheels beforethe stability system is activated.
Symbol Explanation
Lane keeping aid White symbol: lane keeping aid on and marker lines detected. Gray symbol: lane keeping aid on and no marker lines detected. Yellow symbol: lane keeping aid active
Lane keeping aid and rain sen- sor White symbol: lane keeping aid on and marker lines detected. Rainsensor on. Gray symbol: lane keeping aid on and no marker lines detected.Rain sensor on.
A
US models
B Canadian models
C Twin Engine Plug-in Hybrid vehicles only.
Door/hood/tailgate/fuel filler door
reminder
If a door or the hood/tailgate/fuel filler door are not closed properly, the information or warningsymbol will illuminate and a graphic will be dis-played in instrument panel. Stop the vehicle in asafe place as soon as possible and close thedoor, etc.
Page 135 of 580
INSTRUMENTS AND CONTROLS
}}
133
Related information
•Instrument panel (p. 128)
• Warning symbols in the instrument panel (p. 140)
• Door and seat belt reminders (p. 68)
Hybrid-related information in the instrument panel
Different types of information will be displayed in the instrument panel, depending on the drivemode selected. These drive modes offer uniqueways of helping the driver achieve the best pos-sible driving economy. The vehicle also stores driving statistics that can be viewed in the form of a bar graph.
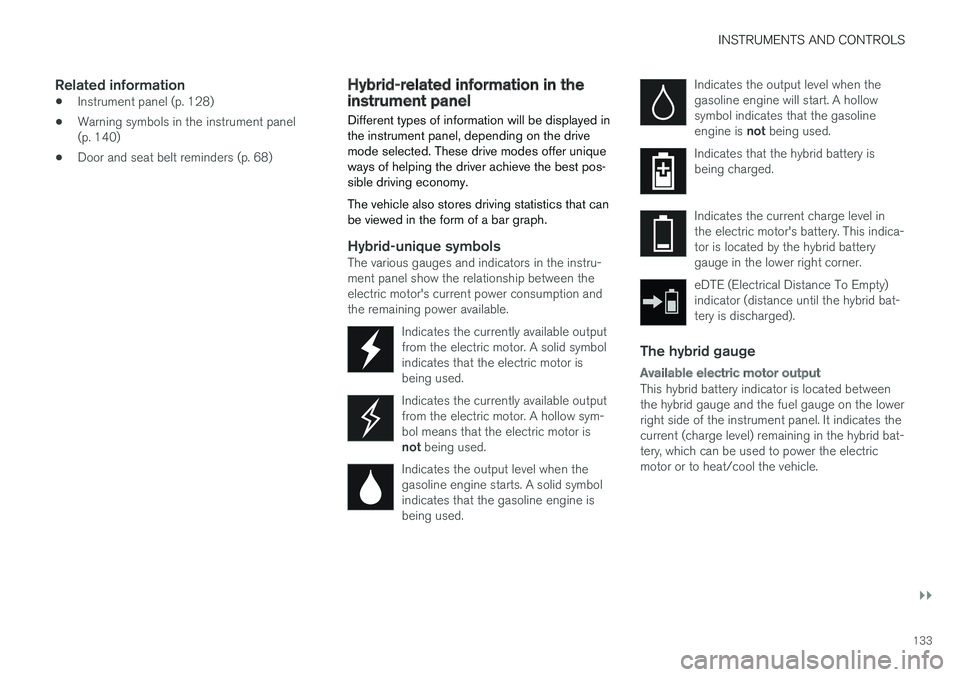
Hybrid-unique symbolsThe various gauges and indicators in the instru- ment panel show the relationship between theelectric motor's current power consumption andthe remaining power available.
Indicates the currently available outputfrom the electric motor. A solid symbolindicates that the electric motor isbeing used.
Indicates the currently available output from the electric motor. A hollow sym-bol means that the electric motor is not being used.
Indicates the output level when the gasoline engine starts. A solid symbolindicates that the gasoline engine isbeing used.
Indicates the output level when the gasoline engine will start. A hollowsymbol indicates that the gasoline engine is not being used.
Indicates that the hybrid battery is being charged.
Indicates the current charge level in the electric motor's battery. This indica-tor is located by the hybrid batterygauge in the lower right corner.
eDTE (Electrical Distance To Empty) indicator (distance until the hybrid bat-tery is discharged).
The hybrid gauge
Available electric motor output
This hybrid battery indicator is located between the hybrid gauge and the fuel gauge on the lowerright side of the instrument panel. It indicates thecurrent (charge level) remaining in the hybrid bat-tery, which can be used to power the electricmotor or to heat/cool the vehicle.