ECO mode VOLVO XC90 TWIN ENGINE 2018 Manual PDF
[x] Cancel search | Manufacturer: VOLVO, Model Year: 2018, Model line: XC90 TWIN ENGINE, Model: VOLVO XC90 TWIN ENGINE 2018Pages: 686, PDF Size: 17 MB
Page 478 of 686

STARTING AND DRIVING
476Towing using a towline
This section refers to one vehicle being towed
behind another using a towline.
Twin Engine vehicles may not be towed behind
another vehicle due to the risk of damage to the
electric motor. If the vehicle cannot be driven and
needs to be moved, it must be transported on a
tow truck with all four wheels on the bed of the
truck.
Towing another vehicleTowing another vehicle requires a lot of power -
use the AWD drive mode. This helps charge the
hybrid battery and improve the vehicle's driving
and roadholding characteristics.
Before towing another vehicle, check applicable
speed limit regulations.
Jump startingDo not tow the vehicle to start the engine. Use an
auxiliary battery if the start battery's charge level
is so low that the engine cannot be started.
CAUTION Attempts to tow-start the vehicle could cause
damage to the electrical drive motor and
three-way catalytic converter.
Related information
•
Attaching and removing the towing eyelet
(p. 476)
• Hazard warning flashers (p. 161)
• Recovery (p. 477)
• Jump starting using another battery (p. 469)
• Selecting ignition mode (p. 428) Attaching and removing the towing
eyelet
Use the towing eyelet to tow another vehicle.
Screw the towing eyelet securely into place in
the threaded outlet behind the cover on the
right-hand side of the rear bumper.
NOTE If the vehicle is equipped with a towbar, there
is no rear attachment for the towing eye.
Attaching the towing eyelet
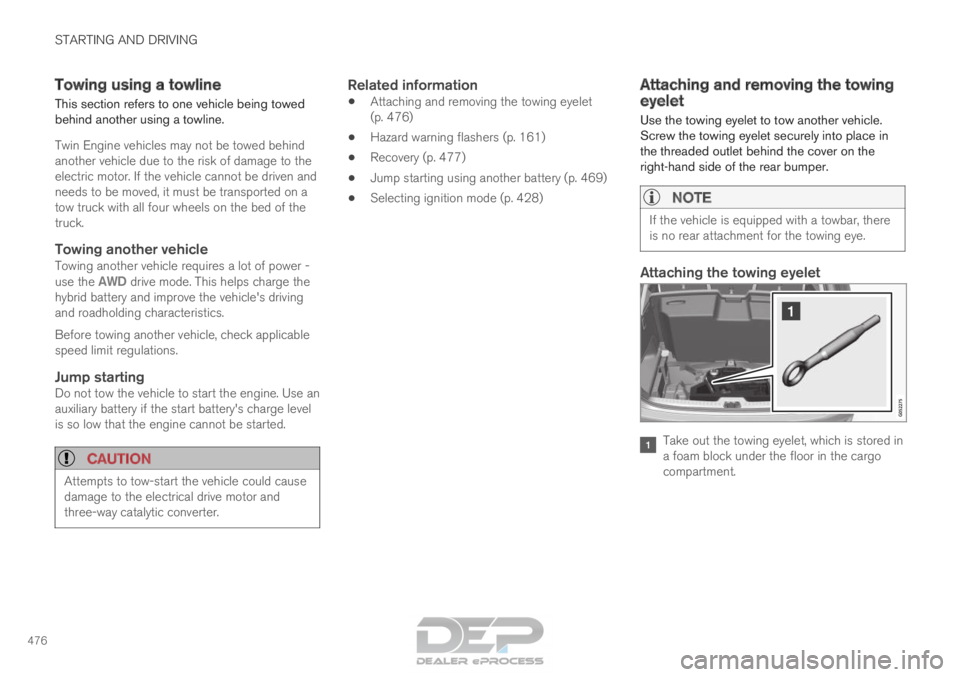
Take out the towing eyelet, which is stored in
a foam block under the floor in the cargo
compartment.
Page 482 of 686

||STARTING AND DRIVING
* Option/accessory.
480 www.HomeLink.com, www.youtube.com/
HomeLinkGentex or call 1-800-355-3515.
Programming individual buttons
To program an individual HomeLink
®
button:
1. Press and hold the desired button for about 20 seconds.
2. When the indicator light on HomeLink ®
starts flashing slowly, it is possible to pro-
gram as usual.
Note: If the button you are reprogramming
does not program with a new device, it will
return to the previously saved programming.
Resetting the HomeLink ®
buttons
It is only possible to reset all HomeLink ®
buttons
at once. It is not possible to reset individual but-
tons. Individual buttons can only be reprogram-
med.
– Press and hold the outer buttons (1 and 3)
on HomeLink ®
for about 10 seconds.
>
When the indicator light goes from a
steady glow to flashing, the buttons have
been reset and are ready for reprogram-
ming.
Related information
• Using HomeLink (p. 480)
• HomeLink ®
* (p. 478)
• Type approval for HomeLink ®
* (p. 481) Using HomeLink
Once HomeLink ®
is programmed, it can be
used instead of the separate remote controls.
Press and hold the programming button. The
garage door, gate, alarm system, etc. will be acti-
vated (this may take several seconds). If the but-
ton is held down for more than 20 seconds,
reprogramming will begin. The indicator light will
glow steadily or flash when the button has been
pressed. The original remote controls may be
used concurrently with HomeLink ®
if desired.
NOTE If the ignition is off, HomeLink
®
works for
30 minutes after the driver's door has been
opened.
WARNING •
If you use HomeLink ®
to open a garage
door or gate, be sure no one is near the
gate or door while it is in motion.
• Do not use HomeLink ®
with any garage
door opener that lacks safety stop and
reverse features as required by US fed-
eral safety standards (this includes any
garage door opener model manufactured
before April 1, 1982). A garage door that
cannot detect an object - signaling the
door to stop and reverse - does not meet
current U.S. federal safety standards. For
more information, contact HomeLink at:
www.homelink.com.
Related information
• HomeLink ®
* (p. 478)
• Programming HomeLink ®
* (p. 479)
• Type approval for HomeLink ®
* (p. 481)
Page 497 of 686

AUDIO, MEDIA AND INTERNET
495
The IBOC system is referred to as a "hybrid"
since it is both analog and digital. During hybrid
operation, receivers still continue to receive the
analog (non-digital) signal. HD Radio receivers
incorporate both modes of reception, where the
receiver will automatically switch to the analog
signal if the digital signal cannot be decoded or
is lost by the receiver.
When you have tuned to an HD Radio station, the
symbol will appear in the infotainment sys-
tem display. The symbol will be displayed in dif-
ferent colors:
• Grayed-out symbol: No HD Radio broad-
cast reception
• White symbol: the radio is actively receiving
an HD broadcast
• Orange symbol: the radio is receiving an
HD broadcast with digital sound
More information about HD Radio and IBOC can
be found on DTS, Inc.'s website, www.dts.com.
Artist Experience™A radio station's logo and album art can be dis-
played. If a station opts to provide this informa-
tion, it is broadcast once every 12 minutes, which
means that there may be a delay before the
logo/album art appear on the screen. The radio
can store 100 station logos so the next time the
radio is tuned to the same station, the logo will
be displayed immediately. Album art is synched
with the artist that you are currently listening to.
Ball game modeThis feature means that a main FM station (HD1)
will broadcast live events, where the content of
the programming is more important than sound
quality, in analog mode only to help prevent the
delay between analog and digital broadcasting.
The HD Radio symbol will be white during live
broadcasts and "Live" will be displayed next to
the symbol.
Benefits of digital broadcasting
• Better sound (FM sounds near CD quality).
• Some FM frequencies offer a greater num-
ber of listening choices through "multicast-
ing" (consisting of a frequency's main chan-
nel and any sub-channels that may also be
available on that particular frequency.)
• When receiving a digital signal there is no
multipath disturbance or hisses/pops/crack-
ling due to outside influences.
How HD Radio ™ Technology
broadcasting works
HD Radio works similarly to conventional radio
and broadcasts of this type are available in many
areas of the United States. However, there are a
few key differences:
• Instead of transmitting one analog signal,
stations send out a bundled signal - both
analog and digital.
• An HD Radio receiver can receive both digi-
tal and analog broadcasts. Depending on the terrain and location of the vehicle (which will
influence the signal strength), the receiver
will determine which signal to receive.
Related information
•
Radio (p. 490)
• Activating and deactivating the HD Radio™
(p. 496)
• HD Radio™ sub-channels (p. 496)
• HD Radio™ limitations (p. 497)
• Changing waveband and radio station
(p. 491)
• Searching for a radio station (p. 492)
Page 499 of 686

AUDIO, MEDIA AND INTERNET
497
Selecting sub-channels
To listen to a station's sub-channel(s), tap the
station on the screen or press the forward/back
arrow keys on the right-side steering wheel key-
pad or below the screen.
Sub-channels can also be saved as radio favor-
ites.
If you tap a sub-channel favorite, it may take up
to 6 seconds before the channel becomes audi-
ble. If you tap a station while you are out of digital
range of the transmitter, No reception will be
displayed.
Related information
• HD Radio™ (p. 494)
• Activating and deactivating the HD Radio
™
(p. 496)
• Changing waveband and radio station
(p. 491)
• Searching for a radio station (p. 492)
• HD Radio™ limitations (p. 497) HD Radio
™ limitations
Limitations
•
Main channel vs. sub-channels (FM only):
The main channel is the only channel that
can receive in hybrid mode (both digital and
analog). If a frequency has sub-channels,
they are broadcast in digital mode only. The
main FM channel will be displayed as, for
example, "WRIF-FM HD1". The sub-FM
channels will be displayed as"WRIF-FM
HD2", "WRIF-FM HD3", etc.
• Reception coverage area: Due to current
IBOC transmitter power limitations, the
reception coverage area in digital mode is
somewhat more limited than the station's
analog coverage area. Be aware that, like all
radio transmission technology, terrain, time of
day, vegetation and buildings can have a
positive or negative effect on radio reception.
• Analog to digital/digital to analog blend-
ing: Analog to digital blending will occur as
the signal strength reaches a preset thresh-
old in the receiver. This will be noticeable in
fringe areas (areas with weak reception) and
is normal.
NOTE There may be a noticeable difference in
sound quality when a change from analogue
to digital or digital to analogue occurs, such
as:
• Volume increase or decrease
• Equalizer settings, i.e., Bass/ Midrange/
Treble cut or boost
• Time alignment (Digital program material
in extreme cases can be as much as 8
seconds behind the analogue). This will
noticeable as a "stuttering" effect.
The above items are dependant on the
broadcaster's equipment settings and do
not indicate a fault in the vehicle's radio
receiver or antenna systems.
Related information
• HD Radio™ (p. 494)
• Activating and deactivating the HD Radio™
(p. 496)
• HD Radio
™
sub-channels (p. 496)
Page 519 of 686

AUDIO, MEDIA AND INTERNET
* Option/accessory.517
Related information
•Apple ®
CarPlay ®
* (p. 515)
• Using Apple ®
CarPlay ®
* (p. 515)
• Resetting center display settings (p. 135) Tips for using Apple
®
CarPlay ®
*
Here are some useful tips for when you use
CarPlay ®
.
• Update your iPhone with the latest version of
iOS operating system and ensure that the
apps have been updated.
• In the event of a problem with CarPlay, dis-
connect the phone from the USB port and
reconnect. Otherwise, try to close the app on
the phone that is not working and then
restart the app, or try closing all apps and
restart your phone.
• If the apps do not appear when CarPlay
starts (black screen), try minimizing and
expanding the tile for CarPlay.
• Using apps that are not compatible with
CarPlay may sometimes mean that the con-
nection between the phone and the car is
broken. Information about supported apps
and compatible phone models can be found
on Apple's website. You can also search for
CarPlay in the App Store to find information
about apps that are compatible with CarPlay
in your market.
• CarPlay only works with iPhone 9
.NOTE Availability and functionality can vary depend-
ing on market.
Related information
•
Apple ®
CarPlay ®
* (p. 515) 8
Apple and CarPlay are registered trademarks of Apple Inc..
9 Apple, CarPlay and iPhone are registered trademarks owned by Apple Inc.
Page 552 of 686

WHEELS AND TIRES
550Tires
The function of the tires is to carry loads, provide
traction on road surfaces, reduce vibrations and
protect the wheels from wear. The tires significantly influence the vehicle's driv-
ing characteristics. The type, dimensions, tire
pressure and speed rating have a considerable
impact on how the vehicle performs.
Your vehicle is equipped with tires according to
the vehicle's tire information placard on the B-pil-
lar (the structural member at the side of the vehi-
cle, at the rear of the driver's door opening).
WARNING A damaged tire could cause the driver to lose
control of the vehicle.
CAUTION Some Volvo models are equipped with an
Ultra High Performance tire and wheel com-
bination designed to provide maximum dry
pavement performance with consideration for
hydroplaning resistance. They may be more
susceptible to road hazard damage and,
depending on driving conditions, may achieve
a tread life of less than 30,000 km (20,000
miles). Even if this vehicle is equipped with
Volvo's advanced AWD or stability system,
these tires are not designed for winter driving,
and should be replaced with winter tires when
weather conditions dictate.
The tires have good road holding characteristics
and offer good handling on dry and wet surfaces.
It should be noted however that the tires have
been developed to give these features on snow/
ice-free surfaces.
Most models are equipped with "all-season" tires,
which provide a somewhat higher degree of road-
holding on slippery road surfaces than tires with-
out the "all-season" rating. However, for optimal
roadholding on icy or snow-covered roads, we
recommend snow tires on all four wheels.
When replacing tires, be sure that the new tires
are the same size designation, type (radial) and
preferably from the same manufacturer, on allfour wheels. Otherwise there is a risk of altering
the vehicle's roadholding and handling characte-
ristics.
Recommended tiresOn delivery, the car is equipped with Volvo origi-
nal tires that have the VOL
1
marking on the side
of the tires. These tires have been designed spe-
cifically for your vehicle. It is therefore important
when replacing tires that the new tires have this
same marking to help maintain the vehicle's driv-
ing characteristics, comfort and fuel consumption.
New tires Tires are perishable goods. After a few years,
they will begin to harden and their friction proper-
ties will gradually deteriorate. Always replace tires
with the freshest tires possible. This is particularly
important for snow tires. A series of numbers is
1
This may vary for certain tire dimensions.
Page 553 of 686

WHEELS AND TIRES
}}
551
imprinted on the sidewall of the tire. The last four
digits in the series is the Department of
Transportation (DOT) stamp and indicates the
week and year the tire was manufactured. The
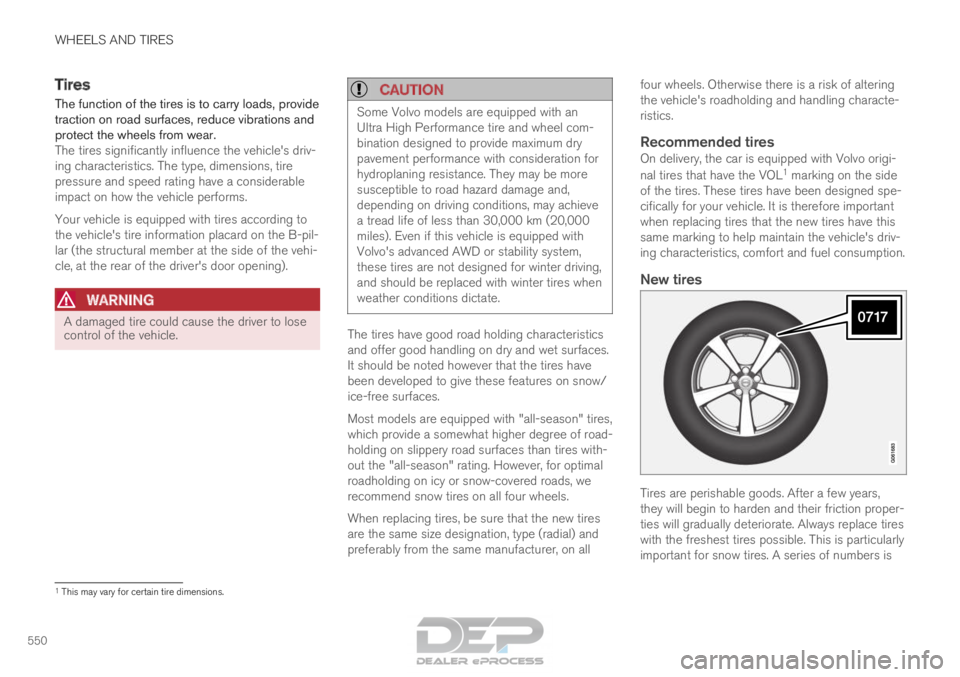
tire in the illustration has 0717 as the last four
digits, which means it was manufactured week 7
of 2017.
Tire ageTires degrade over time, even when they are not
being used. It is recommended that tires gener-
ally be replaced after 6 years of normal service.
Heat caused by hot climates, frequent high load-
ing conditions or Ultra Violet (U.V.) exposure can
accelerate the aging process. The temporary
spare
2
should also be replaced at 6-year inter-
vals, even if it has never been used. A tire with
e.g., visible cracks or discoloration should be
replaced immediately.
Tire economy
• Maintain correct tire pressure.
• Avoid fast starts, hard braking and tire
screeching.
• Tire wear increases with speed.
• Correct front wheel alignment is very impor-
tant.
• Unbalanced wheels impair tire economy and
driving comfort. •
Tires must maintain the same direction of
rotation throughout their lifetime.
• When replacing tires, the tires with the most
tread should be mounted on the rear wheels
to reduce the chance of oversteer during
hard braking.
• Hitting curbs or potholes can damage the
tires and/or wheels permanently.
Tire rotationYour vehicle has no required tire rotation. Driving
style, tire pressure, climate and road conditions
affect how quickly the tires age and exhibit signs
of wear. Maintaining the correct tire pressure
helps keep tread wear evenly distributed.
To help prevent differences in tread depth and
wear patterns forming on the tires, the front and
rear wheels should be rotated, i.e. the front tires
moved to the rear and the rear tires moved to the
front. Ideally, tire rotation should be done the first
time after approximately 5000 km (ca
3100 miles) and thereafter at 10,000 km
(approx. 6200 miles) intervals.
If you have any questions regarding tread depth,
Volvo recommends consulting an authorized
Volvo workshop. If significant differences in wear
(> 1 mm difference in tread depth) between the
tires have already occurred, the least worn tires
should always be mounted on the rear wheels. A
front-wheel skid (understeer) is usually easier to control than a rear-wheel skid (oversteer). If the
front wheels skid, the vehicle will continue in a
straight line instead of the rear wheels skidding
to the side, which could cause you to completely
lose control of the vehicle. It is therefore impor-
tant that the rear wheels never lose grip before
the front wheels.
Storing wheels and tiresWhen storing complete wheels (tires mounted on
rims), they should be suspended off the floor or
placed on their sides on the floor.
Tires not mounted on rims should be stored on
their sides or standing upright, but should not be
suspended.
CAUTION
Tires should preferably be stored in a cool,
dry, dark place, and should never be stored in
close proximity to solvents, gasoline, oils, etc.
2
Not available on all models.
Page 559 of 686

WHEELS AND TIRES
* Option/accessory.557
Checking tire pressure
Correct inflation pressure helps improve driving
stability, save fuel and increase the service life of
the tires.
Tire pressure decreases over time, which is nor-
mal. Tire pressure also varies depending on the
ambient temperature. Driving on under-inflated
tires could cause the vehicle to overheat and lead
to damage. Tire pressure affects traveling com-
fort, road noise and driving characteristics.
Check the pressure in the tires every month. Use
the recommended inflation pressure for cold tires
for optimal tire performance and wear. Under-
inflated or over-inflated tires could cause uneven
tread wear.
Use an air pressure gauge and check the infla-
tion pressure on all the tires, including the spare
tire 4
, at least once a month and before long trips.
Volvo strongly recommends buying a reliable air
pressure gauge, as the automatic gauges provi-
ded at service stations may be inaccurate.
WARNING •
Under-inflation is the most common
cause of tire failure and may result in
severe tire cracking, tread separation, or
"blow-out," with unexpected loss of vehi-
cle control and increased risk of injury.
• Under-inflated tires reduce the load car-
rying capacity of your vehicle.
Cold tiresInflation pressure should be checked when the
tires are cold.
The tires are considered to be cold when they
have the same temperature as the surrounding
(ambient) air.
This temperature is normally reached after the
vehicle has been parked for at least 3 hours.
After driving for approximately 1.6 km (1 mile),
the tires are considered to be warm. If you need
to drive longer than that to inflate the tires, check
and record the inflation pressure of the tires first
and inflate accordingly when you arrive at the
pump.
When the ambient temperature changes, so does
the inflation pressure. A 10-degree temperature
drop causes a corresponding drop in inflation
pressure of 1 psi (7 kPa). Check the inflation
pressure of the tires regularly and adjust to the correct pressure, which can be found on the vehi-
cle's tire information placard or certification label.
If you check inflation pressure when the tires are
warm, you should never release air. The tires
become warm after driving and it is normal for
warm tires to have an inflation pressure above
the recommended pressure for cold tires. A warm
tire with an inflation pressure equal to or under
the recommended pressure for cold tires could
be significantly under-inflated.Related information
•
Adjusting tire pressure (p. 558)
• Recommended tire pressure (p. 559)
• Tire pressure monitoring system* (p. 559)
• Tires (p. 550) 4
Not available in all models.
Page 560 of 686

WHEELS AND TIRES
558Adjusting tire pressure
Tire pressure decreases over time, which is nor-
mal. The tire pressure must therefore be
adjusted to maintain the recommended tire pres-
sure.
Use the recommended inflation pressure for cold
tires for optimal tire performance and wear.
NOTE To help prevent incorrect inflation pressure,
pressure should be checked when the tires
are cold. The tires are considered to be cold
when they have reached the same tempera-
ture as the ambient temperature (about 3
hours after the vehicle was last driven). After
driving for a few kilometers, the tires will warm
up and the pressure will increase.
1. Remove the valve cap from the tire and press
the air pressure gauge firmly onto the valve.
2.
Inflate to the recommended inflation pres-
sure. 3. Screw the valve cap back on.
NOTE •
After inflating a tire, always replace the
valve cap to help prevent valve damage
caused by gravel, dirt, etc.
• Use plastic valve caps only. Metal caps
could corrode and become difficult to
remove. 4. Visually inspect the tire to make sure there
are no nails or other embedded objects that
could puncture the tire and cause air leak-
age.
5.
Check the sidewalls to make sure there are
no gouges, cuts, bulges or other irregulari-
ties.
6. Repeat this procedure for each tire, including the spare tire 5
.
NOTE If you have overfilled the tire, release air by
pushing on the metal stem in the center of
the valve. Then recheck the pressure with
your tire gauge.
Related information
•
Recommended tire pressure (p. 559)
• Checking tire pressure (p. 557)
• Inflate tires with the compressor included in
the tire sealing system (p. 577)
• Approved tire pressure (p. 665) 5
Not available on all models.
Page 561 of 686

WHEELS AND TIRES
}}
* Option/accessory. 559
Recommended tire pressure
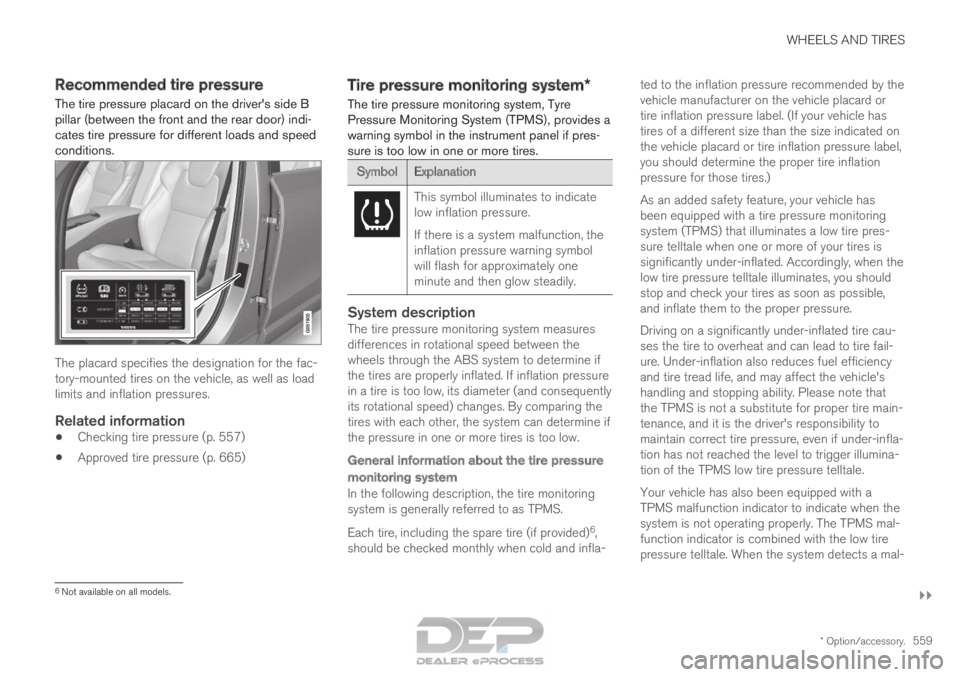
The tire pressure placard on the driver's side B
pillar (between the front and the rear door) indi-
cates tire pressure for different loads and speed
conditions. The placard specifies the designation for the fac-
tory-mounted tires on the vehicle, as well as load
limits and inflation pressures.
Related information
•
Checking tire pressure (p. 557)
• Approved tire pressure (p. 665) Tire pressure monitoring system*
The tire pressure monitoring system, Tyre
Pressure Monitoring System (TPMS), provides a
warning symbol in the instrument panel if pres-
sure is too low in one or more tires. Symbol
Explanation This symbol illuminates to indicate
low inflation pressure.
If there is a system malfunction, the
inflation pressure warning symbol
will flash for approximately one
minute and then glow steadily.
System descriptionThe tire pressure monitoring system measures
differences in rotational speed between the
wheels through the ABS system to determine if
the tires are properly inflated. If inflation pressure
in a tire is too low, its diameter (and consequently
its rotational speed) changes. By comparing the
tires with each other, the system can determine if
the pressure in one or more tires is too low.
General information about the tire pressure
monitoring system
In the following description, the tire monitoring
system is generally referred to as TPMS.
Each tire, including the spare tire (if provided)
6
,
should be checked monthly when cold and infla- ted to the inflation pressure recommended by the
vehicle manufacturer on the vehicle placard or
tire inflation pressure label. (If your vehicle has
tires of a different size than the size indicated on
the vehicle placard or tire inflation pressure label,
you should determine the proper tire inflation
pressure for those tires.)
As an added safety feature, your vehicle has
been equipped with a tire pressure monitoring
system (TPMS) that illuminates a low tire pres-
sure telltale when one or more of your tires is
significantly under-inflated. Accordingly, when the
low tire pressure telltale illuminates, you should
stop and check your tires as soon as possible,
and inflate them to the proper pressure.
Driving on a significantly under-inflated tire cau-
ses the tire to overheat and can lead to tire fail-
ure. Under-inflation also reduces fuel efficiency
and tire tread life, and may affect the vehicle's
handling and stopping ability. Please note that
the TPMS is not a substitute for proper tire main-
tenance, and it is the driver's responsibility to
maintain correct tire pressure, even if under-infla-
tion has not reached the level to trigger illumina-
tion of the TPMS low tire pressure telltale.
Your vehicle has also been equipped with a
TPMS malfunction indicator to indicate when the
system is not operating properly. The TPMS mal-
function indicator is combined with the low tire
pressure telltale. When the system detects a mal-
6
Not available on all models.