VOLVO XC90 TWIN ENGINE 2019 Owners Manual
Manufacturer: VOLVO, Model Year: 2019, Model line: XC90 TWIN ENGINE, Model: VOLVO XC90 TWIN ENGINE 2019Pages: 697, PDF Size: 10.33 MB
Page 491 of 697
STARTING AND DRIVING
}}
* Option/accessory. 489
Recovery
This section refers to transporting the vehicle
with a tow truck or similar vehicle.
Call a professional towing service for assistance.
In certain conditions, the towing eyelet can be
used to pull the vehicle onto a flatbed tow truck.
CAUTION Note that vehicles with Twin Engine must
always be towed raised with all wheels on the
tow truck.
For vehicles equipped with leveling control*:
If the vehicle is equipped with pneumatic suspen-
sion, this feature must be turned off before the
vehicle is lifted onto a tow truck. Turning off the
function in the center display.
1. Tap Settings in the Top view.
2.
Tap My Car Parking Brake and
Suspension .
3. Select Disable Leveling Control.
The vehicle's location and ground clearance
determine if it can be lifted onto a tow truck. If
the incline of the tow truck is too steep or if the
ground clearance under the vehicle is insufficient,
attempting to pull it up may result in damage. In
this case, the vehicle should only be lifted with
the tow truck's lifting equipment.
WARNING No person or object should be behind the tow
truck when the vehicle is lifted onto the bed
of the truck.
Related information
Attaching and removing the towing eyelet
(p. 488) HomeLink
®
*10
HomeLink ®11
is a programmable remote control,
integrated in the vehicle electrical system, that
can control up to three different devices (e.g.
garage door opener, alarm system, outdoor and
indoor lighting) and thereby replace the remote
controls for these.
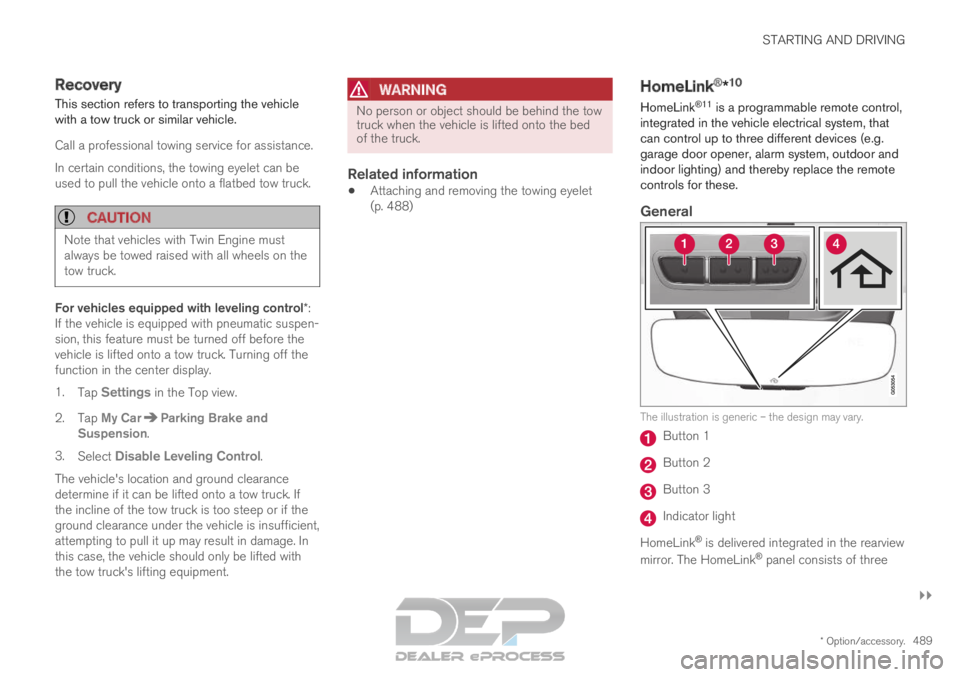
General The illustration is generic – the design may vary.
Button 1
Button 2
Button 3
Indicator light
HomeLink ®
is delivered integrated in the rearview
mirror. The HomeLink ®
panel consists of three
Page 492 of 697
||STARTING AND DRIVING
* Option/accessory.
490 programmable buttons and an indicator light in
the mirror.
For more information about HomeLink
®
, please
visit www.HomeLink.com, www.youtube.com/
HomeLinkGentex or call 1-800-355-3515.
Save the original remote controls for future pro-
gramming (e.g. for use in another vehicle). It is
also advisable to delete the button programming
if the vehicle is sold.
Related information
Using HomeLink ®
* (p. 491)
Programming HomeLink ®
* (p. 490)
Type approval for HomeLink ®
* (p. 492) Programming HomeLink
®
*12
Follow these instructions to program
HomeLink ®
, reset all programming, or program
individual buttons.
NOTE In some vehicles, the ignition must be on or in
the "accessory position" before HomeLink
®
can be programmed or used. It can be a good
idea to put new batteries in the remote con-
trol being replaced by HomeLink ®
for faster
programming and better radio signal trans-
mission. The HomeLink ®
buttons should be
reset before programming.
WARNING While HomeLink
®
is being programmed, the
garage door or gate being programmed may
be activated. Make sure that no one is near
the door or gate during programming. When
programming a garage door opener, it is
advised to park outside of the garage. 1.
Point the remote control at the HomeLink ®
button to be programmed and hold it about
2-8 cm (1-3 inches) from the button. Do not
obstruct the HomeLink ®
indicator light.
Note: Some remote controls are more effec-
tive at programming HomeLink ®
from a dis-
tance of about 15-20 cm (6-12 inches). Try
moving the remote control closer or further
away if you are experiencing any difficulties
programming.
2.
Press and hold both the remote control but-
ton and the HomeLink ®
button to be pro-
grammed.
3. Do not release the buttons until the indicator light has stopped flashing slowly (about once
a second) and either flashes quickly (about
10 times a second) or glows steadily.
>Steady glow: Indication that program-
ming is complete. Press the programmed
button twice to activate.
Flashing quickly: The device being pro-
grammed with HomeLink ®
may have a
security function that requires an extra
step. Try pressing the programmed button
twice to see whether the programming
works. Otherwise, continue with the fol-
lowing steps. 10
Certain markets only.
11 HomeLink and the HomeLink house symbol are registered trademarks of Gent\
ex Corporation.
12 Certain markets only.
Page 493 of 697
STARTING AND DRIVING
}}
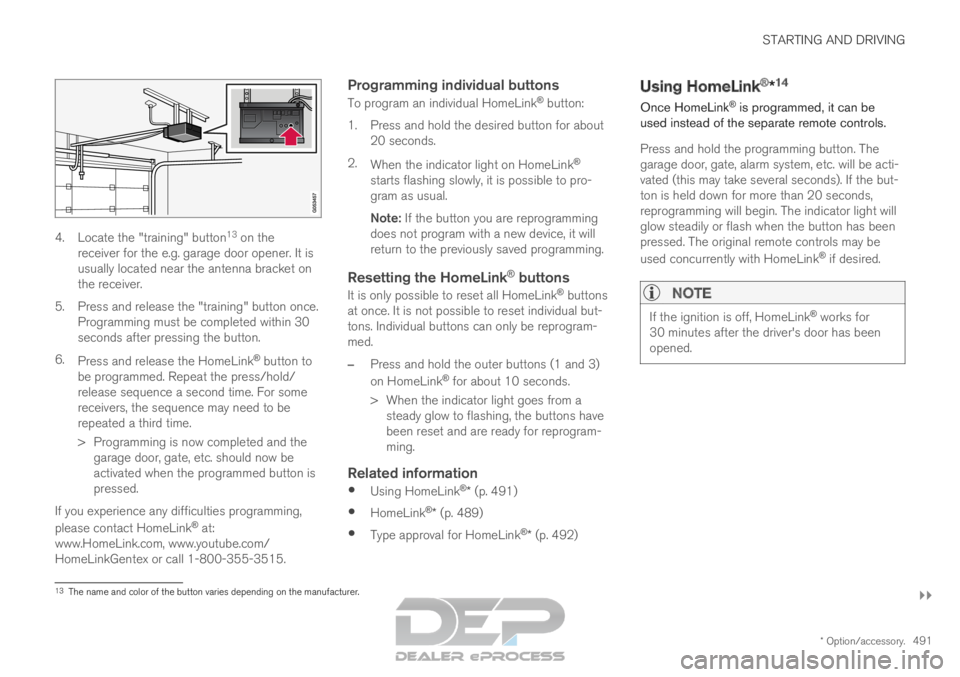
* Option/accessory. 4914. Locate the "training" button
13
on the
receiver for the e.g. garage door opener. It is
usually located near the antenna bracket on
the receiver.
5.
Press and release the "training" button once.
Programming must be completed within 30
seconds after pressing the button.
6. Press and release the HomeLink ®
button to
be programmed. Repeat the press/hold/
release sequence a second time. For some
receivers, the sequence may need to be
repeated a third time.
> Programming is now completed and the garage door, gate, etc. should now be
activated when the programmed button is
pressed.
If you experience any difficulties programming,
please contact HomeLink ®
at:
www.HomeLink.com, www.youtube.com/
HomeLinkGentex or call 1-800-355-3515.
Programming individual buttons
To program an individual HomeLink ®
button:
1. Press and hold the desired button for about 20 seconds.
2. When the indicator light on HomeLink ®
starts flashing slowly, it is possible to pro-
gram as usual.
Note: If the button you are reprogramming
does not program with a new device, it will
return to the previously saved programming.
Resetting the HomeLink ®
buttons
It is only possible to reset all HomeLink ®
buttons
at once. It is not possible to reset individual but-
tons. Individual buttons can only be reprogram-
med.
– Press and hold the outer buttons (1 and 3)
on HomeLink ®
for about 10 seconds.
>
When the indicator light goes from a
steady glow to flashing, the buttons have
been reset and are ready for reprogram-
ming.
Related information
Using HomeLink ®
* (p. 491)
HomeLink ®
* (p. 489)
Type approval for HomeLink ®
* (p. 492) Using HomeLink
®
*14
Once HomeLink ®
is programmed, it can be
used instead of the separate remote controls.
Press and hold the programming button. The
garage door, gate, alarm system, etc. will be acti-
vated (this may take several seconds). If the but-
ton is held down for more than 20 seconds,
reprogramming will begin. The indicator light will
glow steadily or flash when the button has been
pressed. The original remote controls may be
used concurrently with HomeLink ®
if desired.
NOTE If the ignition is off, HomeLink
®
works for
30 minutes after the driver's door has been
opened. 13
The name and color of the button varies depending on the manufacturer.
Page 494 of 697
||STARTING AND DRIVING
* Option/accessory.
492
WARNING
If you use HomeLink ®
to open a garage
door or gate, be sure no one is near the
gate or door while it is in motion.
Do not use HomeLink ®
with any garage
door opener that lacks safety stop and
reverse features as required by US fed-
eral safety standards (this includes any
garage door opener model manufactured
before April 1, 1982). A garage door that
cannot detect an object - signaling the
door to stop and reverse - does not meet
current U.S. federal safety standards. For
more information, contact HomeLink at:
www.homelink.com.
Related information
HomeLink ®
* (p. 489)
Programming HomeLink ®
* (p. 490)
Type approval for HomeLink ®
* (p. 492) Type approval for HomeLink
®
*15
FCC (USA) and IC (Canada)This device complies with FCC rules part 15 and
Industry Canada RSS-210. Operation is subject
to the following two conditions: (1) This device
may not cause harmful interference, and (2) This
device must accept any interference that may be
received including interference that may cause
undesired operation.
WARNING The transmitter has been tested and complies
with FCC and IC rules. Changes or modifica-
tions not expressly approved by the party
responsible for compliance could void the
user's authority to operate the device.
16
Type approval for EUGentex Corporation hereby declares that
HomeLink®
Model UAHL5 complies with the
Radio equipment directive 2014/53/EU.
Wavelengths within which the radio equipment
operates:
433.05MHz-434.79MHz <10mW E.R.P.
868.00MHz-868.60MHz <25mW E.R.P.
868.70MHz-868.20MHz <25mW E.R.P.
869.40MHz-869.65MHz <25mW E.R.P.
869.70MHz-870.00MHz <25mW E.R.P.
Certificate holder address: Gentex Corporation,
600 North Centennial Street, Zeeland MI 49464,
USA
For more information, see support.volvocars.com.
Related information
HomeLink ®
* (p. 489) 14
Certain markets only.
15 Certain markets only.
16 The term "IC:" before the certification/registration number only signifi\
es that Industry Canada technical specifications were met.
Page 495 of 697
STARTING AND DRIVING
}}
* Option/accessory. 493
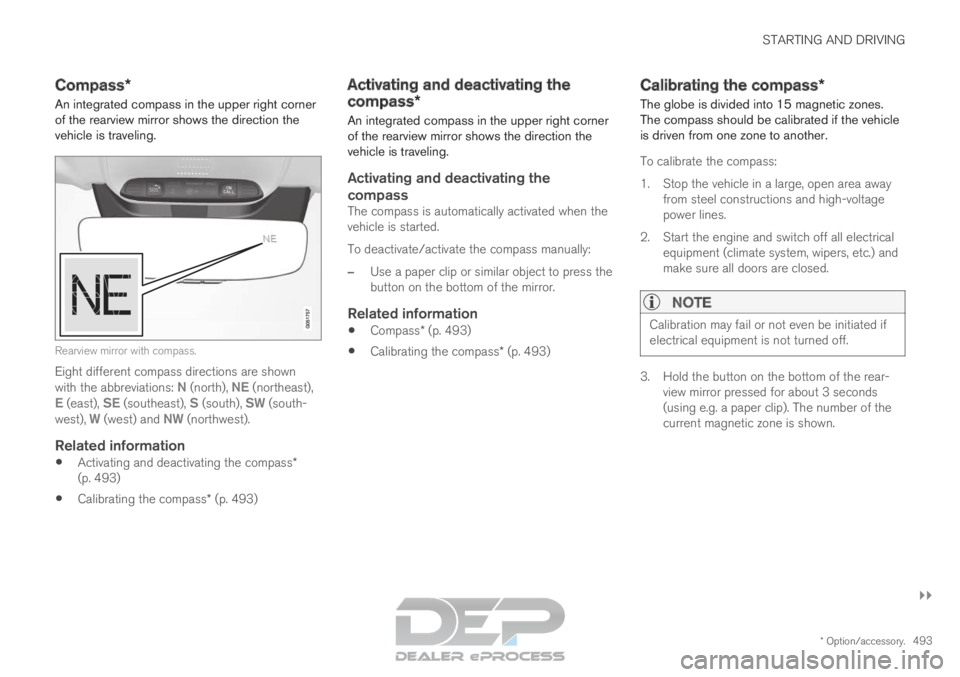
Compass*
An integrated compass in the upper right corner
of the rearview mirror shows the direction the
vehicle is traveling. Rearview mirror with compass.
Eight different compass directions are shown
with the abbreviations: N (north),
NE (northeast),
E (east), SE (southeast), S (south), SW (south-
west), W (west) and NW (northwest).
Related information
Activating and deactivating the compass*
(p. 493)
Calibrating the compass* (p. 493) Activating and deactivating the
compass*
An integrated compass in the upper right corner
of the rearview mirror shows the direction the
vehicle is traveling.
Activating and deactivating the
compass
The compass is automatically activated when the
vehicle is started.
To deactivate/activate the compass manually:
– Use a paper clip or similar object to press the
button on the bottom of the mirror.
Related information
Compass* (p. 493)
Calibrating the compass* (p. 493) Calibrating the compass*
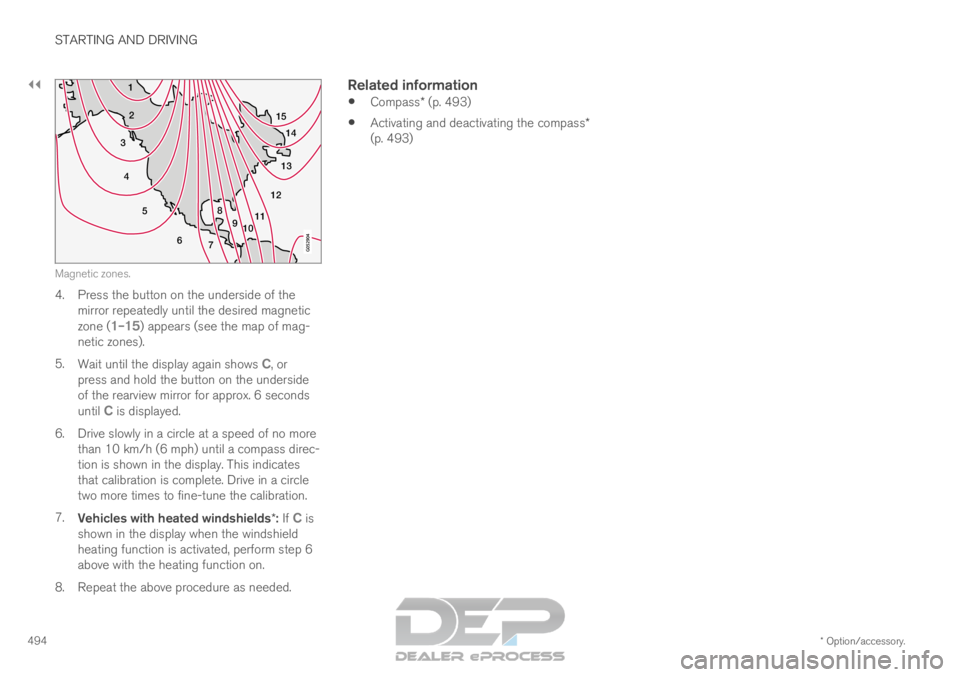
The globe is divided into 15 magnetic zones.
The compass should be calibrated if the vehicle
is driven from one zone to another.
To calibrate the compass:
1.
Stop the vehicle in a large, open area away
from steel constructions and high-voltage
power lines.
2. Start the engine and switch off all electrical equipment (climate system, wipers, etc.) and
make sure all doors are closed.
NOTE Calibration may fail or not even be initiated if
electrical equipment is not turned off.
3. Hold the button on the bottom of the rear-
view mirror pressed for about 3 seconds
(using e.g. a paper clip). The number of the
current magnetic zone is shown.
Page 496 of 697
||STARTING AND DRIVING
* Option/accessory.
494 15
14
13
12
11
9
8
7
6
5
4
3
2
1
10Magnetic zones.
4. Press the button on the underside of the
mirror repeatedly until the desired magnetic
zone ( 1–15) appears (see the map of mag-
netic zones).
5. Wait until the display again shows C, or
press and hold the button on the underside
of the rearview mirror for approx. 6 seconds
until
C is displayed.
6.
Drive slowly in a circle at a speed of no more
than 10 km/h (6 mph) until a compass direc-
tion is shown in the display. This indicates
that calibration is complete. Drive in a circle
two more times to fine-tune the calibration.
7. Vehicles with heated windshields*: If C is
shown in the display when the windshield
heating function is activated, perform step 6
above with the heating function on.
8.
Repeat the above procedure as needed.
Related information
Compass* (p. 493)
Activating and deactivating the compass*
(p. 493)
Page 497 of 697

A U D I O , M E D I A A N D I N T E R N E T
Page 498 of 697
AUDIO, MEDIA AND INTERNET
* Option/accessory.
496 Audio, media and Internet
The audio and media system consists of a media
player and a radio. A cellular phone can also be
connected through Bluetooth to use hands-free
functions or play music in the vehicle. When the
vehicle is connected to the Internet, it is also
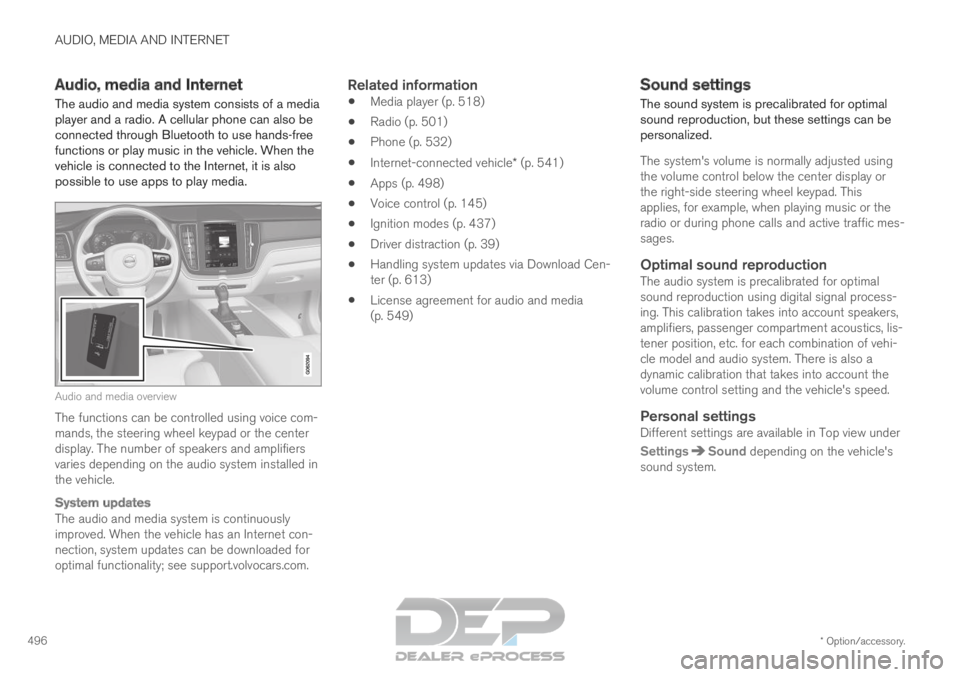
possible to use apps to play media. Audio and media overview
The functions can be controlled using voice com-
mands, the steering wheel keypad or the center
display. The number of speakers and amplifiers
varies depending on the audio system installed in
the vehicle.
System updates
The audio and media system is continuously
improved. When the vehicle has an Internet con-
nection, system updates can be downloaded for
optimal functionality; see support.volvocars.com.
Related information
Media player (p. 518)
Radio (p. 501)
Phone (p. 532)
Internet-connected vehicle* (p. 541)
Apps (p. 498)
Voice control (p. 145)
Ignition modes (p. 437)
Driver distraction (p. 39)
Handling system updates via Download Cen-
ter (p. 613)
License agreement for audio and media
(p. 549) Sound settings
The sound system is precalibrated for optimal
sound reproduction, but these settings can be
personalized.
The system's volume is normally adjusted using
the volume control below the center display or
the right-side steering wheel keypad. This
applies, for example, when playing music or the
radio or during phone calls and active traffic mes-
sages.
Optimal sound reproductionThe audio system is precalibrated for optimal
sound reproduction using digital signal process-
ing. This calibration takes into account speakers,
amplifiers, passenger compartment acoustics, lis-
tener position, etc. for each combination of vehi-
cle model and audio system. There is also a
dynamic calibration that takes into account the
volume control setting and the vehicle's speed.
Personal settingsDifferent settings are available in Top view under
Settings Sound
depending on the vehicle's
sound system.
Page 499 of 697
AUDIO, MEDIA AND INTERNET
}}
* Option/accessory. 497
Premium Sound* (Bowers & Wilkins)
Tone - setting for e.g. bass, treble, equalizer,
etc.
Balance - balance between right/left and
front/rear speakers.
System Volumes – adjusts volume in the
various systems of the car, e.g.
Voice
Control, Park Assist and Phone Ringtone.
High Performance Pro* (Harman
Kardon)
Equalizer - setting of equalizer.
Balance - balance between right/left and
front/rear speakers.
System Volumes – adjusts volume in the
various systems of the car, e.g. Voice
Control, Park Assist and Phone Ringtone.
High Performance
Tone - setting for e.g. bass, treble, equalizer,
etc.
Balance - balance between right/left and
front/rear speakers.
System Volumes – adjusts volume in the
various systems of the car, e.g.
Voice
Control, Park Assist and Phone Ringtone.
Related information
Sound experience* (p. 497)
Media player (p. 518)
Voice control settings (p. 148)
Phone settings (p. 540)
Audio, media and Internet (p. 496)
Internet-connected vehicle* (p. 541) Sound experience*
Sound experience is an app that provides
access to additional sound settings.
Open
Sound Experience from the center dis-
play's App view. Depending on the sound system
installed in the vehicle, the following settings are
possible:
Premium Sound* (Bowers & Wilkins)
Studio - the sound can be optimized for
Driver, All and Rear.
Individual stage - surround sound mode
with settings for intensity and enclosure.
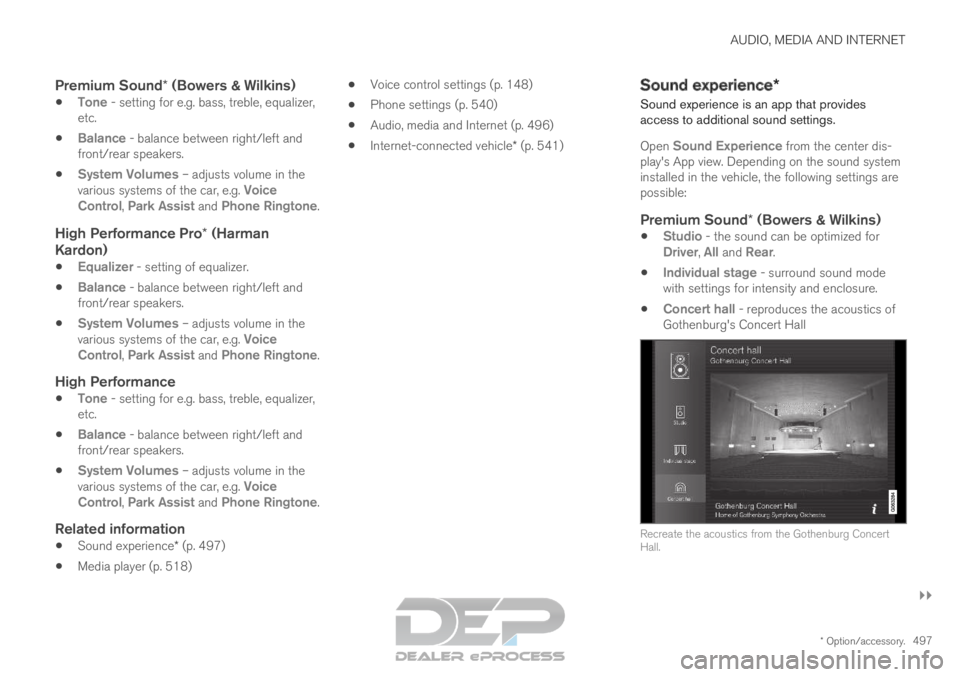
Concert hall - reproduces the acoustics of
Gothenburg's Concert Hall Recreate the acoustics from the Gothenburg Concert
Hall.
Page 500 of 697
||AUDIO, MEDIA AND INTERNET
* Option/accessory.
498
High Performance Pro* (Harman
Kardon)
Seat Optimization - the sound can be opti-
mized for Driver, All and Rear.
Surround - surround sound mode with level
settings.
Tone - setting for e.g. bass, treble, equalizer,
etc.
Related information
Sound settings (p. 496)
Navigating in the center display's views
(p. 115) Apps
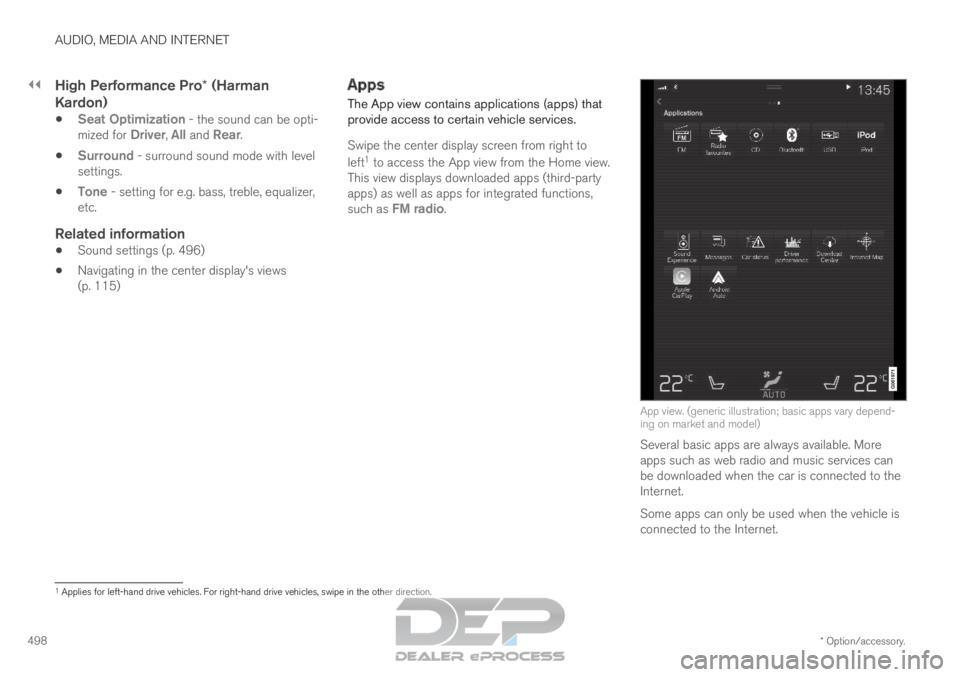
The App view contains applications (apps) that
provide access to certain vehicle services.
Swipe the center display screen from right to
left 1
to access the App view from the Home view.
This view displays downloaded apps (third-party
apps) as well as apps for integrated functions,
such as FM radio. App view. (generic illustration; basic apps vary depend-
ing on market and model)
Several basic apps are always available. More
apps such as web radio and music services can
be downloaded when the car is connected to the
Internet.
Some apps can only be used when the vehicle is
connected to the Internet. 1
Applies for left-hand drive vehicles. For right-hand drive vehicles, swi\
pe in the other direction.