window VOLVO XC90 TWIN ENGINE HYBRID 2017 Owner's Manual
[x] Cancel search | Manufacturer: VOLVO, Model Year: 2017, Model line: XC90 TWIN ENGINE HYBRID, Model: VOLVO XC90 TWIN ENGINE HYBRID 2017Pages: 584, PDF Size: 14.2 MB
Page 159 of 584

INSTRUMENTS AND CONTROLS
}}
157
Pop-up messages
Messages are sometimes displayed in pop-upwindows. Messages of this type have higher pri-ority than ones in the status bar and must beconfirmed or action must be taken before theydisappear. Messages that need to be stored aresaved under My car messages in Top view.
Related information
•Instrument panel (p. 132)
•Center display overview (p. 33)
Handling messages in theinstrument panel and center display
Instrument panel
Message in the instrument panel (12" version) and theright-side steering wheel keypad
Left/right arrow keys
Confirm
Some messages in the instrument panel containone or more buttons for e.g., confirming a mes-sage or accepting a proposal.
Handling new messages
For messages with buttons:
1. Navigate among the buttons available bypressing the left/right arrow keys (1).
2. Confirm a choice by pressing (2).
> The message will disappear from theinstrument panel.
For messages without buttons:
–Close the message by pressing (2) or let themessage time-out after a short period.
>The message will disappear from theinstrument panel.
If a message needs to be saved, it will be storedin the Car status app, which can be opened inthe center display's App view. Car messagestored in Car status application will be dis-played at this time in the center display.
Center display
Message in the center display
Some buttons in the center display have a button(or several buttons in a pop-up) to make it possi-
Page 163 of 584

INSTRUMENTS AND CONTROLS
* Option/accessory, for more information, see Introduction.161
Opening/closing the App menu
–Press the App menu (1).
The App menu cannot be opened if there areunread/unconfirmed messages in the instru-ment panel. The message must be confirmedbefore the App menu can be opened.
>The App menu opens/closes.
The App menu closes automatically after a periodof inactivity or after certain selections are made.
Navigating and making selections in the
App menu
1. Navigate between the various apps by press-ing left or right (3).
> Functions for the preceding/next app willbe displayed in the App menu.
2. Scroll through the current app's selectionsusing up or down (4).
3. Confirm or select a function by pressing (2).
> The function will be activated and in cer-tain cases, the App menu will close.
Related information
•Instrument panel App menu (p. 160)
Using the windshield wipers
Before using the wipers, ice and snow shouldbe removed from the windshield. Be sure thewiper blades are not frozen in place.
Right-side steering wheel lever
Thumb wheel to set rain sensor* sensitivity/interval wiper speed
Single sweep
Move the lever down and release it for asingle sweep.
Wipers off
Move the lever to position 0 to turn offthe windshield wipers.
Interval wipers
Set the wiper interval speed by movingthe thumb wheel upward or downward.
Continuous wipers
Move the lever upward for the wipers tooperate at normal speed.
NOTE
Before using the wipers, be sure that thewiper blades are not frozen onto the wind-shield and that any ice or snow on the wind-shield has been removed.
Move the lever upward to the next posi-tion for maximum wiper speed.
Related information
•Tailgate window wiper and washer (p. 164)
•Activating/deactivating the rain sensor(p. 162)
•Windshield and headlight washers (p. 163)
Page 164 of 584

INSTRUMENTS AND CONTROLS
162
Activating/deactivating the rainsensor
The rain sensor monitors the amount of water onthe windshield and automatically regulates wiperspeed.
Right-side steering wheel lever
Rain sensor button
Thumb wheel for adjusting sensitivity/intervalwiper speed
When the rain sensor is activated, the symbol will illuminate in the instrument panel.
Activating the rain sensor
When activating the rain sensor, the engine mustbe running or the ignition must be in mode I or II.
The windshield wiper lever must also be in posi-tion 0 or in the single sweep position.
Activate the rain sensor by pressing the button. The wipers will make one sweep.
If the lever is pressed down, the wipers will makeadditional sweeps across the windshield.
Move the thumb wheel upward for increased sen-sitivity or downward for decreased sensitivity. Thewipers will make one extra sweep if the thumbwheel is moved upward.
Deactivating the rain sensor
Deactivate the rain sensor by pressing the button or by moving the lever upward to anotherwiper position.
The rain sensor is automatically deactivated inignition mode 0.
The rain sensor is also automatically deactivatedwhen the wipers blades are put in the serviceposition and will reactivate when the wipers havebeen returned to the normal operating position.
CAUTION
Deactivate the rain sensor when washing thevehicle in an automatic car wash if the engineis running or if the ignition is left in mode I orII. The symbol in the instrument panel will goout. If the rain sensor is not deactivated, thewipers may start inadvertently in the car washand could be damaged.
Activating/deactivating the memory
function
The rain sensor's memory function can be set toactivate the rain sensor each time the engine isstarted:
1.In the center display, select SettingsMy
CarWipers
2.Activate by selecting the Rain SensorMemory box.
Deactivate by deselecting the Rain SensorMemory box.
Related information
•Using the windshield wipers (p. 161)
•Windshield wipers in the service position(p. 543)
•Tailgate window wiper and washer (p. 164)
Page 165 of 584
INSTRUMENTS AND CONTROLS
* Option/accessory, for more information, see Introduction.163
Windshield and headlight washers
Use the windshield/headlight washers to helpimprove visibility.
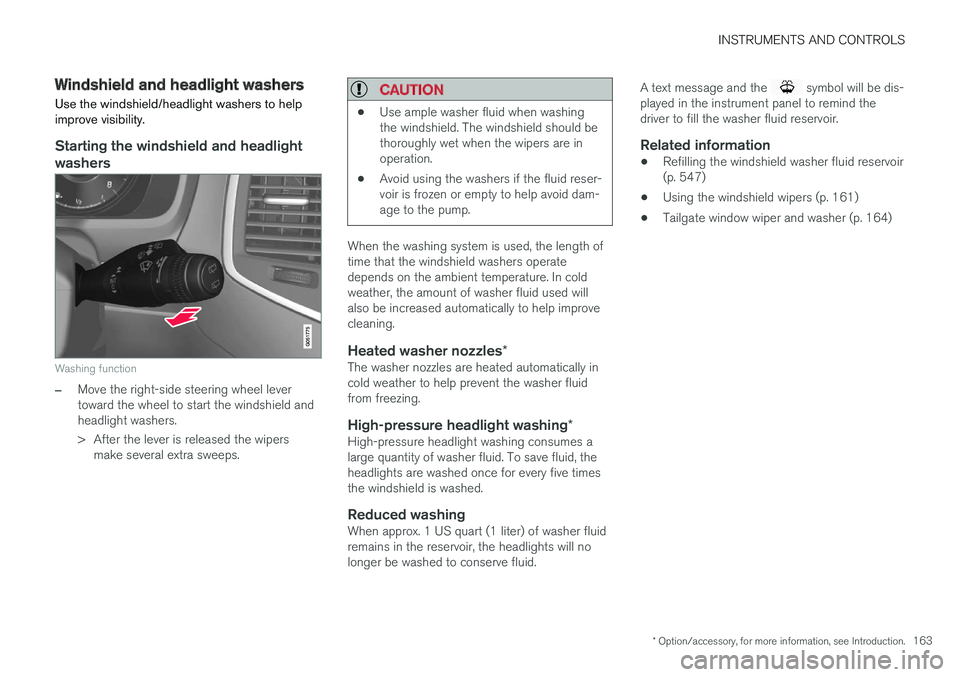
Starting the windshield and headlight
washers
Washing function
–Move the right-side steering wheel levertoward the wheel to start the windshield andheadlight washers.
>After the lever is released the wipersmake several extra sweeps.
CAUTION
•Use ample washer fluid when washingthe windshield. The windshield should bethoroughly wet when the wipers are inoperation.
•Avoid using the washers if the fluid reser-voir is frozen or empty to help avoid dam-age to the pump.
When the washing system is used, the length oftime that the windshield washers operatedepends on the ambient temperature. In coldweather, the amount of washer fluid used willalso be increased automatically to help improvecleaning.
Heated washer nozzles *
The washer nozzles are heated automatically incold weather to help prevent the washer fluidfrom freezing.
High-pressure headlight washing *
High-pressure headlight washing consumes alarge quantity of washer fluid. To save fluid, theheadlights are washed once for every five timesthe windshield is washed.
Reduced washing
When approx. 1 US quart (1 liter) of washer fluidremains in the reservoir, the headlights will nolonger be washed to conserve fluid.
A text message and the symbol will be dis-played in the instrument panel to remind thedriver to fill the washer fluid reservoir.
Related information
•Refilling the windshield washer fluid reservoir(p. 547)
•Using the windshield wipers (p. 161)
•Tailgate window wiper and washer (p. 164)
Page 166 of 584
INSTRUMENTS AND CONTROLS
* Option/accessory, for more information, see Introduction.164
Tailgate window wiper and washer
Start the tailgate window wiper/washer with con-trols on the right-side steering wheel lever.
NOTE
The rear wiper is equipped with a cut-offfunction, which means that it will not operateif its electric motor overheats. The wiper willfunction again after a cool-down period(30 seconds or longer, depending on the heatof the motor and ambient temperature condi-tions).
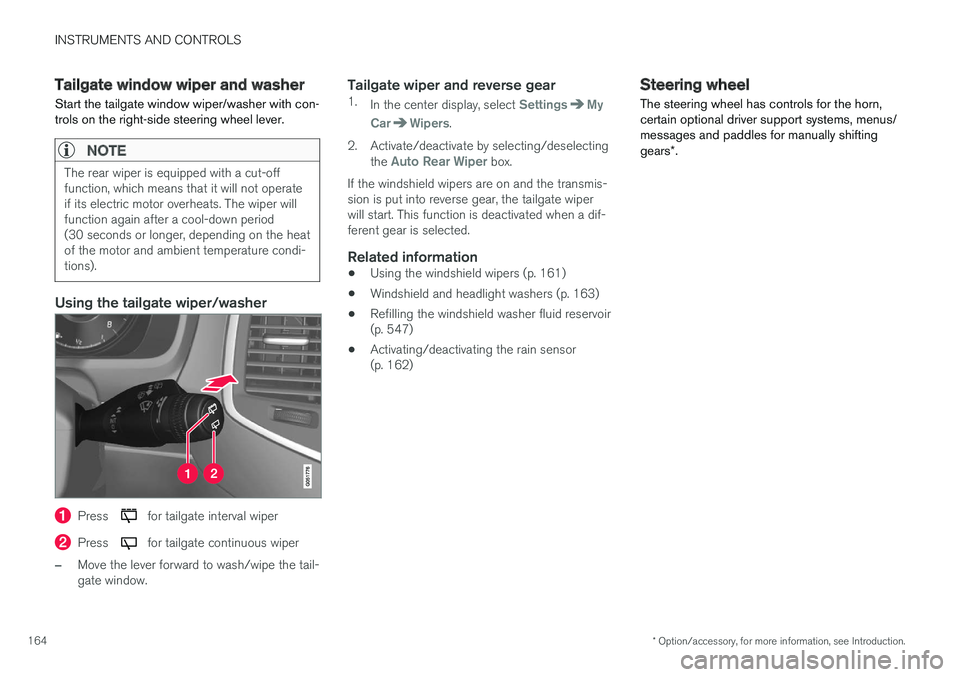
Using the tailgate wiper/washer
Press for tailgate interval wiper
Press for tailgate continuous wiper
–Move the lever forward to wash/wipe the tail-gate window.
Tailgate wiper and reverse gear
1.In the center display, select SettingsMy
CarWipers.
2. Activate/deactivate by selecting/deselectingthe Auto Rear Wiper box.
If the windshield wipers are on and the transmis-sion is put into reverse gear, the tailgate wiperwill start. This function is deactivated when a dif-ferent gear is selected.
Related information
•Using the windshield wipers (p. 161)
•Windshield and headlight washers (p. 163)
•Refilling the windshield washer fluid reservoir(p. 547)
•Activating/deactivating the rain sensor(p. 162)
Steering wheel
The steering wheel has controls for the horn,certain optional driver support systems, menus/messages and paddles for manually shiftinggears*.
Page 184 of 584

||
INSTRUMENTS AND CONTROLS
182
4.Tap Confirm.
>The new driver profile has now beenselected and the system will load the set-tings stored in that profile.
Related information
•Driver profiles (p. 181)
•Editing a driver profile (p. 182)
•Linking a remote key to a driver profile(p. 183)
Editing a driver profile
The driver profiles can be edited to e.g., changetheir names or lock a profile.
All types of changes in driver profiles are made
from the center display's Top view: Settings
SystemDriver Profile.
Changing a profile's name
Changing a driver profile's name is done from theDriver Profile window:
1.Tap Edit Profile.
>A menu will open in which the profile canbe edited.
2.Tap the Profile Name box.
>A keyboard will be displayed and can be
used to change the name. Tap toclose the keyboard.
3.Save the changes by tapping Back/Close.
>The name has now been changed.
Locking/unlocking a driver profile
In some cases, it may be desirable to not savecertain settings in the active driver profile. Forthis reason, the profile can be locked. To lock/unlock a profile from the Driver Profile window:
1.Tap Edit Profile.
>A menu will open in which the profile canbe edited.
2.Tap Protect My Profile to lock/unlock theprofile.
3.Save the change by tapping Back/Close.
>When a profile is locked, settings that arechanged in the vehicle will not be savedautomatically in the profile and will have tosaved manually by tapping Savechanges. However, when the profile isunlocked, the changes will be saved auto-matically.
Resetting driver profile changes
Settings that have been changed and saved inone or more driver profiles can be reset.
NOTE
Global Reset is only possible when the vehi-cle is stationary.
Page 192 of 584
||
CLIMATE
* Option/accessory, for more information, see Introduction.190
Preconditioning
Preconditioning the vehicle before driving canhelp reduce wear and reduce energy consump-tion during a trip.
NOTE
Full preconditioning is only possible when thevehicle's charging cable is connected.
In other cases, the passenger compartmentcan be cooled for 3 minutes in warm weather.This function is started from the Parkingclimate tab in the center display's Climateview.
With the charging cable connected, precondition-ing can be started immediately or a timer functioncan start this procedure at a later time.
This feature utilizes several of the vehicle's sys-tems:
•The High Voltage Coolant Heater (HVCH)warms the hybrid battery and passengercompartment in cold weather.
•In warm weather, the ventilation system willattempt to cool the passenger compartmentto the current ambient temperature.
•In warm weather, the air conditioning systemwill cool the passenger compartment to acomfortable temperature.
•The electrically heated steering wheel andseats can be activated.
•Heating for the windshield, tailgate windowand door mirrors can be activated.
If preconditioning is used in warm weather, a cer-tain amount of water may condense under thevehicle, which is normal.
When preconditioning is used, this system willattempt to establish a comfortable temperature inthe passenger compartment but not necessarilythe temperature currently set in the climatesystem.
Maintaining a comfortable passenger
compartment climate
The climate in the passenger compartment canbe maintained even when the vehicle is parkedand the engine is turned off (e.g., if anyoneintends to remain in the vehicle).
This function can only be direct-started.
This function utilizes several of the vehicle's sys-tems:
•Residual heat from the engine is used helpkeep the passenger compartment warm incool temperatures.
•In warm weather, the ventilation system willattempt to cool the passenger compartmentto the current ambient temperature.
This function will not be activated if the vehicle islocked from the outside in order to avoid using
residual engine heat unnecessarily. This functionis primarily intended for use when the engine isnot running but someone remains in the vehicle.
Related information
•Starting and stopping preconditioning(p. 194)
•Activating/deactivating the climate comfortretaining function* (p. 191)
•Activating/deactivating the parking climatetimer (p. 191)
•Charging the hybrid battery (p. 413)
•Hybrid battery charging cable (p. 405)
Page 195 of 584
CLIMATE
193
3.Tap Add timer.
>A pop-up window will open.
NOTE
A new timer setting cannot be made if thereare already 8 timers set. Delete one of theexisting timer settings in order to add a newone.
4.Tap Date to set a specific date for the timersetting.
Tap Days to set a timer for one or more daysof the week.
For Days: activate/deactivate the repeatfunction by selecting/deselecting theRepeat weekly box.
5.For Date: Select a date for preconditioningby scrolling in the date list using the arrowkeys.
For Days: Select days of the week for pre-conditioning by tapping the days' buttons.
6.Set the time at which preconditioning shouldbe completed by scrolling with the arrows inthe clock.
7.Tap Confirm to add the timer setting.
>The timer settings will be added to the listand activated.
Editing a timer setting
1. Open Climate view in the center display.
2.Tap the Parking climate tab.
3.Tap the timer setting to be changed.
> A pop-up window will open.
4. Change the setting as described in the sec-tion "Adding a timer setting" above.
Deleting a timer setting
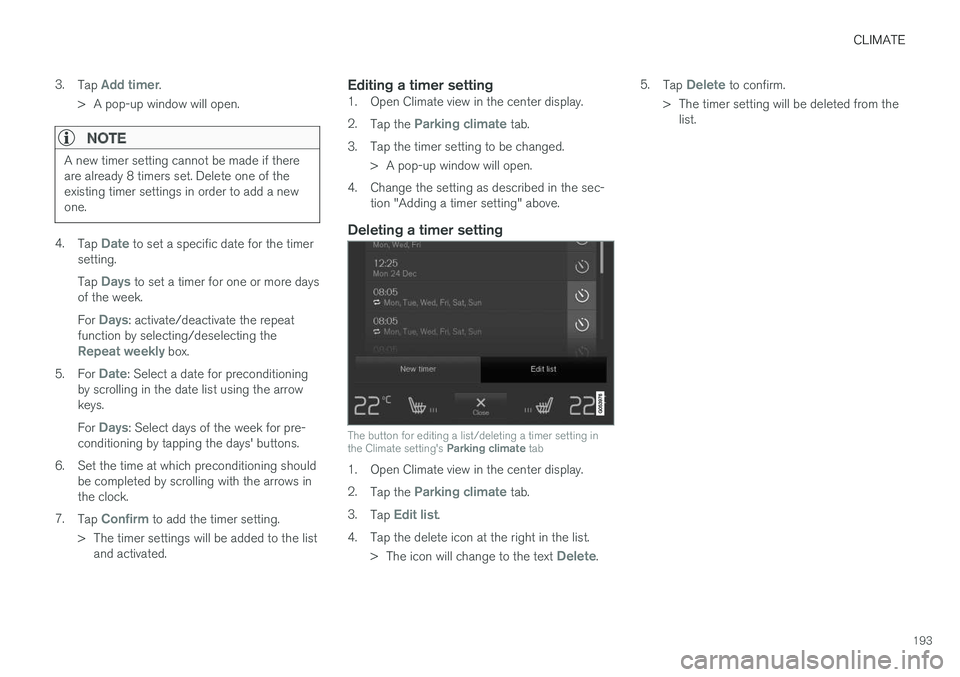
The button for editing a list/deleting a timer setting inthe Climate setting's Parking climate tab
1. Open Climate view in the center display.
2.Tap the Parking climate tab.
3.Tap Edit list.
4.Tap the delete icon at the right in the list.
>The icon will change to the text Delete.
5.Tap Delete to confirm.
>The timer setting will be deleted from thelist.
Page 196 of 584
CLIMATE
* Option/accessory, for more information, see Introduction.194
Starting and stoppingpreconditioning
Preconditioning heats/cools the passenger com-partment prior to driving. Please note that thecharging cable must be connected.
Starting/stopping from the center
display
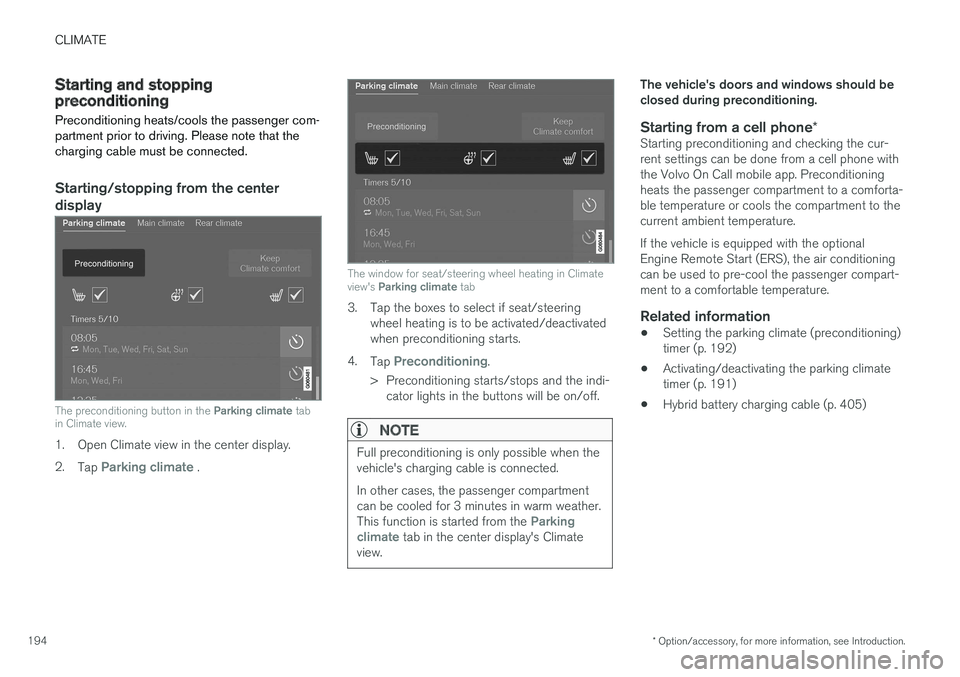
The preconditioning button in the Parking climate tabin Climate view.
1. Open Climate view in the center display.
2.Tap Parking climate .
The window for seat/steering wheel heating in Climateview's Parking climate tab
3. Tap the boxes to select if seat/steeringwheel heating is to be activated/deactivatedwhen preconditioning starts.
4.Tap Preconditioning.
>Preconditioning starts/stops and the indi-cator lights in the buttons will be on/off.
NOTE
Full preconditioning is only possible when thevehicle's charging cable is connected.
In other cases, the passenger compartmentcan be cooled for 3 minutes in warm weather.This function is started from the Parkingclimate tab in the center display's Climateview.
The vehicle's doors and windows should beclosed during preconditioning.
Starting from a cell phone *
Starting preconditioning and checking the cur-rent settings can be done from a cell phone withthe Volvo On Call mobile app. Preconditioningheats the passenger compartment to a comforta-ble temperature or cools the compartment to thecurrent ambient temperature.
If the vehicle is equipped with the optionalEngine Remote Start (ERS), the air conditioningcan be used to pre-cool the passenger compart-ment to a comfortable temperature.
Related information
•Setting the parking climate (preconditioning)timer (p. 192)
•Activating/deactivating the parking climatetimer (p. 191)
•Hybrid battery charging cable (p. 405)
Page 198 of 584
CLIMATE
* Option/accessory, for more information, see Introduction.196
Air quality
The materials used in the passenger compart-ment have been selected and designed to bepleasant and comfortable, even for people withasthma or other types of allergies.
Materials in the passenger
compartment
The materials used have been developed to helpminimize the amount of dust and make the cabineasier to keep clean.
All floor mats (including the cargo compartment)can be easily removed for cleaning.
Only use cleaning agents and car care productsrecommended by Volvo. Clean regularly and fol-low the instructions included with the product.
Air filtering systems
In addition to the passenger compartment filter,the Clean Zone Interior Package* and the InteriorAir Quality System* contribute to a cleaner pas-senger compartment environment.
Clean Zone
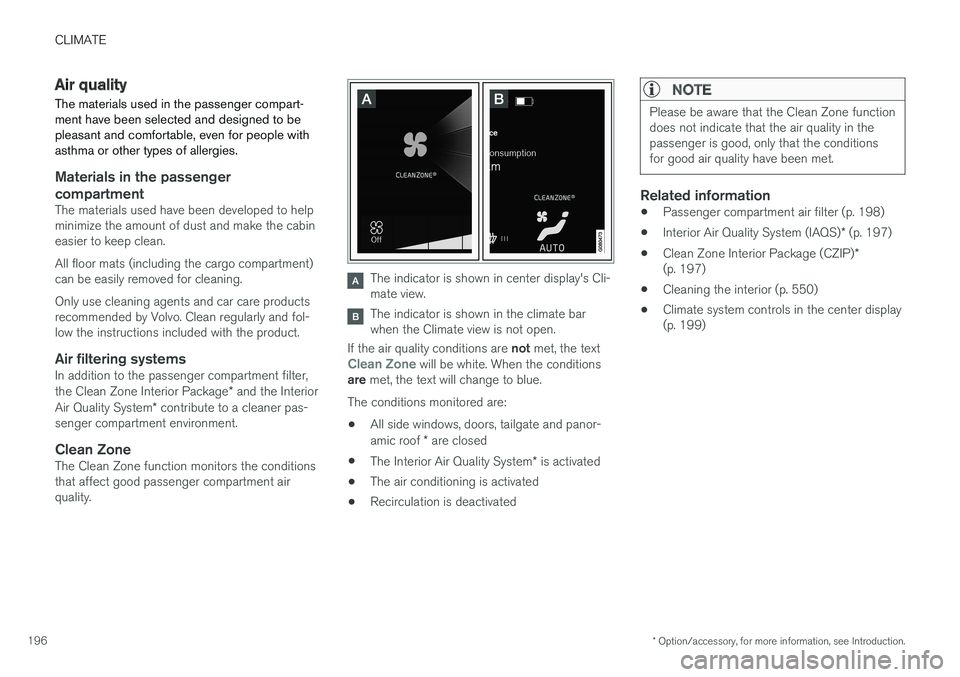
The Clean Zone function monitors the conditionsthat affect good passenger compartment airquality.
The indicator is shown in center display's Cli-mate view.
The indicator is shown in the climate barwhen the Climate view is not open.
If the air quality conditions are not met, the textClean Zone will be white. When the conditionsare met, the text will change to blue.
The conditions monitored are:
•All side windows, doors, tailgate and panor-amic roof * are closed
•The Interior Air Quality System* is activated
•The air conditioning is activated
•Recirculation is deactivated
NOTE
Please be aware that the Clean Zone functiondoes not indicate that the air quality in thepassenger is good, only that the conditionsfor good air quality have been met.
Related information
•Passenger compartment air filter (p. 198)
•Interior Air Quality System (IAQS)* (p. 197)
•Clean Zone Interior Package (CZIP)*(p. 197)
•Cleaning the interior (p. 550)
•Climate system controls in the center display(p. 199)