check engine YAMAHA GIGGLE50 2007 User Guide
[x] Cancel search | Manufacturer: YAMAHA, Model Year: 2007, Model line: GIGGLE50, Model: YAMAHA GIGGLE50 2007Pages: 72, PDF Size: 1.05 MB
Page 38 of 72

6-6
1
2
3
4
5
6
7
8
9
EAU17226
PERIODIC MAINTENANCE AND MINOR REPAIRPanel CTo remo
ve the panel
ZAUM00**
1
1. Panel C1. Open the seat. (See page 3-9.)
2. Remove the screws, and then take
the panel off.To install the panel
Place the panel in the original position,
and then install the screws.
EAUT2070
Checking the spark plugThe spark plug is an important engine
component, which is easy to check.
Since heat and deposits will cause any
spark plug to slowly erode, the spark
plug should be removed and checked
in accordance with the periodic main-
tenance and lubrication chart. In addi-
tion, the condition of the spark plug can
reveal the condition of the engine.
To remove the spark plug
1. Remove panel A. (See page 6-5.)
2. Remove the spark plug cap.ZAUM00**
1
1. Spark plug wrench
Spark plug, checking
3. Remove the spark plug as shown,
with a spark plug wrench available
at a Yamaha dealer.
To check the spark plug
1. Check that the porcelain insulator
around the center electrode of the
spark plug is a medium-to-light tan
(the ideal color when the vehicle is
ridden normally).
NOTE:
If the spark plug shows a distinctly dif-
ferent color, the engine could be oper-
ating improperly. Do not attempt to di-
agnose such problems yourself. In-
stead, have a Yamaha dealer check the
vehicle.2. Check the spark plug for electrode
erosion and excessive carbon or
other deposits, and replace it if
necessary.Specified spark plug:
CR7E (NGK)
15P-F8199-E0_ch6.pmd2007/06/21, 11:09 6
Page 39 of 72

6-7
1
2
3
4
5
6
7
8
9
EAU17226
PERIODIC MAINTENANCE AND MINOR REPAIR
To install the spark plug
1. Measure the spark plug gap with a
wire thickness gauge and, if nec-
essary, adjust the gap to specifi-
cation.Spark plug gap:
0.7 ~ 0.8 mm (0.028 ~ 0.031 in)2. Clean the surface of the spark plug
gasket and its mating surface, and
then wipe off any grime from the
spark plug threads.
3. Install the spark plug with the spark
plug wrench, and then tighten it to
the specified torque.Tightening torque:
Spark plug:
NOTE:
If a torque wrench is not available when
installing a spark plug, a good estimate
of the correct torque is 1/4~1/2 turn past
finger tight. However, the spark plug
should be tightened to the specified
torque as soon as possible.
4. Install the spark plug cap.
5. Install the panel.
EAUT1460
Engine oil and oil strainerThe engine oil level should be checked
before each ride. In addition, the oil must
be changed and the oil strainer cleaned
at the intervals specified in the periodic
maintenance and lubrication chart.
To check the engine oil level
1. Place the vehicle on the
centerstand.NOTE:
Make sure that the vehicle is positioned
straight up when checking the oil level.
A slight tilt to the side can result in a
false reading.2. Start the engine, warm it up for sev-
eral minutes, and then turn it off. Engine oil
15P-F8199-E0_ch6.pmd2007/06/21, 11:09 7
Page 40 of 72

6-8
1
2
3
4
5
6
7
8
9
EAU17226
PERIODIC MAINTENANCE AND MINOR REPAIRZAUM00**
1
2
3
1. Engine oil filler cap
2. Maximum level mark
3. Minimum level mark3. Wait a few minutes until the oil
settles, remove the oil filler cap,
wipe the dipstick clean, insert it
back into the oil filler hole (without
screwing it in), and then remove it
again to check the oil level.NOTE:
The engine oil should be between the
minimum and maximum level marks.4. If the engine oil is below the mini-
mum level mark, add sufficient oil
of the recommended type to raise
it to the correct level.5. Insert the dipstick into the oil filler
hole, and then tighten the oil filler
cap.
To change the engine oil and clean
the oil strainer
1. Start the engine, warm it up for sev-
eral minutes, and then turn it off.
2. Place an oil pan under the engine
to collect the used oil.
3. Remove the engine oil filler cap and
the engine oil drain bolts A and B
to drain the oil from the crankcase.
ZAUM00**
1
1. Engine oil drain bolt A
ZAUM00**
1
1. Engine oil drain bolt B
ECAT1020
cCWhen removing the engine oil drain
bolt B, the O-ring, compression
spring, and oil strainer will fall out.
Take care not to lose these parts.4. Clean the oil strainer with solvent,
and then check it for damage and
replace it if necessary.
5. Check the O-ring for damage and
replace it if necessary.
6. Install the oil strainer, compression
spring, O-ring and engine oil drain
bolt B.
15P-F8199-E0_ch6.pmd2007/06/21, 11:09 8
Page 41 of 72

6-9
1
2
3
4
5
6
7
8
9
EAU17226
PERIODIC MAINTENANCE AND MINOR REPAIR
NOTE:
Make sure that the O-ring is properly
seated.7. Install engine oil drain bolt A, and
then tighten both drain bolts to their
specified torques.Tightening torque:
Engine oil drain bolt A:
Engine oil drain bolt B:
ZAUM00**
1
1. Oil filler hole
8. Add the specified amount of the
recommended engine oil, and then
install and tighten the oil filler cap.Recommended engine oil:
See page 8-1.
Oil change quantity:
0.78 L (0.82 US qt) (0.69 Imp.qt)
ECA11670
cC● ●● ●
●
Do not use oils with a diesel
specification of “CD” or oils of a
higher quality than specified. In
addition, do not use oils labeled
“ENERGY CONSERVING II” or
higher.
● ●● ●
●
Be sure no foreign material en-
ters the crankcase.
9. Start the engine, and then let it idle
for several minutes while checking
it for oil leakage. If oil is leaking,
immediately turn the engine off and
check for the cause.
10. Turn the engine off, and then check
the oil level and correct it if neces-
sary.
EAUT1560
Final transmission oilThe final transmission case must be
checked for oil leakage before each ride.
If any leakage is found, have a Yamaha
dealer check and repair the scooter. In
addition, the final transmission oil must
be changed as follows at the intervals
specified in the periodic maintenance
and lubrication chart.
1. Start the engine, warm it up by
riding the scooter for several min-
utes, and then stop the engine.
2. Place the scooter on the
centerstand.
3. Place an oil pan under the final
transmission case to collect the
used oil. Final transmission oil
15P-F8199-E0_ch6.pmd2007/06/21, 11:09 9
Page 42 of 72
6-10
1
2
3
4
5
6
7
8
9
EAU17226
PERIODIC MAINTENANCE AND MINOR REPAIRZAUM00**
1
2
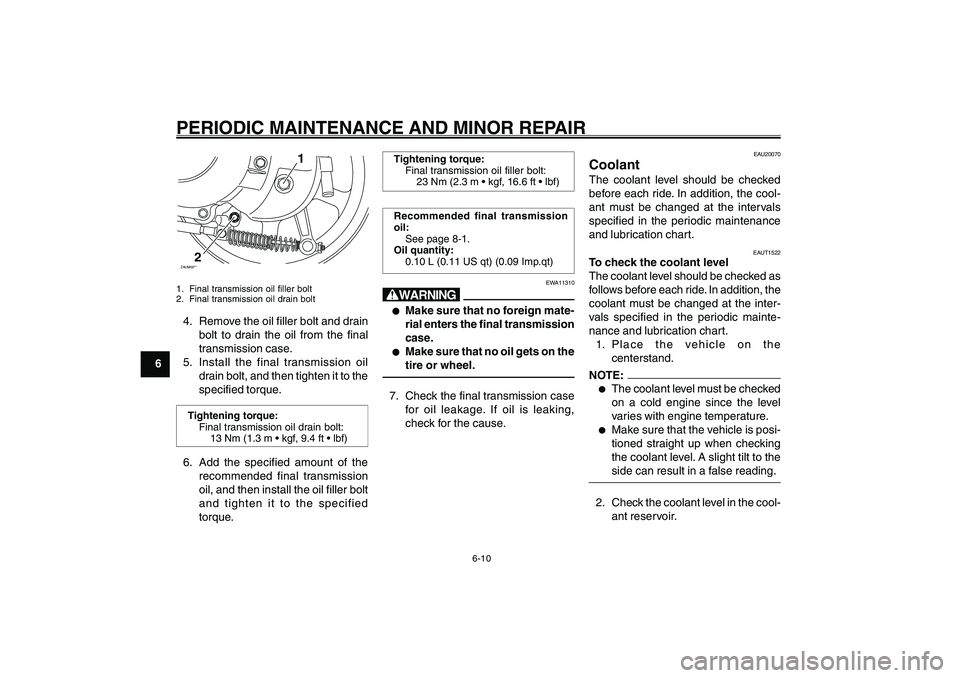
1. Final transmission oil filler bolt
2. Final transmission oil drain bolt4. Remove the oil filler bolt and drain
bolt to drain the oil from the final
transmission case.
5. Install the final transmission oil
drain bolt, and then tighten it to the
specified torque.Tightening torque:
Final transmission oil drain bolt:
6. Add the specified amount of the
recommended final transmission
oil, and then install the oil filler bolt
and tighten it to the specified
torque.
Tightening torque:
Final transmission oil filler bolt:
Recommended final transmission
oil:
See page 8-1.
Oil quantity:
0.10 L (0.11 US qt) (0.09 Imp.qt)
EWA11310
w● ●● ●
●
Make sure that no foreign mate-
rial enters the final transmission
case.
● ●● ●
●
Make sure that no oil gets on the
tire or wheel.
7. Check the final transmission case
for oil leakage. If oil is leaking,
check for the cause.
EAU20070
CoolantThe coolant level should be checked
before each ride. In addition, the cool-
ant must be changed at the intervals
specified in the periodic maintenance
and lubrication chart. Coolant
EAUT1522
To check the coolant level
The coolant level should be checked as
follows before each ride. In addition, the
coolant must be changed at the inter-
vals specified in the periodic mainte-
nance and lubrication chart.
1. Place the vehicle on the
centerstand.NOTE:●
The coolant level must be checked
on a cold engine since the level
varies with engine temperature.
●
Make sure that the vehicle is posi-
tioned straight up when checking
the coolant level. A slight tilt to the
side can result in a false reading.
2. Check the coolant level in the cool-
ant reservoir.
15P-F8199-E0_ch6.pmd2007/06/21, 11:09 10
Page 43 of 72
6-11
1
2
3
4
5
6
7
8
9
EAU17226
PERIODIC MAINTENANCE AND MINOR REPAIR
NOTE:
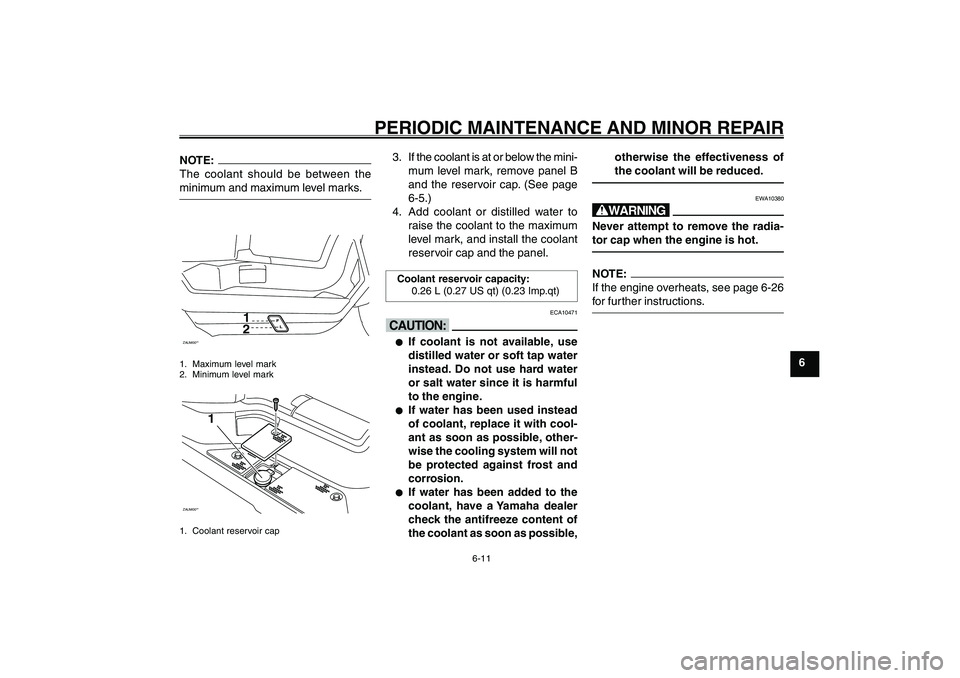
The coolant should be between the
minimum and maximum level marks.ZAUM00**
12
1. Maximum level mark
2. Minimum level markZAUM00**
1
1. Coolant reservoir cap
3. If the coolant is at or below the mini-
mum level mark, remove panel B
and the reservoir cap. (See page
6-5.)
4. Add coolant or distilled water to
raise the coolant to the maximum
level mark, and install the coolant
reservoir cap and the panel.Coolant reservoir capacity:
0.26 L (0.27 US qt) (0.23 Imp.qt)
ECA10471
cC● ●● ●
●
If coolant is not available, use
distilled water or soft tap water
instead. Do not use hard water
or salt water since it is harmful
to the engine.
● ●● ●
●
If water has been used instead
of coolant, replace it with cool-
ant as soon as possible, other-
wise the cooling system will not
be protected against frost and
corrosion.
● ●● ●
●
If water has been added to the
coolant, have a Yamaha dealer
check the antifreeze content of
the coolant as soon as possible,otherwise the effectiveness of
the coolant will be reduced.
EWA10380
wNever attempt to remove the radia-
tor cap when the engine is hot.NOTE:
If the engine overheats, see page 6-26
for further instructions.
15P-F8199-E0_ch6.pmd2007/06/21, 11:09 11
Page 44 of 72
6-12
1
2
3
4
5
6
7
8
9
EAU17226
PERIODIC MAINTENANCE AND MINOR REPAIR
EAUT1990
Replacing the air filter elementThe air filter element must be replaced
and the check hoses must be cleaned
at the intervals specified in the periodic
maintenance and lubrication char t.
Have a Yamaha dealer replace the air
filter element. Air filter element, replacing
Throttle cable free play, checking
Valve clearance
EAU21401
Valve clearanceThe valve clearance changes with use,
resulting in improper air-fuel mixture
and/or engine noise. To prevent this from
occurring, the valve clearance must be
adjusted by a Yamaha dealer at the in-
tervals specified in the periodic mainte-
nance and lubrication chart.
EAU21382
Checking the throttle cable
free playThe throttle cable free play should mea-
sure 1.5 ~ 3.5 mm (0.06 ~ 0.14 in) at
the throttle grip. Periodically check the
throttle cable free play and, if necessary,
have a Yamaha dealer adjust it.
15P-F8199-E0_ch6.pmd2007/06/21, 11:09 12
Page 51 of 72
6-19
1
2
3
4
5
6
7
8
9
EAU17226
PERIODIC MAINTENANCE AND MINOR REPAIR
ZAUM00**
EAU23290
Checking the wheel bearingsThe front and rear wheel bearings must
be checked at the intervals specified in
the periodic maintenance and lubrica-
tion chart. If there is play in the wheel
hub or if the wheel does not turn
smoothly, have a Yamaha dealer check
the wheel bearings. Steering, checking
Wheel bearings, checking
EAU23280
Checking the steeringWorn or loose steering bearings may
cause danger. Therefore, the operation
of the steering must be checked as fol-
lows at the intervals specified in the
periodic maintenance and lubrication
char t.
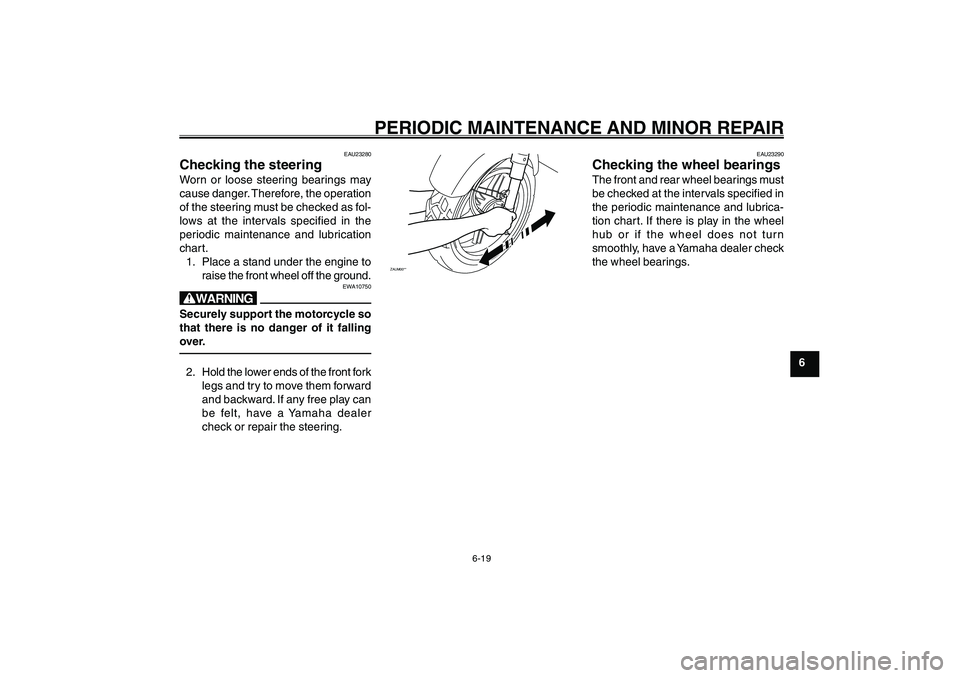
1. Place a stand under the engine to
raise the front wheel off the ground.
EWA10750
wSecurely support the motorcycle so
that there is no danger of it falling
over.2. Hold the lower ends of the front fork
legs and try to move them forward
and backward. If any free play can
be felt, have a Yamaha dealer
check or repair the steering.
15P-F8199-E0_ch6.pmd2007/06/21, 11:09 19
Page 57 of 72
6-25
1
2
3
4
5
6
7
8
9
EAU17226
PERIODIC MAINTENANCE AND MINOR REPAIR
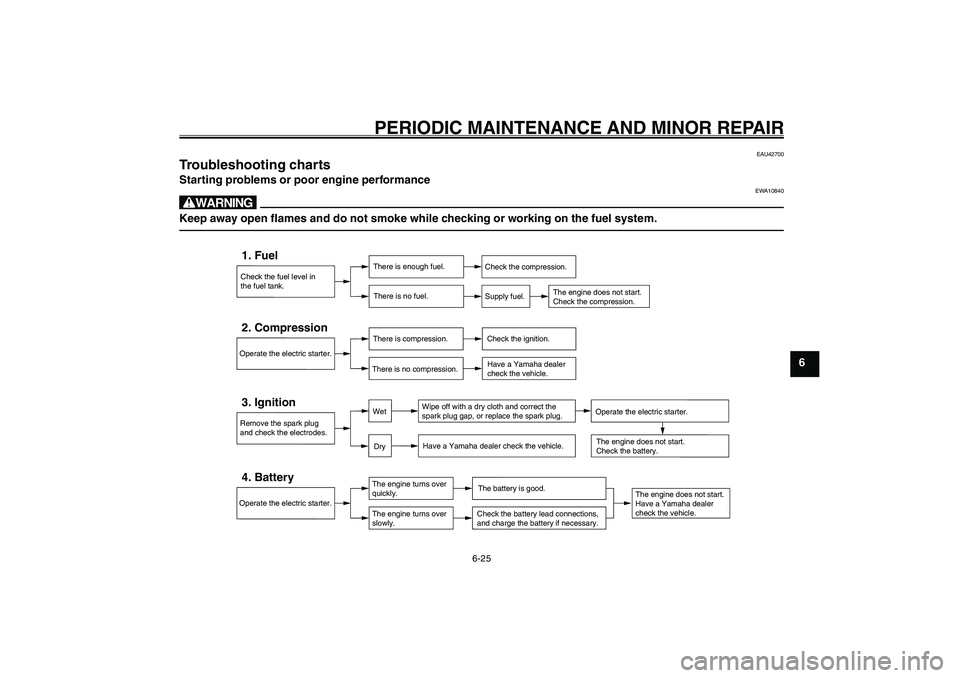
Troubleshooting charts
EAU42700
Troubleshooting chartsStarting problems or poor engine performance
EWA10840
wKeep away open flames and do not smoke while checking or working on the fuel system.
Check the fuel level in
the fuel tank.1. Fuel
There is enough fuel.
There is no fuel.
Check the compression.
Supply fuel.
The engine does not start.
Check the compression.
Operate the electric starter.2. Compression
There is compression.
There is no compression.
Check the ignition.
Have a Yamaha dealer
check the vehicle.
Remove the spark plug
and check the electrodes.3. Ignition
Wipe off with a dry cloth and correct the
spark plug gap, or replace the spark plug.
Have a Yamaha dealer check the vehicle.
The engine does not start.
Have a Yamaha dealer
check the vehicle.
The engine does not start.
Check the battery.
Operate the electric starter.4. Battery
The engine turns over
quickly.
The engine turns over
slowly.
The battery is good.Check the battery lead connections,
and charge the battery if necessary.
DryWet
Operate the electric starter.
15P-F8199-E0_ch6.pmd2007/06/21, 11:09 25
Page 58 of 72
6-26
1
2
3
4
5
6
7
8
9
EAU17226
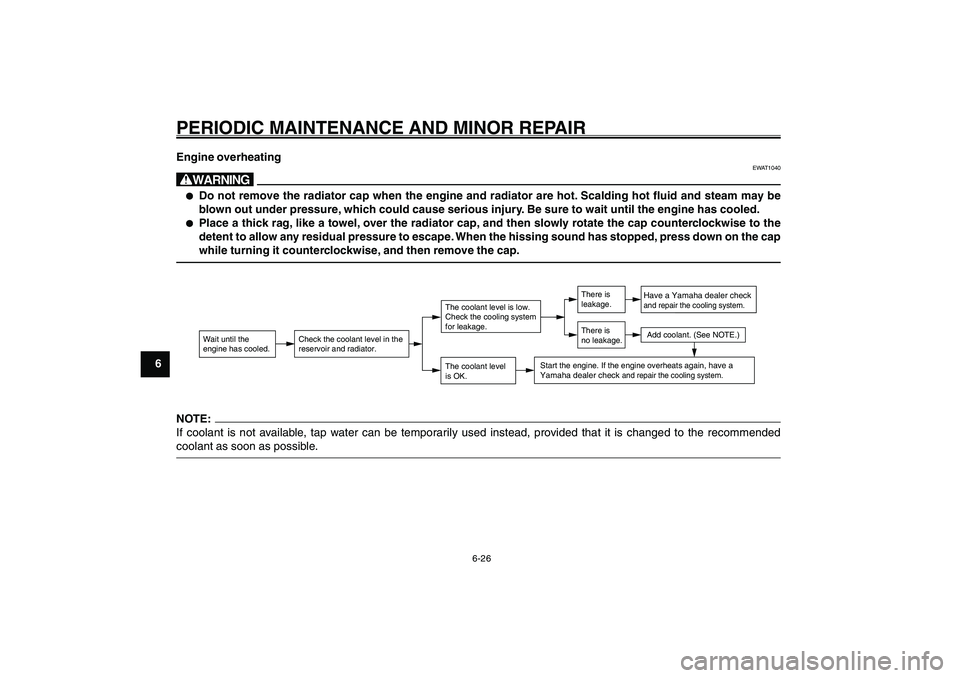
PERIODIC MAINTENANCE AND MINOR REPAIREngine overheating
EWAT1040
w● ●● ●
●
Do not remove the radiator cap when the engine and radiator are hot. Scalding hot fluid and steam may be
blown out under pressure, which could cause serious injury. Be sure to wait until the engine has cooled.
● ●● ●
●
Place a thick rag, like a towel, over the radiator cap, and then slowly rotate the cap counterclockwise to the
detent to allow any residual pressure to escape. When the hissing sound has stopped, press down on the cap
while turning it counterclockwise, and then remove the cap.
NOTE:
If coolant is not available, tap water can be temporarily used instead, provided that it is changed to the recommended
coolant as soon as possible.
Wait until the
engine has cooled.
Check the coolant level in the
reservoir and radiator.
The coolant level
is OK.The coolant level is low.
Check the cooling system
for leakage.
Have a Yamaha dealer checkand repair the cooling system.Add coolant. (See NOTE.)
Start the engine. If the engine overheats again,
have a
Yamaha dealer check
and repair the cooling system.
There is
leakage.
There is
no leakage.
15P-F8199-E0_ch6.pmd2007/06/21, 11:09 26